1
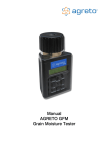
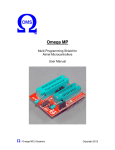
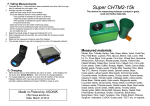
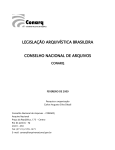
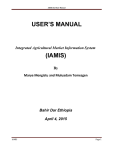
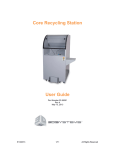
SINAR
TECHNOLOGY
Operator Manual
SINAR Model 6096 FarmPro™
Sinar Technology, Unit 5, Camberley Business Centre,
Bracebridge, Camberley, Surrey, GU15 3DP, UK
Tel: 0844 745 1999 International: +44 208 328 0727 Fax: +44 (0)1276 29941
email: [email protected] Website: www.sinar.co.uk
Technical Specifications
Dimensions:
21 x 7.5 x 7.5 cm
Weight:
1.6kg (including carrying case)
Storage Temperature:
-20 deg C to + 55 deg C; Humidity up to 98% non condensing
Construction:
Non shock ABS Plastic
Measurement cell and grinder/compressor hardened steel.
Supplied with shock proof carrying case
Display:
Direct digital display with accuracy to one decimal point
Power Supply:
9 volt Alkaline Battery
Measurement range.: 5 –50% depending on crop
Precision:
+/- 0.5 %mc or better to Oven - I.S.T.A Methods
Calibrations - individual calibrations for all Grain types including:
Wheat
9 ml Test volume
Barley
9 ml
Oats
11 ml
Oil Seed Rape
11 ml
Linseed
9 ml
Peas
11 ml
Beans
9 ml
Rye
9 ml
Maize
11/18 ml (for < 20%mc)
Sunflower
9 ml
Triticale
9 ml
Red Fescue
18 ml
Rye Grass
18 ml
Blue Grass
18 ml
Repeatability:
Standard Deviation of 0.05 to 0.15 (dependant on application)
Functions:
Automatic temperature correction with calculation of average.
Warranty:
2 years warranty against component failure and faulty workmanship
Manufactured in the European Community
-1 -
Operating Instructions:
1.
Measuring %mc
a)
b)
Inspect the cell to ensure it is clean and empty
Turn on the analyzer by pressing ON/TEST button. The >> MEASURE << menu will be
automatically displayed.
Accept mean by pressing the ON/TEST button.
By using the or
arrows select the crop or commodity for measurement.
Measure the volume of crop/commodity as indicated by the displayed calibration.
The volume will be either 9 ml or 11 ml. dependant on the crop or commodity. For
convenience these are provided in the cap of the grinder/compressor. Fill the appropriate
cup to be level with the surface of the cap. Pour the measured volume into the measuring
cell and screw down the cap clockwise until the stainless steel pin in the cap and
measuring cell prevent further rotation. see figures 1a - 1 d.
Press the ON/TEST button to start the test. The progress of the test is indicated by a ∗ on
the display every second. After 15 seconds the moisture content will be displayed on the
left-hand side of the LCD e.g. 14.9 % and the right-hand will show the average of all
measurements, e.g. 14.7%.
The analyzer will retain the chosen crop displayed and a new measurement can
be made by emptying the test cell and re-filling with a new sample.
c)
d)
e)
f)
g)
Note: THOROUGHLY CLEAN THE CELL WITH THE WIRE BRUSH PROVIDED
BEFORE PERFORMING A NEW TEST
2.
To select crop or function
a)
When pressing the ON/TEST the analyzer will show software version and the country
code, followed by the level of battery and lastly the >> MEASURE<< menu. If you wish
to accept this choice of menu press the ON/TEST button and the desired crop can be
selected by use of the or arrows. If you wish to return to the >> MEASURE<<menu
simply press the ESC/OFF button and use the or arrow keys to cycle through the
menus.
3.
How to adjust a calibration
Each calibration can, if required be adjusted individually, up or down by 3.9%mc in
increments of 0.1%mc.
a)
b)
c)
d)
e)
f)
g)
Turn the analyzer by pressing ON/TEST. The menu >>MEASURE<< will be displayed.
Using the or
arrow keys the menu >>CALIBRATION<< can be selected.
Accept the menu by pressing ON/TEST.
By using the or
arrow keys select the desired crop.
Accept this choice by pressing ON/TEST. The numeric value +0.0 is shown on the
display.
By using the or
arrow keys the desired calibration can be adjusted up to a
maximum of -3.9 to +3.9 %mc.
Accept the adjusted value by pressing the ON/TEST button.
Note: Where an adjustment has been made to a factory installed calibration a * will
appear at the end of the crop name.
Some calibrations are factory biased on delivery and should only be changed with
extreme caution.
-2-
4.
How to clear the calculated average values.
a)
b)
Turn on the analyzer by pressing the ON/TEST button. The menu>>MEASURE<< will
appear on the display.
By pressing the or arrow key the menu >>CLEAR AVERAGE<< is selected.
-3-
Figure 1a. Fill the measuring cup to the
top, ensuring the crop is level with the top
of the grinder/compressor cap.
Figure 1 b. Pour measured
sample into measuring cell.
Note: Stainless steel stop pin
on right-hand side of cell
Figure 1 c. Place grinder/compressor cap
onto shaft of measuring cell. Rotate
clockwise. Note: Stainless steel stop pin
on right-hand side of cap
Figure 1 d. Screw down the cap
clockwise until the stainless steel
stop pin in the cap and measuring
cell prevent further rotation.
-4-
4.
How to clear the calculated average values(continued)
c)
Accept this choice by pressing ON/TEST. The wording “OK” will appear on the
display followed by automatic return to >>MEASURE<<.
5
How to turn the unit off.
a)
Press the OFF/ESC button and hold down until the analyzer is turned off.
Note: The analyzer will automatically turn off 120 seconds after the last operation to
conserve battery power.
5.
Constructing a Calibration.
If you require a calibration for a particular crop not included in the analyzer, then this
can be done by selecting the calibration with name “BIT”.
a)
b)
c)
d)
e)
f)
g)
Turn on the analyzer by pressing the ON/TEST . The menu>>MEASURE<<
will appear.
Accept the menu by pressing the ON/TEST.
By using the or
arrow keys select the “BIT” scale.
Fill the measurement cell with crop of known moisture content, place the grinder/
compressor onto the shaft, rotate clockwise and make a test as described in section 1.
Write down the value which appears on the display together with the known
moisture content value.
Repeat the steps d) & e) with different known moisture content samples. Preferably
at 0.5%mc change in sample over the moisture range of interest.
A calibration chart can be constructed by plotting the BIT values against %mc.
Unknown sample values can then be calculated by reading the BIT value and using
the calibration scale to look up the moisture content of the unknown.
6.
How to read temperature.
Select the “BIT” calibration and proceed as detailed in 5.a) - 5.d) above.
The temperature is the value displayed on the right in ° C.
7.
Error Messages
The following error messages may occur on the display:
Error Message
Definition
Temperature ++
Temperature above limit
Temperature - -
Temperature below limit
Hi
%mc above upper limit of calibration
(Note: The error signal can also signify
the cell has been over-tightened and the
two steel plates have touched.)
Lo
%mc below lower limit of calibration
Change Battery
Replace battery
-5-
8.
Useful information
Note: 1
In order to ensure correct measurements, the surfaces of the measuring cell and
grinder/compressor cap MUST be thoroughly cleaned with the wire brush provided
after each test. Any remnants of very moist, oily or adhesive grains can be removed
by grinding with a dry sample.
NEVER ROTATE THE GRINDER/COMPRESSOR ONTO THE MEASURING CELL
WITHOUT SAMPLE BEING PRESENT. SERIOUS DAMAGE TO THE
GRINDING SURFACES CAN RESULT.
Note: 2
With some grains, at high moisture content there is a risk that the grinder plates in
the measuring cell and grinder/compressor cap may touch. Under these circum
stances the error message “Hi” will be displayed. To alleviate this problem the
sample volume should be increased.
Note 3.
The calibration curve for Maize (Corn) indicates sample volumes of 11/18. For
moisture contents upto 20%mc use a 11 ml volume. For moisture contents greater
than 20%mc use a 18 ml volume ( 2 x 9ml).
Note 4.
If the sample temperature is greater than that of the measuring cell e.g samples
coming directly from a dryer, it is recommended to preheat the measuring cell as
follows:-
a)
b)
9.
Fill the measuring cell with the hot sample and wait 60 - 120 seconds before
taking a measurement.
Refill the cell with a new hot sample and test as described in section 1.
Storage and Use of the Analyzer
It is recommended that the analyzer is:
Always stored in the carrying case.
Not exposed to large temperature fluctuations.
Kept dry.
Allowed to acclimatise when taken from a cold storage location to a warmer testing
environment to prevent possible condensation.
Cleaned thoroughly on all surfaces with a clean damp cloth and the battery
removed before storage at the end of the season.
If the above instructions and guidelines are followed you can expect a long and excellent
performance from your Sinar Model 6096 FarmPro Moisture Analyzer.
-6-