1
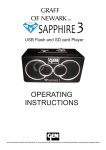
Digital Thermostat
GP610FB09 User Manual
appliances should be avoided.
2. The thermostat consists of three parts, bottom shell and
Function instruction
The main functions of GP610FB09 can be
accomplished by means of the four functional keys
(Figure I), and displayed distinctly by means of
liquid crystal screen (Figure II).
The outer shell
3. Connect the plug of tier wire with the socket of the face
LCD
S1:On/Off key;
Confirm key
S2:Temperature,time,
parameter down
key
POWER
SWITCH
Heating mode
Timing function on
small box. Separate it with a small screwdriver by
prizing lightly the clip on the top of the thermostat.
Refer to the wiring diagram first and connect the ends
of the box steadily with wire. After assembling with the
bottom shell, lead the tier wire out through the square
hole and fix with M4 screws onto the standard box on
the wall.
shell and after checking, button up the lower side of the
face shell and then the upper side until a “ka” sound is
heard, which means installation finished.
Wiring diagram
S4: Functions
exchanging key
S3: Temperature,
time, parameters
up key
Wind valve on mode
Lock mode
Cooling mode
Automation mode
The displaying
number
Off mode
The temperature
3: Temperature, difference
ime, parameters
Figure
I
Figure II
Installation
1. Thermostat should be installed on the wall that
can reflect temperature indoor or inside area,
with the height of about 1.4 meters above the
ground. Direct sunshine and heat-generation
T1—room temperature sensor; T2—water temperature
sensor (anti-freezing)
Operating procedure
(From left to right, the four pressing keys are S1, S2, S3,
and S4 respectively)
1. Turn on & off: Press S1, the thermostat is turned on;
Press S1 again, it is turned off. The output switch is
severed and the white character “OFF” is displayed.
2. Temperature Setting: Under the turned on working state,
the temperature can be changed through S2, S3. Press
S2 once, the number is minus 0.5; Press S3 once, the
number is added 0.5. If press S2 or S3 for more than 3
seconds, the setting number will come down or go up
quickly. In the process of setting the temperature, when
the number is glittering, if press S1 until the lock sign
appears, it indicates the number is locked and the
setting number can’t be changed by pressing S2, S3.
Press S1 for several seconds until the lock sign
disappears, and then the setting number can be changed
by pressing S2, S3. After finishing, it will return to
working state automatically and display the room
temperature. In addition, the setting data will be
memorized and will never be lost after power-off. After
setting the temperature, the thermostat will change the
wind circulation automatically according to the setting
number to obtain comfort and energy-saving effect.
3. Working modes: Under the working state, press S4 to
enter working modes setting function. The signs of
refrigeration and heating will be displayed by glittering.
The functions can be changed by S2, S3 and be locked
or unlocked by pressing S1. After finishing, it will
return to the working state automatically and display the
room temperature. The setting data will be memorized
and never be lost after power-off. The working modes
can be set according to seasons. Refrigeration mode can
be adopted in the summer and heating mode can be
adopted in winter.
4. Fan running state: Under the working state, press S4
twice to enter the running state setting function.
Automation--- Low wind--- Medium wind--- High
wind--- Medium wind of opening valve--- High wind of
opening valve can be automatically transferred through
S2, S3. It can be locked or unlocked by pressing S1.
After finishing, it will return to the working state
automatically and display the room temperature. The
setting data will be memorized and never be lost after
power-off. Under the automatic running state, the
thermostat will change the wind circulation
automatically according to the setting temperature to
obtain the comfort and energy-saving effect. It is also
flexible and convenient under the manual running state.
5. Timing off: Under the working state, pressing S4 for
three times to display the clock sign and enter timing
turn-off setting function. Change or quickly change or
prolong the turn-off time through S2, S3. After finishing,
it will return to working state automatically and display
the actual room temperature and the clock sign on the
left side of the LCD. The temperature will minus the
time automatically. It turns off automatically when the
time becomes 0. The setting range of timing turn-off:
0.1---9.9 hours.
6. Anti cold/hot air protection:
Heating mode, fan stops when water temperature
difference between the detected room temperaure
and setpoint.
Heating mode, thermostat output controlled by
detected room temperature and water temperature
at the same time.
b) Anti-freezing function:Heating mode,
Off mode, when water temp. T2<6 ℃ or room
temperature T1<3℃ while the thermostat is off,
valve open, fan does not work..
Working mode, when T2<6℃, valve remain open,
fan stops. Resume normal working when T2>6℃.
8. Sensor failure alarm:
If there is failure on sensor T1, the whole LCD flickers,
outputs break off, “01” displayed.
If there is failure on sensor T2, the whole LCD flickers,
outputs break off, “02” displayed.
9. self-restart function:
If there is electricity break and electrify later on,
thermostat maitain the working/off state before the
electricity faliure.
Technical Parameters:
Working Voltage
Self
Power
Consumption
≤1W
Output power
≤200W
Temp. range
belows 45℃,in order to avoid cold wind;
If thermostat started by man, water valve open, fan acts
8 seconds delay, fan acts automatically in auto mode or
acts according to the chosen state in manual mode;
If thermostat turned off by man, water valve close first,
fan stops 15s seconds delay.
7. Temperature control illustration.
a) Cooling mode, thermostat outputs just related to the
AC 220V 50-60HZ
5-35℃
Control Precision
±1℃
Dimension
86mm *86mm*13mm
Outer Shell
White,
heat-resistant
PC/ABS
high-quality
material :
Installation
Standard
Wiring Standard
2-M4, Standard wiring box:
60mm-65mm
Wire
section
diameter
≦
1.5mm*mm
Weight
200g
Caution:
1. Connect the wires correctly according to the wiring
diagram.
2. Open the outer shell is strictly prohibited after the
thermostat is electrified.