1
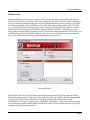
Backup and Restore
Backup and Restore
User manual
For version 5.0.0.8
All rights reserved © 1989–2008 Microware Software - Rev. 1.0.5 October 2, 2008
Page 1
Backup and Restore
Table of Contents
1.0 Overview............................................................................................................................................. 3
1.1 Main features......................................................................................................................................4
1.2 Notes for the users of previous versions of EasyLog.......................................................................5
1.2 Notes for the users of previous versions of EasyLog.......................................................................5
1.3 Backing up a Log................................................................................................................................5
1.4 Backing up a Manager Database...................................................................................................... 9
1.5 Restoring a Log................................................................................................................................ 11
1.6 Restoring a Manager Database.......................................................................................................13
1.7 Defining a good backup strategy.................................................................................................... 13
1.8 Transferring a log to another user................................................................................................. 15
1. 9 Transferring a Log between two different computers.................................................................15
1.10 Backup to a removable unit IOmega ZIP and JAZZ................................................................. 16
1.11 Backup on CD or DVD Disk......................................................................................................... 16
Page 2
Backup and Restore
1.0 Overview
Backup and Restore for EasyLog is a software utility that performs the backup/restore functions for
EasyLog including powerful features and is fully compliant with ZIP compression format. Backup for
EasyLog compresses the data saving space on your hard-disk and allows an easy backup of your data
on every sort of media, such as hard-disk, or removable disks (floppy disks, IOmega ZIP, CD, DVD
etc.). This program has been designed to be used as backup/restore program but can also be used to
transfer your Log and data between different computers quickly and easily. Although you can use
many kinds of external backup programs to make your data safe, Backup and Restore for EasyLog is an
excellent solution that automatically compresses and copies your data and allows easy restoration of
them. The window that opens when you run the program is shown below:
Opening Window
The program offers new powerful features specifically designed for EasyLog that make the backup
process easy and automatic for the novice users and, at the same time, offers a flexible instrument that
can satisfy the needs of most skilled users. Adopting a good backup strategy can avoid the
consequences of a system or a disk crash, or accidentally deleting files. Later in this manual common
activities that are possible with the Backup and Restore utility will be analyzed and some step by step
examples and suggestions will be given.
Page 3
Backup and Restore
1.1 Main features
• Automatic data compression: 100% compliant with zip utilities such as PkZip, WinZip.
• Circular backup: Select a destination directory and define the number of backup you want to
maintain. The program will automatically maintain a list of the most recent backups.
• Backup identification: Each backup can be identified by a text description. It is strongly
recommended that you include the date and time of the backup in the description. You can change this
as you wish by editing the description. When restoring a backup you can browse the available backups
and see the description. This can help you to choose the correct backup to restore.
• Fixed and removable disk support: You can choose any kind of media for your backup, fixed or
removable disk.
• Automatic spanned backups across multiple disks: If the size of the backup is greater than the
floppy disk capacity, the program will automatically span the backup on multiple disks, prompting
when you need to put in a new disk.
• Exclude indexes: This feature allows you to save space on the destination media by not backing up
the index files. The index files will be automatically rebuilt at the next launch of EasyLog after the
restore.
• Exclude Ini files: This feature allows the exclusion of the configuration files EL5.INI, LOG.INI and
other INI files from the backup. These files contain the general preferences of EasyLog and the specific
settings of the Log you want to backup. This is specially useful when you transfer a Log to another
EasyLog user. It avoids having your own preferences overwrite the ones of the destination user who
will restore your backup.
• Exclude Check file: Like the previous feature, this allows you to exclude your own DXCC
recognition files as a part of the backup. Thus they will not overwrite those of the destination user.
Main window attributes: The main window for Backup and Restore module has four panels.
●
●
●
●
●
The panel in the upper left is labeled Log. This is where you select the log to be backed up or
the manager database to be backed up.
The panel on the upper right is labeled Destination. This is where you select the place to put a
backup or the place to find a backup to restore.
The panel on the lower left is labeled Options. This is where you select how and what to
backup.
The panel on the lower right is labeled Note. This is where you enter a description of the
backup.
The row of buttons at the bottom are used to initiate actions.
Page 4
Backup and Restore
1.2 Notes for the users of previous versions of EasyLog
Through release 4.54, EasyLog included two different programs to perform backup and restore
operations. Starting with EasyLog 4.6 both the operations of backup and restore were combined in one
program, the Backup and Restore utility.
Previous releases of backup and restore programs used a different compression system (LHA) which is
not compatible with the new one used by Backup and Restore for EasyLog 5. For this reason you can
not use the new Backup and Restore utility to restore a backup made with the previous version of
backup and restore utilities. Of course, the old utilities can not be used to restore backups made with
the new version of backup utility.
1.3 Backing up a Log
Refer to the Opening Window illustration on page 3 and also the illustration below for the following
discussion.
Selecting the Log to backup
Page 5
Backup and Restore
In the upper left corner of the main window, there is a panel containing a combo box and two mutually
exclusive check circles. One check circle is labeled Log and the other is labeled Manager. The one
selected has a black dot in the middle of the circle. If Manager is selected, click on the one labeled Log
to select it. Now choose the log you wish to backup. To do this, click on the down arrow of the combo
box. A pop down menu will show you the logs that are available for backup. Place your cursor on the
one you wish to backup and double click. The name of the log will be shown in the combo box.
Next you need to choose the destination folder for the backup. In the upper right panel named
Destination, there are two mutually exclusive choices. They are “drive A:” and “Free Path”. If you
wish to backup onto a floppy disk, click the circle labeled “drive A:”. If you wish to backup to another
lettered drive (other than CD or DVD drive) click “Free Path”. Then either type the full path to the
drive and folder or click the button labeled “...” to browse for the destination where you wish to store
the backup. The browse window lets you select the drive with a combo box. Click on the drive letter
to see the existing folders on it. Follow through the paths until you find the one you want and double
click on your selection. In the illustration below, the path C:\EL5\Backup was chosen.
Selecting the backup destination path
Page 6
Backup and Restore
Setting the backup options
Now you should select the options you wish for this backup. The illustration just above shows the
Options in the lower left panel. You can either do a regular backup or a circular backup. A regular
backup is one in which is replaced every time a new backup is done. A circular backup will keep the
last several backups. You can select the number of backups to keep. When you reach the number of
backups you have specified and do another backup, the oldest one will be deleted and the new one
added. If you choose circular backups, the backup file name will be the name of the log with #n
appended to the end and the file extension will be ZIP. The letter “n” represents an integer that will be
incremented every time you do a circular backup of a particular log. For Example, if the log you wish
to backup is 07ARCWSS and this is the fourth time you have done a circular backup on it, the file
name will be 07ARCWSS#4.ZIP. Backup and Restore determine this integer by looking at the the
largest integer found in the folder for similarly named backup files. This integer is automatically
incremented and appended to the file name.
The other options are available by check boxes (see illustration). These boxes are named:
1) Only modified file:
This option will backup only those files of the log that have changed since the last backup was
made. This option is only available for non-circular backups and is grayed out if the circular
backup check box is checked.
Page 7
Backup and Restore
2) Exclude indexes:
EasyLog 5, as well as other database applications, use indexes in various ways. One of the ways
EasyLog 5 uses indexes is to control the order that QSOs are displayed in the log spreadsheet. If
you check this option, those index files are not included in the backup. This will reduce the size of
the backup. It is not a problem because after the backup is restored, opening it in EasyLog 5 will
rebuild all the indexes that were not backed up.
3) Exclude check file:
This option will not back up the check file. The check file is the file that contains the intelligence
from which EasyLog 5 determines the DXCC entity for a QSO from the call sign. If you are
giving a friend a copy of your log, check this option so that you do not overwrite your friend’s
check file when he restores your log to his computer.
4) Exclude Ini file:
Ini files are those custom configurations that you have made for your log. It also includes
configurations for PSK31, Com port used for transceiver control and many others. They are
scattered throughout the various sub-folders of your EasyLog 5 installation folder. Again, when
you are giving a friend a copy of your log, check this box. Otherwise, your Ini files will replace
those that he has and yours are not likely to be the same as his.
Once you have set the Log, the Destination path, Options, and entered your note to describe the
backup, click the Backup button and the backup will be performed. A backup progress window will
appear, as shown in the illustration below. Once the backup is completed the number of files created
will be shown in this window and you can click on Close. Your backup is now complete unless you
wish to put it on a CD or DVD. Refer to section 1.11 for procedures to do that.
Backup progress window
Page 8
Backup and Restore
1.4 Backing up a Manager Database
Selecting the manager database
To backup the Manager database, you must check the Manager check circle in the upper left panel of
the window. Select a log. Since the Manager database is kept in the EL5\Manager folder it does not
matter what log is selected. Choose the destination where you wish to save the backup in the upper
right panel. Then, select the options that you wish to apply in the lower left panel. Put any note you
wish to save with the backup in the lower right panel. Then click the Backup button. The Manager
backup progress window will then appear. It is shown in the illustration below. When the backup is
complete, close the progress window.
Page 9
Backup and Restore
Manager database backup progress window
Page 10
Backup and Restore
1.5 Restoring a Log
To restore a log, select Log in the upper left panel of the window. Then in the upper right window
select “drive A:” if your backup is on a floppy disk. If it is on some other media, select “Free Path”
and enter the full path to the folder where the backup is located. You can click on the button labeled
“...” to browse your computer for the path to the backup file. Once this is done, you must set the
circular backup check circle. The following is an important:
•
If the circle is not checked, you will only see the file names for the backups that were made as
standard backups.
•
If the circle is checked, you will only see the file names for the backups that were made as
circular backups.
If you do not see the backup name that you wish to restore, change the check status of the circular
backup check circle. You should then see the one you want if it is contained in the free path you
entered earlier. The next illustration shows an example of a list of backups available to restore.
Selecting a backup to restore
Page 11
Backup and Restore
Select one of the log backups to restore and then click the OK button. Please note that both of these
backups were done as circular backups because they both have a #1 at the end of the file name. If you
have done a number of circular backups, you would see file names with #2, #3, etc. appended to the file
name. Now click on the Restore button and the restore will begin. The restore progress window will
appear. This is shown in the illustration below. Please note that the files restored will be written to the
original folders where they were at the time of the backup. If those folders no longer exist because you
have moved your installation of EasyLog 5, they will be created and the files will be written to them.
Also if you are restoring a log sent to you by another user and he installed EasyLog in a different folder
than you did, the folders from which he made the backup will be created on your computer and the files
written there. If you do not know that he installed in a different folder that you, this could lead to some
confusion and you might think the restore did not work.
Restore progress window
Once the restore is complete, you can click on the Close button and then close the Backup and Restore
window.
Page 12
Backup and Restore
1.6 Restoring a Manager Database
To restore a backed up Manager Database, click the Manager check circle in the upper left panel.
Select the source path for the backup in the upper right panel as before. Then click the Restore button
and a selection window will appear showing those manager database backups that are available to
restore. Then click on the one you wish to restore and the restore progress window will appear as it did
for the log restore. The restored Manager database will be put in the EL5\Manager folder.
1.7 Defining a good backup strategy
Defining a good backup strategy is essential for the safety of your data. A good strategy should define
how you will backup your data and how frequently. The more often you backup your data the less risk
you will have for losing data from system crashes or hard disk failures. If you perform backup
frequently, the worst thing that can happen is you lose the last few modifications you made to your
databases (Log, manager...) after the previous backup. For a frequent backup strategy, this can mean
losing only a few QSOs that can be easily restored without big waste of time. Of course, a good idea
would be to perform a backup just after every change to your databases. If you do your backups to a
hard drive, it is important to remember that you should not keep your backups on the same hard drive
as where you have EasyLog 5 installed. If that drive crashes, both the EasyLog 5 installation and your
backups can be lost. If you must backup to the same drive that contains EasyLog 5, make sure to copy
those backups to a removable media drive, a second hard drive, or a networked hard drive often.
The media
An efficient backup strategy depends also on the media you choose and the care you take in archiving
your media. Good labeling of the backups will help also in locating the right backup you need in a short
time.
Floppy disks
The use of floppy disks as backup media should be limited because the low quality of the media limits
how long the data can be kept. This means that the floppy disk could be corrupted, even thought you
have kept it in a safe place, just when you need it, making your data unavailable for a restore. If you
choose this kind of media for your backup, please take care to use good quality floppy disks. Here are
some suggestions:
• Use only new good quality floppy disks.
• Do not use recovered floppy disks you already used many times!
Page 13
Backup and Restore
• Always make double or triple backup copies and archive the disk sets in different and safe places.
• Archive the floppy disk in safe places, far from magnetic fields or radio-frequency sources, dust,
humidity and heat.
• Change to new floppy disks often.
• Always label your floppy disks and describe exactly what they contain (Log name, date and time of
backup).
The IOmega Zip or Jazz drive
These require the same care as a normal floppy disk. Floppy disks and the IOMEGA disks both save
data on a magnetic film but the IOmega Zip and Jazz drives have a lot more capacity (100 Mbytes or 1
Gigabyte for IOmega Jazz). Since these media cost a lot more than normal floppy disks many users
use the same disk for too long, compromising the safety of the data.
The CD and DVD media
These media are very common now because of large capacity, low cost, and technical characteristics
that allow a high security level for the data you save on them. A CD can contain up to 700 Mbytes of
data (equivalent to nearly 500 floppy disks) and guarantees high security level of data in time. A DVD
can contain close to 5 G bytes and has the same security level as a CD. They are also insensitive to
magnetic fields and radio-frequency energy. The low cost of these media, (much lower than a normal
floppy disk), the portability (almost every PC now includes a combination CD/DVD writer drive and
every one includes a combination CD/DVD reader drive) make them the best solution for archiving
purposes. They are much better for maintaining data integrity than other removable media devices as
floppy disk or IOmega Zip and Jazz disks.
The Hard Disk
Using your local or network shared hard disk as a backup media is also a very good solution when
security and redundancy conditions exist. Thanks to low hardware costs, it is now common for PCs to
be connected to each other by a local area network (LAN) or that a PC includes 2 or more hard disks.
In these cases, it can be a good backup solution to increase the security of your data by performing a
backup of your data on one or more local or remote hard disks.
Page 14
Backup and Restore
1.8 Transferring a log to another user
When you wish to transfer a log to another user who is using this same version of backup utility (2.05
or later) please follow this procedure:
• Backup the log, selecting Exclude check files and Exclude Ini files to avoid overwriting the settings
of the destination user with your own. Select “drive A:” or another removable media unit as the
destination. Be sure that both computers can use the media that you select. You could also send it to
the other user by email as an attached file.
• On the destination computer, run the Backup and Restore utility, specify the source drive and click
the Restore button. If the source is a floppy disk, select “drive A:” otherwise specify the removable
unit path. If you sent the file by email, detach it from the email and specify the source drive as the full
path to the file on your hard drive. When the Restore procedure finishes, you can run EasyLog and
open the Log just transferred.
1. 9 Transferring a Log between two different computers
When you need to transfer one or more logs between two different computers, i.e. to move your log to
your new computer, or because you want to transfer your logs to the computer at your office, follow
this procedure:
• Backup the log, selecting Exclude check files and Exclude Ini files to avoid overwriting the settings
of the destination user with your own. Select “drive A:” or another removable media unit as the
destination. Be sure that both computers can use the media that you select. If applicable, you could
also send it by email as an attached file.
• On the destination computer, run the Backup and Restore utility, specify the source drive and click
the Restore button. If the source is a floppy disk select “drive A:” otherwise specify the removable
unit path. If you sent the file by email, detach it from the email and specify the source drive as the full
path to the file on your hard drive. When the Restore procedure finishes, you can run EasyLog and
open the Log just transferred.
Page 15
Backup and Restore
1.10 Backup to a removable unit IOmega ZIP and JAZZ
If you own an IOmega unit the procedure is the same as for any other removable unit except CD or
DVD. Please proceed in this way:
• Be sure that the ZIP unit has been connected to the PC parallel port and connected to power-supply,
that it contains a formatted disk, and that the driver has been previously installed.
• Verify that the unit has been mapped as a logical unit (i.e: G:, H: ...) by the ZIP driver during the
startup of your PC and that this unit is accessible on your computer.
• Select Free Path as destination and specify a valid path internal to your Zip unit (i.e. G:\ if G: is the
identification of your ZIP unit).
• Select your preferences and perform the backup.
1.11 Backup on CD or DVD Disk
If you own a CD or DVD writer and you want to backup your data on a CD or DVD media, you should
consider using the software to save the whole EasyLog main directory (typically \EL5) CD or DVD.
This software is normally included with your CD or DVD drive. Thanks to the large capacity of a CD
(about 700 M bytes) and even larger capacity of a DVD (nearly 5 G bytes), this could be the most
practical solution. Please refer to your CD or DVD writer software manual for additional information.
Please note that EasyLog 5 does not contain software that will allow you to write directly to the CD or
DVD media. You must first make the backup to your hard drive and then use the software that came
with the drive or your operating system to copy the files to the CD or DVD.
If you want to use Backup for EasyLog 5 and its unique features like the circular backup, excluding
indexes and configuration file etc., but you still want to save your data on a CD please follow these
instructions:
• Create a directory on your hard-disk that you will use to contain your backups.
• Select Free Path as the destination (upper right corner of window) and specify the path of the
directory you previously created.
• Select your own preferences and perform your backup.
• Using your CD or DVD Writer software, select the directory containing the backups and copy it on
the CD or DVD.
Page 16
Backup and Restore
Alphabetical Index
Backup button...................................................8, 9
Backup progress window............................8, 9, 10
Backup strategy.............................................. 3, 13
CD.....................................................3, 6, 8, 14, 16
Circular backup.....................................4, 7, 11, 16
Close button........................................................12
Destination path................................................6, 8
Drive A:.................................................... 6, 11, 15
DVD..................................................3, 6, 8, 14, 16
Exclude check file............................................ 4, 8
Exclude indexes................................................4, 8
Exclude Ini file..................................................... 8
Exclude Ini files..............................................4, 15
Floppy................................... 3, 4, 6, 11, 13, 14, 15
Free Path................................................... 6, 11, 16
IOmega........................................................... 3, 14
Manager database backup progress window...... 10
OK button........................................................... 12
Only modified file................................................ 7
Opening Window..................................................3
Regular backup..................................................... 7
Restore progress window..............................12, 13
Selecting a backup to restore.............................. 11
Selecting the backup destination path.................. 6
Selecting the Log to backup................................. 5
Selecting the manager database............................ 9
Setting the backup options....................................7
Page 17