1
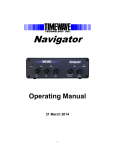
SignaLink™ Sound Card - Radio Interface 154 Hillview Drive Grants Pass, Oregon 97527 (541) 474-6700 Fax: (541) 474-6703 Internet: http://www.tigertronics.com Grants Pass, Oregon Installation & Operation after completing the installation you have any difficulty, please refer to the “Troubleshooting” section near the end of this manual. It covers most of the common problems that you might run into. Technical Support for the SignaLink is also available if you need it. Please see the “Technical Support” section of this manual for more information. - WHAT YOU WILL NEED If you purchased the optional SignaLink Accessory Kit, then you should have everything that you need to complete the installation and start operating. If not, then you will need to purchase the following items from your local electronics supply store: - INTRODUCTION The Tigertronics SignaLink opens up a whole new world of digital communication possibilities. Now you can operate all of today’s most popular modes without having to purchase an expensive multimode controller. The SignaLink bridges the gap between your computer’s sound card and your radio to provide instant compatibility with a multitude of sophisticated communications programs. Programs are available for every imaginable mode including PSK-31, MT63, RTTY, SSTV, APRS, and Packet. More than 80 programs are available through our web site alone and many more can be found by searching the Internet software archives. • You will need two Shielded audio cables with a 3.5mm stereo plug installed on each end. These cables must be long enough to attach the SignaLink to your sound card’s Mic and Speaker jacks. • If your radio does not provide speaker audio on the microphone connector (see your radio manual), then you will also need one shielded audio cable with 3.5mm mono plug installed on each end. This cable is to connect your radio’s External Speaker or Headphone Jack to the SignaLink so it can be relatively short. A length of two feet is about right. The SignaLink is designed and manufactured using only the highest quality components. Assembly is done using “state of the art” robotic production equipment. Strict testing of every unit and our high level of quality control insures you of a premium quality product that will provide many years of dependable service. A great deal of effort has gone into the design and manufacture of the SignaLink and we are very proud to make it available To verify your radio wiring you will need a multimeter. A 3/32” Allen Wrench will be needed to remove the SignaLink’s cover and needle-nosed pliers would be very helpful to install the programming jumpers. You will need some software for testing when the installation is complete. Sample software selections for popular modes (PSK-31, RTTY, CW, etc.) are supplied on the optional Accessory Kit CDROM. If you did not purchase the accessory kit, then you will want to select some software from our web site and download it for installation and testing. - INSTALLATION OVERVIEW - - CONNECTING POWER - The SignaLink is very easy to install and operate. However, if it is not installed and operated correctly, you will not realize its best performance and in extreme cases you can damage your other equipment. Therefore, it is extremely important that you take the time to read these installation instructions carefully to avoid any possible problems. If CAUTION – Before applying power to the SignaLink read this entire section thoroughly. Both the SignaLink and your radio can be damaged by improper installation. The SignaLink requires a power source of 6.75 to 15 volts DC at 10 milliamps. This is low enough that it can usually be powered by the “Accessory Voltage” found on the microphone connector of most radios. If Accessory Voltage is not available from the radio, then power can be supplied through a 2.1mm power jack on the rear of the unit. - CONNECTING THE SOUND CARD The SignaLink connects to the sound card through two shielded audio cables with 3.5mm stereo connectors. Connect one cable from the jack labeled “Computer – SPKR” on the SignaLink to the jack labeled “Speaker Output” on your sound card. Connect the other cable from the jack labeled “Computer – MIC” on the SignaLink to the “Microphone lnput” on the sound card. Powering From Your Radio – To determine if the SignaLink can be powered from your radio, you will need to check the “pin-out” of your radio’s mic connector in the radio Operators Manual. Most radios have a small amount of power available (typically 8v@10ma) for microphone accessories (DTMF pad, LEDs, etc.). If your manual shows this voltage is available on a mic pin, then you can skip now to the “Connecting The Radio” section. That section will cover making the actual power connection. If power is not available on the radio mic connector then you have a couple of other easy options for powering the SignaLink. Note that if you normally have speakers connected to your sound card and want to keep them connected while the SignaLink is installed, you will need to use a stereo “Y” adapter cable on the sound card output. We have supplied a “Y” adapter in our Optional Accessory Kit for your convenience. IMPORTANT NOTE: We do not recommend the use of a “Y” adapter unless you are using “amplified” speakers. Conventional speakers often times cause slight overloading of the sound card output, which results in minor distortion. This distortion is generally not noticeable to your ear but can greatly impact the quality of some digital modulation signals like PSK-31. It is generally preferred not to leave the speakers connected unless they can be switched OFF when not in use. You will find most of the digital modulation schemes very loud and very annoying anyway! The first option would be to obtain power from whatever 12 volt supply powers your radio. To do this you will need to make a short cable from that power supply to the external power jack on the back of the SignaLink. The jack requires a 2.1mm/5.5mm power plug. We have provided this plug in our installation kit for your convenience. You will need to wire the plug to your power supply in the appropriate manner. The polarity of the plug should be center positive. Be sure to wire the plug with the correct polarity and be sure to install a fuse in the line for safety. - CONNECTING THE RADIO The second option for powering the SignaLink is to use a Wall Transformer. This is the quick and easy solution but it does require an outlet. If you choose this option, you will need to select a transformer with an appropriate rating. A common problem in selecting wall transformers is that they almost always put out more voltage than you expect. This is because they are rated for output voltage at a specific load current. If the load on the transformer is below the rated load, then the voltage output will be higher than the rated output. Under a light load, it is not uncommon for wall transformers to provide twice their rated output voltage! This means that a typical 12 volt transformer might put out as much as 25 volts under little or no load, which would exceed the SignaLink input voltage ratings. Because of the very light load (10ma) provided by the SignaLink, you will need to select a transformer with a rated voltage well under 12 volts. We would recommend a 6 volt transformer with a low current rating. Below are some transformer sources that are appropriate. CAUTION – Before connecting the SignaLink to your radio, read this entire section thoroughly. Both the SignaLink and your radio can be damaged by improper installation. The SignaLink attaches to the radio through an 8-pin RJ-45 connector located on the rear of the unit. A radio cable with the appropriate Mic connector for your radio was supplied with the SignaLink for this purpose. One end of this cable plugs into the SignaLink’s “RADIO” connector and the other end plugs into the radio’s microphone connector. This cable brings all of the radio’s microphone lines into the SignaLink, so that you can connect to any line that is required. The SignaLink uses the radio’s Ground, PTT, Speaker Output, Mic Input and Accessory Voltage (power) lines. Because the location of these signals on the Mic connector varies from radio to radio, we have provided a “Microphone Programming Socket” (see JP-1 in Figure-3). The Programming Socket provides a convenient way to route the various signals to the correct pin on the mic connector. This is accomplished with “press-in” jumper wires so no soldering is required. Radio Shack P/N 273-1758 (6v 300ma). You will also need the 2.1mm (5.5mm OD) adapter plug P/N 273-1716. Since the Programming Socket is a standard DIP-16 format, you can also use a Dip Header Module for programming rather than wires. This “module” approach requires soldering but does have the advantage that the resulting “module” can be quickly changed to re-configure for different radios. The Header Modules are available from Tigertronics and other suppliers like DigiKey and Mouser. Signal Lines – Every installation requires connecting to at least three of the mic connector pins. These are Mic Input, PTT, and Ground. On many radios there are actually two Mouser Electronics (1-800-346-6873): P/N 412-106054. (6v 500ma). Mouser also has a 9 Volt 200ma wall transformer (P/N: 412-109024) that will work. Digikey (1-800-344-4539): P/N DPD090020-P-5 or DPD090020-P5-TC. These are both 9 Volt 200 ma units that will work fine. 2 ground connections (Mic Ground & PTT Ground). The Programming Socket has multiple ground (G) connections for this reason. make sure the radio power is OFF, make sure NO JUMPERS are installed in JP-1, and the supplied cable is connected between the SignaLink and the radio. On many radios the mic connector also provides access to Supply Voltage and Speaker Audio. Supply Voltage has already been discussed in the section on “Connecting Power”. If your radio has power available on the mic connector then you will be instructed to connect it later in this section. If Speaker Audio is not available from the mic connector on your radio then you will need to install a short (2ft) jumper cable from the External Speaker or Headphone jack on your radio to the SPKR jack on the rear panel of the SignaLink. If this signal is available on the mic connector, then you will connect it later in this section. Note that you should not find the lines “scrambled”. They will either be in the correct order or they will be completely reversed (pin 1=8, 2=7, 3=6, etc). First check the Ground pin (or pins) recorded earlier. You can do this by checking for continuity between the radio chassis and the pins numbered on the Programming Socket (JP-1). JP-1 is a very convenient place to probe since it is wired 1:1 to every pin on the radio connector. You will be checking against the numbers you recorded earlier from the Operators Manual. Note that if your radio has a separate mic ground it may have a slight resistance to chassis ground. Any other ground pin should test very close to zero ohms. If you do not get the expected continuity in this test, try checking against the numbers in the reverse order (1=8, 2=7, 3=6, etc). It would probably be very helpful to make a new table using the reversed number sequence to avoid mistakes! This step should establish whether or not the radio connector is “reverse ordered” and allow you to correct the numbers on your table. Before proceeding with jumper installation you should verify in your radio manual that the radio PTT requirements do not exceed the specifications of the SignaLink keying circuit. Verify that the PTT is “Grounded” to make the radio transmit and the PTT signal does not exceed 15 volts @ 75ma. This is well within the ratings of all modern radios but could be a problem on some older rigs. If your radio exceeds these specifications or requires some other keying arrangement, then you will need to key the radio using a low voltage/low current relay. Once you are confident about the ground lines you can move on to other pins. If your radio had Accessory Power you should be able to turn ON the radio and use your multimeter (volts scale) to test for power on the appropriate pin of JP-1. Identifying Jumper Locations – This is a two-step process. First we will identify the mic connector pin-out and then we will verify that they are correct. The verification process is very important since incorrect wiring could damage your equipment. The final steps will be to draw a wiring diagram using Figure-1 and actually install the jumpers. • You can test the PTT pin as follows: First check the pin with your multimeter (volts). You should see a voltage on the PTT pin (5-12v) when the radio is ON. You should be able to key the radio by grounding the PTT line. For the sake of safety, you might want to ground the PTT pin through a small value resistor (100-1000 ohms) in case it’s not the pin you think it is! Be sure your radio power is set to LOW and an antenna or dummy load is connected for this test, as the radio will go into “transmit” with the line grounded. Lookup Mic Pin-out – In your radio’s Operator Manual, find the page that identifies the pin-out of the microphone connector. Using the manual, identify the pin numbers assigned to the following signals and record them below: ____ ____ ____ ____ ____ ____ PTT (Sometimes called “Standby”) Mic Input Speaker Audio Accessory Power Mic Ground PTT or Chassis Ground If the Speaker signal is available on your mic connector, you can try attaching a speaker or headphone to the appropriate pin on JP-1 to see if you can hear audio. There is no easy way to test the mic line but there will be little doubt about it if the other lines are correct. The main thing you are looking for here is to determine whether or not the connector numbers are reversed on your radio. If you have any unresolved errors you should double check your numbering in the Operators Manual again. ** Note that some radios only have one ground pin. ** Speaker and Accy. Power are not always available. • Verify Pin-out – This step is Extremely Important since not all manufacturers use the same numbering convention for their connectors. This is especially true of radios using RJ-45 mic connectors. This brief verification process could ward off a major disaster when you turn on the power! This procedure verifies that the pin numbers which you just identified in the Operators Manual do in fact match the numbers identified on the Programming Socket. The easiest way to do this is to use a multimeter to verify some of the more important lines. Before you start, you will need to 3 JP1 have a new socket installed! This should not be an issue if you are just a little bit careful. If you plan to change the socket configuration often for different radios, you might prefer to use a Dip Header for programming, rather than wires. The Dip Header is a small terminal block that you can solder the wires onto and then simply plug into JP-1 when it’s finished. This is by far the best method if you need to switch radios often. The Dip Headers are available from electronic suppliers like DigiKey (P/N A103-ND), Mouser (P/N 544-16PT-02), Radio Shack (P/N RSU11323763). Radio Mic Connector G 8_______________________ G 7_______________________ G 6_______________________ --- 5_______________________ PWR 4_______________________ PTT 3_______________________ MIC 2_______________________ SPKR 1_______________________ Once you have all of the jumpers installed, take a minute to look them over. You might want to compare your jumper settings to the sample settings shown in the “Jumper Settings” section of the SignaLink CDROM. If you are using the external “SPKR” or “PWR” input jacks on the rear of the SignaLink, then you should NOT have any jumpers going to the “SPKR” or “PWR” pins on JP-1. Figure 1 – Jumper Wiring Diagram • Draw Jumper Wires - Once you have verified your pin-out and are comfortable with the results, you are ready to label the lines in Figure-1 and draw in the jumper wires. To do this, you simply need to draw a line between the pins on the left of JP-1 (G, PWR, PTT, Mic & SPKR) and their appropriate match on the right side of the diagram. For example, draw a line between “PWR” pin on the left of JP-1 and the line that you labeled “Accessory Voltage”. The “PTT” pin should be connected to the pin that you labeled “PTT” and so on. An example of the Jumper Wiring Diagram for a Kenwood TS-450 is shown below. JP1 Radio Mic Connector G Ground 8_______________________ G Mic Ground 7_______________________ G Receive Audio 6_______________________ --- +8 VDC 5_______________________ PWR 4_______________________ PTT 3_______________________ MIC Packet Standby (PTT) 2_______________________ SPKR • Measure Accessory Voltage – This step is normally not necessary. But, if you have wired the accessory power from your radio and are not sure if it is adequate to power the SignaLink, you can easily verify the voltage. First make sure the pc board is on an insolated surface (no metal or wire clippings under board!). Turn on the radio and press the Power switch on the SignaLink. The green power led should illuminate. Using your multimeter (volts) verify the voltage between chassis ground and test point TP-1 near the left rear corner of the SignaLink pc board (Figure-3). The voltage should be at least 6.75 volts for proper operation. If the voltage is not adequate, you will need to remove the power jumper on JP-1 and power the unit externally (see “Connecting Power”). Mic Input 1_______________________ Figure 2 – Example Jumper Wire Diagram for TS-450 • VERY IMPORTANT NOTE! – You are about to install the jumper wires. The wires must be 24ga AWG or you will damage the socket! It would be best to use the wires we provided for this purpose to avoid damage. • Install Jumper Wires – Now that you know where the jumper wires go, all you need to do is install them! This is best done by gripping them close to the end with needle-nosed pliers. When pushing the wires into the socket, be very careful not to bend them back and forth or they might break. If you break a wire off in the socket, there is no way to remove it. You will have to Figure 3 – Location of TP-1, JP-1 and JP-2. 4 to a point about 50% higher than the point where PTT activates. This should be the optimum setting for the transmit controls. Turn “TUNE” off when you are finished. When using your communications program you should never have to set these levels again. All further adjustments during operation should be done using the mic gain control. - AUXILIARY AUDIO OUTPUT – The SignaLink has an Auxiliary Audio Output jack on the front panel that can be used to attach an external radio speaker or headphones for monitoring receiver audio. Inside the SignaLink we have provided jumper JP-2 to allow you to select when the external audio jack is active. By default we have jumpered both positions on JP-2 which makes the audio available all of the time. However, you can move the jumpers to allow the jack to be active only when the SignaLink is ON or OFF. To make the jack active when the unit is ON, jumper pins 1 & 2. To make the jack active when the unit is OFF, jumper pins 3 & 4. For example, if you only install the jumper on pins 3 & 4, the audio jack will only be active when the SignaLink is OFF. This is a nice way to mute the speaker when you are working the digital modes! Note that if your radio had audio on the mic connector, you can also use the rear panel SPKR connector for an external speaker. This jack is wired directly to the SPKR pin on JP-1. IMPORTANT: Attaching or removing an external speaker while you are using the SignaLink will change the loading on the radio’s speaker circuit which will probably cause a change in the level of audio going to the sound card. In this case it may be necessary to re-adjust the audio level to compensate. • - GENERAL RADIO SETTINGS After performing the initial sound card level adjustments, you will normally only need to adjust the mic gain and speaker volume when operating your programs. The mic gain will control your output power and speaker volume will control the audio level going to the sound card. Most programs include guidelines for making these adjustments. - SET AUDIO LEVELS - IMPORTANT: Virtually all communications programs require that you TURN OFF any Speech Processing or Compression features in your radio. This is to insure RF linearity. You must also TURN OFF your VOX circuit when using the SignaLink. Before you operate your SignaLink on the air, you will want to adjust the Receive and Transmit Audio levels. Incorrect adjustment of these levels can cause poor performance or unreliable operation. This procedure tells you how the levels should be set. It assumes you already know how to use your computer to set sound card levels. If you are not familiar with setting the sound card levels, please refer to a more detailed “step-by-step” procedure for doing this in the back of the manual. - SIGNALINK OPERATION Operation of the SignaLink is very simple. The SignaLink “receive” circuitry is active at all times. You do not need to turn the SignaLink ON to receive signals through it. The “transmit” circuitry is only active when the unit is turned “ON”. When active, the SignaLink will trigger your radio’s PTT whenever it sees sound card activity so it is important to keep it turned “OFF” when it is not in use to prevent accidental transmissions. Perhaps the only other thing that needs to be understood is the function of the front panel “Delay” switch. This switch is used to control the “Hang Time” for the SignaLink’s Auto-PTT circuit. With the switch pressed (IN), the radio will remain keyed for approximately 800 milliseconds after signal input has stopped (like VOX delay). This setting is especially well suited for CW modes but can be used in most other modes as well. When the Delay switch released (OUT), the delay lowers to about 28 milliseconds. This setting is suitable for CW QSK operation and for modes that require fast turnaround times like Packet. It is also the best position for many other digital modes like PSK-31 and MT63. (Note that the operation of this switch was reversed on the early “Rev-B and Rev-C” SignaLink models.) Before you can adjust the audio levels, the SignaLink must be connected to the sound card and radio. Both the SignaLink and the radio should be powered ON and a communications program that you have selected should already be installed on your computer. Note that you will be using the communications program to generate the audio tones that are used to adjust the level controls, so CW programs should NOT be used unless they have a continuous "Tune" mode. A PSK-31 program like DigiPan is ideal for making these adjustments. • Receive Audio – For this adjustment you need only to call up the “Volume Control Panel” and select “Adjust Volume For Record”. Make sure that the “Master Volume” and “Microphone Volume” are selected (check box). Set both the “Master Volume” and “Microphone Volume” to 50%. This setting should be adequate for normal operation. All further adjustment of receive level within your communications program should be done with the radio volume control. Transmit Audio – For this test you can set your radio to SSB and turn the mic gain all the way down so that it will not actually transmit. Select “TUNE” in your communications program. Call up the “Volume Control Panel” and select “Adjust Volume For Playback”. Make sure that the “Master Volume” and “Wave Volume” are not muted (check box). Adjust the “Master Volume” for 75% of full volume. Next set the “Wave Volume” to zero and then advance it slowly noting the point where the SignaLink PTT light illuminates. Increase the level 5 Customers returning products for refund will be charged a Restocking Fee equal to 20% of the purchase price, to cover the cost of re-testing and re-stocking. Products that have been damaged or modified in any way may not be returned. Contact our Technical Support department for the RMA#. - VISIT OUR WEB SITE If you have Internet access, please visit our web site at: http://www.tigertronics.com Our site contains the latest news about Tigertronics’ products, support information, and other information of interest to all Hams and SWLs. This is also the best source for downloadable programs that work with our products. We also have all of our distribution software and documentation available for download as well. The site is updated often, so stop in on a regular basis and get the latest news and updates. - TECHNICAL SUPPORT BEFORE YOU CALL – The vast majority of technical issues can be resolved with the information that is available in this manual and on our web site. If you thoroughly investigate these resources, you will probably never need to call. Please take some time to read through this manual, and then check the online support resources to be sure that you have the most current software and documentation available. Thank you. - YOUR COMMENTS WELCOME Tigertronics has made every effort to make the SignaLink the best product possible. We welcome any comments or suggestions that you would like to make. Please drop us a note to let us know about your experiences, tips you would like to share with other users, or how we might do a better job for you. If you encounter a problem that you cannot resolve with the SignaLink (not software), please contact our Technical Support Staff at (541) 862-2639. They are available every Monday, Wednesday and Friday, from 1:00 PM to 5:00 PM Pacific Time. Be sure to have your equipment available for testing when you call. Please DO NOT mail, email, or fax your technical inquiries. We realize that calling is a little more expensive, but more can be accomplished in a few minutes on the phone than can be done in hours of writing! - LIMITED WARRANTY Tigertronics warrants the SignaLink to be free of defects in material and workmanship for a period of 90 days from the date of shipment. Tigertronics will repair or replace, at its option, any parts found to be defective during the warranty period. This warranty does not include any unit that has been subject to misuse, neglect, improper installation or operation. This warranty is in lieu of all others, express or implied, and no person or representative is authorized to assume for Tigertronics any other liability in connection with the sale or use of this product. Tigertronics will not be responsible for any expense or loss of revenue or property incurred by the user due to operation or malfunction of this equipment. Tigertronics reserves the right to make circuit or component changes, or to incorporate new features, at any time, without obligation. - GENERAL SPECIFICATIONS Power Supply: 6.75 - 15 VDC @ 13 ma (max) Freq Response: 100Hz - 30KHz In / Out Impedance: 600 ohm Attenuation: Radio To Sound Card: 200:1 Sound Card to Radio: 5:1 Auto-PTT Delay: Fast (OUT) – 28 ms Slow (IN) – 800ms MOSFET Transistor Rating - 15v @ 75 ma (Max) PTT Circuit: - RETURN POLICY A Return Material Authorization Number (RMA#) must be obtained from the factory before any product will be accepted for return or repair. Items received at the factory without an RMA# clearly marked on the OUTSIDE of the package WILL BE REFUSED. Items being returned must be sent prepaid. Returned items should have a note attached showing the RMA#, customer name, return address, phone number, and action requested. Units being returned for warranty repair must be accompanied by a copy of the original sales invoice showing the date of purchase. Customers wishing to return a product for REFUND, for ANY REASON, must receive an RMA# within 15 days from the shipping date shown on the original sales invoice. 6 Radio Connector: Mic, Spkr, Pwr, PTT - RJ-45 Spkr - 3.5mm Mono Sound Card Conn: Mic/Spkr - 3.5mm Stereo Other Connectors: Aux. Spkr - 3.5mm Mono Aux. Power - 2.1mm Coaxial Case: Extruded Aluminum - 6061T4 Dimensions: 1.1” x 2.7” x 3.2” Operating Temp: -30C to +60C Troubleshooting and Detailed Adjustment Procedures - TROUBLESHOOTING These are the most common problems as reported by our Technical Support Staff. If you cannot resolve your problem, or if you do not find your problem listed here, then please refer to the Technical Support section of this manual. Radio Won't Transmit (SignaLink's PTT Indicator Is OFF) - It is important to remember that the SignaLink keys the radio automatically when it detects transmit audio. If the PTT light on the SignaLink is OFF, then it is most likely because the sound card is not sending a signal or the signal level is too low. Verify the following: • Sound card not functioning properly - If you are not sure if your sound card is functioning, you should perform the Sound Card Test following this section. • Sound card levels set too low – Repeat the procedure for setting the audio levels from the sound card (see Adjusting Audio Levels). • Sound card cables reversed – Make sure you have not reversed the mic/spkr cables to the sound card and that they are plugged into the correct sound card jacks. Most sound cards are poorly marked so you may need to refer to your computer’s manual to verify the correct jack location. • Sound card not functioning properly - If you are not sure if your sound card is functioning, you should perform the Sound Card Test following this section. • Sound card or radio level controls set too low or muted - Because there are multiple controls that effect audio levels, it is very easy to have one set wrong. See the "Adjusting Audio Levels" section to correct the problem. • Sound card cables reversed – Make sure you have not reversed the mic/spkr cables to the sound card and that they are plugged into the correct sound card jacks. Most sound cards are poorly marked so you may need to refer to your computers manual to verify the correct jack location. • Computer too slow or incompatible with software. Software not configured properly - Check the documentation for the program that you are using and verify that your computer meets the minimum requirements. If you are using a PCI sound card, make sure that the program will work with it. Some programs will NOT work with PCI sound cards at all. Verify that the program is configured correctly and be sure that you are using it correctly. If all else fails, test using a different program. Why Can't I Receive Some Stations - No matter how good your antenna and radio are, there will always be some stations that you cannot copy (even with strong signals!). While the reason for this may be because of operator error (wrong mode or baud rate, off frequency, etc.), radio wave propagation problems can often prevent you from receiving. Some modes are more susceptible to this than others. For example, even though PSK31 usually works very well with weak signals, sometimes even strong PSK31 signals cannot be copied at all because of multipath and Doppler Shift propagation problems. Other modes like HF Packet and RTTY do not work well with weak signals and are susceptible to multipath and Doppler Shift. Radio Doesn’t Transmit Even Though The SignaLink's PTT Indicator Is ON - If the SignaLink's PTT light comes on but the radio doesn't transmit, then you have jumpered the PTT incorrectly on JP-1. This should not be an issue if you tested the PTT line as outlined in the jumper section. If you find ANY jumper connected wrong then we recommend that you go through the entire jumper installation procedure again. Radio Transmits But Power Output Is Too Low – Power is normally adjusted using the radios mic gain control. If the gain control is fully clockwise and you still have not reached full power then you have the sound card output level set too low. Review the "Adjusting Audio Levels" section of the manual again. Windows "System Sounds" Cause The SignaLink To Transmit – Since the SignaLink is activated by sound card output, it is important that it is turned OFF when not in use. The sounds that are generated by Windows during different system events (Startup, Shutdown, File Close, etc.) can be transmitted if they are inadvertently sent to the SignaLink. My Transmit Signal Is Wide Or Distorted - This is generally the result of over-driving your radio or having forgotten to turn off your speech processor/compressor. Some radios simply do not perform well at full output in applications like PSK-31. Try turning the mic gain down to reduce distortion and see if it improves the quality of your signal. - TESTING YOUR SOUND CARD If you are having unexplainable problems or are simply not sure if your sound card is working at all, you can use the following test procedure to verify sound card operation. This test uses the Sound Recorder program that comes with I Can't Seem To Receive - There are several possible causes for this problem: 7 Windows to test your sound card’s record and playback functions. Before you begin the test, you need to verify that your computer speakers are plugged into the sound card and that all programs that use the sound card are closed. shown in Figure-2. Note that the Master Volume control may be labeled “Volume Control”. To test the record function of the sound card, we need to have an audio source connected to the sound card's Microphone input. We will use your radios external speaker output for this purpose. Disconnect ALL CABLES from the SignaLink before you start this test. • Using a stereo cable, connect the Speaker or Headphone output of your radio to the “SPKR” jack on the rear of the SignaLink. Be sure to use the jack that’s labeled “SPKR” (not the one labeled “Computer - SPKR”). • Using another stereo cable, connect the SignaLink’s “Computer - MIC” jack to your sound card’s Microphone input jack (not the Line Input). Make sure no other cables are connected. Before we can record a signal, we need to adjust the radio and computer volume controls. Please note that the volume settings used here are for test purposes only. The controls will need to be re-adjusted later using the procedure found in the “Adjusting Audio Levels” section of this manual. For now, adjust the audio level controls as follows: • Set your radio’s volume control to half of full volume. • Run the Windows Volume Control program by clicking on the Start Button and selecting Programs, Accessories, Multimedia (or Entertainment) and then Volume Control. The Volume Control panel should look similar to the one shown below: Figure 2 – Sample Properties Page • Click OK to close the properties page. The Playback volume controls should now be displayed. • Set the Master Volume and Wave controls to 1/2 of full volume. Verify that the Master Volume and Wave Level controls are NOT muted. The Balance controls should be left in their center position. • From the Options menu, select Properties to display the Properties page. In the “Adjust Volume For” window, select Recording. • In the “Show the following volume controls” window, verify that the Microphone box is checked. When you are done, the Properties Page should look similar to the one shown below. Figure 1 – Volume Control Panel • From the Options menu, select Properties to display the Properties page. In the “Adjust Volume For” window, select Playback. • In the “Show the following volume controls” window, verify that the Master Volume and Wave controls are selected. The Properties Page should look like the one Figure 3 – Record Properties 8 • Click OK to close the properties page. • The Volume Control panel should now show only the Recording controls. It should look similar to the picture shown below. • To begin recording, click the Record button. If everything is working correctly, you will see the position slider moving from left to right and the Position display incrementing. You should also see the scope display in the center of the program window track the audio signal. If nothing happens, or if you get an error message, then see the "Sound Card Problems" section below. • If everything appears to be working, then let the program record for a few seconds and then click the Stop button. We now have a test sound recorded that we can play back through the speakers. • To play the sound, click the Play button. You should hear the sound through your computer speakers. If you do, then you can close the Sound Recorder program. Your sound card is functioning correctly. If you don’t hear the sound playback, then you need to proceed to the "Sound Card Problems" section. Sound Card Problems Figure 4 – Record Level Controls • • While Tigertronics does NOT provide support for sound card problems, we have listed a few troubleshooting tips here to help you with some of the most common problems. If you are unable to resolve a problem with your sound card, then you will need to contact your computer’s manufacturer or a computer repair shop for help. Set the Sound Card’s Master Volume and Microphone Level controls to mid range. Verify that these controls are “Selected” by the Select check box below each control. If only one level control can be selected at a time, then select the Microphone input. NOTE: The Master Volume control may not be shown. • If the record and playback features of the Sound Recorder program seem to work, but no sound is ever heard (or seen on the scope display), then check the level controls. You might have one of the volume controls muted, de-selected or set too low. If the volume controls look ok, then check your cabling. Verify that the cables have the right type of connector installed (3.5mm stereo) and are plugged into the right jacks. • If you receive an error message when you click the Record or Play button, then you need to verify that all other programs that use the sound card are closed. Problems can occur if more than one program tries to access the sound card at one time. If all of the other sound card programs are closed and you still receive an error message when you click the Record or Play button, then your sound card or its drivers may not be installed correctly. Refer to the instructions that came with your sound card (or computer) to re-install the card and / or drivers. • If all of the Sound Recorder control buttons (Record, Play, etc.) are disabled, then your sound card drivers are probably not installed correctly. Refer to the instructions that came with your sound card (or computer) to re-install the card and /or drivers. Note that it is normal for the Play, Rewind and Fast Forward Click on the X in the upper right-hand corner to close the Volume Control. Your new settings will be saved automatically. Now that the recording and playback controls are set to a usable level, we are ready to record and playback a test sound. • Start the Sound Recorder program by clicking on the Start Button and selecting Programs, Accessories, Multimedia (or Entertainment) and then Sound Recorder. The Sound Recorder program should look like the picture below. Note the location of the Record, Stop and Play buttons. Figure 5 – Sound Recorder Screen Shot 9 buttons to be disabled until after you have recorded a sound. • In the “Show the following volume controls” window, verify that the Master Volume and Wave level controls are selected. When you are done, the Properties Page should look like the one shown in Figure-7. - DETAILED PROCEDURE TO SET LEVELS NOTE: The Master Volume control may be simply labeled “Volume Control”. This is a “Step-By-Step” procedure to assist those who are not already familiar with setting sound card levels using the Windows Volume Control Panel. Before you operate your SignaLink on the air, you will want to adjust the Receive and Transmit Audio levels. Incorrect adjustment of these levels can cause poor reception, over-modulation, or improper operation. This procedure will show you how to adjust your sound card and radio audio levels for optimum performance. Before you can adjust the audio levels, the SignaLink must be connected to the sound card and radio. Both the SignaLink and the radio should be powered ON and a communications program that you have selected should already be installed on your computer. Note that we will be using the communications program to generate the audio tones that are used to adjust the level controls, so CW programs should NOT be used unless they have a continuous "Tune" mode. A program like DigiPan is ideal. Transmit Audio Figure 7 – Playback Properties Follow the steps below to set your transmit audio level. • • Start the communication program and leave it in Receive mode. Run the Windows Volume Control program by clicking on the Start Button and selecting Programs, Accessories, Multimedia (or Entertainment) and then Volume Control. The Volume Control panel should look similar to the one shown in Figure-6. • Click OK to close the Properties page. • Set the sound card’s Master Volume control to approximately 75% of full volume. Set the sound card’s Wave level control to minimum. • The Balance controls should be left at their center position. • Verify that the Master Volume and Wave level controls are NOT muted (check box). Any other controls that you are not using can be muted to reduce the amount of noise picked up by the sound card. • Verify that all special audio processing features are turned OFF. This includes features like “Mic Boost”, “Bass Boost”, “Audio Expander”, etc. These features must be turned OFF or they will distort your transmit audio. • Put your communications program into transmit mode. If the program has a “Tune” or “Adjust Transmit Drive” mode, then select it. • The SignaLink’s PTT light should be OFF at this point. Now, slowly slide the sound card’s Wave level control up until the PTT LED turns ON. When the LED turns ON, note the position of the slider and then increase its level by about 50%. The sound card’s volume level is Figure 6 – Volume Control Panel • From the Options menu, select Properties to display the Properties page. In the “Adjust Volume For” window, select Playback. 10 now properly set. Any further adjustments should be made using the radio’s Microphone Gain control (see the next step). • shown in Figure-9. Now that the sound card levels are set correctly, you can use the radio’s microphone gain control to adjust the transmit power to the desired level. Before you adjust the power level, you need to check your radio’s manual and find out what the recommended maximum transmit level and duty cycle are. Most digital modes are similar to RTTY and cannot be run at full power without damaging your radio. Receive Audio Follow the steps below to set your receive audio level. • Set your radio’s volume control to about 25% of full volume. • If it's not already running, start the Windows Volume Control program again by clicking on the Start Button and selecting Programs, Accessories, Multimedia (or Entertainment) and then Volume Control. • From the Options menu, select Properties to display the Properties page. In the “Adjust Volume For” window, select Recording. • In the “Show the following volume controls” window, verify that the Microphone box is checked. When you are done, the Properties window should look similar to the one shown in Figure-8. Figure 9 – Record Level Controls • Set the sound card’s Master Volume and Microphone Level controls to mid range. Verify that these controls are selected by the “Select” check box below each control. If only one level control can be selected at a time, then select the Microphone input. NOTE: The Master Volume control may not be shown. • The sound card’s volume levels are now properly set. Any further adjustments should be made using the radio’s Volume control. Click the “X” in the upper right hand corner of the Volume Control window to close it and save your settings. SignaLink and AutoPTT are trademarks of Tigertronics Copyright © 2001-2005 Tigertronics - All Rights Reserved Figure 8 – Recording Properties • Click OK to close the Properties window. • The Volume Control panel should now show only the Recording controls. It should look similar to the picture NOTE: This manual updated for SignaLink Rev-“D” units. (10/1/05 Rev-D) 11 Notes 12