1
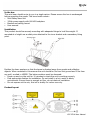
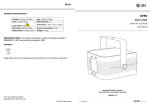
MINI GALAXY
RGB Laser with
Internal Battery
Item ref: 152.767UK
User Manual
Thank-you for choosing this Mini Galaxy RGB laser.
This laser takes the popular galaxy model and scaled it down to create this mini RGB version
with an internal battery. This high quality unit creates clusters of laser beams over a large
area, creating an effect similar to one when a light is shone on a mirror ball generating
thousands of laser points. The handy small size allows easy carrying and quick setup and is
further enhanced by the use of fog. Ideal for mobile DJs or small parties.
•
•
•
•
•
•
•
•
Built-in rechargeable battery offers great portability
RGB laser gives seven colour modes in R, G, B, RG, RB, GB, RGB
Wide coverage
Fire fly, firework and star cluster effects
8 refraction effects
2 different speeds for auto and sound to light mode
Can be controlled by supplied remote controller
Supplied with stand and ceiling mount
WARNING This item contains laser radiation, no user serviceable/repairable
parts within. Please refer to licensed electrician to perform any required
repair or maintenance. This product is strictly for professional use only.
Approved personnel required to install and operate the unit, strictly following
the laser health and safety guidelines HSG95.
For detailed information regarding HSG95, please see the below web link:
http://www.hse.gov.uk/pubns/books/hsg95.htm
This product is a class 3R laser but contains class 3B laser when the case is
open. Care needs to be taken when operating the device. Risk of damage is
low but still present. Extreme care needs to be taken if case is to be opened,
as full power 3B laser beams can escape without the casing and lens
protection. Please read this manual thoroughly before use.
In the box
This mini laser should arrive to you in a single carton. Please ensure the box is undamaged
before accepting the goods. The box should contain:
• Mini Galaxy laser unit
• 12Vdc power supply with UK & EU adaptors
• Bracket and ceiling mount
• User manual
Installation
This product should be securely mounting with adequate fixings to hold the weight. If
mounted at a height use a safety wire attached to the inner bracket and a secondary fixing
point.
Position the laser aperture so that the beam is directed away from people and reflective
objects. When mounted in this manner the unit should be 3m from the ground and 2.5m from
any wall, as cited in HSG95. The below cautions must be observed:
• Power up and run the unit for 10 minutes to check the unit is working properly
• Find appropriate lication for installation. Do not install in a hot, moist or dusty
environment. Ensure there is enough air flow, do not obstruct ventilation.
• Do not expose unit to rain, this init is strictly for indoor use only.
Product layout
152.767UK User Manual
1.
2.
3.
Mode select switch to select between
auto and sound to light modes
Built-in mic
IR receiver
4.
5.
6.
7.
LED status indicator
Battery power switch
12Vdc in
Ventilation fan, do not block
On/Off – to turn unit on and off
Sound to light – press to select sound to light mode, sensitivity can be adjust through
numbers 1-9 (1 being least sensitive and 9 being most sensitive).
Auto mode – press to select auto mode, the laser will run through various different effects.
Colour selection – press to select different laser colours and combinations.
Effect freeze – press to freeze current displaying effect.
A – controls red colour laser, press A then number 1 to 9 to control the red laser strobe.
Speed increase with number value. Press A then 0 will turn the red laser off.
B – controls green colour laser, press B then number 1 to 9 to control the green laser strobe.
Speed increase with number value. Press B then 0 will turn the green laser off.
C – controls blue colour laser, press C then number 1 to 9 to control the blue laser strobe.
Speed increase with number value. Press C then 0 will turn the blue laser off.
- press to change the refraction effect.
Maintenance
There are no end-user serviceable parts within the unit. To maintain a workable condition we
advice dusting the unit on a regular basis. Before cleaning or dusting, always ensure the
mains power cable is removed from the unit. Use a soft cloth, lightly dampened with water or
mild detergent to wipe off the dust from the casing. DO NOT use spray on the case as
droplets may enter the unit through the ventilation and cause damage to electronics inside.
Remove the trapped dust from the ventilation holes of the unit with a vacuum cleaner with a
brush attachment, a dust blower or a hand brush.
152.767UK User Manual
Troubleshooting
No power output
Power on but no output
Unable to power by battery
Check power supply is fully plugged in and mains is
switched on.
Check pin adaptor is fully slotted on the power supply and
DC plug is fully inserted into the back of the unit.
Ensure unit is switched on by pressing and holding the
mode button.
Ensure remote control battery is not dead.
Ensure the unit is not on sound to light mode.
Ensure laser aperture is not blocked
Ensure battery switch is switched on.
Ensure battery is fully charged before use.
Specifications
Power adaptor
100-240Vac, 50/60Hz
Battery type
Li-Ion 2200mAh @ 7.2Vdc
Battery operation time
Single colour: 3hrs, Two colours: 2hrs, RGB: 1hr
Power supply
12Vdc @ 1A
Power consumption
15W max.
Laser class
3B
Red laser power
100mW 650nm
Green laser power
50mW 532nm
Blue laser power
100mW 450nm
Dimensions
90 x 145 x 46mm
Weight
350g
Laser safety standard
BSEN60825-1 2007
This product complies with laser safety standard EN60825-1 2007.
This product is classed as Electrical or Electronic equipment and should not be disposed
with other household or commercial waste at the end of its useful life.
The goods must be disposed of according to your local council guidelines.
Errors and omissions excepted.
Copyright© 2014. AVSL Group Ltd.
152.767UK User Manual