1
state LED will get in red color, and turns off the output at the same time, until the battery voltage
recovers to over discharge return voltage, the system will work again automatically. The controller
only for lead-acid battery.
Load indication: the load LED lights when the load works. If the load current is 1.25 times higher
for 60 seconds or 1.5 times higher for 5 seconds than rated current of the controller, the trouble LED
flash slowly in red to show overload happened, and the controller will shut down output. When load
short circuit happens, the trouble LED will flash quickly, then the controller will shut down its output.
When it happens, please check if the load is properly connected. Disconnect the load at fault and
press the button, it will resume its work in 30 seconds or in another day.
Installation:
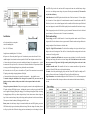
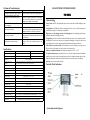
a. fix the controller in a certain place .
size of the installing hole :
118
65
Size: 118×65X30(mm)
Work mode setting:
Way of setting: press the on & off button for 5 seconds long until the number on the LED screen
begins to flash. Press the button to choose a proper number. When the number no longer flashes, the
setting is completed. Press the button to check the value.
Light ON+ Light OFF control mode: The load will start working when it gets dark until it gets
bright or to the end of a setting time. There will be a 10 mins delay before turning on the load in order
Length between installing holes:110×45(mm)
b. Prepare wire. Choose the plastic Copper wire. Current density no more than 4A/mm2. Cut the
suitable length of wire and make it as shout as possible. Peel off 5mm the plastic at the end of wire.
c. Connect the wire to the battery port on the controller to the battery. Pay attention to the +, - pole of
the connection. If the pole is reverse, it does not work. It has the function of self protection, and there
is no any part will be damaged during this step, but should correct this mistake.
d. Connect the wire to the PV port on the controller to PV panel. If the connection is correct and the
PV panel gets the sunlight, charging indicator will be light.
e. Connect the load to the load port on the controller. Attention the +, - pole should be correct.
!! Attention: during the installation, if the voltage of the system is 24V, you can not use the
hands to touch any conductor in the system circuit in order to protect from electric shock.
Using:
Charge & overpressure indication:If the system is properly connected ,when sunlight shines on the
PV panel ,the charge LED lights in green,indicating the system is working in a good order. PWM
mode is applied in charging. During the charging, if over discharge has happened, firstly the voltage
for charging battery will be up to boost voltage and keep 10 mins, then returns to direct voltage and
keep 10 mins to activate battery, lastly to float voltage and keep this state for the best state of battery.
These process is benefit to battery full charging and its life -span.
Battery state: when the battery voltage is in normal condition, the state LED lights in green; state
LED flashes slowly in green when battery finishes its charge; When the voltage of the battery is lower,
it will get in yellow color. When the voltage goes down continuously to over discharge, the System
to make sure if it really gets dark.
Light ON + set time delay OFF mode: the start process same with above. Load will be closed after
the setting time. Setting time can be seen in time setting table. If the load dose not work to set the
time to occurrence of light control ,the light control priority.Setting time can be seen in time
setting table.
Common controller mode: The controller will work as a common controller, no light and time
control, no ON and OFF delay time. only has the else function.
Test mode: It used for system debugging. Only cancel the ON and OFF delay.If no sunlight on PV
panel, it will turn on load at once; If sunlight on PV panel, it will turn off load at once.
Light+Time modes: when the number displayed on the LED is from 1 to 7, it is in Direct output mode.
Ten minutes after darkness falls, the output switches on and remains on for the duration of the delay
selected.