1
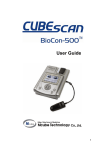
User’s Manual User’s Manual for BioCon-500TM Safety Summary 1. Since the surface of the Probe affects the result of data, users should keep as follows; (1) Clean the cap of probe with tissue before using the device. (2) Apply gel on the top of probe, position the probe on the abdomen of patient, and start scanning. (3) Try to scan at least 2 ~ 3 times to get more accurate results. (4) Remove and re-apply gel after scanning 4 ~ 5 times, to scan again. (5) Remove the residual gel on the probe’s surface after scanning finished. (6) Move carefully not to drop the probe off. 2. The device can be used as being charged. In case of using the device as being charged, users should assure if the device is connected to the charger. 3. The device should be made its adapter parted from the main unit with the charging lamp(Yellow) off. 4. The indication lamps (Green, Yellow) are turned off automatically in SCAN mode and turned on as the SCAN mode is terminated, which users should not be misconceived for an equipment failure. 5. In case the error message appears, users can refer to the operation manual and take a proper action. [p. 30, 3.9 Error Message] 6. The device should be used after ultrasonic gel applied on the probe or patient’s abdomen. Thus, users should avoid using this device against patients with skin disease or injury. 7. In order to get more accurate data, the probe should be positioned toward patient’s bladder during examination. Mcube Technology Co., Ltd. www.mcubetech.co.kr 1/41 User’s Manual for BioCon-500TM 8. The device is turned off automatically in 7 minutes if not used, which is set as default and can be changed as adjusting the value of ‘Auto Power’ in ‘Maintenance Mode’. 9. Do not decompose by yourself if a failure is detected as it may cause additional failure. 10. The device must not be used without the battery module of main unit. 11. When you scan the bladder of patient, you must place the scan button on the probe to the right side of patient. Mcube Technology Co., Ltd. www.mcubetech.co.kr 2/41 User’s Manual for BioCon-500TM 1. Introduction BioCon-500TM is the device that measures the volume of bladder and the residual urine using echo effect of ultrasound. BioCon-500TM is composed of the main unit processing data and the ultrasonic probe. Main unit consists of LCD for display, thermal printer for output results and USB terminal for transferring the measured data to PC. Fig 1.1 BioCon-500 Mcube Technology Co., Ltd. www.mcubetech.co.kr 3/41 User’s Manual for BioCon-500TM 2. Composition of BioCon-500 BioCon-500 consists of the main unit and the ultrasonic probe. 2.1. Functions of each part of the main unit Fig. 2.1 Front of main unit No. Item Function 1 LCD 2 Thermal printer 3 Indication lamp 4 Select button Function menu selection 5 Power button Turns on / off main unit power 6 PRINT button Prints measured data to thermal printer 7 SCAN button For SCAN function Displays menu, indicates current state Prints out measured data. Green lamp(left) : Adaptor connection status Yellow lamp(right) : Charging status Mcube Technology Co., Ltd. www.mcubetech.co.kr Remark 4/41 User’s Manual for BioCon-500TM Fig. 2.2 Right-side view of main unit No. Item Function 1 Phone terminal 2 USB terminal 3 Probe terminal Updates software of system Transmits measured data to PC Remark RS232 Will be expanded hereafter Connects probe to main unit. Fig. 2.3 Left-side view of main unit No. Item 1 Adapter terminal Function Remark Connects charging DC adapter to main unit. Fig. 2.4 Rear view of main unit No. Item 1 Handle Function When Carrying to a close distance. Mcube Technology Co., Ltd. www.mcubetech.co.kr Remark 5/41 User’s Manual for BioCon-500TM 2.2 Probe Fig. 2.4 Ultrasonic probe and cable No. Item Function 1 Probe cap Transmits and receives ultrasound signal 2 Cable Connects between probe and main unit. 3 Connector 4 SCAN button Junction part between ultrasonic cable and main probe terminal The same function as SCAN button of main unit. Mcube Technology Co., Ltd. www.mcubetech.co.kr Remark 6/41 User’s Manual for BioCon-500TM 2.3 System diagram Fig. 2.5. System Diagram (excluding power unit) * PC software will be expanded hereafter. Mcube Technology Co., Ltd. www.mcubetech.co.kr 7/41 User’s Manual for BioCon-500TM 3. How to use 3.1 Preliminary preparation for use 3.1.1 Check charging status of device. 3.1.2 Check the connection between main unit and probe. 3.1.3 Apply ultrasonic gel on probe cap evenly. 3.1.4 The probe should be placed on the lower abdomen at 4 cm away from the pubis and positioned toward the bladder. 3.1.5 The probe should be placed in the direction of scan button toward the right side of patient. 3.2 Explanation about 2 modes The device can be operated in 2 modes, which are standard mode and advanced mode. 3.2.1 Standard Mode 1) General view Fig.3.1 Initial page of Standard Mode Fig.3.2 SCAN function screen in standard mode Mcube Technology Co., Ltd. www.mcubetech.co.kr 8/41 User’s Manual for BioCon-500TM Fig.3.3 SCAN result screen in standard mode Fig. 3.4 Image of printer output in standard mode (Print Option : Raw Image) 2) Functions in Standard Mode Function GEN. (←) RESET(→) Description Push the left arrow key to change the gender as fig.3.5. Push the right arrow key to go to initial page as Fig.3.1 in any status. Print out the current SCAN results in one session as Fig.3.4. PRINT “NO DATA AVAILABE” message appears if pressing PRINT button without having any measured data. SETUP(↑) Push the up arrow key to go to SETUP page (See page 16, 3.4.1 SETUP in Standard Mode ) Mcube Technology Co., Ltd. www.mcubetech.co.kr 9/41 User’s Manual for BioCon-500TM Down Key(↓) To review next plane images, press down key Fig. 3.5 Selection of gender in standard mode 3.2.2 Advanced Mode 1) General view Fig.3.6 Initial page of Advanced Mode Fig.3.7 Advanced SCAN standby Mcube Technology Co., Ltd. www.mcubetech.co.kr 10/41 User’s Manual for BioCon-500TM Fig.3.8 Image of scanning in advanced mode Fig. 3.9 Advanced mode scan result (Scan Result : B-Mode) Fig.3.10 Advanced Mode PRINT sheet 2) Functions in Advanced Mode Function Description Prints out SCAN result as Fig 3.10. PRINT “NO DATA AVAILABE” message appears if pressing PRINT button without having any measured data or setting at B-mode image SETUP(↑) Push the up arrow key to go to SETUP page (See page 20, 3.4.2 SETUP in Advanced Mode ) Mcube Technology Co., Ltd. www.mcubetech.co.kr 11/41 User’s Manual for BioCon-500TM RESET(→) Down Key(↓) Push the right arrow key to go to initial page as Fig. 3.6. To review next plane images, press down key. Mcube Technology Co., Ltd. www.mcubetech.co.kr 12/41 User’s Manual for BioCon-500TM 3.3 Positioning of Ultrasonic Probe (1) Push the scan button one time and enter into the pre-scan function. Through the pre-scan function, try to have the bladder placed in the center of scan section and try to get the biggest image. Then push the scan button one more time to start measuring the residual urine. (2) Scanning time is around 4 seconds and the probe should be kept steady. (3) After scanning finished, LCD displays the measurement result. (4) If the center of the bladder image leans toward a certain area(up, down, left, and right), go back to the step (1) and start again from pre-scan. (5) To make the bladder in the center of circle, keep the probe location and adjust the angle of the probe as below. ※ After pushing the scan button one time as (1) above, you can stop the pre-scanning and come back to the initial page when pushing the Down Key(↓) for a while(more than 1 second). In the direction of leg In the direction of right In the direction of left In the direction of head Mcube Technology Co., Ltd. www.mcubetech.co.kr 13/41 User’s Manual for BioCon-500TM (6) When LCD displays as ‘Fig. Result a’, the sign ‘(<?)’ above the current value means that part of the whole bladder is located out of scan range in the previous scanning attempt. Fig. result a (7) When LCD displays as ‘Fig. Result b’, the sign ‘(<?)’ above the maximum value means that part of the whole bladder is located out of scan range in the maximum value among all the scanning attempts in current session. Fig. result b Mcube Technology Co., Ltd. www.mcubetech.co.kr 14/41 User’s Manual for BioCon-500TM (8) When LCD displays as ‘Fig. Result c’, the sign ‘(<?)’ above the current value means that part of the whole bladder is located out of scan range in the previous scanning attempt, as (6), and at the same time the sign ‘(<?)’ above the maximum value means that part of the whole bladder is located out of scan range in the maximum value among all the scanning attempts, as (7). Fig. result c Mcube Technology Co., Ltd. www.mcubetech.co.kr 15/41 User’s Manual for BioCon-500TM 3.4 SETUP in 2 modes 3.4.1 Standard Mode There are some kinds of setup in standard mode. In SETUP mode, all arrow keys are used to move a cursor. -. Chang the date and time -. System mode setup -. Print option setup -. Prescan Enable setup 1) Changing the date and time a. Move the cursor at Set Date/Time by up or down key b. Push the Enter key (inside arrow keys) Fig. 3.11 c. Move the cursor to the position by left or right arrow key, push up or down key for selecting digits. d. Push the Enter key after Fig. 3.12 Mcube Technology Co., Ltd. www.mcubetech.co.kr changing date / time. 16/41 User’s Manual for BioCon-500TM e. Move the cursor to Exit by down arrow key. Push the Enter key to exit setup page Fig. 3.13 2) System Mode SETUP a. Move the cursor to System Mode by up or down key b. Push the Enter key (inside arrow keys) Fig. 3.14 c. Push the left or right arrow key to select a desired mode - Standard - Advanced d. Push the Enter key after changing system mode. Fig. 3.15 Mcube Technology Co., Ltd. www.mcubetech.co.kr 17/41 User’s Manual for BioCon-500TM e. Move the cursor to Exit by down arrow key. Push the Enter key to exit setup page Fig. 3.16 3) Print Option SETUP a. Move the cursor at Print Option by up or down key b. Push the Enter key (inside arrow keys) Fig. 3.17 Mcube Technology Co., Ltd. www.mcubetech.co.kr 18/41 User’s Manual for BioCon-500TM c. Push the left or right arrow key to select a desired mode. - Value Only - Raw Image - Walls - All Planes . d. Push the Enter key to finish print option change. Fig. 3.18 e. Move the cursor to Exit by down arrow key. Push the Enter key to exit setup page. Fig. 3.19 Mcube Technology Co., Ltd. www.mcubetech.co.kr 19/41 User’s Manual for BioCon-500TM 4) Prescan Enable SETUP a. Move the cursor to Prescan Enable. b. Push the enter key. Fig. 3.20 c. Choose On or Off with the left or right key. d. Push the enter key after finishing selection. Fig. 3.21 3.4.2 Advanced Mode There are some kinds of setup in advanced mode. In SETUP mode, all arrow keys are used to move a cursor. -. Input Hospital Name -. Scan Result SETUP -. Flash Store SETUP -. Test Print Mcube Technology Co., Ltd. www.mcubetech.co.kr 20/41 User’s Manual for BioCon-500TM Changing Date/Time, System mode and Print option in advanced mode follows the same procedure as in standard mode. 1) Input Hospital Name a. Move the cursor at Hospital Name by up or down key b. Push the Enter key (inside arrow keys) Fig. 3.22 c. Move the cursor to a desired position and push the Enter key. (e.g. M) d. After finish input the name, move the cursor to DONE. Push the Enter key. Fig. 3.23 e. Move the cursor to Exit by down arrow key. Push the Enter key to exit setup page. Fig. 3.24 Mcube Technology Co., Ltd. www.mcubetech.co.kr 21/41 User’s Manual for BioCon-500TM 2) Scan Result SETUP a. Move the cursor at Scan Result by up or down key b. Push the Enter key (inside arrow keys) Fig. 3.25 c. Move the cursor by left or right key to a desired scan result and push the Enter key. - Contour - B-Mode Fig. 3.26 d. Move the cursor to Exit by down arrow key. Push the Enter key to exit setup page Fig. 3.27 Mcube Technology Co., Ltd. www.mcubetech.co.kr 22/41 User’s Manual for BioCon-500TM 3) Flash Store SETUP a. Move the cursor at Flash Store by up or down key b. Push the Enter key (inside arrow keys) Fig. 3.28 c. Move the cursor by left or right key to on or off and push the Enter key. Fig. 3.29 d. Move the cursor to Exit by down arrow key. Push the Enter key to exit setup page. Fig. 3.30 Mcube Technology Co., Ltd. www.mcubetech.co.kr 23/41 User’s Manual for BioCon-500TM 4) Test Print a. Move the cursor at Test Print by up or down key b. Push the Enter key (inside arrow keys) Fig. 3.31 c. Printout the paper form thermal printer as the left figure. Fig. 3.32 d. Move the cursor to Exit by down arrow key. Push the Enter key to exit setup page. Fig. 3.33 Mcube Technology Co., Ltd. www.mcubetech.co.kr 24/41 User’s Manual for BioCon-500TM 3.5 Print Option 3.5.1 Value Only The printed-out result displays the volume capacity in value only as following. Fig. 3.34 Value only result 3.5.2 Raw Image The printed-out result displays ultrasonic raw image as well as volume capacity as following. Fig. 3.35 Raw Image result Mcube Technology Co., Ltd. www.mcubetech.co.kr 25/41 User’s Manual for BioCon-500TM 3.5.3 Walls The printed out result displays Wall images as well as volume capacity as following. Fig. 3.36 Wall Image result 3.5.4 All Planes The printed-out result displays 12 planes as well as volume capacity. Mcube Technology Co., Ltd. www.mcubetech.co.kr 26/41 User’s Manual for BioCon-500TM 3.6 Print function in Advanced Mode 3.6.1 Input Patient ID 1) After one SCAN session, push the right arrow key to go to the initial page 2) Push the PRINT button to display LCD as Fig. 3.37., and input patient ID as followings. a. Push the left arrow key Fig. 3.37 b. Move the cursor by right arrow key and select a digit from 0 to 9 by up or down arrow key. c. After fixing a 10 digit number, push the Enter key (inside arrow Fig. 3.38 keys) d. Go to Fig. 3.37. Fig. 3.39 Mcube Technology Co., Ltd. www.mcubetech.co.kr 27/41 User’s Manual for BioCon-500TM 3.6.2 Print Function Press the PRINT button at the state of fig. 3.6 after one scan session, to display as following. Fig 3.40 PRINT function in Advanced mode Item PRINT Function Prints out the results (including the image and the measured value) of 12 planes at the thermal printer. Prints out the frequency of each range in one session (currently not applicable) HIST(→) Fig 3.41 HISTOGRAM output Prints out the current SETUP status SET(↑) Fig 3.42 Setup Status output EXIT(↓) Exit to initial page. Mcube Technology Co., Ltd. www.mcubetech.co.kr 28/41 User’s Manual for BioCon-500TM 3.7 Scan Result in Advanced Mode 3.7.1 B-Mode It displays B-Mode image as SCAN result in LCD. Fig 3.43 SCAN result (B-Mode) 3.7.2 Contour It displays Contour image as SCAN result in LCD. Fig 3.44 SCAN result (Contour) Mcube Technology Co., Ltd. www.mcubetech.co.kr 29/41 User’s Manual for BioCon-500TM 3.8 Flash Store in Advanced Mode 3.8.1 On 1) Stores the maximum SCAN result of one session in Flash memory. 2) SCAN result will not be deleted if the power is put off and back on. 3.8.2 Off 1) Flash memory does not store any data. 3.9 Error Messages Message Situation No measured data or viewing B-mode NO DATA AVAILABLE image BATTERY LOW. RECHAGE BEFORE NEXT USE Power shortage SYSTEM WILL BE TURNED OFF NO PAPER No printer paper NO SCANHEAD No connecting probe ERROR in Cable Connection Transducer cable error 3.10 Short key functions Short key Function ↓ Turns over another images of 12 images Enter + ← Regulates contrast of images on 4 steps Enter + ↑ Regulates LCD brightness to brighter Enter + ↓ Regulates LCD brightness to darker Mcube Technology Co., Ltd. www.mcubetech.co.kr Remark Displays 2 images on LCD Rotates 4 steps 30/41 User’s Manual for BioCon-500TM 3.11 Changing the thermal printer paper a. Open the printer cover as the left image. b. Grab a printer paper in one hand as the left image and slightly pull out the paper to insert in the paper cart by using the other hand. c. Close the printer cover after inserting papers in printer cart. 3.12 After Using the device The method of keeping the device after using -. After using the device, users should keep the normal environment with the temperature of 10℃~ 40℃ and the humidity of 0% ~ 80% RH in a clean room not exposed to the sun. -. Since the surface of the probe affects the result of data, users should take special caution not to scratch the surface of the Probe. -. Probe should be protected against external impacts when users move or keep the device Mcube Technology Co., Ltd. www.mcubetech.co.kr 31/41 User’s Manual for BioCon-500TM 4. Maintenance Experienced service providers are available for helping you with maintenance of the apparatus. We provide best quality services at any desired time. Even after the warranty period, we provide you routine or emergency services based on the service contract or on call. (1) Cleaning outer case (housing) of the system - Clean the outer case of the system with a soft, little moistened cloth. - When the case is heavily soiled by oil or dirt, use a little bit of a neutral detergent to clean. - Do not use chemicals (hydrochloric acid, bleach). (2) Periodically inspect the parts that are observable to you. (3) Always keep the environment clean and tidy to thus no dirt or foreign substance is present around the apparatus. (4) If the message, “BATTERY LOW RECHAGE BEFORE NEXT USE SYSTEM WILL BE TURNED OFF” pops up even with recharging over enough time (about 4 hours), then it indicates that the life of the battery is over. Thus, the battery should be replaced with new one. (5) If it seems to be an error or unreasonable value in scanned results, please contact the manufacturer or the agent for following: - Re-calibration for bladder scanning - With no improvement from re-calibration, then it needs inspection and repair from the manufacturer or the agent. Mcube Technology Co., Ltd. www.mcubetech.co.kr 32/41 User’s Manual for BioCon-500TM 5. Technical Descriptions 5.1 Acoustic Output Reporting Table 5.1.1 Definitions and Symbols p_ MPa The Peak Rarefactional Acoustic Pressure is the maximum of the modulus of the negative instantaneous acoustic pressure expressed as a positive number. ISPTA mW/cm 2 The maximum value of the temporal average derived intensity in an acoustic field. For systems in combined operating mode, the time interval over which the temporal average is taken is sufficient to include any period during which scanning may not be taking place. System settings User selectable system settings which may include Application, a SV and Focal Length. Ip mm This is the distance from the transducer output face to the point of maximum pulse-pressure-squared integral (or max mean square acoustic pressure for continuous pressure for CW) wpb6 (||) mm This is the -6dB pulse beamwidth in the beam axis (X) at the point of max pulse-pressure-squared integral (or max mean square acoustic pressure for continuous pressure for CW). If the beamwidths in X and Y differ than less than 10%, there is no need to specify both. For scanning modes, the beam-widths shall correspond to the central scan line only. wpb6 mm (_|_) This is the -6dB pulse beamwidth in the elevational axis (Y) at the point of max pulse-pressure-squared integral (or max mean square acoustic pressure for continuous pressure for CW). If the beamwidths in X and Y differ than less than 10%, there is no need to specify both. For scanning modes, the beam-widths shall correspond to the central scan line only. Prr kHz Pulse Repetition Rate is the rate of successive pulses or tonebursts and applies to single element non-scanning systems and automatic scanning systems. Mcube Technology Co., Ltd. www.mcubetech.co.kr 33/41 User’s Manual for BioCon-500TM Srr Hz Scan Repetition Rate is the rate of the same identical point of successive frames, sectors, or scans and applies to automatic scanning systems (modes) only. Output beam dimensions mm Output beam dimensions are the dimensions of the ultrasound b beam (-6dB pulse beamwidth) in a specified direction normal to the beam alignment axis and at the transducer output face. In scanning modes, these shall refer to the center scan line only. Fawf MHz The Arithmetic-mean Acoustic Working Frequency is the arithmetic mean of the frequencies f1 and f2 at which the amplitude of the spectrum of the acoustic signal first becomes 3dB lower than the peak amplitude. APF c % Acoustic Power-up Fraction is the ratio of the peak rarefactional acoustic pressure when the system is in Powerup mode to the maximum value of the the peak rarefactional acoustic pressure for any system settings of a specified mode of operation. This ratio is determined from measurements made at the position which yields the maximum pulse-pressure-squared integral (or maximum mean square acoustic pressure for CW) AIF d % Acoustic Power-up Fraction is the ratio of the peak rarefactional acoustic pressure when the system is in Initialization mode to the maximum value of the the peak rarefactional acoustic pressure for any system settings of a specified mode of operation. This ratio is determined from measurements made at the position which yields the maximum pulse-pressure-squared integral (or maximum mean square acoustic pressure for CW) Maximum power mW This is the Maximum Temporal Average power output. For e scanning modes, this shall be the total power output of all the acoustic pulses. Iob mW/cm 2 Output Beam Intensity is the temporal-average power output divided by the output beam area Power-up With the probe connected, cycle power on the system. Write mode down the mode to which the system powers up. Usually, it is “B” mode. Initialization f Write down “N/A “ where it denotes “system settings do not mode change on new patient entry” Mcube Technology Co., Ltd. www.mcubetech.co.kr 34/41 User’s Manual for BioCon-500TM Acoustic Write down “YES “ if the system is supplied with an output freeze output freeze facility. All Medison currently are supplied with this facility. Itt mm Transducer to Transducer output face distance is the distance along the beam alignment axis between the surface containing the active face of the transducer or elements and the transducer output face (usually the lens thickness) Its mm Transducer Standoff distance is the shortest distance between the transducer output face and the patient entry plane. The term “contact” is used to connate direct contact between the transducer output face and the patient. Inclusive Make a note of the Inclusive Modes for this particular declaration modes which are not being declared separately. 5.1.2 Results p_ (MPa) 0.305 2 ISPTA (mW/cm ) System settings 0.0313 a Ip (mm) wpb6 60.0 (||) (mm) 4.99 ( ) (mm) 5.85 prr (kHz) N/A srr (Hz) 6.00 b Output beam dimensions (mm) fawf (MHz) APF AIF c d 8.98 x 14.0 2.77 (%) 100 (%) <100 Maximum power e (mW) 2 Iob (mW/cm ) Power-up mode 0.279 0.222 B f Initialization mode N/A Acoustic output freeze Yes Mcube Technology Co., Ltd. www.mcubetech.co.kr 35/41 User’s Manual for BioCon-500TM Itt (mm) Its (mm) Contact Inclusive modes - a FZ – Focal zone; Penetration, General, Resolution – Frequency option b denotes diameter c Acoustic power-up fraction d Acoustic initialization fraction e Controllable by the user in 10% steps f System settings do not change on new patient entry 5.2 Index Value table 5.2.1 Definitions and Symbols MI the Mechanical Index TISscan the Soft Tissue Thermal Index in an auto-scanning mode TISnon-scan the Soft Tissue Thermal Index in a non-auto-scanning mode. TIB the Bone Thermal Index. TIC the Cranial Thermal Index. Aaprt the area of the active aperture (square centimeters). pr.3 the derated peak rarefactional pressure associated with the transmit pattern giving rise to the value reported under MI (megapascals) Wo For TIB and TIC: time average acoustic power at the source, in milliwatts. (Also see the definitions for W 01 and W 01x1 that follow.) For TIS scan, W o = W o1 + W o1x1 For TIS non–scan, W o = W o1x1 W o1: For scanning modes and/or scanning components of combinational modes: time average acoustic power at the source, per cm, in milliwatts. This is the acoustic power emitted from the central 1– cm length, in the scan direction, of the aperture corresponding to the scanned pulses. W o1x1: For non–scanning modes and/or non–scanning components of combinational modes: time average acoustic power at the source, 2 per cm , in milliwatts. This is the acoustic power emitted from the 2 central 1 cm of the active non–scanned aperture through which the highest acoustic power is being transmitted. Mcube Technology Co., Ltd. www.mcubetech.co.kr 36/41 User’s Manual for BioCon-500TM W .3(z1) the derated ultrasonic power at axial distance z1 (milliwatts). ITA.3(z1) the derated spatial-peak, temporal-average intensity at axial distance z1 (milliwatts per square centimeter). z1 the axial distance corresponding to the location of max[min(W .3(z), 2 ITA.3(z) x 1 cm )], where z = zbp (centimeters). zbp 1.69 Aaprt zsp For MI, (centimeters). the axial distance at which pr.3 is measured for TIB, the axial distance at which TIB is a maximum (i.e., zsp = zB.3) (centimeters). deq(z) the equivalent beam diameter as a function of axial distance z, and is 0.5 equal to [(4/ )(W o/ITA(z))] where ITA(z) is the temporal-average intensity as a function of z (centimeters). fc is the center frequency (MHz). For MI, fc is the center frequency associated with the transmit pattern giving rise to the maximum reported value of MI. For TI, for combined modes involving transmit patterns of unequal center frequency, fc is defined as the overall range of center frequencies of the respective transmit patterns. Dim. of Aaprt the active aperture dimensions for the azimuthal and elevational planes (centimeters). PD the pulse duration (microseconds) associated with the transmit pattern giving rise to the reported value of MI. PRF the pulse repetition frequency associated with the transmit pattern giving rise to the reported value of MI (Hz). pr@PIImax the peak rarefactional pressure at the point where the freefield, spatial-peak pulse intensity integral is a maximum (megapascals). See Section 6.2.4.1 of the Output Display Standard, entitled "Measurement Methodology for Mechanical and Thermal Indices". deq@PIImax the equivalent beam diameter at the point where the freefield, spatial-peak pulse intensity integral is a maximum (centimeters). See Section 6.2.5.1 of the Output Display Standard, entitled "Measurement Methodology for Mechanical and Thermal Indices". FL the focal length, or azimuthal and elevational lengths, if different (centimeters). Mcube Technology Co., Ltd. www.mcubetech.co.kr 37/41 User’s Manual for BioCon-500TM IPA.3@MImax the derated pulse average intensity at the point of maximum reported MI (Watts per square centimeter). 5.2.2 Results Index Label M.I. TIS TIB scan non- TIC scan Maximum Index Value 0.117 Pr.3 (MPa) Wo (mW) min of [W.3(z1),ITA.3(z1)] (mW) z1 (cm) Assoc Zbp (cm) Acoustic Zsp (cm) Parameter deq(zsp) (cm) fc (MHz) Dim of Aaprt 0.00367 0.00551 0.279 0.279 2.77 2.77 0.898 0.898 1.4 1.4 2.00 2.00 8.00 8.00 0.195 4.80 2.77 X (cm) Y (cm) PD (µsec) PRF (Hz) Pr@PIImax Other deq@PIImax (MPa) 0.726 *6 0.305 (cm) FLx Information Focal (cm) FLy Length (cm) Ipa.3 @MImax Control 1 Control 2 Mcube Technology Co., Ltd. www.mcubetech.co.kr (W/cm2) 1.25 MI TIS_as 38/41 User’s Manual for BioCon-500TM Operating Control 3 Control Control 4 Conditions Control 5 Control 6 Control 7 Notes: (a) This index is not required to this operating mode. (b) This probe is not intended for adult transcranial uses. (c) This formulation for TIS is less than that for an alternate formulation in this mode. (d) The maximum index value is less than 1.0 * PRF for scanning modes is the product of the frame rate and the number of pulse per line Mcube Technology Co., Ltd. www.mcubetech.co.kr 39/41 User’s Manual for BioCon-500TM 6. Specifications Item Features - 16V DC Adapter (Input : AC 100~240V 50/60Hz) - 7.4V(3.7V x 2): Battery Pack Power battery cell: Li-ion rechargeable, 3.7V, 2350 mAh (LG Chem., Ltd., Model ICR18650) - Scan: 1 hour and 30min – 1 scan in every 15sec Standby: 3 hour and 30min - 3D sector scan Ultrasound Probe - 2.8MHz ultrasound frequency - B-mode scan image - scan angle : 120° Printer - built in (50mm width) - speed : 5cm/sec 〃 STN LCD - 5.6 Display - 320×240 pixels - 16 ray levels - Bladder volume range: 0 - 999ml Range - Accuracy: ±20%,±20ml (0 - 699ml) ±25%,±25ml (700 - 999ml) Dimension External Interface - 340(L)×240(W)×49.9(H) mm - USB 2.0 basic Mcube Technology Co., Ltd. www.mcubetech.co.kr 40/41 User’s Manual for BioCon-500TM Symbols Type BF USB Caution Reference number Date of manufacture Serial number DC terminal Mcube Technology Co., Ltd. www.mcubetech.co.kr 41/41 Mcube Technology, Co., Ltd. Distributor Roon #803 Shinnae-technotown, 485, Sangbong-Dong, Chungnang-Gu, Seoul, 131-220, Korea Tel. : +82-2-3421-7780 Fax. : +82-2-3421-7076 E-mail : [email protected] Web site : www.mcubetech.co.kr MUM-BioCon 500(Rev. 4.6) Mcube Technology Co., Ltd. www.mcubetech.co.kr