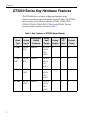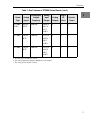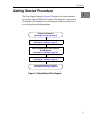
1
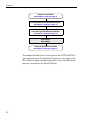
UM-17548-H
DT3000 Series
Getting Started Manual
Eighth Edition
May, 2005
Copyright © 2000 to 2005 by Data Translation,
Inc.
All rights reserved.
Information furnished by Data Translation, Inc.
is believed to be accurate and reliable; however,
no responsibility is assumed by Data
Translation, Inc. for its use; nor for any
infringements of patents or other rights of third
parties which may result from its use. No license
is granted by implication or otherwise under any
patent rights of Data Translation, Inc.
Use, duplication, or disclosure by the United
States Government is subject to restrictions as set
forth in subparagraph (c)(1)(ii) of the Rights in
Technical Data and Computer software clause at
48 C.F.R, 252.227-7013, or in subparagraph (c)(2)
of the Commercial computer Software Registered Rights clause at 48 C.F.R., 52-227-19 as
applicable. Data Translation, Inc., 100 Locke
Drive, Marlboro, MA 01752
Data Translation, Inc.
100 Locke Drive
Marlboro, MA 01752-1192
(508) 481-3700
www.datatranslation.com
Fax: (508) 481-8620
E-mail: [email protected]
Data Translation® is a registered trademark of
Data Translation, Inc. DT-Open LayersTM,
DataAcq SDKTM, Data Acquisition OMNI CDTM,
DT-LV LinkTM, DTx-EZTM, and DT VPITM are
trademarks of Data Translation, Inc.
All other brand and product names are
trademarks or registered trademarks of their
respective companies.
Table of Contents
About this Manual . . . . . . . . . . . . . . . . . . . . . . . . . . . . . . . . . vii
Intended Audience. . . . . . . . . . . . . . . . . . . . . . . . . . . . . . . . . . . . . . vii
How this Manual is Organized . . . . . . . . . . . . . . . . . . . . . . . . . . . vii
Conventions Used in this Manual . . . . . . . . . . . . . . . . . . . . . . . . viii
Where To Get Help. . . . . . . . . . . . . . . . . . . . . . . . . . . . . . . . . . . . . . . x
Chapter 1: Overview . . . . . . . . . . . . . . . . . . . . . . . . . . . . . . . . 1
DT3000 Series Key Hardware Features . . . . . . . . . . . . . . . . . . . . . . 2
DT3000 Series Software . . . . . . . . . . . . . . . . . . . . . . . . . . . . . . . . . . . 4
Getting Started Procedure. . . . . . . . . . . . . . . . . . . . . . . . . . . . . . . . . 5
Chapter 2: Preparing to Use a
DT3000 Series Board. . . . . . . . . . . . . . . . . . . . . . . . . . . . . . . . 7
Unpacking . . . . . . . . . . . . . . . . . . . . . . . . . . . . . . . . . . . . . . . . . . . . . . 9
Checking the System Requirements . . . . . . . . . . . . . . . . . . . . . . . 10
Installing the Software . . . . . . . . . . . . . . . . . . . . . . . . . . . . . . . . . . . 11
Viewing the DT3000 Series Documentation Online . . . . . . . . . . 13
Chapter 3: Installing the Board and Loading the Device Driver
15
Setting up the Computer . . . . . . . . . . . . . . . . . . . . . . . . . . . . . . . . . 17
Setting up an Expansion Slot . . . . . . . . . . . . . . . . . . . . . . . . . . . . . 18
Inserting the DT3000 Series Board into the Computer . . . . . . . . 19
Loading the Device Driver . . . . . . . . . . . . . . . . . . . . . . . . . . . . . . . 21
Windows 2000 . . . . . . . . . . . . . . . . . . . . . . . . . . . . . . . . . . . . . . 21
Windows XP. . . . . . . . . . . . . . . . . . . . . . . . . . . . . . . . . . . . . . . . 22
Chapter 4: Attaching and Configuring a Screw Terminal
Panel/ Backplane . . . . . . . . . . . . . . . . . . . . . . . . . . . . . . . . . . 23
iii
Contents
Using the DT730 or DT730-T Screw Terminal Panel . . . . . . . . . . 25
Attaching a DT730 or DT730-T Screw Terminal Panel . . . . 26
Configuring a DT730 or DT730-T Screw Terminal Panel . . 27
Jumpers . . . . . . . . . . . . . . . . . . . . . . . . . . . . . . . . . . . . . . . . 28
Configuring Jumper W1 - Common Ground Sense 28
Configuring Jumpers W2 and W3 - CJC . . . . . . . . . 29
Configuring Jumpers W4 to W7 - Analog Outputs on
the 5B01 or 7BP16-1 Backplane . . . . . . . . . . . . . . . . . 29
Resistors . . . . . . . . . . . . . . . . . . . . . . . . . . . . . . . . . . . . . . . 30
Configuring Resistors R1 to R32 - Input Bias Return
30
Configuring Resistors R33 to R64 - Current Shunt 31
Using 5B and 7B Series Conditioning Backplanes. . . . . . . . . . . . 32
Attaching a 5B Series Backplane . . . . . . . . . . . . . . . . . . . . . . . 32
Attaching a 7B Series Backplane . . . . . . . . . . . . . . . . . . . . . . . 33
Considerations When Using 5B or 7B Series Accessories . . 34
Chapter 5: Wiring Signals . . . . . . . . . . . . . . . . . . . . . . . . . . . 37
Before Wiring . . . . . . . . . . . . . . . . . . . . . . . . . . . . . . . . . . . . . . . . . . 39
Wiring Recommendations . . . . . . . . . . . . . . . . . . . . . . . . . . . . 39
DT730 and DT730-T Screw Terminal Assignments . . . . . . . 40
Connecting Analog Input Signals . . . . . . . . . . . . . . . . . . . . . . . . . 47
Connecting Single-Ended Voltage Inputs . . . . . . . . . . . . . . . 48
Connecting Pseudo-Differential Voltage Inputs . . . . . . . . . . 48
Connecting Differential Voltage Inputs . . . . . . . . . . . . . . . . . 49
Connecting Current Loop Inputs . . . . . . . . . . . . . . . . . . . . . . 52
Connecting Analog Output Signals. . . . . . . . . . . . . . . . . . . . . . . . 53
Connecting Digital I/O Signals . . . . . . . . . . . . . . . . . . . . . . . . . . . 54
Connecting Counter/Timer Signals . . . . . . . . . . . . . . . . . . . . . . . 56
Connecting Event Counting Signals. . . . . . . . . . . . . . . . . . . . 56
Connecting Frequency Measurement Signals. . . . . . . . . . . . 58
iv
Contents
Connecting Pulse Output Signals . . . . . . . . . . . . . . . . . . . . . . 59
Chapter 6: Verifying the Operation of a
DT3000 Series Board . . . . . . . . . . . . . . . . . . . . . . . . . . . . . . 61
Installing the Quick Data Acq Application . . . . . . . . . . . . . . . . . 63
Running the Quick Data Acq Application . . . . . . . . . . . . . . . . . . 64
Performing a Single-Value Analog Input Operation . . . . . . 65
Performing a Single-Value Analog Output Operation . . . . 65
Performing a Continuous Analog Input Operation. . . . . . . 66
Performing a Single-Value Digital Input Operation . . . . . . 67
Performing a Single-Value Digital Output Operation . . . . . 68
Performing a Frequency Measurement Operation. . . . . . . . 69
Performing a Pulse Output Operation. . . . . . . . . . . . . . . . . . 70
Appendix A: Using Your Own Screw Terminal Panel . . . . 71
Analog Inputs . . . . . . . . . . . . . . . . . . . . . . . . . . . . . . . . . . . . . . . . . . 73
Single-Ended Inputs . . . . . . . . . . . . . . . . . . . . . . . . . . . . . . . . . 73
Pseudo-Differential Inputs. . . . . . . . . . . . . . . . . . . . . . . . . . . . 74
Differential Inputs . . . . . . . . . . . . . . . . . . . . . . . . . . . . . . . . . . . 75
Analog Outputs . . . . . . . . . . . . . . . . . . . . . . . . . . . . . . . . . . . . . . . . 76
Digital Inputs and Counter/Timer Inputs . . . . . . . . . . . . . . . . . . 77
Digital Outputs . . . . . . . . . . . . . . . . . . . . . . . . . . . . . . . . . . . . . . . . . 78
v
Contents
vi
About this Manual
This manual describes how to set up and install the following
components:
• DT3000 Series software
• DT3000 Series board
• DT3000 Series device driver
• DT730 or DT730-T screw terminal panel
• 5B01 or 5B08 signal conditioning backplane
• 7BP16-1, 7BP08-1, or 7BP04-1 signal conditioning backplane
It also describes how to wire signals to the board and how to verify
the board’s operation using the Quick Data Acq application.
Intended Audience
This document is intended for engineers, scientists, technicians, or
others responsible for setting up a DT3000 Series board to perform
data acquisition operations. It is assumed that you are familiar with
the requirements of your application. It is also assumed that you are
familiar with Microsoft® Windows® 2000 or Windows XP.
How this Manual is Organized
This manual is organized as follows:
• Chapter 1, “Overview,” describes the key features of the DT3000
Series hardware and the DT3000 Series software, and provides an
overview of the DT3000 Series getting started procedure.
vii
About this Manual
• Chapter 2, “Preparing to Use a DT3000 Series Board,” describes
how to unpack the DT3000 Series package, check the system
requirements, install the DT3000 Series software, and view the
DT3000 Series documentation online.
• Chapter 3, “Installing the Board and Loading the Device Driver,”
describes how to install the DT3000 Series board and load the
DT3000 Series device driver.
• Chapter 4, “Attaching and Configuring a Screw Terminal Panel/
Backplane,” describes how to attach a DT730 or DT730-T screw
terminal panel to a DT3000 Series board, how to attach 5B or 7B
Series conditioning backplanes, and how to configure these
accessories for use with a DT3000 Series board.
• Chapter 5, “Wiring Signals,” describes how to wire signals to a
DT3000 Series board using the DT730 screw terminal panel.
• Chapter 6, “Verifying the Operation of a DT3000 Series Board,”
describes how to verify the operation of a DT3000 Series board
with the Quick Data Acq application
• Appendix A, “Using Your Own Screw Terminal Panel,”
describes additional considerations to keep in mind when
designing your own screw terminal panel for use with a DT3000
Series board.
An index completes this manual.
Conventions Used in this Manual
The following conventions are used in this manual:
• Notes provide useful information that requires special emphasis,
cautions provide information to help you avoid losing data or
damaging your equipment, and warnings provide information to
help you avoid catastrophic damage to yourself or your
equipment.
viii
About this Manual
• Items that you select or type are shown in bold.
• Courier font is used to represent source code.
Related Information
Refer to the following documents for more information on using the
DT3000 Series board:
• The DT3000 Series User’s Manual (UM-17546). Included on the
Data Acquisition OMNI CDTM provided with the DT3000 Series
board, this manual describes the features of the DT3000 Series
boards and the DT3000 Series Device Driver in detail.
• DT Measure Foundry Getting Started Manual (UM-19298) and
online help. These documents describe how to use DT Measure
Foundry™ to build drag-and-drop test and measurement
applications for Data Translation® data acquisition devices
without programming.
• DataAcq SDK Getting Started Manual (UM-18326). Included on the
Data Acquisition OMNI CD provided with the DT3000 Series
board, this manual describes how to develop your own
application program using the Microsoft C compiler and how to
use the DT-Open Layers DataAcq SDKTM to access the capabilities
of Data Translation data acquisition boards.
• DTx-EZ Getting Started Manual (UM-15428). This manual
describes how to use the ActiveX controls provided in DTx-EZTM
to access the capabilities of Data Translation data acquisition
boards in Microsoft Visual Basic® or Visual C++®.
• DT VPI User’s Manual (UM-16150). This manual describes how to
use DT VPITM and the Agilent® VEE™ visual programming
language to access the capabilities of Data Translation data
acquisition boards.
ix
About this Manual
• DT-LV Link Getting Started Manual (UM-15790). This manual
describes how to use DT-LV LinkTM with the LabVIEW®
graphical programming language to access the capabilities of
Data Translation data acquisition boards.
Where To Get Help
Should you run into problems installing or using a DT3000 Series
board, our Technical Support Department is available to provide
technical assistance. Refer to the DT3000 Series User’s Manual for
more information (refer to page 13 for more information on viewing
this manual). If you are outside the U.S. or Canada, call your local
distributor, whose number is listed on Data Translation’s web site
(www.datatranslation.com).
x
1
Overview
DT3000 Series Key Hardware Features . . . . . . . . . . . . . . . . . . . . . . 2
DT3000 Series Software . . . . . . . . . . . . . . . . . . . . . . . . . . . . . . . . . . . 4
Getting Started Procedure. . . . . . . . . . . . . . . . . . . . . . . . . . . . . . . . . 5
1
Chapter 1
DT3000 Series Key Hardware Features
The DT3000 Series is a family of high-performance, high
channel-count data acquisition boards for the PCI bus. The DT3000
Series consists of the following boards: DT3001, DT3001-PGL,
DT3002, DT3003, DT3003-PGL, DT3004, and DT3005. The key
features of these boards are listed in Table 1.
Table 1: Key Features of DT3000 Series Boards
2
Analog Input
Sample
Frequency
Analog
Input
Ranges
Analog
Outputs
Digital
I/O
Lines
Counter/
Timers
16 SE/
8 DI
330 kHz
±1.25 V,
±2.5 V,
±5 V,
±10 V
2b
8
1
DT3001PGLa
16 SE/
8 DI
330 kHz
±0.02 V,
±0.1 V,
±1 V,
±10 V
2b
8
1
DT3002a
32 SE/
16 DI
330 kHz
±1.25 V,
±2.5 V,
±5 V,
±10 V
0
8
1
DT3003a
64 SE/
32 DI
330 kHz
±1.25 V,
±2.5 V,
±5 V,
±10 V
2b
8
1
Board
Type
Analog
Inputs
DT3001a
Overview
Table 1: Key Features of DT3000 Series Boards (cont.)
Analog Input
Sample
Frequency
Analog
Input
Ranges
1
Analog
Outputs
Digital
I/O
Lines
Counter/
Timers
Board
Type
Analog
Inputs
DT3003PGLa
64 SE/
32 DI
330 kHz
±0.02 V,
±0.1 V,
±1 V,
±10 V
2b
8
1
1
DT3004c
16 SE/
8 DI
100 kHz
±1.25 V,
±2.5 V,
±5 V,
±10 V
2b
8
1
1
DT3005c
16 SE/
8 DI
200 kHz
±1.25 V,
±2.5 V,
±5 V,
±10 V
2b
8
1
a. The analog I/O resolution is 12 bits.
b. The analog output throughput is 200 kHz for each channel.
c. The analog I/O resolution is 16 bits.
1
1
1
1
1
1
3
Chapter 1
DT3000 Series Software
The DT3000 Series Software includes the following software
components, which are provided on the Data Acquisition OMNI CD:
• DT3000 Series Device Driver −You must install and load the
device driver to use a DT3000 Series board with any of the
supported software packages or utilities.
• The Quick Data Acq application −This application provides a
quick way to get a DT3000 Series board up and running. Using
the Quick Data Acq application, you can verify the features of the
board, display data on the screen, and save data to disk.
• DT3000 Series User’s Manual (in PDF format) −This manual
describes the features of the DT3000 Series boards and how to use
the DT3000 Series Device Driver with DT-Open Layers-compliant
software to write an application program.
• This manual (in PDF format).
• Adobe Acrobat Reader −Allows you to view and print the PDF
files.
Refer to page 11 for information on installing the software.
4
Overview
Getting Started Procedure
The flow diagram shown in Figure 1 illustrates the steps needed to
get started using a DT3000 Series board. This diagram is repeated in
each chapter; the shaded area in the diagram shows you where you
are in the getting started procedure.
Prepare to Use a Board
(see Chapter 2 starting on page 7)
1
1
1
Install the Board and Load the Device Driver
(see Chapter 3 starting on page 15)
Attach and Configure a Screw Terminal
Panel/Backplane
(see Chapter 4 starting on page 23)
Wire Signals
(see Chapter 5 starting on page 37)
Verify the Operation of the Board
(see Chapter 6 starting on page 61)
1
1
1
Figure 1: Getting Started Flow Diagram
1
1
1
5
Chapter 1
6
2
Preparing to Use a
DT3000 Series Board
Unpacking . . . . . . . . . . . . . . . . . . . . . . . . . . . . . . . . . . . . . . . . . . . . . . 9
Checking the System Requirements . . . . . . . . . . . . . . . . . . . . . . . 10
Installing the Software . . . . . . . . . . . . . . . . . . . . . . . . . . . . . . . . . . . 11
Viewing the DT3000 Series Documentation Online . . . . . . . . . . 13
7
Chapter 2
Prepare to Use a Board
(this chapter)
Install the Board and Load the Device Driver
(see Chapter 3 starting on page 15)
Attach and Configure a Screw Terminal
Panel and Signal Conditioning Backplane
(see Chapter 4 starting on page 23)
Wire Signals
(see Chapter 5 starting on page 37)
Verify the Operation of the Board
(see Chapter 6 starting on page 61)
8
Preparing to Use a DT3000 Series Board
Unpacking
Open the shipping box and remove the wrapped DT3000 Series
board.
CAUTION:
Keep the board in its protective antistatic bag until you are ready to
install it; this minimizes the likelihood of electrostatic damage.
2
2
2
Verify that the following items are present:
• DT3000 Series data acquisition board
2
• Data Acquisition OMNI CD
If an item is missing or damaged, contact Data Translation. If you are
in the United States, call the Customer Service Department at (508)
481-3700. An application engineer will guide you through the
appropriate steps for replacing missing or damaged items. If you are
located outside the United States, call your local distributor, listed on
Data Translation’s web site (www.datatranslation.com).
Once you have unpacked your board, check the system requirements,
as described in the next section.
2
2
2
2
2
9
Chapter 2
Checking the System Requirements
For reliable operation, your DT3000 Series board requires the
following minimum system requirements:
• An 80486, Pentium, or compatible processor
• At least one available PCI (revision 2.0-compliant or greater),
32-bit or 64-bit, +5 V expansion slot
• Microsoft Windows 2000 or Windows XP
• At least 32 MB available RAM
• At least one CD-ROM drive
• A VGA, or compatible, display (640 x 480 or higher, 256 colors
recommended)
Once you have verified that your system meets the system
requirements, install the software as described in the next section.
10
Preparing to Use a DT3000 Series Board
Installing the Software
2
CAUTION:
This version of the Data Acquisition OMNI CD provides
WDM-compliant device drivers and DLLs (version 5.0 or greater) for
the DT3000 Series boards. Other Data Translation boards/modules
may not provide WDM-compliant drivers.
You cannot use a DT3000 Series board at the same time as another
Data Translation board/module unless both devices provide
WDM-compliant drivers.
To install the software, perform the following steps:
1.
Insert the Data Acquisition OMNI CD into your CD-ROM drive.
Typically, the CD opens automatically. If the CD does not open
automatically, select Run from the Windows Start menu. Enter
x:\setup.exe (where x is the letter of your CD-ROM drive) in the Run
dialog box or use the Browse button to locate setup.exe, and then click
OK.
2.
From the Data Acquisition Software setup program, click Install
Drivers.
A list of items that you are about to install appears.
3.
Click Install now!
The DT-Open Layers Data Acquisition software wizard appears.
4.
Click Next.
The installer prompts you for the destination location.
5.
Either change the directory path and/or name using Browse or
accept the default directory (C\Program Files\Data Translation),
and then click Next.
The installer prompts you to begin file installation.
6.
Click Next.
The installer copies the files to the destination directory.
2
2
2
2
2
2
2
2
11
Chapter 2
12
7.
Click Finish.
The DT Data Acquisition Software setup program reappears.
8.
Click Quit Installer.
Preparing to Use a DT3000 Series Board
Viewing the DT3000 Series
Documentation Online
2
Note: To view the DT3000 Series documentation, you must have
Adobe Acrobat Reader 5.0 or greater installed on your system.
Acrobat Reader 6.0 is provided on the Data Acquisition OMNI CD.
If you install Acrobat Reader 6.0 from this CD, make sure that you
open Acrobat Reader and accept the license agreement before
viewing the documentation.
2
You can access the DT3000 Series documentation from the Hardware
Documentation program group. From the Windows Start menu, click
Programs|Data Translation, Inc|Hardware Documentation, and
then select the appropriate document.
2
The following may be helpful when using Adobe Acrobat Reader:
• To navigate to a specific section of the document, click a heading
from the table of contents on the left side of the document.
• Within the document, click the text shown in blue to jump to the
appropriate reference (the pointer changes from a hand to an
index finger).
• To go back to the page from which the jump was made, click the
right mouse button and Go Back, or from the main menu, click
Document, and then Go Back.
• To print the document, from the main menu, click File, and then
Print.
• To increase or decrease the size of the displayed document, from
the main menu, click View, and then Zoom.
• By default, text and monochrome images are smoothed in
Acrobat Reader, resulting in blurry images. If you wish, you can
2
2
2
2
2
2
13
Chapter 2
turn smoothing off by clicking File, and then
Preferences/General, and unchecking Smooth Text and Images.
14
3
Installing the Board and
Loading the Device Driver
Setting up the Computer . . . . . . . . . . . . . . . . . . . . . . . . . . . . . . . . . 17
Setting up an Expansion Slot . . . . . . . . . . . . . . . . . . . . . . . . . . . . . 18
Inserting the DT3000 Series Board into the Computer . . . . . . . . 19
Loading the Device Driver . . . . . . . . . . . . . . . . . . . . . . . . . . . . . . . 21
15
Chapter 3
Prepare to Use a Board
(see Chapter 2 starting on page 7)
Install the Board and Load the Device
Driver (this chapter)
Attach and Configure a Screw Terminal
Panel and Signal Conditioning Backplane
(see Chapter 4 starting on page 23)
Wire Signals
(see Chapter 5 starting on page 37)
Verify the Operation of the Board
(see Chapter 6 starting on page 61)
Note: All DT3000 Series boards are factory-calibrated and require
no further adjustment prior to installation. If you are using the
DT3000 Series board and decide later to recalibrate it, refer to the
DT3000 Series User’s Manual for instructions (see page 13 for
information on viewing this manual).
16
Installing the Board and Loading the Device Driver
Setting up the Computer
3
CAUTION:
To prevent electrostatic damage that can occur when handling
electronic equipment, use a ground strap or similar device when
performing this installation procedure.
To set up the computer, perform the following steps:
1.
Turn off the computer.
2.
Turn off all peripherals (printer, modem, monitor, and so on)
connected to the computer.
3.
Unplug the computer and all peripherals.
4.
Remove the cover from you computer. Refer to your computer’s
user manual for instructions.
3
3
3
3
3
3
3
3
17
Chapter 3
Setting up an Expansion Slot
Once you have set up the computer, set up an expansion slot by
performing the following steps:
1.
Select a 32-bit or 64-bit PCI expansion slot.
PCI slots are shorter than ISA or EISA slots and are usually white
or ivory. Commonly, three PCI slots (one of which may be a
shared ISA/PCI slot) are available. If an ISA board exists in the
shared slot, you cannot use the slot for a PCI board; if a PCI board
exists in the shared slot, you cannot use the slot for an ISA board.
2.
18
Remove the cover plate from the selected expansion slot. Retain
the screw that held it in place; you will use it later to install the
board.
Installing the Board and Loading the Device Driver
Inserting the DT3000 Series Board into the
Computer
Once you have set up an expansion slot, perform the following steps
to insert the DT3000 Series board into the computer:
1.
Discharge any static electricity by holding the wrapped board in
one hand while placing your other hand firmly on a metal
portion of the computer chassis.
2.
Carefully remove the antistatic packing material from the board.
(It is recommended that you save the original packing material in
the unlikely event that your board requires servicing in the
future.)
3.
Hold the board by its edges and do not touch any of the
components on the board.
4.
Position the board so that the cable connectors are facing the rear
of the computer, as shown in Figure 2.
DT3000
Series Board
3
3
3
3
3
Rear of Computer
3
3
PCI Expansion Slot Bus Connector
3
Figure 2: Inserting the DT3000 Series Board in the Computer
3
19
Chapter 3
5.
Carefully lower the board into the PCI expansion slot using the
card guide to properly align the board in the slot.
6.
When the bottom of the board contacts the bus connector, gently
press down on the board until it clicks into place.
CAUTION:
Do not force the board into place. Moving the board from side to side
during installation may damage the bus connector. If you encounter
resistance when inserting the board, remove the board and try again.
20
7.
Secure the board in place at the rear panel of the system unit
using the screw removed from the slot cover.
8.
Power up the computer.
9.
Follow the steps on page 21.
Installing the Board and Loading the Device Driver
Loading the Device Driver
To load the DT3000 Series device driver in
3
• Windows 2000, follow the steps on this page.
• Windows XP, follow the steps on page 22.
3
Windows 2000
Once you have installed the DT3000 Series driver from the Data
Acquisition OMNI CD, installed a DT3000 Series board, and powered
up the host computer, the New Hardware Found dialog box appears.
Perform the following steps to load the device driver in Windows
2000:
1.
Click Next.
2.
Click Search for a suitable driver for my device (recommended).
3.
Click Specify a location, and click Next.
4.
Browse to WinNT/System32/Drivers/DT3000.Inf, and then click
Open.
5.
Click OK.
6.
Click Next.
The files are copied.
7.
Click Finish.
Once the driver is loaded, perform the steps in Chapter 4 to attach
and configure the screw terminal panel and signal conditioning
backplane.
3
3
3
3
3
3
3
21
Chapter 3
Windows XP
Once you have installed the DT3000 Series driver from the Data
Acquisition OMNI CD, installed a DT3000 Series board, and powered
up the host computer, the New Hardware Found dialog box appears.
Perform the following steps to load the device driver in Windows XP:
1.
Click Next.
2.
Click Search for a suitable driver for my device (recommended).
3.
Click Specify a location, and click Next.
4.
Browse to Windows/System32/Drivers/DT3000.Inf, and then
click Open.
5.
Click OK.
6.
Click Next.
The files are copied.
7.
Click Finish.
Once the driver is loaded, perform the steps in Chapter 4 to attach
and configure the screw terminal panel and signal conditioning
backplane.
22
4
Attaching and Configuring a
Screw Terminal Panel/
Backplane
Using the DT730 or DT730-T Screw Terminal Panel . . . . . . . . . . 25
Using 5B and 7B Series Conditioning Backplanes. . . . . . . . . . . . 32
23
Chapter 4
Prepare to Use a Board
(see Chapter 2 starting on page 7)
Install the Board and the Device Driver
(see Chapter 3 starting on page 15)
Attach and Configure the Screw Terminal
Panel and Signal Conditioning Backplane
(this chapter)
Wire Signals
(see Chapter 5 starting on page 37)
Verify the Operation of the Board
(see Chapter 6 starting on page 61)
24
Attaching and Configuring a Screw Terminal Panel/ Backplane
Using the DT730 or DT730-T Screw
Terminal Panel
The DT730 and DT730-T screw terminal panels are accessory
products that provide convenient screw terminal connections for
DT3000 Series boards. The DT730 is a general-purpose screw terminal
panel providing analog, digital, counter/timer, external trigger, and
external clock connections. The DT730-T is the same as the DT730,
but also provides cold-junction compensation (CJC) for thermocouple
connections.
The DT730 and DT730-T provide a J1 connector for connecting to
your DT3000 Series board using the EP291 cable (included with the
screw terminal panel). The DT730 and DT730-T also provide a 26-pin,
J2 connector to allow connection to standard 5B and 7B Series signal
conditioning backplanes.
The following section describes how to attach a DT730 or DT730-T
screw terminal panel to a DT3000 Series board. The section on page
27 describes how to configure a DT730 or DT730-T screw terminal
panel for use with a DT3000 Series board.
4
4
4
4
4
4
4
4
4
25
Chapter 4
Attaching a DT730 or DT730-T Screw Terminal
Panel
To connect the DT730 or DT730-T screw terminal panel to a DT3000
Series board, perform the following steps:
1.
Plug one end of the EP291 flat ribbon cable into the connector at
the rear of the DT3000 Series board and the other end into the
DT730 or DT730-T, as shown in Figure 3.
DT3000 Series Board
Rear Panel Connector
J1 Connector
Ferrite Clamp
Computer
(Side View)
EP291 Cable
DT730 or
DT730-T
Figure 3: Connecting the DT730 or DT730-T to the DT3000 Series Board
2.
26
To reduce EMI emissions, place the ferrite clamp, shipped with
the DT3000 Series board, no more than six inches from the
DT3000 Series board connector. The ferrite clamp attaches to the
cable with an integral latch and grips the cable to prevent sliding.
Attaching and Configuring a Screw Terminal Panel/ Backplane
Configuring a DT730 or DT730-T Screw Terminal
Panel
Figure 4 illustrates the screw terminal and component locations for
the DT730 and DT730-T.
W2*
TB44 TB52 TB60
TB68
TB76
TB84
4
4
W3*
4
TB92 TB100
1
4
J2
TB37
J1
W1
W4
1 W5
Spare
Jumpers
TB1
R61
R29
R62
R30
R63
R31
R64
R32
TB45 TB53
R57
R53
R25
R21
R58
R54
R26
R22
R59
R55
R27
R23
R60
R56
R28
R24
TB61
R49
R17
R50
R18
R51
R19
R52
R20
TB69
R45
R13
R46
R14
R47
R15
R48
R16
TB77
R41
R9
R42
R10
R43
R11
R44
R12
TB85
R37
R5
R38
R6
R39
R7
R40
R8
TB93
R33
R1
R34
R2
R35
R3
R36
R4
4
W7
W6
R99*
TB27
TB36
TB10
TB16 TB17
TB26
*Jumpers W2 and W3, and
potentiometer R99 are on the
DT730-T only.
Figure 4: DT730 and DT730-T Screw Terminal Panels
4
4
4
4
27
Chapter 4
Jumpers
The DT730 and DT730-T screw terminal panels contain jumpers W1,
and W4 to W7. The DT730-T screw terminal panel also contains
jumpers W2 and W3. Jumper W1 provides the CJC circuitry, and
jumpers W4 to W7 are associated with analog outputs on the 5B01
and 7BP16-1 signal conditioning backplanes. The following
subsections describe these jumpers.
Note: The screw terminal panels were initially shipped with
enough jumper plugs to select every possible configuration. Spare
jumper plugs are stored on the panel itself (on the posts marked
spare). Save these jumper plugs for future use.
Configuring Jumper W1 - Common Ground Sense
Jumper W1 is installed when the board is shipped from the factory.
This jumper connects Amp Low (TB35) to Analog Ground (TB36) on
the screw terminal panel. Amp Low is connected to the low side of
the board’s input amplifier.
When connecting pseudo-differential analog inputs directly to the
screw terminal panel, remove jumper W1 and connect Amp Low to a
remote common-mode voltage to reject offset voltages common to all
64 input channels. Refer to page 49 for an example of using jumper
W1.
Note: If you are using a 5B Series backplane, install jumper W3 on
the backplane to connect Amp Low to Analog Ground on the
backplane.
28
Attaching and Configuring a Screw Terminal Panel/ Backplane
Configuring Jumpers W2 and W3 - CJC
The DT730-T screw terminal panel is provided for thermocouple
connections and includes a CJC circuit for measuring temperature at
the connector blocks on the screw terminal panel. Power is derived
from ±Vcc on the DT3000 Series board.
Installing jumpers W2 and W3 connects the CJC circuit to channel 0.
Jumper W2 connects the temperature sensor to channel 0 high;
jumper W3 connects channel 0 low to analog ground.
The output is 0.50 mV/° C or 12.5 mV at 25° C.
After scaling for the gain and thermocouple type, you must add this
voltage to the thermocouple voltage to remove the offset created by
the temperature of the screw terminal panel when measuring
thermocouple inputs on the DT730-T directly.
Note: 5B and 7B thermocouple modules provide their own CJC and
return a voltage that already compensates for the CJC. Therefore, if
you are using the DT730-T with a 5B or 7B thermocouple module,
you do not have to compensate for offsets as you do when
measuring thermocouples on the DT730-T directly.
4
4
4
4
4
4
Configuring Jumpers W4 to W7 - Analog Outputs on the 5B01 or
7BP16-1 Backplane
4
Note: You cannot use analog output modules on the 5B08, 7BP08-1,
or 7BP04-1 backplane.
4
Jumpers W4 to W7 are provided if you are using the DT730 or
DT730-T screw terminal panel with analog output modules on a 5B01
or 7BP16-1 signal conditioning backplane.
4
29
Chapter 4
Install jumpers W4 and W5 to connect DAC0 from the data
acquisition board to channel 14 on the 5B01 or 7BP16-1 backplane.
Jumper W4 connects DAC0 to channel 14; jumper W5 connects
DAC0’s return.
Install jumpers W6 and W7 to connect DAC1 from the data
acquisition board to channel 15 on the 5B01 or 7BP16-1 backplane.
Jumper W6 connects DAC0 to channel 15; jumper W7 connects
DAC1’s return.
Note: If you are using analog output modules on the 5B01or
7BP16-1 backplane, ensure that you make no connections to the
screw terminals corresponding to that signal on the screw terminal
panel. For example, if you are using channel 14 on the 5B01 for
analog output, do not use screw terminals corresponding to DAC0
on the screw terminal panel. You can read the output of the DACs as
inputs.
Resistors
Locations are provided on the DT730 and DT730-T for user-installed
bias return and current shunt resistors. (Resistors must be 1/4 W
size.) The following subsections describe these resistors and their use.
Configuring Resistors R1 to R32 - Input Bias Return
Differential mode permits low-level signal measurement by limiting
common-mode input noise. This mode provides a separate return
path for each channel.
For floating signal sources, where the voltage source has no
connection with earth ground, you need to provide a bias return path
by adding input bias return resistors. Input bias resistors R1 through
R32 connect the low sides of channels 0 to 31 to analog ground, where
R1 corresponds to channel 0 and R32 corresponds to channel 31.
30
Attaching and Configuring a Screw Terminal Panel/ Backplane
When input bias resistors are installed for an analog input channel,
the high (or positive) side of the analog input channel returns the
source input impedance through the bias return resistor to the low
side of the channel, and then to analog ground.
4
Typical resistor values are 1 kΩ to 100 kΩ depending on the
application. Refer to page 50 for an example of using an input bias
return resistor.
4
Configuring Resistors R33 to R64 - Current Shunt
4
In single-ended mode, inputs share a common return path.
Single-ended connections should be restricted to applications with
high-level voltage inputs and short lead lengths.
Current shunt resistors R33 to R64 connect the high side of analog
input channels 0 to 31 to the low side of each input. Resistor R33
corresponds to analog input channel 0; resistor R64 corresponds to
analog input channel 31. Current shunt resistors typically convert 4 to
20 mA to 1 to 5 V for A/D conversion.
Note that, depending on your application, a bias current return
resistor may also be required in addition to the current shunt resistor.
The typical current shunt resistor value is 250 Ω. If, for example, you
add a 250 Ω resistor to location R33 and connect a 4 to 20 mA current
loop input to channel 0, the input range for channel 0 is converted to
1 to 5 V. Refer to page 52 for an example of using a current shunt
resistor.
4
4
4
4
4
4
31
Chapter 4
Using 5B and 7B Series Conditioning
Backplanes
This section describes how to attach a 5B or 7B Series signal
conditioning backplane to a DT730 or DT730-T screw terminal panel
and considerations when using signal conditioning accessories with
DT3000 Series boards.
Attaching a 5B Series Backplane
To connect a 5B Series signal conditioning backplane to the DT730 or
DT730-T screw terminal panel, perform the following steps while
referring to Figure 5:
J2 Connector
DT730 or
DT730-T
To DT3000
Series board
5B01 or 5B08
AC1315
Cable
PWR-977
Power Supply
To wall outlet
Figure 5: Connecting the 5B Series Backplane to the
DT730 or DT730-T Screw Terminal Panel
32
1.
Plug one end of the AC1315 cable into the J2 connector of the
DT730 or DT730-T screw terminal panel.
2.
Plug the other end of the AC1315 cable into the 26-pin connector
on the 5B Series backplane.
Attaching and Configuring a Screw Terminal Panel/ Backplane
3.
Connect power supply PWR-977 to the +5 V and power ground
screw terminals on the 5B Series backplane and to the wall outlet.
4
Attaching a 7B Series Backplane
To connect a 7B Series signal conditioning backplane to the DT730 or
DT730-T screw terminal panel, perform the following steps while
referring to Figure 6:
J2 Connector
To DT3000
Series board
4
AC1393
Adapter Cable
DT730 or
DT730-T
7BP16-1, 7BP08-1,
7BP04-1
AC1315
Cable
4
HES14-21
Power Supply
4
4
To wall outlet
Figure 6: Connecting the 7B Series Backplane to the DT730 or DT730-T
Screw Terminal Panel
1.
Plug one end of the AC1315 cable into the J2 connector of the
DT730 or DT730-T screw terminal panel.
2.
Plug the other end of the AC1315 cable into the 26-pin connector
of the AC1393 adapter cable; then, attach the 25-pin connector of
the AC1393 adapter cable to the 7B Series backplane.
3.
4
4
4
Connect power supply HES14-21 to the V+A and COM screw
terminals on the 7B Series backplane and to the wall outlet.
4
33
Chapter 4
Considerations When Using 5B or 7B Series
Accessories
When using the DT730 or DT730-T screw terminal panel with 5B or
7B Series signal conditioning accessories, keep the following
considerations in mind:
• Configure your DT3000 Series board to use single-ended mode.
You must remove jumper W1 on the DT730 or DT730-T screw
terminal panel, as described on page 28. If you are using a 5B
Series backplane, you must also install jumper W3 on the 5B
Series backplane to connect Amp Low to Analog Ground.
• The 5B08 and 7BP08-1 map to single-ended analog input
channels 0 to 7, and the 7BP04-1 maps to single-ended analog
input channels 0 to 3. If you are using a signal conditioning
module for an analog input channel, ensure that you connect the
analog input signal to the module on the signal conditioning
backplane. For channels that do not use signal conditioning,
connect the analog input signals to the DT730 or DT730-T screw
terminal panel.
• By default, the 5B01 and 7BP16-1 backplanes map to
single-ended analog input channels 0 to 15. However, by
configuring jumpers W4 to W7 on the DT730 or DT730-T, as
described on page 29, you can use channels 14 and 15 on the 5B01
or 7BP16-1 backplane as analog output channels 0 and 1.
Note: You cannot use analog output modules on the 5B08,
7BP08-1, or 7BP04-1 backplane.
• 5B thermocouple modules provide their own CJC and return a
voltage that already compensates for CJC. Therefore, when using
5B Series modules, you do not have to compensate for offsets as
you do when measuring thermocouples on the DT730-T directly.
34
Attaching and Configuring a Screw Terminal Panel/ Backplane
• The output of many 5B modules is ±5 V. The output of many 7B
modules is 0 to 10 V. Ensure that you select an input range that
matches the output of the 5B or 7B modules that you are using.
For example, if you are using 5B modules that have an output of
±5 V, use a bipolar input range and a gain of 2 on the DT300
Series board.
• Connect all unused inputs to analog common. Reading an open
channel can cause settling problems on the next valid channel.
• Refer to the user’s manuals and data sheets for the 5B and 7B
Series for more information.
4
4
4
4
4
4
4
4
4
35
Chapter 4
36
5
Wiring Signals
Before Wiring . . . . . . . . . . . . . . . . . . . . . . . . . . . . . . . . . . . . . . . . . . 39
Connecting Analog Input Signals . . . . . . . . . . . . . . . . . . . . . . . . . 47
Connecting Analog Output Signals. . . . . . . . . . . . . . . . . . . . . . . . 53
Connecting Digital I/O Signals . . . . . . . . . . . . . . . . . . . . . . . . . . . 54
Connecting Counter/Timer Signals . . . . . . . . . . . . . . . . . . . . . . . 56
37
Chapter 5
Prepare to Use a Board
(see Chapter 2 starting on page 7)
Install the Board and Load the Device Driver
(see Chapter 3 starting on page 15)
Attach and Configure the Screw Terminal
Panel and Signal Conditioning Backplane
(see Chapter 4 starting on page 23)
Wire Signals
(this chapter)
Verify the Operation of the Board
(see Chapter 6 starting on page 61)
This chapter describes how to wire signals to the DT730 or DT730-T
screw terminal panel. For information on how to wire signals to the
5B or 7B Series signal conditioning modules, refer to the data sheets
and user’s manuals for the 5B and 7B Series.
38
Wiring Signals
Before Wiring
This section describes wiring recommendations and the pin
assignments of the DT730 and DT730-T screw terminal panel.
CAUTION:
To avoid electrical damage, ensure that power is turned off to the
computer and to any attached devices before wiring signals to the
STP3000 Screw terminal panel.
Wiring Recommendations
5
5
5
5
Keep the following recommendations in mind when wiring signals to
the DT730 or DT730-T screw terminal panel:
• Use individually shielded twisted-pair wire (size 14 to 26 AWG)
when using the DT3000 Series board in highly noisy electrical
environments.
• Separate power and signal lines by using physically different
wiring paths or conduits.
• To avoid noise, do not locate the DT730 or DT730-T screw
terminal panel and cabling next to sources that produce high
electromagnetic fields, such as large electric motors, power lines,
solenoids, and electric arcs, unless the signals are enclosed in a
metal shield.
• Connect the analog shield to screw terminals TB35, TB36, and
TB51 through TB56 on the DT730 or DT730-T screw terminal
panel.
• Connect the digital shield to the digital ground screw terminals
on the screw terminal panel.
• Connect the analog and digital shields to one end only (either at
the DT730, DT730-T, or the signal source).
5
5
5
5
5
39
Chapter 5
• When first installing the board, it is recommended that you do
the following:
− Wire a function generator or a known voltage source to analog
input channel 0 (use the differential configuration).
− Wire an oscilloscope or voltage meter to analog output
channel 0.
− Wire a digital input to digital I/O Port A.
− Wire a external clock or scope to counter/timer channel 0.
− If you have not done so already, install the DT3000 Series
software.
− Run the Quick Data Acq application (described in Chapter 6
starting on page 61) to verify that the board is operating
properly.
− Once you have determined that the board is operating
properly, wire the signals according to your application’s
requirements.
DT730 and DT730-T Screw Terminal Assignments
Table 2 describes each of the screw terminal assignments and
identifies the resistors that are associated with each channel.
40
Wiring Signals
Table 2: Screw Terminal Descriptions and Resistor Use
for the DT730 and DT730-T
Screw
Terminal
Numbera
Signal Name
Single-Ended
Differential
1
Digital Ground
2
Digital Ground
3
UCLK_OUT
4
IADCLK0
5
USER_GATE
6
EADTRIG/EDATRIG
7
USER_CLK1
8
EADCLK1
9
Digital Ground
10
Digital Ground
11
RESERVED
12
RESERVED
13
+5V_OUT
14
+5V_OUT
15
Digital Ground
16
Digital Ground
17
DIG_IOB3
18
DIG_IOA3
5
Resistor Used
Bias Return
Current Shunt
5
Not Applicable
5
5
5
5
5
5
5
41
Chapter 5
Table 2: Screw Terminal Descriptions and Resistor Use
for the DT730 and DT730-T (cont.)
Screw
Terminal
Numbera
42
Signal Name
Single-Ended
Differential
19
DIG_IOB2
20
DIG_IOA2
21
DIG_IOB1
22
DIG_IOA1
23
DIG_IOB0
24
DIG_IOA0
25
Digital Ground
26
Digital Ground
27
−15V_OUT
28
+15V_OUT
29
Analog Common
30
Analog Common
31
DAC1_GND
32
DAC1_OUT
33
DAC0_GND
34
DAC0_OUT
Resistor Used
Bias Return
Current Shunt
Not Applicable
Wiring Signals
Table 2: Screw Terminal Descriptions and Resistor Use
for the DT730 and DT730-T (cont.)
Screw
Terminal
Numbera
Signal Name
Single-Ended
Differential
35
Amp Low
36
Analog Gnd
37
AIN63
AIN31_L
38
AIN55
AIN31_H
39
AIN62
AIN30_L
40
AIN54
AIN30_H
41
AIN61
AIN29_L
42
AIN53
AIN29_H
43
AIN60
AIN28_L
44
AIN52
AIN28_H
45
AIN59
AIN27_L
46
AIN51
AIN27_H
47
AIN58
AIN26_L
48
AIN50
AIN26_H
49
AIN57
AIN25_L
50
AIN49
AIN25_H
51
AIN56
AIN24_L
52
AIN48
AIN24_H
53
AIN47
AIN23_L
54
AIN39
AIN23_H
5
Resistor Used
Bias Return
Current Shunt
Note:
Jumper W1 Connects Amp Low to
Analog Gnd
R32
R64
R31
R63
5
5
5
R30
R62
5
R29
R61
R28
R60
5
R27
R59
R26
5
R58
R25
R57
5
R24
R56
5
43
Chapter 5
Table 2: Screw Terminal Descriptions and Resistor Use
for the DT730 and DT730-T (cont.)
44
Screw
Terminal
Numbera
Signal Name
Resistor Used
Single-Ended
Differential
Bias Return
55
AIN46
AIN22_L
R23
56
AIN38
AIN22_H
57
AIN45
AIN21_L
58
AIN37
AIN21_H
59
AIN44
AIN20_L
60
AIN36
AIN20_H
61
AIN43
AIN19_L
62
AIN35
AIN19_H
63
AIN42
AIN18_L
64
AIN34
AIN18_H
65
AIN41
AIN17_L
66
AIN33
AIN17_H
67
AIN40
AIN16_L
68
AIN32
AIN16_H
69
AIN31
AIN15_L
70
AIN23
AIN15_H
71
AIN30
AIN14_L
72
AIN22
AIN14_H
73
AIN29
AIN13_L
74
AIN21
AIN13_H
Current Shunt
R55
R22
R54
R21
R53
R20
R52
R19
R51
R18
R50
R17
R49
R16
R48
R15
R47
R14
R46
Wiring Signals
Table 2: Screw Terminal Descriptions and Resistor Use
for the DT730 and DT730-T (cont.)
Screw
Terminal
Numbera
Signal Name
Single-Ended
Differential
Bias Return
75
AIN28
AIN12_L
R13
76
AIN20
AIN12_H
77
AIN27
AIN11_L
78
AIN19
AIN11_H
79
AIN26
AIN10_L
80
AIN18
AIN10_H
81
AIN25
AIN09_L
82
AIN17
AIN09_H
83
AIN24
AIN08_L
84
AIN16
AIN08_H
85
AIN15
AIN07_L
86
AIN07
AIN07_H
87
AIN14
AIN06_L
88
AIN06
AIN06_H
89
AIN13
AIN05_L
90
AIN05
AIN05_H
91
AIN12
AIN04_L
92
AIN04
AIN04_H
93
AIN11
AIN03_L
94
AIN03
AIN03_H
5
Resistor Used
Current Shunt
5
R45
R12
R44
5
R11
R43
5
R10
R42
R9
R41
5
R8
R40
5
R7
R39
5
R6
R38
R5
R37
5
R4
R36
5
45
Chapter 5
Table 2: Screw Terminal Descriptions and Resistor Use
for the DT730 and DT730-T (cont.)
Screw
Terminal
Numbera
Signal Name
Resistor Used
Single-Ended
Differential
Bias Return
95
AIN10
AIN02_L
R3
96
AIN02
AIN02_H
97
AIN09
AIN01_L
98
AIN01
AIN01_H
99
AIN08
AIN00_L
100
AIN00
AIN00_H
R35
R2
R34
R1
a. The screw terminal assignments match the pin numbers of the J1 connector.
46
Current Shunt
R33
Wiring Signals
Connecting Analog Input Signals
The DT730 screw terminal panel supports both voltage and current
loop inputs. You can connect analog input voltage signals to the
DT730 in the following configurations:
• Single-ended −Choose this configuration when you want to
measure high-level signals, noise is not significant, the source of
the input is close to the DT730 or DT730-T screw terminal panel,
and all the input signals are referred to the same common
ground. When you choose the single-ended configuration, all 32
analog input channels are available.
• Pseudo-Differential −Choose this configuration when noise or
common-mode voltage (the difference between the ground
potential of the signal source and the ground of the DT730 or
DT730-T screw terminal panel or the difference between the
grounds of other signals) exists and the differential configuration
is not suitable for your application. This option provides less
noise rejection than the differential configuration; however, all 32
analog input channels are available.
• Differential −Choose this configuration when you want to
measure low-level signals (less than 1 V), you are using an A/D
converter with high resolution (> 12 bits), noise is a significant
part of the signal, or common-mode voltage exists and you want
the most noise rejection. When you choose the differential
configuration, 16 analog input channels are available.
Note: It is recommended that you connect all unused analog input
channels to analog ground.
This section describes how to connect single-ended,
pseudo-differential, and differential voltage inputs, as well as current
loop inputs to the DT730 or DT730-T screw terminal panel.
5
5
5
5
5
5
5
5
5
47
Chapter 5
Connecting Single-Ended Voltage Inputs
Figure 7 shows how to connect single-ended voltage inputs (channels
0, 1, and 8, in this case) to the DT730 and DT730-T screw terminal
panel.
TB36
+
Vin 0
+
Signal
Source
Analog In 0
Analog In 8
Jumper W1
Installed
W1
TB35
Analog In 1
Vin 8
+
Vin 1
TB100
TB98
TB99
Analog Ground
DT730 or
DT730-T
Panel
Figure 7: Connecting Single-Ended Voltage Inputs
(Shown for Channels 0, 1, and 8)
Connecting Pseudo-Differential Voltage Inputs
Figure 8 shows how to connect pseudo-differential voltage inputs
(channels 0, 1, and 8, in this case) to the DT730 or DT730-T screw
terminal panel.
48
Wiring Signals
Signal Source
-
+
VIN 0
-
Analog Ground
Analog In 8
+
TB35
Analog In 1
VIN 8
+
VIN 1
*
5
TB36
Analog In 0
DT730
or
DT730-T
Panel
5
TB100
TB98
TB99
5
Remove Jumper W1 to use Amp
Low as a remote ground sense.
VCM
5
*Make this connection as close to VIN sources as
possible to reduce ground loop errors.
Vcm is the common mode voltage for all 64
analog inputs.
5
Figure 8: Connecting Pseudo-Differential Voltage Inputs
(Shown for Channels 0, 1, and 8)
5
Connecting Differential Voltage Inputs
Figure 9A illustrates how to connect a floating signal source to the
DT730 or DT730-T screw terminal panel using differential inputs and
a bias return resistor.
In Figure 9B, the signal source itself provides the bias return path;
therefore, you do not need to use bias return resistors. Rs is the signal
source resistance while Rv is the resistance required to balance the
bridge. Note that the negative side of the bridge supply must be
returned to analog ground.
5
5
5
49
Chapter 5
A)
TB36
+
Floating
Signal
Source
Analog In 0
TB99
TB100
Rs
DT730
or
DT730-T
Panel
Analog In 0
Return
-
Rb
Analog Ground
B)
Use resistor R1 to connect
the low side of channel 0 to
analog ground.
Analog In 0
Return
TB36
Bridge
Rv
TB99
Rs
TB100
Analog In 0
DT730
or
DT730-T
Panel
-
+
DC Supply
Analog Ground
Figure 9: Connecting Differential Voltage Inputs (Shown for Channel 0) with
and without Input Bias Return Resistors
Note that since they measure the difference between the signals at the
high (+) and low (−) inputs, differential connections usually cancel
any common-mode voltages, leaving only the signal. However, if you
are using a grounded signal source and ground loop problems arise,
connect the differential signals to the DT730 or DT730-T screw
terminal panel as shown in Figure 10, using an input bias return
50
Wiring Signals
resistor if the external ground signal is floating. In this case, make
sure that the low side of the signal (−) is connected to ground at the
signal source, not at the DT730 or DT730-T screw terminal panel, and
do not tie the two grounds together.
5
5
+
Grounded
Signal
Source
Analog In 0
TB99
Es
Analog In 0
Return
Signal Source
Ground Vg1
TB100
DT730 or
DT730-T
Panel
R1
TB36
Install resistor R1 for bias return if the
external ground is floating.
Figure 10: Connecting Differential Voltage Inputs from a Grounded Signal
Source (Shown for Channel 0)
5
5
5
5
5
5
5
51
Chapter 5
Connecting Current Loop Inputs
Figure 11 shows how to connect a current loop input (channel 0, in
this case) to the DT730 or DT730-T screw terminal panel.
+VCC
4 to 20 mA
Analog Input 0
TB36
TB99
Analog Input 0
Return
TB100
R33
DT730
or DT730-T
Panel
Analog Ground
Use current shunt resistor R33 to convert current to
voltage; 250 Ω for 4 to 20 mA = 1 to 5 V.
If needed, also use resistor R1 to provide a bias return
path.
Figure 11: Connecting Current Inputs to the DT730 or DT730-T Screw
Terminal Panel (Shown for Channel 0)
52
Wiring Signals
Connecting Analog Output Signals
Figure 12 shows how to connect an analog output voltage signal
(channel 0, in this case) to the DT730 screw terminal panel.
5
5
5
Analog Output 0
Load
Analog Output 0 Ground
TB34
TB33
DT730 or DT730-T
Panel
5
Figure 12: Connecting Analog Output Voltages (Shown for Channel 0)
5
5
5
5
5
53
Chapter 5
Connecting Digital I/O Signals
Figure 13 shows how to connect a digital input signal (channels 0 and
1 of digital port A, in this case) to the DT730 or DT730-T screw
terminal panel.
Digital I/O Port A, Line 1
TTL Inputs
Digital I/O Port A, Line 0
Digital Ground
TB22
TB24
TB25
DT730 or DT730-T
Panel
Figure 13: Connecting Digital Inputs
(Channels 0 and 1, Port A Shown)
Figure 14 shows how to connect a digital output signal (channel 0 of
digital port 1, in this case) to the DT730 or DT730-T screw terminal
panel.
54
Wiring Signals
5
0 Out = LED On
Digital I/O Bank B, Line 0
+
500
5V
Ω
5
TB23
Digital Ground
TB25
-
DT730 or DT730-T
Panel
Figure 14: Connecting Digital Outputs
(Channel 0, Port 1 Shown)
5
5
5
5
5
5
5
55
Chapter 5
Connecting Counter/Timer Signals
The DT3000 Series board and DT730 screw terminal panel provide
one user counter/timer channel that you can use to perform the
following operations:
• Event counting
• Frequency measurement
• Pulse output (rate generation, one-shot, and repetitive one-shot)
This section describes how to connect counter/timer signals to
perform these operations. Refer to the DT3000 Series User’s Manual for
more information on using the counter/timers.
Connecting Event Counting Signals
Figure 15 shows one example of connecting event counting signals to
the DT730 or DT730-T screw terminal panel. In this example, clock
edges are counted while the gate is active.
56
Wiring Signals
Digital Ground
External
Gating
Switch
Gate Input
TB1
TB5
5
5
TB7
TB9
User Clock Input
Signal Source
DT730 or
DT730-T
Panel
5
5
Digital Ground
Figure 15: Connecting Event Counting Signals
(Shown Using an External Gate)
Figure 16 shows another example of connecting event counting
signals to the DT730 or DT730-T screw terminal panel. In this
example, a software gate is used to start the event counting operation.
5
5
5
5
5
57
Chapter 5
TB1
Digital Ground
Signal Source
TB7
User Clock Input
DT730 or
DT730-T
Panel
Figure 16: Connecting Event Counting Signals
without an External Gate Input
Connecting Frequency Measurement Signals
On the DT3000 Series, a frequency measurement application uses the
same wiring as an event counting application that does not use an
external gate signal (see Figure 16).
The software uses the Windows timer to specify the duration of the
frequency measurement. The frequency of the clock input is the
number of counts divided by the duration of the Windows timer.
58
Wiring Signals
Connecting Pulse Output Signals
Figure 17 shows one example of connecting pulse output signals to
the DT730 or DT730-T screw terminal panel using an external gate
type.
5
5
Digital Ground
Heater
Controller
TB3
User Counter Output
External
Gating
Switch
TB1
Gate Input
5
TB5
TB7
5
TB9
Digital Ground
DT730 or
DT730-T
Panel
Figure 17: Connecting Pulse Output Signals
(Using an External Gate)
Figure 18 shows another example of connecting a pulse output
operation to the DT730 or DT730-T screw terminal panel using a
software gate type.
5
5
5
5
5
59
Chapter 5
Digital Ground
TB1
Heater
Controller
TB3
User Counter Output
TB5
TB7
User Clock Input 0
Signal Source
DT730 or
DT730-T
Panel
Digital Ground
Figure 18: Connecting Pulse Output Signals
(Using an External Gate)
60
TB9
6
Verifying the Operation of a
DT3000 Series Board
Installing the Quick Data Acq Application . . . . . . . . . . . . . . . . . 63
Running the Quick Data Acq Application . . . . . . . . . . . . . . . . . . 64
61
Chapter 6
Prepare to Use a Board
(see Chapter 2 starting on page 7)
Install the Board and Load the Device Driver
(see Chapter 3 starting on page 15)
Attach and Configure the Screw Terminal
Panel and Signal Conditioning Backplane
(see Chapter 4 starting on page 23)
Wire Signals
(see Chapter 5 starting on page 37)
Verify the Operation of the Board
(this chapter)
You can verify the operation of a DT3000 Series board using the
Quick Data Acq application. Quick Data Acq allows you to do the
following:
• Acquire data from a single analog input channel or digital input
port
• Acquire data continuously from one or more analog input
channels using an oscilloscope, strip chart, or Fast Fourier
Transform (FFT) view
• Measure the frequency of events
• Output data from a single analog output channel or digital
output port
• Output pulses either continuously or as a one-shot
• Save the input data to disk
62
Verifying the Operation of a DT3000 Series Board
Installing the Quick Data Acq Application
The Quick Data Acq application is installed automatically when you
install the driver software. See “Installing the Software” on page 11.
6
6
6
6
6
6
6
6
6
63
Chapter 6
Running the Quick Data Acq Application
To run the Quick Data Acq application, perform the following steps:
1.
If you have not already done so, power up your computer and
any attached peripherals.
2.
Select Quick Data Acq from the Data Translation, Inc\Quick
Data Acq program group.
Note: The Quick Data Acq application allows you to verify basic
operations on the board; however, it may not support all of the
board’s features.
For information on each of the features provided, use the online help
for the Quick Data Acq application by pressing F1 from any view or
selecting the Help menu. If the system has trouble finding the help
file, navigate to C:\Program Files\Data Translation, Inc\
Quick Data Acq\Qkdataacq.hlp, where C: is the letter of your hard
disk drive.
For detailed information on the supported features of the board,
refer to the DT3000 Series User’s Manual (see page 13 for information
on viewing this manual).
64
Verifying the Operation of a DT3000 Series Board
Performing a Single-Value Analog Input Operation
To verify that the board can read a single analog input value, perform
the following steps:
6
1.
Connect a voltage source, such as a function generator, to analog
input channel 0 (differential mode) on the DT3000 Series board.
Refer to page 50 for an example of how to connect a differential
analog input.
6
2.
In the Quick Data Acq application, click the Acquisition menu.
3.
Click Single Analog Input.
6
4.
Select the appropriate DT3000 Series board from the Board list
box.
5.
In the Channel list box, select analog input channel 0.
6.
In the Range list box, select the range for the channel.
The default is ±10 V.
7.
Select Differential.
8.
Click Get to acquire a single value from analog input channel 0.
The application displays the value on the screen in both text and
graphical form.
6
6
6
Performing a Single-Value Analog Output Operation
To verify that the board can output a single analog output value,
perform the following steps:
1.
Connect an oscilloscope or voltmeter to DAC0 on the board.
Refer to page 53 for an example of how to connect analog output
signals.
2.
In the Quick Data Acq application, click the Control menu.
3.
Click Single Analog Output.
4.
Select the appropriate DT3000 Series board from the Board list
box.
6
6
6
65
Chapter 6
5.
In the Channel list box, select analog output channel 0.
6.
In the Range list box, select the output range of DAC0.
The default is ±10 V.
7.
Enter an output value, or use the slider to select a value to output
from DAC0.
8.
Click Send to output a single value from DAC0.
The application displays the output value on the screen in both text and
graphical form.
Performing a Continuous Analog Input Operation
To verify that the board can perform a continuous analog input
operation, perform the following steps:
66
1.
Connect known voltage sources, such as the outputs of a function
generator, to analog input channels 0 and 1 on the DT3000 Series
board (using the differential configuration). Refer to page 50 for
an example of how to connect a differential analog input.
2.
In the Quick Data Acq application, click the Acquisition menu.
3.
For this example, click Scope.
4.
Select the appropriate DT3000 Series board from the Board list
box.
5.
In the Sec/Div list box, select the number of seconds per division
(.1 to .00001) for the display.
6.
In the Channels list box, select analog input channel 1, and then
click Add to add the channel to the channel list.
Channel 0 is automatically added to the channel list.
7.
Click Config from the Toolbar.
8.
From the Config menu, select ChannelType, and then select
Differential.
Verifying the Operation of a DT3000 Series Board
9.
From the Config menu, select Range, and then select Bipolar or
Unipolar depending on the configuration of your board.
The default is Bipolar.
10. From the Scope view, double-click the input range of the channel
to change the input range of the board (±10 V, ±5 V, ±2.5 V,
±1.25 V for bipolar ranges or 0 to 10 V, 0 to 5 V, 0 to 2.5 V or 0 to
1.25 V for unipolar ranges).
The default is ±10 V. Note that the display changes to reflect the selected
range for all the analog input channels on the board.
11. In the Trigger box, select Auto to acquire data continuously from
the specified channels or Manual to acquire a burst of data from
the specified channels.
12. Click Start from the Toolbar to start the continuous analog input
operation.
The application displays the values acquired from each channel in a
unique color on the oscilloscope view.
13. Click Stop from the Toolbar to stop the operation.
6
6
6
6
6
Performing a Single-Value Digital Input Operation
To verify that the board can read a single digital input value, perform
the following steps:
1.
Connect a digital input to digital input line 0 of port A on the
DT3000 Series board. Refer to page 54 for an example of how to
connect a digital input.
2.
In the Quick Data Acq application, click the Acquisition menu.
3.
Click Digital Input.
4.
Select the appropriate DT3000 Series board from the Board list
box.
5.
Select digital input port A by clicking Port A.
6
6
6
6
67
Chapter 6
6.
Click Get.
The application displays the value of each digital input line in port A on
the screen in both text and graphical form.
Performing a Single-Value Digital Output Operation
To verify that the board can output a single digital output value,
perform the following steps:
68
1.
Connect a digital output to digital output line 0 of port B on the
DT3000 Series board. Refer to page 55 for an example of how to
connect a digital output.
2.
In the Quick Data Acq application, click the Control menu.
3.
Click Digital Output.
4.
Select the appropriate DT3000 Series board from the Board list
box.
5.
Select digital output port B by clicking Port B.
6.
Click the appropriate bits to select the digital output lines to write
to. If the bit is selected, a high-level signal is output to the digital
output line; if the bit is not selected, a low-level signal is output to
the digital output line. Optionally, you can enter an output value
in the Hex text box.
7.
Click Send.
The application displays the value of each digital output line of digital
port B on the screen in both text and graphical form.
Verifying the Operation of a DT3000 Series Board
Performing a Frequency Measurement Operation
To verify that the board can perform a frequency measurement
operation, perform the following steps:
6
Wire an external clock source to counter/timer 0 on the DT3000
Series board. Refer to page 58 for an example of how to connect a
an external clock for a frequency measurement operation.
6
Note: The Quick Data Acq application works only with
counter/timer 0.
6
2.
In the Quick Data Acq application, click the Acquisition menu.
3.
Click Frequency Counter.
6
4.
Select the appropriate DT3000 Series board from the Board list
box.
5.
In the Count Duration text box, enter the number of seconds
during which events will be counted.
6.
Click Start to start the frequency measurement operation.
The operation automatically stops after the number of seconds you
specified has elapsed, and the frequency is displayed on the screen.
1.
If you want to stop the frequency measurement operation when it is
in progress, click Stop.
6
6
6
6
6
69
Chapter 6
Performing a Pulse Output Operation
To verify that the board can perform a pulse output operation,
perform the following steps:
1.
Connect a scope to counter/timer 0 on the DT3000 Series board.
Refer to page 59 for an example of how to connect a scope (a
pulse output) to counter/timer 0.
Note: The Quick Data Acq application works only with
counter/timer 0.
70
2.
In the Quick Data Acq application, click the Control menu.
3.
Click Pulse Generator.
4.
Select the appropriate DT3000 Series board from the Board list
box.
5.
Select either Continuous to output a continuous pulse stream or
One Shot to output one pulse.
6.
Select either Low-to-high to output a rising-edge pulse (the high
portion of the total pulse output period is the active portion of
the signal) or High-to-low to output a falling-edge pulse (the low
portion of the total pulse output period is the active portion of
the signal).
7.
Enter a percentage or use the slider to select a percentage for the
pulse width. The pulse width determines the duty cycle of the
pulse.
8.
Click Start to generate the pulse(s).
The application displays the results both in text and graphical form.
9.
Click Stop to stop a continuous pulse output operation. One-shot
pulse output operations stop automatically.
A
Using Your Own Screw
Terminal Panel
Analog Inputs . . . . . . . . . . . . . . . . . . . . . . . . . . . . . . . . . . . . . . . . . . 73
Analog Outputs . . . . . . . . . . . . . . . . . . . . . . . . . . . . . . . . . . . . . . . . 76
Digital Inputs and Counter/Timer Inputs . . . . . . . . . . . . . . . . . . 77
Digital Outputs . . . . . . . . . . . . . . . . . . . . . . . . . . . . . . . . . . . . . . . . . 78
71
Appendix A
Data acquisition boards can perform only as well as the input
connections and signal integrity you provide. If you choose not to use
the DT730 or DT730-T screw terminal panel, consideration must be
given to how the signals interact in the real world as well as how they
interact with each other.
This appendix describes additional considerations to keep in mind
when designing your own screw terminal panel for use with a
DT3000 Series board. Refer to Appendix B of the DT3000 Series User’s
Manual for connector and cable specifications.
72
Using Your Own Screw Terminal Panel
Analog Inputs
DT3000 Series boards have three different types of analog input
configurations that you can use:
• Single-ended
• Pseudo-differential
A
A
• Differential
This section describes wiring considerations for these analog input
configurations.
Single-Ended Inputs
With single-ended inputs, you have the maximum number of inputs
but the worst-case noise immunity without external signal
conditioning.
The major problem with this configuration it that you need a
common ground between the external inputs and the data acquisition
board. Even with conditioning, you must consider the cable length
and how the cable is routed. If the cable is over 3 feet, you must
consider the ringing and cross-talk in the cable. A typical cable has
30 pF per foot of capacitance. If the source impedance is 1,000 Ω and
the cable is 3 feet, then the cross talk based on the source impedance
is 1,000 Ω x (30 pF x 3 ft) = 90 ns.
This seems negligible, but when you consider that it requires nine
time constants to settle within 0.01%, the cross-talk becomes almost
10% of the settling time when switching channels at 100 kHz.
In addition, coupling must be considered when adjacent channels
have high-speed signals, especially if these signals are TTL-type with
high-speed edges.
A
A
A
A
A
A
A
73
Appendix A
If it is provided and not used, ensure that you connect Amp Low to
the analog common of the DT3000 Series board or to ground when
running in single-ended mode.
Pseudo-Differential Inputs
Pseudo-differential inputs allow one common-mode voltage for all
single-ended inputs. With this type of connection, the low side of the
instrumentation amplifier is used to sense an external common-mode
voltage. For example, if you have a signal-conditioning rack, the
Amp Low signal connects to the analog common of the external rack.
The pseudo-differential configuration allows you to use the
maximum number of input channels, while placing an impedance
between the external ground and the data acquisition ground or
analog common. Even if it is 100 Ω, this impedance provides the bias
return currents for the inputs and causes only 10 mA of current to
flow with a ground potential difference of 1 V. (The input bias current
is typically in milliamperes.) This is usually manageable by the
common-mode range of the instrumentation amplifier and analog
ground system. Consider the problems with 1 Ω of impedance
between 1 V of potential difference. The resulting 1 A of current
causes many problems in the analog signal integrity.
If it is available, use Amp Low as a remote ground sense when
running in pseudo-differential mode.
74
Using Your Own Screw Terminal Panel
Differential Inputs
Differential inputs offer the maximum noise rejection at the expense
of half your total channel count. For the best results, shielded twisted
pairs are a must. The shield must connect at one end so that ground
currents do not travel over the shield. In low-level voltage
applications, differential inputs reduce problems not only due to
electrostatic and magnetic noise, but due to cross-talk and thermal
errors.
One problem to consider with differential inputs is the bias current
error. The differential impedance is usually hundreds of megaohms.
With a very small bias current multiplied by this high input
impedance, the voltage produced is out of the common-mode input
range of the instrumentation amplifier.
You must provide an external resistor to return this bias current to the
analog common of the data acquisition board. This resistor is
typically in the order of 1 kΩ to 100 kΩ from the input low side to
analog common. Alternatively, you can return the external common
through a 10 Ω to 100 kΩ resistor to analog common (it cannot be 0 Ω
due to ground currents).
A
A
A
A
A
A
A
A
A
75
Appendix A
Analog Outputs
The analog output channels on DT3000 Series boards have a
resolution of 12 bits (even though the accuracy may be less).
Data Translation ensures that the analog outputs do not break into a
high frequency oscillation with high capacitance loads that occur
with long cables. Typically, the analog outputs drive 1,000 pF without
degradation and bandwidth-limit with higher capacitive loads.
The grounds of most boards are optimized for analog inputs at the
expense of some logic or high-frequency noise on the analog outputs.
This is because the analog and digital grounds of the board are
connected at the ADC’s input.
The analog outputs are brought out as a high and a low signal, but
the low side is the analog ground at the DAC’s output buffer. To
remove the high-frequency noise and smooth the glitch energy on the
analog outputs, you can install a 15 kHz RC filter on the output, a
100 Ω resistor in series with the output, and a 0.1 μF capacitor
between the output side of the 100 Ω resistor and output low.
76
Using Your Own Screw Terminal Panel
Digital Inputs and Counter/Timer Inputs
To prevent damage when power is removed, you must provide
current limiting circuitry for TTL-type input.
On high-speed clock inputs, a ground that is located in the connector
next to the clock must be connected as a twisted pair with the
high-speed clock input.
A
A
A
A
A
A
A
A
A
77
Appendix A
Digital Outputs
If you are using the high drive capability of a DT3000 Series board,
ensure that the load is returned to the digital ground provided in the
connector next to the outputs.
If just eight of the digital outputs are switching 16 mA per output,
then 128 mA of current flows. To minimize problems with ringing,
loading, and EMI, a 22 Ω resistor is used in series with all digital
outputs. You must consider this 22 Ω resistor if you are matching
cable impedance to the far end.
78
Index
Numerics
5B01 backplane
attaching 32
connecting analog outputs 29
considerations when using 34
5B08 backplane
attaching 32
considerations when using 34
7BP04-1 backplane
attaching 33
considerations when using 34
7BP08-1 backplane
attaching 33
considerations when using 34
7BP16-1 backplane
attaching 33
connecting analog outputs 29
considerations when using 34
A
AC1315 cable 32, 33
AC1393 adapter cable 33
Amp Low 28
analog input channel configuration
differential 47
pseudo-differential 47
single-ended 47
analog inputs, when not using the
DT730/DT730-T 73
analog outputs
connecting to 5B01 29
connecting to 7BP16-1 29
when not using the DT730/DT730-T
76
application wiring
analog output signals 53
current loop analog inputs 52
differential analog inputs 49
digital I/O signals 54
event counting applications 56, 57
frequency measurement applications
58
pseudo-differential analog inputs 48
pulse output applications 59
single-ended analog inputs 48
attaching the screw terminal panel 26
B
bias return resistors 30
C
cable
AC1315 32, 33
EP291 26
cables
AC1393 adapter 33
CJC
on 5B Series modules 34
on screw terminal panel 29
common ground sense 28
configuring the DT730 or DT730-T
screw terminal panel 27
connecting signals
79
Index
analog output signals 53
current loop analog inputs 52
differential analog inputs 49
digital I/O signals 54
event counting applications 56, 57
frequency measurement applications
58
pseudo-differential analog inputs 48
pulse output applications 59
single-ended analog inputs 48
conventions used viii
counter/timer
connecting event counting signals 56,
57
connecting frequency measurement
signals 58
connecting pulse output signals 59
when not using the DT730/DT730-T
77
current loop inputs 52
current shunt resistors 31
D
device driver 4
differential inputs 47, 49
when not using the DT730/DT730-T
75
digital inputs, when not using the
DT730/DT730-T 77
digital outputs, when not using the
DT730/DT730-T 78
DT3000 Series Device Driver 4
DT730 or DT730-T screw terminal
panel 26
80
E
EMI emissions 26
EP291 cable 26
event counting 56
expansion slot selection 18
F
ferrite clamp 26
G
ground sense 28
H
help, online 64
I
input bias return resistors 30
input configuration
differential analog 47
pseudo-differential analog 47
single-ended analog 47
inserting the board 19
installing the Quick Data Acq
application 63
J
jumper
W1 28
W2 29
W3 29
W4 29
W5 29
Index
W6 29
W7 29
L
layout of panel 27
loading the device driver
Windows 2000 21
Windows XP 22
M
manuals 4
O
online help 64
P
panel layout 27
pseudo-differential inputs 47, 48
when not using the DT730/DT730-T
74
Q
Quick Data Acq 4
continuous analog input operations
66
frequency measurement operations
69
installing 63
pulse output operations 70
running 64
single-value analog input operations
65
single-value analog output
operations 65
single-value digital input operations
67
single-value digital output
operations 68
R
related documents ix
requirements 10
resistors
R1 to R32 30
R33 to R64 31
running the Quick Data Acq
application 64
S
screw terminal panel 26
selecting an expansion slot 18
setting up the computer 17
single-ended inputs 47, 48
when not using the DT730/DT730-T
73
slot selection 18
software supported 4
system requirements 10
U
unpacking 9
using your own screw terminal panel
71
W
W1 jumper 28
81
Index
W2 jumper 29
W3 jumper 29
W4 jumper 29
W5 jumper 29
W6 jumper 29
W7 jumper 29
Windows 2000, loading the device
driver 21
Windows XP, loading the device
driver 22
wiring recommendations 39
when using your own screw terminal
panel 73
wiring signals
analog output signals 53
current loop analog inputs 52
differential analog inputs 49
digital I/O signals 54
event counting applications 56, 57
frequency measurement applications
58
pseudo-differential analog inputs 48
pulse output applications 59
single-ended analog inputs 48
82