1
TIBCO® Spotfire® DecisionSite® 9.1.1 Deployment and Administration Manual
Important Information
SOME TIBCO SOFTWARE EMBEDS OR BUNDLES OTHER TIBCO SOFTWARE. USE
OF SUCH EMBEDDED OR BUNDLED TIBCO SOFTWARE IS SOLELY TO ENABLE
THE FUNCTIONALITY (OR PROVIDE LIMITED ADD-ON FUNCTIONALITY) OF THE
LICENSED TIBCO SOFTWARE. THE EMBEDDED OR BUNDLED SOFTWARE IS NOT
LICENSED TO BE USED OR ACCESSED BY ANY OTHER TIBCO SOFTWARE OR FOR
ANY OTHER PURPOSE.
USE OF TIBCO SOFTWARE AND THIS DOCUMENT IS SUBJECT TO THE TERMS AND
CONDITIONS OF A LICENSE AGREEMENT FOUND IN EITHER A SEPARATELY
EXECUTED SOFTWARE LICENSE AGREEMENT, OR, IF THERE IS NO SUCH
SEPARATE AGREEMENT, THE CLICKWRAP END USER LICENSE AGREEMENT
WHICH IS DISPLAYED DURING DOWNLOAD OR INSTALLATION OF THE
SOFTWARE (AND WHICH IS DUPLICATED IN TIBCO BUSINESSWORKS
CONCEPTS). USE OF THIS DOCUMENT IS SUBJECT TO THOSE TERMS AND
CONDITIONS, AND YOUR USE HEREOF SHALL CONSTITUTE ACCEPTANCE OF
AND AN AGREEMENT TO BE BOUND BY THE SAME.
This product includes software licensed under the Common Public License. The source code for
such software licensed under the Common Public License is available upon request to TIBCO
and additionally may be obtained from http://wtl.sourceforge.net/.
This document contains confidential information that is subject to U.S. and international
copyright laws and treaties. No part of this document may be reproduced in any form without
the written authorization of TIBCO Software Inc.
TIBCO, Spotfire, and Spotfire DecisionSite are either registered trademarks or trademarks of
TIBCO Software Inc. and/or subsidiaries of TIBCO Software Inc. in the United States and/or
other countries. All other product and company names and marks mentioned in this document
are the property of their respective owners and are mentioned for identification purposes only.
This software may be available on multiple operating systems. However, not all operating
system platforms for a specific software version are released at the same time. Please see the
readme.txt file for the availability of this software version on a specific operating system
platform.
THIS DOCUMENT IS PROVIDED “AS IS” WITHOUT WARRANTY OF ANY KIND,
EITHER EXPRESS OR IMPLIED, INCLUDING, BUT NOT LIMITED TO, THE IMPLIED
WARRANTIES OF MERCHANTABILITY, FITNESS FOR A PARTICULAR PURPOSE,
OR NON-INFRINGEMENT. THIS DOCUMENT COULD INCLUDE TECHNICAL
INACCURACIES OR TYPOGRAPHICAL ERRORS. CHANGES ARE PERIODICALLY
ADDED TO THE INFORMATION HEREIN; THESE CHANGES WILL BE
INCORPORATED IN NEW EDITIONS OF THIS DOCUMENT. TIBCO SOFTWARE INC.
MAY MAKE IMPROVEMENTS AND/OR CHANGES IN THE PRODUCT(S)
AND/OR THE PROGRAM(S) DESCRIBED IN THIS DOCUMENT AT ANY TIME.
Copyright © 1996- 2008 TIBCO Software Inc. ALL RIGHTS RESERVED.
THE CONTENTS OF THIS DOCUMENT MAY BE MODIFIED AND/OR QUALIFIED,
DIRECTLY OR INDIRECTLY, BY OTHER DOCUMENTATION WHICH ACCOMPANIES
THIS SOFTWARE, INCLUDING BUT NOT LIMITED TO ANY RELEASE NOTES AND
"READ ME" FILES.
TIBCO Spotfire DecisionSite is covered by U.S. Patent No. 6,014,661 and U.S. Patent No. 7,
216,116. Other patent(s) pending.
TIBCO Software Inc. Confidential Information
Table Of Contents
Table of Contents
1 1.1 1.2 1.3 1.4 1.5 1.6 2 2.1 2.2 2.3 2.4 3 3.1 3.2 3.3 3.4 3.5 4 4.1 4.2 4.3 4.4 4.5 4.6 4.7 4.8 4.9 4.10 5 DEPLOYING DECISIONSITE FOR THE FIRST TIME............................................. 1 Deployment Procedure ..................................................................................................................... 1 Updating the PDF Manuals on the Server........................................................................................ 1 Unlocking Administrator Privileges ................................................................................................... 1 Deploying Software Packages ......................................................................................................... 2 Spotfire Library ................................................................................................................................. 3 Configuring Additional Functionality ................................................................................................. 7 UPGRADING DECISIONSITE ................................................................................. 8 Upgrading Procedure ....................................................................................................................... 8 Updating the PDF Manuals on the Server........................................................................................ 8 Deploying Software Packages ......................................................................................................... 8 Configuring Additional Functionality ................................................................................................. 8 CONFIGURING DECISIONSITE ............................................................................ 10 DecisionSite Posters ...................................................................................................................... 10 Configuring Computation Services ................................................................................................. 23 Configuring DecisionSite for Functional Genomics ........................................................................ 25 Configuring DecisionSite for Lead Discovery ................................................................................. 33 Configuring DecisionSite for Microarray Analysis .......................................................................... 41 SPOTFIRE DECISIONSITE ADMINISTRATION ................................................... 43 Setting Up the Environment ........................................................................................................... 43 DecisionSite Administrator ............................................................................................................. 47 DecisionSite Information Designer ................................................................................................. 59 DecisionSite Information Builder .................................................................................................. 118 DecisionSite ApplicationManager................................................................................................. 158 Changing the Unsupported Client Info ......................................................................................... 166 Changing the "Remember Me" Time ............................................................................................ 167 Spotfire Support Pages for Packages .......................................................................................... 167 Connecting to Spotfire Analytics Server ....................................................................................... 168 Listing Which Users Have Access to a Certain Application ......................................................... 170 INDEX .................................................................................................................. 174 iii
Deploying DecisionSite for the First Time
1
1.1
Deploying DecisionSite for the First
Time
Deployment Procedure
This chapter explains how to deploy and set up TIBCO® Spotfire® DecisionSite® on a
Spotfire Analytics Server for the first time. It is required that you have already installed and
configured the Spotfire Analytics Server itself.
If you already have a version of Spotfire DecisionSite on the server, and which to deploy a later
version of DecisionSite, then please follow the instructions in chapter 2, "Upgrading
DecisionSite", instead.
1.2
Updating the PDF Manuals on the Server
In order for the end users to get access to the Spotfire DecisionSite manuals when they select
Help > PDF Manuals from the Spotfire DecisionSite Client, you must copy these manuals to the
server.
► To copy the Spotfire DecisionSite manuals:
1.
2.
1.3
From the documentation folder on the Spotfire DecisionSite deployment kit, copy all
the PDF-manuals and the file called manuals.jsp.
Paste these into the following folder on the Spotfire Analytics Server machine:
<installation directory>\server\webapps\spotfire\support\manuals\
Unlocking Administrator Privileges
► To define an Admin user, and unlock administrator privileges
for that user:
1.
2.
3.
You will need the unlock codes provided in the documentation folder of the
deployment kit, in the file codes.txt. Open this file and print it for future reference.
Open an Internet Explorer browser.
Enter the name of your Spotfire Analytics Server in the Address field.
Response: This opens the Spotfire Spotfire Analytics Server start page.
1
TIBCO® Spotfire® DecisionSite® 9.1.1 - Deployment and Administration Manual
4.
5.
6.
7.
8.
9.
1.4
If you are using Database Authentication you must create a new user who will be the
Admin of the Spotfire Analytics Server. If you are using Windows Authentication or
LDAP Authentication, proceed to the next step.
Click on Create user, and enter a username (Preferably “admin” or similar) and a
password. Then click OK.
Click on the Unlock Administrator privileges link.
You will be required to log in. If you are using Database Authentication, enter the user
you created above, otherwise pick an already existing user to be Admin of the Spotfire
Analytics Server, and log in.
You will now be able to unlock Administrator Privileges for that user.
Enter the codes provided in the codes.txt file, and click on Unlock.
Response: A message appears stating that you successfully unlocked DecisionSite
Administrator.
Click on the main page link to return to the start page.
Deploying Software Packages
► To deploy new software packages:
1.
2
Make sure that the Spotfire Analytics Server is running.
Deploying DecisionSite for the First Time
2.
3.
4.
5.
6.
7.
1.5
1.5.1
Start the DecisionSite Administrator tool from the main server page in Internet
Explorer.
Select Deployer from the top menu frame.
Browse to the temporary folder where you unzipped the installation files from the
Spotfire DecisionSite deployment kit.
Select and open the file ds911_distribution.zip.
Click on Deploy.
The contents of the distribution are shown in a separate window. Click on Deploy in
this window. All software components of DecisionSite Client 9.1.1 will now be
installed.
Spotfire Library
Setting Up Spotfire Library
In order to use Spotfire Library there are additional installation steps that must be performed.
You need to modify some server settings and initialize the Spotfire Library database. Proceed
with the instructions below.
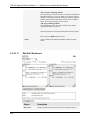
1.5.2
1.5.2.1
Example of Spotfire Library Design
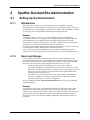
Library Design Introduction
For an efficient use of your Library, a structure is needed that can accommodate your
company’s needs. This is done in two steps, first by giving users access permissions to the
Library and second, deciding on an efficient layout of the Library.
The Library is divided into Library Sections where all access permissions are set. It is the
Library Sections which contains the analysis material and folders. The permissions apply to the
entire Library Section, regardless of the folder structure inside it. Library Sections can only be
created by Library Section Creators, which is a group controlled in the Library Administrator.
1.5.2.2
Overview of Library Design
Your Library should reflect your company. This is a recommended practice. This applies to the
structure of Library Sections and folders as well as the access permissions of the users.
The first step of designing your Library after installation is to add users to the Library Section
Creators group, which is the group that has permission to create Library Sections. It is
recommended that the members of this group be the same users that manage content and users
in your organization. It is also recommended that the creators of analysis material such as
Guides and Posters become members of this group.
When you have organized the members of the Library Section Creators group, it is
recommended that you create a number of Library Sections that reflect your company. These
will act as a preconfigured structure which the users can use. Depending on your company and
its business model, a few designs are recommended.
• By DecisionSite Application. If the users work in DecisionSite Applications, such as
DecisionSite for Lead Discovery and/or custom DecisionSite Applications, it is
recommended that you create Library Sections with the exact same name as these
Library Sections.
• By project. If your company is organized into projects, perhaps a Library Section
structure with a Library Section for each project is useful. This way all users in a
specific project can get write access to its Library Section and some other access to
other projects.
3
TIBCO® Spotfire® DecisionSite® 9.1.1 - Deployment and Administration Manual
•
•
•
•
By customer. If you work tightly with customers and you want to share analysis
material with the customers, a Library Section structure for each customer could be
useful, enabling you to share material with each customer in a secure way.
By department, allowing for instance all engineers to access the same analysis
material.
By geography, such as for each site.
By domain, structuring all users working with a specific domain, such as Toxicology,
to work in the same Library Section.
Linking dynamic Library content to your applications
In DecisionSite Client, the users have a menu option called Guides > Run from Library.... It
is a means to access Guides published to the Library in a simple way. When the user clicks the
menu option, an Open from Library dialog appears where users can browse for Guides. By
default, this targets a Library Section with the same name as the current DecisionSite
application. This is done to minimize the amount of browsing needed for the user in the
Library.
For example, a user who is using the DecisionSite for Lead Discovery application clicks the
Guides > Run from Library.... The user is then directed to the installed Library Section
DecisionSite for Lead Discovery.
It is recommended that you create Library Sections corresponding to DecisionSite applications
you will use, and vice versa. Using this functionality, the users will have easy access to
dynamic Library content.
1.5.2.3
Example of a Library Organization
Company Acme is a chemistry company working with High Throughput Screening (HTS)
analysis. It has developed its own DecisionSite application designed for efficiency called
”DecisionSite for HTS quality control”. The company engineers also use DecisionSite
for Lead Discovery when performing some surrounding analysis. Acme has divided its
operations into projects, or therapeutic teams, with each project working with a specific disease
area. In this example, project A works with tumors. Finally, the projects involves customers to
which Acme publishes results.
Acme has decided to create a structure following this corporate structure, using the following
Library Sections with their respective access permissions:
• DecisionSite for HTS quality control. This is viewed as a Library Section containing
tools which are used by the scientists. New tools might be added by a few power users.
Because of this, the group Everybody has read access and a set of power users from
various projects has write access. With this Library Section, all users of the application
DecisionSite for HTS quality control has direct access to useful Guides.
• DecisionSite for Lead Discovery. This installed Library Section works similarly to
DecisionSite for HTS quality control.
• Project A. This Library Section is open for writing by all members of the Project A
and reading for Everybody.
• Project B, C, ... .
• Customer Alpha. This Library Section is intended for sharing results with customers.
Acme has decided to give write access to project mangers and engineers, plus the
contact persons at the customer company. The customers will only see their Library
Section. Project members have read access to view the project findings.
• Customer Beta, Gamma, ... .
• HTS internal. This is a Library Section used by the HTS scientists for publishing of
temporary results and findings in the daily work. Everybody has write access to this
Library Section.
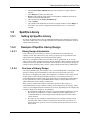
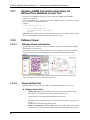
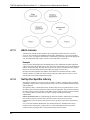
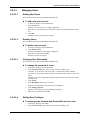
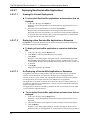
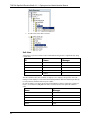
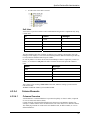
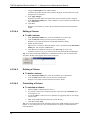
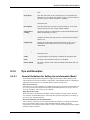
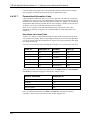
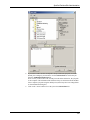
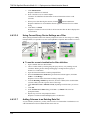
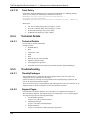
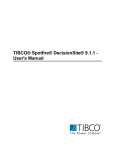
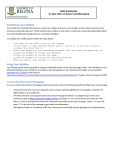
Example of how the Library Section view could appear to a user from project A at Acme in this
case.
4
Deploying DecisionSite for the First Time
Users of the DecisionSite applications DecisionSite for Lead Discovery and DecisionSite for
HTS quality control would get directed into their corresponding Library Sections.
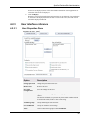
1.5.3
Spotfire Library Database Connections
► To set up Spotfire Library Connections:
1.
2.
3.
Open an Internet Explorer browser.
Enter the name of your Spotfire Analytics Server in the Address field. (Example:
http://analyticsserver)
Response: This opens the Spotfire Analytics Server start page.
Click on Library Administrator, and log in with your DecisionSite administrator
username/password.
The actual Spotfire Library Database tables have already been created when installing
the Spotfire Analytics Server. This was done by running the create_library_env.sql
script by the person who installed the server.
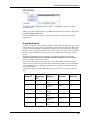
What you need to do now is to enter the same information in the panel below, to
connect the Spotfire Library to its database.
To find the information you need to enter below, see the Installation Procedures
chapter of the "Spotfire Analytics Server - Installation and Configuration Manual",
where the person who installed the Spotfire Analytics Server should have written
down the settings. Find the settings for the Spotfire Library Database. Another option
is to check the settings made in the file library-service.xml located in the <Server
Installation Directory>/server/webapps/spotfire/WEB-INF/ folder.
5
TIBCO® Spotfire® DecisionSite® 9.1.1 - Deployment and Administration Manual
4.
5.
6.
1.5.4
Enter the Spotfire Library database connection settings. These must match the settings
specified in the Installation Procedures chapter of the Spotfire Analytics Server Installation and Upgrade Manual.
Click on the Start button to activate the Spotfire Library.
The Spotfire Library Status should change to ”Running”.
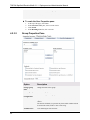
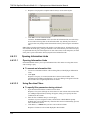
Specifying the Library Section Creators
Next, you must specify which users and groups will be Library Section Creators. These users
will be allowed to create new Library Sections.
As DecisionSite Administrator you already have full access to the Spotfire Library.
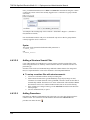
► To allow users to create Library sections:
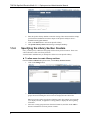
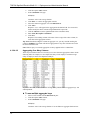
From the Select workbench drop-down menu, select Library Section Creators.
1. Click on the Change button.
2.
3.
6
In the search field, type in the name of the group or user you are interested in. The
groups and users matching the search criteria are displayed in the leftmost list.
Tip: You can use regular expressions to limit the search. For example, use an asterisk
(*) to display all users, or append it to a string (John*) to display all users beginning
with 'John'.
Select one or many groups and users from the leftmost list, and click on the Add >>
button to include them as Library Section Creators.
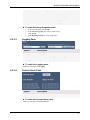
Deploying DecisionSite for the First Time
4.
5.
You can also select one or many groups and/or users from the rightmost list of owners,
and click on the <<Remove button, to remove them from the list of owners.
Click on the Save button, to make your changes take effect.
The Spotfire Library has now been set up and is ready to use.
1.6
Configuring Additional Functionality
You have now deployed DecisionSite Client 9.1.1 on the Spotfire Analytics Server, and set up
all the basic functionality. However, there are a number of additional features that you can set
up and configure for use on your DecisionSite system, if you have purchased the corresponding
licenses.
Additional Features
• DecisionSite Posters
• Computation Services
• DecisionSite for Functional Genomics
• DecisionSite for Lead Discovery
• DecisionSite for Microarray Analysis
If any of these features are relevant for you, proceed to chapter 3, "Configuring DecisionSite",
where you will find instructions on how to set them up.
7
TIBCO® Spotfire® DecisionSite® 9.1.1 - Deployment and Administration Manual
2
2.1
Upgrading DecisionSite
Upgrading Procedure
This chapter explains how to upgrade the DecisionSite version on your Spotfire Analytics
Server, by deploying a new version of Spotfire DecisionSite. It is required that you have
already installed and configured the Spotfire Analytics Server itself.
If you have never before had Spotfire DecisionSite on the server, and wish to deploy and set up
the system for the first time, then please follow the instructions in chapter 1 "Deploying
DecisionSite for the First Time" instead.
2.2
Updating the PDF Manuals on the Server
In order for the end users to get access to the Spotfire DecisionSite manuals when they select
Help > PDF Manuals from the Spotfire DecisionSite Client, you must copy these manuals to the
server.
► To Copy the Spotfire DecisionSite Manuals:
1.
2.
2.3
From the documentation folder on the Spotfire DecisionSite deployment kit, copy all
the PDF-manuals and the file called manuals.jsp.
Paste these into the following folder on the Spotfire Analytics Server machine:
<installation directory>\server\webapps\spotfire\support\manuals\
Deploying Software Packages
► To deploy new software packages:
1.
2.
3.
4.
5.
6.
7.
2.4
Make sure that the Spotfire Analytics Server is running.
Start the DecisionSite Administrator tool from the main server page in Internet
Explorer.
Select Deployer from the top menu frame.
Browse to the temporary folder where you unzipped the installation files from the
Spotfire DecisionSite deployment kit.
Select and open the file ds911_distribution.zip.
Click on Deploy.
The contents of the distribution are shown in a separate window. Click on Deploy in
this window. All software components of DecisionSite Client 9.1.1 will now be
installed.
Configuring Additional Functionality
You have now deployed DecisionSite Client 9.1.1 on the Spotfire Analytics Server, and set up
all the basic functionality. However, there are a number of additional features that you can set
up and configure for use on your DecisionSite system, if you have purchased the corresponding
licenses.
If you have already set up these features for previous versions of Spotfire DecisionSite, you do
not need to perform the configuration tasks again.
Additional Features
•
•
8
DecisionSite Posters
Computation Services
Upgrading DecisionSite
• DecisionSite for Functional Genomics
• DecisionSite for Lead Discovery
• DecisionSite for Microarray Analysis
If any of these features are relevant for you, proceed to chapter 3, "Configuring DecisionSite",
where you will find instructions on how to set them up.
9
TIBCO® Spotfire® DecisionSite® 9.1.1 - Deployment and Administration Manual
3
3.1
3.1.1
3.1.1.1
Configuring DecisionSite
DecisionSite Posters
Spotfire DecisionSite Visualization Services
Visualization Services Introduction
As of DecisionSite 8.1, the entire function of rendering visualizations for DecisionSite Posters
has been separated from the Spotfire Analytics Server to a dedicated application called
Visualization Services. This can be a installed either on the same machine as the Spotfire
Analytics Server (if it is a Windows machine) or on a separate machine all together.
Visualization Services runs as a Windows service.
The Spotfire Analytics Server communicates with Visualization Services, which provides
visualizations for the Posters opened from the Spotfire Library.
3.1.1.2
Requirements
Requirements for Visualization Services
The requirements which must be met in order to run Visualization Services can be found at:
http://www.spotfire.com/sr
Visualization Services must be installed on a Windows machine running:
• Microsoft Windows Server 2000 SP1 or higher
• Microsoft Windows Server 2003
If you are running your Spotfire Analytics Server on a Windows platform it is possible to install
Visualization Services on the same machine.
Hardware requirements vary greatly depending on the number of simultaneous users and the
load of the server.
Note: You cannot connect several Spotfire Analytics Servers to the same instance of
Visualization Services.
Requirements for the Spotfire Analytics Server:
The requirements which must be met in order to run Spotfire DecisionSite Posters can be found
at:
http://www.spotfire.com/sr
• It is recommended that Oracle not be running on the machine running Visualization
Services since both applications are memory intensive which might affect
performance.
• If you intend to use the ISIS Details-on-Demand, it requires ISIS Direct 2.0 or MDL®
ISIS 5.0.
Client requirements
The requirements which must be met in order to use Spotfire DecisionSite Posters on a client
machine can be found at:
http://www.spotfire.com/sr
Note that ”MDL Chime Pro 2.6 SP5 for Web” must be installed on the client if you
intend to view ISIS structures in the Details-on-Demand window in DecisionSite Posters.
10
Configuring DecisionSite
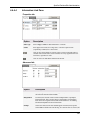
3.1.1.3
Communication
The Spotfire Analytics Server and Visualization Services uses standard HTTP for
communication. The port used is configured when installing Visualization Services.
3.1.2
Installing Visualization Services
► Installing Visualization Services:
1.
2.
3.
Log into the Windows server as a user with Admin privileges.
Copy the file setup.exe for Visualization Services to the local disk of the intended
server.
Run the setup.exe file.
Response: The installer starts.
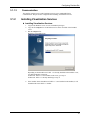
Depending on whether Microsoft .NET 1.1 is already installed on the machine or not,
two different dialogs can appear.
If Microsoft .NET 1.1 is not available on the server go to step 4.
If Microsoft .NET 1.1 is already installed go to step 8.
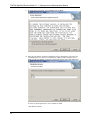
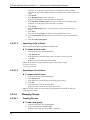
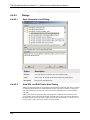
4.
If the installer detects that Microsoft .NET 1.1 is not installed on the machine, it will
launch the Microsoft .NET 1.1 installer.
11
TIBCO® Spotfire® DecisionSite® 9.1.1 - Deployment and Administration Manual
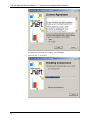
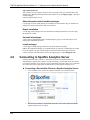
Read the license agreement, select I agree, and click Install.
5.
12
Microsoft .NET 1.1 is installed.
Configuring DecisionSite
6.
Click OK when the installation is complete.
7.
You may need to restart Windows after this step. You will be prompted to do so, if that
is the case. Restart windows, and proceed below afterwards as the Visualization
Services installer will automatically continue.
If you are not prompted to restart Windows, just continue below.
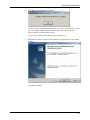
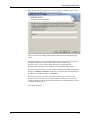
8.
With Microsoft .NET 1.1 installed on the machine, the Visualization Services installer
continues.
Click Next to continue.
13
TIBCO® Spotfire® DecisionSite® 9.1.1 - Deployment and Administration Manual
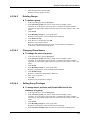
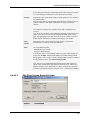
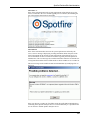
9.
Read the license agreement, select I accept, and click Next.
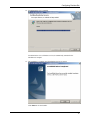
10. Enter the port number on which Visualization Services should listen. This is the port
Visualization Services will use to communicate with the Spotfire Analytics Server.
Make sure the port number you specify is not already used by some other application.
It can be any unused port from 1-65535. Default is 12000.
Click Next to continue.
14
Configuring DecisionSite
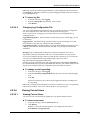
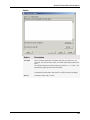
11. Enter the user name and password to be used for running the Windows service. This
user must have the ”Log on as service” privilege.
The user must also have ”Full Control” permission to the installation target
folder.
The default option is to leave both fields empty, which will run the service under the
”Local System” account, which always has the needed privilege.
On some systems you may need to make sure that the corresponding user
”System” has Full Control permission to the installation target folder.
If you wish to specify another user, the username should be preceded by the Domain it
belongs to: <domain>\<username>. If the user is a local user, the user name must be
preceded by a dot and a backslash: .\<username>.
Note: If you intend to use HTTPS with Client Certificates, do not use the Local
System account. Instead specify a user name and password of the user who's client
certificate should be used for the communication between Visualization Services and
the Spotfire Analytics Server.
Click Next to continue.
15
TIBCO® Spotfire® DecisionSite® 9.1.1 - Deployment and Administration Manual
12. Select whether to do a Complete or Custom install, and click Next.
Custom will let you specify the folder where you want to install Visualization
Services, where as Complete will install it in the predefined folder
C:\Program Files\Spotfire\VisualizationServices. Apart from that, the two options are
the same.
13. Click Install to begin the installation.
16
Configuring DecisionSite
14. Visualization Services is installed.
Visualization Services (a Windows service) is automatically started after the
installation is complete.
15. The installation is complete, and Visualization Services is started.
Click Finish to exit the installer.
17
TIBCO® Spotfire® DecisionSite® 9.1.1 - Deployment and Administration Manual
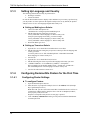
3.1.3
Setting Up Language and Country
The following instructions need only be performed for:
• WebLogic on Solaris
• Tomcat on Solaris
In order for DecisionSite Posters to display values and dates in your country’s preferred way,
you may need to set some options on the Spotfire Analytics Server. By default, the Spotfire
Analytics Server is set to use Language=English and Country=US.
► Setting up WebLogic on Solaris:
1.
2.
3.
Start a text editor and open the file:
<installation dir>/weblogic/spotfire/startWebLogic.sh
Edit the following line among the java options:
JAVA_OPTIONS="-Duser.language=en -Duser.country=US"
and specify the language and country you want. Example:
JAVA_OPTIONS="-Duser.language=ja -Duser.country=JP"
JAVA_OPTIONS="-Duser.language=sv -Duser.country=SE"
Restart the WebLogic server.
► Setting up Tomcat on Solaris
1.
2.
3.
4.
5.
6.
7.
3.1.4
3.1.4.1
Open the file <server install dir>/bin/catalina.bat in a text editor.
Edit the following line among the java options so that it specifies the language and
country you want:
set JAVA_OPTS=-server -XX:+DisableExplicitGC -Xms256M -Xmx256M Duser.language=en -Duser.country=US
Save the file.
Open the file <server install dir>/bin/service.bat
Edit the following line so that it specifies the language and country you want:
"%EXECUTABLE%" //US//%SERVICE_NAME% ++JvmOptions "Djava.io.tmpdir=%CATALINA_BASE%\temp" --JvmMs 256 --JvmMx 256 XX:+DisableExplicitGC -Duser.language=en -Duser.country=US
Save the file and restart the Tomcat server.
Configuring DecisionSite Posters for the First Time
Configuring Poster Settings
► To configure Posters:
1.
2.
3.
18
Open an Internet Explorer browser.
Enter the name of your Spotfire Analytics Server in the Address field. (Example:
http://spotfireanalyticsserver)
Note: The URL you enter will be the actual URL Visualization Services will use to
communicate with the Spotfire Analytics Server. Do not use ”localhost”,
always specify a full server URL.
Response: The Spotfire Analytics Server start page is opened.
Click on Library Administrator and log in with your DecisionSite administrator
username/password.
Configuring DecisionSite
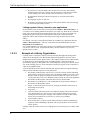
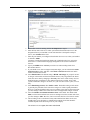
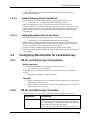
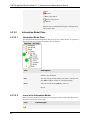
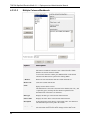
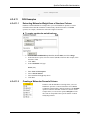
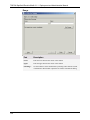
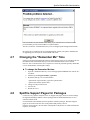
4.
From the Select workbench drop-down menu, select Poster Options.
5.
6.
If the Poster service is running, click on the Stop button to stop it.
Enter the host name of the server where you installed Visualization Services in the
designated field. If you installed it on the same machine as the Spotfire Analytics
Server, enter localhost in the field.
Enter the port number you configured Visualization Services to use when you installed
it. Default is 12000.
Comment: Clicking the Details link displays the Visualization Services version, the
Poster Service version and the Language setting that will be used in Visualization
Services.
Specify the SMTP server and Port you wish to use when sending emails from
DecisionSite Posters.
If your SMTP server does not support anonymous login, you can select the Use name
and password check box, and enter a User name and Password. All Poster emails
will be send from this account.
Select Email format. The default setting is HTML with images. If you prefer to have
no images in the emails sent from DecisionSite Posters, only a hyperlink to the Poster
itself, this can be done by changing to Text only. This can be useful if many users are
burdened by large emails due to slow modem connections or similar. Some email
systems cannot show images in an email, so if your users have such a system, set Text
only.
Select Email image format, either JPEG or PNG. The default setting is PNG which
is generally the preferable choice since these images are of better quality than JPEG.
However, if the DecisionSite Posters users are running Lotus Notes as their mail client,
you must change to JPEG since Lotus Notes does not support PNG images in emails.
Select the Number of included Annotation Notes in the emails. The default is No
limit, but if the DecisionSite Posters users are running Lotus Notes as their mail client,
you must change to Max: 15 or less, since Lotus Notes also has a size limit for emails.
The next thing to do is to define how many and which Decision Status levels users
should be able to set the Posters to. Which Decision Status levels that should be
available depends on the decision process at your company.
7.
8.
9.
10.
11.
12.
13.
The default levels are: Open, For review and Closed.
19
TIBCO® Spotfire® DecisionSite® 9.1.1 - Deployment and Administration Manual
Use the Add new..., Edit... and Remove... buttons to change the available levels.
14. One Decision Status level must be set as Default. Do this by selecting it from the list
and clicking on the Set as default button.
15. Use the Move up and Move down buttons to position the Decision Status levels in the
order you want. The order they are positioned in the list is the same order they will
appear in the Posters menu.
16. Click on the Save button to make your changes take effect.
17. Click on the Start button to start the Poster service.
3.1.4.2
Setting Up ISIS Direct Connections
If you want to setup an ISIS Direct connection in order to show chemical structures in the
Details-on-Demand window of the Poster, then perform the steps below.
An ISIS Direct Details-on-Demand created in this way will be available to anyone creating a
Poster. If the Poster author wants to setup a certain Poster with an ISIS Direct Details-onDemand, he can do so, and it will be displayed for anyone opening the Poster later.
Note: A Poster author can also create various web-searches for the Details-on-Demand window
when publishing a Poster. Such a web-search can, for instance, connect to a chemical structure
database other than ISIS, link to an internal rock sample database, or to a general search engine
such as Google.
► To set up ISIS Direct connections:
1.
2.
3.
4.
5.
6.
20
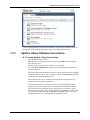
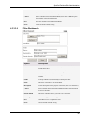
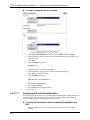
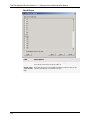
From the Select workbench drop-down menu, select ISIS Direct Configuration.
Click on the Change button.
You can create one or more ISIS Direct connections. Each one will appear in the
topmost list after you have created and saved it.
Click on the New button. This clears all fields and lets you enter parameters for a new
connection.
Enter a Connection name. This is the name that will be seen by the end users when
they wish to create a Poster with an ISIS Direct connection.
Optionally enter a Connection description, explaining more details about the
connection.
Enter Oracle server, Oracle port and Oracle SID.
Configuring DecisionSite
7.
8.
9.
Enter an Oracle user and password, which has access rights to the ISIS Direct
database.
Enter the minimum and maximum number of connections.
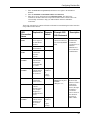
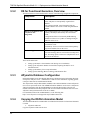
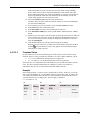
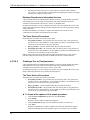
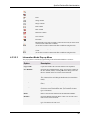
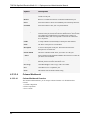
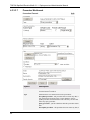
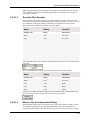
Enter the necessary information for the ISIS table names. The table below
summarizes the ISIS Connection setup in DecisionSite Posters and also shows the
executed SQL statements to help you understand the mechanics behind the
connections.
Three SQL statements are constructed based on information entered during the ISIS Connection
Setup in DecisionSite Posters.
ISIS
Connection
Items
Explanation
Example
Values
Example ISIS
Oracle User
Name
A user that has
access rights to
the ISIS Direct
database.
isis_user
SELECT
cdcaux.ctenvinit('isis_
user.isisrc2d') FROM
dual;
Main Table
The name of the
ISIS Database.
isisrc2d
Structure
Table
The table that
contains the
Structure
column.
isisrc2d_mol
ISIS/Direct
Initialization
Command
executed once to
initialize
ISIS/Direct at
first connection
establishment.
Structure
Column
The column
with structure
information.
Can be BLOBs
or similar.
ctab
Structure Key
Column
The column
with the unique
identifiers for
the structures.
cdbregno
(numbers)
or
corpid
(strings)
Name Table
The table that
contains the
Name column.
isisrc2d_mol
Name Column
The column
with the
structure name
(for example
”3,5Dichlorobenzoic
acid”).
molname
SELECT molname
FROM isisrc2d_mol
WHERE
cdbregno=’12’;
Name Key
Column
The column
with the unique
identifiers for
the structure
names.
cdbregno
(numbers)
or
corpid
(strings)
Chemical Name
Retrieval (B)
When a record is
marked in a
DecisionSite
Poster, this SQL
statement is
executed to
retrieve name of
the chemical
structure in
MDL Chime.
Description
SQL Statement
21
TIBCO® Spotfire® DecisionSite® 9.1.1 - Deployment and Administration Manual
10. Click on the Save button to save the ISIS Direct connection. It will appear in the list at
the top of the screen.
11. You can now test the ISIS Direct connection by entering a compound ID in the field
next to URL for testing configuration [mysearch] using compound: at the top of the
screen.
This displays a hyperlink just below the field. Click on this to launch a new Internet
Explorer window, in which the chemical structure should appear if the connection has
been set up correctly.
3.1.4.3
Verifying the DecisionSite Posters Installation
To verify that DecisionSite Posters has been installed and is ready to use, you can perform the
following procedure in which you will create a new Poster, publish it in the Spotfire Library,
and finally delete it again.
► How to verify the DecisionSite Posters installation:
1.
2.
3.
4.
5.
6.
7.
8.
Open an Internet Explorer browser.
Enter the name of your Spotfire Analytics Server in the Address field. (Example:
http://analyticsserver)
Response: The Spotfire Analytics Server start page is opened.
Click on DecisionSite Library and log in with your DecisionSite administrator
username/password.
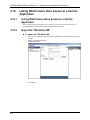
Click on New Library Section.
Select the No, create a blank Library Section radio button, and click Next.
Enter a Title, Description and Keywords and click Next.
Return to the Spotfire Analytics Server start page (Step 2).
Click on DecisionSite Administrator, and select the Admin user.
Response: A new Product License can be seen: DecisionSite Posters.
9. Assign the DecisionSite Posters and Spotfire Library license to the Admin user.
10. Start DecisionSite Client and log into the Spotfire Analytics Server as the user
mentioned in the previous step.
11. Open a data set, for example C:/Program
Files/Spotfire/DecisionSite/Data/General/Baseball/baseball.sfs.
12. Create a scatter plot and select File > Publish Poster to Library....
Response: The Publish Poster to Library - step 1(3) dialog opens.
Response: If the Unsupported Items dialog appears, just click Close.
13. Click the Next button.
Response: The Publish Poster to Library - step 2(3) dialog opens.
14. Click on the Library Section you created previously.
15. Click Next.
16. Enter a description and a keyword, then click Finish.
22
Configuring DecisionSite
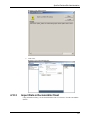
Response: The Poster Published dialog is displayed.
17.
18.
19.
20.
21.
Click Send Email.
Enter your own email address in the To: field and the From: field, and click OK.
Click Close in the Poster Published dialog.
An email should arrive shortly. Verify that is looks good.
Click on the plot in the email and verify that the Poster is opened in a new browser
window.
Installation verified.
3.2
3.2.1
Configuring Computation Services
Setting Permissions for Computation Services
Computation Services enables DecisionSite users to connect to various third-party statistics
servers such as SAS, R and S-PLUS.
► To make the Computation Services features available to users:
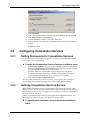
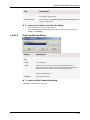
1.
2.
In DecisionSite Administrator, select Users or Groups from the top menu frame.
Select the Computation Services Designers check box for the users and/or groups
that you wish to have permission to use each feature.
Comment: The licence controls which users will have access to the design
environment of Computation Services. All users of DecisionSite will be able to
execute predefined configurations if they are incorporated in a Guide.
3. Click on the Save this Configuration button.
The users whose permissions you have set will now get access to the new Computation
Services functionality the next time they connect to the Spotfire Analytics Server.
3.2.2
Defining Computation Services Servers
When running Computation Services on DecisionSite Client, one has to specify on which
statistics server to execute the various configurations (scripts). To simplify for the end users, it
is possible to preconfigure lists of available servers for all types of connectors. This is done in
the same file for all connectors.
Note: SAS, R and S-PLUS are third-party software that must be installed separately. For
detailed system requirements, please visit http://www.spotfire.com/sr.
► To specify which calculation servers should be available for
users:
23
TIBCO® Spotfire® DecisionSite® 9.1.1 - Deployment and Administration Manual
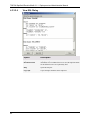
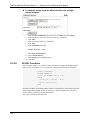
1.
Open the file compserv-servers.xml in your favorite editor. It is located in the
directory:
<installation directory>\server\application-data\toolsettings\
Note: If the xml file is not there, you probably need to apply the patch A35259 from
http://support.spotfire.com/patches.asp
Example:
<?xml version="1.0" encoding="UTF-8"?>
<settings>
<servers>
<category>Spotfire.Category.CompServ.PreDefined.RServer</category
>
<server>
<address>http://myRserver</address>
</server>
<server>
<address>http://Rserver2:8012</address>
</server>
</servers>
<servers>
<category>Spotfire.Category.CompServ.PreDefined.SPlusServer</cate
gory>
<server>
<address>http://mysplusserver:9081</address>
</server>
</servers>
<servers>
<category>Spotfire.Category.CompServ.PreDefined.SASServer</catego
ry>
<server>
<address>bridge://mysasserver:9081</address>
</server>
</servers>
</settings>
2.
3.2.3
Continue to the section below describing the connector of interest.
SAS Connector
► To configure the SAS connector:
1.
2.
3.
4.
3.2.4
Make sure you have followed the general steps above.
In the file compserv-servers.xml, locate the following section:
<category>Spotfire.Category.CompServ.PreDefined.SASServer</category>. This is
where you will add the addresses to all SAS servers on your company.
For each SAS server that you want to add to the list, specify an element as follows:
<server>
<address>YOUR_SERVER_ADDRESS</address>
</server>
where YOUR_SERVER_ADDRESS should be the address to the SAS server, e.g.,
bridge://mysasserver:9081.
Save the file.
R Connector
► To configure the R connector:
1.
24
Make sure you have followed the general steps above.
Configuring DecisionSite
2.
3.
4.
3.2.5
In the file compserv-servers.xml, locate the following section:
<category>Spotfire.Category.CompServ.PreDefined.RServer</category>.This is
where you will add the addresses to all R servers on your company.
For each R server that you want to add to the list, specify an element as follows:
<server>
<address>YOUR_SERVER_ADDRESS</address>
</server>
where YOUR_SERVER_ADDRESS should be the address to the R server, e.g.,
http://myRserver.
Save the file.
S-PLUS Connector
► To configure the S-PLUS connector:
1.
2.
3.
4.
3.2.6
Make sure you have followed the general steps above.
In the file compserv-servers.xml, locate the following section:
<category>Spotfire.Category.CompServ.PreDefined.SPlusServer</category>. This is
where you will add the addresses to all S-PLUS servers on your company.
For each S-PLUS server that you want to add to the list, specify an element as follows:
<server>
<address>YOUR_SERVER_ADDRESS</address>
</server>
where YOUR_SERVER_ADDRESS should be the address to the S-PLUS server, e.g.,
http://mysplusserver:9081.
Save the file.
Custom Connectors
If you or your company have developed any type of custom connectors you should be able to
specify a list of servers the same way as for the out-of-the box alternatives above. In this case
you must probably create the <category> element for your custom connector yourself.
3.3
3.3.1
Configuring DecisionSite for Functional
Genomics
DS for Functional Genomics, Prerequisites
Before you begin
To make the full set of tools work, you need access to the following key pieces:
• Affymetrix AADM database or GCOS
• Pathway map and coordinate files
• Gene ontology and annotation files
Checklist
•
•
Make sure Information Services is installed and running, and that you are authorized to
make changes to the AADM database instance.
Log into Windows on the Spotfire Spotfire Analytics Server using a user account that
has local administrative privileges.
25
TIBCO® Spotfire® DecisionSite® 9.1.1 - Deployment and Administration Manual
3.3.2
DS for Functional Genomics, Overview
The DecisionSite for Functional Genomics consists of the following configurable components:
Component
Description
AADM IM
In the AADM Information Model, AADM based columns,
filters, and joins are conceptionally organized into
domains.
After setting up the IM, some information links are
available and new ones can be created using Information
Builder.
Retrieve from Database tool
(Affymetrix data
integration)
After configuring this tool, it is possible to retrieve both
summary and analysis data directly into DecisionSite
Client.
Configuration of this tool is normally handled during
installation of the server. Updates are managed using an
XML file on the server.
Pathway Viewer
Connects map information files to the data set in
DecisionSite Client.
The Pathway Viewer tool will not work without pathway
maps and coordinate files on the server.
Gene Ontology Browser
Connects ontology files to the data set via annotation files.
The Gene Ontology Browser tool can also run using local
files, but setting up files on the server simplifies the use of
the tool for the end user.
These are the main tasks:
• Setting up the Retrieve from Database tool (during server installation).
• Setting up the Affymetrix database environment (importing the IM) for use of
information links.
• Setting up the Pathway Viewer map information.
• Setting up Gene Ontology Browser ontology and annotation files.
3.3.3
Affymetrix Database Configuration
Information Models access data through Data Sources defined using the Information Designer.
See Spotfire Analytics Server - Administrator’s Guide for more information regarding general
concepts of data sources and Information Models.
The Affymetrix® Analysis Data Model (AADM) is the relational database schema Affymetrix
uses to store experiment results. The AADM Information Model is used to retrieve Affymetrix
Analysis information from the AADM database into Spotfire DecisionSite Client. It also
includes information links that prompt the end user for metadata information and retrieves the
Affymetrix Analysis Information for STAT (AADM).
For a detailed schema of the AADM database, see the following link:
https://www.affymetrix.com/support/developer/aadm/content.affx
3.3.4
Copying the DSFG Information Model
The Information Model for AADM which is included in DecisionSite for Functional Genomics
is called:
• affymetrix-aadm.xml
Copy the affymetrix-aadm.xml file from
26
Configuring DecisionSite
<installation directory>\server\application-data\iis\applicationiim\affymetrix-aadm\
to
<installation directory>\server\application-data\iis\export\
This allows you to perform any necessary changes to the XML file that you will use in the
export directory, while keeping the original XML file intact. All IMs that are to be imported by
the Information Designer must be placed in this directory.
3.3.5
3.3.5.1
Importing the Information Model
Creating Views
Note: The following steps are applicable on Oracle databases only.
The AADM IM includes references to the AADM database and to a set of views in the AADM
database instance. These three views need to be created before the IM can be used. The SQL
code for the views is shown below. (Replace AADM_SCHEMA in the example views with the
name of your own AADM schema.)
The views can be created either in the AADM schema or in another schema, where the schema
owner has ’select’ privileges to the AADM schema.
You also need to change the placeholder AADM_VIEWS_SCHEMA in the affymetrixaadm.xml file to the schema name that you are using. See ”Editing the IM XML File”
for more information.
PROTOCOL PARAMETER View
CREATE OR REPLACE VIEW V_PROTOCOL_PARAMETER
(
PROTOCOL_ID,
PARAMNAME,
PARAMVALUE
)
AS
SELECT
PRT.ID,
PT.NAME,
P.STRING_VALUE
FROM
AADM_SCHEMA.PARAMETER P,
AADM_SCHEMA.PARAMETER_TEMPLATE PT,
AADM_SCHEMA.PROTOCOL PRT,
AADM_SCHEMA.PROTOCOL_TEMPLATE PRTT
WHERE
PRT.ID=P.PROTOCOL_ID AND
PRTT.ID=PRT.TEMPLATE_ID AND
PT.PROTOCOL_TEMPLATE_ID=PRTT.ID AND
PT.PARAMETER_IDX = P.PARAMETER_IDX
EXPERIMENT ANALYSIS View
CREATE OR REPLACE VIEW V_EXPERIMENT_ANALYSIS
(
A_PROTOCOL_ID,
E_PROTOCOL_ID,
TARGET_ID,
PHYSICAL_CHIP_ID,
EXPERIMENT_NAME,
ANALYSIS_ID,
ANALYSIS_NAME,
ANALYSIS_DATE
)
27
TIBCO® Spotfire® DecisionSite® 9.1.1 - Deployment and Administration Manual
AS
SELECT
ACHP.PROTOCOL_ID,
EXP.PROTOCOL_ID,
EXP.TARGET_ID,
EXP.PHYSICAL_CHIP_ID,
EXP.NAME,
ACHP.ID,
ACHP.NAME,
ACHP.ANALYSIS_DATE
FROM
AADM_SCHEMA.EXPERIMENT EXP,
AADM_SCHEMA.ANALYSIS_DATA_SET DSCEL,
AADM_SCHEMA.ANALYSIS ACEL,
AADM_SCHEMA.ANALYSIS_DATA_SET DSCHP,
AADM_SCHEMA.ANALYSIS ACHP
WHERE
EXP.ID = DSCEL.EXPT_ID AND
ACEL.DATA_SET_COLLECTION_ID = DSCEL.COLLECTION_ID
AND
DSCHP.ANALYSIS_ID = ACEL.ID AND
ACHP.DATA_SET_COLLECTION_ID = DSCHP.COLLECTION_ID
ANALYSIS TYPE View
CREATE OR REPLACE VIEW V_ANALYSIS_TYPE
(
ID,
TYPE
)
AS
SELECT
DISTINCT(ANALYSIS_ID) ID,
'STAT' TYPE
FROM
AADM_SCHEMA.ABS_GENE_EXPR_RES_STAT
UNION
SELECT
DISTINCT(ANALYSIS_ID) ID,
'EMP' TYPE
FROM
ADM_SCHEMA.ABS_GENE_EXPR_RESULT
3.3.5.2
Editing the IM XML File
Before importing the IM you must make sure that you have edited the affymetrix-aadm.xml file
to point to your current AADM schema and to the schema where you created the views. The
following references should be changed in the affymetrix-aadm.xml file:
<schema>AADM_VIEWS_SCHEMA</schema>
to
<schema>YOUR_AADM_VIEWS_SCHEMA</schema>
and
<schema>AADM_SCHEMA</schema>
to
<schema>YOUR_AADM_SCHEMA</schema>
where YOUR_AADM_VIEWS_SCHEMA is the schema where you created the views and
YOUR_AADM_SCHEMA is the name of the AADM schema used at your company.
3.3.5.3
Importing the IM
Import the Information Model using the Information Designer.
28
Configuring DecisionSite
Once the Model is imported, you will be asked to update the AADM Data Source information
with a user name, password, server, port and SID.
3.3.6
Updating AADM Connection Information for
Retrieve from Database (Remote) Tool
The Retrieve from Database (Remote) tool in DecisionSite for Functional Genomics is
normally configured in the Affymetrix Database step of the installation process for the Spotfire
Analytics Server.
However, there may be times when the connection needs to be updated later on. For these
occasions, you can edit the affymetrix-tool.settings.xml file, located in the following directory,
to update the AADM connection information:
• <install directory>\server\application-data\affymetrix-tool
<?xml version="1.0" encoding="UTF-8"?>
<affymetrix>
<connection name="aadm-remote">
<user>aadm</user>
<password>aadm</password>
<driver-class>oracle.jdbc.driver.OracleDriver</driver-class>
<connection-url>jdbc:oracle:thin:@qaoracle:1521:qa</connection-url>
</connection>
<settings>
<setting name="aadm-remote">
<table-owner/>
</setting>
<setting name="aadm-local">
<table-owner/>
</setting>
</settings>
</affymetrix>
Edit the selected element to change the port, SID, host, user or password.
If the user defined in <user> is not the owner of the AADM schema, the <table-owner> should
be set to the owner of the AADM schema.
Example:
<user>aadm_not_owner</user>
...
<setting name="aadm-remote">
<table-owner>aadm</table-owner>
</setting>
Note: Make sure to edit the table-owner for the aadm-remote tool.
29
TIBCO® Spotfire® DecisionSite® 9.1.1 - Deployment and Administration Manual
3.3.7
Updating AADM Connection Information for
Retrieve from Database (Local) Tool
The Retrieve from Database (Local) tool retrieves data from AADM using an ODBC
connection on the client.
If the user defined in <user> is not the owner of the AADM schema, the <table-owner> should
be set to the owner of the AADM schema.
Example:
<user>aadm_not_owner</user>
...
<setting name="aadm-local">
<table-owner>aadm</table-owner>
</setting>
Note: Make sure to edit the table-owner for the aadm-local tool. Also, note that all users of the
Retrieve from Database (Local) tool will be affected by this setting.
3.3.8
3.3.8.1
Pathway Viewer
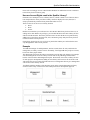
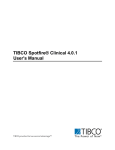
Pathway Viewer Introduction
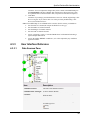
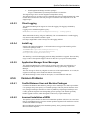
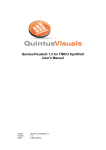
The Pathway Viewer tool maps a location on a pathway image to a specific Pathway identifier
(PathwayID), see picture below.
The Pathway Viewer tool will allow the end users to select pathways of interest, and interact
(bi-directionally) between their DecisionSite Client visualization and the display of the
Pathway.
DecisionSite Client with data linking DataID to PathwayID (left) and Pathway map with
PathwayIDs highlighted that are marked in the browser.
3.3.8.2
Required Data Files
Basically, there are 5 files or file types that are important for the Pathway Viewer tool.
► Pathway Viewer files:
1.
Pathway image files (in GIF or JPG format). These are the actual pathway image
maps. There is an example file provided by default in the directory:
<install directory>\server\application-data\pathwayviewer\data
2.
30
The example file is called sample.gif. If you want to download other image maps, you
can go to:
ftp://ftp.genome.ad.jp/pub/kegg/pathways/map
Pathway coordinate files (containing PathwayID, Xmin, Xmax, Ymin, Ymax). These
are the files on the server that link the PathwayIDs to the coordinates on the pathway
Configuring DecisionSite
3.
4.
5.
image maps. The sample file provided by default is called sample.coord. It contains
the coordinates for PathwayIDs on the sample.gif pathway image map.
Such files can be downloaded from:
ftp://ftp.genome.ad.jp/pub/kegg/pathways/map
pathway_settings.xml This is the settings file that links everything together by
specifying the image files and coordinate files that should be used, as well as specifies
the pathway names.
idmapping.xml This is the file on the server that links the records in the end user's
data set to the PathwayIDs. There is an example file provided by default. In the
example file, the data in the DLBCL data is linked to the PathwayIDs.
Note: This is a manually configured file - that is, you must edit this file and manually
map the end user data to the pathway data.
The end user's data file - this is the data that is opened up in DecisionSite Client and
will be linked to the pathway maps.
All files involved in the configuration of the tool should be placed in the following
directory on the Spotfire Analytics Server:
<install directory>\server\application-data\pathwayviewer
3.3.8.3
Configuring the Pathway Viewer
When the tool is shipped in DecisionSite for Functional Genomics, there is no pathway
information installed on the server, except for a limited example configuration. Real pathway
information must be added as part of the product configuration.
► The following items must be configured:
•
•
•
Configure the pathway_settings.xml file.
Add pathway image maps and coordinate files to the data directory on the server.
Construct an idmapping.xml file based on the end user’s data format.
Configure the pathway_settings.xml file:
This is the example pathway_settings.xml file:
<pathway_settings admin="true">
<maingroups name="Cancer">
<subgroups name="Immunity">
<pathway pathwayid="map00010" filedir=""
coordinatefile="sample.coord"
imagefile="sample.gif"
pathwayname="NK cell-mediated cytotoxicity"/>
</subgroups>
</maingroups>
</pathway_settings>
Edit the <maingroups> and <subgroups> elements to contain the folder names and information
about the pathway maps and coordinates that you want to display to the end users of the tool.
For each subgroup, the <pathway> element should contain the information of the individual
pathways.
This must include:
a) the pathway identifier (e.g., pathwayid="map00010" )
b) one coordinate file containing the PathwayID and the xy box coordinates (e.g., coordinatefile
= "sample.coord")
c) one image file (e.g., imagefile="sample.gif")
31
TIBCO® Spotfire® DecisionSite® 9.1.1 - Deployment and Administration Manual
d) the pathway name (as it will be displayed to the end users in the user interface of the tool,
e.g., pathwayname="NK cell-mediated cytotoxicity")
There may be many pathways included in each subgroup. Once you have added the pathway
information for the individual pathways, they should show up in the pathway tree.
Add pathways (e.g., KEGG) to data directory:
Place any pathway image and pathway coordinate files that you want the end users to have
access to in the following directory on the Spotfire Analytics Server:
• <install directory>\server\application-data\pathwayviewer\data
Construct an idmapping.xml file:
Contact a person knowledgeable in the end user’s data formats to assist in creating or editing
the file named idmapping.xml. This file should contain many to many mappings of internal IDs
(used in the data set) and PathwayIDs. You can edit the enclosed idmapping.xml file in the
directory:
• <install directory>\server\application-data\pathwayviewer
The file needs the following structure (tab separated):
<data PathwayIDName="PathwayID">String String String
Z93241 3.6.1.34 "Oxidative phosphorylation,Photosynthesis,ATP
Synthase"
Z83821 2.3.1.37 "Glycine, serine and threonine metabolism"
Z18785 1.11.1.7 "Phenylalanine metabolism,Methane
metabolism,Flavonoids, stilbene and lignin biosynthesis"
... ... ...
</data>
The mapping information between the internal identifiers in the data sets used by the end users
and the pathway identifiers (many to many) should be pasted between the data elements and the
first line should be: String (to import the data into the DecisionSite Client as strings).
3.3.8.4
Upgrading a Previous Version of Pathway Viewer
If you have been using the Pathway Viewer tool previously on a Spotfire Analytics Server, your
old data and settings files will remain in their old directories during a server upgrade. To use the
old files on a later Spotfire Analytics Server you should copy all image maps and coordinate
files from their old location to:
• <install directory>\server\application-data\pathwayviewer\data
You should also copy the idmapping.xml and pathway_settings.xml file to:
• <install directory>\server\application-data\pathwayviewer
and make sure to remove any defaultdir and pathwayid_to_clientid_file attributes from the
<pathway_settings> element of the pathway_settings.xml file.
3.3.9
3.3.9.1
Gene Ontology Browser
Gene Ontology Browser Introduction
The Gene Ontology Browser tool is used to connect a data set in DecisionSite Client to gene
ontologies provided by the Gene Ontology Consortium (or other ontology files with the same
structure) via an annotation file that links the different files together. The tool can be run using
local files, but setting up files on the server simplifies the use of the tool for the end users.
Note: On WebSphere servers you may have to create the following directory structure under
the application-data directory for yourself:
geneontology
annotations
32
Configuring DecisionSite
ontologies
See Note under ”Copying the DSFG Information Model” for more information
regarding WebSphere paths.
3.3.9.2
Adding Ontology Files to the Server
Place the ontology files in the following directory on the Spotfire Analytics Server:
• <install directory>\server\application-data\geneontology\ontologies
Note: There should only be one set of ontology files on the server. This means one
component.ontology, one function.ontology and one process.ontology. (The file names are not
important.) The tool will always try to parse all available ontology files in this folder. Hence,
old files should be replaced or removed from this folder upon update to avoid trouble when
running the tool.
3.3.9.3
Adding Annotation Files to the Server
Place the annotation files in the following directory on the Spotfire Analytics Server:
• <install directory>\server\application-data\geneontology\annotations
Note: The names of the annotation files will be visible to the end users of the tool in a dropdown list. This means that the file names should be unique and make sense to the end users, so
that they can select the correct annotation for their current analysis.
For more information regarding supported annotation file formats, see the chapter
”Gene Annotation File Formats” in the Spotfire DecisionSite for Functional Genomics
- User’s Manual.
3.4
3.4.1
Configuring DecisionSite for Lead Discovery
DS for Lead Discovery, Prerequisites
Before you begin
To use the Information Model for ActivityBase, you must have access to:
• ActivityBase 4.0, 4.1 or 5.0 database
To use MDL Direct as a structure provider for the Structure Analytics tools, you must have
access to:
• MDL Direct 2.0 through 5.1 Molecules database
Checklist
•
•
3.4.2
Make sure Information Services is installed and running, and that you are authorized to
make changes to the data sources.
Log into Windows on the Spotfire Analytics Server machine using a user account that
has local administrative privileges.
DS for Lead Discovery, Overview
The DecisionSite for Lead Discovery consists of the following configurable components:
Component
Description
ActivityBase IM
In the ActivityBase Information Model, columns, filters, and
joins are conceptionally organized into domains. For instance, a
set of columns may be considered relevant for a particular task,
and are therefore saved in the same domain.
After setting up the IM, some information links are available
33
TIBCO® Spotfire® DecisionSite® 9.1.1 - Deployment and Administration Manual
and new ones can be created using Information Builder.
MDL Direct as
structure provider
The Structure Analytics tools of DecisionSite for Lead
Discovery needs access to structures from a structure provider.
If MDL ISIS/Host is to be used as a structure provider, no
configuration is necessary on the server.
However, if MDL Direct is to be used, you will need to
configure the desired connections according to the steps
described later in this chapter.
These are the main tasks:
• Setting up the ActivityBase database environment (importing the IM) for use of
information links.
• Configuring MDL Direct to be used as a structure provider for the Structure Analytics
tools (optional).
3.4.3
ActivityBase Database Configuration
Information Models access data through Data Sources defined using the Information Designer.
The ActivityBase Information Models are used to retrieve information from the database into
Spotfire DecisionSite Client.
3.4.4
Copying the DSLD Information Model
The Information Models available for the different versions of ActivityBase are called:
• abase40.xml
• abase41.xml
• abase50.xml
Copy the XML file of interest from
<installation directory>\server\application-data\iis\applicationiim\activitybase\
to
<installation directory>\server\application-data\iis\export\
This allows you to perform any necessary changes to the XML file that you will use in the
export folder, while keeping the original XML file intact. All IMs that are to be imported by the
Information Designer must be placed in this directory.
3.4.5
3.4.5.1
Importing Information Models
Editing Information Models
ActivityBase 4.0, 4.1 or 5.0 IM
Before importing the selected XML file, make sure to change the following references in the
abase40.xml, abase41.xml or abase50.xml file:
<schema>ACTIVITYBASE_SCHEMA</schema>
to
<schema>YOUR_ACTIVITYBASE_SCHEMA</schema>
where YOUR_ACTIVITYBASE_SCHEMA is the name of the schema that ActivityBase uses
at your company.
3.4.5.2
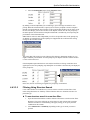
Importing the DSLD IM
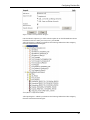
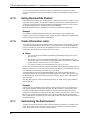
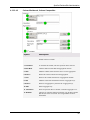
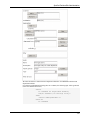
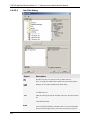
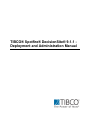
Import the desired Information Model using the Information Designer.
34
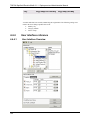
Configuring DecisionSite
Import workbench in Information Designer.
Once the Model is imported, you will be asked to update the ACTIVITYBASE Data Source
information with a user name, password, server, port and SID.
After importing the 4.0 Model you should see the following Information Links and Query
Elements in the Information Designer:
ActivityBase 4.0 Information Model.
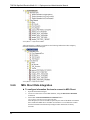
After importing the 4.1 Model you should see the following Information Links and Query
Elements in the Information Designer:
35
TIBCO® Spotfire® DecisionSite® 9.1.1 - Deployment and Administration Manual
ActivityBase 4.1 Information Model.
After importing the 5.0 Model you should see the following Information Links and Query
Elements in the Information Designer:
ActivityBase 5.0 Information Model.
3.4.6
MDL Direct Data Integration
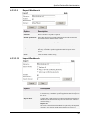
► To configure Information Services to connect to MDL Direct:
1.
2.
3.
36
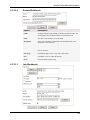
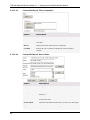
Open the Information Designer.
Create a new data source for the MDL-database, using the Data Source Definition
workbench.
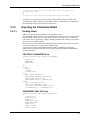
Set the New connection initialization commands field to
select cdcaux.ctenvinit('isis.isisrc2d') from dual
where ’isis.isisrc2d’ should be replaced by the name of the MDL environment
that is enabled for MDL Direct. An MDL environment is a set of tables that contain
chemical information and chemically intelligent index mechanisms for binary
structures.
Configuring DecisionSite
Note: The ”New connection initialization commands” option is used to point
out the MDL environment. Therefore, if you want to use multiple MDL connections,
you must make a new connection for each MDL environment that you want to use.
3.4.7
Creating Column Elements for MDL Direct
To use MDL Direct as a structure provider for the Structure Analytics tools, the data source (or
data sources) must first be defined according to ”MDL Direct Data Integration”. Then
continue by creating column elements according to the following process:
► Create column elements:
1.
2.
3.
4.
5.
6.
7.
8.
9.
3.4.8
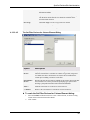
Open the Information Designer.
In the Select workbench drop-down list, choose Multiple Columns.
Click Change.
In the Data Sources tree view to the left, click to select the molecule table. This is
usually called <MDL environment>_MOL (e.g., ISISRC2D_MOL).
Click Add >.
In the Information Model tree view to the right, create a new domain by right-clicking
and selecting New Domain... from the pop-up menu.
Comment: The new domain will be created under the domain that you currently have
selected. To place your new domain at the root level, first click Select None.
In the Information Model tree, click on your newly created domain.
In the Multiple Columns workbench, click < Select.
Click Save.
Creating a Molfile Column Element
► To create a molfile column element:
1.
2.
3.
4.
5.
6.
7.
8.
9.
3.4.9
In the Select workbench drop-down list, choose Column.
Click Change.
In the Data Sources tree view, under the previously used molecule table, click on the
blob column that contains structures (usually named CTAB).
In the Column Element workbench, click Add >.
Change the calculation to molfile(C1).
Comment: The function molfile is described in the MDL Direct Reference Manual.
Give the new column element the name MOLFILE (or anything else you can
remember later).
Comment: This column element will be referred to as MOLFILE later in this
document.
In the Information Model tree, click on your newly created domain.
In the Column workbench, click < Select.
Click Save.
Comment: If desired, other useful column elements can be created in a similar way by
using the MDL Direct Reference Manual.
Creating a Similarity Score Column Element
► To create a similarity score column element:
1.
2.
In the Select workbench drop-down list, choose Column.
Click Change.
37
TIBCO® Spotfire® DecisionSite® 9.1.1 - Deployment and Administration Manual
3.
In the Data Sources tree view, under the previously used molecule table, click on the
blob column that contains structures (usually named CTAB).
4. In the Column Element workbench, click Add >.
5. Change the calculation to molsim(C1, ?, ’NORMAL’).
Comment: The function molsim is described in the MDL Direct Reference Manual.
6. Give the new column element the name MOLSIMILARITY (or anything else you can
remember later).
Comment: This column element will be referred to as MOLSIMILARITY later in this
document.
7. In the Information Model tree, click on your newly created domain.
8. In the Column workbench, click < Select.
9. Change the Type from blob to real.
10. Click Save.
Comment: If desired, other useful column elements can be created in a similar way by
using the MDL Direct Reference Manual.
3.4.10
Setting Permissions for Column Elements
When all column elements have been created you need to make sure that all intended end users
have access to the elements.
If a user lacks access to the ID column for a specified connection, he/she will not have access to
that particular connection.
► To set permissions:
1.
2.
3.
4.
5.
6.
7.
3.4.11
In the Select workbench drop-down list, choose Permissions.
Click Change.
Click to select the appropriate Group or User from the list on the left.
Click Edit Permissions.
Locate the domain you created under chapter "Creating Column Elements for MDL
Direct" and select the Execute check box for this domain.
Click Save Permissions.
Repeat for other users or groups, if applicable.
Creating and Storing the Configuration File
For the connection to an MDL Direct data source to show up in the Structure Connection dialog
in DecisionSite Client, it is necessary to create a configuration file on the server.
If you want to set up multiple MDL Direct connections, all connections are configured in the
same file, each under a separate <configuration> tag. You can also create several configurations
against the same database. For example, you might want to set up connections involving a
different number of available columns, or to use different ID columns for various user groups.
► To create a configuration file:
1.
2.
3.
4.
38
Use Explorer (or another file browser) to browse to the directory on the server called
<install directory>/server/application-data/chemistry-framework/.
Copy the file template-mdl-direct.xml and name the new copy mdl-direct.xml.
Open the mdl-direct.xml file in your favorite editor.
Change the <name>, <title>, <description> and <tooltip> tags to display suitable
information.
Comment: The name must be unique for each connection. It is used by the Structures
in Table tool. The title is what the end users will see as an option in the drop-down list
of the Structure Connection dialog. The description is also shown to the end users in
this dialog and should contain more information about the selected connection. The
Configuring DecisionSite
5.
ToolTip is shown when an end-user is hovering with the mouse pointer over the
database connection link in Structure Viewer. If no ToolTip has been specified, the
description is used instead.
Now, you need to add the guid for each column element that should be used by the
Structure Analytics tools to suitable positions in this file.
Comment: The guids can be obtained from the Information Model tree view in
Information Designer. Right-click on the desired element in the tree view, select Copy
Guid from the pop-up menu and paste the guid in the mdl-direct.xml file.
Example:
Tag in configuration file
Element in Information Model
<reference-column>
CDBREGNO
<id-column>
CDBREGNO
<structure-column>
MOLFILE
<pl:constant name=”idColumn”>
CDBREGNO
<pl:constant name=”structureColumn”>
CTAB
<pl:constant
name=”similarityScoreColumn”>:
MOLSIMILARITY
<data-column>
Other columns you want to display (one row
for each column).
6.
7.
3.4.12
If your MDL Direct setup includes a column containing structure keys, it needs to be
identified by a <meta-data> tag to be recognized by the Add Structure Keys tool. For
the data column containing structure keys, add a meta-data tag according to the
following example:
<data-column column-guid="aaedcad0-5ea3-11aa-20ae-00a0ac110a07"> <!-ISIS2DKEYS -->
<meta-data
name="Spotfire.ChemistryFramework.StructureKeysColumn">true</meta-data>
</data-column>
The column-guid attribute in the example should be replaced with your guid for the
structure keys column.
Save the file to the same location on the server (<install directory>/server/applicationdata/chemistry-framework/).
Adding Licenses for the Users
► To enable MDL Direct features for users or groups:
1.
In DecisionSite Administrator, click on Groups or Users to open the properties for the
group or user you wish to give access to DecisionSite for Lead Discovery.
2. Make sure that the DecisionSite for Lead Discovery check box is selected.
3. Make sure the DecisionSite level is set to at least DecisionSite Nominal.
4. Click Save This Configuration.
5. Repeat for other users or groups, if applicable.
Explanation of the different licenses:
39
TIBCO® Spotfire® DecisionSite® 9.1.1 - Deployment and Administration Manual
Check box in
DecisionSite
Administrator:
Things that the user or group will have
access to:
DecisionSite for Lead
Discovery
Select this check box to ensure access to all possible
structure providers.
All DecisionSite for Lead Discovery features will be
available, including the Chemistry Services and, hence,
the possibility to use ISIS/Host and MDL Direct, as well
as custom structure providers.
DecisionSite for Lead
Discovery, no ISIS/Host
Select this check box to allow users to run against MDL
Direct or custom structure providers only.
All tools will be available except those that are specific
to ISIS/Host, since this structure provider will be
prohibited.
If both of the above check boxes are selected, the user or group will have access to everything
described under DecisionSite for Lead Discovery above (the latter check box is ignored).
3.4.13
Troubleshooting MDL Direct Connections
Some of the problems that may occur when you configure a connection to MDL Direct may be
detected by the Structure Analytics Diagnostics tool. This tool is available in DecisionSite
Client, under Help > Structure Analytics Diagnostics, and it can be a valuable help in
detecting what may have gone wrong during the configuration.
Missing Columns
When the configuration is read, the guids are confirmed in the Information Model. If a guid
cannot be located, that column element is discarded from the configuration.
If the id-column (e.g., CDBREGNO) is missing, the Structure Analytics Diagnostics tool will
state it is missing, and the configuration will not be shown in the drop-down list of the Structure
Connection dialog.
If the structure-column (e.g., MOLFILE) is missing, the Structure Analytics Diagnostics tool
will state it is missing, and the configuration will not be shown in the drop-down list of the
Structure Connection dialog.
If the reference-column is missing, the Structure Analytics Diagnostics tool will state it is
missing, and the configuration will not be shown in the drop-down list of the Structure
Connection dialog. If there is no reference column at all in the configuration the id-column will
be used instead.
A column might be missing due to either of the following:
• The guid entered in the configuration file (mdl-direct.xml) is wrong (misspelled).
• The user does not have Execute permissions on that particular column element.
• The column element is missing (removed from the database).
Configuration File Issues
If the file name (mdl-direct.xml) is wrong, the Structure Analytics Diagnostics tool should say
it failed to find it.
40
Configuring DecisionSite
If the XML in the configuration file (mdl-direct.xml) is incorrect, the Structure Analytics
Diagnostics tool should say it is invalid.
Specification of Rules
For information on how to specify mandatory and recommended rules, see Spotfire Developer
Network.
3.5
3.5.1
Configuring DecisionSite for Microarray
Analysis
Introduction
This chapter describes how to install and configure Spotfire DecisionSite for Microarray
Analysis, which provides multiple levels of probe level analysis, normalization, quality
assessment, and advanced statistics for secondary analysis of both Affymetrix and 2-Channel
microarray experiments.
Important: Spotfire DecisionSite for Microarray Analysis requires Spotfire Analytics Server 9.0
or higher.
Before you begin, make sure that you have access to the latest software distribution archive
from the Spotfire download site. It contains the following files:
• The file TIB_DSMA_9.1.1_distribution.zip, which is what you will deploy on the
server
• The release notes for DecisionSite for Microarray Analysis 9.1.1
3.5.2
Installation
If you should need more information on how to deploy zip files on the server, please see
chapter "DecisionSite Administrator".
► To deploy the DecisionSite for Microarray Analysis distribution
file:
1.
2.
3.
4.
5.
6.
7.
8.
3.5.3
Make sure that the Spotfire Analytics Server is running..
Unzip the downloaded installation archive file for DecisionSite for Microarray
Analysis to a temporary folder.
Start the DecisionSite Administrator tool (either on the server using Internet Explorer
or, in DecisionSite, select Tools > Administration > DecisionSite Administrator).
Note: You must have administrator's privileges to run this tool.
Select Deployer from the top menu frame.
Browse to the temporary folder where you unzipped the Spotfire DecisionSite
deployment kit.
Select and open the file TIB_DSMA_9.1.1_distribution.zip.
Click on Deploy.
The contents of the distribution are again shown in a separate window. All software
components of DecisionSite for Microarray Analysis 9.1.1 will now be installed.
Configuration
► To make the new features of DecisionSite for Microarray
Analysis available to users:
1.
In DecisionSite Administrator, select Users or Groups from the top menu frame.
41
TIBCO® Spotfire® DecisionSite® 9.1.1 - Deployment and Administration Manual
2.
3.
4.
42
Select the DecisionSite for Microarray Analysis check box for the users and/or
groups that you wish to have permission to use each feature. (For more information on
how to configure Users or Groups, see chapter "DecisionSite Administrator".)
Click on the Save this Configuration button.
The users whose permissions you have set will now get access to the new functionality
of DecisionSite for Microarray Analysis the next time they connect to the Spotfire
Analytics Server.
Spotfire DecisionSite Administration
4
4.1
4.1.1
Spotfire DecisionSite Administration
Setting Up the Environment
Introduction
This section gives a broad overview of the different steps recommended to set up the
DecisionSite platform when the Spotfire Analytics Server is installed. The intent is to give you
as an administrator an understanding of each step and its impact on the environment. For details
on each step you are recommended to read the Help for the appropriate tool.
Example
An example company, Acme Corp., is used to exemplify the process of setting up the
environment. Acme Corp. is a company active in the gene exploration field and consists of a
research department, a sales department, and a management department. The research
department in turn consists of three projects, A, B, and C. Analysis results from research and
sales needs to be communicated internally as well as to management.
Research also got a tool-development group with representatives from each project. Their goal
is to develop tools needed to make the gene research more efficient.
Acme Corp. has got a system administrator who is responsible for installing the Spotfire
Analytics Server and setting up the DecisionSite platform. We will call the administrator Tom.
4.1.2
Users and Groups
Users and groups of users play an important role in the DecisionSite environment. In the
DecisionSite Administrator, users can be added to the environment and organized into groups.
The design of the groups affect which tools that become available for the user and what data
that can be retrieved. The user and group organization affects users in two ways:
• The DecisionSite application. Different users at your site can use different
DecisionSite applications. DecisionSite Base, DecisionSite for Lead Discovery, and
DecisionSite for Functional Genomics are examples of DecisionSite applications. Each
has its own set of tools, aimed at its field. The DecisionSite application determines
which tools your users has access to.
• The analysis access in the Spotfire Library. The Spotfire Library will be discussed
later but is a publishing area for analysis material. Access to this material can be
controlled by granting access to the users and groups.
The user organization is done in DecisionSite Administrator where users can be added and
made part of groups.
Example
Tom decides to create a group for each department and one for each project in the research
department. By creating these groups Tom wants to ensure that each group gets the tools
needed for their specific needs, without the distraction of unnecessary items. Tom also creates a
group consisting of the development team at the research department. With this group, the
developers can create an environment of Guides, applications, and extensions not ready for
production.
43
TIBCO® Spotfire® DecisionSite® 9.1.1 - Deployment and Administration Manual
4.1.3
Add Licenses
All interaction with the Spotfire Analytics Server depends on what licenses the users have
access to. The licensing is also handled in DecisionSite Administrator. If you grant a product
license to a user or group, the functionality is automatically presented to them in the appropriate
way. No functionality that requires a license can be used before you unlock it.
Example
Acme Corp. has decided that sales and management use the standard DecisionSite application,
which only requires the default license. They will also use DecisionSite Posters to communicate
analysis results efficiently. This tool does need a license, which Tom grants them. By granting
this license, the DecisionSite Poster functionality will appear for these users.
Research uses DecisionSite Posters and the DecisionSite for Functional Genomics, which
includes a number of useful tools when working with genes. Both require a license, so Tom
unlocks these for the Research department group.
4.1.4
Set Up the Spotfire Library
The Spotfire Analytics Server from version 8.0 features a Library, which provides convenient
publishing of analysis data. Using the Spotfire Library, the users can publish and share all their
analysis material.
The Spotfire Library is divided into Library Sections where all access permissions are set. It is
the Library Sections which contains the analysis material and folders. The permissions apply to
the entire Library Section, regardless of the folder structure inside it. Library Sections can only
be created by Library Section Creators, which is a group controlled in the Library
Administrator.
Library Section Creators is a predefined group in the DecisionSite Administrator. By adding
users to this group, they become Library Section Creators. Library Section Creators
automatically receive the Library Section Owner access privilege in the Library Sections they
create.
It is you, the DecisionSite administrator who decides which users should become Library
Section Creators. This means you do not have to create and manage the Library Sections
yourself, rather you delegate this to the specified Library Section Creators.
44
Spotfire DecisionSite Administration
Please refer to Setting up Access to DecisionSite Products for information on how to add users
to the Library Section Creators group.
How are Access Rights used in the Spotfire Library?
Each time a user attempts to access a Library Section, a check is made to see if that user has at
least read permission. In any tool where Library content is displayed to a user, that user is
always presented only with the Library Items that he has access to.
There are three levels of access to Library Sections:
• Read
• Write
• Owner
Read access means that you can list and view all content in that Library Section. However, no
editing can be done. With write privileges, you can add content into the entire Library Section
and also read the material. The Library Section Owner can also edit the access permissions by
adding users to the Library Sections read, write, and Owner groups. Only the Library Section
Owner can delete a Library Section.
Each Library Section has its own set of access permissions and they are enforced in the same
way throughout the entire Library Section.
Example
Tom adds the manager of each department, Ann for research, Peter for sales, and Nicole for
management, as Library Section Creators. Eventually, Tom might add more people as Creators,
but for now these people will do.
The departments will create the Library Sections they need as their work changes. For example,
sales and management create one Library Section each for the publishing of DecisionSite
Posters of sales statistics and management reports. In Research, Ann creates a Library Section
for each project in her department, adding an extra Library Section Owner for each. Peter and
Ann assign write access to their staff and read access to management. Nicole gives management
write access to their Library Section.
Tom finally adds the members of the developer group at the research department as Library
Section Creators. They can then create new Library Sections for development purposes.
45
TIBCO® Spotfire® DecisionSite® 9.1.1 - Deployment and Administration Manual
A view of the major Library Sections at Acme Corp. Each solid box represents a Library
Section. As the business develops, more Library Sections can be added by the Library Section
Creators.
4.1.5
Set Up DecisionSite Posters
DecisionSite Posters allows users to mail analysis results and view interactive analyses as web
pages. The Posters enable a fast and efficient sharing of information. If a DecisionSite Poster
license has been purchased, it must be installed by the administrator before it can be used (see
the Spotfire Analytics Server - Installation and Upgrade Manual).
When DecisionSite Posters is installed, the license can be added to users and groups.
Example
Tom reads the installation manual and follows the instructions on how to configure the
company system to use DecisionSite Posters. Then he proceeds to add the DecisionSite Posters
license to the users from DecisionSite Administrator.
4.1.6
Create Information Links
To use the DecisionSite analytical platform, the users must be able to use their data. Since data
is normally stored in databases, these need to be accessed. Spotfire provides the Information
Services to do this. To access the tools in Information Services, licenses need to be unlocked.
Having done that, the data access setup is done in three steps:
► Steps:
1.
Set up connections with database information in Information Designer. One person
does this once.
2. Design data views with Information Builder (IB). These predefined data views are
later used by all users to access data. Setting up the data views are done by designated
people, and only rarely when new views are needed.
3. Use of data on a daily basis in Information Library (IL) by everyone.
The access to all databases and their content is established with Information Designer. Here, the
database connections are set up with relevant database information. The administrator does this
once and no decisions about the actual data retrieval are made.
Actual data links are designed in Information Builder; this is done occasionally when the
information model needs to be modified. Designing data links is normally done by users with
in-depth knowledge of the data infrastructure of the company, who set up the links needed for
their colleagues.
The daily data retrieval is made with Information Library in which users click on predefined
links to load data.
Example
Acme Corp. uses two databases with a number of tables in them. Tom sets up connections to
both of these databases in Information Designer. Tom does not have to work with the actual
information model when he does this. Instead, two members of the development team are
assigned the responsibility of setting up the data links needed by the researchers. These two use
IB to set up a number of links identified to capture the data demand at each research project.
Having done this, all researchers are now able to analyze the research data with simple clicks in
Information Library.
4.1.7
Customizing the Environment
A number of customizations can be made to the DecisionSite environment. An example can be
made with a Guide, which is basically a series of tools to guide the user through an analysis
chain. These Guides can be saved in the Spotfire Library.
46
Spotfire DecisionSite Administration
When the users work with DecisionSite Client, helpful Library Guides can be shown in
dynamic views to the user. Such a view can be set up to display the Guides available in a
specified Library Section. So, using the different access combinations made with the Library
Sections, different users can see different Guides with the same view.
For example, say that all users get a Guide view added to their common DecisionSite
application. The view displays all Guides in two Library Sections, "Research" and "Sales". If a
user only has read access to the "Research" Library Section, only Guides from "Research"
Library Section is presented to that user.
DecisionSite Analysis Builder is needed to create Guide views.
Example
A developer creates a view of Guides for the research department. The view displays Guides
placed in the Library Sections of any of the research projects.
With this Guide view, each user is only presented with Guides relevant to his or her project
since each user only has read access to her own projects Library Section.
4.2
DecisionSite Administrator
4.2.1
Introduction
4.2.1.1
Introduction
DecisionSite Administrator is a tool for managing DecisionSite users and groups. You can
organize users into groups, define profiles for the individual user and group, and assign licenses
to groups and users.
4.2.1.2
Preconditions
Installation
DecisionSite Administrator is automatically installed together with the Spotfire Analytics
Server. To run DecisionSite Administrator, the Spotfire Analytics Server and the Spotfire
Analytics Server database must be running.
Licensing
The user must have a license for DecisionSite Administrator to run the tool. A user can ask for
a DecisionSite Administrator license from the system administrator. After getting a license for
DecisionSite Administrator, a user can unlock the license by opening DecisionSite Client and
clicking on the File > DecisionSite Login > Unlock New License.... Another way to unlock the
license is to open a new Internet Explorer window, enter the URL to the Spotfire Analytics
Server, for example http://myserver:8080/spotfire, and then click on the Unlock Administrator
privileges link.
4.2.1.3
Related reading
For detailed accounts of setting up the server-side of Spotfire® DecisionSiteTM, please consult
the "Spotfire Analytics Server - Installation and Configuration Manual".
4.2.2
4.2.2.1
Using DS Administrator
Users and Groups
•
A user is a DecisionSite user whose login name is registered in the Spotfire Analytics
Server system.
47
TIBCO® Spotfire® DecisionSite® 9.1.1 - Deployment and Administration Manual
•
•
•
•
•
4.2.2.2
A group is a collection of users.
A user can be a member of one or many groups.
A group cannot be a member of another group.
All users are members of the Everyone group.
The Everyone group cannot be deleted and will always contain all users. You can add
new products for it and change the DecisionSite level.
Setting up Access to DecisionSite Products
The task of assigning users and groups access to the products purchased from Spotfire is done
in the DecisionSite Administrator. There are two things that determine which functionality a
user/group have access to: Product licenses and DecisionSite Levels.
Product license
The Product license determines which collection of tools and Guides that will be available for
the user/group (see License information for more information):
• DecisionSite for Functional Genomics
• DecisionSite MapConnect
• DecisionSite Statistics
• Computation Services Designers
• DecisionSite for Lead Discovery
• DecisionSite Posters
• Spotfire Library
• DecisionSite for Lead Discovery, no ISIS/Host
If you develop your own custom DecisionSites, these will be available here as well.
Note: Assigning the DecisionSite Posters license to a user will automatically assign the user a
license for Spotfire Library as well.
DecisionSite Levels
For each user or group you also set a DecisionSite Level. This is the level of access a user
should have to the fundamental data retrieval and administration features of Spotfire
DecisionSite. There are five levels available.
• None &endash; The default level a user gets before being assigned a proper level. (If a
user or group with no DecisionSite level is assigned a product license for either
DecisionSite for Lead Discovery or DecisionSite for Functional Genomics, the
DecisionSite level of that user or group will be automatically changed to nominal by
the admin tool.)
• Nominal &endash; For users who do not use any of the Information Services
capabilities, but use all of the other fundamental features of DecisionSite.
• Basic &endash; Users of the Information Library and the fundamental features.
• Power &endash; Users of the Information Library and Information Builder, and the
fundamental features.
• Administrator &endash; Users of Information Library, Information Builder and
Administration Tools (Information Designer and DecisionSite Administrator), and the
fundamental features.
Users and groups can have access to multiple product licenses, while only one choice of
DecisionSite level is applicable.
48
Spotfire DecisionSite Administration
4.2.2.3
4.2.2.3.1
Managing Users
Adding New Users
This can only be done when using Database Authentication.
► To add a new user account:
1.
2.
3.
4.
4.2.2.3.2
At the top of the page, click the Users tab.
Click Create User.
Response: The Create New User dialog is displayed.
Enter the user name and password. This will be stored as the login information for the
user.
Click OK.
Response: The new user account is created.
Deleting Users
This can only be done when using Database Authentication.
► To delete a user account:
1.
2.
3.
4.2.2.3.3
At the top of the page, click the Users tab.
Click Remove a User.
Response: The Remove a User dialog is displayed.
Enter the user name, and click OK.
Response: The user is removed.
Changing User Passwords
This can only be done when using Database Authentication.
► To change the password of a user:
1.
2.
3.
4.
5.
6.
4.2.2.3.4
At the top of the page, click the Users tab.
In the Search for users pane, enter a search criteria for finding a user.
Comment: To see all users, enter an asterisk (*) wildcard. The asterisk wildcard
represents any letter and/or number and can be used in the search, before or after a text
string.
Comment: If you are using Database Authentication, this may take some time if there
are many users.
Click Search.
In the Matching Users list, click a user ID.
Response: The properties of the selected user are displayed.
Click Change password.
Response: The Change User Password dialog is displayed.
Enter a new password and click OK.
Setting User Privileges
► To assign groups, products and DecisionSite level to a user:
1.
2.
At the top of the page, click Users.
In the Search for users pane, enter a search criteria for finding a user.
49
TIBCO® Spotfire® DecisionSite® 9.1.1 - Deployment and Administration Manual
Comment: To see all users, enter an asterisk (*) wildcard. The asterisk wildcard
represents any letter and/or number and can be used in the search, before or after a text
string.
3. Click Search.
4. In the Matching Users list, click a user ID.
Response: The properties of the selected user are displayed.
5. In the Search for available groups field, enter a search criteria for finding groups.
Comment: To see all groups, enter an asterisk (*) wildcard.
6. Click Search.
7. In the Available groups list box, select the groups to which you want the user to
belong.
8. Click Add >.
9. Select one or more Products to which you wish to grant the user access.
10. From the DecisionSite level drop-down list, select the level of access granted to the
user.
11. Click Save This Configuration.
4.2.2.3.5
Importing a List of Users
This can only be done when using Database Authentication.
► To import a list of users:
1.
2.
3.
4.
At the top of the page, click the Users tab.
Click Import Users.
In the Import Users from File dialog, enter a file name, or browse for a file.
Click OK.
Response: The users listed in the file are added.
Note: The file must be a comma-separated text file (UTF-8), in this format:
username1,password1
username2,password2
4.2.2.3.6
Exporting a List of Users
► To export a list of users:
1.
2.
3.
4.
5.
At the top of the page, click the Users tab.
Click Export Users.
In the Export List of Users dialog, select which group to export.
Click OK.
Select where to save the file and click Save.
Response: The user names are saved as a new text file.
Note: For security reasons, user passwords are not included in the exported file. This file
contains only user names.
4.2.2.4
Managing Groups
4.2.2.4.1
Creating Groups
► To add a new group:
1.
2.
50
At the top of the page, click the Groups tab.
In the Groups pane click Create Group.
Response: The Create New Group dialog is displayed.
Spotfire DecisionSite Administration
3.
4.2.2.4.2
Enter the group name, and click OK.
Response: The new group is created.
Deleting Groups
► To delete a group:
1.
2.
3.
4.
5.
6.
4.2.2.4.3
At the top of the page, click the Groups tab.
In the Search for groups pane, enter a search criteria for finding a group.
Comment: To see all groups, enter an asterisk (*) wildcard. The asterisk wildcard
represents any letter and/or number and can be used in the search, before or after a text
string.
Click Search.
In the Matching Groups list, click a group name.
Response: The properties of the selected group are displayed.
Click Remove Group.
In the Remove a Group dialog, click OK.
Response: The group is removed.
Note: You cannot delete the Everyone group, or an group that is configured to
synchronize with an external LDAP server.
Changing Group Names
► To change the name of a group:
1.
2.
3.
4.
5.
6.
7.
4.2.2.4.4
At the top of the page, click the Groups tab.
In the Search for groups pane, enter a search criteria for finding a group.
Comment: To see all groups, enter an asterisk (*) wildcard. The asterisk wildcard
represents any letter and/or number and can be used in the search, before or after a text
string.
Click Search.
In the Matching Groups list, click a group name.
Response: The properties of the selected group are displayed.
Click Rename Group.
Response: The Rename Group dialog is displayed.
Enter a new group name.
Click OK.
Response: The Group Name is changed.
Setting Group Privileges
► To assign users, products and DecisionSite level to the
members of a group:
1.
2.
3.
4.
5.
At the top of the page, click the Groups tab.
In the Search for groups pane, enter a search criteria for finding a group.
Comment: To see all groups, enter an asterisk (*) wildcard. The asterisk wildcard
represents any letter and/or number and can be used in the search, before or after a text
string.
Click Search.
In the Matching Groups list, click a group name.
Response: The properties of the selected group are displayed.
In the Search for available users field, enter a search criteria for finding users.
51
TIBCO® Spotfire® DecisionSite® 9.1.1 - Deployment and Administration Manual
Comment: To see all users, enter an asterisk (*) wildcard.
In the Available users list box, select the users that you want to include in the group.
Click the Add > button to add the selected users to the Group members list.
Note: You cannot add any users to a group that is configured to synchronize with an
external LDAP server.
8. Select one or more Products to which you wish to grant the group members access.
9. From the DecisionSite level drop-down list, select the level of access granted to the
group members.
10. Click Save This Configuration.
6.
7.
4.2.2.5
4.2.2.5.1
Logging User Activity
Viewing Log Files
Log files register user activity on your Spotfire Analytics Server. They allow you to keep track
of when users log on, when users fail to log on, etc.
The log files are located in the directory:
<installation directory>/spotfire/logs
There are several log files that you can configure and view:
DecisionSite Log
Actual file dss.log is located in the logs directory.
This file logs all activity on the server except the events recorded by the DecisionSite Access
Log and the DecisionSite Client Log. It includes the SQL log and a simplified version of the
Access log. You can set the detail level of what this file shall log, by selecting different Log
Configuration Files.
DecisionSite Access Log
Actual file located in <installation directory/spotfire/administrator/dssaccess.log.
This file logs all logins and logouts from DecisionSite Clients to the Spotfire Analytics Server.
It shows which user logged in/out and when. It is always enabled, and is unaffected by Log
Configuration File settings.
DecisionSite SQL Log
Actual file sql.log is located in the logs directory.
This file logs the SQL that is generated each time a user executes an information link. You can
set the detail level of what this file shall log, by selecting different Log Configuration Files
(below).
DecisionSite Client Log
Actual file dssclient.log is located in the logs directory.
This file logs information each time an unsupported client tries to log on to the Spotfire
Analytics Server. The log entry will state the Operating System, Web browser version, etc. It is
always enabled, and is unaffected by Log Configuration File settings.
DecisionSite Posters Log (posteraccess.log)
Actual file posteraccess.log is located in the logs directory.
This file logs an entry every time a user creates or opens a Poster. The format is: Timestamp;
User; User IP; Command; GUID.
Note: Spotfire Analytics Server uses rolling logs, which means that when a log file gets too big
it splits into several files. These are indexed by a number, (the higher the number, the older the
log) and can be selected in the drop-down list. When a rolling log file reach a certain number it
is deleted.
Note: By default, the DecisionSite logs use standard ISO 8601 date format. If you prefer
another date format you can edit the log4j-config files. For more information, see
http://jakarta.apache.org/log4j/docs/index.html.
52
Spotfire DecisionSite Administration
Note: Only log files that contain logging information, will be displayed in the drop-down list.
Click Logging to update the list when you expect that logging information has been written to a
previously empty log file.
► To view a log file:
1.
2.
3.
4.2.2.5.2
At the top of the page, click Logging.
From the View log files drop-down list, select a log file.
Click Refresh.
Changing Log Configuration File
You can set what should be logged in the log files, by selecting a certain Log Configuration
File. This configuration file will set the level of detail for the actual log files.
There are three "levels" of logging you can choose between, by selecting different Log
Configuration Files:
log4j-minimal.properties - The DecisionSite Log will only log errors, and the SQL Log will
be deactivated.
log4j-properties - The default setting. The DecisionSite Log will log warnings, errors and
basic information. The SQL Log will log basic SQL information.
log4j-debug.properties - The DecisionSite Log will log detailed debug information as well as
warnings, errors and other detailed information. The SQL Log will log more detailed SQL
information.
Warning: Only use Debug mode for diagnostics, and not for continuous server use. It
significantly reduces the performance of the server, and also produces very large log files.
If you want to configure the logs in other ways than the above options let you, you can create
your own Log Configuration File using standard Log4j syntax (more info at
http://jakarta.apache.org/log4j/docs/index.html).
Placing a new log4j configuration file with a name matching the pattern log4j*.properties in
the <installation directory>/spotfire/spotfire/WEB-INF/ directory, will cause it to appear in the
drop-down list among the other Log Configuration Files and can thus be selected.
► To change current log setting:
1.
2.
3.
At the top of the page, click Logging.
From the Current log configuration file drop-down list, select the required logging
level.
Click OK.
All the DecisionSite log files will now begin logging the messages according to the
new log setting.
Note: Only use Debug mode for diagnostics, and not for continuous server use. It significantly
reduces the performance of the server, and also produces very large log files.
4.2.2.6
Viewing Current Users
4.2.2.6.1
Viewing Current Users
You can view a list of all users that are logged on to your Spotfire Analytics Server.
► To view current users:
1.
2.
At the top of the page, click the Current Users tab.
Click Refresh.
Response: A list of the currently logged in users is displayed. The format is
User:Machine and Logged in since.
53
TIBCO® Spotfire® DecisionSite® 9.1.1 - Deployment and Administration Manual
4.2.2.7
4.2.2.7.1
Deploying New DecisionSite Applications
Viewing the Current Deployments
► To view which DecisionSite applications and extensions that are
deployed:
1.
2.
4.2.2.7.2
At the top of the page, click Deployer.
Response: A list of all applications and extensions that are deployed on the server is
displayed.
Select one or more items from the list, and click View Details.
Response: More detailed information about the applications and extensions are
displayed, such as the version number, etc. If the item is based on another application
or extension, this will be shown. If there are any other applications or extensions that
are applied to the item, this will be shown too.
Deploying a New DecisionSite Application or Extension
Prerequisite: A file named distribution.zip has been created using DecisionSite Builder. See
DecisionSite Developer for documentation.
► To deploy a DecisionSite application or extension distribution
file:
1.
2.
3.
4.
4.2.2.7.3
At the top of the page, click the Deployer tab.
Click Browse... and select a distribution.zip file to deploy.
Click Deploy.
Response: A new dialog appears, listing the contents of the distribution.zip file. The
New Version? column indicates if the packages about to be deployed are of a later
version than the packages already installed. All packages that have a later version will
be installed.
Click Deploy.
Response: The packages are installed.
Un-Deploying a DecisionSite Application or Extension
An application represents a running instance of Spotfire DecisionSite, that is, a predefined
selection of Tools and Guides. An extension is an add-on to an existing application or
extension. It may be a Tool, a Guide or an external link. The same extension can be added to
several applications, and several extensions can be added to the one application.
If an application or extension is removed, all its extensions will also be removed. However, if
an extension is applied to several applications, it will not be removed until the last application
using that extension is removed.
If an application or extension is un-deployed, and has an older version on the server, the older
version will still be deployed and used.
► To Un-deploy DecisionSite applications and extensions that are
deployed:
1.
2.
3.
54
At the top of the page, click the Deployer tab.
Response: A list of all applications and extensions that are deployed on the server is
displayed.
Select the check boxes of the applications and/or extensions you want to un-deploy.
Click Un-Deploy.
Response: A new dialog appears listing the contents of the projects about to be undeployed. If there are any applications or extensions that are based on a project that are
Spotfire DecisionSite Administration
4.
4.2.3
4.2.3.1
about to be un-deployed, these will be listed under a dotted line. Such applications or
extensions will also be un-deployed.
Click Un-Deploy.
Response: The specified applications and extensions are un-deployed. If an application
or extension is un-deployed, and has an older version on the server, the older version
will still be deployed and used.
User interface reference
User Properties Pane
Option
Description
Change password
Change the password for this user.
Remove user
Remove this user.
Save This
Configuration
Save the settings for this user.
Search
Populates the Available groups list with groups that match the search
criteria.
The asterisk wildcard (*) represents any letter and/or number and can
be used in the search, before or after a text string.
Available groups
Groups matching the search criteria.
User included in
Groups to which this user belongs.
Add >
Click to add selected groups to User included in.
55
TIBCO® Spotfire® DecisionSite® 9.1.1 - Deployment and Administration Manual
< Remove
Click to remove selected groups from User included in.
Products
Products to which this user has access.
DecisionSite Level
Level of access.
► To reach the User Properties pane:
1.
2.
3.
4.
4.2.3.2
56
At the top of the page, click Users.
In the Search for users pane, enter a search criteria.
Click Search.
In the Matching Users list, click a user ID.
Group Properties Pane
Option
Description
Change group
name
Change the name of this group.
Remove group
Remove this group.
Save This
Configuration
Save the settings for this group.
Search
Populates the Available users list with users that match the search
criteria.
The asterisk wildcard (*) represents any letter and/or number and can
be used in the search, before or after a text string.
Available users
Users matching the search criteria.
Spotfire DecisionSite Administration
Group members
Members of this group.
Add >
Click to add selected users to this active group.
< Remove
Click to remove selected users from the active group.
Products
Products to which members of this group have access.
DecisionSite Level
Level of access for members of this group.
► To reach the Group Properties pane:
1.
2.
3.
4.
4.2.3.3
At the top of the page, click Groups.
In the Search for groups pane, enter a search criteria.
Click Search.
In the Matching Groups list, click a group name.
Logging Pane
Option
Description
View log files
Select a log file.
Refresh
Refresh the log view to display the selected log file.
Set Configuration
Change the current log configuration file.
► To reach the Logging pane:
At the top of the page, click Logging.
4.2.3.4
Current Users Pane
Option
Description
Refresh
Refresh the list of current users.
► To reach the Current Users pane:
At the top of the page, click Current Users.
57
TIBCO® Spotfire® DecisionSite® 9.1.1 - Deployment and Administration Manual
4.2.3.5
DecisionSite Deployment Pane
Option
Description
Browse...
Click to browse for a distribution.zip file
Deploy
Click to deploy the selected distribution.zip file.
Currently deployed Displays a list of the applications and extensions that are currently
deployed on the server.
on [server]
Un-Deploy
Un-deploys the applications and extensions selected in the list.
View details
Displays more details, such as version number, about the applications
and extensions selected in the list.
► To reach the DecisionSite Deployment pane:
At the top of the page, click Deployer.
4.2.4
Troubleshooting
4.2.4.1
Technical support
Technical support is available at no charge as described below. The best way to report problems
is with the support forms available from http://support.spotfire.com.
► When reporting problems, please include the following
information:
1.
2.
3.
4.
58
Is the problem reproducible? If so, how?
What platform are you running Spotfire Analytics Server on?
What browser are you using?
What version of Spotfire Spotfire Analytics Server are you running?
Spotfire DecisionSite Administration
5.
If a dialog box with an error message was displayed, please include the full text of the
dialog box, including the text in the title bar.
Note: To get context-sensitive help when working with analyses in Spotfire DecisionSite, press
F1 at any time.
4.3
4.3.1
4.3.1.1
DecisionSite Information Designer
Introduction
Introduction to Information Designer
Information Designer is an administrative tool for managing the Information Model (IM). This
model is a representation of one or more databases which may be geographically dispersed. It
allows end users to execute advanced database queries without any knowledge of SQL or the
underlying database structures.
Information Designer is part of a suite of tools called Information Services. The other tools,
directed at end users, are Information Library and Information Builder. While Information
Builder is used to create information links (queries) from columns and filters, Information
Library is used only for executing these links and retrieving the data.
Note: To run Information Designer you need DecisionSite Client installed on the same
machine.
4.3.1.2
General Workflow
This is the general workflow for using Information Designer:
1. Set up the data sources
Enter the information required to connect to the databases which will be accessed through the
Information Model.
2. Create domains for storing elements
The Information Model is a hierarchical structure, where domains correspond to folders on a
file system.
3. Combine tables by creating joins
If you want to work with data from different tables, you first need to create joins.
4. Define column elements from available data sources
Define the column elements to be shown to the user. These columns can be taken directly from
tables in one or more databases. They can also be calculated, filtered or otherwise modified.
5. Create filter elements to be used in the domain
Create filter elements with descriptive names to be applied by the user at will.
6. Set permissions for individual users or user groups
Different groups of users are given different levels of access to data. These permissions are
administered in Information Designer.
59
TIBCO® Spotfire® DecisionSite® 9.1.1 - Deployment and Administration Manual
4.3.1.3
Related Reading
To find out more on how to use the Information Builder and Information Library, please use
the online help for these products.
For information on how to use Spotfire® DecisionSiteTM, please consult the Spotfire
DecisionSite Client, User's Guide and Reference Manual.
For detailed accounts of setting up the server-side of Information Services, see the Spotfire
Analytics Server, Installation and Administrator's Guide.
4.3.2
4.3.2.1
4.3.2.1.1
Using Information Designer
Data Sources
Data Sources Overview
Data sources are the physical units from which data can be retrieved, usually databases.
Connecting to a database requires technical know-how not always found among end users.
Therefore, Information Designer lets the administrator make all the required settings in
advance, including database name, user name, password, etc. This information becomes part of
the Information Model so that when an end user executes an information link, the connection
with any required databases is established automatically and invisibly.
User authentication to the data source can be made in two ways. Either once when creating the
data source connection. In this case, all users connect with the same credentials. This is simple
way to authenticate users when everyone has the same permissions to the data source.
The other choice is to require authentication each time a connection is used. This is useful when
a more detailed security model is required. Using user authentication, row level security can be
obtained. The credentials can either be supplied by the user or by a plug-in when running an
Information Link against this data source. A plug-in allows the user to log in to the
DecisionSite environment only once, leaving it up to the plug-in to deliver the data source
credentials. Without a plug-in, users will have to supply their data source credentials in a
prompt. Credentials are cached in the data source so that users are prompted only once.
The layout and handling of the data sources affect most other actions involving the various
parts of Information Services. Therefore, it is most valuable to do a proper planning before
starting to work on the layout. Modifications to the data sources after the Information Model
and information links have been defined will probably mean that some manual work is needed
to make sure all information links are still functional.
4.3.2.1.2
Creating a Data Source
► To create a new data source:
1.
2.
3.
4.
5.
6.
7.
8.
60
From the Select workbench drop-down list, select Data Source.
Click Change.
Response: The Data Source Definition workbench is displayed.
In the Name field, enter the name of the new data source.
Modify the Connection URL.
Enter a Username and Password that gives access to the data source.
Select whether user must be authenticated when accessing the data source.
Response: If this option is selected, authentication is required when accessing this
connection, either by the user or by a plug-in. If not selected, the credentials supplied
above will be used for all users. Even if user authentication is selected, Username and
Password must be supplied since they are used by Information Designer.
Enter any additional configuration settings.
Click Save.
Spotfire DecisionSite Administration
Note: Setting up a data source to ISIS/Direct requires special attention. Click here for more
information.
Note: If you are connecting to a non-writable data source (for example, SAS/SHARE or
ODBC) you must clear the Allow writing in temporary tables check box.
Note: For SAS/SHARE and ODBC data sources, both Min and Max No. of connections should
be set to 0 in order to disable connection pooling. The same holds for other data sources that
does not support pooled connection since there is no valid ping command.
4.3.2.1.3
Modifying a Data Source
► To modify an existing data source:
1. From the Select workbench drop-down list, select Data Source.
2. Click Change.
3. In the Defined data sources list box, select a data source.
4. Change any fields.
5. Click Save or Save Copy.
Note: If the name of a data source is changed, all elements based on that data source will be
automatically updated so that they keep referring to the same underlying database.
Note: If you rename a data source, so that the new name is identical to the name of another
already existing data source, that data source will be replaced with the data source you changed
the name for. Hence, it is important to verify that the changes you have made are correct before
clicking Save.
4.3.2.1.4
Removing a Data Source
► To remove a reference to a database:
1. From the Select workbench drop-down list, select Data Source.
2. Click Change.
3. In the Defined data sources list box, select a data source
4. Click Remove.
Note: Elements based on a data source that is removed will remain in the Information Model.
However, they will not work unless a new data source is defined using the same name as the
deleted data source.
4.3.2.1.5
Issues when Creating an ISIS/Direct Data Source
When creating a data source for ISIS/Direct, it is necessary to make the following setting in the
Data Source Definition workbench, under New connection initialization commands:
select cdcaux.ctenvinit('schema.dbname') from dual
4.3.2.1.6
Creating a Table Alias
You can create a duplicate reference to a database table from Information Designer. This
duplicate is called a Table Alias, and references the very same data, only using an alias. This
can be useful in certain cases, most often when in need of a self join within a table (below).
► Creating a Table Alias:
1.
2.
Select a table in the Data Sources pane.
Right-click the table and select Add Alias.
61
TIBCO® Spotfire® DecisionSite® 9.1.1 - Deployment and Administration Manual
3.
A Table Alias of the table is created.
Self Joins
A Self Join is a join from a table to itself. In Information Designer this is implemented by using
a Table Alias.
ID
Name
Manager
1
Sarah
2
2
Mike
3
3
Carla
Null
4
Vincent
2
5
Adrian
3
The above database table lists a number of employees at a company, and specifies who is the
manager of each employee. Carla is the head of the department. Mike and Adrian report directly
to Carla, whereas Sarah and Vincent report to Mike.
In order to produce a list where the ID stated in the Manager column is replaced by a name (see
below), we would need a self join in the table. The table needs to look up the ID column in
itself.
Name
Manager
Sarah
Mike
Mike
Carla
Carla
62
Vincent
Mike
Adrian
Carla
Spotfire DecisionSite Administration
This is done by first creating a Table Alias of the table, and then creating a join between the
table and its alias:
WHERE TABLE.ID=TABLE_ALIAS1.MANAGER
4.3.2.2
4.3.2.2.1
Domains
Domains Overview
Column elements, filter elements, and joins can be organized into domains in the Information
Model, the same way files are often organized into folders.
A domain may contain other domains. For example, a department may have a domain, within
which each research group has its own subdomain. As an administrator, you can control which
users have access to specific domains.
In the Information Model pane, you will see that domains have the same collapsible and
expandable behavior as folders in a tree structure:
4.3.2.2.2
Creating a New Domain
To be able to save column and filter elements, you must first create a domain in the Information
Model.
► To create a new domain:
1.
2.
3.
4.
5.
6.
4.3.2.2.3
From the Select workbench drop-down list, select Domain.
Click Change.
Response: The Domain Element workbench is displayed.
In the Name field, enter the name of the new domain.
In the Description field, enter your own description of this domain.
In the Information Model pane, select a parent domain, and then click < Select. The
new domain will become a subdomain of the selected domain.
Comment: If no parent domain is selected, the created domain will be placed in the
root of the Information Model.
Click Save.
Response: The domain is added to the Information Model
Editing a Domain
► To change the name and description of a domain:
1.
2.
3.
4.
4.3.2.2.4
In the Information Model pane, select the domain (folder icon) that you want to edit.
Click Edit in the Information Model pane.
Response: The domain information is loaded and enabled for editing.
Modify the desired fields.
Click Save.
Deleting a Domain
► To delete a domain and all its contents:
1.
2.
In the Information Model pane, select the domain that you want to delete.
Click Delete at the top of the Information Model pane.
63
TIBCO® Spotfire® DecisionSite® 9.1.1 - Deployment and Administration Manual
Response: The domain is deleted from the Information Model.
4.3.2.2.5
Moving a Domain
► To move a domain and all its contents:
1.
In the Information Model pane, select the domain (folder icon) that you want to
move.
2. Click Edit in the Information Model pane.
Response: The domain information is loaded and enabled for editing.
3. Select a new parent domain in the Information Model pane.
4. Click < Select.
5. Click Save.
Response: The domain and all its contents are moved to the new location.
Tip: You can also move the domain using a simple drag-and-drop operation. The moved
domain will be appended to the contents of the destination domain.
4.3.2.3
4.3.2.3.1
Joins
Joins Overview
The SQL join operation defines how rows in different tables relate to one another. Normally an
identifier column in one table maps to a similar column in another table. This allows
information links (queries) to draw values from two or more different tables. Joins can be set up
between tables in different data sources.
In the Information Model, joins are represented by this icon:
4.3.2.3.2
Creating a Join
If you want to combine columns from two disparate data sources, for example if one field is in
a different table than the rest of the information, you need to create a join between two columns.
► To create a join:
1.
2.
3.
4.
5.
6.
7.
8.
9.
From the Select workbench drop-down list, select Join.
Click Change.
Response: The Join Element workbench is displayed.
From the Data Sources pane, select the first column to include in the join operation.
Click Add >.
Select the second column to include in the join operation.
Click Add >.
Optionally, repeat steps 4 and 5 for any additional columns to be included in the join.
Click either Freehand or Select.
Select join operator from the Condition drop-down list, or type a freehand join.
Comment: There are two basic types of joins that can be done between tables: inner
joins and outer joins. An inner join will return records for which only the matching
64
Spotfire DecisionSite Administration
10.
11.
12.
13.
14.
15.
16.
4.3.2.3.3
fields in both tables are equal. An outer join will return all the records (including
NULL values) from one table, and only the matching records from the other table.
In the Condition drop-down list, outer joins include the (+) character. The position of
the plus sign indicates which table will contribute only the matching records. The
column on the opposite side will return all records.
Select which Tables to join using the two drop-down lists.
Comment: This is necessary when more than two tables are involved in defining the
join. See also Freehand joins.
If you want the join to be case-sensitive, select the Case sensitive check box.
In the Name field, enter a name for the join.
In the Description field, enter your own description of the join.
In the Information Model pane, select a parent domain, and then click the < Select
button.
Sometimes you may want to create more than one join between the same two tables. In
such a situation, one of the joins must be the default one that Information Links will
use. If you want the join you are currently creating to be the default one, select the
check box Default join.
Click the Save button to save the join in the selected parent domain.
Response: The join will receive a GUID in the selected domain, and will be denoted
with the icon. Note that the join object only appears in the Information Designer
and will not be visible to the user.
Freehand Joins
In many situations, a join can be defined using one of the operators in the Conditions dropdown list. However, it may sometimes be desirable to use more complex conditions, such as:
• C1 = 2 * C2 (mathematical calculation prior to comparison)
• C1 = C3 AND C4 = C2 (an intermediate table used to set up the join)
In the latter case, it is important to select which tables to join - the tables in which C1 and C2
occur. The other columns included in the join condition, C3 and C4, are found in an
intermediate table. No join is created between this table and the other two.
Example
In the following tables, we want to create a join that links T1 and T3. In this way, we will be
able to query the database for, say, the address of the person who earns 1400. To achieve this,
T2 is used as intermediate table. The tables T1 and T3 should be selected from the Tables to
join drop-down lists (see Creating a join). The join, again, is defined as:
C1 = C3 AND C4 = C2
T2
T1
Name
(C1)
Salary
John
T3
Name
(C3)
Number
(C4)
1000
John
1
Steve
1400
Steve
2
Lisa
1200
Lisa
3
Number (C2) Address
1
Boston
2
Stockholm
3
Tokyo
65
TIBCO® Spotfire® DecisionSite® 9.1.1 - Deployment and Administration Manual
4.3.2.3.4
Editing a Join
► To edit a join:
1.
2.
In the Information Model pane, select the join that you want to edit.
Click the Edit button in the Information Model pane.
Response: The join is loaded and enabled for editing.
3. Modify the desired fields.
Comment: To move an existing join between domains, select a new domain in the
Information Model pane, then click the < Select button.
4. Click Save or Save Copy.
Comment: Use Save Copy if you want to keep the old join as well as the edited one.
Tip: To see from which table and database a column has been taken, click the column name.
The path to the data source appears at the bottom of the page.
4.3.2.3.5
Deleting a Join
► To delete a join:
1.
2.
4.3.2.3.6
In the Information Model pane, select the join that you want to delete.
Click the Delete button at the top of the Information Model pane.
Response: The join is deleted from the Information Model.
Creating a Table Alias
You can create a duplicate reference to a database table from Information Designer. This
duplicate is called a Table Alias, and references the very same data, only using an alias. This
can be useful in certain cases, most often when in need of a self join within a table (below).
► Creating a Table Alias:
1.
2.
66
Select a table in the Data Sources pane.
Right-click the table and select Add Alias.
Spotfire DecisionSite Administration
3.
A Table Alias of the table is created.
Self Joins
A Self Join is a join from a table to itself. In Information Designer this is implemented by using
a Table Alias.
ID
Name
Manager
1
Sarah
2
2
Mike
3
3
Carla
Null
4
Vincent
2
5
Adrian
3
The above database table lists a number of employees at a company, and specifies who is the
manager of each employee. Carla is the head of the department. Mike and Adrian report directly
to Carla, whereas Sarah and Vincent report to Mike.
In order to produce a list where the ID stated in the Manager column is replaced by a name (see
below), we would need a self join in the table. The table needs to look up the ID column in
itself.
Name
Manager
Sarah
Mike
Mike
Carla
Carla
Vincent
Mike
Adrian
Carla
This is done by first creating a Table Alias of the table, and then creating a join between the
table and its alias:
WHERE TABLE.ID=TABLE_ALIAS1.MANAGER
4.3.2.4
4.3.2.4.1
Column Elements
Columns Overview
All information in a relational database is represented explicitly as values in tables, composed
of rows (records) and columns (fields).
Column elements in the Information Model can be based on several database columns. For
example, a column element can be calculated as the sum of the values in two different columns.
The underlying columns can reside in the same database table, in different tables, or even on
different databases.
67
TIBCO® Spotfire® DecisionSite® 9.1.1 - Deployment and Administration Manual
Columns can be defined with built-in column filters, that are automatically applied when the
column is retrieved. You can also add a personalized column filter condition that limits data
depending on the currently logged in user, see Personalized Information Links. Additionally,
columns can also be set up to include aggregate data.
In the Information Designer, columns are represented by these icons:
Real column
Integer column
String column
Date column
DateTime column
Time column
BLOB (binary large object) column. Cannot be retrieved, but can be used in the
structure search filter condition.
(It can also be used in custom made filter conditions using the API).
CLOB (character large object) column. Can be retrieved to DecisionSite Client.
(It can also be used in custom made filter conditions using the API).
Unknown column (in the Data Sources pane only)
Must be set manually to one of the accepted column types (above) before it can
be saved in the IM.
4.3.2.4.2
Creating a Column Element
► To add a column:
1.
2.
From the Select workbench drop-down list, select Column.
Click Change.
Response: The Column Element workbench is displayed.
3. Select a column (leaf node in the Data Sources tree).
Comment: In the Data Sources pane to the left, click the signs to browse databases
and tables.
4. Click Add >.
Comment: Repeat this step if you need to include more data to calculate your column
element.
5. If you want the column to be calculated, enter the expression in the Calculation field.
Comment: For instance, if you have added two numerical columns you could calculate
the sum by entering "C1+C2". More
6. In the Aggregation section, click Show >> to show the aggregation controls. More
7. In the Filter section, click Show >> to show the filtering controls. More
8. In the last section, enter the name for the new column in the Name field.
Comment: Curly brackets { } are not allowed in column names.
9. In the Description field, enter your own description of the column.
Comment: The maximum limit of the description is 255 characters.
10. In the Information Model pane, select a domain to save the column in, and then click
the < Select button.
11. Select the data Type of the column element.
68
Spotfire DecisionSite Administration
Comment: It is recommended that you use conversion functions for mapping columns.
See notes below.
12. Click Set... to modify the set of run-time filters allowed for this column in Information
Builder.
Comment: By default, all available filter types are enabled, except for the Structure
Search filter. Structure Search filters can be added to columns of type blob, integer and
real. Make sure that a valid structure or structure ID is included in the column prior to
adding a structure search filter.
Comment: It is not possible to combine Drillable with any of the filter devices list box,
check boxes or radio buttons.
13. Click Save to save/update the column, or click Save copy to create a copy.
Response: The column is saved in the Information Model, and will receive a GUID
and an icon denoting its type.
Comment: Use Save Copy if you want to keep the old column definition unchanged.
Note: If the column in the database is of the type Real, and you want to create a column
element of the type Integer, then set the Type (step 11 above) to Integer. Similarly, if the
column in the database is of the type Unknown, you must manually choose an appropriate type
before the column can be saved. It is also strongly recommended that you use an Oracle
conversion function (for example ROUND) in the Calculation field (step 5 above).
Note: For the Unicode data type NVARCHAR, convert(<column name>, 'UTF-8') should be
entered in the Calculation field or else it will not be possible to filter on the column.
4.3.2.4.3
Creating Multiple Column Elements
The Multiple Columns Workbench can be used if you want to create many column elements in
one operation.
Note: Whole databases and schemas cannot be added, only columns and tables are available
using this Workbench.
► To add multiple columns to the IM:
1.
2.
3.
4.
5.
6.
From the Select workbench drop-down list, select Multiple Columns.
Click Change.
Response: The Multiple Column Elements workbench is displayed.
Select the columns of interest (leaf nodes in the Data Sources tree).
Comment: In the Data Sources pane to the left, click the signs to browse databases
and tables. You can select several columns at once by pressing Ctrl and clicking on
the desired columns. It is also possible to select an entire table by clicking on it in the
Data sources pane.
Click Add >.
Comment: Columns of type Unknown cannot be added in the Multiple Columns
Workbench since they do not automatically map against the datatypes in the IM.
Response: The columns are added to the Column elements list. If a table was selected,
all columns in the table will be added to the list.
Tip: Repeat this step if you want to include more columns.
Click on an element in the Column elements list to select it (or go to step 8 to add the
columns using the default settings).
Comment: This step is not necessary unless you want to change the name or
description of the element.
Change the Name of the column element.
Comment: The default name is the same one as in the database, but with _ and replaced by space, and only the first character in the name capitalized. Whitespace
characters at the beginning or end of the name are also removed.
69
TIBCO® Spotfire® DecisionSite® 9.1.1 - Deployment and Administration Manual
7.
Change the Description of the column element.
Comment: By default, the path to the column is displayed. The maximum limit of the
description is 255 characters.
8. Click Apply Changes.
Response: The name and/or description of the selected column element is changed.
9. In the Information Model pane, select a domain to save the columns in, and then click
the < Select button.
10. Click Save.
Response: The columns are saved to the specified parent domain in the Information
Model.
4.3.2.4.4
Editing a Column
► To edit a column:
1.
2.
In the Information Model pane, select the column that you want to edit.
Click the Edit button at the top of the Information Model pane.
Response: The column information is loaded and enabled for editing.
3. Modify the desired fields.
Tip: To move a column to a different domain, select a new domain in the Information
Model pane, then click the < Select button.
4. Click Save to save/update the column, or click Save Copy to create a copy.
Comment: Use Save Copy if you want to keep the old column definition unchanged.
Tip: To see from which table and database a column has been taken, click the column name.
The path to the data source appears at the bottom of the page.
4.3.2.4.5
Deleting a Column
► To delete a column:
1.
2.
4.3.2.4.6
In the Information Model pane, select the column that you want to delete.
Click the Delete button at the top of the Information Model pane.
Response: The column is deleted from the Information Model.
Calculating a Column
► To calculate a column:
1.
2.
Start by adding a column from Data Sources.
If you want a column to be calculated, enter the expression in the Calculation field,
for example C1+C2.
3. Use the two Show >> buttons to access functions for aggregating data, or for creating
a built in filter.
4. Enter Name and Description, and choose a parent directory.
5. Click Save or Save Copy.
Tip: Use conversion functions in the calculation field to map CLOB columns to String, Real to
Integer, etc. Just setting the Type is not recommended. See Creating a Column Element for
more information.
70
Spotfire DecisionSite Administration
4.3.2.4.7
Defining a Column Filter
Column filters are automatically applied when the column is retrieved. Such filters, unlike
filters that are defined and saved as separate elements (filter elements), cannot be disabled by
the user.
Column filters are defined as the column element is being created. The following steps should
be taken in addition to what is described in Creating a Column Element.
► To define a column filter:
1.
2.
In the Filter section, click the Show >> button to show the filtering controls.
In the Data Sources pane, select a column and then click the Add > button to add the
column to use in the filter condition.
Comment: Repeat this step if you need to include more columns in your filter
condition.
3. In the Condition field, define a filter condition based on the chosen column or
columns, for example C1<2000, or if you are using two columns, C1<C2.
Comment: To combine conditions, use the AND or operators, for example C1>2000
AND C2<1000.
Comment: You can also add a personalized filter condition that limits data depending
on the currently logged in user. See Personalized Information Links.
4. Write a clear description of how the column is filtered. This is important, since the
user will not be able to disable the filter when using this column element.
Note: When an information link is executed, aggregation is always applied before the filter.
4.3.2.4.8
Date and Time Columns
A data source provides date and time information as Oracle DATE columns. This format can be
mapped to either a DATE, TIME or a DATETIME data type in the Information Model (see
Creating a Column Element).
Note: The lowest valid year is 100.
► To find the number of days between two DATE columns:
1.
2.
3.
From the Data Sources pane, select two columns of type DATE.
In the Calculation field, enter the expression c1 - c2.
Comment: By selecting only one column, you can also find the elapsed number of
days from today, using the expression sysdate - c1.
In the Save column section, set Type to integer.
► To generate a Spotfire DecisionSite DATE column from an
Oracle DATE column:
1. From the Data Sources pane, select a column of type DATE.
2. In the Save column section, set Type to date.
Note: Any SQL arithmetic expression may be entered into the Calculation field &endash;
however, you need to make sure to use the correct syntax since no validation will be performed.
4.3.2.4.9
Working with Aggregation
4.3.2.4.9.1
Using Aggregation
► To calculate average values:
1.
Select a value column from the Data Sources pane.
71
TIBCO® Spotfire® DecisionSite® 9.1.1 - Deployment and Administration Manual
2.
3.
Click the topmost Add > button.
In the Calculation field, type:
AVG(C1)
Comment: AVG is the average function.
4. Click Show >> to show the aggregation controls.
5. Select the column to aggregate over from Data Sources.
6. Click Add >.
Response: "AC1" will appear in the Aggregation Calculation field. You can use this
field to modify the chosen column using mathematical expressions.
7. Click the Add button (on the right-hand side of the Calculation field).
8. Enter Name, Description and Domain.
9. Click Save.
Response: The resulting column will consist of the average of the value column, for
each value in the aggregation column.
Tip: Rather than hard coding the columns to aggregate over, you may consider marking the
column as Drillable. The column will then be aggregated over any other columns retrieved in
the same information link.
Note: When a query is executed, aggregation is always applied before a column filter.
4.3.2.4.9.2
Aggregating Over Many Columns
There may be situations where it is necessary to use more than one aggregation column. In the
following table, for example, we can compare the salary of each employee with the average
salary of employees at the same department and job.
To produce this table, we must define the Average Salary column with two aggregate keys: Job
and Department.
► To use multiple aggregate keys:
1.
2.
3.
Select a value column from the Data Sources pane.
Click the topmost Add > button.
In the Calculation field, type:
AVG(C1)
Comment: AVG is the average function. You can find more aggregate functions here.
72
Spotfire DecisionSite Administration
4.
5.
6.
Click Show >> to show the aggregation controls.
From Data Sources, select the first column to aggregate over (for example Job).
Click Add >.
Response: "AC1" will appear in the Aggregation Calculation field.
7. Click the Add button (on the right-hand side of the Calculation field).
8. Click Clear.
Response: The Columns field is emptied.
9. Select the second column to aggregate over (for example Department).
10. Click Add >.
Response: "AC2" will appear in the Aggregation Calculation field.
11. Click the Add button (on the right-hand side of the Calculation field).
12. Enter Name, Description, etc.
13. Click Save.
Response: The resulting column will consist of the average of the value column, for
each value in the aggregation column.
Note: It would not have been possible to produce the table above using the Drillable option. If
the Average Salary column element had been drillable, it would have appeared identical to the
Salary column.
4.3.2.4.9.3
Using Drillable
When creating an aggregated column, it is possible to specify aggregate keys (the columns over
which to aggregate). This is done from the Column Element workbench, under Aggregation.
It is also possible to ignore the aggregation settings altogether, by selecting the Drillable check
box. This way the column will be aggregated over all other columns being retrieved in the same
information link. The following table illustrates this. Average Salary Drillable is calculated
using the AVG function. No aggregate keys have been specified, and instead the Drillable
check box has been selected.
As we see above, the average salary is computed for each value in Job. We could just as well
have defined a salary column explicitly aggregated over Job. However, by using the Drillable
option, we can now retrieve a different set of columns and still get a useful answer:
Note: It is not possible to combine Drillable with any of the filter devices list box, check boxes
or radio buttons.
73
TIBCO® Spotfire® DecisionSite® 9.1.1 - Deployment and Administration Manual
4.3.2.5
4.3.2.5.1
Filter Elements
Filter Elements Overview
Filters correspond to the WHERE clauses in SQL, and are used to specify that only certain rows
of a table are retrieved from the data source, based on the criteria described in the filtering
condition.
Filter elements can be applied as required by the user. In the Information Model, they are
represented by this icon:
Filters can also be included as part of a column definition. Such filters cannot be disabled by the
user. Whenever the column is retrieved, the data will be filtered.
4.3.2.5.2
Creating a Filter Element
This topic describes how to create filters as separate elements. These can be applied as required
by the user. See Defining a Column Filter for information on how to add a filter as part of a
column definition.
► To create a filter:
1.
2.
3.
4.
5.
6.
7.
8.
4.3.2.5.3
From the Select workbench drop-down list, select Filter.
Click Change.
Response: The Filter Elements workbench is displayed.
In the Data Sources pane, select a column and then click the Add > button to add the
column to use in the filter condition.
Comment: Repeat this step if you need to include more columns in your filter
condition.
Define a filter condition with the chosen columns, for example C1>=2000, or if you
are using two columns, C1<C2. See also Relational Operators.
Comment: You can also add a personalized filter condition that limits data depending
on the currently logged in user. See Personalized Information Links.
In the Name field, enter the name for the new filter.
In the Description field, type your own description of the filter.
In the Information Model, select a domain, and then click the < Select button.
Click Save to save the filter in the selected domain folder.
Editing a Filter
This section describes how to edit the properties of a filter.
► To edit a filter element:
1.
2.
In the Information Model pane, select the filter that you want to edit.
Click the Edit button at the top of the Information Model pane.
Response: The name of the filter and filter conditions are loaded and enabled for
editing.
3. Modify the desired fields.
Tip: To move an existing filter to a new domain, select a new domain in the
Information Model pane, then click the < Select button.
4. Click Save or Save Copy.
Comment: Use Save Copy if you do not want to overwrite the old filter definition.
Tip: To see from which table and database a column has been taken, click the column name.
The path to the data source appears at the bottom of the page.
74
Spotfire DecisionSite Administration
4.3.2.5.4
Deleting a Filter
► To delete a filter:
1.
2.
4.3.2.5.5
In the Information Model pane, select the filter that you want to delete.
Click the Delete button at the top of the Information Model pane.
Response: The filter is deleted from the Information Model.
Relational Operators
The following operators can be used in filters:
=
Equal
<> or !=
Not Equal
<
Less Than
>
Greater Than
<=
Less Than or Equal To
>=
Greater Than or Equal To
•
•
•
4.3.2.6
4.3.2.6.1
Generally, with text columns, it is best to use = or !=.
Make sure that any text that appears in the statement is surrounded by single quotes (').
To combine multiple conditions, use the AND or operators, for example C1>2000
AND C2<1000.
Procedures
Procedures Overview
Database Procedures
A database procedure is a set of SQL statements that can be stored in the database. Once this
has been done, clients do not need to keep reissuing the individual statements but can refer to
the database procedure instead.
Database procedures can be useful in many situations:
• When multiple client applications are written in different languages or work on
different platforms, but need to perform the same database operations.
• Some institutes, like banks, where security is important, use database procedures for
all common operations. This provides a consistent and secure environment, and
procedures can ensure that each operation is properly logged. In such a setup,
applications and users would not get any access to the database tables directly, but can
only execute specific database procedures.
• Database procedures can provide improved performance because less information
needs to be sent between the server and the client. However, this increases the load on
the database server system because more of the work is done on the server side and
less is done on the client (application) side. Consider this if many client machines
(such as Web servers) are serviced by only one or a few database servers.
75
TIBCO® Spotfire® DecisionSite® 9.1.1 - Deployment and Administration Manual
•
Database procedures also allow you to have libraries of functions in the database
server. This is a feature shared by modern application languages that allow such design
internally, for example, by using classes.
Database Procedures in Information Services
Using Information Designer and Information Builder you select pre-made database procedures
and configure these to be accessible in Information Links. These Information Links are
available to the DecisionSite Client users to retrieve or manipulate data.
In Information Designer you select a database procedure from your available data sources, and
define which input parameters that the procedure should prompt for, and any potential resulting
columns and joins.
In Information Builder you configure a complete Information Link with one or more
combinations of procedures and columns from other tables.
The Three Kinds of Procedures
Information Services defines three kinds of procedures:
• Pre-update procedure - this procedure does not return any data, it only performs an
operation on one or more databases. All pre-update procedures in an Information Link
will always be executed before any query procedure.
• Query procedure - just like a database table this procedure returns data.
• Post-update procedure - this procedure does not return any data, it only performs an
operation on one or more databases. All post-update procedures in an Information Link
will always be executed after any query procedure.
Note: If using Oracle stored procedures that return data, Information Services only support
procedures that return data of the type REF CURSOR (also known as Table Function).
4.3.2.6.2
Creating a Pre- or Post-procedure
Using Information Designer and Information Builder you select pre-made database procedures
and configure these to be accessible in Information Links. These Information Links are
available to the DecisionSite Client users in order to retrieve data.
In Information Designer you select a database procedure from your available data sources, and
define which input parameters the procedure should prompt for.
The Three Kinds of Procedures
Information Services defines three kinds of procedures:
• Pre-update procedure - this procedure does not return any data, it only performs an
operation on one or more databases. All pre-update procedures in an Information Link
will always be executed before any query procedure.
• Query procedure - just like a database table this procedure returns data.
• Post-update procedure - this procedure does not return any data, it only performs an
operation on one or more databases. All post-update procedures in an Information Link
will always be executed after any query procedure.
► To Create a Pre-update or Post-update procedure:
1.
2.
3.
4.
76
From the Select workbench drop-down list, select Procedures.
Click Change.
Response: The Procedures workbench is displayed.
From the Data Sources pane, select the database procedure you wish to use.
Click Add >.
Response: The database procedure is added to the workbench. Information Designer
analyzes the database procedure and makes a guess as to whether it is a pre-update
Spotfire DecisionSite Administration
procedure or a query procedure (it never sets post-procedure by default).
5.
6.
7.
8.
9.
10.
11.
12.
13.
4.3.2.6.3
Select the Type of procedure: Pre-update procedure or Post-update procedure.
Comment: Pre-update procedures are always executed first in an Information Link.
Post-update procedures are always executed last in an Information Link.
If the database procedure requires any Input Parameters, their name and type are
displayed.
Select whether the input parameter should receive a Default value by entering a value
(of the appropriate type) in the input field. If not, leave the field blank.
Select whether you want the end user to be prompted for a single value, several values,
or not at all, from the Prompt drop-down list box.
Comment: If you select several values, the end user will be allowed to enter several
values separated by a comma. The procedure will run once for each of these values in
an iterative loop.
If you want to allow the input parameter to be Null, select the Permit Null check box.
Example 1: Enter Default value and No prompt, means that the specified default value
will always be used as input parameter.
Example 2: Leave Default value empty, select Permit Null and Single value prompt,
will cause the end user to be prompted for a value. If the end user does not enter a
value in the prompt, Null will be used.
Example 3: Leave Default value empty, leave Permit Null empty and Single value
prompt, will cause the end user to be prompted for a value. If the end user does not
enter a value in the prompt, an error message will appear since Null is not allowed.
Comment: You cannot select the combination: No Default value, Not allow Permit
Null and No Prompt, since this is a paradox.
In the Name field, enter a name for the procedure.
In the Description field, enter your own description of the procedure.
In the Information Model pane, select a parent domain, and then click the < Select
button.
Click the Save button to save the join in the selected parent domain.
Response: The procedure will receive a GUID in the selected domain, and will be
icon. Note that the procedure object will be visible to the end user
denoted with the
in the list of Information Links. You can also make larger, more complex Information
Links using the procedure when creating an Information Link in Information Builder.
Creating a Query Procedure
Using Information Designer and Information Builder you select pre-made database procedures
and configure these to be accessible in Information Links. These Information Links are
available to the DecisionSite Client users in order to retrieve data.
In Information Designer you select a database procedure from your available data sources, and
define which input parameters the procedure should prompt for, and any potential resulting
columns and joins.
77
TIBCO® Spotfire® DecisionSite® 9.1.1 - Deployment and Administration Manual
The Three Kinds of Procedures
Information Services defines three kinds of procedures:
• Pre-update procedure - this procedure does not return any data, it only performs an
operation on one or more databases. All pre-update procedures in an Information Link
will always be executed before any query procedure.
• Query procedure - just like a database table this procedure returns data.
• Post-update procedure - this procedure does not return any data, it only performs an
operation on one or more databases. All post-update procedures in an Information Link
will always be executed after any query procedure.
► To Create a Query procedure:
1.
2.
3.
4.
5.
6.
7.
From the Select workbench drop-down list, select Procedures.
Click Change.
Response: The Procedures workbench is displayed.
From the Data Sources pane, select the database procedure you wish to use.
Click Add >.
Response: The database procedure is added to the workbench. Information Designer
analyzes the database procedure and makes a guess as to whether it is a pre-update
procedure or a query procedure (it never sets post-procedure by default).
Select the Type of procedure: in this case a Query procedure.
If the database procedure requires any Input Parameters, their name and type are
displayed.
Select whether the input parameter should receive a Default value by entering a value
(of the appropriate type) in the input field. If not, leave the field blank.
8. Select whether you want the end user to be prompted for a single value, several values,
or not at all, from the Prompt drop-down list box.
Comment: If you select several values, the end user will be allowed to enter several
values separated by a comma. The procedure will run once for each of these values in
an iterative loop.
9. If you want to allow the input parameter to be Null, select the Permit Null check box.
Example 1: Enter Default value and No prompt, means that the specified default value
will always be used as input parameter.
Example 2: Leave Default value empty, select Permit Null and Single value prompt,
will cause the end user to be prompted for a value. If the end user does not enter a
value in the prompt, Null will be used.
Example 3: Leave Default value empty, leave Permit Null empty and Single value
prompt, will cause the end user to be prompted for a value. If the end user does not
enter a value in the prompt, an error message will appear since Null is not allowed.
Comment: You cannot select the combination: No Default value, Not allow Permit
Null and No Prompt, since this is a paradox.
10. Click the Insert button to add a new line in which to specify a Resulting Column that
the procedure will return.
78
Spotfire DecisionSite Administration
11. In the Original Name field, enter the exact name of a column the database procedure
returns. This name is specified in the actual database procedure, so you have to know
this beforehand.
12. Select the Type the resulting column should have.
13. Enter a descriptive Label for the resulting column. This Label is the name the end user
will see in DecisionSite Client.
14. If you want to specify a Join between the database procedure and another table, use the
Join pane.
Comment: You can only specify one (1) join.
15. From the Data Sources pane, select the first column to include in the join operation.
16. Click Add >.
17. In the Procedure Join column field, enter the name of the column in the database
procedure you wish to join with.
Comment: This may be one of the columns specified in the Result Columns pane, but
can also be another column as long as it is available in the database procedure (for
example and ID column).
18. Click Add.
19. Click either Select or Freehand.
20. Select join operator from the Condition drop-down list, or type a freehand join.
21.
22.
23.
24.
25.
Comment: There are two basic types of joins that can be done between tables: inner
joins and outer joins. An inner join will return records for which only the matching
fields in both tables are equal. An outer join will return all the records (including
NULL values) from one table, and only the matching records from the other table.
In the Condition drop-down list, outer joins include the (+) character. The position of
the plus sign indicates which table will contribute only the matching records. The
column on the opposite side will return all records.
If you want the join to be case-sensitive, select the Case sensitive check box.
In the Name field, enter a name for the procedure.
In the Description field, enter your own description of the procedure.
In the Information Model pane, select a parent domain, and then click the < Select
button.
Click the Save button to save the join in the selected parent domain.
Response: The procedure will receive a GUID in the selected domain, and will be
denoted with the <IMAGE> icon. Note that the procedure object will be visible to the
end user in the list of Information Links. You can also make larger more complex
79
TIBCO® Spotfire® DecisionSite® 9.1.1 - Deployment and Administration Manual
Information Links using the created procedure when creating an Information Link in
Information Builder.
4.3.2.6.4
Editing a Procedure
► To edit a procedure:
1.
2.
3.
4.
4.3.2.6.5
In the Information Model pane, select the procedure that you want to edit.
Click the Edit button in the Information Model pane.
Response: The procedure is loaded and enabled for editing.
Modify the desired fields.
Click Save or Save Copy.
Comment: Use Save Copy if you want to keep the old procedure as well as the edited
one.
Deleting a Procedure
► To delete a procedure:
1.
2.
4.3.2.7
4.3.2.7.1
In the Information Model pane, select the procedure that you want to delete.
Click the Delete button at the top of the Information Model pane.
Response: The procedure is deleted from the Information Model.
Export
Exporting a Domain
A domain, including all subdomains and elements (joins, filters, columns) contained therein,
can be saved as an XML file on the server.
► To export a domain:
1.
2.
3.
4.
5.
6.
7.
4.3.2.8
4.3.2.8.1
From the Select workbench drop-down list, select Export.
Click Change.
Response: The Export workbench is displayed.
Enter a filename (e.g., "abase50.xml").
Select Include permissions if you want the permission settings to be saved together
with each exported element.
In the Information Model pane, select the domain that you want to export.
Click < Select.
Click Export.
Response: The chosen domain and all information in it are saved on the server under
<installdir>\spotfire\application-data\iis\export. On WebSphere web servers, the
path to the directory varies with the server name and may look something like this:
<installdir>\installedApps\<server
name>\Spotfire_DecisionSite_Analytics_Server.ear\application-data\iis\export.
Import
Importing Elements
A previously exported domain, including all subdomains and elements (joins, filters, columns),
can be imported back into the Information Model. For example, DecisionSite for Lead
Discovery includes a predefined Information Model for ActivityBase. This can easily be
imported into your new Information Model.
80
Spotfire DecisionSite Administration
Note: The IM is automatically updated if the name of an existing data source is changed.
Therefore, you can import your IM directly, and later change the names of your data source in
the Data Sources workbench. There is normally no need to edit any XML files to make it work.
► To import a domain:
1.
Place the file to be imported in the directory <installdir>\spotfire\applicationdata\iis\export.
Comment: On WebSphere web servers, the path to the directory varies with the server
name and may look something like this:
<installdir>\installedApps\<server
name>\Spotfire_DecisionSite_Analytics_Server.ear\application-data\iis\export.
2. From the Select workbench drop-down list, select Import.
3. Click Change.
Response: The Import Workbench is displayed.
4. Enter a filename (e.g., "abase50.xml").
5. Select Import mode.
Comment: See Import Workbench for more information on the available options. Note
that joins cannot be overwritten.
6. Select Include permissions if you want to include the permission settings for the
imported elements.
7. In the Information Model pane, select the domain under which you want to store the
imported domain.
8. Click < Select.
9. Click Import.
Response: The saved domain is added to the Information Model.
Note: When importing elements that were exported from the 7.0 version of Information
Designer, or that were exported from the 6.3 version and then upgraded, these will be
associated with the current default data source. Select a suitable default data source prior to
importing such elements.
4.3.2.9
4.3.2.9.1
Permissions
Setting Permissions
When you have set up the Information Model with appropriate columns and filters, you also
need to create user accounts and set the permissions for these accounts. This is done using the
Permissions workbench.
• Execute rights permit the user or group to see and use elements of a domain (filters,
columns and information links).
• Execute + Modify rights also permit the user or group to add and remove information
links from the domain.
• Modify rights alone gives no access to the domain. The domain will not be visible in
Information Builder or Information Designer.
• The user permissions shown for individual users are only the permissions set explicitly
for that user. The user may have additional rights, if he/she belongs to a group.
• Users that do not have access to a domain will not have access to a sub-domain within,
even if they have been given Modify + Execute rights to the sub-domain
► To set permissions for users/groups:
1.
2.
From the Select workbench drop-down list, select Permissions.
Click Change.
Response: The Permissions workbench is displayed.
81
TIBCO® Spotfire® DecisionSite® 9.1.1 - Deployment and Administration Manual
3.
4.
5.
6.
7.
4.3.2.10
4.3.2.10.1
Click Groups or Users.
Response: All available users or groups appear in the accounts list.
In the accounts list select the user or group whose permissions you want to edit.
Click Edit permissions.
Response: The domains and the permissions for the selected user are shown. Note that
individual users also may have other rights, if he/she belongs to a group.
Scroll down to the domain folder that you want to make available for the chosen user,
and select the check boxes to set the Modify and Execute permissions.
Comment: If you change the permissions for a domain that contains subdomains, you
will have the option to propagate the change to all the subdomains within that folder.
When you have set the permissions for the domains that should be available, click the
Save permissions button to save the settings.
Response: The user will now be able to interact with these domains. The level of
interaction will depend on the Modify and Execute settings.
Information Links
Editing the SQL of an Information Link
Information Links are created using the Information Builder. However, sometimes there may be
situations where complex SQL queries are needed that cannot be generated by Information
Builder and the elements in the Information Model. An example might be to retrieve
information from relational databases or databases with complex schemas, where queries
generated by Information Builder are not fast enough and need tuning to reach an acceptable
performance. For those purposes the possibility to manipulate the generated SQL of an
information link has been introduced.
► To modify the SQL of an information link:
1.
2.
3.
4.
5.
82
In the Information Model pane, browse the folder structure and click on the
information link (designated by the icon) that you wish to edit.
Click the Edit button, or right-click on the information link and select Edit SQL from
the context menu.
Response: The Edit SQL workbench is displayed with details of the selected
information link.
Select the Data source that you want to work against from the drop-down list box.
Comment: Complex information links may contain elements from several different
data sources. You can only edit the SQL part of the query that belongs to a single data
source at a time. After you have saved your first changes you can switch to another
data source to edit the rest of the SQL.
To edit Pre-Updates, SQL or Post-Updates, click the corresponding radio button.
Comment: Use SQL to modify the SELECT statement of the information link. Use
Pre-Updates or Post-Updates to add new statements or scrips to be run before or after
the data retrieval.
Edit the SQL statement (or add Pre- or Post-Updates) in the Modified SQL text box.
Spotfire DecisionSite Administration
Comment: You can compare the changes that you have made in the Modified SQL to
the Original SQL at all times. Multiple SQL statements are allowed as long as they
are separated with a semicolon and new line (except the last statement in sequence).
6. Click Save.
Comment: If you change your mind and want to start over with the original SQL, click
Reset to Original. If you want to start over with a previously modified SQL, click
Reset to Saved instead of Save.
Note: The modified SQL is not validated before execution. For this reason, you should not:
• alter the name of a column (the AS-part of SELECT xxx AS yyy)
• alter the number of columns returned
• alter the datatype of columns returned
• alter the order of columns returned
• remove <temporary_result_#> from the FROM-clause in information links that go
against multiple data sources
• remove the trailing WHERE <conditions>, as it will be replaced by any conditions
applied at runtime
4.3.3
4.3.3.1
User Interface Reference
Data Sources Pane
Item
Description
1. Database instance
The name of the database instance.
2. Database link / Catalogue
A link to another database.
3. Schema
The owner or database administrator that has set up the
different tables.
4. Table
A set of columns.
5. Column
The column has an icon that denotes the column type.
Available types are:
String
Integer
83
TIBCO® Spotfire® DecisionSite® 9.1.1 - Deployment and Administration Manual
Real
DateTime
Binary Large Object
Character Large Object
Unknown
A Table Alias. You can create a duplicate reference to a
database table from Information Designer. This duplicate is
called a Table Alias.
6. Table Alias
4.3.3.2
Information Model Pane
4.3.3.2.1
Information Model Pane
The Information Model pane displays the data access layer as a folder structure. It is possible to
drag an element from one place to an other in the tree structure.
4.3.3.2.2
Item
Description
Select none
To save something at the root level (instead of selecting a
domain), click this button.
Edit
Select an existing element (domain, join, filter or column), and
click Edit to load the settings for viewing and editing.
Delete
Select an element and click Delete to remove it.
1. Domain
An expanded domain. Click the plus (+) and minus (-) to browse
the tree.
2. Column element
A column element.
Icons in the Information Model
In the Information Model, the following icons may appear. Click on a link in the table below to
find out more about each element type.
Icon
Element type
Domain
84
Spotfire DecisionSite Administration
Information Link
Join
Filter
String column
Integer column
Real column
Date column
DateTime column
Time column
Procedure
BLOB (binary large object) column. Cannot be retrieved, but can be used
in the structure search filter condition.
(It can also be used in custom made filter conditions using the API).
CLOB (character large object) column. Can be retrieved to DecisionSite
Client.
(It can also be used in custom made filter conditions using the API).
4.3.3.2.3
Information Model Pop-up Menu
The pop-up menu is reached by right-clicking in the Information Model tree structure.
Option
Description
Copy GUID
Copies the GUID of the selected element to the clipboard.
New Domain...
Opens the New Domain dialog, where you can enter a name for
the new domain (folder). Clicking OK in the dialog will create
the new domain on the level of the selected element.
Edit
Opens the Workbench used to edit the selected element (Domain,
Join, Column, Filter or Edit SQL Workbench (for information
links)).
Edit SQL
Opens the Edit SQL Workbench. (Only available for information
links.)
View SQL
Opens the View SQL dialog which displays the SQL statements
used in the selected information link. (Not available for other
types of elements.)
Delete
Remove the selected element from the Information Model.
Rename...
Opens the Rename Element dialog, where you can enter a new
name for the selected element.
Select None
Deselects all elements. Can be used in case you want to save any
type of element to the root level.
85
TIBCO® Spotfire® DecisionSite® 9.1.1 - Deployment and Administration Manual
4.3.3.2.4
86
View SQL Dialog
Option
Description
SQL for the selected
Information Link
Displays the SQL statements used to retrieve the desired
information. If several Data Sources are used, the SQL statements
for the different sources are separated by lines.
Help
Opens this help file.
Copy SQL
Copies the SQL statements to the clipboard.
Spotfire DecisionSite Administration
4.3.3.3
4.3.3.3.1
Workbenches
Data Source Definition Workbench
Option
Description
Defined data
sources
Lists all data sources that have been defined.
Edit
Opens the settings of the selected data source for editing.
Remove
Removes the selected data source.
GUID
Unique identifier of the selected data source.
Name
The name of the data source as you want it to appear in the Data
Sources pane.
Type
Type of database. Choose from Oracle, DB2, SQL Server, MySQL,
SAS/SHARE or ODBC. For information about how to set up other
types of databases, please refer to the Spotfire Analytics Server Installation and Administrator's guide.
Connection URL
URL of database. The format of this URL depends on the type of
database. Change the placeholders in the default URL so that it links to
87
TIBCO® Spotfire® DecisionSite® 9.1.1 - Deployment and Administration Manual
your selected database.
88
No. of connections
Min. is the minimum number of users that can submit queries at any
one time.
Max. is the maximum number of users that can submit queries at any
one time. Additional users will be put in a queue.
Set both min and max to 0 for SAS/SHARE, ODBC and other data
sources that does not support pooled connections (i.e. there is no valid
ping command).
Username
Username.
Password
Password.
User
authentication
Use individual user names to authenticate users when running
Information Links. By default, this will prompt the user for credentials
when running the Information Link against this data source for the first
time. Optionally, a plug-in can be used to retrieve the credentials.
Default data
source
The default data source will be used by all imported elements when
importing an Information Model from Spotfire Analytics Server 7.1.1 or
older.
Default join data
source
The default join data source is used for creating temporary tables and
joining the final result when running an Information Link. It is used
when running against several data sources where no data source allows
writing in temporary tables.
Allow writing in
temporary tables
Allows the Information Services to create temporary tables in this data
source. This is needed when running Information Links that joins data
from several data sources or has a large number of filter values.
To guarantee full compatibility between Information Services and
Oracle databases, it is recommended that the compatible setting in
init.ora (for the databases) is set to: compatible=8.1.0.0.0
New connection
initialization
commands
Command executed when initializing a database connection. This is
needed when setting up a data source to ISIS/Direct (see Issues when
Creating an ISIS/Direct Data Source for details).
Fetch size
The maximum number of values in each block of data retrieved from
the database. Used for performance tuning. In general, use higher values
for physically distant databases. Use lower values when the number of
users is high. Entering the value zero will make the JDBC driver use its
default value.
Batch size
The maximum number of values in each block of data written to the
database. Used for performance tuning. In general, use higher values for
physically distant databases. Use lower values when the number of
users is high. Entering the value zero will make the JDBC driver use its
default value.
Save Copy
Click Save Copy to create a copy with a new GUID.
Save
Click Save to save or update the data source.
Clear
Clears all fields without saving.
Spotfire DecisionSite Administration
4.3.3.3.2
4.3.3.3.3
Domain Workbench
Option
Description
GUID
A unique identifier used internally to identify the data elements. The
GUID appears once the Domain has been created and saved.
Name
The name of the domain to be saved/edited.
Description
A free-text description of the domain. The maximum limit of the
description is 255 characters.
Parent domain
The name of domain folder where you want to save the domain.
< Select
Select a domain in the Information Model and then click this button to
retrieve the name.
Save Copy
Click Save Copy to create a copy with a new GUID.
Save
Click Save to save or update the domain.
Clear
Clears all fields without saving.
Join Workbench
89
TIBCO® Spotfire® DecisionSite® 9.1.1 - Deployment and Administration Manual
Option
Description
Add >
Select a column from Data Sources, and then click this button to
include it in the join.
Remove
Removes a column from the list of columns included in the join.
Select
Select this button to choose from standard joins in the drop-down list.
Freehand
Select this button to enter your own join definition.
Case sensitive
Select this check box to make the join case sensitive.
Tables to join
Select one table from each drop-down list. If you are only using two
columns in the join, then do not alter the default choices. If more than
two columns are included in the join condition (for example, an
intermediate table), then it is important to select the two tables that
are to be joined.
GUID
A unique identifier used internally to identify the data elements.
Name
The name of the join to be saved/edited.
Description
A free-text description of the join. The maximum limit of the
description is 255 characters.
Parent domain
The name of domain folder where you want to save the join.
< Select
Select a domain in the Information Model, then click here to place the
join in the selected domain.
Default join
Select this check box if you want this join to be the default one if two
different joins between the same tables exist.
Save Copy
Click Save Copy to create a copy with a new GUID.
Save
Click Save to save or update the join.
Clear
This button clears all fields without saving.
4.3.3.3.4
Column Workbench
4.3.3.3.4.1
Column Workbench Overview
The column workbench allows you to compose column elements. It is divided into three
sections:
1. Column Composition
2. Filter Composition
3. Save Column
90
Spotfire DecisionSite Administration
4.3.3.3.4.2
Column Workbench, Column Composition
Option
Description
1. Add >
Select a column from Data Sources, and then click this button to
include in the new column.
2. Remove
Deletes the selected column from the composition.
3. Calculation
To calculate the column, enter the expression in this text box.
4. Show/Hide
Click this button to show/hide the aggregation controls.
5. Add >
Adds the columns selected in Data Sources to the aggregation.
6. Remove
Deletes the selected column from the aggregation.
7. Clear
Removes all columns from the list of aggregation columns.
8. Add
Adds the result of the calculation to the list of aggregate keys.
9. Remove
Removes an aggregate key from the list of aggregate keys.
10. Edit
Edits an aggregate key.
11. Calculation
Enter an expression here to calculate a column to aggregate over.
12. Drillable
Check if you want the column to aggregate over all other columns
that the user selects at run-time. See Using Drillable for more
information.
91
TIBCO® Spotfire® DecisionSite® 9.1.1 - Deployment and Administration Manual
4.3.3.3.4.3
Column Workbench, Filter Composition
Option
Description
Show >>/ Hide << Click this button to show/hide the filter controls.
4.3.3.3.4.4
92
Add >
Select a column from Data Sources, and then click this button to include
in the filter.
Remove
Deletes the selected column from the composition.
Condition
In this field, enter a condition containing the selected column or
columns.
Column Workbench, Save Column
Option
Description
GUID
A unique identifier used internally to identify the data elements.
Name
The name of the column to be saved/edited (max. 30 characters).
Description
A short description of the purpose of the column (max. 255
characters).
< Select
Select a domain in the Information Model and then click this button
to retrieve the name.
Parent domain
The name of the domain folder where you want to save the column.
Type
Use this list box to select the data type of the column.
Spotfire DecisionSite Administration
4.3.3.3.4.5
Filter devices
Lists the filter devices that will be available for run-time filters in
Information Builder.
Set...
Opens the Set Filter Devices for Column Element dialog were you
can determine which filter devices should be available for the
selected column element.
Save Copy
Click Save Copy to create a copy with a new GUID.
Save
Click Save to save or update the column.
Clear
Clears all fields without saving.
The Set Filter Devices for Column Element Dialog
Option
Description
Available filter
devices
Displays the filter devices available for the data type of this column. The
Structure Search filter is available for columns of type blob, integer and
real. Make sure that a valid structure or structure ID is included in the
column prior to adding a structure search filter.
Selected filter
devices
Displays the filter devices that are enabled for the column. This means that
the selected devices will be presented as prompting type options when
defining a prompted information link in Information Builder.
Add >>
Adds the selected device to the list of selected devices.
<< Remove
Removes the selected device from the list of selected devices.
► To reach the Set Filter Devices for Column Element dialog:
1.
2.
Select the Column workbench and create a new column element, or edit an existing
column element from the Information Model.
Click on Set....
93
TIBCO® Spotfire® DecisionSite® 9.1.1 - Deployment and Administration Manual
4.3.3.3.5
94
Multiple Columns Workbench
Option
Description
Add >
Select one or more tables or columns from Data Sources, and then click
this button to include the columns as new column elements. Whole
databases or schemas cannot be added.
To select more than one column, press Ctrl and click on the desired
columns in the Data Sources pane before clicking Add >.
< Remove
Deletes the selected columns from the Column elements list.
Remove All
Clears the Column elements list.
Name
The name of the column to be saved. Click on a column element to
display its name in the text box.
The default name is the same as the name in the database, but with _ and
- replaced by space, and only the first character capitalized. The
maximum limit of the name is 30 characters.
Data type
Displays the data type of the selected column element.
Source name
Displays the source name of the selected column element.
Description
A short description of the purpose of the column (max. 255 characters).
The default description is the path to the column.
Apply Changes
Click this button to apply any changes to the name or description of the
selected column element. Note that no changes will be made to the
Spotfire DecisionSite Administration
column element unless this is done.
4.3.3.3.6
Parent domain
The name of the domain folder where you want to save the columns.
< Select
Select a domain in the Information Model, then click < Select to place
the columns in the selected domain.
Save
Save the columns to the Information Model.
Clear
Clears all fields without saving.
Filter Workbench
Option
Description
Add >
Select a column from the Data Sources, and then click this button to
include in the filter.
Remove
Deletes the selected column from the composition.
Condition
In this field, enter a condition containing the selected column or
columns.
GUID
A unique identifier used internally to identify the filter.
Name
The name of the filter to be saved/edited.
Description
A short description of the purpose of the filter (max. 255 characters).
< Select
Select a domain in the Information Model and then click this button
to retrieve the name.
Parent domain
The name of domain where you want to save the filter.
Save Copy
Click Save Copy to create a copy with a new GUID.
Save
Click Save to save or update the filter.
Clear
Clears all fields without saving.
95
TIBCO® Spotfire® DecisionSite® 9.1.1 - Deployment and Administration Manual
4.3.3.3.7
96
Procedure Workbench
Option
Description
Add >
Select a database procedure from the Data Sources list, and then
click this button to include it.
Type
Information Services defines three kinds of procedures:
Pre-update procedure - this procedure does not return any data, it
only performs an operation on one or more databases. All preupdate procedures in an Information Link will always be executed
before any query procedure.
Query procedure - just like a database table this procedure returns
data.
Post-update procedure - this procedure does not return any data, it
Spotfire DecisionSite Administration
only performs an operation on one or more databases. All postupdate procedures in an Information Link will always be executed
after any query procedure.
Name(Type)
States the name and type of the input parameters detected in the
database procedure.
Default value
Select whether the input parameter should receive a Default value
by entering a value (of the appropriate type) in the input field. If not,
leave the field blank.
Permit Null
If you want to allow the input parameter to be Null, select the
Permit Null check box.
Prompt
Select whether you want the end user to be prompted for a single
value, several values or not at all, from the Prompt drop-down list
box.
Insert
Click the Insert button to add a new line in which to specify a
Resulting Column that the query should produce.
Original Name
In the Original Name field, enter the exact name of a column the
database procedure returns. This name is specified in the actual
database procedure, so you have to know this before hand.
Type
Select the Type the resulting column should have.
Label
Enter a descriptive Label for the resulting column. This Label is the
name the end user will see in DecisionSite Client.
X
Remove the corresponding Resulting Column row.
Add >
Select a column from Data Sources, and then click this button to
include it in the join.
Remove
Removes a column from the list of columns included in the join.
Procedure Join
column
In the Procedure Join column field, enter the name of the column
in the database procedure you wish to join with.
This may be one of the columns specified in the Result Columns
pane, but can also be another column as long as it is available from
the database procedure result (for example an ID column).
Add
Click Add to include the column specified in the Procedure Join
column field in the join.
Select
Select this button to choose from standard joins in the drop-down
list.
Freehand
Select this button to enter your own join definition.
Case sensitive
Select this check box to make the join case sensitive.
GUID
A unique identifier used internally to identify the filter.
Name
The name of the filter to be saved/edited.
Description
A short description of the purpose of the procedure (max. 255
characters).
< Select
Select a domain in the Information Model and then click this button
to retrieve the name.
97
TIBCO® Spotfire® DecisionSite® 9.1.1 - Deployment and Administration Manual
4.3.3.3.8
Parent domain
The name of domain where you want to save the procedure.
Save Copy
Click Save Copy to create a copy with a new GUID.
Save
Click Save to save or update the procedure.
Clear
Clears all fields without saving.
Permissions Workbench
Option
Description
1. Groups/Users
selection
Select to see individual accounts or group accounts.
2. Account list
Select the account (group or individual) to modify.
3. Edit permissions
Loads the current domain settings for the selected user.
4. Domain folders
The existing domains in the Information Model.
5. Modify setting
When this check box is selected, the user has the right to change
the elements in this domain.
6. Execute setting
When this check box is selected, the user has access to the
contents of this domain.
7. Update permissions
Saves the settings for the selected user.
Note: The user permissions shown for individual users are only the permissions set explicitly
for that user. The user may have additional rights, if he/she belongs to a group.
98
Spotfire DecisionSite Administration
4.3.3.3.9
4.3.3.3.10
Export Workbench
Option
Description
Filename
Enter a filename. No path is required.
Include permissions
Select this check box to include information about the permissions
associated with the domain and its content.
Domain
The domain selected for exporting (see below).
< Select
Select a domain in the Information Model and then click this button.
Export
Exports the specified domain and its contents in an XML file to the
directory <installdir>\spotfire\application-data\iis\export on the
server.
Clear
Clears all fields without saving.
Import Workbench
Option
Description
Filename
Enter the name of the file to be imported. The file must be present
in the directory <installdir>\spotfire\application-data\iis\export on
the server.
Import mode
Controls how conflicts between existing and imported GUIDs are
handled. (Note that elements may have the same name without a
conflict arising.)
Replace all
The entire current Information Model is replaced by the imported
elements. Any selection under Parent domain (see below) is
99
TIBCO® Spotfire® DecisionSite® 9.1.1 - Deployment and Administration Manual
ignored.
Add, overwrite conflicting elements
If a GUID already exists the element is overwritten with imported
information (unless it is a join, in which case it must be removed
manually). The imported element will appear under the imported
domain, while the old element will be removed from its domain.
Hence, the element will appear to have moved.
Add, keep conflicting elements
If a GUID already exists, the current element is kept and the
imported information is ignored.
4.3.3.3.11
100
Include permissions
Select this check box to include information (in the XML file)
about the permissions associated with the domain and its content.
Parent domain
The domain in which you want to store the imported information.
This is ignored if Replace All is selected.
< Select
Select a domain in the Information Model and then click this
button.
Import
Imports the specified XML file.
Clear
Clears all fields without saving.
Edit SQL Workbench
Option
Description
Data source
Displays the data sources used by the current information link in a
Spotfire DecisionSite Administration
drop-down list. You can only edit the SQL of one data source at the
time.
4.3.4
4.3.4.1
Pre-Updates
Click this radio button to enter statements to be executed before the
data retrieval. For example, this could be a call to a stored procedure or
statements such as 'CREATE TABLE' or 'INSERT'.
SQL
Click this radio button to display and modify the SQL of the
information link.
Post-Updates
Click this radio button to be able to enter statements to be executed
after the data retrieval. For example, 'DROP TABLE'.
Synchronized
scrolling
Select this check box to simultaneously scroll both the Modified SQL
and the Original SQL text boxes.
Modified SQL
Modify the SQL of the information link in this text box. Multiple SQL
statements are allowed as long as they are separated with semicolons
and new line.
Original SQL
Displays the original SQL of the information link so that you can
immediately see the differences that you have made upon your
modification.
Reset to Saved
Resets the Modified SQL to the last saved SQL.
Reset to Original
Resets the Modified SQL to the SQL originally created in the
Information Link.
GUID
A unique identifier used internally to identify the information link.
Name
The name of the information link to be saved/edited.
Parent domain
The name of domain folder where the modified information link will
be saved.
Save
Click Save to save the modified information link.
Tips and Examples
General Guidelines for Setting Up an Information Model
The Information Model (IM) concept aims to supply each end user with the data they need,
with a minimum of effort and confusion. Consequently, when building an IM, it is important to
understand who the end users are and what data they require for their work.
Who are the end users?
Permissions are set on the domain level. Finding groups of users who work on related data will
give you a good clue about the domain structure you should implement. Do not give all users
access to everything - this will only cause confusion.
What data do they need?
What information is needed? How much data can users handle in a single request? Are there
any commonly used threshold values? Answering these questions will guide you in setting up
the correct joins, columns and filters.
Will users build their own information links?
Some end users will want to use the column and filter elements that you design, and assemble
their own information links (queries) using Information Builder. Others will be less
experienced, or may perform repetitive tasks. For these you should consider preparing complete
information links in advance.
101
TIBCO® Spotfire® DecisionSite® 9.1.1 - Deployment and Administration Manual
4.3.4.2
Where to Store Join Elements
From a technical point of view, join elements can be placed anywhere in the tree structure.
They are not visible to end users, and the system will find the join elements needed for a
particular query, regardless of location. Unlike filter and column elements, no control of
permissions is performed on join elements.
Nevertheless, it is a good habit to place joins in logical locations so they can easily be found for
reconfiguration. Consider placing join elements in a special "join domain" near the root domain
for each data source. In other words, if you have an ISIS/Direct data source, then create an
"ISIS" root domain with an "ISIS joins" sub domain.
4.3.4.3
Understanding Filters
There are two ways to control filtering in Spotfire Information Designer. One is to create
separate filter elements. These will appear as icons, and allow the end user to apply them in an
information link at will. The other method is to associate a filter directly to the column. This
means that when the column element is used in an information link, the column filter is
automatically applied.
Use column filters only when there is no reason to believe the user will ever want to use the
column without a filter. Make sure the column description makes it clear to the user that a filter
is being applied.
Use filter elements when you want to give users the option to use or not use the filter. Again,
remember to write a good description of the filter.
4.3.4.4
Personalized Information Links
Using personalized information links you can set up a data source to return only information
applicable for a certain User or Group. Depending on which user is logged in and accesses the
information link, different subsets of the data will be available. For example, you could set up
an information link that detects whether the user retrieving data is a member of the sales force
for Europe, Asia or the US and only return data for that continent.
Below are two examples of personalized information links. The first will retrieve data
depending on which user is logged in, the second depending on which groups that user is a
member of.
User Name via Lookup Table
Scenario: You want to set up an information link to a table of data with sales made by all the
sales people in his company. However, depending on which person from the sales department
accesses an analysis using this information link, only the sales figures pertaining to that single
user should be retrieved.
First, take a look at the Sales table containing the total sales of every person in the sales force.
Order ID
Employee ID
Product
Sale ($)
1
101
Cornflakes
100
2
150
Soda
550
3
244
Cornflakes
160
4
101
Mineral Water
400
5
101
Soda
120
6
339
Mineral Water
200
Then you must create a "Lookup Table" that matches the Employee ID to the actual Spotfire
User Name for each person logging into the Spotfire Analytics Server.
102
Spotfire DecisionSite Administration
Spotfire Username
Employee ID
mikesmith
101
lauraclarke
150
sarahdonovan
244
malcomreynolds
339
Next, you add an Information Services Filter or Column that constrains the "Spotfire
Username" column to only return values for the currently logged in user.
An example of the resulting SQL for this would be: "LookupTable"."Spotfire Username" =
'malcomreynolds'
Finally, you create an Information Services Join between the Sales table and the Lookup table joining the Employee ID columns.
Now the Information Link is ready to be used and will only retrieve data for the currently
logged in user.
Group Membership
Scenario: You want to set up an information link to a table of data with sales made by all of the
sales people in the company. However, depending on which person from the sales department
accesses an analysis using this information link, only the sales figures pertaining to the region
that sales person is assigned to should be retrieved. For example, if a sales person is working in
the East region, she should only be allowed to see sales figures made in that region (by any
person).
The Spotfire Administrator has created groups on the Spotfire Analytics Server named
SalesForce-East, SalesForce-West, SalesForce-South, and SalesForce-North. Each sales
person is a member of one or more of these.
Note: You can also create a Lookup table, just as in the first example, in which you assign
various users or groups to categories that match your Sales table. That way you do not need to
create superfluous groups on the Spotfire Analytics Server if groups with matching names are
not already available.
You then take a look at the Sales table containing the total sales of every person in the sales
force.
Order ID
Employee
ID
Region
Product
Sale ($)
1
101
SalesForceEast
Cornflakes
100
2
150
SalesForce-
Soda
550
103
TIBCO® Spotfire® DecisionSite® 9.1.1 - Deployment and Administration Manual
West
3
244
SalesForceNorth
Cornflakes
160
4
101
SalesForceEast
Mineral Water
400
5
101
SalesForceEast
Soda
120
6
339
SalesForceEast
Mineral Water
200
Next, you add an Information Services Filter or Column that constrains the "Region" column
so that it only returns values if the currently logged in user is a member of a group with that
exact name.
An example of the resulting SQL of this would be: "SalesTable"."Region" = ('SalesForceEast','SalesForce-North')
Now the information link is ready to be used and will only retrieve data for groups that the
currently logged in user is a member of.
Syntax
The syntax for the personalized information link parameters is:
%CURRENT_USER%
and
%CURRENT_GROUPS%
4.3.4.5
Replacing Null
Sometimes a column returns null values. By using the Oracle SQL function NVL, null values
can be replaced with another value.
Note: The following example only applies to data retrieved from an Oracle database.
► To modify a column to replace null values with 0 (zero):
104
1.
2.
3.
Select the column in the Information Model (IM).
Click Edit.
In the Calculation field, type:
4.
NVL(C1,0)
Click Save.
Spotfire DecisionSite Administration
Note: Sometimes a null value has a meaning different from zero, such as "value unknown".
Make sure you understand how the data is meant to be interpreted before replacing values!
4.3.4.6
Limiting the Number of Records Returned
The Oracle pseudo column ROWNUM makes it possible to use a filter to control the number
of records returned by an information link.
Note: The following example only applies to data retrieved from an Oracle database.
► To create a filter that limits the number of records returned by
an information link:
1.
2.
From the Select workbench drop-down list, select Filter, and click Change.
In the Condition field, type:
ROWNUM < 11
3.
4.
5.
4.3.4.7
Enter Name and Description.
Select a Parent domain.
Click Save.
Concatenating Strings
The Oracle SQL function CONCAT lets you create a column by concatenating strings from
different tables.
Note: The following example only applies to data retrieved from an Oracle database.
105
TIBCO® Spotfire® DecisionSite® 9.1.1 - Deployment and Administration Manual
► To combine strings from two different tables into a single
column element:
1.
2.
3.
4.
5.
6.
From the Select workbench drop-down list, select Column, and click Change.
In the Data Sources pane, select the first column (e.g., FirstName).
Click Add >.
Select the second column (e.g., .LastName)
Click Add >.
In the Calculation field, enter:
concat ( concat (C1, ' '), C2)
7.
8.
9.
10.
4.3.4.8
Enter Name and Description.
Select a Parent domain.
Select string from the Type drop-down.
Click Save.
PL/SQL Functions
In the following example, we will retrieve salary information for employees in both USD and
SEK. One way of doing this is to write a function in SQLplus that performs the calculation:
CREATE FUNCTION money_converter
( amount IN NUMBER)
RETURN NUMBER IS
return_val NUMBER (10,2) := 0;
BEGIN
return_val := amount * 10.3;
Return (return_val);
END;
/
The salary in USD is used as input, and the output is a value that is 10.3 times bigger. Store the
function in the SDP_ADMIN schema (or elsewhere if a different administrator user name is
used) to make it accessible by Information Designer.
Now create a column element as follows:
106
Spotfire DecisionSite Administration
Also create a column element "Employee" with employee names, and "Salary (USD)" with the
original salary values.
When an information link with these three columns is executed from Information Builder, the
generated SQL looks as follows:
SELECT
E1."ENAME" AS "Employee",
E1."SAL" AS "Salary (USD)",
money_converter(E1."SAL") AS "Salary (SEK)"
FROM
"SCOTT"."EMP"@"DBLINK" E1
Note: Some of the more advanced features of PL/SQL are not supported, for example stored
procedures or executing anonymous PL/SQL Blocks.
4.3.4.9
Details on Data Sources and Information Models
Prior to version 7.1 of Spotfire Analytics Server, Information Services used database links to
access the data. A problem with database links is that they must be defined in the database. In
DecisionSite 7.1 and later, the data sources concept allows direct connection to a separate data
source instead of via the database links. This makes it a lot easier to move an Information
Model (IM).
107
TIBCO® Spotfire® DecisionSite® 9.1.1 - Deployment and Administration Manual
Since all references in an exported Information Model go to the data sources object, all
problems that can occur on import due to changes in database structure can be avoided. An
Information Model can be imported directly and the data source can later be renamed using the
Information Designer Data Sources Workbench, without you ever having to edit any XML
files.
It is therefore recommended to use direct connection to a specific data source rather than via
database links when you create new Information Models.
Note: In some cases database links may lead to better performance than using direct
connection. For example, this could be the case when you are using information links that join
to several databases.
Import of Information Models that still use database links:
If an Information Model is imported from a DecisionSite 7.0 or older, the desired data source
must temporarily be set to the default data source in order for the import to work properly. After
the import has been made, you can go back to your current default data source again.
Since no user names or passwords are stored at the export, you will be prompted to configure
the new data source.
In the XML files of exported Information Models, database links are referred to using the tag
<catalog>.
If you do have <catalog> references in an exported Information Model you must do one of the
following things prior to import:
• Make sure that the corresponding catalog (database link) is defined in the database. If
it does not exist, create it, or, if it exists with a different name, change the name on all
occurrences in the XML file using Find/Replace in your favorite text editor.
• Replace all <catalog> references with <data-source> to switch to the recommended
direct connection. This is applicable only to files from version 7.1 or later. Give the
108
Spotfire DecisionSite Administration
data source definition (at the beginning of the file) a suitable name, e.g.,
ACTIVITYBASE.
Update all data source references and remove the corresponding catalog references.
Example:
<data-source>oracle_1</data-source>
<catalog>ACTIVITYBASE</catalog>
<schema>ABASE</schema>
should be replaced by
<data-source>ACTIVITYBASE<data-source>
<schema>ABASE<schema>
Here you should also rename the data source definition at the beginning of the file from
"oracle_1" to "ACTIVITYBASE" and replace the URL with the new one linking to the correct
data source:
Note: If there are other catalog references in the file that link to "oracle_1", the "oracle_1" data
source must be kept and you should instead create a new ACTIVITYBASE data source.
4.3.4.10
4.3.4.10.1
Examples of Generated SQL
SQL - Filters
In this example we will define a column element with a filter. The column should only return
commissions above 1000.
109
TIBCO® Spotfire® DecisionSite® 9.1.1 - Deployment and Administration Manual
The column element defined above will result in the following SQL when executed as part of
an information link:
SELECT
E1."COMM" AS "High Commission"
FROM
"SCOTT"."EMP"@"DBLINK" E1
WHERE
(E1."COMM" > 1000)
4.3.4.10.2
SQL - GROUP BY
In the following example, we will use aggregation to calculate the average salary for employees
in various departments. We are assuming that the database provides the salary (SAL) and
department (DEPTNO) for each employee.
Define a column element as follows:
110
Spotfire DecisionSite Administration
We must also define a column element "Department Number" from DEPTNO which returns
department numbers.
If we define an information link using these two columns, the following SQL will be generated
(notice the GROUP BY clause):
SELECT
E1."DEPTNO" AS "Department Number",
AVG(E1."SALARY") AS "Average Salary"
FROM
"SCOTT"."EMP"@"DBLINK" E1
GROUP BY
E1."DEPTNO"
111
TIBCO® Spotfire® DecisionSite® 9.1.1 - Deployment and Administration Manual
4.3.4.10.3
SQL - Subqueries
Information Designer supports subqueries (inner SQL). In this example we will demonstrate
how to retrieve all employees with salary greater than the average.
We create a new column "Employees with high salary" with the following filter condition:
FC1 > (Select avg(SAL) from SCOTT.EMP@DBLINK)
Note: Be careful to include all brackets or it will not work!
The column element defined above will result in the following SQL when executed as part of
an information link (notice that the WHERE clause includes the sub query from the filter
condition):
SELECT
E1."ENAME" AS "Employees with high salary"
FROM
"SCOTT"."EMP"@"DBLINK" E1
WHERE
(E1."SAL" >(
Select
avg(SAL)
112
Spotfire DecisionSite Administration
from
SCOTT.EMP@DBLINK
))
4.3.4.11
4.3.4.11.1
ISIS Examples
Extracting Molecular Weight from a Structure Column
Databases with the ISIS/Direct Cartridge allow you to use ISIS/Direct operators to extract
information from a BLOB column that contains binary chemical structures. The molwt
operator, for example, calculates the molecular weight of a structure.
► To create a molecular weight column:
1.
2.
3.
4.
From the Select workbench drop-down list, select Column, and click Change.
In the Data Sources pane, select the structure (BLOB) column. In this example, it has
the name CTAB.
Click Add >.
In the Calculation field, type:
molwt ( C1 )
5.
6.
7.
8.
4.3.4.11.2
Enter Name and Description.
Select a Parent domain.
Select real from the Type drop-down.
Click Save.
Creating a Molecular Formula Column
Databases with the ISIS/Direct Cartridge allow you to use
ISIS/Direct operators to extract information from a BLOB
column that contains binary chemical structures. The molfmla
operator returns the molecular formula of a structure. In the
example below, we also use the operator fmla_like to limit
the results to compounds with a specific number of carbon
and hydrogen atoms.
113
TIBCO® Spotfire® DecisionSite® 9.1.1 - Deployment and Administration Manual
► To create a molecular formula column:
1.
2.
3.
4.
<
From the Select workbench drop-down list, select Column, and click Change.
In the Data Sources pane, select the structure (BLOB) column. In this example, it has
the name CTAB.
Click Add >.
In the Calculation field, enter:
molfmla ( C1 )
5.
6.
7.
8.
Expand the filter section by clicking Show >>.
In the Data Sources pane, select the structure (BLOB) column again.
Click Add > (in the Filter section).
In the Condition field, enter:
fmla_like ( FC1 , 'C(1-3) H(1-5)') = 1
9.
10.
11.
12.
4.3.4.11.3
Enter Name and Description.
Select a Parent domain.
Select string from the Type drop-down.
Click Save.
Combining ISIS and ActivityBase Data
The following example describes how to combine data from ISIS and ActivityBase databases. It
represents a typical use case, where the user wants to access ActivityBase data, while using
structure search to filter for certain chemical structures in ISIS.
► To set up an Information Link for combining ActivityBase and
ISIS:
1.
114
Set up two data sources - one for the ISIS database and one for the ActivityBase
database.
Spotfire DecisionSite Administration
2.
Comment: See Creating a Data Source.
Create the following joins between the two databases.
Join column...
...with column
Data
Source
Table
Column
Data
Source
Table
Column
ActivityBase
STUDY
STDYID
ActivityBase
PROTSTDY
STDYID
ActivityBase
TOCCASON
TOCCID
ActivityBase
TOTSODRS
TOCCID
ActivityBase
PROTSTDY
PROTID
ActivityBase
TOCCASON
PROTID
ActivityBase
TOTSODRS
OBJDID
ISIS
ISISRC2D_MOL
CORP_ID
3.
Create column elements as follows:
Name
Data
Source
Study
ActivityBase STUDY
STDYID
Protocol
ActivityBase PROTSTDY
PROTID
Run
ActivityBase TOCCASON
TOCCID
Plate_ID
ActivityBase TOTSODRS
OLPTID
Compund_ID
ActivityBase TOTSODRS
OBJDID
Batch
ActivityBase TOTSODRS
OBJDBATCHREF
Result
ActivityBase TOTSODRS
TTORRSLTVALUE
Well_Row
ActivityBase TOTSODRS
substr(TTORWELLREFERENCE,1,1)
Well_Column
ActivityBase TOTSODRS
substr(TTORWELLREFERENCE,2,2)
Table
Completion_Date ActivityBase TOCCASON
ctab
ISIS
4.
5.
6.
7.
8.
Column
Filter
Device
TOCCDATEACTUALCOMP
ISISRC2D_MOL CTAB
Structure
Search
Launch Information Builder.
Create an information link using all the columns in (3).
For the columns Study, Protocol, Run and Plate_ID, enable run-time filtering by
selecting a suitable prompt method.
Comment: See the help file for Information Builder for more information. This is
reached by launching the tool and clicking Help.
For the column ctab, select prompt method Structure Search.
Click Open to execute the query.
4.3.5
Troubleshooting
4.3.5.1
Troubleshooting
Please note: To run Information Designer you need DecisionSite Client installed on the same
machine.
115
TIBCO® Spotfire® DecisionSite® 9.1.1 - Deployment and Administration Manual
If you get error messages from Microsoft Internet Explorer (IE) when trying to run Information
Designer you should check your security settings. You must allow ActiveX controls to run. All
ActiveX controls in Information Designer are signed and safe to run.
► To enable ActiveX controls:
1.
2.
Launch Information Designer.
In the bottom right-hand corner of the IE window containing Information Designer,
check the web zone (for example, "Local intranet").
3. In IE, click Tools > Internet Options... and go to the Security tab.
4. Select the web zone of Information Designer (for example "Local intranet").
5. Click Custom Level.
6. Under Download signed ActiveX Controls select Prompt.
7. Under Run ActiveX controls and plug-ins select Enable.
8. Under Script ActiveX controls marked safe for scripting select Enable.
9. Click OK.
10. In the Internet Options dialog, click OK.
Note: Enabling ActiveX controls is important also when using Information Builder or
Information Library.
4.3.6
Glossary
4.3.6.1
Glossary
The glossary only contains brief definitions of the terminology. You can also use the Index or
Search tab to the left to find more information within this help file.
Column element
A list of values. A column element can correspond to a database field, but can also be the result
of calculations performed on multiple fields from several databases. What the column element
returns is defined by the administrator.
Database
A collection of related data, usually in the form of multiple files or tables that are linked to each
other.
Data connection
A collection of information required to access a specific database. The collection includes a
data source name (DSN) and login information. Data connections are stored in a project and are
activated when the user performs an action that requires access to the database.
Data source
The entity that provides data; similar to the term back end.
Element
Any constituent that can be added to an information link, in other words, column elements,
filter elements and other information links.
Field
A location in a record where data is stored; used in some database systems to mean "column."
Although the terms "field" and "column" have slightly different meanings in formal database
theory, in most instances they are used synonymously.
116
Spotfire DecisionSite Administration
Filter
A set of criteria applied to records to show a subset of the records or to sort the records.
GUID
Global Unique Identifier, A GUID establishes a unique identity for elements in the Information
Model. For example: f9717cc0-e965-11d4-941b-0010ac110117.
Information Builder
A tool for creating and executing information links in Spotfire DecisionSite.
Information Model
The Information Model consists of the data integration layer, which manages connections with
the various data sources, and the data access layer, which associates database identifiers with
user-friendly column names. Appears to the user as a folder structure.
Information Services
A suite of tools for accessing databases. Includes Information Designer, Information Builder,
and Information Library.
Information Library
A tool for executing information links.
Information link
A predefined database query, including all required connection information. When opened
(executed), will retrieve data from databases and visualize it in DecisionSite.
Join
An element used to describe how tables relate to one another. Tables are typically joined using
data that they have in common (see Primary key).
Join operator
A comparison operator in a join condition that determines how the two sides of the condition
are evaluated and which records are returned. The most common comparison operator is
equivalence (=).
Key
A column used to identify a record, often used as the index column for a table.
Personalized Information Links
An information link that returns a subset of data depending on which user is logged in.
Pre-updates
A pre-updates element is part of a SQLQuery definition and contains SQL update statements to
be executed before a query.
Post-updates
A post-updates element is part of a SQLQuery definition and contains SQL update statements
to be executed after a query.
117
TIBCO® Spotfire® DecisionSite® 9.1.1 - Deployment and Administration Manual
Primary key
A column or combination of columns that uniquely identifies rows in a table. It cannot contain
null values and must always have a unique index. A primary key is used to relate a table to
foreign keys in other tables.
Query
A specific request or set of instructions for retrieving, modifying, inserting, or deleting data in a
database.
Record
A term used in some database systems to mean "row". Although "record" and "row" have
slightly different meanings in formal database theory, in most instances they are used
synonymously. In Spotfire terminology, usually taken to mean a datapoint in a visualization.
Run-time filters
Filters which prompt the user for filter conditions while the information link is being executed.
These filters are added when an information link is created in Information Builder.
Row
In a table, a set of related fields that are treated as a unit and that describe a specific entity. A
row is the logical equivalent of a record.
Server
A computer on a network that controls access to data.
SQL
Structured Query Language, a database query and programming language.
Table
A collection of associated columns. The logical equivalent of a database file.
4.4
4.4.1
4.4.1.1
DecisionSite Information Builder
Introduction
Introduction to Information Builder
Information Builder is a tool for creating and opening information links. An information link is
a database query specifying the columns to be loaded, and any filters needed to narrow down
the data set prior to visualization in Spotfire DecisionSite.
Information Builder is built on top of the Information Model (IM). This model resides on your
server and is a representation of one or more databases which may be geographically dispersed.
It allows you to execute advanced database queries without any knowledge of the underlying
database structures. The model appears as a folder structure (see Element Pane) which is set up
by the administrator.
Information Builder is part of a suite of tools called Information Services. The other tools are
Information Library and Information Designer. While Information Builder is used to create
information links (queries) from building blocks such as columns and filters, Information
Library is used only for opening these links and retrieving the data. Information Designer is the
administrative tool for working with the Information Model. It allows the administrator to
define columns and filters using joins and aggregation, and to set user permissions for accessing
various parts of the model.
118
Spotfire DecisionSite Administration
4.4.1.2
Related Reading
Please refer to the Spotfire DecisionSite User's Guide and Reference Manual for information
about visualizations, query devices and other basic functions not covered in this User's Guide.
The Spotfire DecisionSite User's Guide and Reference Manual can be reached by clicking Help
> Help Topics in the main menu bar of Spotfire DecisionSite.
For detailed accounts of setting up the server-side of Information Services, see the "Spotfire
Analytics Server - Installation and Administrator's Guide".
4.4.2
4.4.2.1
Fundamental Concepts
Fundamental Concepts
Spotfire DecisionSite Information Services requires no prior knowledge of query languages
such as SQL. However, it is important to understand a few terms and concepts as they are used
in this product:
• Information links
• Column elements
• Filters
• Domains
• Procedures
4.4.2.2
Information Links
An information link is a structured request for data which can be sent to the database. These
specifications include one or more columns, and may include one or more filters.
Stated in English, an information link could be: "Fetch the Name, Address and Phone_number
for employees that pass the filter High_Income."
4.4.2.3
Column Elements
Column elements in an information link may refer to multiple tables in different databases.
However, Information Builder represents columns as if they were located in the same
spreadsheet, regardless of the physical location of the data.
In a Spotfire DecisionSite context, columns are entities that can be assigned to the axes in a
plot. For example, data on chemical elements may include element name, atomic mass and
atomic number.
Typical column names in other domains are:
• combinatorial chemistry: compound name, number of atoms
• clinical research: age, gender, histology
• HTS: plate id, percent inhibited
• genetics: gene name, physical location, function
119
TIBCO® Spotfire® DecisionSite® 9.1.1 - Deployment and Administration Manual
4.4.2.4
Filters
Filters are conditions that limit the amount of data returned by an information link. For
example, a filter could set the conditions "X > 10 AND Y < 100". There are three ways of
filtering data when working with information links.
Filter elements are set up by the administrator, and appear
in the Elements pane of Information Builder. They can be
added to any information link, just like column elements,
but cannot be modified. See Creating a new information
link to find out how to include a filter element.
Hard filters are set up as you define the information link,
and are saved with the link. This means that they cannot be
reused in other links. Also, hard filters can only specify a
range or a list of values, and so are less versatile than filter
elements. See Adding Hard Filters for more details.
Run-time filters are also set up when you create an
information link. However, the actual conditions are
entered by the user only when the link is opened
(executed). For each column that has been set up like this, a
dialog will appear allowing the user to enter threshold
values or select individual values. See Adding Run-time
Filters for more details.
4.4.2.5
Domains
Domains are containers, similar to file folders, that are used to organize
information links and other elements such as filters and columns. The
domain structure is independent of the physical location of data.
Domains are created by the administrator using Information Designer.
4.4.2.6
Procedures
Database Procedures in Information Services
Using Information Designer and Information Builder you select pre-made database procedures
and configure these to be accessible in Information Links. These Information Links are
available to the DecisionSite Client users in order to retrieve data.
In Information Designer you select a database procedure from your available data sources, and
define which input parameters the procedure should prompt for, and any potential resulting
columns and joins.
In Information Builder you configure a complete Information Link with one or more
combinations of procedures and columns from other tables.
The Three Kinds of Procedures
Information Services defines three kinds of procedures:
• Pre-update procedure - this procedure does not return any data, it only performs an
operation on one or more databases. All pre-update procedures in an Information Link
will always be executed before any query procedure.
• Query procedure - just like a database table this procedure returns data.
• Post-update procedure - this procedure does not return any data, it only performs an
operation on one or more databases. All post-update procedures in an Information Link
will always be executed after any query procedure.
120
Spotfire DecisionSite Administration
4.4.3
4.4.3.1
Using the Information Builder
Starting and Closing Information Builder
► To reach Information Builder:
Select Tools > Create Information Link in DecisionSite Client.
► To close Information Builder:
Click on the Start Page button above the Guides pane. This will bring you back to your usual
DecisionSite start page.
4.4.3.2
4.4.3.2.1
Editing Information Links
Creating a New Information Link
Information Builder allows you to create information links. The building blocks are column,
filter and procedure elements that have been set up by the administrator.
► To create an information link:
1.
2.
3.
4.
5.
6.
7.
8.
4.4.3.2.2
In the Elements pane, select the column and filter elements that you want to include.
You can also include procedures.
Comment: To select multiple items, hold down the Ctrl key, and then click on the
desired items. Click the + symbol to expand a domain.
Click Add to link.
Response: The selected elements will be added to the Information Link pane.
Comment:If you want to add more elements, repeat steps 1 and 2. To remove an item
from the information link pane, click the button for the element to be excluded.
If you want to filter the data, set Filter type and Limits.
Click the icon.
Response: The Save Information Link dialog appears.
In the Domains view, select where you want the information link to be saved.
In the Name field, enter a name for the information link.
In the Description field, enter some text describing the purpose of the information
link. This is optional.
Click OK.
Response: The new information link is added to the Information Model. It can now be
accessed by other users.
Modifying an Information Link
If you have been given permission by the administrator, you can edit existing information links.
► To modify an information link:
1.
2.
3.
4.
In the Elements pane, click the information link you wish to edit.
Response: The description of the link appears in the Details pane.
Click Edit Link.
Response: The content of the information link appears in the Information Link pane.
Edit the link in the Information Link pane by adding or removing elements or by
changing the filtering for a column.
Open the modified link or save it by clicking the
button.
121
TIBCO® Spotfire® DecisionSite® 9.1.1 - Deployment and Administration Manual
Comment: Replace the old information link by choosing the same name and folder
location as the old link. Enter a new name (or put the link in another folder) to keep
both the old and the modified information links.
4.4.3.2.3
Deleting an Information Link
► To delete an information link from the Information Model:
1.
Select an information link.
2.
Click the
button on the toolbar.
Response: A dialog appears, prompting you to confirm that you want to delete the link.
3. Click Yes.
Note: You can only delete information links. Column and filter elements cannot be deleted by
anyone other than the administrator.
4.4.3.2.4
Adding Hard Filters
Hard filters are set up as you define the information link and are saved with the link. This
means that they cannot be reused in other links. Also, hard filters can only specify a range or a
list of values, and are therefore less complex than filter elements.
► To add hard filters for a column:
1.
2.
3.
Create an information link.
Select the Properties tab.
For each column, use the Filter type drop-down list to select whether to filter by range
or by values.
Comment: Filtering by range means entering the upper and lower limits of the desired
range. Filtering by values means entering the exact values that you want to include in
the returned data. If no values are entered, there will not be any filtering applied to the
selected column. Strings containing commas can be included as values as well as range
limits using backslash as prefix. For instance, if you want to include the two strings
"Madonna" and "Banderas, Antonio " as values, you would need to escape the comma
by entering: Madonna, Banderas\, Antonio
4. Set the upper and lower limits (range), or enter the desired values, separated with
commas (values).
Comment 1: Limits are inclusive. In other words, if the lower limit is set to 1000, the
value 1000 will be included in the data set.
Comment 2: When setting upper and lower limits on columns of type String, 'A' is
considered to come before 'AA', and 'S' comes before 'Smith'. This means that the
name 'Smith' will not be present when choosing names from 'D' to 'S'. The order of
characters in standard ASCII.
Comment 3: When setting upper and lower limits on columns of type Date, note that
only the standard date format yyyy-mm-dd is recognized. Example: enter 1969-11-17
for November 17th, 1969.
Note: If the Filter type and Limits fields are disabled, go to the Advanced tab and select None
in the Prompt drop-down box for that column. (It is not possible to combine run-time filters
with hard filters.) If this does not help, the reason is probably that the administrator disabled
Range and/or Value filtering when setting up the column element.
Tip: When entering values for filtering you are allowed to use wildcard characters. These are:
122
*
matches any characters (example: '*mber' would return the following months: September,
November and December)
?
match any single character (example: '???ember' would only return the month November)
Spotfire DecisionSite Administration
You can also copy columns from Microsoft Excel. Mark data in Excel by pressing Ctrl + C.
Paste the data in the values field of the selected column by pressing Ctrl + V.
4.4.3.2.5
Adding Run-time Filters
An alternative to setting filter conditions on the Properties tab (see Adding Hard Filters) is to
configure your information link to prompt for filter values as each column is retrieved. This
way you do not have to specify filter conditions in advance. The data set will be pared down
before the next column in sequence is processed (unless you have selected to treat the columns
as independent). See Run-time Filter Example for further information.
► To enable run-time filters:
1.
2.
3.
Create a new information link or modify an existing link.
In the Information Link pane, go to the Advanced tab.
For each column, use the Prompt drop-down list to select how you want to be
prompted for filter conditions during data retrieval. If you do not want run-time
filtering for a column, select None.
Comment: Selecting Values will let you enter a list of values to include. Range will
let you specify a range of values. List Box will display a list box with the available
values. Check Boxes will display a check box for each value in the column. Radio
Buttons will display a radio button for each value. Structure Search will allow you to
filter by substructure or structure similarity (see Filtering Using Structure Search).
4. Save the information link, or open it.
Note: When using run-time filters, the prompts will appear in the order that the columns appear
buttons to move columns up or down.
in the Information Link pane. You can use the
(Filter elements are always applied before run-time filters, regardless of order.)
Tip: When entering values for filtering you are allowed to use wildcard characters. These are:
*
matches any characters (example: '*mber' would return the following months: September,
November and December)
?
match any single character (example: '???ember' would only return the month November)
You can also copy columns from Microsoft Excel. Mark data in Excel by pressing Ctrl + C.
Paste the data in the values field of the selected column by pressing Ctrl + V.
4.4.3.2.6
Making Elements Independent in Prompted Information Links
The default behavior of prompted information links is that each subsequent step lists values
based on earlier selections (See Run-time Filter Example). However, if you are working against
a STAR schema database the procedure may require multiple joins since the elements queried
for the prompts can only be joined by also joining over the large fact table in the STAR schema.
This may result in very long times passing between each prompt. To avoid the long prompt
times, it may be useful to treat the various elements as independent and avoid filtering upon
each prompt step.
► To make an element independent:
1.
2.
3.
Create a new information link or modify an existing link.
In the Information Link pane, go to the Advanced tab.
For each element, use the Independent check box to select whether to treat the
element as independent or not.
Comment: Note that setting columns or filters as independent may result in no data
returned from the information link.
4. Save the information link, or open it.
Note: Setting an element to Independent will have the effect that no previous selections in the
prompt steps will be reflected in the listing for the independent element. Neither will any of the
123
TIBCO® Spotfire® DecisionSite® 9.1.1 - Deployment and Administration Manual
selections made in the prompt step for the independent element be reflected in later prompt
steps (regardless of whether the later prompt steps are independent or not).
4.4.3.2.7
Personalized Information Links
Using personalized information links you can set up a data source to return only information
applicable for a certain User or Group. Depending on which user is logged in and accesses the
information link, different subsets of the data will be available. For example, you could set up
an information link that detects whether the user retrieving data is a member of the sales force
for Europe, Asia or the US and only return data for that continent.
Below are two examples of personalized information links. The first will retrieve data
depending on which user is logged in, the second depending on which groups that user is a
member of.
User Name via Lookup Table
Scenario: You want to set up an information link to a table of data with sales made by all the
sales people in his company. However, depending on which person from the sales department
accesses an analysis using this information link, only the sales figures pertaining to that single
user should be retrieved.
First, take a look at the Sales table containing the total sales of every person in the sales force.
Order ID
Employee ID
Product
Sale ($)
1
101
Cornflakes
100
2
150
Soda
550
3
244
Cornflakes
160
4
101
Mineral Water
400
5
101
Soda
120
6
339
Mineral Water
200
Then you must create a "Lookup Table" that matches the Employee ID to the actual Spotfire
User Name for each person logging into the Spotfire Analytics Server.
Spotfire Username
Employee ID
mikesmith
101
lauraclarke
150
sarahdonovan
244
malcomreynolds
339
Next, you add an Information Services Filter or Column that constrains the "Spotfire
Username" column to only return values for the currently logged in user.
124
Spotfire DecisionSite Administration
An example of the resulting SQL for this would be: "LookupTable"."Spotfire Username" =
'malcomreynolds'
Finally, you create an Information Services Join between the Sales table and the Lookup table joining the Employee ID columns.
Now the Information Link is ready to be used and will only retrieve data for the currently
logged in user.
Group Membership
Scenario: You want to set up an information link to a table of data with sales made by all of the
sales people in the company. However, depending on which person from the sales department
accesses an analysis using this information link, only the sales figures pertaining to the region
that sales person is assigned to should be retrieved. For example, if a sales person is working in
the East region, she should only be allowed to see sales figures made in that region (by any
person).
The Spotfire Administrator has created groups on the Spotfire Analytics Server named
SalesForce-East, SalesForce-West, SalesForce-South, and SalesForce-North. Each sales
person is a member of one or more of these.
Note: You can also create a Lookup table, just as in the first example, in which you assign
various users or groups to categories that match your Sales table. That way you do not need to
create superfluous groups on the Spotfire Analytics Server if groups with matching names are
not already available.
You then take a look at the Sales table containing the total sales of every person in the sales
force.
Order ID
Employee
ID
Region
Product
Sale ($)
1
101
SalesForceEast
Cornflakes
100
2
150
SalesForceWest
Soda
550
3
244
SalesForceNorth
Cornflakes
160
4
101
SalesForceEast
Mineral Water
400
5
101
SalesForceEast
Soda
120
6
339
SalesForceEast
Mineral Water
200
125
TIBCO® Spotfire® DecisionSite® 9.1.1 - Deployment and Administration Manual
Next, you add an Information Services Filter or Column that constrains the "Region" column
so that it only returns values if the currently logged in user is a member of a group with that
exact name.
An example of the resulting SQL of this would be: "SalesTable"."Region" = ('SalesForceEast','SalesForce-North')
Now the information link is ready to be used and will only retrieve data for groups that the
currently logged in user is a member of.
Syntax
The syntax for the personalized information link parameters is:
%CURRENT_USER%
and
%CURRENT_GROUPS%
4.4.3.2.8
Adding a Structure Search Filter
Users of DecisionSite for Lead Discovery can use structure search in run-time filters. This
means using substructure or similarity search to limit the data set to chemical structures of a
particular type.
Structure search can be used on BLOB, Integer and Real column elements. For Integer and
Real, it is important that the values in the column are valid compound identifiers.
► To set up a run-time filter with structure search:
1.
2.
3.
4.
4.4.3.2.9
Create a new information link or modify an existing link.
Add a column element of the type BLOB (Binary Large Object), Integer or Real.
Comment: For column elements of the type BLOB, a structure search run-time filter is
automatically enabled. The Retrieve box on the Advanced tab will be disabled. BLOB
data cannot be retrieved or visualized in DecisionSite, but can be used for filtering.
If the column type is Integer or Real, go to the Advanced tab and select the Structure
Search prompt.
Save the information link, or open it.
Adding Procedures
Procedures are added to an Information Link in the same way as any other element such as a
column or filter. You select them from the Elements Pane and click Add to Link. The
procedure icon looks like this:
126
Spotfire DecisionSite Administration
Priority of Execution:
You can include column elements, filter elements and procedure elements in the same
Information Link. These will be executed in a certain priority order when the Information Link
is executed:
• All pre-update procedures will execute in top-down order. The procedure is executed
before any data is retrieved. No data is expected from the pre-update procedure, and no
join is performed. Any prompting will occur in the top-down order.
• All query procedures and column elements will execute in top-down order. The
procedures run as a part of the data retrieval. Data from the procedures is joined with
the rest of the columns. Any prompting will occur in the top-down order.
• All post-update procedures will execute in top-down order. The procedure is
executed after the data has been retrieved. No data is expected from the post-update
procedure, and no join is performed. Any prompting will occur in the top-down order.
Note that the order of the elements in the user interface only has significance for the elements of
the same "priority class". A pre-update procedure will always execute before a query procedure
regardless if that pre-update procedure is placed at the bottom of the list.
4.4.3.2.10
Displaying SQL Statements for an Information Link
Sometimes it may be of interest to view the SQL statements generated for an information link.
► To view the SQL behind an information link:
1.
Make sure the information link or columns of interest are added to the Information
Link pane (by clicking Edit Link or Add to Link, respectively, after selecting the
elements).
2.
button in the toolbar of Information Builder.
Click on the
Response: The View SQL and Edit Oracle Hints dialog is displayed.
Look at the generated SQL in the text field. Click OK when finished.
Comment: If several Data Sources are used, the SQL statements for the different
sources are separated by lines.
Comment: Click Copy SQL to copy the information in the text field to the clipboard.
3.
4.4.3.2.11
Editing Oracle Hints
If you are working against an Oracle database that rarely updates its statistics, or if you are
querying operational databases with complex schemas, adding one or more Oracle hints to the
information link can improve the overall performance of the information link.
127
TIBCO® Spotfire® DecisionSite® 9.1.1 - Deployment and Administration Manual
Oracle hints are comments included in an SQL statement that are used in the choosing of
execution plan for the statement. If you have detailed information about your data, that a certain
index is more selective for certain queries, for example, including hints to the information link
can result in a more efficient execution plan. See Oracle documentation for more information
about hints.
Note: In some cases adding a hint can actually decrease the performance of an information link.
If this is the case, click Edit Oracle Hints... and remove the hint.
► To add hints to an information link:
1.
Make sure the information link or columns of interest are added to the Information
Link pane (by clicking Edit Link or Add to Link, respectively, after selecting the
elements).
2.
button in the toolbar of Information Builder.
Click on the
Response: The View SQL and Edit Oracle Hints dialog is displayed.
Click on Edit Oracle Hints... next to the data source that you want to annotate with
hints.
Comment: If several Data Sources are used, each one will have a separate Edit Oracle
Hints-link.
Response: The Edit Oracle Hints dialog is displayed.
Enter the hints, separated by space, and click OK.
Response: The hints are added to the SQL statement.
Click OK.
Response: The View SQL and Edit Oracle hints dialog is closed
3.
4.
5.
6.
Save the information link by clicking .
Comment: Note that the hint is not saved with the information link until the entire
information link is saved.
Note: If an information link has been added to the Information Link pane using Add to Link and
no additional elements have been added, Edit Oracle Hints will not be available. To display the
Edit Oracle Hints link, use Edit Link when you move the information link to the Information
Link pane.
Note: If more than one information link containing hints is added to the Information Link pane,
all hints will be removed from the SQL statement. This is due to the fact that the hints in the
different information links might conflict with each other and that there is currently no way for
the system to figure out if the two hints will work together.
4.4.3.2.12
Selecting Join Path
When you are creating multiple joins between tables in Information Designer, you can specify
which join will be the default one. Sometimes you may want to create an information link that
does not use the default join though, and this can be done by selecting the join path manually
from Information Builder. Also, when there are several possible join paths between a number of
tables, you may want to specify which one you want the information link to use.
Let's say the default join path between Table 1 and Table 4 is via Table 3 and the joins
TABLE1.ID=TABLE3.ID and TABLE3.NAME=TABLE4.NAME.
128
Spotfire DecisionSite Administration
For a certain information link this is not what you want, instead you wish to configure the link
to join via Table 2 using the joins TABLE1.ID=TABLE2.ID and
TABLE2.COST=TABLE4.COST.
This can be done by clicking on the Join Path Edit... button in Information Builder, and
selecting a different join path than the default one. By simply selecting one new join, a
complete join path using that join and the resulting default joins will be displayed. By selecting
additional joins, the join path might be updated using other default joins to form the shortest
join path given the current selected joins.
The basic principle of the Join path dialog is this: The joins you pick for the Selected Joins list
are the ones that will always be used in the join path. These are the joins that are actually saved
in the information link. The joins displayed in the Additional Default Joins list, are the joins
that will complete the join path at this time. Note that these may change if new default joins are
created/updated in Information Designer.
► To Select a Join Path:
1.
When editing the information link you wish to select a join path for, click the Join Path
Edit... button.
129
TIBCO® Spotfire® DecisionSite® 9.1.1 - Deployment and Administration Manual
Response: The Join Path dialog appears and the default join path is displayed in the
Additional Default Joins list.
2.
3.
130
Select another join you wish to use from the Available Joins list and click Add.
Response: The new join is added to the Selected Joins list, and the Additional
Default Joins list is updated showing the default joins that will be used to create a
complete join path between the tables.
Spotfire DecisionSite Administration
4.
5.
If you want to make sure the second join is always used in the join path, even if the
default join is changed, you must move it to the Selected Joins list. Select the join
from the Additional Default Joins list.
Note: Even if you do not move the second join to the Selected Joins list, the join path
is still complete. The information link will then always use the Selected Join and then
form a complete join path using the default joins (which may have been changed later
on from Information Designer).
Click on the < arrow button to move the join to the Selected Joins list.
131
TIBCO® Spotfire® DecisionSite® 9.1.1 - Deployment and Administration Manual
6.
Response: The join path is complete and will always use the selected joins.
7.
Click OK to save the information link.
Comment: The Selected Joins will be saved for the information link, and will always
be used when retrieving data via the information link. Any default joins will not be
saved, as these may change and are determined on the fly when using the information
link.
Note: When executing an Information Link against several data sources, all subqueries are run
first and then the main query, joining all subresults. This means that the joins in the main query
are performed after all joins in the subqueries. In each where-clause in the subqueries, the order
of the joins is preserved from the chosen join-path in the Information Link.
4.4.3.3
Opening Information Links
4.4.3.3.1
Opening Information Links
Information Builder allows you to open information links. This means accessing data sources
and executing a query.
► To execute an information link:
1.
2.
4.4.3.3.2
Create a new information link or edit an existing link (see Modifying an Information
Link).
Click Open.
Response: The query is executed, and the data is shown in DecisionSite. If the
information link includes prompted filters, one or more dialogs will appear before the
data is loaded. See Using Prompted Filters for details.
Using Run-time Filters
► To specify filter parameters during retrieval:
1.
2.
3.
132
Open an information link that contains run-time filters.
Response: The system will begin to retrieve data. For each column with run-time filter
(see Adding Prompted Filters) a dialog will appear, asking you to specify the filter
conditions for this column.
Enter the filter conditions that you want to apply.
Comment: If you are using the List Box, Check Boxes or Radio Buttons prompt
methods, then you will find that only values that have not been eliminated by previous
filter conditions are shown.
Click Next >>, or Finish when you have come to the last column.
Response: The data is retrieved and displayed in DecisionSite.
Spotfire DecisionSite Administration
Note: Dialogs are displayed in the order the columns appear in the Information Link pane. In
other words, the first column for which Prompt has been set to anything but None will be the
first to display a dialog.
4.4.3.3.3
Run-time Filter Example
Information links may include more than one column with run-time filters. In this case each
filter will reduce the data set, such that subsequent prompts may present fewer values. (This can
be overridden by treating the columns as independent.) Consider the following example:
This is the data as it would look if no filters were being applied:
Name
Salary
Location
Prompt: None
Range
Check Boxes
Miller
1300
New York
King
1400
New York
Clark
700
New York
Ford
1100
Dallas
Adams
900
Dallas
Scott
1300
Dallas
Jones
1200
Dallas
James
800
Chicago
Turner
1000
Chicago
As the information link is opened, Salary will be filtered first (the order is set in the Information
Link pane).
The user enters the limits 1100 to 1300. After the first filter, the following remains:
Name
Salary
Location
Prompt: None
Range
Check Boxes
Miller
1300
New York
Ford
1100
Dallas
Scott
1300
Dallas
Jones
1200
Dallas
Several rows, including all Chicago employees, have been filtered out. This means that when
the Location filter is shown, Chicago will not be presented as an option:
4.4.3.3.4
When to Use the Independent Setting
The Independent setting on the Advanced tab can be used to treat elements (columns or filters)
as independent during the opening of prompted information links. The default behavior of
prompted information links is that each subsequent step lists values based on earlier selections.
133
TIBCO® Spotfire® DecisionSite® 9.1.1 - Deployment and Administration Manual
However, if you are working against, e.g., a STAR schema database the procedure may require
multiple joins since the elements queried for the prompts are linked only by the large fact table
in the STAR schema.
Setting an element to Independent will have the effect that no previous selections in the prompt
steps will be reflected in the listing for the independent element. Neither will any of the
selections made in the prompt step for the independent element be reflected in later prompt
steps (regardless of whether the later prompt steps are independent or not). It may also be of
interest to use the independent setting on an element that is not prompted, e.g., on a column
with a hard filter:
Example
Say that you have information about your employees and their salaries stored in a STAR
schema database with a layout similar to the one below:
Now, you want to retrieve information about the salary of your employees in the Chicago
office, with the possibility to filter using DeptNo and Gender upon running the information
link.
► These are the steps you would perform to retrieve this type of
information:
1.
134
2.
3.
Create an information link by adding all the interesting columns to the Information
Link pane.
Select the values Filter type for the Location column.
Enter Chicago in the text box.
4.
5.
Switch to the Advanced tab.
Select suitable Prompt options (e.g., List Box)) for the DeptNo and Gender columns.
Spotfire DecisionSite Administration
6.
Select the Independent option for the Location column.
By making Location independent you avoid having to join to the large fact table for each
prompt. When the information link is opened you will first be prompted to choose a DeptNo.
Instead of going through the large fact table to the Location table and filter out all values except
the ones for Chicago, you will see all values in the DeptNo column. For the next prompt step
the much quicker connection between DeptNo and Gender is used directly, thus improving the
performance of the information link.
Note: When Location is made independent you will see all possible values in the prompt step
for DeptNo even though some of them perhaps are inapplicable due to the hard filter setting
Chicago on the Location column.
This means that if all employees in the Chicago office belong to department number 30, you
might accidentally select number 20 in the prompt step for DeptNo with the result that no data
is retrieved from the server.
If the Independent option had not been selected, the hard filter on Chicago would have been
applied prior to the first prompting step and DeptNo 30 would have been the only one displayed
in the prompt list:
In this case, the risk of selecting wrong data in a prompt step is minimized.
4.4.3.3.5
Filtering Using Structure Search
Users of DecisionSite for Lead Discovery can use structure search in run-time filters. This
means using substructure or similarity search to limit the data set to chemical structures of a
particular type.
► To use structure search in a run-time filter:
1.
2.
Open an information link that contains columns with structure search run-time filters.
Response: The system will begin to retrieve data. For each column with a run-time
filter the Set Filter for Column Dialog will appear, asking you to specify the filter
conditions for this column.
Select Substructure or Similarity, depending on the type of search you want to
perform.
135
TIBCO® Spotfire® DecisionSite® 9.1.1 - Deployment and Administration Manual
3.
4.
5.
6.
4.4.3.3.6
Click Edit Structure.
Response: ISIS/Draw is launched.
Draw a structure to use as search template.
Comment: See ISIS/Draw documentation for more information on how to edit
structures.
When you are done drawing the structure, click the
button in ISIS/Draw.
Response: ISIS/Draw is closed and the structure appears in the Set Filter for Column
dialog.
Click Next > or Finish.
Response: The data is retrieved. If this is the last run-time filter the data is displayed in
a visualization.
Using Current Query Device Settings as a Filter
When opening information links with columns prompted for values or value range (see Adding
Prompted Filters) it is possible to use the visual capabilities of Spotfire DecisionSite to set these
values.
► To use the current visualization for filter definition:
1.
2.
3.
4.
5.
6.
7.
8.
9.
4.4.3.3.7
Open a suitable data set in DecisionSite.
Choose a subset either by selecting using the query devices, or by marking records.
Comment: Marking means clicking and dragging a rectangle around a group of
markers in a visualization.
Open an information link that contains prompted filters.
When the Set Filter for Column dialog for the desired column appears, click Get
Values... or Get Range....
Response: The Get Values from Data Set dialog is displayed.
From the Matching column drop-down list, select the column (in the visualized data
set) from which you want to get the values or the range.
Click Selected records or Marked records, depending on which values you want to
use.
Click OK.
In the Set Filter for Column dialog, click Next > (or Finish if this is the last
prompted column).
Repeat steps 4 to 8 for each prompted column.
Response: The data is loaded and displayed in a visualization.
Adding Columns to an Existing Data Set
As you assemble your data set, you may want to create a few intermediate visualizations to see
what information needs to be added and what can be left out.
136
Spotfire DecisionSite Administration
► To add new columns:
1.
2.
Compose a new information link. For details see Creating a new information link.
Click Open.
Comment: The data retrieved using the current information link is visualized in
DecisionSite.
3. Create new visualizations and apply suitable settings for color and size.
4. Return to the Information Builder and add any additional columns to the information
link.
5. Click Open.
6. Click Yes when prompted about whether or not you want to add the result as new
columns to the current data set.
Response: The changes will be reflected in the query devices, but the data will still be
displayed using the plots that you created.
Note: The steps above only apply when a column element is added to an information link. If a
filter is added, or if a column element is removed from the information link, then the entire data
set will be retrieved again. Any visualization settings (axes, colors, etc.) that have been made
will then be lost.
4.4.3.4
Transforming the Data
4.4.3.4.1
Eliminating Duplicates
Eliminating duplicates means removing all duplicate records from the returned data set. By
duplicates we mean records where all fields are identical to all fields of another record.
Consider the following example:
Before removing duplicates
After removing duplicates
Name Income
Name Income
Smith
1200
Smith
1200
Jones
700
Jones
700
Banks
700
Banks
700
Smith
1200
Smith
900
Smith
900
► To eliminate duplicates:
1.
2.
3.
4.
4.4.3.4.2
Create a new information link or edit an existing link (see Modifying an Information
Link).
In the Information Link pane, click Edit... on the Conditioning line.
Response: The Data Conditioning dialog opens.
Select Distinct as conditioning type.
Click OK.
Response: In the Information Link pane, Conditioning has been set to Distinct. This
means that duplicate records will be removed from the data set returned by this
information link when it is opened.
Pivoting Data
Pivoting is a method of rearranging rows into columns. This flexibility allows you to rotate row
and column headings around the core data. In general, pivoting is used to be able to carry out
137
TIBCO® Spotfire® DecisionSite® 9.1.1 - Deployment and Administration Manual
visual analyses on data that originally reside in a tall/skinny format. Pivoting may also be used
to create more query devices by splitting a column into several other columns.
► To pivot data:
1.
Create a new information link or edit an existing link (see Modifying an Information
Link).
2. In the Information Link pane, click Edit... on the Conditioning line.
Response: The Data Conditioning dialog opens.
3. Select Pivot as conditioning type.
4. Click Configure....
Response: The Pivot dialog opens.
5. In the Identity section, select the columns that you want to use to identify records.
Comment: Each unique value in the chosen identity column produces a row in the
generated table.
6. In the Category section, select the columns that you want to use for generating new
columns in the new table.
Comment: Each unique value in the chosen category column produces a new column
in the generated table.
7. In the Values section, select the (continuous) column that you want to aggregate.
Comment: The column from which the data is pulled. The values in the generated table
are computed according to the method selected under Computation.
Note: The computation method depends on what type of column you select. If the
selected column is numeric, the aggregation method will be set to Average. Columns
of type string will be set to Concatenation.
8. In the Other columns section, select any other columns that you want to include in the
new table.
9. Select a naming scheme to use for naming the pivoted columns.
10. Click OK.
Response: The Pivot dialog is closed.
11. In the Data Conditioning dialog, click OK.
Response: In the Information Link pane, Conditioning has been set to Pivot. This
means that the data will be pivoted when the information link is opened.
4.4.3.4.3
Example of Pivoting
Pivoting a data set means changing it from a tall/skinny format to a short/wide format. Consider
the following tall/skinny table, based on a series of temperature measurements:
138
City
Month
Temp
London
February
4
New York
February
6
London
May
16
New York
May
19
London
August
28
New York
August
26
London
November
13
New York
November
11
Spotfire DecisionSite Administration
As we add more observations, the table grows taller, but remains three columns wide. While
useful during data collection, this format may not be appropriate for certain types of
calculations or visualizations. For example, the entities that interest us are the different cities, so
we may want a representation with a single record for each city.
Pivoting this table produces the following (note that avg(Temp) is the average of a single cell):
City
avg(Temp)
for February
avg(Temp)
for May
avg(Temp)
for August
avg(Temp)
for
November
London
4
16
28
13
New
York
6
19
26
11
Each city is now represented by a single record, which makes this format very suitable for
Spotfire DecisionSite profile charts. The following steps have been performed during the
pivoting:
• A row has been created for each unique value in City.
• A column has been created for each unique value in Month.
• A value from Temp has been entered for each cell in the resulting grid.
The following settings were made in the Pivot dialog to produce this result:
• Identity: City
• Category: Month
• Values: Temp
4.4.3.4.4
Example of Pivoting with Aggregation
Note: To understand this example, it is recommended to read Example of Pivoting first.
Apart from changing format from tall/skinny to short/wide, pivoting can be used to create a
more compact table. Consider the following table, based on a series of temperature
measurements:
City
Month
Day
Temp
London
February
1
5
London
February
15
8
London
May
1
15
London
May
15
22
New York
February
1
9
New York
February
15
7
New York
May
1
18
New York
May
15
24
Tall/Skinny=>Short/Wide conversion lets us pivot and aggregate this table, producing the
following:
139
TIBCO® Spotfire® DecisionSite® 9.1.1 - Deployment and Administration Manual
City
avg(Temp) for February
avg(Temp) for May
London
6.5
18.5
New York
8
21
A smaller table has been created, summarizing the original table. The following settings were
made in the Pivot dialog to produce this result:
• Identity: City
• Category: Month
• Values: Temp
4.4.4
4.4.4.1
140
User interface reference
User Interface Overview
Spotfire DecisionSite Administration
Option
Description
Displays the Save Information Link dialog which saves the configuration
currently shown in the Information Link pane into a new (or updated)
information link.
Deletes the information link selected in the Elements pane.
Refreshes the entire tree structure in the Elements pane.
Note: Use right-click and Refresh to update only the selected element.
Displays the View SQL and Edit Oracle Hints dialog.
Elements
Contains information about the available elements. See the Elements
pane topic for more information.
Information Link Lists the elements included in the current information link. See the
Information Link Pane topic for more details on the various parts of this
pane.
Clear Link
4.4.4.2
Clears the entire Information Link pane without saving.
Properties tab
This tab is used to define hard filters for any column.
Advanced tab
This tab is used to define run-time filters for any column.
Conditioning
Displays which type of conditioning is used for the information link.
(Selected by clicking Edit....)
Conditioning:
Edit...
Opens the Data Conditioning dialog where you can select between the
conditioning types Distinct or Pivot (or None).
Join Path: Edit...
If there are several possible join paths between the tables in the
information link, you can specify which join path to use by clicking
Edit.... This opens the Join Path dialog.
Open
Executes an information link and retrieves the data into Spotfire
DecisionSite.
Elements Pane
141
TIBCO® Spotfire® DecisionSite® 9.1.1 - Deployment and Administration Manual
4.4.4.3
Option
Description
Available
elements
Displays all available information links, column elements or filter
elements. Click on the desired element to select it.
Details
Displays information about the selected element.
Edit Link
Click here to edit an information link selected under Available elements.
Add to Link
Click here to add the selected element to the Information Link pane.
Icons in the Elements Pane
In the Elements pane, the following icons may appear. Click on a link in the table below to find
out more about each element type.
Icon
Element type
Domain
Information link
Filter
String column
Integer column
Real column
Date column
DateTime column
Procedure
Time column
BLOB (binary large object) column. Cannot be retrieved, but can be used
in the structure search filter condition.
(It can also be used in custom made filter conditions using the API).
CLOB (character large object) column. Can be retrieved to DecisionSite
Client.
(It can also be used in custom made filter conditions using the API).
142
Spotfire DecisionSite Administration
4.4.4.4
Information Link Pane
Properties tab
Option
Description
Filter type
Select range or values to add a hard filter to a column.
Limits
Enter upper/lower limits for a range filter, or list the required values
(separated by commas) for a values filter.
Click to move the elements up or down. This is used to control the order of
columns with run-time filters. Filter elements are always applied before runtime filters, regardless of order.
Click to remove an individual element from the link.
Advanced tab
Option
Description
Retrieve
Deselect to prevent a column from being loaded. (Filter conditions will
still affect the amount of data loaded.)
Independent
If selected, the element will be treated as independent in a prompted
information link. This is used to improve performance of information
links when retrieving data from STAR schema databases. See Making
Elements Independent for more information.
Prompt
Select how each run-time filter should appear when the link is opened.
Select None to disable run-time filtering. If a run-time filter is selected, all
143
TIBCO® Spotfire® DecisionSite® 9.1.1 - Deployment and Administration Manual
settings regarding hard filters in the Properties tab will be disabled.
4.4.4.5
4.4.4.5.1
4.4.4.5.2
Dialogs
Save Information Link Dialog
Option
Description
Domains
Select the domain in which to save the information link.
Name
Enter a name for the link. It should not contain any blank spaces.
Description
Describe the information link.
View SQL and Edit Oracle Hints Dialog
Note: If an information link has been added to the Information Link pane using Add to Link and
no additional elements has been added, Edit Oracle Hints will not be available. To display the
Edit Oracle Hints link, use Edit Link when you move the information link to the Information
Link pane.
Note: If more than one information link containing hints are added to the Information Link
pane, all hints will be removed from the SQL statement. This is due to the fact that the hints in
the different information links might conflict with each other and that there is currently no way
for the system to figure out if the two hints will work together.
144
Spotfire DecisionSite Administration
Option
Description
SQL for current Displays the SQL statements behind an information link. If several Data
Sources are used, the SQL statements for the different sources are
Information
separated by lines.
Link elements
Edit Oracle
Hints...
Displays the Edit Oracle Hints dialog. Here you can enter an oracle hint in
order to improve performance of the information link when using complex
data sources.
Note: In some cases adding a hint can actually decrease the performance
of an information link. If this is the case, click Edit Oracle Hints... and
remove the hint.
Copy SQL
Copies the SQL statements to the clipboard.
► To reach the View SQL and Edit Oracle Hints dialog:
4.4.4.5.3
1.
Make sure the information link or interesting columns are added to the Information
Link pane (by clicking Edit Link or Add to Link after selecting elements).
2.
Click on the
button in the toolbar of Information Builder.
Edit Oracle Hints Dialog
145
TIBCO® Spotfire® DecisionSite® 9.1.1 - Deployment and Administration Manual
Enter the Oracle hints that you wish to add to the SQL statement, separated by a space. /*+ and
*/ will be automatically added to the entered hints.
Note: In some cases adding a hint can actually decrease the performance of an information link.
If this is the case, click Edit Oracle Hints... and remove the hint.
► To reach the Edit Oracle Hints dialog:
Click Edit Oracle Hints... next to the data source of interest in the View SQL and Edit Oracle
Hints dialog.
4.4.4.5.4
146
Pivot Dialog
Option
Description
Identity
Each unique value in the chosen identity column produces a row in the
Spotfire DecisionSite Administration
generated table.
If you choose more than one column, then the new table will have a separate
row for each unique combination of values in the chosen columns.
Category
Each unique value in the chosen category column produces a new column in
the generated table.
Selecting more than one column under means that the new table will have a
separate column for each unique combination of values in the chosen
columns.
Values
The column from which the data is pulled. The values in the generated table
are computed according to the method selected under Computation (e.g.,
average).
Note: If you are certain that each combination of Identity and Category has a
unique value, then you can select the Computation: None which will not
apply any aggregation of the data. However, the pivot will fail if you select
None, and each combination of Identify and Category is not unique.
Other
columns
This option allows you to include an overall average of a particular
measurement, for each row in the generated table.
Column
names
You can select how the pivoted columns should be named. By default there
are two predefined options:
Method(Value) for Column
Category - Method(Value)
You can also create a custom naming scheme for your pivoted columns. To
do this click the Edit... button and the Edit Pivot Column Naming Scheme
dialog appears. After you have created a naming scheme it will be available in
the drop-down list box as User edited naming scheme.
Note: One can create additional default naming schemes that will always
appear in the Column names drop-down list box for all users. Talk to your
Spotfire Analytics Server administrator to do this, and read more about the
procedure in the Spotfire Spotfire Analytics Server - Administrator's Manual.
4.4.4.5.5
Edit Pivot Column Naming Scheme
Option
Description
Expression
Enter an expression here which will be used to name the pivoted columns.
147
TIBCO® Spotfire® DecisionSite® 9.1.1 - Deployment and Administration Manual
There are three parameters that can be used:
%M = Computation Method
%V = Value Columns
%C = Category Values
You can enter other text freely in this field.
Note: One can create additional default naming schemes that will always
appear in the Column names drop-down list box for all users. Talk to your
Spotfire Analytics Server administrator to do this, and read more about the
procedure in the Spotfire Spotfire Analytics Server - Administrator's
Manual.
Example:
If we look at the example from Example of Pivoting again.
The following table is transformed by pivoting:
City
Month
Temp
London
February
4
New York
February
6
London
May
16
New York
May
19
London
August
28
New York
August
26
London
November
13
New York
November
11
By using the Expression "Month: %C - Average:(%V)" we would get the following table
with column names.
City
Month:
Month: August Month:
Month: May February November Average(Temp)
Average(Temp)
Average(Temp) Average(Temp)
London 4
16
28
13
New
York
19
26
11
6
Since we knew that this transformation was about average temperature we choose to write the
text Average instead of including the Computation Parameter %M in the column name.
4.4.4.5.6
Set Filter for Column Dialog
The Set Filter for Column dialog appears when an information link is being opened, and a
column is encountered that has been set up with a run-time filter. The dialog may take various
forms depending on the type of prompt selected. Strings containing commas can be included
both as values, as well as range limits by escaping the comma with a backslash.
148
Spotfire DecisionSite Administration
Values
Option
Description
Text field
Enter a comma-separated list of column values that you want to use as a
constraint. You can also paste values of a column from a Microsoft Excel®
sheet.
Note: When using the Get Values feature, the characters ',' '*' '?' and '\', will
automatically appear prefixed with a backslash.
Get Values...
Use this button to set the column filter by fetching values from the current
visualization in DecisionSite. Opens the Get Values from Data Set dialog.
Browse...
Fetch filter values from a text file.
149
TIBCO® Spotfire® DecisionSite® 9.1.1 - Deployment and Administration Manual
Range
150
Part
Description
Lower
Enter the lower limit for the values of the column.
Upper
Enter the upper limit for the values of the column.
Get Range...
Use this button to set the column filter by fetching values from the current
visualization in DecisionSite. Opens the Get Values from Data Set dialog.
Spotfire DecisionSite Administration
List Box
Option
Description
List box
Select the individual values for the column by clicking the entries in the list.
To select consecutive values, click the first item, press and hold down
SHIFT, and then click the last item. To select multiple entries that are not
consecutive, press and hold down CTRL, and then click each item.
To select all the values in the list, press CTRL+A.
Include empty
values for this
step
Select this check box to also include records that contain no data for this
column (consequently not available in the list).
151
TIBCO® Spotfire® DecisionSite® 9.1.1 - Deployment and Administration Manual
Check Boxes
Part
Description
Check boxes
Select individual values for the column by checking the entries in the list. To
select all the values in the list, press CTRL+A.
Include empty Select this check box to also include records that contain no data for this
values for this column (consequently not available in the list).
step
152
Spotfire DecisionSite Administration
Radio Buttons
Option
Description
Radio buttons
Select a unique value for the column by clicking on an entry in the list.
Include empty
values for this
step
Select this check box to also include records that contain no data for this
column (consequently not available in the list).
153
TIBCO® Spotfire® DecisionSite® 9.1.1 - Deployment and Administration Manual
Structure Search
4.4.4.5.7
154
Option
Description
Search for
Select whether to search using a substructure, or to search for
structures similar to a master structure.
If similarity is selected, enter a threshold value between 1 and 100. A
high value means that only very similar records will be included in the
resulting list.
Edit Structure
Launches ISIS/Draw, where you can edit the master structure before
launching the search.
Import Structure
Displays the Open dialog where you can select a MOL file to use in
the search.
Get Values from Data Set Dialog
Spotfire DecisionSite Administration
Part
Description
Matching column:
Use the drop-down list to select the column in the current data set
from which to get the values.
Get values from:
Select whether to use Marked records or Selected records as filter
values (or range limits).
► To reach the Get Values from Data Set dialog:
1.
2.
4.4.4.5.8
Open an Information Link with run-time filters.
When the Set Filter for Column dialog for the desired column appears, click Get
Values... or Get Range....
Data Conditioning Dialog
Option
Description
Conditioning
type:
None
No conditioning.
Pivot
Allows you to transform your data from a tall/skinny format to a
short/wide format by rotating row and column headings around the core
data. Select which columns to work on by clicking Configure....
Distinct
Removes all duplicate records (records where all fields are identical)
from the returned data set.
Configure...
Opens the Pivot dialog.
► To reach the Data Conditioning dialog:
Click Edit... in the Information Link pane.
155
TIBCO® Spotfire® DecisionSite® 9.1.1 - Deployment and Administration Manual
4.4.4.5.9
Join Path dialog
Option
Description
Refreshes the entire tree structure in the Available Joins list.
Note: Use right-click and Refresh to update only the selected element.
Displays the View SQL and Edit Oracle Hints dialog.
Available Joins
Lists the available joins that can be added to the information link.
Details
Displays details about the SQL for the currently selected join in the
Available Joins list.
Add
Adds the selected join from the Available Joins list to the Selected Joins
list.
Selected Joins
Lists the joins that will always be used in the join path between the tables
in the information link.
Moves a join up or down in the list. This is used to control the order the
joins are performed when the information link is executed. Joins higher
up in the list have higher priority. The order of the joins may improve
156
Spotfire DecisionSite Administration
performance of the information link.
Removes the selected join from the Selected Joins list.
Moves the selected join from the Additional Default Joins list to the
Selected Joins list, so that it will always be used in the information link.
Additional
Default Joins
Lists the additional default joins that are used to complete the join path of
the tables in the information link. This list is updated and based on the
joins that has been selected so far.
Update
continuously
When selected this option continuously updates the Additional Default
Joins list with appropriate joins. However, since this might be time
consuming on some systems, there is an option to turn it off.
► To reach the Join Path dialog:
Click Edit... in the Information Link pane.
4.4.5
Glossary
4.4.5.1
Glossary
The glossary only contains brief definitions of the terminology. You can also use the Index or
Search tab to the left to find more information within this help file.
Column element
A list of values. A column element can correspond to a database field, but can also be the result
of calculations performed on multiple fields from several databases. What the column element
returns is defined by the administrator.
Database
A collection of related data, usually in the form of multiple files or tables that are linked to each
other.
Element
Any constituent that builds up an information link, in other words, column elements, filter
elements and other information links.
Independent
An element setting in the Information Link pane (Advanced tab). If selected, the element will
be treated as independent in a prompted information link. Hereby, you can avoid filtering upon
each prompt step and, thus, improve performance of information links when retrieving data
from STAR schema databases.
Information Builder
A tool for creating and executing information links in Spotfire DecisionSite.
Information Model
The Information Model consists of the data integration layer, which manages connections with
the various data sources, and the data access layer, which associates database identifiers with
user-friendly column names. Appears to the user as a folder structure.
157
TIBCO® Spotfire® DecisionSite® 9.1.1 - Deployment and Administration Manual
Information Services
A suite of tools for accessing databases. Includes Information Designer, Information Builder,
and Information Library.
Information Library
A tool for executing information links.
Information Link
A predefined database query, including all required connection information. When opened
(executed), the information link will retrieve data from databases and visualize it in
DecisionSite.
Pivoting
Choosing dimensions from the set of available dimensions in a multidimensional data structure
for display in the rows and columns of a cross-tabular structure.
Query
A specific request or set of instructions for retrieving, modifying, inserting, or deleting data in a
database.
Record
A term used in some database systems to mean "row". Although record and row have slightly
different meanings in formal database theory, in most instances they are meant synonymously.
Row
In a table, a set of related columns of information that are treated as a unit and that describe a
specific entity. A row is the logical equivalent of a record.
SQL
Structured Query Language, a database query and programming language.
4.5
4.5.1
4.5.1.1
DecisionSite ApplicationManager
General Information and Background
General Information and Background
This chapter provides information about how the DecisionSite ApplicationManager works, and
is intended for administrators who whish to learn more about the inner workings of the
DecisionSite environment.
The DecisionSite ApplicationManager provides functionality and service for configuration,
versioning, and delivery of DecisionSite guided analytic applications from server to client.
DecisionSite ApplicationManager has a client/server architecture and thus has both
DecisionSite Client and Server components. It provides powerful functionality for delivering
and upgrading applications with new functionality in the DecisionSite Client end user
environment.
4.5.1.2
DecisionSite Application Delivery and Update
The DecisionSite ApplicationManager delivers new and/or updated functionality to
DecisionSite Client in the form of tools, guides and applications when the user logs in. Upon
first login after a fresh installation of DecisionSite Client, all tools, guides and applications that
158
Spotfire DecisionSite Administration
the user is licensed to are delivered to the client. The licensed tools, guides and applications are
specified in a user profile that is delivered to the client. If the user profile changes such that
additional tools, guides and/or applications are assigned to the user, the new applications and its
components are delivered at the next login. If an application has been extended to contain a new
tool or guide, all end users with access to that application will automatically receive the new
content. The same applies, if new versions of tools, guides or applications are deployed on the
server.
4.5.1.3
Offline Analysis
The update and delivery mechanism of the DecisionSite ApplicationManager makes it possible
to use DecisionSite and its analytic applications "off-line". Analytic tools and guides can be
built for on-line only or on-line and off line use. In other words, users can use the off-line
designed components of DecisionSite applications even if the DecisionSite Client is not
connected to the Spotfire Analytics Server. The off-line use is suitable for travel, field use or
other activities where access to a Spotfire Analytics Server is not possible.
4.5.1.4
Release Upgrade
The DecisionSite ApplicationManager enables asynchronous upgrades of Spotfire Analytics
Server and Client as new releases are available.
A new version of the Spotfire Analytics Server can be installed. Users can then continue to use
it with older versions of DecisionSite Client but with access to all new and updated
functionality in the form of tools, guides and applications that will be downloaded from the
server.
For example, an organization has already deployed a released version of DecisionSite and now
wants to roll out a new release of DecisionSite. The complete upgrade can be staged by first
upgrading the server to the new version. All users running the old DecisionSite Client version
can access the new server, since the application manager will automatically upgrade itself and
all new applications, tools and guides.
4.5.2
4.5.2.1
Platform for DecisionSite Client Applications
Platform for DecisionSite Client Applications
DecisionSite ApplicationManager constitutes the platform for DecisionSite client applications,
enabling customers and third-party companies to extend the existing functionality of
DecisionSite Client applications.
4.5.2.2
Runtime Components
The DecisionSite ApplicationManager provides APIs for managing:
• URLs
• Paths
• Files
• Registry
• Data protection
• XML
• Error handling
• and more...
4.5.2.3
Spotfire Protocol
The DecisionSite ApplicationManager defines its own protocol - the spotfire:// protocol for:
• Shipping and addressing DHTML and JScript for online and offline usage
159
TIBCO® Spotfire® DecisionSite® 9.1.1 - Deployment and Administration Manual
•
4.5.2.4
Providing a security model for trusted DecisionSite client applications
Software Distribution
The DecisionSite ApplicationManager provides the mechanism through which DecisionSite
client applications are delivered from the Spotfire Analytics Server to the DecisionSite clients.
Features provided through this mechanism are:
• Packaging format
• Automatic deployment from server
• Strict versioning policy
In addition to this built-in functionality for DecisionSite client software distribution, customers
can use the following alternative distribution mechanisms:
• MSI/Install kit
• Repackaging
4.5.2.5
Plug-in Enabled Framework
The DecisionSite ApplicationManager constitutes a framework which can be extended in terms
of the software functionality it offers to the connecting DecisionSite clients. This can be done
through a plug-in mechanism with the following characteristics:
• All features defined as resources
• Abstract addressing of resources
• Hierarchical definition of resources
• General extendibility at any level of the hierarchy
• Support for custom (application defined) resources
• General mechanism for replacing and/or extending existing resources
4.5.2.6
Developer Support
DecisionSite ApplicationManager also provides an environment and tools with which
developers can:
• Build and test client features without server (available through Spotfire Developer
Network)
• Create and deploy extensions to a Spotfire Analytics Server via the DecisionSite
ApplicationManager software distribution mechanism
4.5.3
4.5.3.1
Configuration Parameters
Install Folder
Software distributed by DecisionSite ApplicationManager is silently installed to the current
install folder. The install folder can be configured separately for machine and user packages.
HKLM\Software\Spotfire\Distribution\InstallFolder = String(<path>)
HKCU\Software\Spotfire\Distribution\InstallFolder = String(<path>)
HKLM\Software\Spotfire\Distribution\PerUserInstallFolder =
String(<path>)
By default the install folder is based on folder settings for the operating system:
Machine: %PROGRAMFILES%\Spotfire\Packages
User: %USERPROFILE%\Local Settings\Application Data\Spotfire\Packages
160
Spotfire DecisionSite Administration
4.5.3.2
Install Mode
The DecisionSite ApplicationManager can install packages per machine and per user. Per-user
installation is not supported for Microsoft Windows NT 4.
The effective install mode is determined based on system capabilities, user privileges and local
settings. The default install mode has been changed over time:
• DecisionSite v7.1.1 and earlier: Prefer per-user installation.
• DecisionSite v7.2 and above: Prefer per-machine installation
Some settings to control the install mode were introduced for DecisionSite v7.1.1:
HKLM\Software\Spotfire\Distribution\AllowPerUserInstall = DWORD(0|1)
HKLM\Software\Spotfire\Distribution\PreferredInstallMode =
String(User|Machine)
4.5.3.3
Roaming Profiles
Microsoft Windows roaming profiles are supported for DecisionSite 7.2 and above. Due to
compatibility issues with previous versions this support must be enabled manually.
Please contact Spotfire Support for current information and assistance on using roaming
profiles.
4.5.3.4
Server Addresses
The Spotfire DecisionSite Client is associated with a home server. Choosing a different server
in the Login dialog changes the current home server.
At initial start-up after installation there is no home server. Instead the Guides pane is directed
to a default server. The important difference between home server and default server is that the
default server does not have be a Spotfire Analytics Server.
The default server can be set from the installer when Spotfire DecisionSite Client is installed.
The setting can also be modified directly in the registry:
HKLM|HKCU\Software\Spotfire\eApplication\Servers\DefaultServer =
String(<url>)
There is also support for a custom start page. The custom start page can be configured from the
Options-dialog in the Guides pane. The dialog is available via the context menu.
The custom start page can also be configured via the registry:
HKLM|HKCU\Software\Spotfire\eApplication\Navigator\CustomStartPage =
String(<url>)
4.5.3.5
The Spotfire Zone
Dynamic content in the Guides pane requires access to Spotfire APIs. These APIs are not safe
for scripting. To allow API usage the servers must be trusted. This can be done either by adding
the servers to the Trusted Sites or by adding the servers to the Spotfire Zone.
The Spotfire Zone is defined in the registry:
HKLM|HKCU\Software\Spotfire\SecurityManager\Spotfire Zone\
<server or domain>\<protocol> = DWORD(0|1)
Protocol can be http or https, use 0 to allow and 1 to deny.
4.5.3.6
Server Display Name
By default the Spotfire Analytics Server is identified by its hostname. For environments with
more than one server, this is not very practical.
To resolve this, each server can by given a display name that is used instead:
<manifest>
<server-info>
...
<title>My Informative Server Name</title>
...
161
TIBCO® Spotfire® DecisionSite® 9.1.1 - Deployment and Administration Manual
</server-info>
...
</manifest>
4.5.3.7
Changing the Text in the Login Dialog
It is possible to change the text that is displayed in the server login dialog. This is done by
editing the manifest.xml file.
► To Change the Text in the Login Dialog:
1.
Open the following file in a text editor.
WebLogic: <installation directory>\spotfire\spotfire\WEB-INF\manifest.xml
2.
3.
4.
WebSphere: <Directory where Spotfire DecisionSite is
deployed>/Spotfire_DecisionSite_Analytics_Server.ear/spotfire.war/WEBINF/manifest.xml
Insert the following passage into the manifest.xml file, anywhere within the
<manifest> tag:
<server-info>
<welcome-message>New login text
</welcome-message>
</server-info>
Save the file.
Restart the DecisionSite Server for the changes to appear.
Example of a login text:
<welcome-message>Welcome to the Spotfire Server. Please Login with the
same username and password as you use for Windows.</welcome-message>
You can also use HTML formatting:
<welcome-message><![CDATA[<h2>Welcome to the Spotfire
Server</h2>]]></welcome-message>
If no <welcome-message> has been added, the Login dialog will use:
<h2>Please log into Spotfire DecisionSite:</h2>
4.5.3.8
Announcing Peers
Spotfire Analytics Server has support for announcing other Spotfire Analytics Servers. All
announced servers are listed in the Login dialog.
Servers are announced by adding a peers section to the manifest stored in:
• WebLogic: <installation directory>\spotfire\spotfire\WEB-INF\manifest.xml
• WebSphere: <Directory where Spotfire DecisionSite is
deployed>/Spotfire_DecisionSite_Analytics_Server.ear/spotfire.war/WEBINF/manifest.xml
See example below for details:
<manifest>
...
<peers>
<server>
<title>My Other Spotfire Analytics Server</title>
<address>http://hostname/spotfire/manifest</address>
</server>
<server>
162
Spotfire DecisionSite Administration
...
</server>
...
</peers>
...
</manifest>
4.5.3.9
Support Policy
Starting with DecisionSite v7.2 the client/server protocol includes features for implementing a
support policy. Spotfire use this technology to prevent usage of DecisionSite on Microsoft
Windows platforms that are no longer supported.
The current server-side implementation is split up into three parts:
• Detection script embedded in
WebLogic: <installation directory>\spotfire\spotfire\WEB-INF\manifest.xml
WebSphere: <Directory where Spotfire DecisionSite is
deployed>/Spotfire_DecisionSite_Analytics_Server.ear/spotfire.war/WEBINF/manifest.xml
• Dialog for notifying the user.
• Policy settings in the following section of the file:
WebLogic: <installation directory>\spotfire\spotfire\WEB-INF\web.xml
WebSphere: <Directory where Spotfire DecisionSite is
deployed>/Spotfire_DecisionSite_Analytics_Server.ear/spotfire.war/WEBINF/web.xml
<context-param>
<param-name>supported_client_min.os</param-name>
<param-value>4.0</param-value>
</context-param>
<context-param>
<param-name>supported_client_min.ie</param-name>
<param-value>5.5</param-value>
</context-param>
<context-param>
<param-name>supported_client_min.dsb</param-name>
<param-value>6.3</param-value>
</context-param>
<context-param>
<param-name>supported_client_min.appmgr</param-name>
<param-value>1.0.0</param-value>
</context-param>
The detection script can be extended to further restrict usage of Spotfire DecisionSite.
The dialog is implemented using DHTML. The default implementation is located in:
• WebLogic:
<installation directory>\spotfire\spotfire\unsupportedclient.htm.
• WebSphere:
<Directory where Spotfire DecisionSite is
deployed>/Spotfire_DecisionSite_Analytics_Server.ear/spotfire.war/unsupportedclient
.htm.
The default implementation can be overridden by providing a different URL for the dialog in:
• WebLogic:
<installation directory>\spotfire\spotfire\WEB-INF\manifest.xml
• WebSphere:
<Directory where Spotfire DecisionSite is
deployed>/Spotfire_DecisionSite_Analytics_Server.ear/spotfire.war/WEBINF/manifest.xml
163
TIBCO® Spotfire® DecisionSite® 9.1.1 - Deployment and Administration Manual
4.5.3.10
Trust Policy
DecisionSite ApplicationManager relies on Microsoft Authenticode for validating packages.
There are two settings for controlling the validation for code trust.
HKLM|HKCU\Software\Spotfire\Distribution\WinTrustUI =
String(All|None|NoGood|NoBad)
HKLM|HKCU\Software\Spotfire\Distribution\CheckRevocations = DWORD(0|1)
WinTrustUI
• All: Always display dialog when a package is verified.
• None: Never display dialog when a package is verified.
• NoGood: Do not display any positive dialog.
• NoBad: Do not display any negative dialog.
4.5.4
Technical Details
4.5.4.1
Technical Details
Per user and per machine installations
Package Contents
• DHTML/JScript
• WSC
• COM: DLL, OCX
• EXE
• HTA
• Basically any file can be included
• Signatures and trust model
• Local application registration
• Integration between DecisionSite Client and DecisionSite ApplicationManager
4.5.5
Troubleshooting
4.5.5.1
CleanUpPackages
The installation can be corrupted by altering the package folders in the file system or by
changing the package registration in the registry.
Spotfire provides a tool to help resolving problems with corrupted package registration. The
tool can be obtained from Spotfire Support.
The tool will clean up any corrupted package and COM registration. The tool can also be run in
diagnostic mode to check for problems. See tool documentation for details.
4.5.5.2
Support Pages
Each installation of Spotfire Analytics Server provides a set of support tools available via
Microsoft Internet Explorer. The Support Pages are located at http://<server>/spotfire/support.
The Support Pages offer the following functionality:
• List all installed packages
Usage: To see what is actually installed.
• Uninstall all packages
Usage: To forcefully uninstall packages.
• Repair installation
Usage: To repair broken COM and package registrations.
164
Spotfire DecisionSite Administration
•
Install Application Manager and other packages
Usage: To administratively bootstrap DecisionSite on a machine.
The Support Pages can be used for diagnostics and problem solving.
The Support Pages rely on some ActiveX-components that will be installed automatically when
needed. The user must have sufficient privileges to install ActiveX-components to use the
Support Pages.
4.5.5.3
Client Logging
The Application Manager has support for client-side logging. The logging is disabled by
default.
Logging can be enabled through the registry:
HKLM|HKCU\Software\Spotfire\eApplication\Log = String(<path<)
When enabled the client log will grow indefinitely. The recommendation is to enable logging
only when needed, and then to disable it again.
Developers might find it useful to always have the logging enabled.
4.5.5.4
Install Log
Starting with Application Manager 7.2 all install actions are logged. The install log will be
written to the packages folder:
%PROGRAMFILES%\Spotfire\Packages\install.log
%USERPROFILE%\Local Settings\Application
Data\Spotfire\Packages\install.log
The install log is useful for debugging problems during installation or upgrade. The most likely
usage scenario is that Spotfire Support will ask for this file if you report an install problem.
4.5.5.5
Application Manager Error Messages
The Application Manager has a framework for reporting errors. Most error dialogs have a
Details button that provides access to a detailed error message generated by Application
Manager.
The error message is effectively a high-level stack trace of the implementation. As a result, the
original error message can be found at the bottom of the message.
The detailed message is most useful for developers; it is not intended for end users.
4.5.6
4.5.6.1
Common Problems
Conflict Between User and Machine Packages
For Microsoft Windows 2000 and later, packages can be installed per user and/or per machine.
User packages always take priority over machine packages. This may lead to situations where
new packages installed per machine are effectively hidden by old packages installed per user.
Usually, problems originate from downgrading per-user packages. The installer gracefully
handles upgrade scenarios, while downgrade scenarios may require manual steps.
4.5.6.2
Incorrect Installation of WSH
The Spotfire System Checker can detect most installation problems. Still, there are some issues
that are not handled properly. The most common problem originates from insufficient versions
of Microsoft Windows Scripting.
Microsoft Windows Scripting can be installed separately, but is generally installed with
Microsoft Internet Explorer.
165
TIBCO® Spotfire® DecisionSite® 9.1.1 - Deployment and Administration Manual
Symptom:
An error dialog when Spotfire DecisionSite Client is started. The dialog reports that Spotfire
Application Manager (Spotfire.eAppFramework.Loader) cannot be created.
Resolution:
Install the latest version of Microsoft Windows Scripting. The installer can be downloaded from
http://msdn.microsoft.com/scripting.
4.5.6.3
Corrupted Registration
The package registration can be corrupted for a number of reasons. Common sources are:
• Uninstall of DecisionSite Client v6
• Restoring an old registry backup
• Usage of roaming profiles on Microsoft Windows 2000 or later
• Manual removal of files, folders and registration
The Application Manager silently resolves many errors during start-up, but severe corruption
will require additional attention.
Spotfire provides a tool for fixing the corrupted registration. Please contact Spotfire Support for
details.
4.5.6.4
Failed to Load User Profile
Problems during installation and upgrade, or in the interaction between Spotfire DecisionSite
Client and Spotfire Analytics Server, often result in "Failed to load user profile".
The profile drives both the client user interface and the installation. Packages required by the
current profile are automatically installed and verified during login.
This error is very general and does not provide any details about what actually happened. Often
the detailed error message will provide enough information to track the problem, but is quite
difficult to interpret.
The recommendation is to look at the bottom of the detailed error message. The message is
built from the bottom up, and the last line or section often provides the most valuable
information for solving the problem.
4.5.7
Further Reading
4.5.7.1
Further Reading
For further reading, see Spotfire Developer Network for a technical reference and description of
the APIs that are available from the DecisionSite ApplicationManager.
4.6
Changing the Unsupported Client Info
When a user tries to log into Spotfire Analytics Server from a DecisionSite Client which is
installed on a machine that does not comply to the minimum system requirements, an error
dialog is displayed.
166
Spotfire DecisionSite Administration
You can edit the text at the bottom of this dialog, if you want the users to contact a certain
person and thus provide an email-address or a phone number.
The file is located at: <installation directory>/server/webapps/spotfire/unsupportedclient.htm
Be careful only to modify the line of text ”Please contact your Spotfire Administrator
for upgrading your client system” not the HTML code itself.
4.7
Changing the "Remember Me" Time
If the user selects the Remember Me check box when logging in, the server remembers his User
ID and Password, and automatically logs in the next time DecisionSite Client is started.
However, after a certain time the user is required to re-enter his password again. By default this
is set to 43200 minutes, which equals 30 days.
► To change the Remember Me time:
1.
4.8
2.
3.
Open the <installation directory>/server/webapps/spotfire/WEB-INF/web.xml file in a
text editor.
Find the tag called login.remember_expiration.
By default, this tag is set to 43200 minutes.
4.
5.
6.
<param-name>login.remember_expiration</param-name>
<param-value>43200</param-value>
Change it to the preferred value.
Save the file.
Restart the server.
Spotfire Support Pages for Packages
Located on every Spotfire Analytics Server are Support web pages, which are used to manage
the Application Manager and the software packages that are downloaded from the server to
each DecisionSite client.
If a DecisionSite Client should experience problems related to packages, then these Support
pages can be used to locate the cause of the problem and possibly correct it.
From the client computer, enter the name of the Spotfire Analytics Server in Microsoft Internet
Explorer, for example:
167
TIBCO® Spotfire® DecisionSite® 9.1.1 - Deployment and Administration Manual
http://home.spotfire.net.
This will take you to the Spotfire Analytics Server start page. There you will find a link to the
Support pages. Detailed information about when and how to use the Support pages is provided
in each web page.
From the Support pages you can:
Show information about installed packages
Use this page to check which packages are installed on a client and how they are installed. All
packages are listed with their name and version number.
Repair installation
Use this page when packages have been installed successfully but problems occur after using
the product for a while.
Uninstall all packages
Use this page in combination with the "Install packages" page to be sure that a known set of
packages are installed on the client.
Install packages
Use this page to install packages and to force the install mode for packages.
Note: If the Application Manager is not installed on the system, then certain things are needed
to run the support web pages. Internet Explorer must allow download of signed ActiveX
controls. The ActiveX control that is used on the support pages is named SfUpgrade.cab.
4.9
Connecting to Spotfire Analytics Server
Starting with DecisionSite version 7.2, the client/server protocol includes features for
implementing a support policy. Spotfire uses this technology to ensure that clients who connect
to a Spotfire Analytics server meet the system requirements enforced by that server. Clients that
do not meet the system requirements are denied access to that Spotfire Analytics server.
► Connecting a DecisionSite Client to a Spotfire Analytics Server:
168
1.
A DecisionSite Client connects to a Spotfire Analytics Server for the first time.
2.
The client environment is detected and compared to the system requirements that the
Spotfire Analytics Server requires.
Spotfire DecisionSite Administration
Alternative A:
If the client environment meets the system requirements enforced by the server, the
client is connected to the server and the upgrade process continues, downloading the
rest of the packages that need to be upgraded.
Alternative B:
If the client environment does not meet the system requirements enforced by the
server, an error message is displayed, providing information about what parts of the
client environment do not meet the system requirements enforced by the server, as
well as information on who to contact for assistance (typically the local Spotfire/IT
administrator). The error message also contains information about the fact that the user
can log into DecisionSite Client in offline mode or choose another server to connect to.
This error message can be modified to match each installation by modifying a file on
the server.
If the user chooses to connect as if in offline mode, the profile that he/she had prior to
connecting to this Spotfire Analytics Server is restored. Naturally, it is possible for the
user to connect to another Spotfire Analytics Server.
169
TIBCO® Spotfire® DecisionSite® 9.1.1 - Deployment and Administration Manual
4.10
4.10.1
Listing Which Users Have Access to a Certain
Application
Listing Which Users Have Access to a Certain
Application
This section describes the steps necessary to import a list of those users who have access to
certain applications in DecisionSite Client using Information Services.
4.10.2
Import the "DS Admin IM"
► To import the "DS Admin IM":
170
1.
In the import workbench, import the IM file "dsadmin.xml" using the following import
settings:
Add, keep conflicting elements
Include permissions
2.
Click Import.
Spotfire DecisionSite Administration
Response: This dialog appears.
3.
4.10.3
Click Close.
Response: The result should be this:
Import Data in DecisionSite Client
Using Information Library, execute the Information Link "List licenses" from the "DS Admin"
domain.
171
TIBCO® Spotfire® DecisionSite® 9.1.1 - Deployment and Administration Manual
You will be prompted for what products to list results for:
172
Spotfire DecisionSite Administration
Finished!
173
TIBCO® Spotfire® DecisionSite® 9.1.1 - Deployment and Administration Manual
5
Index
A Abbreviations .................................................................. 157 Access rights ...................................................................... 81 ActiveX Controls .............................................................. 115 Adding columns ........................................................ 68, 121, 136 domain ......................................................................... 63 filters ............................................................................ 74 groups .......................................................................... 50 joins .............................................................................. 64 multiple columns ......................................................... 69 users ............................................................................. 49 Administrator .................................................................... 47 Administrator Level ........................................................... 48 Aggregation aggregation in Information Designer ........................... 71 example of Pivoting with Aggregation ....................... 139 many columns .............................................................. 72 SQL ............................................................................. 110 using ............................................................................. 71 Annotating information links creating a new information link ................................. 121 save information link dialog ....................................... 144 ApplicationManager ........................................................ 158 Arithmetic expressions ...................................................... 70 Assigning properties to groups .................................................... 51 properties to users ....................................................... 49 Average ............................................................................. 71 B Basic Level ......................................................................... 48 BLOB .................................................................................. 67 C Calculating columns .......................................................... 70 CLOB .................................................................................. 67 Closing ............................................................................. 121 Information Builder .................................................... 121 Column adding ........................................................................ 121 calculating .................................................................... 70 creating ........................................................................ 68 creating multiple .......................................................... 69 deleting ........................................................................ 70 editing .......................................................................... 70 elements .................................................................... 119 filters ............................................................................ 71 icons ........................................................................... 142 type date ...................................................................... 71 type overview .............................................................. 67 type time ...................................................................... 71 174
user interface ............................................................... 90 Combining data sources .................................................... 64 Comparing numeric columns .......................................................... 74 text columns ................................................................ 74 Compound adding a structure search filter .................................. 126 filtering using structure search .................................. 135 Computation Services ....................................................... 23 Concatenating ................................................................. 105 Conditioning conditions .................................................................... 71 data conditioning dialog ............................................ 155 distinct ....................................................................... 137 eliminating duplicates ................................................ 137 filters .......................................................................... 120 information link pane ................................................. 143 pivot ................................................................... 137, 146 Conversion ........................................................................ 68 Creating columns ........................................................................ 68 domains ....................................................................... 63 filters ............................................................................ 74 information link.......................................................... 121 joins .............................................................................. 64 multiple columns ......................................................... 69 D Data Conditioning dialog ......................................................................... 155 distinct ....................................................................... 137 pivot ........................................................................... 137 Data sources creating ........................................................................ 60 details on data sources and IMs ................................. 107 modifying ..................................................................... 61 overview ...................................................................... 60 removing ...................................................................... 61 user interface ............................................................... 83 Database Procedures ........................................................ 75 Databases connecting to ............................................................... 60 creating ........................................................................ 60 Dates parse methods ............................................................. 71 using in hard filters .................................................... 122 DecisionSite deploying ..................................................................... 54 DecisionSite Level .............................................................. 48 Definitions fundamental concepts ............................................... 119 glossary ...................................................................... 157 Deleting columns ........................................................................ 70 domains ....................................................................... 63 Spotfire DecisionSite Administration
filters ............................................................................ 75 groups .......................................................................... 51 information links ........................................................ 122 joins .............................................................................. 66 users ............................................................................. 49 Deployment deploying how to ......................................................... 54 deployment pane ......................................................... 58 Dialog data conditioning ....................................................... 155 get values from data set ............................................ 154 pivot ........................................................................... 146 save information link ......................................... 144, 146 set filter for column ................................................... 148 view SQL and edit oracle hints ................................... 144 Distinct ............................................................................ 137 Domain creating ........................................................................ 63 deleting ........................................................................ 63 domains ..................................................................... 120 editing .......................................................................... 63 moving ......................................................................... 64 overview ...................................................................... 63 user interface ............................................................... 89 Drillable columns ............................................................... 73 Duplicates ........................................................................ 137 E Editing columns ........................................................................ 70 domains ....................................................................... 63 filters ............................................................................ 74 information link SQL .................................................... 82 information links ........................................................ 121 joins .............................................................................. 66 users ............................................................................. 81 Elements elements pane ........................................................... 141 fundamental concepts ............................................... 119 Eliminating duplicates ..................................................... 137 Everyone ........................................................................... 47 Examples pivoting ...................................................................... 138 pivoting with aggregation .......................................... 139 run‐time filter ............................................................ 133 Executing information links ............................................. 132 Export a domain ...................................................................... 80 list of users ................................................................... 50 user interface ............................................................... 99 F FAQ .................................................................................... 58 Field ................................................................................... 67 File exporting a list of users ................................................ 50 importing a list of users ............................................... 50 Filter adding a structure search filter .......................... 126, 135 creating ........................................................................ 74 defining ........................................................................ 71 deleting ........................................................................ 75 devices ......................................................................... 93 different types ........................................................... 102 during retrieval .......................................... 126, 132, 135 editing .......................................................................... 74 element ........................................................................ 74 example ..................................................................... 133 icons ........................................................................... 142 in column elements...................................................... 71 SQL ............................................................................. 109 user interface ............................................................... 95 using run‐time filters .................................................. 132 Freehand joins ................................................................... 65 Functional Genomics ......................................................... 25 G Get Values from Data Set dialog ......................................................................... 154 using current settings as filter .................................... 136 Glossary information builder .................................................... 157 information designer ................................................. 116 Group By ......................................................................... 110 Group Properties pane ...................................................... 56 Groups assigning properties ............................................... 51, 56 creating ........................................................................ 50 definition ...................................................................... 47 deleting ........................................................................ 51 naming ......................................................................... 51 Guidelines........................................................................ 101 H Hard filters adding to an information link ..................................... 122 description of ............................................................. 120 user interface ............................................................. 143 Hints Edit Oracle Hints dialog .............................................. 144 I Icons icons in the elements pane ........................................ 142 icons in the information model .................................... 84 Import details on data sources and IMs ................................. 107 elements from file ........................................................ 80 list of users ................................................................... 50 user interface ............................................................... 99 Independent columns in prompted information links ..................... 123 setting in Advanced tab ............................................. 143 when to use ............................................................... 133 175
TIBCO® Spotfire® DecisionSite® 9.1.1 - Deployment and Administration Manual
Information Builder user interface ............................................................. 140 using ................................................................... 121, 122 Information Designer ........................................................ 87 Information Library ......................................................... 118 Information links annotating .......................................................... 121, 144 creating .............................................................. 121, 143 deleting ...................................................................... 122 editing .......................................................................... 82 executing ............................................................ 132, 143 saving ......................................................................... 121 sequential .................................................................. 132 what are ..................................................................... 119 Information Model details on data sources and IMs ................................. 107 icons ............................................................................. 84 introduction ............................................................... 118 pop‐up menu ............................................................... 85 user interface ............................................................... 84 Information Services introduction ............................................................... 118 Install DecisionSite Deployment pane .................................... 58 deploying ..................................................................... 54 ISIS adding a structure search filter .................................. 126 filtering using structure search .................................. 135 ISIS/Direct .................................................................... 61 Issues when Creating an ISIS/Direct Data Source ........ 87 J Join Path .......................................................................... 128 Joins creating ........................................................................ 64 default .......................................................................... 64 deleting ........................................................................ 66 editing .......................................................................... 66 freehand....................................................................... 65 join path ..................................................................... 128 self join ................................................................... 61, 66 user interface ............................................................... 89 where to store ........................................................... 102 L Lead Discovery .................................................................. 33 Level .................................................................................. 48 Limiting number of records ............................................. 105 Limits adding hard filters ...................................................... 122 adding run‐time filters ............................................... 123 filters ‐ description of ................................................. 120 ui to set limits............................................................. 143 Links .................................................................................. 64 Log files changing log configuration file ..................................... 53 logging pane ................................................................. 57 viewing log files ............................................................ 52 176
M Microarray Analysis ........................................................... 41 Modifying information links ............................................ 121 Molecular formula ........................................................... 113 Molecular weight ............................................................ 113 Multiple Columns creating ........................................................................ 69 user interface ............................................................... 94 N Name changing group names ................................................. 51 naming scheme .................................................. 146, 147 New connection init commands ........................................ 61 Nominal Level .................................................................... 48 None Level ......................................................................... 48 Nullable ............................................................................. 96 NVARCHAR type ................................................................ 68 NVL .................................................................................. 104 O Open importing a list of users ............................................... 50 opening information links .......................................... 132 Operators .......................................................................... 75 Oracle Hints Edit Oracle Hints dialog .............................................. 145 editing ........................................................................ 127 View SQL and Edit Oracle Hints dialog ....................... 144 P Passwords ......................................................................... 49 Permissions exporting ...................................................................... 80 importing ..................................................................... 80 setting .......................................................................... 81 user interface ............................................................... 98 Personalized Information Links creating ...................................................................... 102 using ........................................................................... 124 Pivot dialog ......................................................................... 146 example ............................................................. 138, 139 using ........................................................................... 137 PL/SQL ............................................................................. 106 Posters ............................................................................... 18 Post‐update procedure ..................................................... 75 Power Level ....................................................................... 48 Preconditions .................................................................... 47 Pre‐update procedure ....................................................... 75 Privileges setting group privileges ................................................ 51 setting user privileges .................................................. 49 Procedure Join ................................................................... 96 Procedures Spotfire DecisionSite Administration
Information Builder ............................................ 120, 126 Information Designer ................................................... 75 Product Licence ................................................................. 48 Prompted filters .............................................................. 132 Properties setting group privileges ................................................ 51 setting user privileges .................................................. 49 Q Query ............................................................... 119, 121, 132 creating ...................................................................... 121 definition .................................................................... 119 executing .................................................................... 132 predefined ................................................................. 119 saving ......................................................................... 121 Query procedure ............................................................... 75 R R Connector ....................................................................... 24 Range .............................................................................. 122 Record ............................................................................... 67 References ......................................................................... 47 Relational Operators ......................................................... 75 Remember Me ................................................................ 167 Replacing values .............................................................. 104 Requirements .................................................................... 47 Retrieve data user interface overview ............................................. 140 using the Information Builder .................................... 132 Rights setting group privileges ................................................ 51 setting user privileges .................................................. 49 Roaming Profiles ............................................................. 161 Run‐time filters adding to a column .................................................... 123 example ..................................................................... 133 information designer ................................................... 93 user interface setting up ............................................ 143 using ........................................................................... 132 using structure search ................................................ 135 what are ..................................................................... 120 S SAS Connector ................................................................... 24 Save ................................................................................... 50 Saving a domain to file ............................................................ 80 at root‐level ................................................................. 63 columns ........................................................................ 68 information links ................................................ 121, 144 Selected Joins .................................................................. 128 Selecting Join Path........................................................... 128 Self Join ....................................................................... 61, 66 Sequential information links adding to a column .................................................... 123 using ........................................................................... 132 Server activity .................................................................... 52 Set Filter for Column dialog ............................................. 148 Setting limits using hard filters ........................................................ 122 using run‐time filters .................................................. 123 Settings .............................................................................. 53 Short/Wide example of pivoting ................................................... 138 example of pivoting with aggregation ....................... 139 Similarity search adding a filter ............................................................. 126 filtering using ............................................................. 135 Software Distribution ...................................................... 160 S‐Plus Connector ............................................................... 25 Spotfire Zone ................................................................... 161 SQL displaying ................................................................... 127 editing .......................................................................... 82 filters example ........................................................... 109 group by example ...................................................... 110 in information links .................................................... 119 pl/sql example ............................................................ 106 subqueries example ................................................... 112 view SQL dialog in Information Builder ...................... 144 view SQL dialog in Information Designer ..................... 86 STAR schema independent columns in information links ........ 123, 143 when to use the Independent setting ........................ 133 Stored procedures ............................................................. 75 Structure search adding a filter ............................................................. 126 filtering using ............................................................. 135 Structures ........................................................................ 113 Sub queries ...................................................................... 112 Sum ................................................................................... 71 Support .............................................................................. 58 Support Pages ................................................................. 164 Symbols ........................................................................... 142 T Table alias .................................................................... 61, 66 Tables ................................................................................ 83 Tables and columns ......................................................... 119 Tall/Skinny ....................................................................... 138 Technical support .............................................................. 58 Temporary tables .............................................................. 87 Time .................................................................................. 71 Tips .................................................................................. 101 Transformations Pivot dialog ................................................................ 146 pivoting data .............................................................. 137 Troubleshooting .............................................................. 115 Type ................................................................................... 68 U Update all users ................................................................. 98 User activity....................................................................... 52 User permissions ............................................................... 81 177
TIBCO® Spotfire® DecisionSite® 9.1.1 - Deployment and Administration Manual
User Properties pane ......................................................... 55 Users adding .......................................................................... 49 assigning properties ............................................... 49, 55 definition ...................................................................... 47 deleting ........................................................................ 49 V,W View SQL and Edit Oracle Hints dialog ......................................................................... 144 178
displaying SQL statements ......................................... 127 editing Oracle hints .................................................... 127 View SQL dialog ................................................................. 86 Visualization Services ........................................................ 10 Vocabulary ...................................................................... 157 Vocabulary for Information Designer .............................. 116 Workflow ........................................................................... 59 Z ZIP file ................................................................................ 54