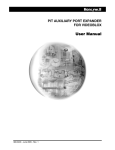
1
MegaPIT™ Protocol Interface Translator HS10PIT User Guide Document 800-00222 – Rev E –06/10 Revisions Issue Date Revisions A June 2007 Initial Revision. B July 2007 First Release Revision. C Dec 2007 Updated Release Revision for content and format updating. D Feb 2009 New firmware; added Chapter 4, MegaPIT Maintenance E June 2010 Added Appendix A, Typical Application and Appendix B, PTZ Look Up Table; updated back cover; added Warranty and Service; minor grammatical changes throughout. FCC Compliance Statement Information to the User: This equipment has been tested and found to comply with the limits for a Class B digital device. Pursuant to Part 15 of the FCC Rules, these limits are designed to provide reasonable protection against harmful interference in a residential installation. This equipment generates, uses, and can radiate radio frequency energy and, if not installed and used in accordance with the instruction manual, may cause harmful interference to radio communications. However, there is no guarantee that interference will not occur in a particular installation. If this equipment does cause harmful interference to radio or television reception, which can be determined by turning the equipment off and on, the user is encouraged to try to correct the interference by one of the following measures: • • • • Reorient or relocate the receiving antenna Increase the separation between the equipment and receiver Connect the equipment to an outlet on a circuit different from that to which the receiver is connected Consult the dealer or a radio/TV technician for help. Caution Changes or modifications not expressly approved by the party responsible for compliance could void the user's authority to operate the equipment. Canadian Compliance Statement This Class B digital apparatus complies with Canadian ICES-003. Cet appareil numérique de la classe B est conforme à la norme NMB-003 du Canada. European Compliance Statement This is a Class B product. In a domestic environment this product may cause radio interference in which case the user may be required to take adequate measures. Document 800-00222 Rev E 06/10 3 Caution Users of the product are responsible for checking and complying with all federal, state and local laws and statutes concerning the monitoring and recording of video and audio signals. Honeywell shall not be held responsible for the use of this product in violation of current laws and statutes. Explanation of Graphical Objects The lightning flash with arrowhead symbol within an equilateral triangle is intended to alert the user to the presence of uninsulated "dangerous voltage" within the enclosure of the product that may be of sufficient magnitude to constitute a risk of electric shock to the person. The exclamation point within an equilateral triangle is intended to alert the user to the presence of important operating and maintenance servicing instructions in the literature accompany the product. Important Safety Instructions READ INSTRUCTIONS - All safety and operating instructions should be read before the unit is operated. 1. RETAIN INSTRUCTIONS - The safety and operating instructions should be retained for future reference. 2. HEED WARNINGS - All warnings on the unit and in the operating instructions should be adhered to. 3. FOLLOW INSTRUCTIONS - All operating and use instructions should be followed. 4. CLEANING - Unplug the unit from the outlet before cleaning. Do not use liquid cleaners or aerosol cleaners. Use a damp cloth for cleaning. 5. ATTACHMENTS - Do not use attachments not recommended by the product manufacturer as they may result in the risk of fire, electric shock, or injury to persons. 6. WATER AND MOISTURE - Do not use this unit near water or in an unprotected outdoor installation, or any area classified as a wet location. 7. ACCESSORIES - Only use accessories specified by the manufacturer. Do not place this product on an unstable cart, stand, tripod, bracket, or table. The product may fall, causing serious injury to a child or adult and serious damage to the equipment. Use only with a cart, stand, tripod, bracket, or table recommended by the manufacturer, or sold with the product. Any mounting of 4 the product should follow the manufacturer's instructions and should use a mounting accessory recommended by the manufacturer. Wall or shelf mounting should follow the manufacturer's instructions and should use a mounting kit approved by the manufacturer. 8. A product and cart combination should be moved with care. Quick stops, excessive force, and uneven surfaces may cause the product and cart combination to overturn. 9. POWER SOURCES - This product should be operated only from the type of power source indicated on the marking label. If you are not sure of the type of power supplied to your facility, consult your product dealer or local power company. 10. OVERLOADING - Do not overload outlets and extension cords as this can result in a risk of fire or electric shock. 11. POWER-CORD PROTECTION - Power supply cords should be routed so that they are not likely to be walked on or pinched by items placed upon or against them, paying particular attention to cords, plugs, and convenience receptacles. 12. SERVICING - Do not attempt to service this unit yourself as opening or removing covers may expose you to dangerous voltage or other hazards. Refer all servicing to qualified service personnel. 13. DAMAGE REQUIRING SERVICE - Unplug the unit from the outlet and refer servicing to qualified service personnel under the following conditions: a. When the power-supply cord or plug is damaged. b. If liquid has been spilled, or objects have fallen into the unit. c. If the unit has been exposed to rain or moisture. d. If the unit does not operate normally by following the operating instructions. Adjust only those controls that are covered by the operating instructions as an improper adjustment of other controls may result in damage and will often require extensive work by a qualified technician to restore the unit to its normal operation. e. If the unit has been dropped or the enclosure has been damaged. f. When the unit exhibits a distinct change in performance - this indicates a need for service. 14. REPLACEMENT PARTS - When replacement parts are required, be sure the service technician has used replacement parts specified by the manufacturer or have the same characteristics as the original part. Unauthorized substitutions may result in fire, electric shock or other hazards. 15. SAFETY CHECK - Upon completion of any service or repairs to this unit, ask the service technician to perform safety checks to determine that the unit is in proper operating condition. 16. LIGHTNING AND POWER LINE SURGES - For added protection of this unit when it is left unattended and unused for long periods of time, unplug it from the wall outlet and disconnect the cable system. This will prevent damage to the unit due to lightning and power-line surges. 17. HEAT - The product should be situated away from heat sources such as radiators, heat registers, stoves, or other products (including amplifiers) that produce heat. 18. INSTALLATION - Install in accordance with the manufacturer’s instructions. Do not install the unit in an extremely hot or humid location, or in a place subject to dust or mechanical vibration. The unit is not designed to be waterproof. Exposure to rain or water may damage the unit. Prior to installation and use of this product, please observe the following cautions and warnings. Document 800-00222 Rev E 06/10 5 Caution CAUTION RISK OF ELECTRIC SHOCK DO NOT OPEN CAUTION: TO REDUCE THE RISK OF ELECTRIC SHOCK, DO NOT REMOVE COVER (OR BACK). NO USER-SERVICEABLE PARTS INSIDE. REFER SERVICING TO QUALIFIED SERVICE PERSONNEL. Warnings WARNING: Installation and servicing must be performed by qualified personnel in accordance with current IEE wiring regulations. WARNING: The PSU must be wired to a double pole fuse spur with 3mm separation. The 3A fuse spur must be located close to the PSU. WARNING: Using replacement parts or accessories other than the original manufacturers may invalidate the warranty. WARNING: There is a risk of explosion if the battery is replaced by an incorrect type. Dispose of used batteries according to their instructions. 6 MegaPIT™ User Manual Contents About This Document . . . . . . Overview of Contents. . . . Typographical Conventions Warranty and Service. . . . 1 . . . . . . . . . . . . . . . . . . . . . . . . . . . . . . . . . . . . . . . . . . . . . . . . . . . . . . . . . . . . . . . . . . . . . . . . . . . . . . . . . . . . . . . . . . . . . . . . . . . . . . . . . . . . . . . . . . . . . . . . . . . . . . . . . . . . . . . . . . . . . . . . . . . . . . . . . . . . . . . . . . . . . . . . . . . . . . . . . . . . . . . . . . . 13 . . . . 13 . . . . . 14 . . . . 14 . . . . . . . . . . . . . . . . . . . . . . . . . . . . . . . . . . . . . . . . . . . . . . . . . . . . . . . . . . . . . . . . . . . . . . . 15 . 16 . 17 . 17 . 18 . . . . . . . . . . . . . . . . . . . . . . . . . . . . . . . . . . . . . . . . . . . . . . . . . . . . . . . . . . . . . . . . . . . . . . . . . . . . . . . . . . . . . . . . . . . . . . . . . . . . . 19 . 19 . 20 . 21 Configuration . . . . . . . . . . . . . . . . . . . . . . . . . . . . . . . . . . . . . . . . . . . . . 23 Configuration Using the LCD Menu . . . . . . . . . . Configuring the System Settings . . . . . . . Configuring the Serial Ports . . . . . . . . . Configuring the Network . . . . . . . . . . . Displaying the Software Version Information. Configuration Using the MegaPIT Web Browser. . . . Configuring the System Settings . . . . . . . Configuring the Serial Ports . . . . . . . . . Configuring Network Settings . . . . . . . . Changing the Password . . . . . . . . . . . 4 . . . . Installation. . . . . . . . . . . . . . . . . . . . . . . . . . . . . . . . . . . . . . . . . . . . . . . 19 Before You Begin . . . . . . Unpack Everything Port Connections . . . . . . Device Connections . . . . 3 . . . . Introduction . . . . . . . . . . . . . . . . . . . . . . . . . . . . . . . . . . . . . . . . . . . . . . 15 Basic Operation . . . . . . . . . . . . . . . . . . . . . . . . . . . . . . . Alarm Description. . . . . . . . . . . . . . . . . . . . . . . . . . . . . . . Protocol Description . . . . . . . . . . . . . . . . . . . . . . . . . . . . . Functions Supported by MAXPRO-Net and VideoBloX Protocols . Functions Supported by PTZ Protocols . . . . . . . . . . . . . . 2 . . . . . . . . . . . . . . . . . . . . . . . . . . . . . . . . . . . . . . . . . . . . . . . . . . . . . . . . . . . . . . . . . . . . . . . . . . . . . . . . . . . . . . . . . . . . . . . . . . . . . . . . . . . . . . . . . . . . . . . . . . . . . . . . . . . . . . . . . . . . . . . . . . . . . . . . . . . . . . . . . . . . . . . . . . . . . . . . . . . . . . . . . . . . . . . . . . . . . . . . . . . . . . . . . . . . . . . . . . . . . . . . . . . . . . . . . . . . . . . . . . . . . . . . . . . . . . . 23 . 24 . 26 . 28 . 28 . 29 . 30 . 31 . 32 . 33 MegaPIT Maintenance . . . . . . . . . . . . . . . . . . . . . . . . . . . . . . . . . . . . . . . . 35 Software Upgrade . . . . . . . . . . . . Configuration File. . . . . . . . . . . . . Importing the Configuration File Exporting the Configuration File Appendix A . . . . . . . . . . . . . . . . . . . . . . . . . . . . . . . . . . . . . . . . . . . . . . . . . . . . . . . . . . . . . . . . . . . . . . . . . . . . . . . . . . . . . . . . . . . . . . . . . . . . . . . . . . . . . . . . . . . . . . . . . . . . . . . . . 35 . 37 . 37 . 38 Typical Application . . . . . . . . . . . . . . . . . . . . . . . . . . . . . . . . . . . . 41 System Connections . . . . . . . . . . . . . . . . . . . . . . . . . . . . . . . . . . . . . . . . . . . Connecting MAXPRO-Net to Multiple VideoBloX Chassis With an HVBGPIO in Master Mode Parameter Setting for Basic Functions . . . . . . . . . . . . . . . . . . . . . . . . . . . . . . . . . . Video Input Setting . . . . . . . . . . . . . . . . . . . . . . . . . . . . . . . . . . . . . . . Video Output Setting . . . . . . . . . . . . . . . . . . . . . . . . . . . . . . . . . . . . . . PTZ Device Control . . . . . . . . . . . . . . . . . . . . . . . . . . . . . . . . . . . . . . . Document 800-00222 Rev E 06/10 . 41 . 44 . 45 . 45 . 47 . 48 7 Contents 8 Appendix B PTZ Look Up Table . . . . . . . . . . . . . . . . . . . . . . . . . . . . . . . . . . . . 49 Appendix C Specifications and Dimensions . . . . . . . . . . . . . . . . . . . . . . . . . . . . . 51 MegaPIT™ User Manual Figures Figure 1-1 MegaPIT Front and Rear Views . . . . . . . . . . . . . . . . . . . . . . . . . . . . . . . . 15 Figure 2-1 MegaPIT Port Connectors . . . . . . . . . . . . . . . . . . . . . . . . . . . . . . . . . . . 20 Figure 2-2 System Connections. . . . . . . . . . . . . . . . . . . . . . . . . . . . . . . . . . . . . . 21 Figure 2-3 MegaPIT Connected to HMAX162. . . . . . . . . . . . . . . . . . . . . . . . . . . . . . . 22 Figure 3-1 MegaPIT Front Panel LCD and Navigation Buttons . . . . . . . . . . . . . . . . . . . . . . 24 Figure 3-2 Log On Window . . . . . . . . . . . . . . . . . . . . . . . . . . . . . . . . . . . . . . . . 29 Figure 3-3 MegaPIT Web Browser Home . . . . . . . . . . . . . . . . . . . . . . . . . . . . . . . . . 30 Figure 3-4 System Configurations Window . . . . . . . . . . . . . . . . . . . . . . . . . . . . . . . . 30 Figure 3-5 Serial Port Configurations Window . . . . . . . . . . . . . . . . . . . . . . . . . . . . . . 31 Figure 3-6 IP Configuration Window . . . . . . . . . . . . . . . . . . . . . . . . . . . . . . . . . . . 32 Figure 3-7 Change Password Window . . . . . . . . . . . . . . . . . . . . . . . . . . . . . . . . . . 33 Figure 4-1 Upgrade Warning . . . . . . . . . . . . . . . . . . . . . . . . . . . . . . . . . . . . . . . 35 Figure 4-2 Software Upgrade Window . . . . . . . . . . . . . . . . . . . . . . . . . . . . . . . . . . 36 Figure 4-3 Select the Upload File . . . . . . . . . . . . . . . . . . . . . . . . . . . . . . . . . . . . . 36 Figure 4-4 Import Configuration File . . . . . . . . . . . . . . . . . . . . . . . . . . . . . . . . . . . 37 Figure 4-5 Select the Configuration File to be Imported . . . . . . . . . . . . . . . . . . . . . . . . . 38 Figure 4-6 Select the File Location . . . . . . . . . . . . . . . . . . . . . . . . . . . . . . . . . . . . 39 Figure A-1 MAXPRO-Net, MegaPIT, and VideoBloX Chassis Connection . . . . . . . . . . . . . . . . 42 Figure A-2 Keyboard Controller Pin Definition . . . . . . . . . . . . . . . . . . . . . . . . . . . . . . 43 Figure A-3 MegaPIT Port Connection . . . . . . . . . . . . . . . . . . . . . . . . . . . . . . . . . . . 43 Figure A-4 Multiple VideoBloX Chassis (With HVBGPIO Set to Master) Connected to a MAXPRO-Net Through a MegaPIT Port Expander . . . . . . . . . . . . . . . . . . . . . . . . . . . . . . 44 Figure A-5 HVBGPIO COM 1 Port Pin Definition . . . . . . . . . . . . . . . . . . . . . . . . . . . . . 45 Figure A-6 MAXPRO-Net RS232 Port Setting . . . . . . . . . . . . . . . . . . . . . . . . . . . . . . . 45 Figure A-7 Video Input Parameters . . . . . . . . . . . . . . . . . . . . . . . . . . . . . . . . . . . . 46 Figure A-8 Video Output Parameters . . . . . . . . . . . . . . . . . . . . . . . . . . . . . . . . . . . 47 Figure C-1 MegaPIT Housing Dimensions . . . . . . . . . . . . . . . . . . . . . . . . . . . . . . . . 53 Document 800-00222 Rev E 06/10 9 Figures 10 MegaPIT™ User Manual Tables Table 1-1 Alarms. . . . . . . . . . . . . . . . . . . . . . . . . . . . . . . . . . . . . . . . . . . . . . 16 Table 1-2 Functions Supported by MAXPRO-Net and VideoBloX Protocols . . . . . . . . . . . . . . . 17 Table 1-3 PTZ Protocols Supported Functions . . . . . . . . . . . . . . . . . . . . . . . . . . . . . . 18 Table 2-1 Shipping List . . . . . . . . . . . . . . . . . . . . . . . . . . . . . . . . . . . . . . . . . . 19 Table 3-1 System Config Submenu Descriptions . . . . . . . . . . . . . . . . . . . . . . . . . . . . . 25 Table 3-2 Serial Config Submenu Descriptions . . . . . . . . . . . . . . . . . . . . . . . . . . . . . . 27 Table 3-3 Ethernet Config Submenu Descriptions . . . . . . . . . . . . . . . . . . . . . . . . . . . . 28 Table A-1 DB9 Port Pin Definitions . . . . . . . . . . . . . . . . . . . . . . . . . . . . . . . . . . . . 42 Table A-2 Video Input Parameter Settings . . . . . . . . . . . . . . . . . . . . . . . . . . . . . . . . 46 Table A-3 Video Output Parameter Settings . . . . . . . . . . . . . . . . . . . . . . . . . . . . . . . 47 Table A-4 PTZ Control via MegaPIT Parameter Settings . . . . . . . . . . . . . . . . . . . . . . . . . 48 Table B-1 PTZ Look Up Table . . . . . . . . . . . . . . . . . . . . . . . . . . . . . . . . . . . . . . . 49 Table C-1 Specifications . . . . . . . . . . . . . . . . . . . . . . . . . . . . . . . . . . . . . . . . . . 51 Document 800-00222 Rev E 06/10 11 Tables 12 MegaPIT™ User Manual About This Document This document introduces the Honeywell MegaPIT (HS10PIT). It covers how to install and operate the MegaPIT. Overview of Contents This document contains the following chapters and appendices: • • • • • • • Document 800-00222 Rev E 06/10 Chapter 1, Introduction, provides an overview of the basic operation of the MegaPIT and describes the alarms and protocols. Chapter 2, Installation, shows the port connection and system configuration. Chapter 3, Configuration, provides the procedure for configuring the MegaPIT using the front panel buttons or using a web browser. Chapter 4, MegaPIT Maintenance, covers how to upgrade the software, and import and export the configuration file. Appendix A, Typical Applications, shows a typical application where a MegaPIT is used in a MAXPRO-Net Server/VideoBloX system. This appendix shows the connection, pin definitions, and how to configure the MegaPIT. Appendix B, PTZ Look Up Table, provides a comprehensive table for determining values to add to Setmax source control. Appendix C, Specifications and Dimensions, includes the specifications and product dimensions. 13 Typographical Conventions This document uses the following typographical conventions: Font What it represents Example Bold Menu tabs or options you select On the Menu Menu, select System Config. Buttons you click to perform actions Press ENTER. Italic Emphasis, titles, or first-time defined concepts and items. Cross-reference within document See Chapter 2, Installation. Cross-reference to an external source Refer to the MAXPRO-Net Configuration Software User’s Guide. Warranty and Service Subject to the terms and conditions listed on the Product warranty, during the warranty period Honeywell will repair or replace, at its sole option, free of charge, any defective products returned prepaid. In the event you have a problem with any Honeywell product, please call Customer Service at 1.800.796.CCTV for assistance or to request a Return Merchandise Authorization (RMA) number. Be sure to have the model number, serial number, and the nature of the problem available for the technical service representative. Prior authorization must be obtained for all returns, exchanges, or credits. Items shipped to Honeywell without a clearly identified Return Merchandise Authorization (RMA) number may be refused. 14 MegaPIT™ User Manual 1 Introduction MegaPIT (HS10PIT) is used to combine two MAXPRO-Net Servers to increase reliability by automatically switching in the event of a System Controller failure. It implements protocol interface transfer from MAXPRO-Net to a range of protocols compatible with equipment such as MAXPRO-Net/VideoBloX Matrix, and PTZ (Pelco D, Pelco P, VCL, IntelliBus™ and Diamond). The MegaPIT has ten serial communications ports. The Master and Slave ports are connected to Master and Slave servers, which are the controllers of the system. The other eight ports are connected to various equipment, such as keyboards and subracks. The MegaPIT unit receives serial messages from the Master/Slave controller via the Master/Slave ports and sends these messages to devices via other communication ports. Basic Operation Figure 1-1 MegaPIT Front and Rear Views Power LED Power supply 10/100 LAN Port RJ11 connectors USB Port LCD (Reserved) RS422/485 RJ45 connector terminal Navigation buttons ENTER button RS485 terminal System parameters are typically configured through the five buttons to the right of the LCD display (see Figure 1-1). After pressing ENTER to enable the LCD menu, the related menu and icons display in the LCD, and the current option of the menu is highlighted. To move between the LCD menu options, use the Navigation buttons (UP/DOWN/LEFT/RIGHT) to move through and select the menu options. Press ENTER (center button) to confirm the menu selection. Document 800-00222 Rev E 06/10 15 Introduction Alarm Description MegaPIT is designed to report operation status. It simulates an RD400 alarm input module located in pseudo-slot (0). For these alarms to be used, they must be included in the External Alarms Input table in MAXPRO-Net. Note To avoid MegaPIT indicating failure during system startup, be sure to set the All parameter in the CTRL field of the Serial Communications Ports, for any ports that are connected to MegaPIT. Alarm inversion is not supported. All alarms must be defined as N/O type alarms. Table 1-1 Alarms Alarm Description ALARM 1 The MegaPIT CPU is operating correctly, to detect a CPU failure. The alarm is ACTIVATED 10 seconds after any RESET command, or 10 seconds following cold-boot initialization. ALARM 2 Master Computer Fail An ACTIVE alarm is generated when communication is lost with the MASTER computer. The alarm CLEARS upon restoration of communications with the MASTER computer. ALARM 3 Not defined ALARM 4 Not defined ALARM 5 Slave Computer Fail An ACTIVE alarm is generated when communication is lost with the SLAVE computer. The alarm CLEARS upon restoration of communications with the SLAVE computer. ALARM 6 Master Selected Status An ACTIVE alarm is generated when the MASTER computer is selected as the system controller. The alarm CLEARS if the SLAVE computer is selected as the system controller. This alarm is activated by automatic and manual selection changeover. ALARM 7 Slave Selected Status An ACTIVE alarm is generated when the SLAVE computer is selected as the system controller. The alarm CLEARS if the MASTER computer is selected as the system controller. This alarm is activated by automatic and manual selection changeover. ALARM 8 16 Not defined MegaPIT™ User Manual Note For more information on alarms in general and details of the External Alarm Inputs tab specifically, refer to the MAXPRO-Net Configuration Software User’s Guide. Protocol Description The Master/Slave port communicates with the server only in RS232 mode and MAXPRO-Net protocol. Ports 1 to 8 can be set to RS232, RS485, RS422 mode with each protocol. Functions Supported by MAXPRO-Net and VideoBloX Protocols Table 1-2 lists the functions supported by the MAXPRO-Net and VideoBloX protocols. Table 1-2 Functions Supported by MAXPRO-Net and VideoBloX Protocols Function MAXPRO-Net VideoBloX Matrix switch Update Date & Time Clear a line of text from a specified output channel and specified line Initialize text inserter Time line selection Reset subrack Poll subrack Write a line of text to a specified output channel and specified line Enable video loss/video restored detection Document 800-00222 Rev E 06/10 Title flash Title off function Read back video status from VideoBloX (when Video Polling option is set ON) 17 Introduction Note Please pay attention to the Extended and Video Polling settings when the Protocol option is set to VideoBloX. See page 25 for more information. Functions Supported by PTZ Protocols PTZ protocols (Pelco D, Pelco P, VCL, IntelliBus™, Diamond) support these functions: Table 1-3 PTZ Protocols Supported Functions Function Function Turn left Iris open Turn right Iris close Turn up Focus near Turn down Focus far Zoom out Preshot recall Zoom in Preshot store Pan, Tilt, and Zoom control at the same time Set AUX (only for Pelco D) Note Clear AUX (only for Pelco D) Please pay attention to the SOURCE CONTROL parameters in Video Inputs of the MAXPRO-Net Server when controlling PTZs via MegaPIT. Figure A-8 shows the PTZ control parameters in MAXPRO-Net server. Table A-4 describes each parameter. 18 MegaPIT™ User Manual 2 Installation This chapter covers the port connections and shows a typical system configuration. Before You Begin Before you install your Honeywell MegaPIT, please read this guide carefully. Keep this guide for future reference. Unpack Everything Check that the items received match those listed on the order form and packing slip. Your MegaPIT packing box should include: Table 2-1 Shipping List Quantity Description Quantity Description 1 MegaPIT main unit 1 This user guide 1 100-240 VAC Adapter 2 Case holder 3 10/100M Network cable, 6.56 ft. (2M) 4 4 Terminal block plug 2 RJ45 to DB9M adapter for VideoBloX Master mode 4 2 Terminal block plugs 2 4-way RJ11 flat ribbon crossover cable, 6.56 ft. (2M) If any parts are missing or damaged, contact the dealer you purchased the MegaPIT from or call Honeywell Customer Service (see Warranty and Service on page 14). Document 800-00222 Rev E 06/10 19 Installation Port Connections Figure 2-1 Power LAN MegaPIT Port Connectors Master/Slave Port 1 - 8 1 RS485+ 2 RS485+9~18 VDC 6 NC 5 NC 4 RS232RX 3 GND 2 RS232TX 1 NC 1 TX+ 2 TX3 RX+ 4 5 6 RX7 8 20 1 NC 2 RS232TX 3 GND 4 RS232RX 5 NC 6 NC 4 RS422RX3 RS422RX+ 2 RS422TX-/RS4851 RS422TX+/RS485+ 1 RS484_2+/RS422_1_RX+ 2 RS485_2-/RS422_1_RX3 NC 4 RS232 TX 5 GND 6 RS232 RX 7 RS422 RX8 RS422 RX+ MegaPIT™ User Manual Device Connections Figure 2-2 System Connections MAXPRO-Netx Matrix CPU MAXPRO-Netx Matrix CPU ACUIX PTZ Domes 1 2 7 RS232 8 MAXPRO-Net COM DB9 Pin 2 RX Pin 3 TX Pin 5 GND 1 2 7 8 RS485 RS232 HDCD8TP Data Distribution HS10PIT (MegaPIT) RS422 RS485 RS485 HMX32129 Matrix Chassis with Cards Cross-over phone cable RS232 HJK7000 UltraKey Plus Controller HVB8U Matrix Chassis with Cards RS232 HHJC5000 UltraKey Lite Controller RS422 CAT5e cable 2600-485-00 DB9-RJ45 Adapter supplied with HS10PIT HVB422FT16 1 2 3 4 CAT5e cable Document 800-00222 Rev E 06/10 To Matrix Switch Comms VideoBloX chassis Set to SLAVE pin out ON 1 OFF 2 OFF 3 ON 4 21 Installation If MegaPIT is required to connect with one or more HMAX162 matrix switchers, the connections should follow Figure 2-3. Figure 2-3 RS422 MegaPIT Connected to HMAX162 Keyboard RS422 INPUT OUTPUT OUTPUT OUTPUT COM1 COM1 Net CPU Alarm In/Out GPIO Slave Video Input Video Input Video Input UTC input board Video Output COM2 COM3 PTZ Ports 1-4 RS422 CONTROL ETHERNET ETHERNET CONTROL VideoBloX FUSE 20A FUSE HMAX162 PTZ HMAX162 PTZ RS485 To VideoBloX Switch Comms RS485 To VideoBloX CPU COM3 MegaPIT 1. Set the following parameters for Ports 1 and 2: Parity = None Stop bits = 1 Data bits = 8 Mode = RS485 Protocol = HMAX162(matrix) For more information, see Configuring the Serial Ports on page 26. Also, baud rate should be VB Switch Comms and VB CPU COM3 and they should be connected, respectively, to VB Switch Comms and VB CPU Com3. 2. Set the following parameters for Ports 3 to 8: Baud rate = 9600 Parity = None Stop bits = 1 Data bits = 8 Mode = RS485 Protocol = HMAX162(matrix) For more information, see Configuring the Serial Ports on page 26. Connect to the HMAX162. 3. 22 For switch video and control PTZ, refer to the HVBNET16CPU Configuration Guide. MegaPIT™ User Manual 3 Configuration This chapter describes how to configure the MegaPIT. The network and serial communication items (protocol selection, baud rate, parity, data bits, stop bits, IP address, and so on) for the MegaPIT can be configured in two ways: • • Using the LCD menu (see Configuration Using the LCD Menu on page 23) Using the MegaPIT web browser (see Configuration Using the MegaPIT Web Browser on page 29) Configuration Using the LCD Menu Caution Document 800-00222 Rev E 06/10 Do not configure the MegaPIT using the LCD and the MegaPIT web browser at the same time. 1. To access the menu, press ENTER (center button) to the right of the LCD on the MegaPIT housing (see Figure 3-1). 2. The menu and icons display in the LCD and the current menu item is highlighted. Use the navigation buttons to move through and select the options. 3. Press ENTER to confirm the menu item or setting. 23 Configuration Figure 3-1 MegaPIT Front Panel LCD and Navigation Buttons Navigation buttons Center button = ENTER LCD display The MegaPIT idle screen displays in the LCD as follows: To switch MegaPIT among the three working states (Auto, Master, and Slave), press UP/ DOWN. In Auto status, the Master server is preferential; that is, MegaPIT automatically switches to Slave only when the Master server fails. In Master status, MegaPIT must work with the Master server regardless of whether the Master server fails or not. Slave status acts the same as Master status. Regardless of which server is being used, the same Failed message displays in the LCD. Configuring the System Settings To configure the system settings: 1. In idle status, press ENTER to display the Admin Menu. The Admin menu displays. Options (4 submenus + exit): System Config Serial Config Ethernet Config SW Version Info Exit 2. 24 Select System Config. MegaPIT™ User Manual 3. The System Config menu displays. Follow Table 3-1 to set the system parameters. Table 3-1 System Config Submenu Descriptions Submenu Options Description ID Code Config Selects the destination subrack required to execute the command string. Options are 0 to 999. For high-level interfaces, use the ID code 999. The LCD displays the current ID. The default ID is 970. Default setting 1. Press LEFT/RIGHT to move between digits. 2. Press UP/DOWN to increase/decrease the value of the highlighted digit. 3. Press ENTER to confirm the setting. Switch Time The time spent switching between Master and Slave controllers. The LCD displays the Switch Time options. The default is 5s. Default setting 1. Press LEFT/RIGHT/UP/DOWN to select the desired menu item. 2. Press ENTER to confirm the setting. Filter Ack ON indicates the filter is enabled. OFF indicates the filter is disabled. The default is ON. 1. Press LEFT/RIGHT to select the desired menu item. 2. Press ENTER to confirm the setting. Video Polling ON indicates video loss detection is enabled. The default is ON. Cascade The default is OFF. Note This menu item is reserved. Backlight Config Document 800-00222 Rev E 06/10 The default option is OFF. 25 Configuration Table 3-1 System Config Submenu Descriptions Submenu Options Description Extended For VideoBloX matrix switchers with more than 256 outputs, set Extended to ON. The matrix input cards must be v2.03 or later. The default is OFF, indicating the output is less than or equal to 256. Serial Port Test The status of each port (M [Master], S [Slave], and 1 to 8) displays here. If one port is receiving data, its RX icon will flicker. When the port is transmitting data, the TX icon for that port flickers. DateTime Format The default is DDMMYY. Choose from these options: Exit DDMMYY YYMMDD YYDDMM MMDDYY DDMMMYY MMMDDYY YYDDMMM YYMMMDD DDMMYYYY YYYYMMDD YYYYDDMM MMDDYYYY DDMMMYYYY MMMDDYYYY YYYYDDMMM YYYYMMMDD Exits the System Config menu. Configuring the Serial Ports The Serial Config menu includes options for setting serial communication parameters, such as baud rate, parity and data bits. Each port must be configured separately. To configure the serial ports: 1. 26 Press ENTER to display the Admin Menu and then select Serial Config. MegaPIT™ User Manual 2. The Serial Config menu displays. Select Master/Slave, or Ports 1 to 8. 3. Follow Table 3-2 to set the serial port parameters. Table 3-2 Serial Config Submenu Descriptions Submenu Options Description Baud Rate Options are shown below. The default is 19200. Parity Options are shown below. The default is EVEN. Stop Bits Options are shown below. The default is 1 Stop Bit. Data Bits Options are shown below. The default is 7 Data Bits. Mode Options are shown below. The default is RS232. Protocol The default is Maxpro-net(matrix). Choose from these options: Maxpro-net(matrix) VideoBlox(matrix) Pelco D(PTZ) Pelco P(PTZ) VCL(PTZ) Diamond(PTZ) AD(PTZ)* Intellibus(PTZ) Pelco(matrix)* AD(matrix)* CT40A HMAX162(matrix) *These options are not currently supported. Note For the Master/Slave port, the only option available is Maxpro-net(matrix). Exit Document 800-00222 Rev E 06/10 Exits the Serial Config menu. 27 Configuration Configuring the Network To configure the network: 1. Press ENTER to display the Admin Menu and then select Ethernet Config. 2. The Ethernet Config menu displays. 3. Follow Table 3-3 to set the network parameters. Table 3-3 Ethernet Config Submenu Descriptions Submenu Options Description IP Address The default is 192.168.001.009. 1. Press LEFT/RIGHT to move between digits. 2. Press UP/DOWN to increase/decrease the value of the highlighted digit. 3. Press ENTER to confirm the setting. Default Gateway The default is 192.168.001.001. Subnet Mask The default is 255.255.255.000. Exit Exits the Ethernet Config submenu. Displaying the Software Version Information To see the current software version information: 28 1. Press ENTER to display the Admin Menu and then select SW Version Info. 2. The Software Version Info submenu displays. This is a status only screen. 3. Press ENTER to exit the SW Version Info submenu. MegaPIT™ User Manual Configuration Using the MegaPIT Web Browser Caution Do not configure the MegaPIT using the LCD and the MegaPIT web browser at the same time. Note Internet Explorer v6.0.0 or later is required. To log on to the MegaPIT web browser: 1. In the Address bar of Internet Explorer, enter the IP address for MegaPIT. This is the same IP address as in Configuring the Network on page 28. 2. The Log on window displays (see Figure 3-2). Figure 3-2 Document 800-00222 Rev E 06/10 Log On Window 3. Enter the user name and password and click OK. The default user name is Administrator and the default password is 1234 (both are case sensitive). 4. Click Login. The MegaPIT Home page displays (see Figure 3-3). 29 Configuration Figure 3-3 MegaPIT Web Browser Home Exit the MegaPIT web browser Configuring the System Settings To configure system settings: 1. On the Home page, select the CONFIGURATION tab. 2. Select System Configurations on the left pane. Figure 3-4 30 System Configurations Window 3. Modify the values in the fields as required. 4. To save the changes, click Apply. To cancel the current changes, click Cancel. To return to the default settings, click Default. MegaPIT™ User Manual Configuring the Serial Ports To configure the serial ports: 1. On the Home page, select the CONFIGURATION tab. 2. Select Serial Port Configurations on the left pane. Figure 3-5 Document 800-00222 Rev E 06/10 Serial Port Configurations Window 3. Modify the values in the fields as required. 4. To save the changes, click Apply. To cancel the current changes, click Cancel. To return to the default settings, click Default. 31 Configuration Configuring Network Settings Note The default network settings are: IP address: 192.168.1.9 Gateway: 192.168.1.1 Subnet Mask: 255.255.255.0 To configure the network settings: 1. On the Home page, select the CONFIGURATION tab. 2. Select IP Configurations on the left pane. Figure 3-6 32 IP Configuration Window 3. Modify the values in the fields as required. 4. To save the changes, click Apply. To cancel the current changes, click Cancel. To return to the default settings, click Default. MegaPIT™ User Manual Changing the Password There is a single user account (Administrator) available in MegaPIT. To change the password: 1. On the Home page, click Change Password on the top right. 2. The Change Password window displays. Enter the current password for verification in the Old Password field and then enter new values in the New Password and Confirm New Password fields. Note The maximum length for the password is 20 characters. The password can be any combination of letters (a - z, or A - Z) and numbers (0 - 9) but may not contain symbols or spaces. Figure 3-7 3. Document 800-00222 Rev E 06/10 Change Password Window To save the changes, click Apply. To cancel the current changes, click Cancel. 33 Configuration 34 4 MegaPIT Maintenance This chapter covers how to upgrade the software and import/export the configuration file. Software Upgrade The software shipped with MegaPIT is contained in the flash memory and can be upgraded via the Internet. To upgrade the software: 1. In the address bar of Internet Explorer, enter the URL for the MegaPIT. This is the same IP address as in Configuring the Network on page 28. 2. The Log on window displays. Enter the user name and password (the default user name is Administrator and the default password is 1234). 3. Click Login. 4. Click the UPGRADE tab on the home page. The following warning displays. Figure 4-1 Document 800-00222 Rev E 06/10 Upgrade Warning 5. Check the network connection, then click OK. 6. The Software Upgrade window displays. Select the appropriate item in the Select Folder drop-down list (Application, FPGA, or KERNEL). 35 MegaPIT Maintenance Figure 4-2 7. Software Upgrade Window Click Browse. The Choose File dialog displays. Figure 4-3 Select the Upload File 8. Navigate to, then select the appropriate file. Click Open. 9. Click Send to upload the upgrade file. A success message appears to indicate a successful upload. 10. The software upgrades. After upgrading, the system reboots automatically. 36 MegaPIT™ User Manual Configuration File All the system settings, serial ports, and Ethernet settings are saved in one configuration file. You can use the MegaPIT web browser to import and export this file among different MegaPITs. Importing the Configuration File To import the configuration file: 1. Launch the MegaPIT web browser (see Configuration Using the MegaPIT Web Browser, page 29). 2. On the CONFIGURATION tab, select Configuration File on the left pane. The following window opens. Figure 4-4 3. Document 800-00222 Rev E 06/10 Import Configuration File To import the configuration file, click Browse. The Choose File dialog displays. 37 MegaPIT Maintenance Figure 4-5 Select the Configuration File to be Imported 4. Navigate to, then select the appropriate file. Click Open. 5. Click Send to import the configuration file. A success message appears to indicate a successful import. 6. After importing, the system reboots automatically. Exporting the Configuration File To export the configuration file: 38 1. After launching the MegaPIT web browser, on the CONFIGURATION tab, select Configuration File. 2. Right-click config.MegaPIT, then select Save target as… from the drop-down list. MegaPIT™ User Manual Figure 4-6 Select the File Location 3. Select the location where you want to save the configuration file. 4. Click Save. The configuration file is exported to your PC hard drive. Note Document 800-00222 Rev E 06/10 The configuration file can be saved as any file name when being exported. However, when importing, the file name must follow the format xxx.MegaPIT (where xxx can be any valid characters and the unique extension MegaPIT is case sensitive. 39 MegaPIT Maintenance 40 A Typical Application This appendix provides an example of a typical system application, when the a MegaPIT is used to connect a MAXPRO-Net Server to a VideoBloX chassis. System Connections In this scenario, the physical connection is shown in Figure A-1. Document 800-00222 Rev E 06/10 1. Make the port connections as shown in Figure A-1. 2. Set the port on the MegaPIT that connects to the VideoBloX chassis to VideoBloX(matrix). By selecting this mode, the communication parameter sets automatically. 3. Follow Table A-1 to set the DB9 Port pin definitions. 4. Follow Figure A-2 and Figure A-3 to set the pin definitions for the keyboard controller and MegaPIT port connections respectively. 5. Set the VideoBloX chassis to Slave mode by setting the chassis DIP switch SW4 to 1. 41 Typical Application Figure A-1 MAXPRO-Net, MegaPIT, and VideoBloX Chassis Connection RS232 MAXPRO-Net/MAX 1000 Server Keyboard Controller RS232 12 : 0 0 4/ 6 / 0 9 M e n u S et u p D o w n Alarm + Focus — Menu MegaPIT F1 F2 F3 F4 F5 Seq Set + Iris — Review + Focus — Fn F6 Login F7 F8 Mon A F9 F10 Mon B MAX Mode VB Mode Network PTZ Mode RS232/RS422 12 : 0 0 4/ 6 / 0 9 M e n u S et u p D o w n Alarm Menu F1 F2 F3 F4 F5 + Focus — Seq Set + Iris — Review Search + Focus — Fn F6 Login F7 Mon A F8 F9 1 2 Tour 4 5 PTZ call 7 8 9 Alt Clr 0 Ent View 3 6 F10 Mon B 1 2: 0 0 4/ 6 / 0 9 M en u S et u p D o w n Alarm Menu F1 F2 F3 F4 F5 F6 F7 F8 F9 F10 + Focus — Seq Set + Iris — Review Search + Focus — Fn Login Mon A View 1 Tour 4 9 Ent Mon B COMMS Video Input FUSE 20A Video Input Video Input Video Output FUSE Table A-1 42 DB9 Port Pin Definitions MAXPRO-Net COM DB9 VideoBloX COM DB9 (Master Mode) VideoBloX COM DB9 (Slave Mode) Pin 2, RX Pin 1, TX- Pin 2, TX+ Pin 1, RX- Pin 2, RX+ Pin 3, TX Pin 3, RX+ Pin 4, RX- Pin 3, TX+ Pin 4, TX- Pin 5, GND Pin 5, GND Pin 5, GND 6 0 Video Input Video Input 3 8 Clr CONTROL Video Input 5 7 Alt RS422 VideoBloX Chassis 2 PTZ call Search 1 2 Tour 4 5 PTZ call 7 8 9 Alt Clr 0 Ent View 3 6 MegaPIT™ User Manual Figure A-2 Keyboard Controller Pin Definition RS232 RS422/485 1 TX+ 2 TX3 RX+ 6 RXPOWER + POWER - Figure A-3 Power LAN 1 RS484_2+/RS422_1_RX+ 2 RS485_2-/RS422_1_RX3 NC 4 RS232 RXD 5 RS232 GND 6 RS232 TXD 7 RS485_1/RS422_1_TX8 RS485_1+/RS422_1_TX+ MegaPIT Port Connection Master/Slave Port 1 - 8 1 RS485+ 2 RS485+9~18 VDC 6 NC 5 NC 4 RS232RX 3 GND 2 RS232TX 1 NC 1 TX+ 2 TX3 RX+ 4 5 6 RX7 8 Document 800-00222 Rev E 06/10 1 NC 2 RS232TX 3 GND 4 RS232RX 5 NC 6 NC 4 RS422RX3 RS422RX+ 2 RS422TX-/RS4851 RS422TX+/RS485+ 1 RS484_2+/RS422_1_RX+ 2 RS485_2-/RS422_1_RX3 NC 4 RS232 TX 5 GND 6 RS232 RX 7 RS422 RX8 RS422 RX+ 43 Typical Application Connecting MAXPRO-Net to Multiple VideoBloX Chassis With an HVBGPIO in Master Mode In this scenario, a MegaPIT port expander connects a MAXPRO-Net server to VideoBloX chassis that contain an HVBGPIO which is set to Master mode. The physical connections are shown in Figure A-4. Figure A-4 Multiple VideoBloX Chassis (With HVBGPIO Set to Master) Connected to a MAXPRO-Net Through a MegaPIT Port Expander MAXPRO-Net/MAX1000 Server RS232 MegaPIT MAX Mode MAX Mode COM1 A L A R M IN / O U T COM1 E TH E R N E T COM1 Alarm In/Out HVBGPIO Slave PTZ Ports 1 - 4 Video Input Alarm In/Out HVBGPIO Master + MATPIT A L A R M IN /O U T PTZ P ORTS 1 - 4 ETHERNET COMMS ETHERNET CO NTROL ETHERNET VideoBloX Chassis A L A R M IN /O U T PTZ P ORTS 1 - 4 PTZ Ports 1 - 4 COM1 Alarm In/Out HVBGPIO Save Video Input Video Input PTZ PORTS 1 - 4 PTZ Ports 1 - 4 CO NTROL A L A R M I N /O U T PTZ PORTS 1 - 4 PTZ Ports 1 - 4 COMMS VideoBloX Chassis Alarm In/Out HVBGPIO Master + MATPIT Video Input FU SE 20 A F U S E 20 A Video Input Video Input Video Input Video Input Video Output Video Output FU S E FU S E CC/EOL Alarm sensors RS232/ RS485 NC/NO Relay outputs Figure A-5 shows the pin definitions for the HVBGPIO COM Port, when this port is used to connect to a MegaPIT or to an older MAX1000 Server. 44 MegaPIT™ User Manual Note The RS232 port on the MAX1000 and on the HVBGPIO (when it is set to Master mode) are set by default to 19k2, EVEN, 7, 1. Set these same parameters on the MAXPRO-Net RS232 port and on the connecting port on the MegaPIT PC. Figure A-5 HVBGPIO COM 1 Port Pin Definition P1 Jumper for MegaPIT 1 RS422 RX+ 2 RS422 RX3 NC 4 RS232 RX 5 GND 6 RS232 TX 7 RS422 TX- / RS4858 RS422 TX+ / RS485+ Figure A-6 P1 Jumper for MAX1000 1 RS422 RX+ 2 RS422 RX3 RS232TX 4 GND 5 RS232 RX 6 NC 7 RS422 TX- / RS4858 RS422 TX+ / RS485+ MAXPRO-Net RS232 Port Setting Parameter Setting for Basic Functions Most of the parameter settings for the two scenarios described above are the same, except where otherwise noted. Video Input Setting To configure video inputs: 1. On the MAXPRO-Net server, access the Video Input tab (see Figure A-7). 2. Follow Table A-2 to set the video input parameters. Document 800-00222 Rev E 06/10 45 Typical Application Figure A-7 Video Input Parameters Table A-2 Video Input Parameter Settings Parameter Description DEVICE TYPE Only Camera type is currently supported. DEVICE NUMBER Select a number to control this input. DEVICE DESCRIPTION The title displayed on the screen. PRIMARY SUBRACK ID The PRIMARY SUBRACK ID is the address of the subrack to which the video input is physically connected. INPUT NUMBER The INPUT NUMBER is the physical connection point on the primary subrack. (PRIMARY SUBRACK ID-1)*128+ INPUT NUMBER is the physical input number. The INPUT NUMBER range is 1 to 128. The maximum number of inputs is 9999. VIDEO FAIL SLOT To enable automatic video fail detection, enter the slot number where the video fail detector module is located. Video Inputs Video Fail Slot 1 to 32 11 33 to 64 12 65 to 96 13 97 to 128 14 Example: If input 129 needs reporting, set the parameters as follows: PRIMARY SUBRACK ID = 2 INPUT NUMBER = 1 VIDEO FAIL SLOT = 11 46 MegaPIT™ User Manual Note When a video input has been set to be reported (for example, input 1), the LED Tx Data on the VideoBloX chassis flashes. In addition, If there is an input board with an address of 1, the PWR LED on the input board and the RxDATA and RTS LEDs on the VideoBloX chassis also flash. When setting input polling for MegaPIT, please ensure that you enable the Video Polling parameter in the MegaPIT. Video Output Setting To configure video output settings: 1. Access the Video Outputs tab (see Figure A-8. 2. Follow Table A-3 to set the video output parameters. Document 800-00222 Rev E 06/10 Figure A-8 Video Output Parameters Table A-3 Video Output Parameter Settings Parameter Description SLOT Physical output number DEVICE TYPE Select Monitor. DEVICE NUMBER Select a number to control this output. 47 Typical Application PTZ Device Control Follow Table A-4 to set PTZ controls using a MegaPIT. Table A-4 PTZ Control via MegaPIT Parameter Settings Parameter Description CONTROL ID Port number (range is 1 to 799); indicates the MegaPIT ID. CONTROL SLOT . CONTROL OFFSET Slots = Port Slots = Port 1 to 4 1 17 to 20 5 5 to 8 2 21 to 24 6 9 to 12 3 25 to 28 7 13 to 16 4 29 to 32 8 The CONTROL OFFSET range is 1 to 32. The address of the PTZ device is ((CONTROL SLOT-1)%4)*32+CONTROL OFFSET. Since each port has four slots, each port can support 128 PTZ devices (4 x 32). Note 48 For more detailed information on setting CONTROL ID, CONTROL SLOT, and CONTROL OFFSET parameters, see Appendix B, PTZ Look Up Table. B PTZ Look Up Table Use Table B-1 to determine values to add to the Setmax source control. NOTES: 1. Control ID is the address of the MegaPIT, valid range for Setmax 1 to 799; Suggested first address. 2. Decide on the actual PTZ address (1 to 128) and then locate it under the Actual PTZ Address column. 3. Look up the corresponding Control Slot, depending on which port you are connected to. 4. Look up the corresponding Control Offset. Table B-1 Control Slot (P=Port on MegaPIT) Control Offset PTZ Look Up Table Actual PTZ Address P1 P2 P3 P4 P5 P6 P7 P8 Control Slot (P=Port on MegaPIT) Control Offset Actual PTZ Address P1 P2 P3 P4 P5 P6 P7 P8 1 5 9 13 17 21 25 29 1 1 3 7 11 15 19 23 27 31 1 65 1 5 9 13 17 21 25 29 2 2 3 7 11 15 19 23 27 31 2 66 1 5 9 13 17 21 25 29 3 3 3 7 11 15 19 23 27 31 3 67 1 5 9 13 17 21 25 29 4 4 3 7 11 15 19 23 27 31 4 68 1 5 9 13 17 21 25 29 5 5 3 7 11 15 19 23 27 31 5 69 1 5 9 13 17 21 25 29 6 6 3 7 11 15 19 23 27 31 6 70 1 5 9 13 17 21 25 29 7 7 3 7 11 15 19 23 27 31 7 71 1 5 9 13 17 21 25 29 8 8 3 7 11 15 19 23 27 31 8 72 1 5 9 13 17 21 25 29 9 9 3 7 11 15 19 23 27 31 9 73 1 5 9 13 17 21 25 29 10 10 3 7 11 15 19 23 27 31 10 74 1 5 9 13 17 21 25 29 11 11 3 7 11 15 19 23 27 31 11 75 1 5 9 13 17 21 25 29 12 12 3 7 11 15 19 23 27 31 12 76 1 5 9 13 17 21 25 29 13 13 3 7 11 15 19 23 27 31 13 77 1 5 9 13 17 21 25 29 14 14 3 7 11 15 19 23 27 31 14 78 1 5 9 13 17 21 25 29 15 15 3 7 11 15 19 23 27 31 15 79 1 5 9 13 17 21 25 29 16 16 3 7 11 15 19 23 27 31 16 80 1 5 9 13 17 21 25 29 17 17 3 7 11 15 19 23 27 31 17 81 1 5 9 13 17 21 25 29 18 18 3 7 11 15 19 23 27 31 18 82 1 5 9 13 17 21 25 29 19 19 3 7 11 15 19 23 27 31 19 83 1 5 9 13 17 21 25 29 20 20 3 7 11 15 19 23 27 31 20 84 1 5 9 13 17 21 25 29 21 21 3 7 11 15 19 23 27 31 21 85 1 5 9 13 17 21 25 29 22 22 3 7 11 15 19 23 27 31 22 86 1 5 9 13 17 21 25 29 23 23 3 7 11 15 19 23 27 31 23 87 Document 800-00222 Rev E 06/10 49 PTZ Look Up Table Table B-1 Control Slot (P=Port on MegaPIT) Control Offset PTZ Look Up Table Actual PTZ Address P1 P2 P3 P4 P5 P6 P7 P8 Control Slot (P=Port on MegaPIT) Control Offset Actual PTZ Address P1 P2 P3 P4 P5 P6 P7 P8 1 5 9 13 17 21 25 29 24 24 3 7 11 15 19 23 27 31 24 88 1 5 9 13 17 21 25 29 25 25 3 7 11 15 19 23 27 31 25 89 1 5 9 13 17 21 25 29 26 26 3 7 11 15 19 23 27 31 26 90 1 5 9 13 17 21 25 29 27 27 3 7 11 15 19 23 27 31 27 91 1 5 9 13 17 21 25 29 28 28 3 7 11 15 19 23 27 31 28 92 1 5 9 13 17 21 25 29 29 29 3 7 11 15 19 23 27 31 29 93 1 5 9 13 17 21 25 29 30 30 3 7 11 15 19 23 27 31 30 94 1 6 10 14 18 22 26 30 31 31 3 8 12 16 20 24 28 32 31 95 1 6 10 14 18 22 26 30 32 32 3 8 12 16 20 24 28 32 32 96 2 6 10 14 18 22 26 30 1 33 4 8 12 16 20 24 28 32 1 97 2 6 10 14 18 22 26 30 2 34 4 8 12 16 20 24 28 32 2 98 2 6 10 14 18 22 26 30 3 35 4 8 12 16 20 24 28 32 3 99 2 6 10 14 18 22 26 30 4 36 4 8 12 16 20 24 28 32 4 100 2 6 10 14 18 22 26 30 5 37 4 8 12 16 20 24 28 32 5 101 2 6 10 14 18 22 26 30 6 38 4 8 12 16 20 24 28 32 6 102 2 6 10 14 18 22 26 30 7 39 4 8 12 16 20 24 28 32 7 103 2 6 10 14 18 22 26 30 8 40 4 8 12 16 20 24 28 32 8 104 2 6 10 14 18 22 26 30 9 41 4 8 12 16 20 24 28 32 9 105 2 6 10 14 18 22 26 30 10 42 4 8 12 16 20 24 28 32 10 106 2 6 10 14 18 22 26 30 11 43 4 8 12 16 20 24 28 32 11 107 2 6 10 14 18 22 26 30 12 44 4 8 12 16 20 24 28 32 12 108 2 6 10 14 18 22 26 30 13 45 4 8 12 16 20 24 28 32 13 109 2 6 10 14 18 22 26 30 14 46 4 8 12 16 20 24 28 32 14 110 2 6 10 14 18 22 26 30 15 47 4 8 12 16 20 24 28 32 15 111 2 6 10 14 18 22 26 30 16 48 4 8 12 16 20 24 28 32 16 112 2 6 10 14 18 22 26 30 17 49 4 8 12 16 20 24 28 32 17 113 2 6 10 14 18 22 26 30 18 50 4 8 12 16 20 24 28 32 18 114 2 6 10 14 18 22 26 30 19 51 4 8 12 16 20 24 28 32 19 115 2 6 10 14 18 22 26 30 20 52 4 8 12 16 20 24 28 32 20 116 2 6 10 14 18 22 26 30 21 53 4 8 12 16 20 24 28 32 21 117 2 6 10 14 18 22 26 30 22 54 4 8 12 16 20 24 28 32 22 118 2 6 10 14 18 22 26 30 23 55 4 8 12 16 20 24 28 32 23 119 2 6 10 14 18 22 26 30 24 56 4 8 12 16 20 24 28 32 24 120 2 6 10 14 18 22 26 30 25 57 4 8 12 16 20 24 28 32 25 121 2 6 10 14 18 22 26 30 26 58 4 8 12 16 20 24 28 32 26 122 2 6 10 14 18 22 26 30 27 59 4 8 12 16 20 24 28 32 27 123 2 6 10 14 18 22 26 30 28 60 4 8 12 16 20 24 28 32 28 124 2 6 10 14 18 22 26 30 29 61 4 8 12 16 20 24 28 32 29 125 2 6 10 14 18 22 26 30 30 62 4 8 12 16 20 24 28 32 30 126 2 6 10 14 18 22 26 30 31 63 4 8 12 16 20 24 28 32 31 127 2 6 10 14 18 22 26 30 32 64 4 8 12 16 20 24 28 32 32 128 50 MegaPIT™ User Manual C Specifications and Dimensions Table C-1 Specifications Specifications Description Operational LCD: Type: STN, Positive Image Backlight: Yellow Green Characters: 122 x 32 Dots USB: Type: A Version: USB 1.1 (Future) Web Browser Supported: IE 6.0 or > on Windows 2000, Windows 2000 Server, XP Pro SP2, Vista Home, Vista Premium PTZ Protocols (Address range): Honeywell Diamond (128), Honeywell VCL (128), Honeywell IntelliBus™ (128), Pelco P (32), Pelco D (128) Matrix Protocols: VideoBloX Sub rack, MAX-1000 Sub rack, HMAX162 Electrical Input Voltage: 100-240 VAC 50/60 Hz Output Voltage: 9 to 18 VDC Power Consumption: 2 A @ 12 VDC Battery: Voltage: 3V Type: CR2032 Mechanical Document 800-00222 Rev E 06/10 Construction: Housing: Alumin7um (AL6055) Finish: Spray black powder with silver gray front panel Dimensions: 17.42 in. (W) x 1.88 in. (H) x 4.63 in. (D) 442.5mm (W) x 47.75mm (H) x 182.25mm (D) Standard 19 in. rack width by 1U height Weight: 5.06 lb. (2.3 kg) 51 Specifications and Dimensions Specifications Description Connectors: LAN: 1x RJ45 Ethernet (10Base-T, 100 Base-TX) Master/Slave: 2x RJ11 RS232 (MAXPRO MX18 pin out) Port 1 to 4:RJ45 (RS232 and RS422) or 4 position Terminal Block RS422 Port 5 to 8: RJ45 (RS232 and RS422) or 2 position Terminal Block RS485 Power: Locking, 2 pos Terminal Block Operating Distance: Up to 4000 ft. (1219m) for RS422/RS485 Environmental Temperature: Operating: 14°F to 122°F (-10°C to +50°C) Storage: -4°F to 149°F (-20°C to +65°C) Relative humidity: 0 to 95% RH (non-condensing) Regulatory 52 Emissions: FCC: Part 15, Class B CE: Class B (EN 55022/A2:2003 89/336/EEC) ICES-003 Immunity: EN 50130-4/A2:2003 Safety: UL 60950-1 EN 60950-1:2006 2006/95/EC MegaPIT™ User Manual Figure C-1 Document 800-00222 Rev E 06/10 MegaPIT Housing Dimensions 53 Specifications and Dimensions 54 Honeywell Systems Group (Head Office) 2700 Blankenbaker Pkwy, Suite 150 Louisville, KY 40299, USA www.honeywellvideo.com +1.800.796.2288 Honeywell Systems Group Northern Europe Ampèrestraat 41 1446 TR Purmerend, The Netherlands www.honeywell.com/security/nl +31.299.410.200 Honeywell Systems Group Europe/South Africa Aston Fields Road, Whitehouse Industrial Estate Runcorn, Cheshire, WA7 3DL, UK www.honeywell.com/security/uk +44.01928.754028 Honeywell Systems Group Deutschland Johannes-Mauthe-Straße 14 D-72458 Albstadt, Germany www.honeywell.com/security/de +49.74 31.8 01.0 Honeywell Systems Group Caribbean/Latin America 9315 NW 112th Ave. Miami, FL 33178, USA www.honeywellvideo.com +1.305.805.8188 Honeywell Systems Group Pacific Level 3, 2 Richardson Place North Ryde, NSW 2113, Australia www.honeywellsecurity.com.au +61.2.9353.7000 Honeywell Systems Group Asia 35F Tower A, City Center, 100 Zun Yi Road Shanghai 200051, China www.asia.security.honeywell.com +86 21.5257.4568 Honeywell Systems Group Middle East/N. Africa Post Office Box 18530 LOB Building 08, Office 199 Jebel Ali, Dubai, United Arab Emirates www.honeywell.com/security/me +971.04.881.5506 Honeywell Systems Group France Immeuble Lavoisier Parc de Haute Technologie 3-7 rue Georges Besse 92160 Antony, France www.honeywell.com/security/fr +33.(0).1.40.96.20.50 Honeywell Systems Group Italia SpA Via della Resistenza 53/59 20090 Buccinasco Milan, Italy www.honeywell.com/security/it +39.02.4888.051 Honeywell Systems Group España Avenida de Italia, n° 7 P.I. - C.T.C. Coslada 28820 Coslada, Madrid, Spain www.honeywell.com/security/es +34.902.667.800 www.honeywellvideo.com +1.800.796.CCTV (North America only) [email protected] Document 800-00222 – Rev E – 06/10 © 2010 Honeywell International Inc. All rights reserved. No part of this publication may be reproduced by any means without written permission from Honeywell. The information in this publication is believed to be accurate in all respects. However, Honeywell cannot assume responsibility for any consequences resulting from the use thereof. The information contained herein is subject to change without notice. Revisions or new editions to this publication may be issued to incorporate such changes.