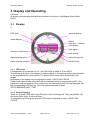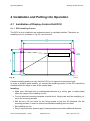
1
Operating Manual Bearing System RT 300 Operating Manual Bearing System RT-300 2-Band Precision Bearing System Issue: 2013/03/04 [Rev 1.03.a] Page 1 of 72 12-9-1-0013-3-1-61 Operating Manual Bearing System RT 300 Edited by: RHOTHETA Elektronik GmbH Dr.-Ingeborg-Haeckel-Str. 2 D-82418 Murnau Germany Email: [email protected] Homepage: www.rhotheta.de Copyrights © RHOTHETA Elektronik GmbH All rights reserved Document Number: 12-9-1-0013-3-1-61 Issue: 20013/03/04 [Rev 1.03.a] HINT The manufacturer reserves on making modifications at any time and without previous information of the here described product. Issue: 2013/03/04 [Rev 1.03.a] Page 2 of 72 12-9-1-0013-3-1-61 Operating Manual Bearing System RT 300 Table of Content 1 GENERAL INFORMATION 1.1 7 Purpose of Use 7 1.1.1 Mobile Use 7 1.1.2 Stationary Use 7 1.2 Content of Delivery 7 1.3 Front View DCU (Display Control Unit) 8 1.4 Brief Summary DCU 8 1.5 Rear View DCU 10 2 TECHNICAL DATA 11 2.1 Electrical Characteristics 11 2.2 Mechanical Characteristics 13 2.2.1 DCU 13 2.2.2 Antenna 14 3 DISPLAY AND OPERATING 3.1 15 Display 15 3.1.1 LED-circle 15 3.1.2 General lighting 15 3.1.3 LC -Graphic-Display 16 3.1.4 Digital Bearing-value Display 16 3.1.5 Direction of reference 16 3.1.6 Display of Signal Level 17 3.1.7 Squelch-level 17 3.1.8 Frequency / Channel display 17 3.1.9 3.1.9.1 Status display „ERROR“ Message 17 18 3.1.10 SCAN-display 18 3.1.11 ”Selective Squelch” (only ELT) 18 3.1.12 Status Alarm Contact 19 Issue: 2013/03/04 [Rev 1.03.a] Page 3 of 72 12-9-1-0013-3-1-61 Operating Manual 3.2 Bearing System RT 300 Operating the Bearing System RT 300 19 3.2.1 3.2.1.1 3.2.1.2 3.2.1.3 Switching On and Off, Key 1: On/Off Switching On: Switching Off: External Switching On/Off 19 19 19 19 3.2.2 Switching the Band, Key 16 <Band> 19 3.2.3 Selection of Frequency / Channel, Key 15 <Channel / Frequ.> 20 3.2.4 3.2.4.1 3.2.4.2 Squelch Function, Key 14 <Squelch> Common Remark Adjusting the Squelch 20 20 21 3.2.5 Volume Key 5 <Vol.+> and 10 <Vol –> 21 3.2.6 3.2.6.1 3.2.6.2 „Selective Squelch“, Key 4 <ELT only> Common Remark Activating / Deactivating „Selective Squelch“ 22 22 22 3.2.7 3.2.7.1 3.2.7.2 Scan function Key 12 <Scan> Common Remarks Scanfunktion Activating / Deactivating Scanning Function 23 23 23 3.2.8 Function Repeat Key 3 <Repeat> 23 3.2.9 Funktion Live Key 8 <Live> 24 3.2.10 Function Clear Key 9 <Clr> 24 3.3 3.3.1 The Menu 25 The Menu Structure 26 3.3.2 The Main Menu 3.3.2.1 Menu LIGHT/LCD 3.3.2.1.1 Adjusting brightness of LC- display: Function DIM LCD 3.3.2.1.2 Adjusting Brightness of Kkeyboard lighting: Function DIM LEGEND 3.3.2.1.3 Adjusting brightness of LED-circle: Function DIM CIRCLE 3.3.2.1.4 Adjusting contrast of the LC-display: Function LCD CONTRAST 3.3.2.2 Menu: BEARING 3.3.2.2.1 Selecting bearing reference direction: Selecting Function BEARING TYPE 30 3.3.2.2.2 Display Bearing Parameters: VIEW BEARING SETUP 3.3.2.3 Menu: INFO 3.3.2.3.1 INFO Beacon 3.3.2.3.2 INFO Receiver 3.3.2.3.3 INFO DCU (Display Control Unit) 3.3.2.3.4 INFO Statistics 3.3.2.4 Menu: SOUNDS Issue: 2013/03/04 [Rev 1.03.a] Page 4 of 72 12-9-1-0013-3-1-61 27 28 28 29 29 29 30 33 33 33 34 34 34 35 Operating Manual 3.3.2.4.1 3.3.2.4.2 3.3.2.5 3.3.2.5.1 3.3.2.5.2 3.3.2.5.3 3.3.2.5.4 3.3.2.5.5 3.3.2.5.6 3.3.2.6 3.3.2.6.1 3.3.2.6.2 3.3.2.6.3 3.3.2.6.4 3.3.2.6.5 3.4 Bearing System RT 300 Adjusting Key Volume: Function BEEP VOLUME Adjusting Volume Alarm Signal: Function ALARM VOLUME Menu SETUP SETUP Menu BEARING SETUP Menu RECEIVER SETUP Menu: SERIAL SETUP Menu: COMPASS SETUP Menu: OTHER SETUP Menu: FACTORY RESET MENU: SERVICE Service menu: BEARING Service menu: RECEIVER Service Menu: DCU Service Menu: COMPASS Service menu: REBOOT Special Functions 35 35 35 36 41 43 46 52 54 55 56 56 57 57 58 58 3.4.1 Locking / Unlocking the Setup Menu 58 3.4.2 Resetting Brightness and Contrast Adjustment of Display 58 3.4.3 Loading Firmware Updates 58 3.5 Interfaces 59 3.5.1 Antenna connector on DCU: 59 3.5.2 3.5.2.1 3.5.2.2 3.5.2.3 3.5.2.4 3.5.2.5 Power Connector Power supply External speaker Alarm contact Extern Input Analog Test 59 60 60 60 60 61 3.5.3 3.5.3.1 3.5.3.2 3.5.3.3 Interface Connector RS-232-Interface RS-485-Interface NMEA (RS-422) Interface 61 62 62 62 4 INSTALLATION AND PUTTING INTO OPERATION 4.1 Installation of Display-Control-Unit DCU 63 63 4.1.1 DCU Installing Cut-out 63 4.1.2 Connecting power supply 64 4.1.3 Connecting the DCU to Ground 64 4.1.4 Connecting Antenna 64 Issue: 2013/03/04 [Rev 1.03.a] Page 5 of 72 12-9-1-0013-3-1-61 Operating Manual Bearing System RT 300 4.2 Determination of Antenna Position 64 4.3 Completing Antenna Cable 66 4.3.1 Type of cable 66 4.3.2 Connecting Pattern of Antenna Cable: 66 4.4 Installing the Antenna 67 4.4.1 Fixing Screw Joint on Mast Tube 68 4.4.2 6-holed Mast Flange 68 4.4.3 Installing Antenna Cable with Pull-relief 68 4.4.4 Fixing the antenna 68 4.4.5 Aligning Antenna for Mobile Use 68 4.4.6 Aligning Antennafor Stationary Use 69 4.4.7 Mounting of Antenna Beams 70 4.5 Configuring Setup 70 5 APPENDIX 5.1 72 Wiring pattern (Recommended RT 300 DCU Connections Plan) Issue: 2013/03/04 [Rev 1.03.a] Page 6 of 72 12-9-1-0013-3-1-61 72 Operating Manual Bearing System RT 300 1 General Information 1.1 Purpose of Use 1.1.1 Mobile Use The RT-300 Bearing System allows bearing of radio signals (radio telephony) in the maritime band as well as bearing of signals on the international VHF distress frequency (121,500 MHz). For training purposes a whole frequency range of the airband (118,800 ... 124,000 MHz) is tunable. Integrating a communication bearing system for coastal and maritime radio stations and a professional SAR-bearing system, the RT 300 Bearing System allows quick bearing and detecting of EPIRB equipped persons or vessels. Especially designed for use under rough circumstances on sea vessels the system is extremely compact. The antenna and the display control unit are waterproof. The most sensitive receiving system allows bearing of weakest signals. Caution: The bearing system RT 300 is not approved for primary navigation purposes. 1.1.2 Stationary Use As a traffic bearing system the RT 300 has a wide range of use, e.g. surveillance of coastal shipping traffic as well as alerting rescue crews in case of accident. 1.2 Content of Delivery 1 1 1 1 1 8 1 1 4 4 4 1 1 1 Operating Manual Display Control Unit DCU Antenna head Mast fastener Reduction mast flange 50 to 40 mm Antenna beams Antenna cable Spare fuse (1A inert) Fixing bolts M4x30 DIN 912 Washers M4 Nuts M4 Power supply cable including fuse holder Test protocol Mounting sketch for DCU installing cut-out Issue: 2013/03/04 [Rev 1.03.a] Page 7 of 72 12-9-1-0013-3-1-61 Operating Manual Bearing System RT 300 1.3 Front View DCU (Display Control Unit) 1 2 3 4 5 6 7 16 8 9 15 14 13 12 11 10 Fig. 1: Front view 1.4 Brief Summary DCU Pos. Designation 01 Function see chapter Switching on and off the bearing system 3.2.1 indicates RB (RB = relative bearing). resolution 10° Repeat: bearing mode, indicates last bearing value during signal pauses : - in menu-mode: moves selecting field to the left - in adjusting mode: sets value to minimum - in frequency / channel selecting mode: moves decimal to the left Bearing-mode: activating of „selective squelch“. (bearing and alerting functions will only be working if ELT modulation is recognized). Function only available in airband. Vol. + : in bearing mode: increases audio-volume : - In menu-mode moves selecting field upwards - in adjusting-mode:increases value for one step 3.1.1 3.2.8 Key: 02 03 LED-circle Key: 04 Key: 05 Key: 06 3.2.6 3.2.5 confirms input or selection Key: Issue: 2013/03/04 [Rev 1.03.a] Page 8 of 72 12-9-1-0013-3-1-61 Operating Manual Pos. Designation 07 Bearing System RT 300 Function see chapter call-up menu or leaving menu Fehler! Verweisquelle konnte nicht gefunden werden. 3.2.9 Key: 08 Key: 09 Key: 10 Key: 11 12 13 Speaker Key: LC-Display 14 Live : in bearing-mode: displaying unaveraged bearing values, if key is pressed, : - in menu-mode: moves selecting field upwards. - in selecting-mode: increases value to maximum - in frequency-/ channel-selecting-mode: moves decimal to the right Clr : in bearing-mode: cancelling bearing 3.2.10 average store Esc : in selecting-mode:jumps to next higher level in adjusting-mode: ignores last not confirmed input and jumps to next higher level Vol. - : in bearing –mode: decreases audio volume 3.2.5 : in menu-mode: moves selecting field downwards : in adjusting-mode: decreases value for one step internal speaker output in bearing-mode: activating and de-activating of 3.2.7 scan-function (confirming with <OK>). Depending of operating mode display of following information: bearing mode: - bearing value - reference direction - signal strength - squelch threshold - active frequency / channel - status report - time since last bearing - scan function “selective squelch“ (ELT only) selecting-mode: - Menu (Menu) - menu level adjusting-mode: - adjusting range / menu - limit values - active buttons activates squelch adjusting mode 3.1.3 activates mode for channel selection (maritime radio band or frequency selection (air band) 3.2.3 change-over between maritime radio band and air band 3.2.2 3.1.7 Key: 15 Key: 16 Key: Issue: 2013/03/04 [Rev 1.03.a] Page 9 of 72 12-9-1-0013-3-1-61 Operating Manual Bearing System RT 300 1.5 Rear View DCU Fig. 2 Pos. Designation Type plate Antenna connector Ground (Gnd) Interface connector Power supply connector Ventilation Issue: 2013/03/04 [Rev 1.03.a] Page 10 of 72 12-9-1-0013-3-1-61 Operating Manual Bearing System RT 300 2 Technical Data 2.1 Electrical Characteristics Designation Bearing principle Value Doppler Direction of bearing reference, digital display - relative - QDM - QUJ relative Direction of bearing reference LED-circle bearing error < 5° In undisturbed wave field, sufficient fieldstrength assumed, signal without modulation. Resolution Digital display LED-circle LC-graphic-display 1° 10° 98x32 dots Sensitivity Airband: Frequency range Maritime radio band Airband Channel pattern Bearable types of modulation Polarisation Polarisation error Garbling cone time of response 156,000 … 162,300 MHz 118,800 … 124,000 MHz 25 KHz A3E; F3E, A2X (ELTmodulation) vertical ≤ 5° ca. 30° to the vertical 300 ms Audio-output operating temperature range Issue: 2013/03/04 [Rev 1.03.a] Remarks 3 kHz rotational frequency, delay time compensation - to antenna direction - relative to megnetic Nord - relative to geographic Nord - to antenna direction 200 nV/m* 350 nV/m** Maritime Band: 300 nV/m* 900 nV/m** max. 1,5 W at 4 Ohm. (Uss-max =10V) DCU: -20° ... +60° C AU: -40° ... +60° C Page 11 of 72 brightness and contrast adjustable * at max. variation of bearing value of 20° and after 20 s of averaging time. ** at max. variation of bearing value of 5° and after 3 s of averaging time - signal of transmitter without modulation Channel 1(ship) – 88 (coast) bearing largly independent of type of modulation at 60° rotation of field vector depending on field strength of signal. at low temperatures running in time up to 5 minutes 12-9-1-0013-3-1-61 Operating Manual Designation Range of operating voltage Current consumption Bearing System RT 300 Value 12 … 28 Volt DC at 12V DC voltage supply: 350 mA (4,8 W) 400 mA (5,4 W) 450 mA (5,4 W) 600 mA (7,2 W) 800 mA (9,6 W) at 24V voltage supply: 250 mA (7,0 W) 300 mA (8,4 W) 350 mA (9,8 W) 400 mA (11,2 W) 600 mA (16,8 W) Issue: 2013/03/04 [Rev 1.03.a] Page 12 of 72 Remarks - standby typ. without ext. speaker max. without ext. speaker typ. with ext. speaker max. with ext. speaker - standby - typ. without ohne ext. speaker - max. without ext. speaker - typ. with ext. speaker - max. with ext. speaker 12-9-1-0013-3-1-61 Operating Manual Bearing System RT 300 2.2 Mechanical Characteristics 2.2.1 DCU 220 210 24.8 192 19.8 58.85 5.5 105 16 17.86 80 113 M5 26 D-Sub connector female D-Sub connector male 30.44 ø4.5 R5 rubber sealing 45°x1 R8 192 Fig. 3 Weight: ca. 700 g Dimensions: see Fig. 3 Protection of housing: IP 67 Issue: 2013/03/04 [Rev 1.03.a] Page 13 of 72 12-9-1-0013-3-1-61 Operating Manual Bearing System RT 300 2.2.2 Antenna Weight: ca. 1300 g Dimensions: see Fig. 4 Protection of housing: IP 671 Antenna beams: 8 pcs. (4 dipoles) The mast flange can be changed by loosening the 6 domed nuts . Caution: Warranty is expiring if opening the antenna. The bearing antenna is available with 2 different antenna flanges: 1. Threaded flange (see Fig. 6) 2. 6-hole flange (see Fig. 5) Fig. 4 75 60 38 12 19 33 60 ø6.4 ø40 ø42 ø50 G2 1/4´´ ø75 Fig. 5 1 Fig. 6 sealed housing flange (e.g. if using pull-relief ) Issue: 2013/03/04 [Rev 1.03.a] Page 14 of 72 12-9-1-0013-3-1-61 Operating Manual Bearing System RT 300 3 Display and Operating Common: All display and operating elements are situated on the front of the Display-Control-Unit (DCU). 3.1 Display x LED circle general lighting status display display frequency - channel scan display level digital direction of reference level analog digital bearing value "selective squelch“ status of alarm-contact squelch-level Fig. 7: Display 3.1.1 LED-circle Corresponding to a resolution of 10°, the LED-circle is made of 36 red LED`s. The reference direction of he display is always relative to the bearing antenna and therefore to the longitudinal axle of the vessel. The preset offset-value will be considered in the display. Brightness of the display may be adjusted in menu: LIGHT\ DIM CIRCLE. Receiving a signal, the bearing value will be displayed with the corresponding LED. If the signal isn`t received anymore for a certain time, the last bearing value will be displayed with the corresponding LED flashing. This time may be adjusted in menu: SETUP\BEARING\LAST_TIME. 3.1.2 General lighting There are 4 green LEDs within the LED-circle as an orientating aid. They are placed in the directions North, East, South and West. The brightness of these green and red LEDs may be adjusted in menu: LIGHT\ DIM CIRCLE. Issue: 2013/03/04 [Rev 1.03.a] Page 15 of 72 12-9-1-0013-3-1-61 Operating Manual Bearing System RT 300 3.1.3 LC -Graphic-Display The centered LC-Display is showing all relevant bearing data, adjustments and status reports. Background brightness may be adjusted in menu: LIGHT\DIM LCD BACKL, contrast in menu: LIGHT\LCD CONTRAST. When adjusting, the range of adjustment will be displayed as well as the active keys and their function. In menu-mode all selecting fields and adjustments are displayed. In bearing-mode the graphic display is divided into following fields: 3.1.4 Digital Bearing-value Display Receiving a bearable signal, the Indicating 28 secs bearing value will appear in the since last bearing display`s lower left area with a resolution of 1°. If there is no more signal available, the display will start flashing for a certain time, alternately showing in the display „LAST“ (adjustable in menu: SETUP\ BEARING\ LAST_TIME). After that the information, „last bearing“ will be shown for 10 min., indicating the duration since the last bearing. After 10 min without signal three dashes are displayed. Fig. 8 Fig. 9 3.1.5 Direction of reference The selected direction of referencce is displayed left of the digital bearing value. Following directions of reference may be selected: Fig. 10 Display REL MAG Direction of reference relative magnetic Nord TRU true (geographic) North Remarks bearing relative to longitudinal axis of antenna (North – South) bearing relative to magnetic North optional internal compass module required or compass information via NMEA interface required, input of variation(see 3.3.2.5.4.5.3) bearing relative to geographic North optional internal compass module required or compass information via NMEA interface required, input of variation(see 3.3.2.5.4.5.3) Issue: 2013/03/04 [Rev 1.03.a] Page 16 of 72 12-9-1-0013-3-1-61 Operating Manual Bearing System RT 300 3.1.6 Display of Signal Level The present signal level is displayed as figures as well as a analog bar graph. The display is not calibrated and is serving as a qualitative measure. Fig. 11 3.1.7 Squelch-level The small triangle on top of the bar graph (see Fig. 11) is the selected squelch level. Is the bar graph of the level-display left of the triangle, receiving is switched off. 3.1.8 Frequency / Channel display The upper right area of the display is showing the present working frequency or the present selcted channel in the maritime band. A duplex channel selected, additional information is given: “SHIP” for a maritime radio station (lower band) or „COAST“ (upper band) for the coastal radio station. The working frequency in the maritime band will be displayed, if Fig. 12 option “CHANNEL MODE OFF” in menu SETUP\RECEIVER\CHANNEL is selected. 3.1.9 Status display The upper left area of the display is showing status information. The bearing system is verifying continouosly different parameters and signals. If everything is working correctly, the information “OK” will be displayed. If one or more parameters are leaving the permitted range of values, a warning message or error message is displayed.. Fig. 13 A warning message is displayed, if working parameters are nearing significantly close to the permitted limit value, or, if external bearing signals are not available anymore. The system´s basic functions are not affected yet, but preventive measures are recommended. A warning is displayed in the status field with the letter „W“ followed by an error indicating figure. After that a short characterization of the warning is displayed. At warnings, indicating the lack of a required signal, the warning message is displayed additionally as a text instead of the digital bearing value. Following warning messages may be displayed: Warning Short designation W1 U-DISP W2 U-REC W3 NO HEAD W4 NO COMP Issue: 2013/03/04 [Rev 1.03.a] Meaning Voltage supply too low Antenna voltage too low No heading data available No compensation of drag error, selected data source not available or faulty data Page 17 of 72 12-9-1-0013-3-1-61 Operating Manual Bearing System RT 300 3.1.9.1 „ERROR“ Message An error message is indicated, if one ore more operating parameters have left the permitted range, or, if the internal electronics have detected a malfunction. In this case the bearing system is out of order. Following errors may be detected by the internal electronics: Error E1 Display message Meaning Operating voltage in display too low E2 Operating voltage in antenna unit too low E3 - no antenna connected - malfunctioning connection AU -DCU - defective antenna E4 E5 E6 BAD ANT BAD DCU PLL-LO E7 E8 E9 PLL-SY -- E10 Faulty data from antenna to DCU Faulty data from DCU to antenna frequency adjustment in receiver module not working synthesizer of receiver not working Not in use now frequency of received signal above permitted range. frequency of received signal under permitted range. 3.1.10 SCAN-display As soon as the scanning mode is activated, on the right hand side of the frequency display the display „SCAN“ will appear (see Fig. 7 “scan display”). In the scanning mode, the receiver will be switched to the distress frequency 121.500 MHz every 40 secs for a duration of 10 secs, in order to receive transmitted distress signals. During this time the message SCAN is displayed inverted, the frequency display is showing 121.500 MHz. 3.1.11 ”Selective Squelch” (only ELT) The activated function “Selective Squelch” (only ELT) is indicated as „O-ELT“ beneath the frequency display. (see also 3.2.6). If this function is activated, only transmitters in the airband sending the normed ELT-sweep-tone will be received. Issue: 2013/03/04 [Rev 1.03.a] Page 18 of 72 12-9-1-0013-3-1-61 Operating Manual Bearing System RT 300 3.1.12 Status Alarm Contact If the function „ELT-PULS (MOB)“ in the menu: SETUP\OTHER\RELAY-MODE is selected, the anchor symbol is indicating the recognized alarm and that the relay has made contact one time. In order to release this function again, the bearing system has to be switched off and on again. (see 3.3.2.5.5.1) 3.2 Operating the Bearing System RT 300 The bearing system can be controlled by using the 13 keys on the front of the DCU. Functions needed for normal bearing operation can be called up directly by function keys. Functions rarely to be changed or functions to be adjusted once during installation are selected in the menu structure. 3.2.1 Switching On and Off, Key 1: On/Off Using key 1 <On/Off> (see Fig. 1: ), you can switch on and off the device. 3.2.1.1 Switching On: Pressing key 1 <On/Off> for at least 1 sec is activating the device. For ca. 1,5 secs the display as shown in Fig. 14 will appear . Now the system is ready to work. Depending on previous menu adjustments the manufacturer´s defaults or the last selected adjustments (setups) will be active. Fig. 14 3.2.1.2 Switching Off: Pressing key 1 <On/Off> is closing the system. This procedure will last 3 secs.. The LCdisplay will show “shutting down”. 3.2.1.3 External Switching On/Off Separating the system from the power supply will close down the system automatically, saving all adjustments automatically. The operating voltage applied again, the system is returning to the last stage before shutting down. If the system was switched on before separating from the operating voltage, it will be switched on after applying the operating voltage. If it was switched off, it will remain switched off. 3.2.2 Switching the Band, Key 16 <Band> The bearing system is able to receive and to bear frequencies in two different bands. So, the standard version is covering the whole maritime band (156.000 ... 162.300 MHz) as well as a certain frequency range in the air band (118.800 ...121.500 ... 124.000 MHz) where the international distress frequency is located. - Pressing key 16 <Band>, the menu for selecting the frequency band will appear in the LC-display (see Fig. 15 and Fig. 16). Fig. 15 Issue: 2013/03/04 [Rev 1.03.a] Page 19 of 72 12-9-1-0013-3-1-61 Operating Manual Bearing System RT 300 - Use keys 5 <+>, 10< ->, 3 <> or 8 <> to select one of the two bands. - The inverted band is selected. - Use key 6 <Ok> to confirm the selection. The device is returning into bearing mode. - Is the selection to be rejected, use key 9 <Esc>. The Fig. 16 device is returning into bearing mode, keeping the previous adjustment. - If the confirmation isn´t executed within 16 secs, the device is returning automatically into the bearing mode, keeping the previous adjustment. - In the third line the available frequency range is indicated. - In the fourth line the active function keys are shown. 3.2.3 Selection of Frequency / Channel, Key 15 <Channel / Frequ.> Selecting the operational frequency in the airband is usually done by direct input, with an incremental width of 25 kHz. In the maritime band each frequency has an assigned channel number. Selecting the frequency in the maritime band is usually done by putting in the desired channel number. However, the direct frequency input in the maritime band can be done as shown in menu: 3.3.2.5.2. Fig. 17 Airband: - After pressing key 15 <Channel / Frequ.> the „Set Frequency“- window will appear on the display (see Fig. 17). Fig. 18 - Keys 3 <> and 8< > are selecting the decimal, the location is underlined. - keys 5 <+> and 10 <–> are increasing resp. decreasing the corresponding value. Inputs will be accepted only in the admitted frequency range. Maritime Band: - After pressing key 15 <Channel / Frequ.> the „Set Channel“- window will appear on the display (see Fig. 18) - keys 5 <+> and 10 <–> are selecting the channel - Key 6 <Ok> confirms theselected frequency / channel. The device is returning into the bearing mode using the selected frequency / channel. - Key 9 <Esc> will reject the selection, and the device is returning into the bearing mode, working on the previous frequency / channel. 3.2.4 Squelch Function, Key 14 <Squelch> 3.2.4.1 Common Remark Our surrounding atmosphere always contains a certain electric field strength, designated as “noise”. This noise voltage, which can be received, depends on the frequency and the location of the receiver. Interpreting signals reasonably is only possible, if their level is higher than the level of the surrounding noise. Using the squelch electronic it is possible to adjust a threshold, under Issue: 2013/03/04 [Rev 1.03.a] Page 20 of 72 12-9-1-0013-3-1-61 Operating Manual Bearing System RT 300 which received signals will not be processed. Usually the sqelch threshold is adjusted as close as possible above the noise level. In that case the bearing system will work only, if a signal is received. As long as no signal is received, the speaker is remaining mute. Important: The squelch level is to be kept as low as possible in order not to suppress weak signals. 3.2.4.2 Adjusting the Squelch Pointer squelch level The squelch level is to be adjusted, receiving level when receiving no signal. bar graph - pressing key 14 <Squelch> , the digital level display „Adjust Squelch“ -window will digital value of squelch appear. level - Key 8 <> is starting the Fig. 19 automatic squelch setting procedure. For a duration of about 3secs the signal level is measured, and then the squelch level will be set ca. 3 % above the peak value of the measuring period. After that the „Adjust Squelch“- window will reappear. - Using keys 5 <+> resp. 10< -> the squelch level can be adjusted manually. - The pointer on the top of the graphic display and the digital display are indicating the present level of the squelch threshold. - Pressing key 3 <> disables the squelch function (level will be set to 0%). - Key 6 <Ok> confirms the input and the device will return into the bearing mode. - Key 9 <Esc> will reject the selection and the device will return into the bearing mode. - If no confirmation, using key 6 <OK> is done within 25 secs after the last input, the device will return into the bearing mode with the previous adjustment. The squelch level for the airband and for the maritime band are adjusted and saved separately. On different frequencies within the range of one band the noise level may be varying significantly. Coastal areas with industries may show higher noise levels than in offshore areas. This makes it important, to periodically check the squelch adjustment, and, if required, to readjust the squelch level in order to acquire highest sensitivity of the bearing system. Remark: While bearing emergency transmitters, which are transmitting often very weak signals, it may be useful to deactivate the squelch function in order to obtain highest sensitivity of the bearing system. In this case it is important to check continouosly if the transmitter is beared and not an interfering signal. This can by verified by changing the heading, causing a change of the relative bearing value. If required, actuate the "Clear"-function (see 3.2.10) 3.2.5 Volume Key 5 <Vol.+> and 10 <Vol –> Pressing key 5 <Vol +> resp. key 10 <Vol -> in the bearing mode, the window „Adjust Volume“ appears. - Further actuating of key 5 increases continuously - the volume, key 10 decreases the volume. Bar graph and digital display are indicating the selected percentage (see Abb. 20) of the maximal volume. Issue: 2013/03/04 [Rev 1.03.a] Page 21 of 72 Abb. 20 12-9-1-0013-3-1-61 Operating Manual Bearing System RT 300 Speaker signal and external audio output are affected equally (see 3.5.2.2). 3.2.6 „Selective Squelch“, Key 4 <ELT only> 3.2.6.1 Common Remark The international distress frequency is reserved exclusively for emergency transmissions. That means, transmissions are to be sent only in case of emergency or in order to prevent an emergency. Airliners, aircrafts or vessels as well as coastal radio stations are kept monitoring these frequencies in order to intercept distress calls. Unfortunately the distress frequencies are misused for entertainment, from our experience about 4 to 8 times a day. In order to prevent false alarms, the bearing system RT 300 has an integrated function called “selective squelch”. If activated, all signals not transmitting the specified sweep tone for emergency transmitters, will be suppressed. Depending on the field strength of the signal, the electronic device takes several seconds to analyse the signal. If an emergency transmission is recognized (e.g. Emergency Locator Transmitter) alarm will be started. This function can only be activated for frequencies in the airband. 3.2.6.2 Activating / Deactivating „Selective Squelch“ Key 4 <ELT only> is opening a window as shown in Fig. 21. If confirming with key 6 <OK> within 5 secs, the “selective squelch” is activated, the device returning in bearing mode. If not confirming within that time, the selected status will remain.The display is showing the selected function „OELT“(see Fig. 7: ). O-ELT means: Only Emergency Locator Transmitter. Deactivation correspondingly (Fig. 23). Fig. 21 Caution: Fig. 22 - The “selective squelch” activated, only signals in the airband with the typical ELT-sweep tone modulation will be beared. All other signals will be suppressed. The “selective squelch” can only be activated in the airband. - At very weak signals detection may take a certain time or even be impossible. In this case alarming is delayed or not possible. - Issue: 2013/03/04 [Rev 1.03.a] Page 22 of 72 12-9-1-0013-3-1-61 Operating Manual Bearing System RT 300 3.2.7 Scan function Key 12 <Scan> 3.2.7.1 Common Remarks The bearing system RT 300 is eqipped with only one receiver. If working in the maritime band, signals in the airband cannot be recognized and vice versa. So, a certain risk exists not to receive a distress signal and not to start alarming. In order to prevent this case the scanning function SCAN was installed. The SCAN-function activated, every 30 secs the device is switching over from the working frequency to the distress frequency 121.500 MHz, but only during a gap of reception. Is a signal received on 121.500 MHz, the device will remain tuned on the distress frequency. The alarm contact will be actuated (see 3.3.2.5.5.1). While scanning, the message SCAN in the display is shown inverted, and in the frequency display 121.500 MHz will be indicated. If no signal is received, the device switches back to the previous working frequency. The function SCAN can be combined with function “selective squelch”. 3.2.7.2 Scanfunktion Activating / Deactivating Scanning Function Pressing key 12 <Scan>, the scanning window in the display is openendas shown in Fig. 23 Confirming within 5 secs with key 6 <OK> activates the scanning function. If not confirming within that time, the selected status will remain. The display „SCAN“ will apear in the LC- display. (see Fig. 7: ). Deactivation correspondingly. (See Fig. 24) Fig. 23 Caution: - We strongly recommend always to activate the scanning function in order to minimize the risk of missing an alarm signal. Fig. 24 - During the scanning process bearing isn´t possible on the operating frequency. If a continuous signal is beared on the operating frequency, there is no scanning on the distress frequency possible (only possible in signal gaps). 3.2.8 Function Repeat Key 3 <Repeat> If no more bearable signal is received, the last bearing value will still be indicated for 10 secs, then the display of the bearing value will disappear e (see 3.1.4). By actuating key 3 <Repeat> the last bearing value will be shown once more. Caution: If there is no compass compensation activated (see 3.3.2.5.4), the indicated bearing value is corresponding with the vessel´s heading at the time of the last bearing. If there was a change of heading in the meantime, this change has to be taken in consideration! Issue: 2013/03/04 [Rev 1.03.a] Page 23 of 72 12-9-1-0013-3-1-61 Operating Manual Bearing System RT 300 3.2.9 Funktion Live Key 8 <Live> The bearing system is processing 750 single bearing procedures per second. These single bearings may be varying in a significant range, depending on signal strength and modulation.. The processing computer is averaging spread of the bearing values over a certain time by the unaveraged signal means of a special processing algorithm (see 3.3.2.5.1.1), thus achieving a fairly stabilized display. Pressing key 8 <Live> during the bearing mode, the LED circle will indicate the unaveraged single bearing values. The range of variation of the display allows to analyze the received signal and is a measure of the bearing quality. Abb. 25 3.2.10 Function Clear Key 9 <Clr> Actuating key 9 <Clr> during the bearing mode, the averaging memory will be canceled. After releasing the key the averaging process is starting again. This function is to be applied in order to minimize the drag error, if receiving very weak signals. Issue: 2013/03/04 [Rev 1.03.a] Page 24 of 72 12-9-1-0013-3-1-61 Operating Manual Bearing System RT 300 3.3 The Menu Adjustments and also system configurations, which haven´t to be changed during bearing operations, are to be selected and adjusted in the menu. Furthermore information as serial numbers or program versions are available. Caution! Wrong adjustments may affect the bearing system`s functions seriously. Alarm functions with a wrong adjustment may not work as desired or may deliver faulty values. So, it is important before starting to adjust, to know what to do. Therefore, please read this operating manual carefully in advance. In case of arising questions, please contact our service. We will support you gladly. - Key 7 <Menu> calls up the main menu on the LC-diplay. - Using keys 3< >, 5< >, 8< >, und 10< > navigate in the corresponding submenu. The selected menu subjects are shown inverted (highlighted). - Key 6 <OK>will confirm the selection. - Pressing key 9 <Esc> will reject the new selection and the device will return to the next higher menu level, or, in the main menu, the device will leave the menu function.. - If the menu is called up and key 7<Menu> is pressed, the device will return to the bearing mode. Changed adjustments will be rejected. For better orientation the LC-display´s top line is showing the present position in the menu. Issue: 2013/03/04 [Rev 1.03.a] Page 25 of 72 12-9-1-0013-3-1-61 Operating Manual Bearing System RT 300 3.3.1 The Menu Structure 1. Level Light Bearing Info Sounds 2. Level DIM LCD DIM LEGEND DIM CIRCLE LCD CONTRAST Bearing Type View Bearing Setup Beacon Receiver DCU Statistics Beep Volume Alarm Volume Bearing Receiver Menu Serial Setup Compass 3. Level 4. Level Average Compensation Mounting Offset Last time Last Comp Channel Mode Power On Default AFC Mode RX Type Baud Rate Identity Protocol Talk Mode Talk Time True Source Static True Intern Compass Calibration Deviation Variation Magnetic Source Static Mag. Relay Other Service Relays Mode MOB Pulse Time Ext. Input Demo Mode Factory Reset Bearing Receiver DCU Compass Reboot Menu Selection Selection Adjustment Display Routine Issue: 2013/03/04 [Rev 1.03.a] Page 26 of 72 12-9-1-0013-3-1-61 Operating Manual Bearing System RT 300 3.3.2 The Main Menu Abb. 26 Ok Ok Ok cancel Ok Ok Ok Pressing key 7 <Menu> in the bearing mode will call up the main menu. Following submenus may be selected: a) LIGHT/LCD : Adjustments of the LC-display´s lighting, keyboard, LED-circle and the display´s contrast. b) BEARING: Selection of reference direction for the digital bearing value Indication of relevant bearing parameters. Issue: 2013/03/04 [Rev 1.03.a] Page 27 of 72 12-9-1-0013-3-1-61 Operating Manual c) INFO: d) SOUNDS: e) SETUP: f) SERVICE: Bearing System RT 300 Indication of received transmitter identification (not available at present) Indication of receiver-parameters Indication of DCU-parameters Indication of operating parameters Adjustment of the keyboard´s volume Adjustment of the alarm signal´s volume Selection of bearing parameters Receiver adjustments Configuration of interface Selection of bearing value compensation with compass Other adjustments Reset of factory defaults Displays and parameters required for service purposes. 3.3.2.1 Menu LIGHT/LCD Menu LIGHT/LCD In submenu MENU\LIGHT\LCD all lighting adjustments for display, keyboard and contrast can be done. Fig. 27 3.3.2.1.1 Adjusting brightness of LC- display: Function DIM LCD Menu LIGHT/LCD DIM LCD In submenu MENU\LIGHT\DIM, select function DIM LCD. The bar graph as shown in Fig. 28 will appear. Keys 5< + > und 10< – > adjust background lighting of the Fig. 28 LC- display. Keys 8< > resp. 3 < > will switch the brightness to maximum or will switch off the lighting. Confirm adjustment using key 6 <OK>. Issue: 2013/03/04 [Rev 1.03.a] Page 28 of 72 12-9-1-0013-3-1-61 Operating Manual Bearing System RT 300 3.3.2.1.2 Adjusting Brightness of Kkeyboard lighting: Function DIM LEGEND Menu LIGHT/LCD DIM LEGEND In submenu MENU\LIGHT\DIM, select function DIM LEGEND. The bar graph as shown in Fig. 29 will appear. Fig. 29 - Adjust brightness of keyboard lighting using keys 5 < + > and 10 < – >. - Keys 8 < > resp. 3 < >, will switch brightness to maximum or shut off. - Confirm selected adjustment using key 6 < OK >. Key 9 < Esc > will reject the adjustment, the device is returning to the next higher menu level. 3.3.2.1.3 Adjusting brightness of LED-circle: Function DIM CIRCLE Menu LIGHT/LCD DIM CIRCLE In submenu MENU\LIGHT\DIM, select function DIM CIRCLE .the bar graph as shown in Fig. 30 will appear. Fig. 30 - Adjust brightness of LED-circle using keys 5 < + > and 10 < – >. - Keys 8 < > resp. 3 < >, will switch brightness to maximum or shut off. - Confirm selected adjustment using key 6 < OK >. - Key 9 < Esc > will reject the adjustment, the device is returning to the next higher menu level. 3.3.2.1.4 Adjusting contrast of the LC-display: Function LCD CONTRAST Menu LIGHT/LCD LCD CONTRAST In submenu MENU\LIGHT/LCD, select function LCD CONTRAST. The bar graph as shown in Fig. 31 will Fig. 31 appear. Adjust contrast of LC-display using keys 5 < + > and 10 < – >. - Keys 8 < > resp. 3 < >, will switch contrast to maximum or minimum. - Confirm selected adjustment using key 6 < OK >. - Key 9 < Esc > will reject the adjustment, the device is returning to the next higher menu level.. Issue: 2013/03/04 [Rev 1.03.a] Page 29 of 72 12-9-1-0013-3-1-61 Operating Manual Bearing System RT 300 Caution! If adjusting the contrast to minimum resp. maximum value, the display may become unreadable! This may complicate readjustment or make it even impossible. In this case please proceed as follows: - Switch off device using key 1 < ON/OFF >. - keep pressed key 7 < Menu > and - switch on device using key 1 < ON / OFF > - release key 7 < Menu > contrast adjustment apears in the default adjustment. If desired, proceed with a new contrast adjustment. 3.3.2.2 Menu: BEARING Menu BEARING Fig. 32 In submenu MENU\BEARING the reference direction of the bearing value display may be selected (see Fig. 7: ). Furthermore, all relevant bearing setups may be observed. 3.3.2.2.1 Selecting bearing reference direction: Selecting Function BEARING TYPE Menu BEARING BEARING TYPE In submenu MENU\BEARING, select function BEARING TYPE. The submenu as shown in Fig. 33 will appear. Fig. 33 Select reference direction by using keys 8 < > resp. 3 < >. The selection is shown inverted. - Confirm selection by using key 6 < OK > . - Key 9 < Esc > will reject the adjustment, the device is returning to the next higher menu level. Issue: 2013/03/04 [Rev 1.03.a] Page 30 of 72 12-9-1-0013-3-1-61 Operating Manual Bearing System RT 300 R E L 0° 24 3.3.2.2.1.1 Reference direction: Relative Bearing - REL The digitally indicated bearing value is N relative to the antenna´s longitudinal axis. If mounted correctly, it is corresponding to the vessel´s (vehicle´s) longitudinal axis. For the determination of the relative bearing Tr an sm no compass information (via NMEA itte r interface or compass module) is required (see. 3.2.8). So, the relative bearing value is available if an external compass is out of order. The digitally shown bearing value is corresponding to the indication of the LED-circle. The reference direction is indicated as Fig. 34: Example Relative Bearing 240° REL (=relative) left of the digital bearing value. relativ bearing240° 3.3.2.2.1.2 Reference Direction: (magnetic) North - MAG If compass data, basing on magnetic north, are available at the interface, and / or the internal compass (optional) is installed, bearing values with reference direction magnetic North may be put out. In example of Fig. 36 bearing relations are shown for the bearing displayof Fig. 35. Reference direction TN MN Fig. 35 VAR 10° W E ST m ag ne t ic b ea ri n g 60 ° sm an Tr er itt M A G 060° ° relative earing 310 b Fig. 36 Issue: 2013/03/04 [Rev 1.03.a] Page 31 of 72 12-9-1-0013-3-1-61 Operating Manual Bearing System RT 300 3.3.2.2.1.3 Reference Direction: Geografic North (true North) - TRUE If compass data, basing on true (geographic) North, are available at the interface, bearing values referring to true North can be put out. Choose in submenu BEARING TYPE selection TRUE (= true North). Now the active reference direction is diplayed as TRU (= true) left of the digital bearing value. If the optional compass module is installed, reference the bearing value can also be put out with direction reference direction geografic North, and the local variation has to be set up in in the setup menu. (see 3.3.2.5.4.5.3). Fig. 37 The example of Fig. 38 is showing relations for the bearing display of Fig. 37. TN tru e be ar in g 60 ° a Tr tt e mi ns r T R U 060 ° rela tive b earing 310° Fig. 38 Issue: 2013/03/04 [Rev 1.03.a] Page 32 of 72 12-9-1-0013-3-1-61 Operating Manual Bearing System RT 300 3.3.2.2.2 Display Bearing Parameters: VIEW BEARING SETUP Menu BEARING VIEW BEARING SETUP In submenu MENU\ BEARING, select display function VIEW BEARING SETUP, see Fig. 39. The important bearing adjustments are shown here. Designation Meaning Fig. 39 Range Averaging Level Depth of averaging store Compensation drag error compensation by compass data Mounting Antenna mounting normal = mast upright inverse = mast downright Offset Offset value to be added to bearing value, e.g. in order to compensate mounting errors. 1 .. 9 ON / OFF normal, inverse 0 – 360° See chapter. 3.3.2.5.1.1 3.3.2.5.1.2 3.3.2.5.1.3 3.3.2.5.1.3 3.3.2.5.1.4 3.3.2.3 Menu: INFO Menu INFO Following information can be put out in the menu INFO: Beacon: Receiver identification Receiver: Receiver data DCU: Data of the Display Control Unit (DCU) Statistics: Operating data of the system Fig. 40 3.3.2.3.1 INFO Beacon Menu INFO BEACON In submenu MENU\ INFO, select display function BEACON. The display appears as shown in Fig. 41. Fig. 41 These functions are not yet available at the present. Issue: 2013/03/04 [Rev 1.03.a] Page 33 of 72 12-9-1-0013-3-1-61 Operating Manual Bearing System RT 300 3.3.2.3.2 INFO Receiver Menu INFO RECEIVER In submenu MENU\ INFO, select display function RECEIVER. The display appears as shown in Fig. 42. Here the important data of the receiver can be seen: Designation DEVICE SERIAL HARDWARE SOFTWARE Fig. 42 Meaning type of receiver serial number of receiver harware version of receiver software version of receiver. 3.3.2.3.3 INFO DCU (Display Control Unit) Menu INFO DCU In submenu MENU\ INFO, select display function DCU. The display appears as shown in Fig. 43. Here the important data of the DCU can be seen: Designation DEVICE SERIAL HARDWARE SOFTWARE Fig. 43 Meaning Type of DCU serial number of DCU hardware version of DCU software version of DCU. 3.3.2.3.4 INFO Statistics Menu INFO STATISTICS In submenu MENU\INFO, select display function STATISTICS. The display appears as shown in Fig. 44. Here the operating parameters can be seen. Designation SWITCHED ON RUNNING TIME EBWJ RESETS Fig. 44 Meaning number of switch-ons operating time number of recognized resets Issue: 2013/03/04 [Rev 1.03.a] Page 34 of 72 12-9-1-0013-3-1-61 Operating Manual Bearing System RT 300 3.3.2.4 Menu: SOUNDS Menu SOUND In submenu MENU\ SOUNDS, the volume of keyboard signals and of the alarm sound may be adjusted. Fig. 45 3.3.2.4.1 Adjusting Key Volume: Function BEEP VOLUME Menu SOUND BEEP VOLUME In this menu the volume of the short audible tone, if pressing a key, can be adjusted. Fig. 46 In submenu SOUND, select function BEEP VOLUME. The bar graph as shown in Fig. 46 will appear. Using keys 5 < + > and 10 < – > the volume of the key signal can be adjusted . Keys 8 < > resp. 3 < >will set the volume to maximum resp. minimum. Key 6 < OK > is confirming the adjustment. 3.3.2.4.2 Adjusting Volume Alarm Signal: Function ALARM VOLUME Menu SOUND ALARM VOLUME If an distress signal is detected, an alarm signal is put out at the speaker and at the audio exit. The volume is adjustable. Abb. 47 In submenu SOUND, select function ALARM VOLUME. The bar graph appears as shown in Abb. 47. Using keys 5 < + > and 10 < – > the volume can be adjusted. Keys 8 < > resp. 3 < >will maximize resp. minimize the volume. Key 6 < OK > will confirm the adjustment. Caution: Too low alarm signals may be not recognized and search and rescue measures may start too late or not at all. 3.3.2.5 Menu SETUP Menu SETUP In submenu MENU\ SETUP all operating setups can be done. Issue: 2013/03/04 [Rev 1.03.a] Page 35 of 72 Fig. 48 12-9-1-0013-3-1-61 Operating Manual Bearing System RT 300 Prior putting into operation the bearing system, all setups have to be checked and, if required, adapted. Warning: Faulty setups may lead to considerable misfunctions, which may not be recognized immediately. Therefore, the setup is to be lead only by instructed persons. In order to avoid unauthorized changes of the setup, the setup menu can be locked. The locking is indicated by the symbol (see Fig. 49). Locking and unlocking see 3.4.1. Fig. 49 The setup menu is structured as follows: Menu Designation BEARING RECEIVER SERIAL COMPASS OTHER Meaning Locked Setup Menu istgesperrt see chapter Setups controlling bearing functions Setups controlling receiver functions Setup of interface parameter Setup of compass data Setup of alarm contact functions Setup external input FACT. RESET Routine to reproduce factory defaults 3.3.2.5.1 3.3.2.5.2 3.3.2.5.3 3.3.2.5.4 3.3.2.5.5 3.3.2.5.6 3.3.2.5.1 SETUP Menu BEARING Menu SETUP BEARING In submenu MENU\ SETUP\ BEARING the setups for the bearing value determination are executed. Abb. 50 Warning: Setup adjustments is this menu are influencing the bearing result. Faulty setups may lead to wrong bearing results, and it may not be possible, to recognize this error imediately. In case of doubt don´t hesitate to contact the service or the service hotline of the firm RHOTHETA. Issue: 2013/03/04 [Rev 1.03.a] Page 36 of 72 12-9-1-0013-3-1-61 Operating Manual Bearing System RT 300 Following setups can be done in the menu BEARING : Menu designation AVERAGE Meaning averaging bearing value COMPENSATION compensation of reference direction MOUNTING mounting direction (up / down) OFFSET bearing value offset LAST TIME Duration of indication of last bearing value LAST COMPENSATION adjustment of the depth of the bearing value memory selection of heading compensation source Input of mounting direction Input of a correcting value (deviation) for bearing value output Adjustment of bearing value indication after last bearing Activation / Deactivation of heading compensation of LED-circle display (repeat function) 3.3.2.5.1.1 Adjusting Bearing Value Averaging Memory: AVERAGING Menu SETUP BEARING AVERAGE Common Remarks: The bearing system processes about 750 bearing values a Fig. 51 second. Depending on the quality of the received signal (field strength, modulation), the single bearing results may be varying significantly. The single bearing values are being averaged with a special algorithm by the DCU´s electronic. The depth of the value memory (number of used single bearing values) may be adjusted in submenu SET AVERAGING LEVEL (see Fig. 51). To be considered: - the greater the averaging level the greater depth of memory. - the greater the averaging level the more stable the display - the greater the averaging level the higher the sensitivity - the greater the averaging level the more drag error (see 3.3.2.5.1.2) So, the adjustment has to be a compromise between a stable display and the drag error. With a high averaging level the sensitivity becomes a bit better (with deactivated squelch), but the display is getting rather inert, thus complicating the normal working with the system. With a low averaging level the display becomes a kind of nervous, especially with modulated, weak signals,. The factory default has the averaging level 5 and is a good compromise. Operating: In submenu SETUP-BEARING, select function AVERAGE. The bar graph as shown in Fig. 51 will appear. Adjust averaging level by using keys 5 < + > and 10 < –>. Issue: 2013/03/04 [Rev 1.03.a] Page 37 of 72 12-9-1-0013-3-1-61 Operating Manual Bearing System RT 300 Keys 8 < > resp. 3 < > will reset the level to maximum or minimum. Key 6 < OK > will confirm the adjustment. 3.3.2.5.1.2 Select source of heading compensation: SET COMPENSATION SOURCE Menu SETUP BEARING COMPENSATION During mobile use on vessels or land vehicles it takes a certain time for the display to respond to a change of heading (or Fig. 52 course). See drag error, see 3.3.2.5.1.1. If compass information is available, the change of heading will be determined and the drag error can be eliminated by the bearing system. The bearing system is corresponding without delay to the changes of heading of the vehicle. In order to activate this function, the delivered (and required) compass data (true, magnetic, internal compass) for compensation have to be selected. It is only mentioned here, that the selected data sources have to be available (see 3.3.2.5.4). Caution: Drag errors will only be compensated, if caused by changes of heading of the own vehicle. If the transmitter is changing it´s position, a drag error will occur again. Following compass data sources may be selected: Designation OFF TRUE MAG INT Meaning no heading compensation The source is an external compass with reference direction geographic (true) North the source is an external compass with reference direction magnetic North the source is the internal compas module (optional) see chapter 3.3.2.5.4.1 3.3.2.5.4.2 3.3.2.5.4.5 3.3.2.5.1.3 Selecting Mounting Direction of Antenna: SELECT MOUNTING TYPE Menu SETUP BEARING MOUNTING Fig. 53 Issue: 2013/03/04 [Rev 1.03.a] Page 38 of 72 12-9-1-0013-3-1-61 Operating Manual Bearing System RT 300 Usually the antenna is mounted on top of a mast (see Fig. 54). In special cases it may be necessary to mount the antenna upside down (see Fig. 55). In submenu MENU\ SETUP\ BEARING\ MOUNTING, the mounting direction may be seleted. NORM is corresponding to the normal topmounting Fig. 54, INVERS coresponding to the upside down mounting as shown in Fig. 55. Fig. 54 normal mounting Fig. 55 upside down mounting 3.3.2.5.1.4 Adjusting Correcting (Offset) Value: ADJUST BEARING OFFSET Menu SETUP BEARING OFFSET If bearing results are differing from the actual angle of arrival for a constant value, a correcting value (offset) can be adjusted, to be added to each bearing result. Deviations are caused e.g. by incorrect alignment of the antenna with the longitudinal axis of the vehicle. Fig. 56 Adjust offset in submenu MENU\SETUP\ BEARING\ OFFSET. - Select the decimal with keys 3 < > and 8 < > .The postion is underlined. - Keys 5 < + > and 10 < – > are increasing / decreasing the value. - If decreasing the value +000, the sign will change to negative. A negative sign indicates the value to be substracted from the bearing result. - Confirm the adjusted value with key 6 < Ok >. The device is returning to the next higher menu level.. - Key 9 < Clr > will reject the adjusted value, the device is returning to the next higher menu level and will work with the previous offset adjustment. Issue: 2013/03/04 [Rev 1.03.a] Page 39 of 72 12-9-1-0013-3-1-61 Operating Manual Bearing System RT 300 3.3.2.5.1.5 Adj. Extended Display of Last Bearing Result : SET BEARING LAST TIME Menu SETUP BEARING LAST TIME After receiving the last signal, the bearing result is still diplayed for a certain adjustable time. This adjustment is done in submenu BEARING LAST TIME. Fig. 57 Operating: - Using keys 3 < > and 8 < >, select the minutes or seconds to be changed. The selected digit is shown underlined. - Increase or decrease the corresponding value by using keys 5 < + > and 10 < – >. - Key 6 < Ok > will confirm the selected value. The device is returning to the next higher level in the menu. - Key 9 < Esc > will reject the selected value. The device will return to the next higher level in the menu and will work with the previous adjustment. 3.3.2.5.1.6 Heading Compensation for REPEAT-FUNCTION : LAST VALUE COMPENSATION Menu SETUP BEARING LAST COMP CCOMPENSATI ON The bearing result is always a relative bearing referring to the antenna´s longitudinal axis. Compass information available, the Fig. 58 bearing result can be converted to a direction, referring to North, independent of the antenna axis. The LED-circle will always indicate the relative bearing. If now activating the REPEAT-function, (showing the last bearing result) – see 3.2.8, the displayed bearing value is the relative bearing value with the vehicles heading at the time when the last bearing signal was received. If there was a change of heading after the last bearing and after activating the REPEAT-function, the indicated bearing value has lost it´s meaning completely. If compass data are available (external or internal), the change of heading can be measured. If activating now the REPEAT function, the indicated value will be corrected for the present heading. Caution: There will only be compensated changes of heading of the own vehicle. Changes of bearing angles, caused by a change of position of the bearing or transmitting station will, - of course-, not be considered. Issue: 2013/03/04 [Rev 1.03.a] Page 40 of 72 12-9-1-0013-3-1-61 Operating Manual Bearing System RT 300 3.3.2.5.2 SETUP Menu RECEIVER Menu SETUP RECEIVER In setup menu RECEIVER, all adjustments concerning the bearing receiver and it´s functions, can be done. Abb. 59 Following adjustments can be done in menu RECEIVER: Menu short designation CHANNEL MODE POWER ON DEFAULT AFC Meaning selecting frequency tuning (in the maritime band) by either selection of channel number or by input of frequency System start when switching on, with last selected adjustments or with factory default activating / deactivating of AFC (automatic frequency control) see chapter 3.3.2.5.2.1 3.3.2.5.2.2 3.3.2.5.2.3 3.3.2.5.2.1 Frequency Selecting Mode in the Maritime Band : CHANNEL MODE Menu SETUP RECEIVER CHANNEL MODE CCOMPENSATION Usually the operating frequency in the maritime band is selected by an allocated channel number. The bearing system offers the possibility to input directly the frequency. In submenu MENU\ SETUP\ RECEIVER\ CHANNEL MODE you can make this setup. Fig. 60 CHANNEL MODE Operating Order ON frequency input by entering channel number OFF Direct frequency input Caution: Selection only possible in the maritime band. Operating: - In submenu MENU\ SETUP-RECEIVER, select function CHANNEL MODE, see Fig. 60. - With keys 5 < + > resp. 8 < > and 10 < – > resp. 3 < > select ON or OFF. - the active selection is shown inverted. - Confirm selection with 6 < OK >. - Key 9 < Clr > will reject the selection, the device will return to the next higher level of the menu. Issue: 2013/03/04 [Rev 1.03.a] Page 41 of 72 12-9-1-0013-3-1-61 Operating Manual Bearing System RT 300 3.3.2.5.2.2 Selecting Starting Setup : POWER ON DEFAULT Menu SETUP RECEIVER POWER ON DEFAULT CCOMPENSATION In submenu MENU\ SETUP\ RECEIVER CHANNEL MODE select, if, after switching on the device, the previous frequency adjustments Fig. 61 will be overtook, or if channel 16 (156,800 MHz) will be selected. In the airband the distress frequency is always preselected (121,500 MHz), in order not to miß an alarm. LOAD POWER ON DEFAULTS ON OFF Starting setup Channel 16 (= 156,800 MHz) (Airband: 121,500 MHz) is preselected In the maritime band, device will start with last operating frequency. (Airband: 121,500 MHz) Operating: - In submenu SETUP\RECEIVER, select function POWER ON DEFAULT, as shown in Fig. 61. - - Keys 5 < + > resp. 8 < > and 10 < – > resp. 3 < > will select ON or OFF. - The active selection is shown inverted. - Key 6 < OK > will confirm the selection. - Key 9 < Clr > will reject the selection, the device will return to the next higher level of the menu, working with the previous adjustment. 3.3.2.5.2.3 Activating / Deactivating AFC: AFC MODE Menu SETUP RECEIVER AFC MODE CCOMPENSATION The bearing receiver is provided with an AFC circuitry (automatic frequency control). Thus, transmitters can be received, even if their Fig. 62 frequency is a bit out of the premitted frequency range. The receiving frequency is tuned automatically in direction of the transmitter frequency. . In the setup menu RECEIVER AFC MODE the AFC- function can be activated and deactivated. AFC MODE ON OFF Working order AFC activated AFC deactivated Issue: 2013/03/04 [Rev 1.03.a] Page 42 of 72 12-9-1-0013-3-1-61 Operating Manual Bearing System RT 300 Operating: - In submenu SETUP\RECEIVER select function AFC MODE. - The menu appears as shown in Fig. 62. - Keys 5 < + > resp. 8< > and 10 < – > resp. 3 < > will select ON or OFF. - The active selection is shown inverted. - Key 6 < OK > will confirm selection. - Key 9 < Clr > will reject the selection, the device will return o the next higher level of the menu, working with the previous adjustment. 3.3.2.5.3 SETUP Menu: SERIAL Menu SETUP SERIAL In submenu MENU\ SETUP\ SERIAL all adjustments concerning interfaces and their function are done. Fig. 63 Following adjustments can be done in submenu SERIAL: Menu Short Designation Meaning RX TYPE selection of type of interface - RS-232 - RS-485 - RS-422 (NMEA) BAUD RATE Adjusting velocity of data transmission IDENTITY selecting address-codes PROTOCOL selecting data protocol TALK MODE selecting transmitting mode TALK TIME Adjusting of transmitting repeating intervall in TALK MODE „Auto“ See Chapter 3.3.2.5.3.1 Selecting Type of Serial Interface for Data Reception : SELECT SERIAL RX TYPE Menu SETUP SERIAL RX TYPE For data exchange, the bearing system is offering three different interfaces: Fig. 64 - RS-232 - RS-485 - RS-422 (NMEA) In setup menu SERIAL RX TYPE the interface for data reception can be selected. Issue: 2013/03/04 [Rev 1.03.a] Page 43 of 72 12-9-1-0013-3-1-61 Operating Manual Designation RS232 NMEA RS485 Bearing System RT 300 Meaning active interface RS-232 active interface RS-422 (NMEA) active interface RS-485 Caution: See documentation ”Serial Communication & Remote Control“ describing exactly all these functions. 3.3.2.5.3.2 Adjusting Velocity of Data Transmission: SET SERIAL BAUD RATE Menu SETUP SERIAL BAUD RATE In submenu MENU\SETUP\ SERIAL\ BAUD RATE, the velocity of data transmission (Baud Rate) of the serial interface can be Fig. 65 adjusted. Following Baud rates are possible: 1.200; 2.400; 4.800; 9.600; 14.400; 19.200; 28.800; 38.400; 57.600; 76.800;115.200 Baud. Caution: See documentation ”Serial Communication & Remote Control“ describing exactly all these functions. 3.3.2.5.3.3 Adjusting device adressing: SET SERIAL IDENTITY Menu SETUP SERIAL IDENTITY In submenu MENU\SETUP\ SERIAL\ IDENTITY an adress of the interface for the bearing system can be set. Fig. 66 Caution: See documentation ”Serial Communication & Remote Control“ describing exactly all these functions. Operating: In submenu SETUP\SERIAL, select function IDENTITY. - The menu appears as shown in Fig. 66. - Keys 5 < + > resp. 8< > and 10 < – > resp. 3 < > will increase / decrease the adress. - Key 6 < OK > will confirm selection. Key 9 < Clr > will reject the selection, the device will return to the next higher level of the menu, working with the previous adjustment. Issue: 2013/03/04 [Rev 1.03.a] Page 44 of 72 12-9-1-0013-3-1-61 Operating Manual Bearing System RT 300 3.3.2.5.3.4 Selecting Data Protocol: SELECT SER. TX PROTOCOL Menu SETUP SERIAL Protocol In submenu MENU\ SETUP\SERIAL\ PROTOCOL the data protocol of the serial interface can be adjusted. Following adjustments are possible: - NMEA - Binary (at the present no data record defined) Abb. 67 Caution: See documentation ”Serial Communication & Remote Control“ describing exactly all these functions. 3.3.2.5.3.5 Selecting Type of Transmission: SELECT SER. TALK MODE Menu SETUP SERIAL TALK MODE In submenu MENU\SETUP\ SERIAL\ TALK MODE the type of data transmission of the serial interface can be selected. Following adjustments are possible: Designation REQUEST AUTO Abb. 68 Meaning Data will only be sent if required by an other device Data will be sent automatically in a certain adjustable intervall Caution: See documentation ”Serial Communication & Remote Control“ describing exactly all these functions. 3.3.2.5.3.6 Adjusting Transmitting Interval.: SET SERIAL AUTO TALK TIME Menu SETUP SERIAL TALK TIME In submenu MENU\ SETUP\ SERIAL\ TALK TIME, select time interval for sending data via the serial interface in transmitting mode ”auto”. Fig. 69 Caution: See documentation ”Serial Communication & Remote Control“ describing exactly all these functions. Issue: 2013/03/04 [Rev 1.03.a] Page 45 of 72 12-9-1-0013-3-1-61 Operating Manual Bearing System RT 300 Operating: - In submenu SETUP\ SERIAL, select adjusting functionTALK TIME. - The menu appears as shown in Fig. 69. - Keys 5 < + > resp. 8 < > and 10 < – > resp. 3 < > are increasing / decreasing the interval. - Key 6 < OK > will confirm the adjustment. - Key 9 < Clr > will reject the selection, the device will return to the next higher level of the menu, working with the previous adjustment.. 3.3.2.5.4 SETUP Menu: COMPASS Menu SETUP COMPASS Via it´s NMEA –interface the bearing system is able to receive and to process data of an external compass and data of the Fig. 70 internal compass module. These data are used to put out heading information referring to North and to compensate drag errors caused by changes of heading. In setup menu COMPASS the reference direction of the incoming data (magnetic / geographic)is to be defined . For stationary use instead of compass data, constant values can be put in (see 3.3.2.5.4.4 ). Following adjustments in menu COMPASS can be done: Menu short designation Meaning TRUE SOURCE source for compass data referring to geographic North: - Static True - internal compass (optional) - NMEA-data in format HCHDG - NMEA-data in format HEHDT - NMEA-data in format HCHDT MAG SOURCE source for compass data referring to magnetic North: - static magnetic - internal compass (optional) - NMEA-data in format HCHDG - NMEA-data in format HEHDT - NMEA-data in format HCHDT STATIC TRUE Input of a constant angle as reference to geographic North. function required for stationary use STATIC MAG Input of a constant angle as reference to geographic North. function required for stationary use. Issue: 2013/03/04 [Rev 1.03.a] Page 46 of 72 see chapter 3.3.2.5.4.1 3.3.2.5.4.2 3.3.2.5.4.3 3.3.2.5.4.4 12-9-1-0013-3-1-61 Operating Manual Bearing System RT 300 Menu short designation Meaning INT. COMPASS see chapter Operating: - In setup menu select function COMPASS. - The display will appear as shown in Fig. 70. - With keys 5 < > resp. 10 < > and 3 < > resp. 8 < >, select corresponding data source. - The active selection is shown inverted. - Key 6 < OK > will confirm the adjustment. - Key 9 < Clr > will reject the selection, the device will return to the next higher level of the menu, working with the previous adjustment. 3.3.2.5.4.1 Selecting Data Source Referring to Geographic (True) North: SET COMPASS TRUE SOURCE Menu SETUP COMPASS TRUE SOURCE In submenu MENU\ SETUP\ COMPASS\ TRUE SOURCE a data source is related to true North. Fig. 71 Following adjustments are possible: Designation STATIC TRUE INT.COMPASS NMEA HCHDG NMEA HEHDT NMEA HCHDT Meaning The source is a constant value. This value can be adjusted as metioned also in 3.3.2.5.4.3 . This adjustment is required for stationary use (see 3.3.2.5.4.3) The source is the (optional) internal compass. Caution: The internal compass module is delivering data referring to magnetic North. Therefore, the local variation has to be compensated (see 3.3.2.5.4.5.3). Data source are data of an external compass, connected via NMEAinterface. Data format is HCHDG (see documentation “Serial Communication & Remote Control“, describing exactly all these functions). Data source are data of an external compass, connected via a NMEA interface. Data format is HEHDT (see documentation ”Serial Communication & Remote Control“, describing exactly all these functions). Data source are data of an external compass, connected via a NMEA interface. Data format is HCHDT (see documentation “Serial Communication & Remote Control“, describing exactly all these functions). Operating: - In submenu COMPASS, select function TRUE SOURCE. - The display appears as shown in Fig. 71. Issue: 2013/03/04 [Rev 1.03.a] Page 47 of 72 12-9-1-0013-3-1-61 Operating Manual Bearing System RT 300 - Keys 5 < > resp. 10 < > and 3 < > resp. 8 < >are selecting the corresponding data source. - The active selection is shown inverted. - Key 6 < OK > will confirm the adjustment - Key 9 < Clr > will reject the selection, the device will return to the next higher level of the menu, working with the previous adjustment. 3.3.2.5.4.2 Selecting Data Source Referring to Magnetic North : SET COMPASS MAG SOURCE Menu SETUP COMPASS MAG SOURCE In submenu MENU\ SETUP\ COMPASS\ MAG SOURCE, a data source is related to magnetic North. Following adjustment are possible: Designation STATIC MAG INT COMPASS NMEA HCHDG NMEA HEHDT NMEA HCHDT Fig. 72 Meaning The source is a constant value. The value can be adjusted as described in. 3.3.2.5.4.4. This adjustment is required for stationary use (see ) The source is the (optional) internal compass. Data source are data of an external compass, connected via NMEAinterface. Data format is HCHDG (see documentation “Serial Communication & Remote Control“, describing exactly all these functions).. Data source are data of an external compass, connected via a NMEA interface. Data format is HEHDT (see documentation ”Serial Communication & Remote Control“, describing exactly all these functions). Data source are data of an external compass, connected via a NMEA interface. Data format is HCHDT (see documentation “Serial Communication & Remote Control“, describing exactly all these functions). Operating: - In submenu COMPASS, select function MAG SOURCE. - The display appears as shown in Fig. 72 - Keys 5 < > resp. 10 < > and 3 < > resp. 8 < >are selecting the corresponding data source. - The active selection is shown inverted. - Key 6 < OK > will confirm the adjustment - Key 9 < Clr > will reject the selection, the device will return to the next higher level of the menu, working with the previous adjustment. Issue: 2013/03/04 [Rev 1.03.a] Page 48 of 72 12-9-1-0013-3-1-61 Operating Manual Bearing System RT 300 3.3.2.5.4.3 Input of Static True value : SET STATIC TRUE HEADING Menu SETUP COMPASS STATIC TRUE In submenu MENU\ SETUP\COMPASS\ STATIC TRUE a constant value (angle) can be related to the direction of reference STATIC TRUE (fixed, static mounting, referring to true North) . Fig. 73 Operating: - Keys 3 < > and 8 < > are selecting the decimal. The selected digit is shown underlined. - Increase / decrease the corresponding value by using keys 5 < + > and 10 < – >. - Key 6 < Ok > will confirm the selected value. The device will return to the next higher level. - Key 9 < Esc > will reject the selected value. The device will return to the next higher level and is working with the previous offset adjustment. 3.3.2.5.4.4 Input of value ”Static magnetic”: SET STATIC MAG Menu SETUP COMPASS STATIC MAGN In submenu MENU\ SETUP\COMPASS\ STATIC MAG a constant value (angle) can be related to the direction of reference STATIC MAGNETIC (fixed, static mounting, referring to magnetic North). Fig. 74 Operating: - Keys 3 < > and 8 < > are selecting the decimal. The selected digit is shown underlined. - Increase / decrease the corresponding value by using keys 5 < + > and 10 < – >. - Key 6 < Ok > will confirm the selected value. The device will return to the next higher level. - Key 9 < Esc > will reject the selected value. The device will return to the next higher level and is working with the previous offset adjustment. Issue: 2013/03/04 [Rev 1.03.a] Page 49 of 72 12-9-1-0013-3-1-61 Operating Manual Bearing System RT 300 3.3.2.5.4.5 Configuration of internal compass module : INT. COMPASS Menu SETUP COMPASS INT. COMPASS Is the bearing system equipped with the optional compass module, following adjustments have to be done: - Calibrating the compass - compensating of deviation (compass error) - adjusting of local magnetic variation Fig. 75 These adjustments can be done in submenu MENU\ SETUP\ COMPASS\ INT. COMPASS. 3.3.2.5.4.5.1 Calibrating Compass: INT. COMPASS CALIBRATION Menu SETUP COMPASS INT. COMPASS CALIBRATION After installing the bearing antenna, the compass should be calibrated. Calibration eliminates environmentally caused interferences of the magnetic field. Calibration improves significantly the precision of the compass. In order to calibrate the compass, the bearing antenna has to be Fig. 76 rotated twice in it´s vertical axis, the rotational direction doesn´t matter. Procedure: - In submenu MENU\ SETUP\ COMPASS\ COMPASS INT\ Fig. 77 CALIBRATION the display appears as shown in Fig. 76. - Use key 8 < > to start the calibrating procedure. - Now the bearing antenna has to be rotated twice (720°) in its vertical axis with an angular speed as constant as possible. - Exactly after rotating 720° the calibration process will be completed by pressing key 8 < >. Procedure for vessels. - The vessel navigates with constant speed on a circular track as narrow as possible. - Start the calibrating procedure at a certain compass course as described above. - The display is as shown in Fig. 77 - After ending the second circle (the same course shown in the compass display) the calibrating will be completed by pressing key 8 < >. Procedure for land vehicles - The vehicle is driving with constant speed on a circular track as narrow as possible. (e.g. in a roundabout). - Start the calibrating in a certain position as described above. - The display is as shown in Fig. 77 . - After ending the second circle the calibrating will be completed by pressing key 8 < >. Issue: 2013/03/04 [Rev 1.03.a] Page 50 of 72 12-9-1-0013-3-1-61 Operating Manual Bearing System RT 300 Caution: After calibrating optimally, the precision of the compass is 2°. If the internal compass is used as a source for north referring bearings, in the adverse case, the compass error can be added the bearing result. Hint: The present compass data can be displayed in submenu MENU\ SERVICE\ COMPASS (see 3.3.2.6.4). 3.3.2.5.4.5.2 Input of Compass Error – Deviation-: INT. COMPASS DEVIATION Menu SETUP COMPASS INT. COMPASS Deviation Deviation is the difference of angle between the actual magnetic North direction and the North direction determined by the internal compass. Usually, the deviation may be different for each compass value. If the calibration was done properly, these Fig. 78 differences have been eliminated largely. If a constant aberration is appearing, it can be compensated TN = true north N TN by the input of a correcting value. CN M DEV VAR 7°W 8°W C = = = 0° 11 8° 11 5° 12 H H M TH Example: - The magnetic heading (MH) of the vessel is 118° (indicated on the vessel´s compass) - The compass heading (CH), put out by the compass module of the bearing system, is 125°. - The difference between CH and MH equals 7°, that means a deviation of 7°. - For the compass heading is greater than the magnetic heading, the direction of the deviation is ”West“. (The deviation is ”EAST“ if Fig. 79 the compass heading is smaller than the direction of the deviation) - The value to be put in in our example therefore is „WEST 007“. MN = magnetic north CN = compass north TH = true heading MH = magnetic heading CH = compass heading H ea din g Hint: The present compass data can be displayed in submenu MENU\ SERVICE\ COMPASS (see 3.3.2.6.4). 3.3.2.5.4.5.3 Input Magnetic Variation: INT. COMPASS VARIATION Menu SETUP Issue: 2013/03/04 [Rev 1.03.a] COMPASS INT. COMPASS Page 51 of 72 VARIATION 12-9-1-0013-3-1-61 Operating Manual Bearing System RT 300 If the compass module shall be used as a source for geographic North, the local magnetic variation has to be put in. Variation is the difference between geographic and magnetic North (see Fig. 79). Magnetic variation is depending on the location on earth and to be taken from corresponding charts. Fig. 80 3.3.2.5.5 SETUP Menu: OTHER Menu SETUP OTHER In submenu SETUP\OTHER, setups, concerning the operation Fig. 81 of the relay contact of the alarm function, are done. Additionally the input of the self bearing suppression (SBS) can be activated and the demo mode can be started. 3.3.2.5.5.1 Configuration of Relay-contact: RELAY Menu SETUP OTHER Relay The bearing system RT 300 is eqipped with a relay-contact, which is closing if a distress signal is detected. It´s contacts are Fig. 82 integrated in the „POWER“ connector (see 3.5.2.3), external devices may be connected (e.g. GPS MOB-function, alarm bell, warning light , etc...). The working order can be set up in submenu OTHER\RELAY. 3.3.2.5.5.1.1 Setting up Relay Mode: RELAYS MODE Menu SETUP OTHER RELAYS RELAYS-MODE Depending on application, different relay modes can be selected: Fig. 83 Designation Disabled On Function Application Relay deactivated no external device connected The contact remains closed Connection of an alarm bell until the received signal is disappeared. Issue: 2013/03/04 [Rev 1.03.a] Page 52 of 72 12-9-1-0013-3-1-61 Operating Manual Bearing System RT 300 Designation Puls (MOB) Function As soon as a signal is exceeding the squelch level, the contact is closing for a defined time and will opens then again. A new activation of the relay will happen only after a restart of the system. The activation is indicated by the anchor-symbol in the LC-display (see Fig. 7: “alarm contact status“). Application For the connection of a MOB-function (Man Over Board) of a GPS-receiver. storage of position at the time of reception. This function is working on all frequencies. Caution: Releasing the relay by restarting the system is to avoid the following situation: If the transmitting signal is lost for a short time, the GPS-position would be overwritten. This position wouldn´t be equivalent to the position of the first alarm (place of accident at MOB-situation). The first position would be overwritten (depending on GPS) and therefore lost. ELT-On Contact closes, as soon as a distress signal (ELTmodulation) is recognized by the ”selective squelch“ and will open again, if no more signal is received. This function is only available in the airband. Contact closes, as soon as the “selective squelch” has recognized a distress signal (ELT-modulation). A new activation of the relay will happen only after restarting the system. The activation is indicated by the anchor symbol in the LC-display(see Fig. 7: “alarm contact status“). - Connection of an alarm bell (if a distress signal is received) to be activated only in the airband. Recommended in connection with OnlyELT-function. ELT-Puls (MOB) As at PULS (MOB) function, but the system will react only on signals in the airband. 3.3.2.5.5.1.2 Adjusting Pulse duration of the relay: MOB PULSE TIME Menu SETUP OTHER RELAY In submenu MENU\ SETUP\ OTHER\ RELAY\ MOB-PULSE TIME the pulse duration of the relay contact can be adjusted. The adjustment can be made for the relay modes „Puls (MOB)“ and „ELT-Puls (MOB)“. Select a pulse duration between 100 ms and 2500 ms. Issue: 2013/03/04 [Rev 1.03.a] Page 53 of 72 MOB PULSE TIME Fig. 84 12-9-1-0013-3-1-61 Operating Manual Bearing System RT 300 3.3.2.5.5.2 Activating / Deactivating of Self Bearing Suppression: EXT. INPUT Menu SETUP OTHER EXT. INPUT If there shall be transmitted on the receiving frequency of the vehicle / ship, also the own transmitting signal will be beared. Fig. 85 Usually this is not desired, additionally there is the disadvantage, that the last bearing will be overwritten. In order to avoid this, there is the function “self bearing suppression”(SBS). For the SBS-function the PTT –key of the transmitter has to be connected to PIN 8 of the “power” connector (see 3.5.2 and 5.1). Now, if the key is actuated, the bearing process is interrupted. 3.3.2.5.5.3 Activating / Deactivating of Self Bearing Suppression: EXT. INPUT Menu SETUP OTHER DEMO MODE By activating the DEMO MODE the DCU can be used without a connected antenna unit (AU). This is very useful for training or Fig. 86 maintenance. The DCU emulate the AU and shows a fictive bearing witch is slowly moving all the time. 3.3.2.5.6 SETUP Menu: FACTORY RESET Menu SETUP FACTORY RESET In submenu MENU\SETUP the function FACTORY RESET can be selected. This function will reset following adjustments to the Fig. 87 factory default: Designation Short Designation Brightness of LC-display Brightness of keyboard Brightness LED-circle Contrast of LC-display bearing reference direction Volume audio-signal Volume keyboard -signal Volume alarm-signal DIM LCD DIM LEGEND DIM CIRCLE LCD CONTRAST BEARING TYPE VOL +; VOLBEEP VOLUME ALARM VOLUME Issue: 2013/03/04 [Rev 1.03.a] Page 54 of 72 Factory default 100 % 50 % 100 % 45 % RELATIVE 50 % 50 % 100 % See chapter 3.3.2.1.1 3.3.2.1.2 3.3.2.1.3 3.3.2.1.4 3.3.2.2.1 3.2.5 3.3.2.4.1 3.3.2.4.2 12-9-1-0013-3-1-61 Operating Manual Bearing System RT 300 Designation Short Designation Bearing value averaging memory Source heading-compensation Mounting direction of bearing antenna Correction value Offset Extended display of bearing value Heading compensation for REPEAT.function frequency selecting mode Starting setup AVERAGING COMPENSATION MOUNTING BEARING OFFSET LAST BEARING TIME LAST VALUE COMPENSATIO CHANNEL MODE POWER ON DEFAULT AFC (automatic frequncy control) AFC MODE serial interface RX-Type Data transmitting velocity (Baud SERIAL BAUD RATE rate) Device addressing SERIAL IDENTITY selecting data protocol SER. TX ROTOCOL selecting type of transmitting SER. TALK MODE Transmitting interval SERIAL AUTO TALK TIME Data source for reference COMPASS TRUE direction geographic North SOURCE Data source for reference COMPASS MAGN. direction magnetic North SOURCE Static True value STATIC TRUE HEADING Static magnetic value STATIC TRUE HEADING Deviation (internal Compass) INT. COMPASS DEVIATION Variation (internal Compass) INT. COMPASS VARIATION Relay-mode RELAY-MODE Pulse duration of relay: MOB-PULSE TIME Self bearing suppression (SBS) EXT. INPUT Factory default Level 5 OFF NORM See chapter 0° 10 sec OFF 3.3.2.5.1.4 3.3.2.5.1.5 3.3.2.5.1.6 ON ON 3.3.2.5.2.1 3.3.2.5.2.2 ON RS-232 4800 Baud 3.3.2.5.2.3 3.3.2.5.3.1 3.3.2.5.3.2 000 NMEA auto talk 250 ms 3.3.2.5.3.3 3.3.2.5.3.4 3.3.2.5.3.5 3.3.2.5.3.6 NMEA HEHDT 3.3.2.5.4.1 NMEA HCHDT 3.3.2.5.4.2 0° 3.3.2.5.4.3 0° 3.3.2.5.4.4 0° 3.3.2.5.4.5.2 0° 3.3.2.5.4.5.3 disabeld 10 ms off 3.3.2.5.5.1.1 3.3.2.5.5.1.2 3.3.2.5.5.2 3.3.2.5.1.1 3.3.2.5.1.2 3.3.2.5.1.3 3.3.2.6 MENU: SERVICE Menu Service In submenu SERVICE all functions required for the verification Fig. 88 of the nominal characteristics of the bearing system, or to support the detection of errors, can be found. Issue: 2013/03/04 [Rev 1.03.a] Page 55 of 72 12-9-1-0013-3-1-61 Operating Manual Bearing System RT 300 3.3.2.6.1 Service menu: BEARING Menu SERVICE 1 BEARING In service menu BEARING all importantant data required for the determination of bearing values, are indicated. These data are used for error analysis in case of service as well as for 2 3 4 5 preadjusting the signal-delay-time-compensation during 6 production. While bearing, the bar graph is permitting Fig. 89 conclusions about the present quality of bearing and signal. Following data are displayed (see Fig. 89): 7 8 1. Bearing quality: percent of determined, usable single bearing values. 2. Level: present signal field strength 3. Bearing value: reference direction and bearing value 4. Bearing phase clockwise rotation: averaged bearing values at clockwise rotation of antenna 5. Bearing phase anticlockwise rotation: averaged bearing values at anticlockwise rotation of antenna 6. Level testing signal: 7. Value of signal-delay-time-adjustment. 8. The slope of the bar is a measure of the bearing quality. The steeper, the better the bearing. Operating: - Key 9 < Clr > is cancelling the averaging memory. After releasing the key the bar graph will be rebuilt. - Leave the menu by pressing key 6 < Ok >. 3.3.2.6.2 Service menu: RECEIVER Menu SERVICE RECEIVER In submenu SERVICE\ RECEIVER present receiver parameters are displayed. Designation STATUS U-IN U-OFFS Fig. 90 Meaning Status of receiver module If no error detected, display OK. If error detected, display of error number. Voltage supply of receiver module Offset voltage of the discriminator (Measure for frequency deviation of transmitter) Issue: 2013/03/04 [Rev 1.03.a] Page 56 of 72 12-9-1-0013-3-1-61 Operating Manual Designation U-LEV LEVEL AFC Bearing System RT 300 Meaning AGC voltage (measure for receiving field strength) Receiving field strength (see also 3.1.6) AFC activated or deactivated (see 3.3.2.5.2.3) 3.3.2.6.3 Service Menu: DCU Menu SERVICE DCU In submenu SERVICE\ DCU present DCU-parameters will be displayed. Designation STATUS U-IN EXT-IN AF-IN Fig. 91 Meaning Status of DCU If no error detected, display OK. If error detected, display of error number. Voltage supply of DCU Displays present logic level of input EXT-IN (see 3.3.2.5.5.2) Audio frequency counter (required for detecting an emergency signal) 3.3.2.6.4 Service Menu: COMPASS Menu SERVICE COMPASS 1 2 In submenu SERVICE\COMPASS the compass data, available for the different reference directions resp.the internal (optional) compass module, are dispayed. Select reference direction using key 3 < > and 8 < >. If there are available NMEA-data as shown in Fig. 92 the graphic display will show bearing value and data transmitting velocity. The LED-circle will show the present bearing too. Example Fig. 92: 1. Data transmitting velocity of (every 1000 msec one set of data); OK is indicating, that all data can be interpreted. 2. present heading Fig. 92 Fig. 93 Fig. 94 Example Fig. 93: Internal compass Compass heading = 208° Data transmitting velocity: 250 msec Heading compensation: activated (+COMP) Issue: 2013/03/04 [Rev 1.03.a] Page 57 of 72 12-9-1-0013-3-1-61 Operating Manual Bearing System RT 300 Example Fig. 94: No compass data available for reference direction geographic North or too few data to be interpreted. 3.3.2.6.5 Service menu: REBOOT Menu SERVICE REBOOT Confirming REBOOT using key 6 < OK > in submenu SERVICE\REBOOT will restart the microprocessor of the DCU. During booting the display is showing „Please wait, reboot in progress!“ as in Fig. 95. Fig. 95 3.4 Special Functions 3.4.1 Locking / Unlocking the Setup Menu The setup menu can be locked in order to prevent unauthorized change of the setup or by mistake. Select SETUP in the main menu and keep pressing key 12 < Scan > for about 3 secs, until the symbol (padlock) is appearing (see Fig. 49) . The setup menu is locked. In order to unlock the menu, select SETUP in the main menu keep pressed key 12 < Scan > for 3 secs, until the symbol disappears. The setup menu is unlocked. 3.4.2 Resetting Brightness and Contrast Adjustment of Display Reading of the LC-display and correction of the contrast value may become impossible if adjusting the contrast value incorrectly. . In that case brightness and contrast adjustments can be reset as follows: - Switch off DCU using key 1 On/Off - Switch on DCU using key 1 On/Off and - press key 7 < Menu > within 1 sec after pressing key ON/OFF Contrast of display and background lighting are set to the factory default. This adjustment will not be stored after switching off the DCU. Therefore, all adjustments in submenu LIGHT/LCD (see 3.3.2.1) have to be redone and confirmed with key OK. 3.4.3 Loading Firmware Updates If there is a new firmware available, it can be uploaded via the interface port on the backside of the DCU. How to proceed is described in the documentation “RT-300 Firmware Update” witch is available by contacting RHOTHETA (www.rhotheta.de). Issue: 2013/03/04 [Rev 1.03.a] Page 58 of 72 12-9-1-0013-3-1-61 Operating Manual Bearing System RT 300 3.5 Interfaces On the backside of the DCU three connectors can be found, connecting antenna, power supply and other external devices. 3.5.1 Antenna connector on DCU: The antenna connector is connecting Display-Control-Unit (DCU) and (Fig. 2 ) antenna unit (AU) Type of connector: D-Sub-socket; 9-poled Pin wiring: 54321 98 76 D-Sub-socket Contact (PIN) 1 2 3 4 5 6 7 8 9 Shield Signalname Signal ANT-EAST ANT-WEST RS485/A RS485/B 12..30V ANT-SOUTH ANT-NORTH NF PHI GND control signal East control signal West data signal data signal voltage supply control signal South control signal North audiosignal bearing signal ground 3.5.2 Power Connector The power supply is connected to the Power Connector (Fig. 2 ). Additionally this connector contains contacts for the external speaker, alarm relay and input for the SBSfunction (self bearing suppression). 1 2 3 4 5 6 7 8 9 D-Sub-socket Contakt (PIN) 1 2 3 4 5 Signalname Signal GND NF-OUT-B RELAY-B RELAY-A U-IN-GND internal and housing ground, audio exit for external speaker alarm contact alarm contact Issue: 2013/03/04 [Rev 1.03.a] negative voltage supply Page 59 of 72 12-9-1-0013-3-1-61 Operating Manual 6 7 8 9 Shield Bearing System RT 300 ANALOG-TEST NF-OUT-A EXT-INPUT U_IN_12..30V GND not connected audio exit for external speaker input for SBS-function positive voltage supply (12 ..24 V) housing ground, frame 3.5.2.1 Power supply The power supply is connected to PIN 5: [-] voltage supply GND (ground) and PIN 9: [+] positive voltage supply . Permitted range of operating voltage: 11V... 28 V DC current consumption: max. 500 mA (depending on operating voltage and connected external devices) Caution: - Ground of voltage supply not identical to ground of housing (due to interconnected noise filter)! - Confusing the poles will damage the device! - The voltage supply is not separeted galvanically from the frame. If desired, eg. in order to prevent current flow to the ground of the vessel, a DC/DC-converter has to be adapted. 3.5.2.2 External speaker An external speaker can be connected to the symmetric audio exit PIN 7 and PIN 2. The level of the audio signal is controlled in the “adjust volume” submenu (see 3.2.5.). Permitted impedance of speaker: 4 ... 600 Ohm max. voltage (PIN 7 – PIN 2): 10 Vss max. permitted power: 1,5 W Caution: The audio exit is connected to a push-pull amplifier. Therefore none of the audio signals is to be connected to ground. Grounding audio signals will damage the device. 3.5.2.3 Alarm contact The alarm contact is connected to (see 3.3.2.5.5.1) PIN 3 and 4. It is a mechanic relay with floating contacts. Current: max. 1A max. voltage: 50 V (DC) (values for ohmic (resistive) load) Controlling: see 3.3.2.5.5.1 3.5.2.4 Extern Input Contact PIN 8 is a sensory input for digital logic levels. The contact is connected to +5V by the means of a PULL-UP-resistor (10 k).In order to activate the SBS-function (as Issue: 2013/03/04 [Rev 1.03.a] Page 60 of 72 12-9-1-0013-3-1-61 Operating Manual Bearing System RT 300 described in 3.3.2.5.5.2) the input has to be connected to GND (PIN 1) by the means of an external operating contact. 3.5.2.5 Analog Test PIN 6 is carrying a nominal signal, serving for trouble-shooting in the case of service. During operation of the bearing system this contact is not to be connected. 3.5.3 Interface Connector The bearing system RT 300 has different interfaces for data exchange. - RS-232 - RS-422 - RS-485 These interfaces are connected to socket ”Interface Connector“ (see Fig. 2 ). 54321 98 76 D-Sub-socket Contact (PIN) 1 Signal name Signal RS485TRX/RS422TX-B Depending on adjustment, see 3.3.2.5.3.1 Selection: RS-485 RS-485 TRX-line NMEA RS-422 TX-B-line RS-232 RS-422 TX-B-line TX-line RS-232-interface (always active) RX-Leitung RS-232-interface (activating see 3.3.2.5.3.1) RS-422 reiceiving line GND Masse Depending on adjustment see 3.3.2.5.3.1 Selection: RS-485 RS-485 TRX-line NMEA RS-422 TX-B-line RS-232 RS-422 TX-B-line RS-422 receiving line anode activation see 3.3.2.5.3.1 RS-422 receiving line kathode activation.see 3.3.2.5.3.1 voltage supply +5V DC (voltage supply for interface modules) current output: max. 200 mA Ground 2 3 RS232TX RS232RX 4 5 6 RS422RX-SHIELD GND RS485TRX/RS422TX-A 7 RS422RX-A 8 RS422RX-B 9 +5V-OUT Shield GND Issue: 2013/03/04 [Rev 1.03.a] Page 61 of 72 12-9-1-0013-3-1-61 Operating Manual Bearing System RT 300 3.5.3.1 RS-232-Interface For Interface functions see documentation “RT-300 NMEA Serial Communication & Remote Control” 3.5.3.2 RS-485-Interface For Interface functions see documentation “RT-300 NMEA Serial Communication & Remote Control” 3.5.3.3 NMEA (RS-422) Interface For Interface functions see documentation “RT-300 NMEA Serial Communication & Remote Control” Issue: 2013/03/04 [Rev 1.03.a] Page 62 of 72 12-9-1-0013-3-1-61 Operating Manual Bearing System RT 300 4 Installation and Putting into Operation 4.1 Installation of Display-Control-Unit DCU 4.1.1 DCU Installing Cut-out The DCU is to be installed in an instrument panel in a suitable position. Therefore, an installing cut-out, as shown in Fig. 96, has to be set. 210 193 ø4.5 80 106 alternative tapping M4 R8.5 Fig. 96 Choose installing position in way, that the DCU is not exposed to excessive heat. In order to achieve good reading, on vessels the installing position of the DCU should be situated within the range of view of the control desk. Installing: Make sure, that there are no endangered elements (e.g. wiring, gas- or water pipes) within the range of the installing cut-out. Cut out attached mounting template, transfer the 4 fixing holes and the installing cutout to the mounting surface. Drill the four 4.5 mm holes for the fixing screws or tap four M 4-threads into the mounting surface, in order to achieve comfortable installing from the front. Set installing cut-out. Plug in connectors for power supply, bearing antenna and other additional devices. Issue: 2013/03/04 [Rev 1.03.a] Page 63 of 72 12-9-1-0013-3-1-61 Operating Manual Bearing System RT 300 Place the DCU into the installing cut-out and fix it using the delivered M4 allen screws. 4.1.2 Connecting power supply The „Power Connector“ (see Fig. 2 ) is connecting DCU and power supply. Wiring pattern: PIN 5: GND (ground resp. negative pole). PIN 9: Voltage supply (+12 ... 24V) - The power supply has to be eqipped with a fuse of 1A, inert. - If the bearing system is to be operated floating, a DC/DC converter has to be adapted between Battery and DCU. The GND-connection is connected galvanically to the housing! 1 2 3 4 5 GND 6 7 8 9 Fig. 97 +12 .. 24V The content of delivery contains a prepared power supply cable. The red cable with integrated fuse holder is to be connected to the positive pole of the voltage supply (+12V ... 24V). The black cable is to be connected to the negative pole of the voltage supply Caution: We strongly point out, that a confusion of poles will damage the device. Never connect the black cable (PIN 5) to positive voltage. PIN 5 is connected to the ground of the housing and causes a short circuit, damaging the device! 4.1.3 Connecting the DCU to Ground The ground connector (Fig. 2 ) of the bearing system has to be connected to the ground of the vehicle. For stationary installations the ground connector has to be connected to earth potential. Use cables of sufficient cross-sectional area. Caution: The antenna´s ground is connected to the DCU. Electrostatic charge may cause very high voltages. Therefore, it is very important earthing the DCU before connecting the antenna. 4.1.4 Connecting Antenna Connect antenna cable (see 4.3) to socket “Antenna Connector“. 4.2 Determination of Antenna Position The quality of the bearing results is depending largely on the antenna´s position. So, an antenna position has to be found, where the transmitter´s wavefield can reach the bearing antenna as undisturbed as possible. The bearing antenna is analysing the incoming wavefield and the microprocessor of the bearing system is determining the direction of incidence of the signal. Reflections of the incoming signal may interfere with the wavefield. The bearing system will determine a direction of incidence as an average of the incoming and the reflected signal. As a result, Issue: 2013/03/04 [Rev 1.03.a] Page 64 of 72 12-9-1-0013-3-1-61 Operating Manual Bearing System RT 300 there is a wobbling bearing display, the error will depend on direction of incidence, distance and vertical angle of incidence of the signal. Reflections mainly are caused by conducting objects. - antennas (especially if working in the same frequency range GPS-antennas not that critical) - metallic superstructures of vessels - metallic masts - steel cables - wet sail-cloth - persons in direct vicinity of the antenna Therefore, the best position of the antenna is on top of the mast, above other antenna systems or other obstacles. In practice, often a compromise has to be found between bearing and other interests. Therefore we will give you here some guidelines: - No disturbing objects in the antenna´s plane if possible disturbing objects as distant as possible. no metallic objects closer than 30 cm under and above bearing antenna. no objects in direct antenna range (between antenna beams of antenna, except mast). In the case of doubt the antenna´s position during a practical try-out has to be tested, prior to final assembly. Example Fig. 98: Position : bearing optimal Position : bearing good Position : bearing sufficient Position : bearing sufficient Fig. 98 Issue: 2013/03/04 [Rev 1.03.a] Page 65 of 72 12-9-1-0013-3-1-61 Operating Manual Bearing System RT 300 4.3 Completing Antenna Cable The delivery contains an antenna cable of 10m length. First of all this cable is intended for testing operation of the system. Usually, for the final assembly a special cable connection has to be put together. The extent of delivery contains the required plugs and mounting material. 4.3.1 Type of cable The connecting cable antenna DCU has to have following features: - Cable length up to 50 m: Cross-sectional area: min. AWG 24 (0,23mm²), number of wires: 9-poled (or more) + shield Type of cable: control cable; twisted wires not required. The type of cable in detail is depending on local requirements (fire protection, oil resistance, heat…). If there are no special requirements, a cable of type LiYCY10X0,25mm 2 may be used. - Cable length up to 100 m: cross-sectional area: min. AWG 22 ( 0,38 mm²), Number of wire pairs: 12-poled twisted in pairs (or more) + shield type of cable: control cable; wires twisted in pairs. The type of cable in detail is depending on local requirements (fire protection, oil resistance, heat…).. If there are no special requirements, a cable of type LifYCY6x2x0,50 mm 2 may be used. 4.3.2 Connecting Pattern of Antenna Cable: Antenne DCU 1 2 3 4 5 54 3 21 98 7 6 6 7 8 9 D-Subconnector D-Sub-socket Kontakt 1 2 3 4 5 6 7 8 9 Shield Kontakt 1 2 3 4 5 6 7 8 9 Shield Issue: 2013/03/04 [Rev 1.03.a] Page 66 of 72 Signal-name ANT-EAST ANT_WEST RS485/A RS485/B 12...30V ANT-SOUTH ANT-NORTH NF PHI GND Signal control signal East control signal West data signal data signal voltage supply control signal South control signal North audio signal bearing signal ground 12-9-1-0013-3-1-61 Operating Manual Bearing System RT 300 Connecting pattern for cable lengths up to 50 m Fig. 99 Connecting pattern for cable lengths up to 100 m: 4.4 Installing the Antenna Fig 100 Issue: 2013/03/04 [Rev 1.03.a] Page 67 of 72 12-9-1-0013-3-1-61 Operating Manual Bearing System RT 300 The antenna is to be mounted on a suitable mast tube. The antenna is delivered either with a threaded flange- or with a 6-holed flange (the flange may be changed if required). 4.4.1 Fixing Screw Joint on Mast Tube If the antenna is deliverd with a screw joint a suitable plastic screw joint is added .. The screw joint is provided for mast tubes with an outside diameter of 50 mm (resp. 40 mm with added reduction. Preferably the mast tube is consisting of plastic. Put compression nut (threaded side to the top) onto the mast tube . Stick together mast tube and flange with a suitable cement - use added reduction for mast diameter of 40 mm. On request there are reductions for other mast diameters. 4.4.2 6-holed Mast Flange If applying the 6-holed flange, the counterpart for the mast is not added and has to be manufactured by oneself. Keep care to align the pitch circle in a way, that one of the holes is situated in the longitudinal axis of the vehicle. 4.4.3 Installing Antenna Cable with Pull-relief Pull antenna cable through mast tube. The socket (female) has to point to the antenna. For cable lenghts of more than 10 m a pull-relief has to be mounted. In any case, we recommend installing the pull-relief (in extent of delivery) between mast and antenna. In this case only the antenna system is waterproof (IP 67). The pull-relief has to be installed before mounting the antenna (if using the added antenna cable, the pull-relief cannot be used). ø40 4.4.4 Fixing the antenna - Connect antenna cable and antenna, tighten checkFig. 101 screws. - Put antenna to the mast-flange. Take care, that the o-ring of the antenna flange is fitting firmly into it´s groove. - Tighten slightly the compression nut (threaded flange). - Align antenna, the arrow-marked dipole pointing exactly in the longitudinal axis of the vehicle. - Tighten firmly screw joint. - If using the 6-holed flange, mount antenna with the arrow pointing to the vehicles direction. - For stationary use, mount anntenna with the arrow pointing to the North. 4.4.5 Aligning Antenna for Mobile Use Before putting into operation the bearing system, the bearing antenna is to be aligned exactly. Issue: 2013/03/04 [Rev 1.03.a] Page 68 of 72 12-9-1-0013-3-1-61 Operating Manual Bearing System RT 300 For vessels and land vehicles the reference direction is the longitudinal axis of the vehicle. The bearing antenna should be aligned in a way, that the arrow-marked pair of beams is pointing parallel to the longitudinal axis to the bow resp. to the front of the vehicle. By the means of a transmitter, the correct alignment can be verified (. In case of an inevitable, unfavourable antenna position, antenna axis and vehicle axis may not coincide (offset). 4.4.6 Aligning Antennafor Stationary Use For stationary use the reference direction of the antenna is magnetic North (QDR) or geographic North (QTE). Aligning for reference direction magnetic North (QDR, from direction finder to transmitter): a) A transmitter is to be put up in a distance of at least 100 m from the bearin g antenna. b) Determine the direction to the bearing antenna by the means of a compass. c) Add or subtract to compass value 180°, thus obtaining the nominal value. d) Switch on transmitter, transmitting continuously. e) Align antenna in a way, that the display is indicating the nominal value. f) Tighten screw-joint of antenna. For verifying purposes the adjustment has to be checked for different directions of transmission. In case of (untolerable) deviations, change position of antenna. Caution: Touching the antenna during rotation will be garbling considerably the bearing result. Befor reading the bearing results at the DCU, take care that there are no persons in the vicinity of the antenna. Aligning for reference direction QDM (magnetic course from transmitter to direction finder): To be done as described in " Aligning for reference direction magnetic North " , the nominal value has to correspond to the determined compass value. Aligning reference direction QUJ (true compass bearing from transmitter to direction finder): To be done as described in " Aligning for reference direction QDM " . Aligning reference direction QTE (true course from direction finder to transmitter): To be done as described in " Aligning for reference direction magnetic North QDR" , the local variation has to be subtracted from the nominal value. Issue: 2013/03/04 [Rev 1.03.a] Page 69 of 72 12-9-1-0013-3-1-61 Operating Manual Bearing System RT 300 4.4.7 Mounting of Antenna Beams Put antenna beams into receptacles of the antenna head, until the fitting is resting fully in the groove of the drilling (see Fig. 102). Tighten fully compressing nut by hand until feeling distinct resistance. Tighten nuts by using a wrench (10 mm), with a torque not exceeding 3 Nm. Don´t bend antenna beams in order to avoid bearing errors. Beam compression nut fitting receptacle Fig. 102 4.5 Configuring Setup Once antenna and DCU connected to the power supply, the bearing system will work already. The factory defaults are set (see 3.3.2.5.6) in a way, that all standard functions are activated. The bearing system is offering a great number of functions, different settings and external devices may be connected. In order to be able to use these features, some adjustments have to be made prior putting into operation the system. The following chapter is to support you for this work: Procedure: Pos Menu 01 02 03 04 Light 05 Sounds 06 Bearing Action Default adjusting brightness of LCD brightness of keyboard brightness LED-circle select reference direction for digital REL bearing value display - REL (relative bearing ) - MAG (magnetic bearing reference direction magnetic North ) TRU (true bearing reference direction geographic North) adjusting keyboard volume - BEEP VOLUME adjusting volume alarm signal 100% - ALARM VOLUME Issue: 2013/03/04 [Rev 1.03.a] Page 70 of 72 See chapter. 3.3.2.1.1 3.3.2.1.2 3.3.2.1.3 3.3.2.2.1 Remarks 3.3.2.4.1 adjust volume audible, but not disturbing for reference directions MAG and TRU the source of compass data has to be defined in menu COMPASS . If using an external compass, in menu SERIAL the interface has to be defined 3.3.2.4.2 12-9-1-0013-3-1-61 Operating Manual Pos Menu 07 Setup Bearing 08 09 10 11 12 13 16 17 18 19 20 21 Action Default bearing value averaging memory 5 adjusting source for heading compensation. - Off (no heading compensation - TRUE (source of heading compensation has reference direction true North- MAG heading compensations has reference direction magnetic North - INT heading compensation by internal compass selecting mounting direction of antenna. - NORM (Normal mounting) - INVERS (mounting upright down) adjusting correcting value - Offset OFF extended display - Last time activating heading compensation for repeat function - LAST VALUE COMPENSATION RECEIVER selecting frequency mode in maritime band - Channel Mode 14 15 Bearing System RT 300 selecting starting setup If there is an external compass connected, it should be used as a source. Norm 3.3.2.5.1.3 0° 3.3.2.5.1.4 The correcting value may compensate constant bearing errors, e.g. caused by misalignment. 3.3.2.5.1.5 Adjusting only recommended, if factory default not optimal. 3.3.2.5.1.6 Only possible, if external or internal compass available 10 sec. OFF ON ON SERIAL Selection of serial interface for data RS-232 reception - RS-232 - NMEA (RS-422) - RS-485 adjusting data transmitting velocity 4800 Baud adjusting device addressing 000 selecting type of transmission auto talk adjusting transmitting intervall 250 ms (in auto-talk-mode) COMPASS selecting data source for reference direction true North selecting reference direction for magnetic North Issue: 2013/03/04 [Rev 1.03.a] See Remarks chapter. 3.3.2.5.1.1 A higher value is only useful, if drag error compensation activated (drag error will increase). smaller values cause nervous display. 3.3.2.5.1.2 Only source can be selected, which are actually available. I selecting MAG or TRUE a corresponding compass signal has to be connected. If selecting INT , the internal compass module has to be integrated. Page 71 of 72 3.3.2.5.2.1 default setup reasonable, for frequency tuning in maritime band usually by entering channel number. 3.3.2.5.2.2 If the device is to restart with last tuned frequency / channel number “OFF” has to be selected. 3.3.2.5.3.1 required only, if external devices connected. Adjustment depending on connected device. 3.3.2.5.3.2 3.3.2.5.3.3 3.3.2.5.3.5 3.3.2.5.3.6 12-9-1-0013-3-1-61 Operating Manual Bearing System RT 300 5 Appendix 5.1 Wiring pattern (Recommended RT 300 DCU Connections Plan) Issue: 2013/03/04 [Rev 1.03.a] Page 72 of 72 12-9-1-0013-3-1-61