1
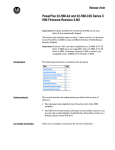
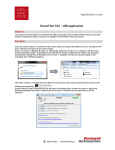
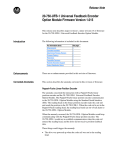
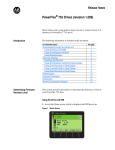
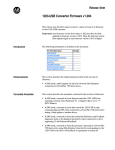
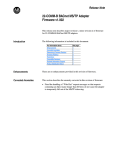
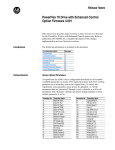
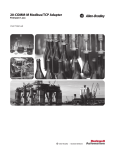
Release Notes
20-COMM-E EtherNet/IP Adapter Firmware Revision
4.002
This release notes document describes major version 4, minor revision 2 of
firmware for 20-COMM-E EtherNet/IP adapters.
The following information is included in this document.
Enhancements
Topic
Page
Enhancements
1
Corrected Anomaly
2
Determining Firmware Revision
2
Firmware Flashing
4
Restrictions
7
Compatible Revisions
7
Rockwell Automation Support
8
Product Satisfaction Return
8
This section describes the enhancements provided in this revision of firmware.
• Improved the dynamic memory allocation HEAP manager to eliminate
potential buffer overruns due to heavy network loading or a burst of
broadcast network messages.
• Added retry detection to the EtherNet/IP UDP server.
• Increased the maximum service data size from 160 to 256 bytes, which
improves data buffering capacity.
• Added logic to detect, ignore, and properly sequence missed I/O packets
when they were received out of order.
2
20-COMM-E EtherNet/IP Adapter Firmware Revision 4.002
Corrected Anomaly
This section describes the anomaly corrected in this revision of firmware.
• A anomaly occurred with the EtherNet/IP UDP server when there was a
problem with the DPI connection to the drive. This caused RSLinx® to
display incorrect information about the device when viewing the Device
Properties screen.
Determining Firmware
Revision
This section describes procedures to determine the firmware revision of your
20-COMM-E EtherNet/IP adapter.
Using the LCD HIM
Step
1. In the Main Menu, press the
to scroll to Device Select.
Example Screens
or
key
F->
Stopped
0.0
2. Press the
selection.
(Enter) key to enter this
3. Press the
or
20-COMM-E adapter.
key to scroll to the
5. In the adapter Main Menu, press the
key to scroll to Diagnostics.
6. Press the
selection.
Main Menu:
Parameter
Device Select
Memory Storage
F->
4. Press the
(Enter) key to display the
adapter Main Menu.
Auto
Hz
Stopped
Auto
Port 5: 20-COMM-E
or
Main Menu:
Diagnostics
Parameter
Device Select
(Enter) key to enter this
7. Press the
or
Device Version.
F->
key to scroll to
8. Press the
(Enter) key to display the
Product Data screen.
Stopped
Auto
Port 5: 20-COMM-E
Diagnostics:
Events
Device Items
Device Version
F->
Stopped
Auto
Port 5: 20-COMM-E
Prev Next
20-COMM-E
FW: 4.001
HW: A Date: 7/12/2009
Rockwell Automation Publication 20COME-RN003A-EN-P - May 2012
20-COMM-E EtherNet/IP Adapter Firmware Revision 4.002
Using DriveExplorer Lite/Full
1. Launch DriveExplorer and go online (via EtherNet/IP using
DriveExplorer Full only, or a 1203-USB or 1203-SSS converter) with the
drive that is connected to the adapter.
2. In the DriveExplorer tree view, click on the 20-COMM-E EtherNet/IP
adapter as shown in Figure 1.
3. Click the information icon to display the adapter’s Properties screen.
4. The “Revision:” field shows the present revision (for example, 4.002) of
the adapter firmware.
TIP
When clicking on the 20-COMM-E adapter using version 5.01 or higher
DriveExplorer Lite/Full, the adapter firmware revision is also shown in
the right pane of the DriveExplorer window.
Figure 1 - Information Icon in DriveExplorer Window
Step 3
Step 2
Step 4
Rockwell Automation Publication 20COME-RN003A-EN-P - May 2012
3
4
20-COMM-E EtherNet/IP Adapter Firmware Revision 4.002
Using DriveExecutive
1. Launch DriveExecutive and go online (via EtherNet/IP, or a 1203-USB or
1203-SSS converter) with the drive that is connected to the adapter.
2. In the DriveExecutive tree view, click on the 20-COMM-E adapter as
shown in Figure 2.
3. Click the information icon to display the adapter’s Properties screen.
4. The “Revision:” field shows the present revision (for example, 4.002) of
the adapter firmware.
Figure 2 - Information Icon in DriveExecutive Window
Step 3
Step 2
Step 4
Firmware Flashing
This section describes procedures to flash upgrade your adapter firmware. Flash
kits for drives and communications adapters are provided on the Allen-Bradley
Web Updates site located at http://www.ab.com/support/abdrives/webupdate.
Flashing can be performed using a drive software tool over EtherNet/IP, or a
1203-USB or 1203-SSS converter. For information about how to connect to your
drive, please refer to the 1203-USB or 1203-SSS User Manual. They can be
viewed/downloaded on the Literature Library web site located at
http://literature.rockwellautomation.com
ATTENTION: Risk of permanent equipment damage exists. Once a flash
update has been started, do not remove power from the drive (or the
20-XCOMM-DC-BASE External Comms Kit, if used) until after the
download has completed and the adapter MOD status indicator starts
FLASHING GREEN. If power is removed before this occurs, the adapter
may be permanently damaged. An adapter that has been damaged in this
way cannot be repaired.
Rockwell Automation Publication 20COME-RN003A-EN-P - May 2012
20-COMM-E EtherNet/IP Adapter Firmware Revision 4.002
5
Installing the Flash Kit
1. Go to the Allen-Bradley Web Updates site at
http://www.ab.com/support/abdrives/webupdate and install the flash kit
for the 20-COMM-E adapter. (This also automatically installs the
ControlFLASH software on your computer.)
2. You are now ready to use DriveExplorer, DriveExecutive, ControlFLASH
or HyperTerminal to update the adapter. Refer to the respective section
below and follow the instructions.
Using DriveExplorer Lite/Full to Flash Update
1. With the Flash Kit installed (see Installing the Flash Kit), launch
DriveExplorer and go online (via EtherNet/IP using DriveExplorer Full
only, or a 1203-USB or 1203-SSS converter) with the drive that is
connected to the adapter.
2. In the DriveExplorer tree view, click on the 20-COMM-E adapter. Then
click the information icon as shown in Figure 1 on page 3 to display the
adapter’s Properties screen.
3. On the 20-COMM-E Properties screen, click the Details tab.
IMPORTANT
This update may cause the adapter parameters to revert to their default
values. You may want to save your configuration using DriveExplorer or
the HIM CopyCat feature before updating.
4. To start the flash update, click the Flash Update… button. Then select
“4.002.xx Full” from the list of available updates and click Next >. Follow
the remaining screen prompts until the flash update procedure completes
and displays the new firmware revision (v4.002).
Using DriveExecutive to Flash Update
1. With the Flash Kit installed (see Installing the Flash Kit), launch
DriveExecutive and go online (via EtherNet/IP, or a 1203-USB or
1203-SSS converter) with the drive that is connected to the adapter.
2. In the DriveExecutive tree view, click on the 20-COMM-E adapter.
Then click the information icon as shown in Figure 2 on page 4 to display
the adapter’s Properties screen.
3. On the 20-COMM-E Properties screen, click the Component Details tab.
IMPORTANT
This update may cause the adapter parameters to revert to their default
values. You may want to save your configuration using DriveExecutive or
the HIM CopyCat feature before updating.
4. To start the flash update, click the Flash Update button. Then select the
20-COMM-E from the list of available devices and click Next >.
5. Select “4.002.xx Full” from the list of available updates and click
Next >. Follow the remaining screen prompts until the flash update
procedure completes and displays the new firmware revision (v4.002).
Rockwell Automation Publication 20COME-RN003A-EN-P - May 2012
6
20-COMM-E EtherNet/IP Adapter Firmware Revision 4.002
Using ControlFLASH to Flash Update
1. With the Flash Kit installed (see Installing the Flash Kit on page 5), launch
ControlFLASH by selecting Start > (All) Programs > Flash
Programming Tools > ControlFLASH.
2. On the ControlFLASH Welcome screen, click Next >.
3. Choose the appropriate 20-COMM-E update from the list of available
updates and click Next >.
IMPORTANT
This update may cause the adapter parameters to revert to their default
values. You may want to save your configuration using the HIM CopyCat
feature, DriveExplorer or DriveExecutive before updating.
4. Expand the tree view for the communication path you are using, and select
the drive icon that represents the drive with the 20-COMM-E adapter you
are updating. Then click OK.
5. With the Multiple Assemblies Found window displayed, select
“Port X - 20-COMM-E” from the list and click OK.
6. With the Firmware Revision window displayed, select “4.002.xx Full”
from the list of available updates and click Next >. Follow the remaining
screen prompts until the flash procedure completes and displays the new
firmware revision (v4.002).
Using HyperTerminal to Flash Update
1. With the Flash Kit installed (see Installing the Flash Kit on page 5), launch
HyperTerminal and go online (via 1203-USB or 1203-SSS converter) with
the drive that is connected to the adapter.
2. Press the Enter key until the main menu (Figure 3 -) appears.
Figure 3 - Main Menu
Main Menu - Enter Number for Selection
1> Display Setup Parameters
2> Display Event Queue
3> Flash Upgrade
3. In the main menu, press 3 to flash upgrade. Then press the number key
that corresponds to the “20-COMM-E” in the list, and press Y (for Yes) to
update the flash code. The terminal program will start displaying the letter
“C.” This signals the XMODEM protocol that the download may
proceed. You then have one minute to start the transfer.
ATTENTION: Risk of injury or equipment damage exists. When you
perform a flash update, the drive will fault if it is receiving control I/O
from the adapter. Verify that the drive has stopped safely or is receiving
control I/O from an alternate source before beginning a flash update.
Rockwell Automation Publication 20COME-RN003A-EN-P - May 2012
20-COMM-E EtherNet/IP Adapter Firmware Revision 4.002
7
4. Select Transfer > Send File to display the Send File screen (Figure 4).
5. Click Browse and navigate to the flash file located in:
C:\ Program Files\ControlFLASH\0001\0078\2000
Figure 4 - Send File Screen
6. In the Select File to Send window list, click on the
“20-COMM-E_04_002_06_Boot.bin” file. Then click Open. This file
name now appears in the Filename box in the Send File screen.
7. In the Protocol box, select “Xmodem.”
8. Click Send. A dialog box appears and reports the progress of the update.
When it is complete, the message “Flash Complete” appears. Press any key
to continue.
IMPORTANT
TIP
Keep the device powered for 15 seconds after the operation has
completed or until the adapter MOD status indicator starts flashing
green.
To cancel the flash update at any time, press CTRL-X.
9. Repeat steps 2 through 8 for the “20-COMM-E_04_002_06_App.bin”
file.
10. Press the Enter key to return to the main menu.
Restrictions
No restrictions apply to this revision of firmware.
Compatible Revisions
To use this revision of firmware, update your system tools as follows:
Update this…
To this Version…
DriveExplorer Lite/Full
4.01 or later
DriveExecutive
3.01 or later
PowerFlex 7-Class Drive
all versions compatible
LCD HIM
all versions compatible
RSLinx Classic
2.43 or later
Rockwell Automation Publication 20COME-RN003A-EN-P - May 2012
Rockwell Automation
Support
Rockwell Automation provides technical information on the web to assist you in
using our products. At http://support.rockwellautomation.com, you can find
technical manuals, a knowledge base of Frequently Asked Questions (FAQs),
technical and application notes, sample code and links to software service packs,
and a MySupport feature that you can customize to make the best use of these
tools.
Rockwell Automation also provides complimentary phone support for drives,
communication adapters, and peripherals. If you experience a problem with the
adapter, please review the information in its User Manual. For further help in
getting your adapter operational, contact a Customer Support representative:
United States
(1) 262.512.8176
Monday – Friday, 7am – 6pm CST
Outside United States
Please contact your local Rockwell Automation
representative for any technical support issues.
For an additional level of technical phone support for installation, configuration,
and troubleshooting, we offer TechConnect Support programs. For more
information, contact your local distributor or Rockwell Automation
representative, or visit http://support.rockwellautomation.com.
Product Satisfaction Return
Rockwell Automation tests all products to ensure that they are fully operational
when shipped from the manufacturing facility. However, if your product is not
functioning and needs to be returned:
United States
Contact your distributor. You must provide a Customer
Support case number (see phone number above to obtain
one) to your distributor to complete the return process.
Outside United States
Please contact your local Rockwell Automation
representative for return procedure.
Allen-Bradley, ControlFLASH, DriveExecutive, DriveExplorer, Rockwell Software, Rockwell Automation, and TechConnect are trademarks of Rockwell Automation, Inc.
Trademarks not belonging to Rockwell Automation are property of their respective companies.
Rockwell Otomasyon Ticaret A.Ş., Kar Plaza İş Merkezi E Blok Kat:6 34752 İçerenköy, İstanbul, Tel: +90 (216) 5698400
Publication 20COME-RN003A-EN-P - May 2012
Copyright © 2012 Rockwell Automation, Inc. All rights reserved. Printed in the U.S.A.