1
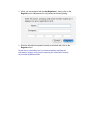
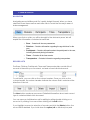
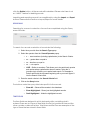
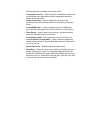
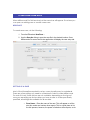
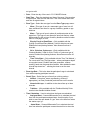
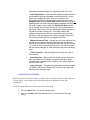
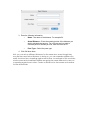
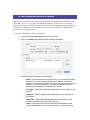
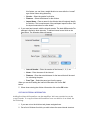
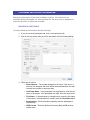
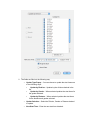
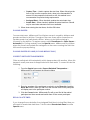
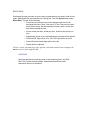
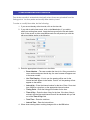
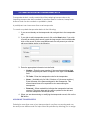
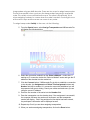
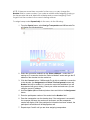
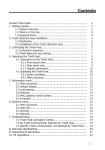
Milliseconds Pro User Documentation Placeholder for picture Milliseconds Computer Services, LLC Salt Lake City, UT, USA © 2006, all rights reserved CONTENTS INTRODUCTION I INSTALLATION Demonstration Mode Registering Milliseconds Pro II USER INTERFACE Navigation Record Lists Searching Time Fields Special Menu III CREATING A NEW RACE New Race New Race Distance IV CREATING/UPDATING AGE DIVISIONS Creating Age Divisions Creating Intervals Copying Intervals V ENTERING/UPDATING PARTCIPANT INFORMATION Entering Participant Information Automatic Start Time Generator (TT Module Only) Assigning Start Times (TT Module Only) Updating Assigned and Actual Start Times Placing Racers Automatically Placing Racers by Hand (Cycling Module) Correct Switched Transponders Recalculate Times Reset Race VI ENTERING/UPDATING TIME DATA Entering Time Data Accepting AMB Data Resetting the Timing Point Setting the Timing Point Clock VII ENTERING/UPDATING TRANSPONDER DATA Entering Transponder Data Assigning Transponders Verifying Transponders Checking in Transponders Missing Transponder List VIII SCORING A RACE I INSTALLATION DEMONSTRATION MODE When you first launch Milliseconds Pro, and you have not registered the application, you will be presented with the following registration dialog. The buttons have the following action: • Quit – Exits the application • Register – Presents the registration dialog, allowing you to enter the registered user’s name, company and license code. • Demo – Start Milliseconds Pro in demonstration mode giving. In demonstration mode, the application has all the functionality for all modules, except when printing results and generating HTML output, every third participant is blank. It also will only run for 30 minutes at a time. • Buy – Launches your web browser and connects you to Milliseconds Computer Services web site. REGISTERING MILLISECONDS PRO In order to register Milliseconds Pro, you will need the following information from Millisecond Computer Services, LLC, the registered user name, registered company, and the registration serial number. This information needs entered exactly as given to you from Milliseconds. 1. If you have not already done so, launch Milliseconds Pro. 2. When you are presented with the Not Registered… dialog, click on the Register button. Milliseconds Pro will present the following dialog: 3. Enter the information requested, exactly as provided, then click on the Register button. I know this is redundant, but if you have problems entering the information, please verify you are entering the information exactly as provided by Milliseconds. II USER INTERFACE NAVIGATION Navigating around Milliseconds Pro is pretty straight forward. When you have selected a race there are five main tabs which control the five major areas of data management. When you click on a tab you will be brought to the data entry area. We will explain the information contained at each tab. • Race – Contains all the race parameters. • Divisions – Contains information regarding the age divisions for the race. • Participants – Contains information about the participants in the race, including times and placing information. • Times – Contains all the time records. • Transponders – Contains information regarding transponders. RECORD LISTS The Race, Divisions, Participants, Times and Transponders tabs contain lists of records. In these lists you can search, sort and access individual records. To sort the list, you can click on the column headers. Once you click on the column header, the column headers indicate the column that is sorted and the direction of the sort. The New button creates a new record. Detailed information about each record type is contained later in this document. You can open an individual record for editing by either double clicking on a record or by clicking it once and then clicking on the Edit button. If you highlight a record or selection of records and click the Delete button, the record will be deleted. If you hold down the option (alt on Windows) key and click the Delete button, all the records will be deleted. Please note there is not an “UNDO” feature for deleting records. Importing and exporting records is accomplished by using the Import and Export buttons. Please see the section on Import/Export for more details. SEARCHING Searching for a record or selection of record is accomplished using the Query area of the tab. To search for a record or selection of records do the following: 1. Select how you wish from the Search Type popup. 2. Select the operator from the Search Operator popup. • = – exact matches (including capitalization) to the Search Criteria • >= – greater than or equal to • <= – less then or equal to • <> – not equal to • LIKE – Similar to searches. This allows you to do partial work queries and queries where capitalization does not matter. Using the % (percent sign) will allow you to partial word search. For example to find all racers with the last name beginning with s you would type s% into the Search Criteria field. 3. Enter the search criteria in the Search Criteria field. 4. Click on the Query button. The buttons under the query criteria do specific for the records. • Show All – Shows all the records in the data base. • Show Highlighted – Shows just the highlighted records. • Omit Highlighted – Hides the highlighted records. TIME FIELDS The time fields are designed to aid in data entry while controlling what is entered. There are two types of time fields, the first just contains a time and the other contains a date and a time. Total times and Net Time are examples of the type of times that are stored in these fields. Milliseconds Pro is designed to allow you to time races up to 99 hours 59 minutes and 59.999 seconds in length. Doing requires being able to store dates with times. In order to support races in that duration, we have to allow dates to be stored with the time. The assigned start, actual start and actual stop times are examples of these. The format is in YYYY-MM-DD HH:MM:SS.THT format. When entering a time into a time and date field, entry point will go to the first digit of the time (see example below). You can begin typing the time. You may also use the left and right arrows to move the entry point and then begin typing. SPECIAL MENU The special menu is where most of the heavy lifting is done by Milliseconds Pro. If is from this men you select the functions the receive times from the timing system, place racers and correct Switched Transponders. • Transponder Assignment – Used to assign transponders. See the transponder section for details on how this works. • Transponder Check-In – Used to check in transponders, which have been checked out to participants. See the transponder section for details on how this works. • Update Start Times – Used to update the start times of the participants. See the Participant section for information on how this works. • Accept AMB Times – Used to accept times from an AMB timing point. See the Participant section for information on how this works. • Place Racers – Used to place or score racers. See the participant section for information on how this works. • Post Results to Web – Not implemented, reserved for future use. • Correct Switched Transponders – Used to correct transponders that participants switched. See the Participant section for information on how to use this, • Recalculate Times – Recalculates all the times stored. • Reset Race – Resets the race to the conditions just before the race started, allowing you to start over. Participant Assigned Start times are set to the divisions start times. DNS and DNF flags are set to yes and DQ is set to no. Actual Stop Time, Net Stop Time and Total Time are set to zero. All time records are deleted. III CREATING A NEW RACE When Milliseconds Pro first launches just the menu bar will appear. From here you can open an existing race or create a new race. NEW RACE To create new race, do the following: 1. From the File select New Race… 2. Use the Save As dialog to save the race file in the desired location. Once Milliseconds Pro saves the file the application will display the race setup tab. SETTING UP A RACE Most of the information required to set up a race is pretty easy to understand. There are a few settings you need to understand in order to make Milliseconds Pro work it’s best. Some options are not available; depending on the type of race you are setting up and modules you have access to. Unless specifically specified, all settings are available for all modules. • Race Name – Enter the name of the race. This will appear on all the start list, results and various other reports. This is a good place to list the title sponsor; however, the space is limited on some reports, so do not go too wild. • Date – Enter the day of the race in YYYY-MM-DD format. • Start Time – Enter the start date and time of the race. If the race has multiple starts, enter the first start time. This is the default start date and time for age divisions. • Race Type – Select the race type from the Race Type popup menu. • Wave –This type of race is a mass start type of race, but will have a different start time for a group of abilities, gender or age divisions. • Mass – This type of race is where all participants start at the same time. This type of race allows the auto-print feature, where Milliseconds Pro will print an Overall by distance results list when there is a full page, to work. • Bicycle Circuit or Road Race – (Only available with the Cycling Circuit/Road Race Module.) Used for bicycle road race. Enables the hand placing features. Also allows more than 3 intervals. • 24 hr, Criterium, Cyclocross – (Only available with the Criterium Module.) Used for 24 hr, Circuit or Cyclocross type of events. Enables hand placing features. Also allows more the 43 intervals. • Time Trial x/Start - (Only available with the Time Trial Module.) For events with Time Trial type starts… where participants depart at a regular interval. Enables start time generation, random seeding, hand start list generation features. Also enables the start interval drop down box… allowing the timer to set the start interval. • Race Age Date – This is the date the participant’s age is calculated from when importing participant records. • Result Type – Select the type of result you wish to produce. • • Normal – Lists place, name, representing, division (if appropriate), net time (if selected) and total time on the results. • Normal with Laps – In addition to the above lists up to three intervals. • Triathlon – (Only available with the Triathlon Module) Prints results in the standard triathlon format. Time Calculation – Used to select how the times are calculated. • Assigned Start – Causes Milliseconds Pro to calculate the total time from the participants assigned start. Use this option if you wish to score the race based on “gun” time or the time from when the starter says “go”. • Actual Start – Causes Milliseconds Pro to calculate the total time from when the participant crosses the start line to when the participant crosses the finish line (frequently called “net” time. • Allow Early Starts – When checked allows participants times to be calculated using the participant’s actual start time if it occurs before the assigned start time. If this is not checked, the participant’s total time is calculated depending the status of the Assigned Start and the Actual Start. Milliseconds Pro ignores all passings that occur before the participant’s assigned start times. The only exception occurs when the Allow Early Starts check box is checked and the data from the time line is processed as start times. When this occurs, the participant’s actual start time is the last time read by timing point. If this time is before the assigned start time, the total time is calculated from the Actual Start time. If the actual start time is after the assigned start time, the total time calculated from the assigned start time. • Minumum Interval Time – Set this time to be the minimum time that has to pass before subsequent passings are counted as a interval time. If a passing occurs before the minimum interval time, it is stored, but is not considered an interval. Use this when there will be multiple passings for each participant at a particular timing point. • Time Truncation – Select the precision at which you wish to time the race. • Race Distances – Miliseconds Pro allows a race to have more than one distance. For example, marathons often have a half marathon race in addition to the marathon race. Add a distance record for each race. • Apply Changes – The apply changes button save the changes you made to the race information tab. Clicking on any other tab also saves any changes made. ADDING RACE DISTANCES Race distance records are used to define and calculate the pace that appears on the results. It also defines the distances that are available in the age categories. To add a race distance to the race do the following: 1. Go to the Race Tab if you are not already there. 2. Click on the New button and Milliseconds Pro will present the following dialog: 3. Enter the following information: • Name – the name of the distance. For example 5k. • Actual Distance – Enter the numeric portion of the distance you wish to calculate the pace on. For a 5k race and you wish to calculate pace on minutes per mile, enter the miles as 3.1. • Pace Type – Select the pace type. 4. Click OK when done. Hint: you can set up different distances for the same race, even though they may be the same actual distance. In doing so, you can separate athletes who really should not be competing against each other. An example of this would be when runners and wheelchair athletes are going the same distance but are not competing against each other. Create on distance for the runners and another for the wheelchairs. IV CREATING/UPDATING AGE DIVISIONS Age Division are used to divide the participant into competitive categories. The separation can occur on age, gender and distance. There has to be at least one age category, but there can be more than one category that a participant is eligible to compete in. For example, a runner may qualify for an age division, as well as, for a weight division. To add an Age Division, do the following: 1. If you are not on the Divisions tab move to that tab. 2. Click on the New button and the following dialog will appear: 3. Enter the division information into the record. • Name – Enter the name of the division. Hint: If your race has multiple distances, Ii is a good idea to indicate which distance the division applies to. That way you can tell at a glance if the participant is in right division. If you just had Male 30 – 39 it may be difficult to tell if the participant is participating in a Marathon or the 5k. • Low Age – Enter the lowest age a participant can be to qualify for the division. • High Age – Enter the highest age a participant can be to qualify for the division. • Start Time – Enter the scheduled start time for the division. It will default to the scheduled start time for the race. • Order – Enter the order in which the division should appear if the participant qualifies for more than one division. For example, using this feature you can force a weight division to come after the “normal” age division when doing data entry. • Gender – Select the gender for division. • Distance – Select the distance for the division. • Import Name – Enter a name for the division that will uniquely identify the division. This is used as part of the participant import function. See the import instructions for more details. 4. If your race has intervals, add the interval records. The basic Milliseconds Pro package is limited to three intervals. To add an Interval record click on the new button. The following dialog will appear: • Interval Number – Enter the number of the interval, 1, 2, 3, etc • Name – Enter the name of the interval. • Distance – Enter the actual distance for the interval that will be used for calculating the pace. • Pace Type – Select the pace type from the popup. When you are done adding the Interval information click on the OK button. 5. When done entering the division information click on the OK button. COPYING INTERVAL INFORMATION Adding the interval information can be repetitive. We have created a way do copy intervals. To copy the interval information from one division to a others, do the following: 1. If your are not on the divisions tab, please navigate there. 2. Get a list of divisions for which you wish to have the same interval structure. 3. Click on the first division record. 4. Click on the Copy Intervals button. 5. Your done. V ENTERING PARTICIPANT INFORMATION Participant information is the heart of Milliseconds Pro. It is where the user maintains timing information for each participant. The entry form is designed to make the process as efficient as possible. ENTERING A PARTICIPANT To enter participant information do the following: 1. If you are not at the participant tab, click on the participant tab. 2. Click on the new button and you will be presented with the following dialog: 3. Fields are as follows: • Racer Number – The number assigned to the racer. If the race is a time trial, the assigned start time will be calculated based on the start intervals and number of racers per start. • Last/Team Name – If the participant is a single person, enter the last name of the person. If the participant is a team, enter the team name. • First Name – If the participant is a single person, enter the first name of the person. If the participant is a team, leave the First Name blank. • Representing – Enter information regarding who the participant is representing. • NGB License – Enter the National Governing Body (NGB) License number here. • Age – Enter the participant’s age. • Gender – Enter the gender for the participant. M for male, F for female and X for Mixed. • Division – Select the appropriate division from the division drop down list. To aid in data entry you may use the arrow keys or begin typing the division name. Once the appropriate division is highlighted, press the Tab key to select the division. When the division is selected, the Assigned Start time and the Assigned Start time has not been set will be populated with the start time from the division. • Assigned Start – Enter the assigned start time. • Actual Start – Enter the actual start time for the participant. • Actual Stop – Enter the actual stop time for the participant. When you leave the actual stop field, Milliseconds Pro will automatically calculate the total time and net time for the participant. • Adjustment – Enter any adjustments to the participant’s time. If you make an entry here, you need to enter a reason in the Adustment/DQ Reason field. When you leave the adjustment field, Millisecond Pro will automatically calculate the total time and net time fir the participant. • Total Time – Enter the total time for the racer. • Net Time – Enter the net time for the racer. • DNS – Checking this checkbox marks the participant as did not start. When an electronic start time is accepted, the application will “uncheck” the DNS check box. If this check box is checked the racer will appear as a DNS on the results, even if the racer has a time. • DNF – Checking this checkbox will mark the participant as did not finish. When an electronic stop time is accepted, the application will “uncheck” the DNF check box. If this check box is checked the participant will appear as a DNF on the results, even if the racer has a time. • DQ – Checking this checkbox will mark participant as disqualified. When this check box is checked, a comment is required in the Adjustment/DQ Reason field. If this check box is checked the participant will appear as DQ on the results, even if the participant has a time. • Laps Completed – This field contains the number of laps the participant has completed. This number can be updated if there was a missed read on at a timing point. • Prevent External Updates – Checking this box prevents the racer record from being updated by external or electronic means. Milliseconds Pro takes the “lowest” stop time that is read from a time line, even if the time is read into the application after “higher” start time. If a participant inadvertently crosses the stop line before they actually complete the race, the second and correct crossing will not update the participant record. So you can correct the actual stop time with the correct time. But if you have to reload the data, the “lower” stop time will update the participant record. Checking this checkbox will only allow updates to the record from the keyboard. • Adjustment/DQ Reason – This field is used to enter comments about why an adjustment was applied to a participant or why a person was disqualified. Information entered here appears on the last page of the results. 4. When you are done entering data, click the OK button. After clicking the OK button another participant record will be presented. If you do not wish to enter another participant, click the Cancel button. AUTOMATIC START TIME GENERATOR (TT MODULE ONLY) ASSIGNING START TIMES (TT MODULE ONLY) UPDATING ASSIGNED AND ACTUAL START TIMES Races rarely start on time to the precise thousandth of a second. So you need a way to capture a start time. When doing this make sure all the clocks, (computer, start time capture, etc) are all synchronized.With the start time you can set the actual start time. To set the start time do the following: 1. From the Special menu select Update Start Time… and Milliseconds Pro will present the following dialog: 2. The fields are filled out the following way: • Update Type Popup – You can choose to update the start times one of the following ways: • Update by Division – Updates by the division checked in the list. • Update by Gender – When selected updates the start times for the gender selected. • Update by Distance – When selected updates the start times for the distance and gender selected. • Update Selection – Select the Division, Gender or Distance desired to update. • New Start Time – Enter the new start time obtained. • Capture Time – Used to capture the start time. When clicked get the time of day from the computer clock, down to the thousandth of a second. As the computer clock tends to drift, this method is not recommended for precise timing requirements. • Assigned Start – When checked, updates the actual start time. • Actual Start – When checked, updates the actual start time. Should only be used when electronic time is not available. 3. When done entering the start times, click the OK button. PLACING RACERS For mass start races, Milliseconds Pro will place racers in overall by distance and gender and then by division. Throughout the race, there will be corrections or updates made to a participants division. When you do this the placing is incorrect for the division. To replace racers, select Place Racers or Place Racers – Automatic(for Cycling module) from the Special menu. Milliseconds Pro will then place the racers and update the categories so the racers crossing the finish line will have the proper placing. PLACING RACERS BY HAND (CYCLING MODULE ONLY) CORRECT SWITCHED TRANSPONDERS Often a participant will inadvertently switch transponders with another. When this happens usually one racer is disappointed with their results. To correct this do the following: 1. From the Special menu select Correct Switched Transponders… Milliseconds Pro will present the following dialog 2. Enter the numbers of the participant to switch in to the Racer No 1 and the Racer No 2 fields. When you tab out of the field the name of the participant will display next to the participant number. 3. Click the Correct button. Milliseconds Pro will go and find all the related participant and time records and switch them to the correct participant.. RECALCULATE TIMES If you change time calculation from Assigned Start time to Actual Start time you will need to recalculate start times. Ti do this select Recalculate Times from the Special menu. RESET RACE Sometimes the race just does not go the way you planned and you need to start all over again. Milliseconds Pro has a simple way of doing this. From the Special menu select Reset Race, This will do the following: • Set all racer record start times to the assigned start time for the participant’s division. Note: If the race is a Time Trial event, the start times will be wrong. We recommend you make a back u of the race data before starting the race. • Set the actual start time, actual stop time, total time and net time to zero. • Adjustments will set to zero and adjustment comments will be erased. • DNS and DNF flags will be set to Yes. DQ Flags will be set to No • Prevent External Update flags will be set to No • Delete all times captured. Division, name, representing, age, gender, switched transponders changes will not be reset to their original state. CAUTIONS Since the participant records are reset to their beginning state, any DNS, DNF, DQ, Prevent External Update, Adjustments and manual times entered will have to be reentered. VI ENTERING/UPDATING TIME DATA Time data normally is entered electronically when times are uploaded from the timing points. You may enter and modify time data by hand. To enter or modify time data, do the following: 1. If you are not already at the time tab, click on the time tab. 2. If you wish to add a time record, click on the New button. If you wish to modify an existing time record, locate the time record in the list and double click on the record. In either case Milliseconds Pro will present you with the edit record dialog similar to the following: 3. Enter the appropriate information in to the fields • Racer Number – The racer number the time is for. After you enter the racer number and press the tab key, the racer’s name will appear next to the racer number. • Use This Passing – If set to yes, the passing will be use for the interval and will appear in the results. If set to “no” the passing will not appear on the results. • Interval No – Enter the interval number for the time. Enter 0 for a start time. 9999 for a stop time, or the appropriate interval number. • Timing Point – Enter the timing point number for the time. • Time of Day – Enter the time of day for the time. If the time of day is entered, the total time and interval time will be calculated with you tab out of the Time of Day field. • Total Time – Enter the total time. • Interval Time – Enter the interval time. 4. When done entering data or making changes click on the OK button. VII CREATING/UPDATING TRANSPONDER DATA Transponder data is usually created by either assigning transponders or by importing transponder data created by another means. However, transponder data records can be created or updated by hand. A participant can have more than one transponder To create or update transponder data do the following: 1. If you are not already on the transponder tab, navigate the to the transponder tab. 2. If you wish to add a transponder record, click on the New button. If you wish to modify an existing time record, locate the time record in the list and double click on the record. In either case Milliseconds Pro will present you with the edit record dialog similar to the following: 3. Enter the appropriate information into the fields: • Number – Enter the racer number. If the racer has participant data entered, the participant name will appear to the right of the Number field. • TX Code – Enter the transponder code for the transponder. • Name – (Available only for 24hr, Criterium or Cylcocross modules.) Enter the name of the person assigned to the transponder. This allows interval times to be reported for who was wearing the transponder. • Returned – When marked this indicates the transponder has been returned. The return date and time will be updated to the date and time the transponder record was saved, 4. When you are done entering or modifying the transponder record, click on the OK button. ASSIGNING TRANSPONDERS Entering in more than one or two transponders is very time consuming and can be error prone. Milliseconds Pro helps solve this problem by allowing you to assign transponders using an AMB decoder. There are two ways to assign transponders. The first is sequential, when you know the transponders are going in sequential order. This usually occurs well before the race. The other is dynamically, this is when assigning numbers to a racer when the order is random. Such might occur at the race’s expo and the racers can come in any order. To assign transponders Serially to the race, do the following: 5. From the Special menu, select Assign Transponders and Milliseconds Pro will display the following dialog: 6. Select the connection method from the Select a Method… combo box. If making an IP connection, delete the “Select a Method” words and type the IP address of the decoder into the combo box. 7. Click the Connect button. If Milliseconds Pro is able to establish a connection to the decoder, the Assignment and Delete This Assignment buttons and Number field will be enabled. If a connection cannot be established you will be presented with a error dialog. Check your cables and make sure you are using the correct IP address 8. Enter the first number of the series into the Number field. 9. Pass the transponder over the decoder loop. If the assignment is successful, the computer will beep, the number will increment, and the transponder number will display. . And if the participant’s information has been entered, the participant’s information will be displayed as well. 10. Repeat step 5 until you are done assigning transponders. 11. When you are done assigning transponders, click on the Done button. NOTE: If there are more than one series for the race, you may change the Number field to a new number. If you make a mistake while assigning, simply go the transponder tab and delete the mistakes and proceed assigning. Don’t forget to set the number to the correct starting number. To assign transponders Dynamically to the race, do the following: 1. From the Special menu, select Assign Transponders and Milliseconds Pro will display the following dialog: 2. Select the connection method from the Select a Method… combo box. If making an IP connection, delete the “Select a Method” words and type the IP address of the decoder into the combo box. 3. Click the Connect button. If Milliseconds Pro is able to establish a connection to the decoder, the Assignment and Delete This Assignment buttons and Number field will be enabled. If a connection cannot be established you will be presented with a error dialog. Check your cables and make sure you are using the correct IP address 4. Hold the Option (Alt on Windows) button down and click on the Assignment button. 5. Enter the participants number of the series into the Number field. 6. Pass the transponder over the decoder loop. If the assignment is successful, the computer will beep, the number will increment, and the transponder number will display. And if the participant’s information has been entered, the participant’s information will be displayed as well. 7. Repeat steps 5 and 6 until you are done assigning transponders. 8. When you are done assigning transponders, click on the Done button. NOTE: If there are more than one series for the race, you may change the Number field to a new number. If you make a mistake while assigning, simply go the transponder tab and delete the mistakes and proceed assigning. Don’t forget to set the number to the correct starting number. VERIFYING TRANSPONDERS CHECKING IN TRANSPONDERS MISSING TRANSPONDER LIST