1
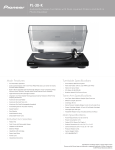
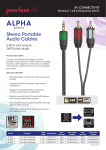
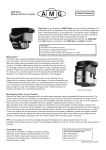
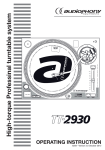
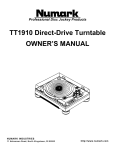
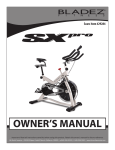
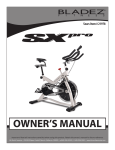
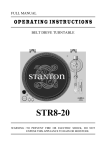
STR8-80
DIRECT DRIVE
DIGITAL OUT
START/STOP
KEY CORRECTION
502-STR880-1029B
USER'S MANUAL
(1) Operating instructions
(2) Platter
(3) Slip mat
(4) Counterweignt
(5) 45 rpm adaptor
(6) Headshell with 520sk cartridge
(7) Dust cover
(8) AC cord
(9) Connecting cord
Be sure to turn off the amplifier's power when making connections.
(1) Analog connections
1
Connect the left (white) and right (red) plugs RCA cord to the amplifier's
left and right "Phono".
2
Connect the connector side of the power cord to the set's power
connector terminal (AC IN).
3
Plug the power cord into an appropriate power outlet.
CONNECTIONS
ASSEMBLY
Please check to make sure the following items are included with the main unit in
the carton:
Check that the power outlet's capacity is sufficient.
FEATURES
(2) Digital connections
1.High torque brush less DC motor
This set uses a high torque brushless DC motor to reach the normal speed of
rotation rapidly and reduce braking time.
2. +/-8%/+/-12% pitch control
The pitch can be changed in a range of +/-8%,+/-12% using the pitch slider.
A quartz lock On/off button lets you return to the normal speed of rotation at the
touch of a button.
3. Pitch correction
When pitch correction is on, musical key tone can be kept constant even when
the platter speed is changed with the slider.
1
Use an RCA cord (not included) to connect the digital output jack.
2
Connect the RCA cord of step 1 into the digital input jack of a "Digital
Processor" or "MD Recorder".
3
Connect the connector side of the power cord to the set's power
connector terminal (AC IN).
4
Plug the power cord into an appropriate power outlet.
Check that the power outlet's capacity is sufficient.
4. 78 rpm compatible
This set can play 33, 45 and 78 rpm records.
5. Digital out
The music output is in digital format and can be reproduced on an external digital
processor or an MD recorder.
Remover all the parts from the box.
2
Remover the packaging materials from the unit and all the parts.
Set the parts on a stable surface when removing the packaging materials.
Handling the parts roughly could result in scratches or deformation.
3
Check the voltage selector switch is set to an appropriate position.
ex.
U.S.A & CANADA : 115V
230V
EUROPE :
4
Insert the platter onto the motor shaft.
5
Set the slip mat on the platter, lining it up with the motor shaft.
2
AC 115/230v, 50/60Hz:
Power consumption:
15W
Dimensions:
450(W) x 352(D) x 148(H)mm
Weight:
9.5Kg
Motor:
8pole, 3phase, brushless DC motor
Starting Torque:
More than 1.6 kgf.cm
Platter:
330mm dia. Aluminun diecast
Pitch:
+/-12%, +/-8%
Brake:
Electronic brake
Wow & Flutter:
Less than 0.20% WRMS (JIS WTD) with 331/3rpm
S/N ratio:
More than 50dB (DIN-B)
Channel Separation:
More than 15 dB
7
SPECIFICATION
1
Power supply:
1
Turn the power dial to turn on.
1
Mount the counterweight on the shaft at the back of the tone arm.
The speed button and the strobe-illuminator light up.
2
Turn on the amplifier's power. Then, select the function switch.
3
Set a record on the platter.
* To play 45 rpm records, use the included adaptor.
4
Set the speed button's according to the record's playing speed.
5
Press the START/STOP button.
6
Hold the head shell's finger support, and move the tone arm to the
desired position over the record.
7
Lower the tone arm gently until the stylus is on the record and playback
begins.
8
Adjust the speed of rotation.
Mounting the cartridge
1
Insert the headshell on which the cartridge has been mounted into the
tone arm and fasten it in place using the lock nut.
Instructions on how to setup the tonearm from the website should be added on this page.
When QUARTZ LOCK Is off, the speed of the platter can be adjusted in a range
of +/-8% / +/-12% by the pitch slider.
The speed is lower than the displayed speed when the strobe is flowing to the
right, higher than the displayed speed when the strobe is flowing to the left.
When the strobe is stopped, the platter is turning at the displayed speed.
When the key adjust button is pressed during the pitch control mode, the button
lights on, and musical key tone can be kept constant even the platter speed is
changed with the slider.
Stopping or interruption playback
1
Stopping or interruption playback.
Raise the tone arm off the record.
2
Hold the head shell's finger support and move the tone arm back onto the
arm rest.
3
Secure the tone arm on the arm rest.
4
Press the START/STOP button.
The platter stops turning.
6
3
ASSEMBLY
OPERATION
Mounting the counterweight
Starting playback
7 Key correction
19
Press to enable key correction the light will turn on and the key won't change when adjusting
the pitch slider. Press again to disable key correction the light will turn off.
20
17
18
8 Quartz lock
ON - Will hold the revolution speed at exactly the specified speed.
OFF - Will allow use of the pitch adjust.
16
9 Reverse/Motor off
15
1
14
13
2
12
11
Press this button to switch the reverse and forward playback.
Hold the reverse button more than 0.5sec , the orange light will on and the player
will brake stop; hold the button again to disable the motor off.
10 Headshell
The cartridge has been pre-mounted on the headshell.
When installing a cartridge, refer to the installation instructions supplied by the
manufacturer of that cartridge.
During installation, attach the stylus protector to guard the stylus tip from damage.
3
10
4
START/STOP
11 Pitch slider
Use this to change the speed of the platter when the PITCH button is lit. You can
adjust the speed in a range of +/-8% or +/-12%.
12 Headshell locking nut
5
6
7
8
9
Attach headshell by inserting into the front end of the tone arm, then turn the locking
nut clockwise with the head shell firmly held horizontally.
13 Tonearm
1 Strobe dots
14 Tone arm clamp and rest
Use this rest the tone arm and clamp it in position during transportation.
15 +/-8% / +/-12% switch
2 Voltage selector
230V
115
Check that the voltage selector switch is set to an appropriate voltage before use.
Press this button to switch pitch in +/-8% that green light is on and pitch in +/-12% that
red light is on.
16 Counterweight
230
115V
Use this to balance the tone arm and to adjust the stylus pressure.
17 Extra stylus holder
3 Power dial (POWER)
Place extra headshells here.
ON-Rotate right
OFF-Rotate left
18 45rpm adaptor holder
4 Start/Stop button (START/STOP)
Press this button to start and stop the platter rotation.
5 Platter revolution speed buttons
Place on the attached 45 rpm adaptor here.
Push down the rear side of 45 rpm adaptor to take it.
19 Remote Start / Stop
This jack can be connected with an external switch to perform the Start / Stop
operation.
33 rpm - Press 33
45 rpm - Press 45
78 rpm - Press 33 and 45
20 Output terminal (DIGITAL OUTPUT)
6 Target light
Press the button to the right and a light will pop up directed at the stylus position.
4
Use this output to connect your STR8-80 to a digital device such as a CD-R or
Computer.
5
PART NAMES AND FUNCTIONSPASSEMBLY
TOP PANEL