1
DataHand Professional II™
U se r ' s Gui d e
Version 1.7.5
November 21, 2002
DataHand® Systems
© Copyright 1997, DataHand® Systems, Inc.
3032 North 33rd Avenue
Phoenix, AZ 85017
All rights are reserved. No part of this publication may be reproduced, stored in a retrieval system or
transmitted in any form or by any means, mechanical, photocopying, recording or otherwise, without the
prior written permission of DataHand® Systems, Inc.
DataHand® Systems is a registered trademark of DataHand® Systems, Inc. Apple is a registered
trademark of Apple Computer, Inc. IBM is a registered trademark of IBM Corporation. Microsoft and
Windows are registered trademarks of Microsoft Corporation.
Neither DataHand® Systems, Inc. nor its affiliates shall be liable to the purchaser of this product or third
parties for damages, losses, costs or expenses incurred by purchaser or third parties as a result of:
accident, misuse or abuse of this product or unauthorized modifications, repairs or alterations to this
product.
DataHand® Systems, Inc. and its affiliates shall not be liable for any damages or problems arising from
the use of any options or any consumable products other than those designated as original DataHand®
Systems, Inc. products or DataHand® Systems, Inc. approved products.
ii
User's Guide, Version 1.7.5, November 21, 200
Co n g ratu l ati o n s!
For choosing the world’s finest
User-to-computer interface.
You are now on the leading edge of interface technology. Your DataHand® System
is a new and advantageous way to work with your computer. Learning to use the
system requires commitment, patience and persistence, which will be well rewarded
by increased comfort, reduced exposure to injury and long-term productivity
increases.
Although this DataHand® System was designed with the goal of reducing
injury exposure, the prolonged use of any manually operated data entry device
(including this DataHand® System) may result in repetitive stress injury or
related injury.
If pain, discomfort, numbness or tingling in the hands or arms is experienced during
or as a result of use, consult an appropriate medical professional and reduce usage
until discomfort is eliminated. Avoid other activities that may aggravate your
condition, such as using other less ergonomic keyboards. To reduce your risk of
repetitive stress injury, please see the ergonomic guidelines in the Ergonomic
Suggestions section of this user manual.
Take frequent breaks from typing and maintain good health habits.
User's Guide, Version 1.7.5, November 21, 2002
iii
CONTENTS
SECTION 1
®
W H A T I S TH E DA T A H A N D
SY S T E M ?
®
Advantages Of The DataHand System
Be Comfortable While Working
Type With Only Slight Finger Movements
Increase Your Efficiency
Hardware Compatibility
Software Compatibility
Care and Maintenance
1
3
3
3
3
4
4
4
SECTION 2
5
G E T T I N G ST A R T E D
Checking the Parts in Your Shipment
Identifying the Components of the Hand Units
Connecting the Equipment
6
7
8
SECTION 3
P O S I T I O N I N G YO U R S E L F
Ergonomic Suggestions
Using The LapLander™
12
13
13
SECTION 4
T R A I N I N G AI D S
Using the Training Aids
iv
16
17
User's Guide, Version 1.7.5, November 21, 2002
SECTION 5
L E A R N I N G TO US E TH E HA N D UN I T S
Learning a New Skill
Setting Reasonable Performance Expectations
Moving Your Fingers to Press the Keys
Moving Your Thumbs to Press the Keys
19
20
20
21
22
SECTION 6
THREE MO DES OF OPERATI O N
Accessing Different Modes
Using Protected Mode Keys
Keys Available in Several Modes
Normal Mode
Keys Available in Normal Mode
A cc essi n g N o r m al M o d e
Layout of Keys in Normal Mode
NAS Mode
Keys Available in NAS Mode
Accessing NAS Mode
Layout of Keys in NAS Mode
10-Key Pad
Keys Available in 10-Key Pad Configuration
Accessing the 10-Key Pad
Layout of 10 Key Pad
Mouse Function Mode
Keys Available in Mouse Function Mode
Accessing Mouse Function Mode
Layout of Keys in Mouse Function Mode
Mouse Click Lock
23
24
25
26
27
27
27
29
31
31
31
31
34
34
35
35
37
37
37
38
38
SECTION 7
U S I N G TH E FI N G E R M O U S E AN D AR R O W KE Y S 4 1
Activating the Mouse or the Arrow Keys
Moving the Mouse Pointer
Moving Slowly
Moving Quickly
Moving at High Speed
Moving Diagonally
Changing Mouse Speed Settings
Clicking the Mouse Buttons
Using the Arrow Keys to Move the Cursor
Moving the Cursor
Switching Back to the Finger Mouse
User's Guide, Version 1.7.5, November 21, 200
42
42
42
42
42
42
43
43
43
43
44
v
Mouse Click Lock
MOUSE Click Lock:
WINDOWS EXAMPLES:
44
44
44
SECTION 8
45
S P E C I A L KE Y S
Switching Left and Right Function for Duplicate Keys: The L/R Modf
Key
46
®
Changing DataHand System Settings: Program Selection Keys 47
Shortcut Keys: Creating Macros
49
Defining and Replaying a Sequential Macro
49
Defining and Replaying a Chorded Macro
50
Reprogramming or Nulling a Macro
50
Programming a Direct Substitution Key
51
SPECIAL KEYS, FEATURES AND OPTIONS
52
Windows Keys ... 104 Keyboard
52
Cursor Keys
52
Mouse Nudge
52
Swap Alt and CTL Keys:
52
L/R ALT and CTL KEYS:
52
SwapThumb ‘UP’ Keys:
53
Foot Pedal Support:
53
PS/2 Mouse Enable:
53
DH-200 MODEL COMPATIBILITY:
53
MacIntosh Users:
53
SECTION 9
55
CO M M O N QUESTI O NS
Questions and Answers
56
SECTION 10
W I N D O W S NO T E S & SH O R T C U T KE Y S
Shortcut Keys using EXCEL with DataHand
Shortcut Keys using Windows with DataHand
Shortcut Keys using WORD with DataHand
G E T T I N G M O R E HE L P
vi
60
61
62
63
64
User's Guide, Version 1.7.5, November 21, 2002
SECTION 1
W H A T IS TH E
D A TA H A N D ® S Y S TE M?
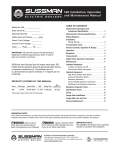
The DataHand® System features a special pair of input devices called hand
units. What makes the hand units so unique is that they combine and replace
the functions of a flat keyboard and mouse, while maximizing your comfort
and efficiency.
SECTION 1 W H A T I S T H E D A T A H A N D S Y S T E M ?
Figure 1. The Hand Units
The hand units were designed around the hands’ most natural position. They
do not force the hand to adapt to the device. Instead of making your fingers
move to the keys, they bring the keys to your fingers.
2
User's Guide, Version 1.7.5, November 21, 2002
SECTION 1 W H A T I S T H E D A T A H A N D S Y S T E M ?
Advantages Of The DataHand® System
Using the hand units instead of a flat keyboard for computer input has many
advantages. Here are some of them.
Be Comfortable While Working
To increase your working comfort you can:
♦ Reduce unnatural arm and elbow bends by tilting the hand units
and spreading them comfortably apart.
♦ Lean back in your chair while working by using the LapLander™
to place the hand units on your lap.
♦ Adjust the arch of your fingers, relative to your hand, by moving
the finger board up, down, forward or backward.
♦ Rest your hands on the palm supports. The supports come in
two sizes: large and small. They support your hands in a
relaxed position and eliminate wrist motions.
See the Ergonomic Suggestions section for more details and an
illustration.
Type With Only Slight Finger Movements
To type on the hand units, you move the fingers only slightly in one
of 5 directions: north, south, east, west and straight down. You
move the thumbs in 4 directions: east, west, straight down and up.
This reduces the repetitive downward pecking motions of fingers
required to operate a flat keyboard and therefore reduces repetitive
stress exposure.
Increase Your Efficiency
You can easily touch-type all the keys on the hand units. Minuscule
finger movements access all the standard keys, the function keys
and the mouse, so blind reaches are eliminated. This reduces
finger workload and can also boost your productivity.
User's Guide, Version 1.7.5, November 21, 2002
3
SECTION 1 W H A T I S T H E D A T A H A N D S Y S T E M ?
Hardware Compatibility
The DataHand® System plugs into all personal computers (ATs and newer)
and compatibles, without the need for additional hardware or software. The
following computers are also supported:
•
•
•
•
•
•
•
•
Apple Macintosh, with an adapter for the Apple Desktop Bus (ADB) or
Universal Serial Bus (USB)
Hewlett Packard X-Terminal
IBM PS/2
IBM RS6000
IBM 3270 mainframes
NCD 101 X-Terminal
Silicon Graphics’ Indy and Indigo II (currently being tested)
SUN (usable type-5 keyboard using SUN’s interface converter)
If you have a computer that is not on this list, and it has a keyboard that you
can unplug, DataHand® Systems, Inc. can set up a custom adaptation of the
DataHand® System to your machine. To discuss customization services,
contact DataHand® Systems, Inc. by using the reference in the Getting More
Help section of this manual.
Note: The right hand unit contains firmware that allows the hand units to be
connected to your particular computer. Utilyzing optional adapters the hand units can
be connected to different types of computers, such as Macintosh or Sun Systems.
Software Compatibility
Any software that runs on your computer will be compatible with the
DataHand® System. By pressing the appropriate keys or key combinations
on the hand units, you can perform the same functions you performed using a
flat keyboard.
If you have a question about how your software is behaving with the hand
units, first read the manual for your software and the Using the Hand Units
and the Common Questions sections in this manual. If you still have a
question, contact DataHand® Systems, Inc. using the reference in the
Getting More Help section.
Care and Maintenance
The DataHand Ergonomic Keyboard requires cleanliness as does all
electric/electronic devices. Foriegn material and dust can cause the keys to not
function or stick open causing multiple characters. Periodically cleaning with canned
air (found in most computer supply stores) will clear the key gaps of foriegn material
and maintain normal operations.
The Palm pads may be removed and washed in a dishwasher.
4
User's Guide, Version 1.7.5, November 21, 2002
SECTION 2
GE TTIN G S TA R TE D
This section identifies and describes the parts of the Professional II™. It
instructs the user how to connect the hand units to your computer and
presents outlined diagrams of the hand units. This section also explains the
warranty that correlates with the DataHand® System purchase. With the
information in this section, the user has enough information to acquaint
themselves with the hand units to successfully begin using the DataHand
System.
SECTION 2 G E T T I N G S T A R T E D
Checking the Parts in Your Shipment
The checklist below describes the parts in your shipment. If any parts are
missing or damaged or to order replacement parts, contact DataHand®
Systems, Inc. customer service using the reference in the Getting More Help
section of this manual. The parts will be sent as soon as possible.
Note: The DataHand® System does not contain a separate mouse. The mouse
function is included in the keys operated by the index fingers on the hand units.
PARTS CHECKLIST
Part Name
þ Hand units:
Left and right
þ Palm
Supports:
Left and right
þ LapLander™:
Use is optional
Description
The hand units are contoured for each
hand and contain finger wells with keys
for each finger. The serial number of
your system is on the underside of each
hand unit. See Figure 2 for a diagram of
the right hand unit.
The palm supports are removable parts
of the hand units. They come in one of 2
sizes: large (L) or small (S). See Figure 2
for a diagram of the right hand unit.
The LapLander™ is a foam-lined board
to which you can bolt the hand units.
See Ergonomic Suggestions page
13 for details.
Order Number
Left hand unit = A240L
Right hand unit = A240R
Left support (L) = 247LL
Right support (L) = 247RL
Left support (S) = 247LS
Right support (S) = 247RS
B70000001
WARNING: DO NOT REMOVE THE
FOAM PADS AND REATTACH TO
THE LAPLANDER --- THE SCREWS
WILL BREAK THROUGH THE
PLASTIC TOP.
þ Foam Wedges:
Two
þ DataHand
System User
Guide
þ DataHand
System
The foam wedges can be used to tilt the
hand units when they are bolted to the
LapLander™. See Ergonomic
Suggestions page 13 for details.
The manual you are reading is the user
manual. It explains how to install the
DataHand® System.
The Training Guide provides step by step
instructions with practice drills.
F70000002
U-200M
U-300M
Training Guide
6
User's Guide, Version 1.7.5, November 21, 2002
SECTION 2 G E T T I N G S T A R T E D
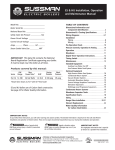
Identifying the Components of the Hand Units
The following diagram labels the parts of the right hand unit. The left-hand
unit mirrors the right hand unit, except it does not have parts 9, 10 and 13.
13
Figure 2. Diagram of the Right Hand Unit
(1)
(2)
(3)
(4a,b)
Finger well surrounded by keys.
The direct access key above the thumb.
Template of key names color-coded by mode.
Nuts for raising or lowering the internal finger board, one on each
side of the hand unit.
(5)
Dials for moving the left and right sides of the finger board, forward
or backward.
(6)
Ribbed rubber palm support, removable and available in two sizes:
Large and small.
(7)
Bolt that attaches the hand unit to the optional LapLander™.
(8a,b) Tilt feet on the underside of the hand unit.
(9)
Keyboard-to-computer cable. This is the 6-pin mini din connector.
(10)
Mouse cable. This is the serial cable with a 9-prong female
terminator. (If PS/2 mouse version, cable has a 6-pin round
terminator like part #9).
(11)
Cable that connects the right and left hand units to each other.
(12)
Bolt that attaches the palm support to the hand unit.
(13)
Four mode indicator lights.
The serial number for your system is on the bottom of both hand units.
User's Guide, Version 1.7.5, November 21, 2002
7
SECTION 2 G E T T I N G S T A R T E D
Positioning the DataHand Ergonomic Keyboard
The DataHand System operates with infrared devices. For stable operation:
1) Keep the units out of direct sunlight: such as near office windows;
2) Place work or desk lamps at least 3 feet away from the units; and
3) If work or desk lamps are within three feet, do not aim the light directly at
the units.
Connecting the Equipment
To connect the DataHand® System to your computer, remove the old input
devices and replace them with the hand units, but you must follow the
instructions below to connect the equipment properly.
Step 1. Preparing the computer.
Power down your computer. This is an important step because the
mouse might not work if you connect the equipment before you shut
off the computer.
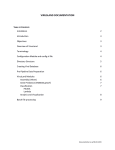
Step 2. Preparing the hand units and using the LapLander™.
♦ The DataHand Ergonomic Keyboard is shipped mounted to the
LapLander. NOTE: If the unit is removed from the LapLander,
do not reinstall the bolts (#12 in Figure 2, #4 in Figure 3)
because the threaded stud is too long and will damage your
unit.
♦ Make sure that the cable that attaches the two hand units to each
other is securely in place.
8
User's Guide, Version 1.7.5, November 21, 2002
SECTION 2 G E T T I N G S T A R T E D
Figure 3. Bolting the Hand Units to the LapLander™
(1)
(2)
(3)
(4)
(5)
LapLander™
1 Slot
Schematic left and right hand units
Bolts that attach the hand units to the LapLander™
Foam Pads
User's Guide, Version 1.7.5, November 21, 2002
9
SECTION 2 G E T T I N G S T A R T E D
Step 3. Removing your old keyboard and mouse.
With your computer turned off, unplug your old keyboard and
mouse, if you had one, from the back of the computer making note
of which ports you used.
Step 4. Identifying the keyboard-to-computer and mouse cables.
Identify the following two cables that emerge from the right hand
unit:
♦ The keyboard-to-computer cable (#9 in Figure 2) has a 6-prong
round terminator.
♦ The mouse cable (#10 in Figure 2) has either a 9-prong female
terminator or a 6-prong round terminator, depending on whether
you have a serial or PS/2 mouse.
Step 5. Connecting the keyboard-to-computer cable.
Plug the cable with the 6-prong terminator into the computer port
from which you removed your keyboard in Step 3.
NOTE: Some notebook computers such as the IBM Thinkpad,
require a “Y-Connector” to connect an external keyboard such
as the DataHand Ergonomic Keyboard to a common single dual
port for the mouse and keyboard connection.
Step 6. Connecting the mouse cable.
♦ If you had a serial mouse, your cable has a 9-prong terminator.
Plug it into the computer port from which you removed your
mouse in Step 3. This will be one of the serial ports, COM 1
through COM 4.
♦ If you had a PS/2 mouse, your cable has a 6-prong round
terminator. Connect the cable to the PS/2 mouse port.
Step 7. Starting your computer.
Turn on your computer.
The green light on the right hand unit should go on indicating you
are in Normal mode.
Note: The right hand unit contains firmware that allows the hand units to be
connected to a IBM PC computer. To connect the keyboard to other
computers such as Macintosh or Sun, you will need an appropriate
converter … contact us for available adapters.
10
User's Guide, Version 1.7.5, November 21, 2002
SECTION 2 G E T T I N G S T A R T E D
Attention
Your DataHand® System has been tested and found to comply with the limits for a
Class B digital device, pursuant to Part 15 of the FCC Rules. These limits are
designed to provide reasonable protection against harmful interference when
equipment is operated in a commercial environment. This device generates, uses,
and can radiate radio frequency and, if not installed and used in acchordance with
this instruction manual, may cause harmful interference to radio communications.
However, there is no guarantee that interference will not occure in a particular
installation. If this device does cause harmful interference to radio or television
reception, which can be determined by turning the device off and on, you are
encouraged to try to correct the interference by one of more of the following
measures:
• Reorient or relocate the receiving antenna.
• Increase the separation between the equipment and receiver.
• Connect the equipment into an outlet on a circuit different from that to which the
receiver is connected.
• Consult the deal or an experienced radio/TV technician for help
User's Guide, Version 1.7.5, November 21, 2002
11
SECTION 3
P OS ITION IN G Y OU R S E LF
This section present the proper positioning of the units to maximize correct
ergonomic style as well as attain the most efficient results. Four steps are
provided in order to increase your working comfort. Together with your chair
and armrests or LapLander™, you can obtain proper hand, arm and upper
body support.
SECTION 3 P O S I T I O N I N G Y O U R S E L F
Ergonomic Suggestions
The following suggestions are meant to increase your working comfort.
Remember that frequent rest breaks and exercises are advised after a period
of typing on any keyboard.
Using The LapLander™
Your Professional II™ comes attached to an optional LapLander™.
The LapLander™ is designed for the user to position the hand units
on the lap as opposed to placing them on the desk. The
LapLander™ is made of a flat-surfaced board with foam attached on
the bottom in order to provide cushion while resting the Professional
II™ on your lap. If you choose to use the Professional II™ without
the optional LapLander, the hand units should be removed from the
LapLander™ and placed on the desk.
WARNING: DO NOT REMOVE THE FOAM PADS AND REATTACH TO
THE LAPLANDER --- THE SCREWS WILL BREAK THROUGH THE
PLASTIC TOP.
Step 1. Positioning your chair, arms and legs.
Your hands and wrists should be in line with each other. Your wrists
should not be twisted or bent. Arm rests on the sides of your chair
can help to support your arms and increase your comfort.
♦ If you use the optional LapLander™:
You can lean back in your chair as you type, but remember to
position yourself so that your wrists are straight.
♦ If you do not use the optional LapLander™:
Place the hand units on the table in front of you. Adjust your
chair so that when you sit you will have angles of 90 degrees or
more at your knees, hips-to-thighs and elbows. If your chair has
arm rests, you may find you are now able to use them to help
support your arms and upper body while you are using the
DataHand® System.
Warning
Although this DataHand® System was designed with the goal of reducing injury
exposure, the prolonged use of any manually-operated data entry device (including
this DataHand® System) may result in repetitive stress injury or related injury.
If pain, discomfort, numbness or tingling in the hands or arms is experienced during or as a
result of use, consult an appropriate medical professional and reduce usage until discomfort
is eliminated. Avoid other activities that may aggravate your condition, such as using other
less ergonomic keyboards. To reduce your risk of repetitive stress injury, please see the
ergonomic guidelines in the Ergonomic Suggestions section of this user manual.
Take frequent breaks from typing and maintain good health habits.
User's Guide, Version 1.7.5, November 21, 2002
13
SECTION 3 P O S I T I O N I N G Y O U R S E L F
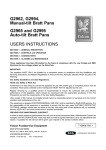
Figure 4. Ergonomic Suggestions
Step 2. Finding a comfortable position for the hand units.
♦ If you use the optional LapLander™:
The hand units are in a lower position than they would be if they
were on the table in front of you. Consequently, they will be
closer together than shoulder-width. You can slide the hand
units through the slits in the LapLander™ as close as or as far
apart as you want. You can also swivel the hand units.
♦ If you do not use the optional LapLander™
Although you might be accustomed to keeping your hands close
together when typing at a keyboard, in the long run placing the
hand units shoulder-width apart will increase your comfort. It will
maintain the forearms at a comfortable angle to the shoulders
and will prevent unnatural curving of the hands and arms around
the body that occurs when using a flat keyboard.
14
User's Guide, Version 1.7.5, November 21, 2002
SECTION 3 P O S I T I O N I N G Y O U R S E L F
Step 3. Adjusting the internal fingerboard.
Everyone’s fingers are different. You can raise, lower or tilt the
finger board to adjust the arch of your fingers relative to your hand:
a) Loosen the nuts (#4a and #4b in Figure 2) on the sides of each
hand unit.
b) Rest one hand on its hand unit.
c) With your other hand, slide the finger board around until it barely
touches the finger tips of your stationary hand.
d) Use the dials on the hand unit (#5 in Figure 2) to move the right
and left sides of the finger board forward or backward.
e) Tighten the nuts.
f) Repeat steps a) through e) for the other hand.
Figure 5. View of the Tilt Feet
Step 4. Using the foam wedges or tilt feet to tilt the hand units.
You might be more comfortable elevating the thumb side of each
hand unit.
♦ If you use the optional LapLander™:
Insert the foam wedges between the hand units and the
LapLander™ on the thumb sides of the hand units.
♦ If you do not use the optional LapLander™:
Raise the tilt feet (#8a and #8b in Figure 2) under the thumb
sides of the hand units. The feet have 2 positions. You cannot
do this if the hand units are attached to the LapLander™.
User's Guide, Version 1.7.5, November 21, 2002
15
SECTION 4
TR A IN IN G AID S
Several training aids were shipped with the DataHand® System, and if you
wish, you can make copies of these aids.
SECTION 3 P O S I T I O N I N G Y O U R S E L F
Using the Training Aids
The training aids have four parts:
♦
Instructions on how to install the DataHand® System to your computer.
♦
A fold-out explaining the parts of the DataHand® System.
♦
Set of templates to use while learning the DataHand® System.
♦
Series of lessons to help you to learn how to use the mouse/function
mode, numeric mode (NAS), alpha mode (NORMAL) and 10-key mode.
User's Guide, Version 1.7.5, November 21, 2002
17
SECTION 5
LE A R N IN G TO U S E TH E
H A N D UN ITS
Learning to use the hand units can be exciting and rewarding. This section
teaches you how to be efficient while learning to adapt a new skill and how to
set reasonable performance expectations. It also teaches you how to move
your fingers when operating the different keys. Keep in mind that practice is
essential to master any new skill.
SECTION 5 L E A R N I N G T O U S E T H E H A N D U N I T S
Learning a New Skill
You can learn to use the hand units most easily by:
♦
Setting reasonable performance expectations.
♦
Using the DataHand® System Training Aids shipped with the DataHand®
System if you have Microsoft Windows®.
♦
Positioning yourself comfortably and taking frequent breaks (see the
section Ergonomic Suggestions for recommendations on positioning
yourself).
♦
Avoiding switching back and forth between a flat keyboard and the hand
units if you find switching to be confusing.
If this is your first experience typing, or if you want to practice typing using the
hand units, you can install a program such as Typing Tutor V™ (Simon and
Schuster) or Dvorak on Typing™ (Interplay). These commercially available
typing programs work well with the DataHand® System. They provide
practice exercises and feedback on accuracy and speed. They can be
purchased from any office supply store at a moderate price and run on a
variety of computers.
If you are converting from a flat keyboard to the hand units, it might be best to
not switch between the two types of keyboards more than necessary.
Frequent switching might be confusing while you are first learning. In
addition, if you are recovering from a hand injury using a flat keyboard might
prolong healing or cause more injury.
Whether you are converting from a flat keyboard or learning to type for the
first time, your comfort level with the DataHand® System will continually
improve with use. You can gain considerable proficiency over time. Over a
period of time, almost every DataHand® System user finds it to be faster and
more comfortable than any other keyboard.
Setting Reasonable Performance Expectations
Many new users wonder why they are not able to attain their previous typing
speeds on the hand units in just a few hours. Becoming proficient in any new
skill takes commitment and practice. Eventually your typing speeds on the
hand units can exceed those attained on a flat keyboard.
Finding time to learn and practice is essential. Uninterrupted training time will
yield the best results. Studies show that 20 or 30 minute learning segments
are most beneficial, but you can gradually increase these times as your
20
User's Guide, Version 1.7.5, November 21, 2002
SECTION 5 L E A R N I N G T O U S E T H E H A N D U N I T S
comfort level increases. A total of 2 hours per day for 2 weeks is
recommended. Most users report that it takes a total of 15 to 50 hours of
practice to become well versed with the system.
You can also use some of your practice time to play games on the computer
that allow you to become accustomed to the sensitivity of the hand units’ keys
and finger mouse.
Moving Your Fingers to Press the Keys
When you place your hands on the hand units, each finger should be able to
move freely in 5 directions: north, south, east, west and straight down. The
keys that you activate by pressing straight down are called the well keys.
North
West
East
South
Straight
Down
Figure 6. Finger Motions
Note: In the following sections, names of keys are bolded. For example, “On the left
thumb, light pressure activates SHIFT.”
User's Guide, Version 1.7.5, November 21, 2002
21
SECTION 5 L E A R N I N G T O U S E T H E H A N D U N I T S
Moving Your Thumbs to Press the Keys
Your right thumb should be able to move freely east, west, southwest, and
straight down to its well key and up to its direct access key. Your left thumb
should be able to move freely east, southeast, west, straight down to its well
key and up to its direct access key.
Up
West
Up
East
West
East
Light pressure down
Hard pressure
down
Southeast
Southwest
Left Thumb
Right Thumb
Figure 7. Thumb Motions
The well keys directly beneath the thumbs actually have two
positions:
♦ Pressing the left thumb lightly activates SHIFT. Hard down
pressure activates the second position, CAP LOCK, and the
lock light over the left thumb goes on; the next cycle of hard
down pressure will deactivate CAP LOCK and the lock light will
go out.
♦ Pressing the right thumb lightly activates NAS SHIFT. Hard
down pressure activates the second position, NAS LOCK, and
the lock light over the right thumb goes on; the next cycle of hard
down pressure will deactivate NAS LOCK and the lock light will
go out.
The keys above the thumbs are called the direct access keys. You
activate these keys by lifting up the thumbs. The use of these keys
is explained in the next section Three Modes of Operation.
22
User's Guide, Version 1.7.5, November 21, 2002
SECTION 6
TH R E E MOD E S OF OP E R A TION
In section 5 you were introduced to the various finger movements in relation
to the keys. In this section you will learn how to use the Professional II™ to
access all of the keys and functions of the traditional flat keyboard. The
Professional II has 4 different operating modes. You will explore these
modes in order to discover the Professional II’s™ greatest potential.
SECTION 6 THREE MODES OF OPERATION
Accessing Different Modes
The hand units operate in three modes as indicated on the right hand unit:
1. NAS (Numbers and Symbols) mode
2. Normal mode
3.
F (Mouse Function) mode
In addition, there is a fourth label on the right hand unit: 10-Key. This stands
for 10-Key pad, which is really a subset of NAS mode. You know you are in a
particular mode when the appropriate indicator light is on. All the modes and
the 10-Key pad are explained in detail in the following sections.
Each mode enables you to access a group of keys. If you want to access a
key that is not available in the mode you are in, you must switch to the mode
in which the key is available. Together, the modes of operation allow you to
access all the keys and functions of a standard flat keyboard without lifting
your hands from the hand units.
The templates on the hand units indicate in which modes the keys are
available by using a color code. The chart below lists the modes, their
associated color codes and the available keys.
Mode
NAS
Normal
Function
10-Key
(a subset
of NAS)
24
Color Code
Blue Keys
(Orange mode
light)
Green Keys
(Green mode
light)
Yellow Keys
(Yellow mode
light)
Pink keys
(Orange and red
mode lights)
DataHand® System Modes
Keys
♦
Numbers 0 – 9
♦
The following punctuation marks and symbols:
& ^ : x’ ( ) ; . ? ! ~ @ # <> % $ - + = / *
♦
NUM LOCK, 10-K ON, 10-K OFF
♦
Letters a - z and A – Z
♦ The following punctuation marks:
,’:.;?|“`{}[]\/
♦
Function keys f1 - f12
♦
Arrow and mouse key toggles
and
♦
The arrow keys ß à á â
♦
The finger mouse arrows ß à á â
♦
The following function keys: HOME, END, PAGE
UP, PAGE DN, PAUSE, INS, HELP, PRINT, m.b.1,
m.b.2, m.b.3, L/R MODF, OPT/CT, NUM LOCK and
SCROLL LOCK.
♦
Numbers of the 10-Key pad 00 and 0 - 9
♦
The following operators: = - * / + ( ) ‘ $ . &
User's Guide, Version 1.7.5, November 21, 2002
SECTION 6 THREE MODES OF OPERATION
Using Protected Mode Keys
FUNCTION KEY PROTECTION: The FUNCTION keys may only be
accessed by holding the Function direct access key (right thumb key – up)
and pressing F1 through F12. F13 through F24 keys are accessed by
holding down SHIFT and at the same time operating F1 through F12
respectively. Any function key accompanied by a modifier (i.e. ALT, CTL or
SHIFT) is automatically sent along with the modifier.
TURNING OFF FUNCTION KEY PROTECTION: The user may toggle
between protected and unprotected function keys. Go to Program Mode (see
User Guide, page #48) and press letter ‘I’ as your Program Selection key.
This disables the protection until the user toggles the command again. The
REV message will now show a ‘f’ in the last position if the protection is
enabled.
MISCELLANEOUS KEYS PROTECTED: The PRINT SCREEN, NUMLOCK,
TEN-OFF, TEN-ON and LEFT/RIGHT MODIFIER keys are protected by
default on power up. If the KEY is available in FUNCTION mode then the
FUNCTION ACCESS key unlocks that key. If the key is found in the NAS
mode, the NAS LOCK (direct access) key unlocks the key and completes the
necessary task.
TURNING OFF PROTECTION: The user may toggle between protected and
unprotected miscellaneous keys. Go to Program Mode (see User Guide,
page #48) and press letter ‘K’ as your Program Selection key. This disables
the protection until the user toggles the command again. The Rev message
does not show the state of this protection mode.
INDIVIDUAL KEYS PROTECTED: Individual keys may be protected from
accidental hits. The user must select the keys to protect through the Program
Mode <C> (see User Guide, page #48). 1 to 5 keys may be chosen for
protection. All keys are available for protection including Mode Access keys.
If the KEY is available in FUNCTION Mode then the FUNCTION ACCESS
key unlocks that key. If the key is found in the NAS Mode, the NAS LOCK
(direct access) key unlocks the key and completes the necessary task.
Program mode <,> will toggle on or off the Individual Key Protection.
PROGRAMMING THE INDIVIDUAL KEYS: Go to Program Mode (see User
Guide, page #48) and press the ‘C’, and program the individual key by
TWICE pressing the key to be protected. NOTE: The CAPS LOCK and
NAS LOCK keys may be protected ... when releasing the CAPS LOCK or
NAS LOCK for second press, be sure to stop midway up and not let the key
up into the FIRST position. To quit mode <C>, hold the NORMAL access key
and TWICE press the ESC key. To delete individual protected keys only,
enter Program Mode <C> and hold up the Normal Mode key and TWICE
press the DEL key. TURNING OFF PROTECTION: The user may toggle
between protected and unprotected Individual keys. Go to Program Mode
User's Guide, Version 1.7.5, November 21, 2002
25
SECTION 6 THREE MODES OF OPERATION
(see User Guide, page #48) and press the letter ‘,’ (comma). This disables
the protection until the user toggles the command again.
Keys Available in Several Modes
All the keys operated by the thumbs, as well as ENTER, DELETE and
ESCAPE, are available in all modes. The functions and the positions of
these keys stay the same in all modes.
The keys available in all modes are indicated in white on the template.
The ESCAPE key (ESC) is one of the keys available in all three modes.
When this key is activated simultaneously with the CONTROL key (left thumb
lower right), the combination emulates the Microsoft Windows® direct access
key now available on some keyboards. A WINDOWS compatible key layout
(104 keyboard) may be selected (see User Guide, page #48). In the NORM
and FUNC modes the WINDOWS key will be in place of the extra ENTER
key (Right Ring East) and the APPLICATIONS Key will be found in the NAS
mode.
Note: As described in the section, Moving Your Thumbs to Press the Keys, the
thumbs can access two keys each in the down position. You activate one key by
applying light pressure and the other key by applying a harder pressure.
Figure 8. Keys Available in all Modes
Some keys are available in two modes. The punctuation keys, such as the
colon and the semi-colon, occur in Normal and NAS modes. Their locations
are the same in both modes.
Other keys that occur in two modes have different locations in each mode,
such as the operator keys in the NAS and 10-Key modes.
26
User's Guide, Version 1.7.5, November 21, 2002
SECTION 6 THREE MODES OF OPERATION
The illustrations on the following pages show the template for all three
modes. Each mode is illustrated and described in detail in the sections that
follow.
Normal Mode
When you turn on your computer, the system comes up in Normal mode.
Keys Available in Normal Mode
This is the mode to type the letters of the alphabet. This is also the
mode to access the punctuation symbols that usually occur on the
middle three rows of a standard flat keyboard, such as the
apostrophe <‘>, quotation marks <“>, comma, period and colon.
A c c e s s in g N or m a l M ode
To enter Normal mode from any other mode, lift the direct access
key above the left thumb. The green indicator light on the right hand
unit should go on.
Figures 9 and 11 show all the letters and symbols each finger can
type in Normal mode. The letters and symbols that are accessed in
Normal mode are indicated in green on the template above the
finger wells.
User's Guide, Version 1.7.5, November 21, 2002
27
SECTION 6 THREE MODES OF OPERATION
Figure 9. Left Hand in Normal Mode
28
User's Guide, Version 1.7.5, November 21, 2002
SECTION 6 THREE MODES OF OPERATION
Figure 10. Layout of Right Index Finger Keys on a Flat Keyboard
and on a DataHand® Keyboard
Layout of Keys in Normal Mode
The layout of keys on a standard flat keyboard is called QWERTY,
for the sequence of letters in the third row of the left hand. If you
are converting from a standard flat keyboard to the hand units, you
will find the mapping of keys to be similar. For example, on a
standard flat keyboard the right index finger types the letters U, J, M
and H. Using the hand units, the right index finger types the letters
U, J, M, H and the apostrophe (‘). On the hand units, each finger
accesses the same letters of the alphabet as it does on a standard
flat keyboard, except for the letters B, T, N and Y.
Figure 10 compares the letters on the standard keyboard and the
DataHand® Systems keyboard typed by the right index finger.
User's Guide, Version 1.7.5, November 21, 2002
29
SECTION 6 THREE MODES OF OPERATION
Figure 11. Right Hand in Normal Mode
30
User's Guide, Version 1.7.5, November 21, 2002
SECTION 6 THREE MODES OF OPERATION
NAS Mode
NAS (Numbers and Symbols) mode contains commonly used numbers and
symbols, including those of the 10-Key pad.
Keys Available in NAS Mode
NAS mode is the mode in which you type the numbers zero through
nine, and the symbols that are found at the top row of a standard
flat keyboard: such as the exclamation point (!), dollar sign ($) and
ampersand (&).
NAS mode is also the mode from which you access the 10-Key pad.
You use the 10 K&P ON and 10 K&P OFF keys on the east and
west of the right pinky finger to switch between NAS mode and the
10-Key pad. See the next section for more details on the 10-Key
pad.
Accessing NAS Mode
To lock into NAS mode, press NAS LOCK (right thumb, hard
pressure, well key). The NAS Lock light under the right thumb goes
on. To exit NAS mode activate either DA key (RT or LT thumb up).
To type just a few characters, instead of locking into NAS mode, you
can shift into NAS mode. To shift, press NAS (right thumb, light
pressure, well key). Continue to hold this key with light pressure
until you finish typing the NAS mode characters.
If you have activated the 10-Key pad and then switch to Normal or
Mouse Function mode, when you return to NAS mode, the 10-Key
pad is automatically switched on. To access the keys available in
NAS mode, you must turn off the 10-Key pad.
The orange right hand NAS light is on when in NAS mode.
Layout of Keys in NAS Mode
Figures 12 and 13 show all the keys available in NAS mode. The
names of keys available in NAS mode are indicated in blue on the
template above your fingers.
User's Guide, Version 1.7.5, November 21, 2002
31
SECTION 6 THREE MODES OF OPERATION
Figure 12. Left Hand in NAS Mode
Figure 13. Right Hand in NAS Mode
32
User's Guide, Version 1.7.5, November 21, 2002
SECTION 6 THREE MODES OF OPERATION
User's Guide, Version 1.7.5, November 21, 2002
33
SECTION 6 THREE MODES OF OPERATION
10-Key Pad
Because you must access the 10-Key pad from NAS mode, the 10-Key pad
is considered a subset of NAS mode.
Keys Available in 10-Key Pad Configuration
Although the numbers may appear to be the same, some special
applications distinguish between the numbers on the 10-Key pad
and the numbers on the top row of the main part of a flat keyboard.
When you use the numbers in NAS mode, it’s like using the
numbers on the top row of a flat keyboard. The same is true when
you use the 10-Key pad numbers. However, if you turn on NUM
LOCK, these number keys will send the 10-Key pad keys.
The keys available on the 10-Key pad are the numbers (00 and 0 9) and the operators of addition (+), subtraction (-), multiplication (*),
division (/), equals (=), parentheses, dollar sign ($), period and
ampersand (&).
In addition, the arrow keys on the left index finger are available for
navigation.
Note: Some keys (such as @, !, #, <, > and %) are not shown in
pink here and in the other guides as on the actual display of the left
hand unit but are shown in NAS mode blue. The rule for the left
hand is: When in 10-Key mode where a character or symbol is not
shown in pink, the character or symbol shown in blue will be
accessed.
34
User's Guide, Version 1.7.5, November 21, 2002
SECTION 6 THREE MODES OF OPERATION
Figure 14. Left Hand in 10-Key Configuration
Accessing the 10-Key Pad
To access the 10-Key pad, press the 10-Key ON key (right pinky,
east) in NAS mode. You stay in 10-Key configuration, in this and
future work sessions, until you press the 10-Key OFF key (right
pinky, west) to return to NAS mode. This means that if you do not
press the 10-Key OFF key and you go to another mode, such as
Mouse Function mode or Normal mode, when you return to NAS
mode, you will automatically be in 10-Key configuration.
You are in 10-Key configuration when the red 10-K&P light and the
orange NAS indicator light on the right hand unit are on at the same
time.
Technical Note: If NUM LOCK is on, the number keys in 10-Key mode
send scan codes of the numeric keypad normally found on the right side of
a flat keyboard. If NUM LOCK is off, the keys send scan codes of the
numeric keys at the top row of a flat keyboard. However, you get numbers
whether NUM LOCK is on or off. You can engage NUM LOCK in either
Mouse Function or NAS mode, and the Num Lock light under the left ring
finger will go on, and the DataHand® System sends a NUM LOCK code to
the computer (required by some program for special features).
Layout of 10 Key Pad
Figures 14 and 15 show all the keys available in the 10-Key pad.
The names of keys available in 10-Key pad configuration are
indicated in pink on the template above your fingers. (If a 10 Key
(pink) symbol is not shown, the NAS (blue) symbol applies.
User's Guide, Version 1.7.5, November 21, 2002
35
SECTION 6 THREE MODES OF OPERATION
Figure 15. Right Hand in 10-Key Configuration
36
User's Guide, Version 1.7.5, November 21, 2002
SECTION 6 THREE MODES OF OPERATION
Mouse Function Mode
Use this mode to access the navigation and special function keys. For more
about the Mouse and Cursor functions see Section 7, Activating the Mouse or
the Arrow Keys, pg. # 42.
Keys Available in Mouse Function Mode
In Mouse Function mode, you can access the DataHand® System
finger mouse and the directional arrow keys. These keys allow you
to navigate the mouse pointer or cursor on the screen. The three
mouse buttons, mb1, mb2, mb3, are also available.
In addition, you can access function keys f1 through f12.
You can also access HOME, END, PAGE UP, PAGE DN, PAUSE,
INS, HELP, PRINT, L/R MODF, OPT/CT, SCROLL LOCK and
NUM LOCK.
Note: HOME is only available with the Arrow Keys activated (see
Section 7).
Figure 16. Left Hand in Mouse Function Mode
Accessing Mouse Function Mode
To enter Mouse Function mode from any other mode, lift the direct
access key above the right thumb.
User's Guide, Version 1.7.5, November 21, 2002
37
SECTION 6 THREE MODES OF OPERATION
You are in Mouse Function mode when the yellow indicator light on
the right hand unit is on.
Layout of Keys in Mouse Function Mode
Figures 16 and 17 show all the keys each finger can use in Mouse
Function mode. The names of keys available in Mouse Function
mode are indicated in yellow on the template above your fingers.
The PRINT key requires a double strike to send the key to the PC.
This helps protect from accidental print commands.
Figure 17. Right Hand in Mouse Function Mode
Mouse Click Lock
MOUSE Click Lock ("Sticky" Mouse Buttons): Hold the Function Mode
direct access key up and press either the right or left mouse buttons. To
release hit either right or left mouse button or any other key that is not a
mouse movement key like ALT, SHIFT or CTL. Examples:
To block text: Enables the click lock for Left Button. Move mouse to hi-light
the text.
To delete text: Press the delete key. The delete will release the mouse
button and delete the text. Try this with CTL X for CUT or CTL C for COPY.
To move text: The user may also move the highlighted text by using click
lock again. Now as you move the mouse the box of text is moved and can be
dropped at a new location with by releasing as described above.
Limitations: The CTL key can not be used with the drag to duplicate an
object selected because the button is released upon action from the CTL key.
To copy, use the right mouse click-lock to move and duplicate the text,
38
User's Guide, Version 1.7.5, November 21, 2002
SECTION 6 THREE MODES OF OPERATION
choose copy when the menu pops up.
Using Key Combinations
If you are using an application that requires you to use key combinations,
such as the function keys in combination with CNTRL, ALT or SHIFT, apply
the keys in the same combination using the DataHand® System. Since
these keys are available in all modes, applying these keys in combination
should not present a problem.
For example, suppose an application requires you to press CNTRL + F8 at
the same time. To press these keys using the DataHand® System, first enter
Mouse Function mode, then press CNTRL (left thumb, southeast) and F8
(right middle finger, north) at the same time.
Left Thumb,
Southeast
+
Right Middle Finger,
North
Figure 18. Key Combinations
If you must use a combination of keys that are not in the same mode or that
are difficult to reach at the same time, define a macro to do this for you. See
the section Shortcut Keys: Creating Macros,PG #49 for instructions.
For more about the Mouse and Cursor functions see Section 7, Activating the
Mouse or the Arrow Keys, pg. # 42.
User's Guide, Version 1.7.5, November 21, 2002
39
SECTION 6 THREE MODES OF OPERATION
40
User's Guide, Version 1.7.5, November 21, 2002
SECTION 7
U S IN G TH E FIN GE R MOU S E
AND ARROW KEYS
While using the Professional II™, you have the option of navigating around
your screen by using either the finger mouse or the arrow keys. This section
will describe the operating capacities of these two functions.
SECTION 7 FINGERMOUSE AND ARROW KEYS
Activating the Mouse or the Arrow Keys
When the computer is first turned on, the mouse is automatically activated
when in Mouse Function mode and is indicated by the yellow mouse light in
the middle of the template for the left middle finger.
To switch to arrow key function, enter Mouse Function mode and press the
arrow toggle
(right middle finger, well key). The yellow mouse light on the
template for the left middle finger goes off. Note: The HOME key is
available with the LT or RT Index Finger Down keys.
To switch back to mouse function, enter Mouse Function mode and press the
mouse key
(left middle finger, well key). The yellow mouse light on the
template for the left middle finger goes back on.
Note: The DataHand® System is not shipped with a mouse driver; it is intended to
work with your existing mouse driver. Make sure that one of the following mouse
drivers is installed on your computer: an IBM PS/2 or Microsoft-compatible driver for
Microsoft Windows® and/or a DOS driver. The newer LOGITEC mouse drivers
allow more than one mouse to be used at one time, ie. PS/2 and serial mouse at the
same time.
Moving the Mouse Pointer
Make sure your computer supports the use of a mouse and that you attached
the appropriate mouse cable to the back of your computer. See Connecting
the Equipment if you have any questions. You can then use the mouse.
Moving Slowly
Move the mouse pointer slowly around the screen by pressing the
north, south, east and west keys with your right index finger.
Moving Quickly
Move the mouse pointer quickly around the screen by pressing the
north, south, east and west keys with your left index finger.
Moving at High Speed
Move the mouse pointer at high speed around the screen by
pressing the north, south, east and west keys with both index
fingers at the same time.
Moving Diagonally
You can move the mouse pointer diagonally by pressing two
adjacent directional keys simultaneously. For example, move
northwest by pressing the north and west keys together with one of
your index fingers.
42
User's Guide, Version 1.7.5, November 21, 2002
SECTION 7 FINGER MOUSE AND ARROW KEYS
Changing Mouse Speed Settings
See Program <J> in the table in the section Changing DataHand®
System Settings: The Program Selection Keys, pg.47, for
instructions on fine tuning mouse speeds using the DataHand®
System.
Your existing software might have a facility to adjust the range of
mouse speeds. For example, in Microsoft Windows®, the mouse
control panel has a slide button for this purpose. However, if you
find that the slide button does not give you the range of control you
need, you may increase the sensitivity of that slide button by editing
the MOUSE.INI file. You do so using a DOS editor. For help with
this, contact DataHand® Systems, Inc. using the reference in the
Getting More Help section.
Clicking the Mouse Buttons
To click the left mouse button, press the mb1 key (left index finger,
well key).
To click the right mouse button, press the mb2 key (right index
finger, well key).
If your computer supports a 3-button mouse, you can click the
equivalent of the middle mouse button by pressing the mb3 key (left
ring finger, well key). You must have first activated the middle
mouse button. See Program <M> in the table in the section
Changing DataHand® System Settings: The Program Selection
Keys, pg.48, for instructions on activating the middle mouse button.
Using the Arrow Keys to Move the Cursor
To use the arrow keys in Mouse Function mode, you must first turn on the
arrow keys and turn off the mouse. To do this, enter Mouse Function mode
and press the arrow key toggle
(right middle finger, well key). The yellow
mouse light on the template for the left middle finger should go off. These
keys are the Grey Arrow Keys on the standard keyboard. Note: The HOME
key is only available in this condition and activated with the LT or RT Index
Finger Down keys.
If you are in 10-Key pad configuration, you do not have to turn on the arrow
keys; they are automatically activated on the left index finger.
Moving the Cursor
Move the cursor around the screen by pressing the north, south,
east and west keys with either index finger.
User's Guide, Version 1.7.5, November 21, 2002
43
SECTION 7 FINGERMOUSE AND ARROW KEYS
Switching Back to the Finger Mouse
To change from arrow key function back to mouse function, first
enter Mouse Function mode. Then press the mouse key
(left
middle finger, well key). The orange mouse light on the template for
the left middle finger should go on.
Note for IBM computers and compatibles only: Most applications do not
distinguish between the directional arrow keys on the right and left hands,
so either hand can move the cursor. However, if your application does
make a distinction, then the left hand arrow keys will behave like the arrow
keys on the extended keyboard of a flat keyboard (between the 10-Key pad
and the main part of the keyboard). The right hand arrow keys will behave
like the arrow keys on the 10-Key pad. If you are working with such an
application, the arrow keys on only one index finger will work. To switch
the set that is operating, see the section Switching Left and Right Function
for Duplicate Keys: The L/R Modf Key. Page # 46.
Mouse Click Lock
MOUSE Click Lock:
Hold the Function Mode direct access key up and press either the right or left
mouse buttons. To release hit either right or left mouse button or any other
key that is not a mouse movement key like ALT, SHIFT or CTL. Examples:
WINDOWS EXAMPLES:
To block text: Enables the click lock for Left Button. Move mouse to hi-light
the text.
To delete text: Press the delete key. The delete will release the mouse
button and delete the text. Try this with CTL X for CUT or CTL C for COPY.
To move text: The user may also move the highlighted text by using click
lock again. Now as you move the mouse the box of text is moved and can be
dropped at a new location with by releasing as described above.
Limitations: The CTL key can not be used with the drag to duplicate an
object selected because the button is released upon action from the CTL key.
To copy, use the right mouse click-lock to move and duplicate the text,
choose copy when the menu pops up.
44
User's Guide, Version 1.7.5, November 21, 2002
SECTION 8
SPECIAL KEYS
This section describes keys that you might use under special circumstances
or with special applications. It directs you through all the necessary steps
when changing functions.
SECTION 8 SPECIAL KEYS
Switching Left and Right Function for Duplicate Keys:
The L/R Modf Key
A few software applications differentiate between keys that are apparently
duplicated on the left and right sides of a standard flat keyboard and use the
different scan codes sent by the keyboard for the right and left
positions…each key position is unique and has its own scan codes assigned.
Some applications may even require that you use the keys in one or the other
of these locations, although most applications allow you to use the keys on
either side, for the same purpose.
The default mode for the duplicated keys is to send the “left” key scan code. .
When these keys are pressed, they send codes to the computer that then
identifies them as the “left” key. To change the L/R Modf, hold up the FUNC
Mode key and at same time press the L/R Modf (left little finger, well
key…light on the right hand will flash to verify entry into right side). To
change a key back to left function, repeat the procedure. Alternatively the
ALT and CNTR keys can toggle to RT by double clicking either key.
When the computer is turned off and on again, the keys revert to the default
“left” key mode. To permanently change the default, use program key <A>,
as described in the table in Changing DataHand® System Settings: The
Program Selection Keys, pg. 48.
Keys
Keys Affected by the L/R Modf Key
Mode
ALT, CNTRL, SHIFT, DELETE
All modes
Note: The extra SHIFT key (right hand, middle
finger, east) in Mouse Function mode acts
opposite to the SHIFT key under the right thumb,
which is available in all modes.
INS, PAGE UP, PAGE DN, END
+*-/
/
WINDOWS
Mouse /Function mode
NAS mode
Normal mode
Normal and Function modes.
Some keys differentiate between left and right function, but are not affected
by the L/R Modf. They are:
•
•
•
46
The Home keys
ENTER
keys in the 10-Key pad configuration
User's Guide, Version 1.7.5, November 21, 2002
SECTION 8 SPECIAL KEYS
The DataHand® System has two HOME keys that are available in Mouse
Function mode. The HOME keys are only in the ARROW condition (mouse
light off) the down keys of the left and right index fingers and have left and
right function, respectively. The L/R Modf key does not affect these keys.
Some applications require the left only or the right only key. If you are using
an application that requires you to use one or the other of these keys, only
one of them will work.
The RETURN key (left thumb, northwest) has left function. The ENTER key
(right ring finger, east) has 10-Key pad Enter. In the 101-keyboard mode, the
L/R Modf affects neither key. Both keys are available in all modes.
In the 104-keyboard mode (WINDOWS), the ENTER key (RT Ring
East—WINDOWS key) can be switched by the L/R Modf in the Normal and
Function Modes.
As stated in the 10-Key Configuration section, if NUM LOCK is on, the
numbers and operators available in 10-Key configuration send the same scan
codes as the keys of the 10-Key pad on the right side of a flat keyboard. If
NUM LOCK is off, the keys send the same scan codes as the keys in the
main part of a flat keyboard. The L/R Modf key does not affect the keys
available in 10-Key configuration.
Changing DataHand® System Settings: Program
Selection Keys
Special program keys allow you to change settings of the DataHand®
System. The new settings will remain in place until you change them again
or perform a full reset.
To make the setting changes, engage these two keys:
• first the direct access key for Normal mode (left thumb, up), then at the
same time
• press and release the Reset button at the back of the left hand unit
Note: To prevent errors, release the Reset button first and then the Normal
Direct Access key.
After you release these keys, the red 10-Key indicator light on the right hand
unit flashes. It continues to flash until you enter one of the Program Selection
keys indicated in the following table.
If the system change takes effect after you press the Program Selection key,
the three mode lights on the right hand unit flash three times in
acknowledgement. If the three mode lights continue to flash, you must take
further action, as specified in the following table.
User's Guide, Version 1.7.5, November 21, 2002
47
SECTION 8 SPECIAL KEYS
Key
A
B
C
,
D
ENTER
(Rt. Ring East)
Toggles all special keys from left function to right or vice versa and save these new
settings as the defaults. See Switching Left and Right Function for Duplicate Keys: The
L/R Modf Key, pg. 46 for information about temporarily switching individual key
functions.
Begins sequential macro recording. See Shortcut Keys: Creating Macros, pg. 49 for
instructions about recording macros.
Begins individual key protection…a key can be individually protected by the mode key
used for the key selected.
Toggles the Individual Key Protection.
If the Dvorak keyboard is purchased … toggles between QWERTY (default) & Dvorak.
Toggles to Windows (104) Key Mode – APPLICATION Key on this key in NAS and RT
WINDOWS key in NORM and FUNC Modes. ENTER in the TEN KEY Mode (no
change). L/R Modf Toggles between LT/RT WINDOWS key.
G
Toggles Mouse “nudge” feature off/on. For more information see Mouse
pg. 52.
I
J
Toggle protection OFF/ON for FUNCTION keys.
Allows mouse speed adjustment. Choose one of the following options:
♦ R to increase left mouse speed
♦ V to decrease left mouse speed
♦ U to increase right mouse speed
♦ M to decrease right mouse speed
♦ H to decrease mouse acceleration
♦ ‘ to increase mouse acceleration
♦ J to exit mouse speed adjustment.
To toggle off or on the Protection Mode for PRINT SCREEN, NUMLOCK, TEN KEY
OFF, TEN KEY ON and L/R MODF. For more information see Pg. 25.
Activates the middle button of a Logitech® 3-button mouse. If the middle button is
already active, this action returns the mouse to 2-button format.
Swap the CTL and ALT keys.
Swap FUNCTION and NORMAL Direct Access keys.
Toggles to emulate the model DH200 with (5) Thumb Keys.
After toggle P --- toggles to model DH200 using thumb down chording (up keys not
needed).
A speed typist option to force the SHIFT break when typing shifted keys: e.g.,!
@#$%^&*().
Changes from IBM PS2 to RS6000 keyboard emulation.
Displays “Rev x.xx MM 2 or 3” (for Microsoft) or Rev x.xx P (for PS/2 mouse) on the
computer screen, where x.xx is the revision number of the DataHand® System you are
using, and 2 or 3 is the number of mouse buttons that are enabled. L or R indicates left
or right key modifier.
Begins a single key substitution. See Programming a Direct Substitution Key, pg. 51.
Begins chorded macro recording. See Shortcut Keys: Creating Macros, pg. 50 for
instructions about recording macros.
Switches the Mouse Function and NAS access keys:
♦ NAS SHIFT (right thumb, light pressure, down) becomes Mouse Function Shift.
♦ NAS LOCK (right thumb, hard pressure, down) becomes Mouse Function Lock.
♦ The Mouse Function mode direct access key (right thumb, up) becomes the NAS
Lock direct access key.
Note: When NAS Shift is lost, Mouse Function Shift is gained. The Mouse
Function Shift might be more useful when you require a lot of cursor and mouse
movement in another mode.
To switch the keys back to their original functions, repeat these steps.
Resets all permanent memory to default values. In other words, the system reverts to
all original settings, such as the original mouse speeds and the original settings for the
NAS and Mouse Function access keys. All desired non-default program modes must
be re-set.
K
M
N
O
P
;
S
Q
R
W
X
Z
Normal direct
access and \ key
(held together)
48
Changing Default Settings & Program Macros
Effect and any further actions necessary
Nudge,
User's Guide, Version 1.7.5, November 21, 2002
SECTION 8 SPECIAL KEYS
Shortcut Keys: Creating Macros
Macros assist to automatically chord keys or provide easy access to difficult
key combinations. You can store a short sequence of keys you use
frequently or even a key combination (chord) under a single key called a
macro. The DataHand can store a maximum of twenty unique macros each
with up to 5 individual keystrokes.
The macro key under which you store your sequence is any key of your
choice.
After you define the macro key, you can replay the stored sequence or chord
by simply pressing Normal Access Key (Left Thumb Up) followed by the
macro key.
Macros help you to reduce repetitive typing and save time. Use macros to:
♦ Store up to twenty unique 5 keys in sequence that you use frequently,
such as a business abbreviation.
♦ Save a sequence, or chord, of up to 5 keys that occur in different modes,
such as a sequence of numbers and letters.
♦ Save a chord of up to 5 keys that occur in the same mode but that might
be difficult to press, such as SHIFT + TAB.
♦ Reassign a key in one mode to another mode. Suppose you do most of
your work in Normal and NAS modes. You can reassign a key you use in
Mouse Function mode, such as one of the keys f1 - f12, to one of these
modes.
Defining and Replaying a Sequential Macro
You can define a sequence of up to 5 keys in a sequential macro.
Step 1. Press Reset and the Normal direct access keys together.
Step 2. Press B.
The red 10-Key indicator light on the right hand unit flashes.
Step 3. Enter the macro key. The macro key is the key that stores the
sequence.
Note: The macro key may be in any mode and the mode’s
direct access key in combination with the macro key “runs” the
macro.
Step 4. Enter the sequence you want to record using up to 5 keys.
User's Guide, Version 1.7.5, November 21, 2002
49
SECTION 8 SPECIAL KEYS
Step 5. To end the recording, together press the Normal Direct Access
key and ESC key.
The three mode lights on the right hand unit will stop flashing.
Step 6. Replay the macro at any time by pressing the appropriate
direct access key and the macro key selected.
Defining and Replaying a Chorded Macro
You can define a combination of up to 5 keys in a chorded macro.
Step 1. Press Reset and the Normal direct access keys together.
The red 10-Key indicator light on the right hand unit flashes.
Step 2. Press X.
The three mode lights on the right hand unit flash.
Step 3. Enter the macro key. The macro key is the key under which
you store the combination.
Step 4. Enter the keys you want to chord, using up to 5 keys. You do
not have to press them together as you enter them.
Step 5. Press the same Normal Access Key and ESC at the same time
to end recording.
The three mode lights on the right hand unit stop flashing.
Step 6. Replay the macro whenever you need it by pressing the Normal
Access Key AND the macro key at the same time..
Reprogramming or Nulling a Macro
You can reprogram a macro by redefining it.
You can null or delete a macro definition by going through the
definition sequence but omitting Step 4.
50
User's Guide, Version 1.7.5, November 21, 2002
SECTION 8 SPECIAL KEYS
Programming a Direct Substitution Key
MACRO Keys for Direct Substitution: In the interest of speed, a key may
be sacrificed for use as a macro key only. When programmed, the macro key
requires only a direct hit to actuate the macro sequence.
Keys like SHIFT, ALT, and CTL that appear twice on a 101 keyboard, may be
combined in a macro regardless of the L/R Modf setting of the keyboard. Do
this by toggling the L/R Modf key when building the MACRO. You can make
a Right SHIFT, etc. available when the default keypad is set with L/R Modf to
the left.
Step 1. Press the Reset key and the Normal Direct Access key
together.
Step 2. Press the letter W.
Step 3. Press the KEY that will change.
Step 4. Press the keys in sequence (up to 5 max) that will be
substituted for the Key to be changed.
Step 5. To end the recording, together press the Normal Direct Access
key and ESC key.
Step 6. Replay the macro at any time by pressing the appropriate the
selected Substitute key.
To Delete the Direct Substitution Macro: Skip Step #4 above.
Note: Keys like SHIFT, ALT and CTL that appear as left and right keys may
be combined as a Macro on the DEK setting the L/R Modf to the proper
setting when creating the Macro will run as a Macro as recorded regardless
of the L/R Modf setting.
User's Guide, Version 1.7.5, November 21, 2002
51
SECTION 8 SPECIAL KEYS
SPECIAL KEYS, FEATURES AND OPTIONS
Windows Keys ... 104 Keyboard
The 104 keyboard is toggled with Program Mode <ENTER> (Rt. Middle
Finger East). If the 104 keyboard is selected then the Right Ring Finger east
becomes:
-
APPLICATION Key in NAS;
Right WINDOWS key in NORM and FUNC modes; and
ENTER in Ten Key Mode.
The L/R Modf toggles between LT/RT WINDOWS key.
(See Changing Default Settings & Program Macros, page 48).
Cursor Keys
Cursor keys are found in the FUNCTION Mode on either the Right or Left
Index Finger when Mouse LED is OFF ... Rt. Middle Finger Down turns the
Mouse LED off. The Ten Key Pad arrows are on the left-hand index finger.
Mouse Nudge
The mouse has a “nudge” feature that allows fine movement by delaying full
speed. A few computers may find the delay excessive. In this case the
“nudge” feature may be cancelled using Program Mode “G” (See Changing
Default Settings & Program Macros, page 48).
Swap Alt and CTL Keys:
The position of these two keys can be changed. From Program Mode (see
User Guide, page 48) set the SWAP CTL & ALT keys with option ‘N’.
L/R ALT and CTL KEYS:
L/R Modf will switch the scan code output of the ALT and CTL keys.
Alternatively a double strike of the either key will temporarily change to the
alternate scan code output.
52
User's Guide, Version 1.7.5, November 21, 2002
SECTION 8 SPECIAL KEYS
SwapThumb ‘UP’ Keys:
From Program Mode (see User Guide, page 48) set the SWAP THUMB ‘up’
keys option ‘O’.
Foot Pedal Support:
The Foot pedals become shifted accesses switches for FUNCTION and
NORMAL Mode direct access key. Call DataHand Systems to add the foot
pedal option. Foot pedals can also be used in macro programs.
PS/2 Mouse Enable:
Any hand mouse if hot plugged (not recommended), will power up as
enabled. The DEK PS/2 mouse also powers up as enabled if reconnected
(not recommended).
DH-200 MODEL COMPATIBILITY:
This section for former DH200 users only.
From Program Mode, set the DH-200 command option ‘P’. This new mode
still allows the use of the direct access switches but creates the chorded NAS
and FUNCTION Mode shifting that was used with the DH-200. The DH-200
keyboards came originally changed mode using a chorded key scheme.
There was no up thumb key. To select this option, press ‘;’ (semi colon) while
in Program Mode. An additional addendum is available for former DH-200
users to explain the DH-200 compatibility.
MacIntosh Users:
The MAC's COMMAND, CONTROL and POWER -ON Keys can be
programmed as follows:
MAC USB ADAPTER SETUP:
The DataHand must first be set up as a 104 key keyboard so the WINDOWS
and APPLICATION Keys are available to the MAC Adapter. See Changing
Default Settings & Program Macros, page 48.
-
Hold Left Thumb up and at the same time press the Square RESET
Button behind the left unit;
Release the RESET Button first and the Left Thumb Up--- the Red LED
on the right unit will be blinking;
Press the Rt. ENTER key (Right Ring East) --- the Green NAS light will
User's Guide, Version 1.7.5, November 21, 2002
53
SECTION 8 SPECIAL KEYS
light.
With the MAC USB Adapter connected hold down <ESC> and at the same
time press the <W> key. Now the MAC Adapter will send the following
commands:
-
Press and hold the <ESC> key and at the same time press the letter <W>
key. Now the MAC Adapter sends:
<COMMAND> Key when the RT <ENTER> Key is pressed in either
NORMAL or FUNCTION Modes.
-
<OPTION> is sent when the RT <ALT> key is pressed (L/R Modf key
toggled) or Double Strike the <ALT> Key.
-
POWER ON is sent with the <SCROLL LOC> key.
ADB ADAPTER:
-
54
If KINESIS P/N-AC016PM (W) --- keys operate as the USB set up above.
If other adapter is used usually <CTRL> is the MAC's <COMMAND> and
<ALT> is the MAC's <OPTION> Key.
User's Guide, Version 1.7.5, November 21, 2002
SECTION 9
C OMMON QU E S TION S
This section covers the most common questions that DataHand® System
users ask, as well as the answers to these questions. If you have questions
that cannot be answered by reading this manual, contact DataHand®
Systems, Inc. customer service, using the reference in Getting More Help at
the end of this section.
SECTION 9 COMMON QUESTIONS
Questions and Answers
1.
Q.
How do I activate the mouse?
A.
First make sure that your computer supports the use of a
mouse. You must also have attached the necessary mouse
cable. See the Getting Started section if you have questions
about connecting the mouse cable.
After you make the necessary cable connections, turn on your
computer. When you enter Mouse Function mode, the orange
mouse light on the template for the left middle finger should be
on and the mouse should be activated. If not, in Mouse
Function mode press the mouse key
(left middle finger,
well key). The mouse light should go on. See the Using the
Finger Mouse and Arrow Keys, page 41 for more details.
2.
Q.
The mouse driver is installed, the mouse cable is connected
and I’ve turned on the mouse. Why doesn’t the mouse work?
A.
If you are using Microsoft Windows® on a PC, sometimes the
default settings in Microsoft Windows® must be changed to
reflect the correct mouse driver. To check that the default
setting is correct, select [Windows Setup] [Options] [Change
System Settings] [Mouse] and make sure the setting is
“Microsoft IBM PS/2 or compatible.” If the mouse still does not
work, you might have to modify the AUTOEXEC.BAT file to
reflect the correct driver designation.
If you have a PS/2 mouse driver, make sure you power down
your system before connecting the parts of the DataHand
System to get a functioning mouse.
You should also determine if you have a bus mouse. If you
do, you must disable the mouse, either through the software or
by removing the card. Contact DataHand® Systems, Inc.
using the reference in Getting More Help, page 64, at the end
of this section.
3.
56
Q.
How do I activate the arrow keys?
A.
In 10-Key configuration, the arrow keys on the left hand index
finger are automatically activated.
User's Guide, Version 1.7.5, November 21, 2002
SECTION 9 COMMON QUESTIONS
The only other mode in which you can use the arrow keys is
Mouse Function mode. In this mode, make sure the orange
mouse light on the template for the left middle finger is off. If it
is on, press the arrow toggle key
(right middle finger, well
key). The mouse light should go off. See Using the Finger
Mouse and Arrow Keys, page 41 for more information.
4.
5.
6.
7.
Q.
Sometimes I get keys that I shouldn’t (e.g., a <1> when I push
the END key or <.> when I push the DEL key) or I don’t get
shiftd keys when I should (e.g., <?>)?
A.
The L/R Modf key is in the Right mode and should be toggled
again to reset to the Left position. See Switching Left and
Right Function for Duplicate Keys, page 46.
Q.
Where is the 10-Key pad?
A.
The numbers on the 10-Key pad, as well as the arithmetic
operators, are available through NAS mode. See the 10-Key
Pad section, page 34 for details and an illustration.
Q.
I used the 10-Key pad, but now I need NAS mode. How do I
get out of the 10-Key pad and back to NAS mode?
A.
If you enter NAS mode and the 10-Key pad is activated, you
must while holding NAS key to 2nd position (all the down)
press 10-Key OFF (right pinky, west) to return to NAS mode.
Otherwise, every time you enter NAS mode, you will access
the 10-Key pad instead of the NAS mode characters.
Q.
My computer is frozen. What can I do?
A.
Check the connections on each of the cables to make sure
that they are secure. Disconnect and then reconnect the hand
unit cables.
If the computer is still frozen, press the Reset button on the
rear of the left hand unit or press CNTRL + ALT + DELETE
together to reboot the system (warm boot). The DataHand®
User's Guide, Version 1.7.5, November 21, 2002
57
SECTION 9 COMMON QUESTIONS
System should return you to Normal mode.
If this does not work, try a cold boot. Turn off the computer,
disconnect and reconnect the cables again and turn the
computer back on. If you have persistent problems, contact
DataHand® Systems, Inc. using the reference in Getting More
Help at the end of this section.
8.
9.
10.
11.
Q.
Why am I having trouble switching modes?
A.
Check to see if any key caps are open or stuck. If so, there
may dust or other foriegn material holding the key open. To
clean the switches, open the keys and blow out with canned
air (found in any computer supply store).
Q.
Using my software, I sometimes have to press several keys
together. Can I still do that with the DataHand® System?
A.
You can press combinations of keys that are available in the
same mode using your DataHand® System to perform the
same functions you performed using a flat keyboard. In the
very rare case where the key combination you require uses
keys not available within one mode, you can define a macro
key. See the section Shortcut Keys: Creating Macros for
details.
Q.
How can I reset to the as shipped Default Settins??
A.
Enter Program Mode <\>. See Changing Default Settings &
Program Macros, page 48.
Q.
How can I display the version number of my DataHand®
System?
A.
58
You can display the version number of your DataHand® System
by using the program key <R>. The number of active mouse
buttons is also displayed. See Changing Default Settings &
Program Macros, page 48.
User's Guide, Version 1.7.5, November 21, 2002
SECTION 9 COMMON QUESTIONS
12.
13.
14.
15.
16.
Q.
Where do I find the serial number of my DataHand® System?
A.
The serial number is on the underside of both hand units.
Q.
How do I get the Function Keys to work?
A.
The Function Keys are “Protected Keys” and require holding
the function Access Key (Rt Thumb Up) at the same time
activating the desired Function Key. For more on Protected
Keys see Using Protected Mode Keys, page 25.
Q.
How can I use the APPLICATION and WINDOWS keys found
on a 104 key keyboard?
A.
The 104 key keyboard mode is awith Program Mode
<ENTER>. See Changing Default Settings & Program
Macros, page 48.
Q.
I can only find one connector to connect the DataHand
Ergonomic Keyboard and Mouse.
A.
Some notebook computers such as the IBM Thinkpad, require
a “Y-Connector” to connect an external keyboard such as the
DataHand Ergonomic Keyboard to the common single dual
port.
Q.
What does the Print Screen key do?
A.
When activating the Print Screen key, Windows loads a copy
of the screen graphics to the clipboaard. The clipboard
contents then can be pasted to a graphics program such as
Paint (found in [Start] [Programs] [Accessories]. If multiple
Windows are open, Ctl-Print Screen will copy the open
window contents only. In DOS the Print Screen key will print
the screen text to the printer.
User's Guide, Version 1.7.5, November 21, 2002
59
SECTION 10
W IN D OW S NOTE S & S H OR TC U T
KEYS
This section covers the shortcut keys useful with DataHand to speed up your Excel,
Windows and Word usage by reducing mouse movement.
SECTION 10 WINDOWS NOTES & SHORTCUT KEYS
Windows Notes & Shortcut Keys:
Shortcut Keys using EXCEL with DataHand
CTL + ESC ALT + TABCTL + F4 ALT + F5CTL + S-
Start menu
Switch between tasks
Close current file
Close Excel
Save file
Numeric Entry / Basic Entry Modes:
Lock into FUNCTION mode (up):
Shift to NAS to enter numbers.
Cursor to next Cell for entry.
OR
Swap Function and NAS mode usage via program mode.
Lock into NAS mode (up):
Enter numbers
Shift to Function (down) & use cursor to move from cell to cell.
Movement to Cell:
ARROW CTRL + HOME CTRL + END CTRL + ARROW F5 or CTRL + G -
ALT + PGDN ALT + PGUP PGUP PGDN -
To move one at a time or let repeat occur.
Move to 1st cell.
Move to last call.
Move to last active cell on Row or Column.
Move to Cell xx
(may type cell # or TAB and cursor to prev cell
location).
Move cursor right a full screen.
Move cursor left a full screen.
Move cursor up a full screen.
Move cursor down full screen.
Mark Cells:
SHIFT + ARROWMark the next cell.
SHIFT + CTRL+END-Mark from cursor to END.
SHIFT +CTRL+HOME-Mark from cursor to cell A1.
SHIFT + CTRL + ARROW – Marks row or column.
(has various affects depending on cursor location).
CTRL + Z Undo
CTRL + C Copy
CTRL + X Cut
CTRL + V Paste
User's Guide, Version 1.7.5, November 21, 2002
61
SECTION 10 WINDOWS NOTES & SHORTCUT KEYS
Miscellaneous:
Shift F3 Shift F4 DBL Left Click CTRL + F9 CTRL + F10 -
Open Function Wizard
Go to next empty cell in row
Edit on cell
Minimize current open file
Toggle between small and large screen
Note: The main limitation using cursors is being unable to edit at the cell
location without deleting the cell data, unless you double click mouse on cell,
or click on edit window, or use f2.
Shortcut Keys using Windows with DataHand
62
CTL + ESC ALT + TAB -
Start Menu
Switch between tasks
ALT SPACE N -
Minimize application screen (do not need to chord)
SNGL RT CLICK
TOP BAR + N -
Minimize application screen
DBL LT CLICK
TOP BAR
Toggle between full screen and small screen
-
Program Tools:
ALT + F4 CTL + F4 CTL + O CTRL + Z -
Close current program window
Close current file
Open selection in file
Undo last
Selecting Files:
CTRL + A SHIFT + ARROW SPACE CTRL + ARROW CTRL + SPACE F2 F5 -
Selects all items
Include all items to the cursor as selected
Select item at cursor
Move cursor without changing selection
Add item at cursor to selection
Rename selected object
Refreshes current window
Button Selection:
ENTER ESC -
Equivalent to clicking the Select button
Equivalent to clicking the Cancel button
User's Guide, Version 1.7.5, November 21, 2002
SECTION 10 WINDOWS NOTES & SHORTCUT KEYS
Miscellaneous:
CTRL DRAG Copy object to new location (problem with using CTRL)
SHIFT + F10 Application key / sometimes right mouse click
PRNTSCRN - Copies screen image to clipboard
ALT + PRNTSCRN - Copies image of active window to clipboard
Shortcut Keys using WORD with DataHand
CTRL B Toggle BOLD on/off
CTRL U Toggle UNDERLINE on/off
SHIFT + ARROW - Mark characters during cursor movement
SHIFT+CTRL+ARROW- Mark words during cursor movement
SHIFT + END Mark from cursor to end of line
DELETE Deletes marked text
HOME Moves cursor to beginning of line
END Moves cursor to end of line
CTRL + ARROW Moves cursor a word at a time
CTRL + HOME Moves cursor to top of document
CTRL + END -Moves cursor to end of document
CTRL + Z Undo last
CTRL + C Copy to clipboard
CTRL + X Cuts to clipboard
CTRL + V Pase from clipboard
User's Guide, Version 1.7.5, November 21, 2002
63
SECTION 10 WINDOWS NOTES & SHORTCUT KEYS
GE TTIN G MOR E HE LP
DataHand® System’s customer service can be reached at (800) 875-7171 or
(602) 233-6000. Please be prepared to give the customer service support
representative the serial number and the version number of your DataHand®
System, the type of computer, and operating system you have.
You can also mail, fax or email your questions to:
DataHand® Systems, Inc.
3032 N. 33rd Ave.
Phoenix, AZ 85017-5201
Attn: Customer Service Support
Fax:
(602) 233-3434
E-Mail:
[email protected]
Website:
64
http://www.datahand.com
User's Guide, Version 1.7.5, November 21, 2002