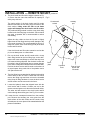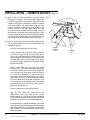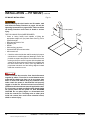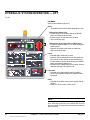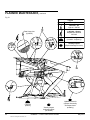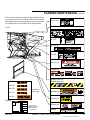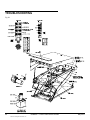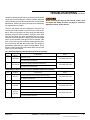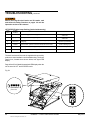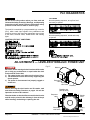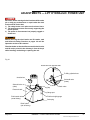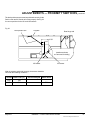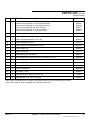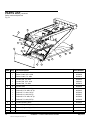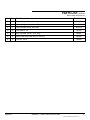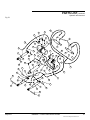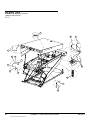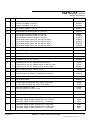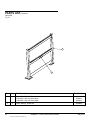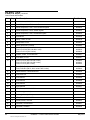
1
Dock Leveler and Lift Combo This manual applies to dock leveler and lift combos manufactured beginning May 2012 with the serial numbers 61045677 and higher Do not install, operate or service this product unless you have read and understand the Safety Practices, Warnings, Installation and Operating Instructions contained in this User’s Manual. Failure to do so could result in death or serious injury. User’s Manual Installation, Operations, Maintenance and Parts Part No. 6009080C table of contents Introduction . ...............................................................2 Safety Signal Words....................................................2 Safety Practices..........................................................3 Owner's Responsibilities ............................................5 Ramp and Lip Grades ................................................7 Installation — Remote Mount......................................6 Installation — Pit Mount............................................18 Service Tools.............................................................28 Components and Specifications................................30 Hydraulic System Operation......................................33 Operation...................................................................36 Operating Instructions — Leveler Mode....................37 Operating Instructions — Lift Mode...........................40 Operating Instructions — ARTD................................42 Planned Maintenance................................................43 Troubleshooting.........................................................46 PLC Diagnostics........................................................53 Adjustments — Leveler Hydraulic Power Unit...........53 Hydraulic Schematic — Leveler................................55 Hydarulic Valve Cross Section — Leveler.................56 Adjustments — Lift Hydraulic Power Unit..................57 Adjustments — Proximity Switches...........................59 Hydraulic Schematic — Lift.......................................63 Electrical Shematics..................................................64 Parts List...................................................................69 Warranty....................................................................91 Manufacturer Contact Information.............................92 introduction Welcome and thank you for choosing this dock leveler and lift combo from 4Front Engineered Solutions, Inc. This user’s manual contains information that you need to safely install, operate and maintain the dock leveler and lift combo. It also contains a complete parts list and information about ordering replacement parts. Please keep and read this user’s manual before using your new dock leveler and lift combo. safety SIGNAL WORDS You may find safety signal words such as DANGER, WARNING, CAUTION or NOTICE throughout this Owner’s Manual. Their use is explained below: This is the safety alert symbol. It is used to alert you to potential personal injury hazards. Obey all safety messages that follow this symbol to avoid possible death or injury. Indicates an imminently hazardous situation which, if not avoided, will result in death or serious injury. Indicates a potentially hazardous situation which, if not avoided may result in minor or moderate injury. Indicates a potentially hazardous situation which, if not avoided, could result in death or serious injury. Notice is used to address practices not related to personal injury. 2 6009080C — Dock Leveler and Lift Combo ©2012 4Front Engineered Solutions, Inc. May 2012 safety practices OPERATION, continued Read these safety practices before installing, operating, or servicing the dock leveler. Failure to follow the safety practices could result in death or serious injury. If you do not understand the instructions, ask your supervisor to explain them to you or call your authorized 4Front Engineered Solutions, Inc. distributor. OPERATION Use restricted to trained operators. Follow procedures on placard posted near the dock leveler and lift combo. Do not use this unit to service vehicles outside its intended working range: 8' long dock leveler and lift combo is 12" above dock. 10' long dock leveler and lift combo is 15" above dock. 12' long dock leveler and lift combo is 18" above dock. All units service 12" below dock. While in Leveler Mode, do not operate leveler portion with equipment, material or people on the ramp or lip. Do not operate the dock leveler and lift combo when anyone is in front of it unless they are securing the maintenance strut. Do not use the dock leveler and lift combo if it looks broken or does not seem to work properly. Inform your supervisor at once. Do not stand in the driveway between the dock leveler and lift combo and a backing vehicle. Before chocking wheels or engaging vehicle restraint, dump air from air ride suspensions and chock vehicle wheels or lock vehicle in place with a vehicle restraining device and set brakes before loading or unloading. Ensure lip plate avoids contact with vehicle sides and cargo. If the lip does not lower to vehicle platform, reposition the vehicle. Do not use a fork truck or other material handling equipment to lower the ramp. Move all equipment, material or people off the dock leveler and lift combo and store unit at dock level before allowing the vehicle to pull out. Store the dock leveler and lift combo at dock level after use. If the dock leveler and lift combo does not operate properly using the procedures in this manual, DO NOT USE THE DOCK LEVELER AND LIFT COMBO. Call your local distributor for service. Stay clear of the dock leveler and lift combo when it is moving. Ensure there are no obstructions which may interfere with the operation of the dock leveler and lift combo. KEEP HANDS CLEAR OF ALL HINGES AND PINCH POINTS AT ALL TIMES. Do not use hands to position the leveler portion in a vehicle or in storing the leveler. Stay clear of the leveler portion unless the lip is supported by the vehicle platform or the ramp is stored. An unsupported leveler can lower unexpectedly. May 2012 6009080C — Dock Leveler and Lift Combo 3 ©2012 4Front Engineered Solutions, Inc. safety practices, continued installation, maintenance and service Place barricades on the dock floor around the dock leveler pit and in the driveway in front of the pit while installing, maintaining or repairing the dock leveler and lift combo. Fig. 1 Lip plate Maintenance struts Be certain, before entering the dock leveler and lift combo pit or doing any maintenance or repair under the dock leveler and lift combo that: 1)The both safety stop blocks are in place on the scissor frame. See Fig. 1. 2)The both both maintenance struts are securely supporting the leveler portion. See Fig. 1. 3)The power is disconnected and properly tagged or locked out. If it is necessary to troubleshoot inside the control box with the power on, USE EXTREME CAUTION. Do not place fingers or uninsulated tools inside the control box. Touching wires or other parts inside the control box may cause electrical shock, serious injury or death. All electrical troubleshooting or repair must be done by a qualified technician and must meet applicable codes. Roller Safety stop blocks Safety stop positions 4 6009080C — Dock Leveler and Lift Combo ©2012 4Front Engineered Solutions, Inc. May 2012 owner’s responsibilities — lift It is the responsibility of the user/purchaser to advise the manufacturer where deflection may be critical to the application. INSPECTION AND MAINTENANCE The dock leveler and lift combo shall be inspected and maintained in proper working order in accordance with the manufacturer’s operating/maintenance manual and safe operating practices. Only trained and authorized personnel shall be permitted to perform maintenance on the dock leveler and lift combo. MAINTENANCE PERSONNEL SHALL: Read and understand the manufacturer’s operating/ maintenance manual, and all safety rules and labels, prior to performing any maintenance or service on the equipment. Full time unlimited access to the manufacturer’s operating/ maintenance manual. REMOVAL FROM SERVICE Any dock leveler and lift combo not in safe operating condition such as, but not limited to, excessive leakage, missing rollers, pins or fasteners, any bent or cracked structural members, cut or frayed electrical wiring or hydraulic lines, damaged or malfunctioning controls or safety devices, etc. shall be removed from service until it is repaired to the original manufacturer’s standards. All repairs shall be made by qualified personnel in conformance with the manufacturer’s instructions. REPAIRS All repairs shall be made by qualified personnel in conformance with the manufacturer's instructions. May 2012 OPERATORS Only trained and authorized personnel shall be permitted to operate the dock leveler and lift combo. BEFORE OPERATION Before using the dock leveler and lift combo: Read and/or have explained and understood, the manufacturer’s operating instructions and safety rules. Inspect the dock leveler and lift combo for proper operation and condition. Any suspect item shall be carefully examined and a determination made by a qualified person as to whether it constitutes a hazard. All items not in conformance with the manufacturer’s specification shall be corrected before further use of the dock leveler and lift combo. DURING OPERATION The dock leveler and lift combo shall only be used in accordance with the manufacturer’s operating/maintenance manual. Do not overload the dock leveler and lift combo. Ensure that all safety devices are operational and in place. MODIFICATIONS OR ALTERATIONS Modifications or alterations of the dock leveler and lift combo shall be made only with written permission from the original manufacturer. These changes shall be in conformance with all applicable provisions of this standard and shall be as safe as the equipment was before modification. These changes shall also satisfy all safety recommendations of the original equipment manufacturer for the particular application of the dock leveler and lift combo. 6009080C — Dock Leveler and Lift Combo 5 ©2012 4Front Engineered Solutions, Inc. Owner’s responsibilities — dock leveler The owner’s responsibilities include the following: The owner should recognize the inherent danger of the interface between dock and transport vehicle. The owner should, therefore, train and instruct operators in the safe use of dock leveling devices. When a transport vehicle is positioned as closely as practicable to a dock leveling device, there shall be at least 4" of overlap between the front edge of the lip and the edge of the floor or sill of the transport vehicle. Nameplates, cautions, instructions and posted warnings shall not be obscured from the view of operating or maintenance personnel for whom such warnings are intended. Manufacturer’s recommended periodic maintenance and inspection procedures in effect at date of shipment shall be followed, and written records of the performance of these procedures should be kept. Dock leveling devices that are structurally damaged or have experienced a sudden loss of support while under load, such as might occur when a transport vehicle is pulled out from under the dock leveling device, shall be removed from service, inspected by the manufacturer’s authorized representative, and repaired as needed before being placed back in service. The owner shall see that all nameplates, caution and instruction markings or labels are in place and legible and that the appropriate operating and maintenance manuals are provided to users. Modifications or alterations of dock leveling devices shall be made only with written permission of the original manufacturer. When industrial vehicles are driven on and off transport vehicles during the loading and unloading operation, the brakes on the transport vehicle shall be applied and wheel chocks or positive restraints that provide the equivalent protection of wheel chocks engaged. The dock leveler should never be used outside its vertical working range or vertical lifting range or outside the manufacturer’s labeled rated capacity. It must also be compatible with the loading equipment and other conditions relating to the dock. 6 6009080C — Dock Leveler and Lift Combo ©2012 4Front Engineered Solutions, Inc. May 2012 ramp and lip grades Fig. 2 Ramp grade Lip grade Above Dock Vehicle bed position from dock, (in.) 12.0 10.0 8.0 15.1 12.8 10.5 8.4 6.1 3.8 11.9 10.1 8.2 5.1 3.3 1.4 9.7 8.2 6.7 2.9 1.0 0.0 6.0 4.0 2.0 0.0 -2.0 -4.0 -6.0 8.2 6.0 4.0 1.9 0.0 -1.9 -3.9 1.4 0.7 -2.8 -4.8 -6.8 -8.9 -11.0 6.4 4.8 3.3 1.7 0.0 -1.5 -3.1 0.3 -2.0 -3.5 -5.2 -6.8 -8.5 -10.1 5.4 4.0 2.7 1.3 0.0 -1.3 -2.6 -1.4 -2.8 -4.1 -5.5 -6.8 -8.3 -9.6 -8.0 -5.9 -13.0 -4.8 -10.0 -7.9 -15.1 -6.4 -12.0 -9.9 -17.1 -8.0 Ramp and lip grade, 4° lip bend, 18" lip -11.8 -13.5 -15.2 -4.0 -5.3 -6.7 -11.0 -12.4 -13.8 Below Dock May 2012 18.0 16.0 15.0 Ramp and lip grades, % for each dock leveler and lift combo length 12' dock 8' dock 10' dock leveler and leveler and leveler and lift combo lift combo lift combo Ramp Lip Ramp Lip Ramp Lip --------14.2 7.4 --------12.7 5.6 ----14.6 7.8 12.0 4.9 6009080C — Dock Leveler and Lift Combo 7 ©2012 4Front Engineered Solutions, Inc. installation — remote mount remote mount installation Fig. 3 Before installing the dock leveler and lift combo, read and follow the Safety Practices on pagse 3-4 and the Operating Instructions on pages 33-42. Failure to follow the Safety Practices could result in death or serious injury. Control panel 60" THE FOLLOWING TOOLS ARE REQUIRED: • Crane or heavy forklift truck capable of lifting the appropriate weight at 6' (2m) load center. See Fig. 4 for expected weight. • Roto-hammer with 3/4" bit. • Hydraulic jack. • Welder. • Short and long pry bars. • Assorted SAE open end wrenches. • Allen wrench set. 1. Check the entire dock leveler and lift combo pit for proper construction to certified approval drawings. Ensure the pit walls are square and plumb. Scrape clean the three embeds in the pit floor. Sweep clean the entire pit floor. Check electrical service running to the pit to ensure it agrees with the phase and voltage of the pump/motor and control box supplied with the dock leveler and lift combo. See tag attached to pump/motor electrical cord and wiring diagram located inside the control box cover. Power to control box must be from fused disconnect supplied by others. Fuse size for a dual element motor protected time delay type fuse can be no greater than 225% of motor FLA. Before doing any electrical work, make certain the power is disconnected and properly tagged or locked out. All electrical work must done by qualified technician and must meet all applicable codes. If it is necessary to make troubleshooting checks inside the control panel with the power on, USE EXTREME CAUTION. Do not place fingers or uninsulated tools inside the control box. Touching wires or other parts inside the control box could cause electrical shock, death or serious injury. 8 6009080C — Dock Leveler and Lift Combo ©2012 4Front Engineered Solutions, Inc. May 2012 installation — remote mount, continued 2. Verify that the voltage of the dock leveler and lift combo matches the facility’s power supply. Mount the control panel on the wall near the front of the dock leveler and lift combo and connect the power supply. The recommended mounting height of the control panel is approximately 60" from the floor to the pushbuttons. See Fig. 3 for detail, review approval drawings for specific details if applicable. 3. Mount the lift power unit on the finished floor within close proximity to the 4" conduit that supplies the hydraulic hose from the pit. Review approval drawings for specific details if applicable. 4. Power needs to be supplied to the lift power unit from the control panel. Review electrical schematics for termination details within the control panel. 5. Electrical connections to the two solenoid valves (SV6 and SV7) will need to be made on the lift power unit. Terminate the lift solenoid cable (cable 616) to the appropriate receptacle on the bottom side of the control panel. Review electrical schematics for termination details. Fig. 4 Dock leveler and lift combo weight chart (remote mounted lift power unit) Size (width x length) 6x8 6.5 x 8 7x8 6 x 10 6.5 x 10 7 x 10 6 x 12 6.5 x 12 7 x 12 Weight in lbs (kg) 7000 (3175) 7200 (3265) 7400 (3356) 8000 (3629) 8200 (3720) 8400 (3810) 9000 (4082) 9200 (4173) 9400 (4264) NOTE: The lip end of the dock leveler and lift combo is slightly heavier than the rear hinge end. Inadequate lifting equipment or practices can cause a lifted load to fall unexpectedly. Make sure lifting chain or other lifting devices are in good condition and have a rated capacity exceeding the lifting load for the angle used. See Fig. 4 for expected weight. Never allow anyone to stand on or near the dock leveler and lift combo when it is being lifted or placed in the pit. Failure to follow this warning can allow the dock leveler and lift combo to fall, tip, or swing into people, resulting in death or serious injury. May 2012 6009080C — Dock Leveler and Lift Combo 9 ©2012 4Front Engineered Solutions, Inc. installation — remote mount, continued 6. The dock leveler and lift combo weight is shown on Fig. 4. Ensure that the crane has sufficient lift capacity to safely carry this load. The entire weight of the dock leveler and lift combo shall be lifted from the four lifting rings mounted on the deck surface. Lifting under the side or end frame angles will damage the dock leveler and lift combo. The preferred lifting method is with a 4-way chain sling hooked to the four lifting lugs on the deck. If short chains are used, a spreader bar is recommended to reduce side loading. Adjust the sling chains so that the lip end is slightly higher than the rear hinge end to prevent damage to the front curtain brackets. The recommended lift point is 6" away from center, closer to the front (lip end) of the dock leveler and lift combo. If the dock leveler and lift combo cannot be set into the pit, it must always rest on a flat surface. 7. Pick up the dock leveler and lift combo with a 4-way chain sling hooked to the four lifting lugs on the deck. Inspect the hoses and fittings to ensure that they have not loosened during shipment. Set the dock leveler and lift combo in the pit while taking care to prevent damage to the sides of the platform and the front curtain brackets. Position the dock leveler and lift combo so that there is an equal space along each side of the platform and a 3/4" space at the rear. Fig. 5 Countersunk screws Cover plate Hydraulic hose Auxiliary port Rear of dock leveler and lift combo 8. The four lifting lugs are attached by shipping bolts which extend down to the lift frame. Loosen the nuts which secure the lifting lugs and then remove the threaded rods. Keep all lifting hardware in case the dock leveler and lift combo must be removed in the future. 9. Locate the hydraulic hose that shipped loose with the dock leveler and lift combo. Connect one end to the remote mounted power unit, above the Solenoid valves. The other end will connect to the dock leveler and lift combo through the auxiliary port. See Fig. 5 for location. 10. Loosen the two countersunk screws from the auxiliary port. Remove the auxiliary port cover plate from the deck surface of the dock leveler and lift combo. Keep all hardware, the cover plate will be reattached after this phase of installation. 10 6009080C — Dock Leveler and Lift Combo ©2012 4Front Engineered Solutions, Inc. May 2012 installation — remote mount, continued 11. Pull the hydraulic hose from the auxiliary port a sufficient distance to gain access to the fitting, approximately 12". Connect the auxiliary hose with the hydraulic hose attached to the remote mounted power unit. Ensure the routing of this hose avoids any pinch points or other hazards. 12. Ensure all electrical and hydraulic connections are made and power is supplied to the control panel. 13. Enter Service Mode by pressing and holding the reset pushbutton (located on the righthand side of the control panel) for 5 seconds. Within the panel, verify the PLC has booted and the PLC run light is solidly illuminated. Ensure the input 19 (door interlock) is illuminated. if it is not, jumper wires must be correctly installed to satisfy this condition. 14. Verify Service Mode is active. The red and green lights located on the panel should be flashing. Press and hold the LIFT RAISE pushbutton and note that the scissor lift motor is running. The lift should start to rise. If within 10 seconds the lift does not rise, the motor polarity may need to be reversed. 15. With the platform raised to floor level, the frame must be shimmed so that all four corners of the platform are level with the floor. Measure and record the height from each corner of the dock leveler and lift combo to the floor. Then select shims approximately equal to the height difference recorded for each corner. If one side is more that 3/8” lower than the other side, insert shims under the low side approximately 3/4 of the difference and repeat the measurement. NOTE: Leveling adjustments are easier to check if the highest corner of the platform is even with the floor. Shims will be used to raise the low corners so that all four corners on the platform are level. Do not enter the pit area under the dock leveler and lift combo unless the scissor motor is off and both safety stop blocks are placed in front of the scissor arm rollers. May 2012 6009080C — Dock Leveler and Lift Combo 11 ©2012 4Front Engineered Solutions, Inc. installation — remote mount, continued 16. Use the three front and three rear leveling bolts to lift the frame until the shims can be inserted. A jack and a short piece of 4" x 4" extending to the upper scissor frame can be used to support the weight and make the front leveling screw easier to adjust. The rear 4" x 10" shims must extend under the rear scissor arm pivot on each side. These 4" x 10" shims will be placed 1/2" from the back edge and 1/2" from the outside edge. See Fig. 9 for more detail on the rear shim locations. Fig. 6 17. The front roller track shims must be placed under the entire length of the front roller track. This shim length will vary depending on dock leveler and lift combo length. The roller track shims shall be placed 1/2" from the front of the scissor frame and 1/2" from the outside edge. After the shims are in place, loosen the leveling bolts so that the weight is resting only on the shim plates. See Fig. 8 for more detail on shim locations. Scissor assembly Scissor frame 4" x 10" shim Leveling bolt NOTE: Carefully stack the shims in all four locations so that the pit floor embeds are visible for welding. 18. Repeat the measurements and adjust the shimming until the platform is level. The platform does not need to be at the same height as the floor, but all four corners must be the same distance above or below the floor. The front of the dock leveler and lift combo may be up to 1/8" higher than the rear, but should not be lower. Check that there is a space of 3/4" between the rear of the platform and the pit wall. Ensure that there is an equal space on both sides of the platform. If the spaces are not correct, the frame can be shifted using a pry bar or small hydraulic jack between the pit wall and the ends of the frame. Do not use the jack near the middle of the frame side angles. Fig. 7 Roller 6" wide shim If the dock leveler and lift combo has been repositioned, re-check the platform for level and shim as required. Scissor frame 19. When the dock leveler and lift combo is properly positioned, remove the safety stop blocks from the lift frame. Operate the unit through the entire range, from fully lowered to fully raised. Watch for any interference with the pit walls. If any interference is found, either remove the obstruction or shift the dock leveler and lift combo in the pit. When the clearances are acceptable, raise the dock leveler and lift combo to floor level. Remove power (panel off) and place both safety stop blocks in front of the lower scissor arm rollers. 12 6009080C — Dock Leveler and Lift Combo ©2012 4Front Engineered Solutions, Inc. May 2012 installation — remote mount, continued Fig. 8 Do not enter the pit area under the dock leveler and lift combo unless the scissor motor is off and both safety stop blocks are placed in front of the scissor arm rollers. 20. When the dock leveler and lift combo has been correctly positioned and leveled. Weld the scissor frame to the shims. Then weld the shims to the pit floor embeds. See Fig. 8 and Fig. 9 for details regarding welding. 2X 1/4 4-10 NOTE: Attach the welder ground cable only to the frame, not to the platform or scissor arms. 6" wide shim track support Do not enter the pit area under the dock leveler and lift combo unless the scissor motor is off and both safety stop blocks are placed in front of the scissor arm rollers. 21. Make sure the scissor arms are firmly resting against safety stop blocks, then disconnect the hydraulic hose at the auxiliary port. Before disconnecting, raise the hose assembly above floor level to ensure excess hydraulic fluid will drain back to the tank. Cap both connections. Front Shim Detail Fig. 9 Reattach the auxiliary port cover plate to the deck assembly. The two countersunk screws should not protrude above the deck surface. 22. Route the remote hydraulic hose through the 4" conduit located near the remote mounted motor. From the pit area, retrieve the remote hydraulic hose and connect it to the hydraulic tee fitting connected to both scissor cylinders. Pull excess hydraulic hose from the conduit for travel above finished floor. See Fig. 10 for detail and location. 1/4 Rear frame embed Scissor frame 2X 4" x 10" shim Rear Shim Detail May 2012 6009080C — Dock Leveler and Lift Combo 13 ©2012 4Front Engineered Solutions, Inc. installation — remote mount, continued 23. While in the pit, route the bundle of electrical cables through the 3" conduit. Leave excess cable length in the pit area for travel above finished floor. These cables will connect to the proper receptacle on the bottom surface of the control panel. The yellow cable (cable 617) with a 19 pin connector contains 24V signal wiring for the proximity switches. The gray cable (cable 615) with an 8 pin connector contains the 24V signal wiring for the solenoids. The black cable (cable 302) with a 4 pin connector contains the power wiring for the leveler power unit. Review electrical schematics for wiring details if the control panels is not fitted with electrical connectors. 24. Once all electrical connections have been made. Place unit in Service Mode and verify all mode functions are available as follows: •Press Lift Lower and verify the lift lowers. •Press Lift Raise and verify the lift raises. Continue to raise the dock leveler and lift combo above floor level to the highest point of travel. Ensure the remote hydraulic hose and all electrical cables have sufficient slack in the line. If needed, put the safety stop blocks in place and pull extra hose cable length through the conduit. Fig. 10 Scissor hydraulic hose Hydraulic tee •Press Leveler Raise and verify the deck portion (leveler) raises. There may be a slight delay, but the leveler deck should start to rise. If the deck does not rise, the motor may be running in reverse. Review the electrical schematics to reverse the motor connections within the control panel and try again. Raise the leveler deck to its full height and before it can float back down, press the Stop button. This will hold the deck in the raised position. Extend both maintenance struts and lower the leveler deck by pulling the Stop button out. •Press Lip Extend and verify the lip extends. •With the deck raised and positioned on the maintenance struts, press and hold the Leveler Mode pushbutton. Verify both lock pins extend and the lip keepers rotate into position. After the cycle has completed, release the Leveler Mode pushbutton. •Press and hold the Lift Mode pushbutton. Verify both lock pins retract and the lip keepers rotate downward and the support legs are positioned to support the deck. After the cycle has completed, release the Lift Mode pushbutton. 14 6009080C — Dock Leveler and Lift Combo ©2012 4Front Engineered Solutions, Inc. May 2012 installation — remote mount, continued •Press the Leveler Raise button to raise the leveler to full height. Press the Stop button and store both maintenance struts. Fig. 11 •Pull the Stop button out and allow the leveler to float down to stored position. The deck should rest on the deck support legs. 25. While in Service Mode, position the dock leveler and lift combo using the raise and lower pushbuttons so that the back edge of the deck is precisely level with the floor. Use a straight edge to accomplish this (a board or equivalent will make a satisfactory marker when laid across the gap of the lift). Do not enter the pit area under the dock leveler and lift combo unless the scissor motor is off and both safety stop blocks are placed in front of the scissor arm rollers. 26. Check and adjust the position of the floor level sensor located under the front right side of the platform. See Fig. 11 for location and details. 27. Loosen the two socket head cap screws that are fixed in the slot of the sensor back plate. This will allow correct positioning of the floor level sensor. If needed, adjust the height of the arm by loosening the screw in the middle of the sensor. As shown in Fig. 12, position the arm of the sensor at 25° to the contact tube. When rotating the sensor, a snap can be felt when rotated past 25°. Adjust the sensor arm and sensor to the correct position and retighten. Floor level sensor Contact target NOTE: The floor level sensor assembly is easily accessed if the leveler platform is raised and placed on the maintenance struts. Raising the leveler deck will not affect the floor level adjustment. Fig. 12 Sensor back plate Socket head cap screws 28. Remove the safety stop blocks from the frame and store the blocks to the side. Lower the dock leveler and lift combo approximately 12" below floor level. Now raise the dock leveler and lift combo. The unit should automatically stop close to floor height. Reposition the floor level sensor if necessary. 29. Raise the dock leveler and lift combo approximately 4" to 6" above floor level. Extend the lock pins using the method described previously. Place a PVC shim bushing over each lock pin. Now place the latch block over each extended lock pin. Orient each latch block as shown in Fig. 13. May 2012 25° Scissor leg Contact target Sensor arm 6009080C — Dock Leveler and Lift Combo 15 ©2012 4Front Engineered Solutions, Inc. installation — remote mount, continued 30. Lower the platform until it is level with the floor. Remove power (panel off) and slide the latch block to fit snug with the embed pit steel. Make a heavy tack weld to the top and both sides of the latch block, attaching it to the pit steel. Fig. 13 Chamfered edge Latch block NOTE: Attach the welder ground cable only to the curb angle, not to the platform scissor arms. 31. After the latch blocks have been tack welded, supply power back to the panel. Place the unit in Service Mode and retract the lock pins. Lower the dock leveler and lift combo several feet below floor level and remove the installation shim bushing from each latch block. Now raise the platform to floor level. It will stop automatically. Extend the lock pins. Carefully inspect the lock pin for proper engagement into the latch blocks. If a pin does not engage properly, note the area of interference. If necescary, remove the latch blocks and repeat the block installation procedure. Latch block embed Lock pin Fig. 14 32. When the blocks have been properly positioned, lower the dock leveler and lift combo and fully weld the latch blocks in place. See Fig. 14 for weld details. NOTE: Fine adjustments can be made to floor level sensing using the PLC’s potentiometer, see Fig. 14. Using a jewelers screwdriver or equivalent, rotate the potentiometer clockwise to increase or raise the point at which the deck will stop. Rotate the potentiometer counter-clockwise to decrease or lower the point at which the deck will stop. This affects the automatic stop feature when raising the deck while in LIFT mode. 33. The dock leveler and lift combo has two principal operating modes, “LIFT” and “LEVELER”. Note panel indications for mode status. Potentiometer Fig. 15 PLC 1/4 2X NOTE: The light communications switch must be in DO NOT ENTER VEHICLE position to perform a transition sequence. 34. If the unit is not already in LIFT Mode, press the LIFT Mode pushbutton indicator. This will initiate a transition which will place the dock leveler and lift combo into the valid LIFT Mode. When sequencing is complete, verify indications represent a valid LIFT Mode configuration, the Lift pushbutton should be solidly lit. Place the light communications switch to the ENTER VEHICLE position and verify the lip operates normally. 16 1/4 Latch block 6009080C — Dock Leveler and Lift Combo ©2012 4Front Engineered Solutions, Inc. 2X Latch block embed May 2012 installation — remote mount, continued 35. Place the light communications switch to the DO NOT ENTER VEHICLE position and press the LEVELER pushbutton indicator. The dock leveler and lift combo unit will fall approximately 4" and then raise to finished floor, ensuring a dock level condition. The deck will then rotate upward, the rear lock pins will extend as the lip keepers rotate into place. The deck will then fall until the lip is resting in the lip keepers, and the leveler motor will stop. When sequencing is complete, verify indications represent a valid LEVELER Mode configuration. The indicator light should be solidly lit. If a failure occurs and diagnostics are being reported, refer to the Diagnostics section for details and correct the problem as required. Place the light communications switch to the ENTER VEHICLE position and verify the leveler operated normally. NOTE: Again, cycle between modes, LIFT Mode then again to LEVELER Mode to ensure all sequencing is correctly performed. If at any time an error occurs or the sequencing does not finish, consult the troubleshooting section of this manual. Fig. 16 Roller curtain Scissor frame Curtain bracket Fig. 17 Front pit wall Pretension 36. The front curtain can be installed only when the unit is in LEVELER Mode. Raise the leveler and put the maintenance struts in place. Put both safety stop blocks in place. Thread the curtain brackets over the rod of the curtain on each end. Lower the assembly to attach the curtain brackets to the scissor frame mounting location with the provided bolts as shown in Fig. 16. Ensure the rod of the curtain assembly extends through the backets on each end. Pit floor Fig. 18 Hanger bracket 37. Pretension the curtain assembly. Rotate the curtain assembly 5 revolutions, as shown in Fig. 17. 38. Install the rod and the hanger brackets through the curtain fabric. Install the hanger brackets as shown in Fig. 18. Ensure the hanger brackets are installed over the leg cross tube. 39. Operate the dock leveler and lift combo throughout the entire range to check for proper operation of the curtain. 40. Raise the dock leveler and lift combo to dock height and store the unit in Leveler mode. Keeper pin Curtain rod May 2012 Leg cross tube 6009080C — Dock Leveler and Lift Combo 17 ©2012 4Front Engineered Solutions, Inc. installation — pit mount, continued Pit Mount installation Fig. 19 Before installing the dock leveler and lift combo, read and follow the Safety Practices on pagse 3-4 and the Operating Instructions on pages 33-42. Failure to follow the Safety Practices could result in death or serious injury. Control panel 60" THE FOLLOWING TOOLS ARE REQUIRED: • Crane or heavy forklift truck capable of lifting the appropriate weight at 6' (2m) load center. See Fig. 20 for expected weight. • Roto-hammer with 3/4” bit. • Hydraulic jack. • Welder. • Short and long pry bars. • Assorted SAE open end wrenches. • Allen wrench set. 1. Check the entire dock leveler and lift combo pit for proper construction to certified approval drawings. Ensure the pit walls are square and plumb. Check electrical service running to the pit to ensure it agrees with the phase and voltage of the pump/motor and control box supplied with the dock leveler and lift combo. See tag attached to pump/motor electrical cord and wiring diagram located inside the control box cover. Power to control box must be from fused disconnect supplied by others. Fuse size for a dual element motor protected time delay type fuse can be no greater than 225% of motor FLA. Before doing any electrical work, make certain the power is disconnected and properly tagged or locked out. All electrical work must done by qualified technician and must meet all applicable codes. If it is necessary to make troubleshooting checks inside the control panel with the power on, USE EXTREME CAUTION. Do not place fingers or uninsulated tools inside the control box. Touching wires or other parts inside the control box could cause electrical shock, death or serious injury. 18 6009080C — Dock Leveler and Lift Combo ©2012 4Front Engineered Solutions, Inc. May 2012 installation — pit mount, continued 2. Verify that the voltage of the dock leveler and lift combo matches the facility’s power supply. Mount the control panel on the wall near the front of the dock leveler and lift combo and connect the power supply. The recommended mounting height of the control panel is approximately 60 inches from the floor to the pushbuttons. See Fig. 19 for detail, review approval drawings for specific details if applicable. Inadequate lifting equipment or practices can cause a lifted load to fall unexpectedly. Make sure lifting chain or other lifting devices are in good condition and have a rated capacity exceeding the lifting load for the angle used. See Fig. 20 for expected weight. Never allow anyone to stand on or near the dock leveler and lift combo when it is being lifted or placed in the pit. Failure to follow this warning can allow the dock leveler and lift combo to fall, tip, or swing into people, resulting in death or serious injury. Fig. 20 Dock Leveler and Lift Combo Weight Chart (Pit Mounted Lift Power Unit) Size (width x length) Weight in lbs (kg) 6x8 7200 (3265) 6.5 x 8 7400 (3356) 7x8 7600 (3447) 6 x 10 8200 (3720) 6.5 x 10 8400 (3810) 7 x 10 8600 (3900) 6 x 12 9200 (4173) 6.5 x 12 9400 (4264) 7 x 12 9600 (4354) 3. The dock leveler and lift combo weight is shown on Fig. 20. Ensure that the crane has sufficient lift capacity to safely carry this load. The entire weight of the dock leveler and lift combo shall be lifted from the four lifting rings mounted on the deck surface. Lifting under the side or end frame angles will damage the dock leveler and lift combo. The preferred lifting method is with a 4-way chain sling hooked to the four lifting lugs on the deck. If short chains are used, a spreader bar is recommended to reduce side loading. Adjust the sling chains so that the lip end is slightly higher than the rear hinge end to prevent damage to the front curtain brackets. The recommended lift point is 6” away from center, closer to the front (lip end) of the dock leveler and lift combo. If the dock leveler and lift combo cannot be set into the pit, it must always rest on a flat surface. NOTE: The lip end of the dock leveler and lift combo is slightly heavier than the rear hinge end. 4. Pick up the dock leveler and lift combo with a 4-way chain sling hooked to the four lifting lugs on the deck. May 2012 6009080C — Dock Leveler and Lift Combo 19 ©2012 4Front Engineered Solutions, Inc. installation — pit mount, continued Inspect the hoses and fittings to ensure that they have not loosened during shipment. Set the dock leveler and lift combo in the pit while taking care to prevent damage to the sides of the platform and the front curtain brackets. Position the dock leveler and lift combo so that there is an equal space along each side of the platform and a 3/4” space at the rear. Fig. 21 Countersunk screws Auxiliary port 5. The four lifting lugs are attached by shipping bolts which extend down to the lift frame. Loosen the nuts which secure the lifting lugs and then remove the threaded rods. Keep all lifting hardware in case the dock leveler and lift combo must be removed in the future. 6. Locate the temporary power cord and the lift solenoid cable that can be found through the auxiliary port. See Fig. 21 for location. 7. Loosen the two countersunk screws from the auxiliary port. Remove the auxiliary port cover plate from the deck surface of the dock leveler and lift combo. Keep all hardware, the cover plate will be reattached after this phase of installation. Cover plate Temporary power cord Solenoid cable Rear of unit Before doing any electrical work, make certain the power is disconnected and properly tagged or locked out. All electrical work must done by qualified technician and must meet all applicable codes. If it is necessary to make troubleshooting checks inside the control panel with the power on, USE EXTREME CAUTION. Do not place fingers or uninsulated tools inside the control box. Touching wires or other parts inside the control box could cause electrical shock, death or serious injury. 8. Connection to the temporary power cord should be made from the auxiliary port to the control panel. Review electrical schematics for termination details. 9. The lift solenoid cable should be pulled from the auxiliary port and connected to the appropriate receptacle on the bottom side of the panel. Review electrical schematics for termination details. 20 6009080C — Dock Leveler and Lift Combo ©2012 4Front Engineered Solutions, Inc. May 2012 installation — pit mount, continued 10. Ensure the routing of lift solenoid cable and the wiring to the temporary power cord avoid any pinch points or other hazards as the dock leveler and lift combo will rise. 11. Ensure all electrical connections are made and power is supplied to the control panel. 12. Enter Service Mode by pressing and holding the reset pushbutton (located on the righthand side of the control panel) for 5 seconds. Within the panel, verify the PLC has booted and the PLC run light is solidly illuminated. Ensure the input 19 (door interlock) is illuminated. if it is not, jumper wires must be correctly installed to satisfy this condition. 13. Verify Service Mode is active. The red and green lights located on the panel should be flashing. Press and hold the LIFT RAISE pushbutton and note that the scissor lift motor is running. The lift should start to rise. If within 10 seconds the lift does not rise, the motor polarity may need to be reversed. 14. With the platform raised to floor level, the frame must be shimmed so that all four corners of the platform are level with the floor. Measure and record the height from each corner of the dock leveler and lift combo to the floor. Then select shims approximately equal to the height difference recorded for each corner. If one side is more that 3/8” lower than the other side, insert shims under the low side approximately 3/4 of the difference and repeat the measurement. May 2012 6009080C — Dock Leveler and Lift Combo 21 ©2012 4Front Engineered Solutions, Inc. installation — pit mount, continued NOTE: Leveling adjustments are easier to check if the highest corner of the platform is even with the floor. Shims will be used to raise the low corners so that all four corners on the platform are level. Fig. 22 Scissor assembly Do not enter the pit area under the dock leveler and lift combo unless the scissor motor is off and both safety stop blocks are placed in front of the scissor arm rollers. 15. Use the three front and three rear leveling bolts to lift the frame until the shims can be inserted. A jack and a short piece of 4" x 4" extending to the upper scissor frame can be used to support the weight and make the front leveling screw easier to adjust. The rear 4" x 10" shims must extend under the rear scissor arm pivot on each side. These 4" x 10" shims will be placed 1/2" from the back edge and 1/2" from the outside edge. See Fig. 25 for more detail on the rear shim locations. 16. The front roller track shims must be placed under the entire length of the front roller track. This shim length will vary depending on dock leveler and lift combo length. The roller track shims shall be placed 1/2" from the front of the scissor frame and 1/2" from the outside edge. After the shims are in place, loosen the leveling bolts so that the weight is resting only on the shim plates. See Fig. 24 for more detail on shim locations. 17. Repeat the measurements and adjust the shimming until the platform is level. The platform does not need to be at the same height as the floor, but all four corners must be the same distance above or below the floor. The front of the dock leveler and lift combo may be up to 1/8” higher than the rear, but should not be lower. Check that there is a space of 3/4" between the rear of the platform and the pit wall. Ensure that there is an equal space on both sides of the platform. If the spaces are not correct, the frame can be shifted using a pry bar or small hydraulic jack between the pit wall and the ends of the frame. Do not use the jack near the middle of the frame side angles. If the dock leveler and lift combo has been repositioned, re-check the platform for level and shim as required. 22 4" x 10" shim Scissor frame Fig. 23 Roller 6" wide shim Scissor frame 6009080C — Dock Leveler and Lift Combo ©2012 4Front Engineered Solutions, Inc. Leveling bolt May 2012 installation — pit mount, continued 18. When the dock leveler and lift combo is properly positioned, remove the safety stop blocks from the lift frame. Operate the unit through the entire range, from fully lowered to fully raised. Watch for any interference with the pit walls. If any interference is found, either remove the obstruction or shift the dock leveler and lift combo in the pit. When the clearances are acceptable, raise the dock leveler and lift combo to floor level. Remove power (panel off) and place both safety stop blocks in front of the lower scissor arm rollers. Do not enter the pit area under the dock leveler and lift combo unless the scissor motor is off and both safety stop blocks are placed in front of the scissor arm rollers. Fig. 24 2X 1/4 4-10 6" wide shim 19. When the dock leveler and lift combo has been correctly positioned and leveled. Weld the scissor frame to the shims. Then weld the shims to the pit floor embeds. See Fig. 24 and Fig. 25 for details regarding welding. Track support embed Front Shim Detail NOTE: Attach the welder ground cable only to the frame, not to the platform or scissor arms. Do not enter the pit area under the dock leveler and lift combo unless the scissor motor is off and both safety stop blocks are placed in front of the scissor arm rollers. Scissor frame Fig. 25 1/4 Scissor frame Rear frame embed 2X 4" x 10" shim Rear Shim Detail May 2012 6009080C — Dock Leveler and Lift Combo 23 ©2012 4Front Engineered Solutions, Inc. installation — pit mount, continued 20. Disconnect the wiring to the temporary power cord and disconnect the lift solenoid cable from the panel and route the solenoid cable back through the auxiliary port. Reattach the auxiliary port cover plate to the deck assembly. The two countersunk screws should not protrude above the deck surface. Before doing any electrical work, make certain the power is disconnected and properly tagged or locked out. All electrical work must done by qualified technician and must meet all applicable codes. If it is necessary to make troubleshooting checks inside the control panel with the power on, USE EXTREME CAUTION. Do not place fingers or uninsulated tools inside the control box. Touching wires or other parts inside the control box could cause electrical shock, death or serious injury. 22. With the temporary power removed, permanent power must be provided from the control panel to the junction box located on the pit mounted lift power unit. 23. While in the pit, route the bundle of electrical cables through the 3" conduit. Leave excess cable length in the pit area for travel above finished floor. These cables will connect to the proper receptacle on the bottom surface of the control panel. The yellow cable (cable 617) with a 19 pin connector contains 24V signal wiring for the proximity switches. The gray cable (cable 615) with an 8 pin connector contains the 24V signal wiring for the solenoids. The black cable (cable 302) with a 4 pin connector contains the power wiring for the leveler power unit. Review electrical schematics for wiring details if the control panels is not fitted with electrical connectors. •Press Leveler Raise and verify the deck portion (leveler) raises. There may be a slight delay, but the leveler deck should start to rise. If the deck does not rise, the motor may be running in reverse. Review the electrical schematics to reverse the motor connections within the control panel and try again. Raise the leveler deck to its full height and before it can float back down, press the Stop button. This will hold the deck in the raised position. Extend both maintenance struts and lower the leveler deck by pulling the Stop button out. •Press Lip Extend and verify the lip extends. •With the deck raised and positioned on the maintenance struts, press and hold the Leveler Mode pushbutton. Verify both lock pins extend and the lip keepers rotate into position. After the cycle has completed, release the Leveler Mode pushbutton. •Press and hold the Lift Mode pushbutton. Verify both lock pins retract and the lip keepers rotate downward and the support legs are positioned to support the deck. After the cycle has completed, release the Lift Mode pushbutton. •Press the Leveler Raise button to raise the leveler to full height. Press the Stop button and store both maintenance struts. •Pull the Stop button out and allow the leveler to float down to stored position. The deck should rest on the deck support legs. 24. Once all electrical connections have been made. Place unit in Service Mode and verify all mode functions are available as follows: •Press Lift Lower and verify the lift lowers. •Press Lift Raise and verify the lift raises. Continue to raise the dock leveler and lift combo above floor level to the highest point of travel. Ensure the remote hydraulic hose and all electrical cables have sufficient slack in the line. If needed, put the safety stop blocks in place and pull extra hose cable length through the conduit. 24 6009080C — Dock Leveler and Lift Combo ©2012 4Front Engineered Solutions, Inc. May 2012 installation — pit mount, continued 25. While in Service Mode, position the dock leveler and lift combo using the raise and lower pushbuttons so that the back edge of the deck is precisely level with the floor. Use a straight edge to accomplish this (a board or equivalent will make a satisfactory marker when laid across the gap of the lift). Fig. 26 Do not enter the pit area under the dock leveler and lift combo unless the scissor motor is off and both safety stop blocks are placed in front of the scissor arm rollers. 26. Check and adjust the position of the floor level sensor located under the front right side of the platform. See Fig. 26 for location and details. 27. Loosen the two socket head cap screws that are fixed in the slot of the sensor back plate. This will allow correct positioning of the floor level sensor. If needed, adjust the height of the arm by loosening the screw in the middle of the sensor. Floor level sensor Contact target As shown in Fig. 27, position the arm of the sensor at 25° to the contact tube. When rotating the sensor, a snap can be felt when rotated past 25°. NOTE: The floor level sensor assembly is easily accessed if the leveler platform is raised and placed on the maintenance struts. Raising the leveler deck will not affect the floor level adjustment. Adjust the sensor arm and sensor to the correct position and retighten. Fig. 27 28. Remove the safety stop blocks from the frame and store the blocks to the side. Lower the dock leveler and lift combo approximately 12" below floor level. Now raise the dock leveler and lift combo. The unit should automatically stop close to floor height. Reposition the floor level sensor if necessary. Sensor back plate Socket head cap screws 29. Raise the dock leveler and lift combo approximately 4" to 6" above floor level. Extend the lock pins using the method described previously. Place a PVC shim bushing over each lock pin. Now place the latch block over each extended lock pin. Orient each latch block as shown in Fig. 28. 25° 30. Lower the platform until it is level with the floor. Remove power (panel off) and slide the latch block to fit snug with the embed pit steel. Make a heavy tack weld to the top and both sides of the latch block, attaching it to the pit steel. NOTE: Attach the welder ground cable only to the curb angle, not to the platform scissor arms. May 2012 Scissor leg Contact target Sensor arm 6009080C — Dock Leveler and Lift Combo 25 ©2012 4Front Engineered Solutions, Inc. installation — pit mount, continued 31. After the latch blocks have been tack welded, supply power back to the panel. Place the unit in Service Mode and retract the lock pins. Lower the dock leveler and lift combo several feet below floor level and remove the installation shim bushing from each latch block. Now raise the platform to floor level. It will stop automatically. Extend the lock pins. Carefully inspect the lock pin for proper engagement into the latch blocks. If a pin does not engage properly, note the area of interference. If necescary, remove the latch blocks and repeat the block installation procedure. Fig. 28 32. When the blocks have been properly positioned, lower the dock leveler and lift combo and fully weld the latch blocks in place. See Fig. 29 for weld details. Latch block embed NOTE: Fine adjustments can be made to floor level sensing using the PLC’s potentiometer, see Fig. 14. Using a jewelers screwdriver or equivalent, rotate the potentiometer clockwise to increase or raise the point at which the deck will stop. Rotate the potentiometer counter-clockwise to decrease or lower the point at which the deck will stop. This affects the automatic stop feature when raising the deck while in LIFT mode. 33. The dock leveler and lift combo has two principal operating modes, “LIFT” and “LEVELER”. Note panel indications for mode status. Latch block Chamfered edge Fig. 29 1/4 34. If the unit is not already in LIFT Mode, press the LIFT Mode pushbutton indicator. This will initiate a transition which will place the dock leveler and lift combo into the valid LIFT Mode. When sequencing is complete, verify indications represent a valid LIFT Mode configuration, the Lift pushbutton should be solidly lit. Place the light communications switch to the ENTER VEHICLE position and verify the lip operates normally. 35. Place the light communications switch to the DO NOT ENTER VEHICLE position and press the LEVELER pushbutton indicator. The dock leveler and lift combo unit will fall approximately 4" and then raise to finished floor, ensuring a dock level condition. The deck will then rotate upward, the rear lock pins will extend as the lip keepers rotate into place. The deck will then fall until the lip is resting in the lip keepers, and the leveler motor will stop. When sequencing is complete, verify indications represent a valid LEVELER Mode configuration. The indicator light should be solidly lit. If a failure occurs and diagnostics are being reported, refer to the Diagnostics section for details and correct the problem as required. Place the light communications switch to the ENTER VEHICLE position and verify the leveler operated normally. 26 2X 1/4 Latch block 6009080C — Dock Leveler and Lift Combo ©2012 4Front Engineered Solutions, Inc. Lock pin 2X Latch block embed May 2012 installation — pit mount, continued NOTE: Again, cycle between modes, LIFT Mode then again to LEVELER Mode to ensure all sequencing is correctly performed. If at any time an error occurs or the sequencing does not finish, consult the troubleshooting section of this manual. Fig. 30 36. The front curtain can be installed only when the unit is in LEVELER Mode. Raise the leveler and put the maintenance struts in place. Thread the curtain brackets over the rod of the curtain on each end. Lower the assembly to attach the curtain brackets to the scissor frame mounting location with the provided bolts as shown in Fig. 30. Ensure the rod of the curtain assembly extends through the backets on each end. Roller curtain Scissor frame Curtain bracket 37. Pretension the curtain assembly. Rotate the curtain assembly 5 revolutions, as shown in Fig. 31. 38. Install the rod and the hanger brackets through the curtain fabric. Install the hanger brackets as shown in Fig. 32. Ensure the hanger brackets are installed over the Fig. 31 Front pit wall Pretension 39. Press the LIFT pushbutton indicator and operate the dock leveler and lift combo throughout the entire range to check for proper operation of the curtain. Pit floor 40. Raise the dock leveler and lift combo to dock height and store the unit in Leveler mode. Fig. 32 Hanger bracket Keeper pin Curtain rod May 2012 Leg cross tube 6009080C — Dock Leveler and Lift Combo 27 ©2012 4Front Engineered Solutions, Inc. Service tools Fig. 33 Before servicing the dock leveler and lift combo, read and follow the Safety Practices on pagse 3-4 and the Operation section of this manual. Be certain, before entering the dock leveler and lift combo pit or doing any maintenance or repair under the dock leveler and lift combo that: 1) The safety blocks are in place on the scissor frame. 2) The both maintenance struts are securely supporting the leveler portion. 3) The power is disconnected and properly tagged or locked out. MAINTENANCE STRUTS AND LIP MAINTENANCE BAR 1. To raise the maintenance struts, two people are needed: a. Ensure the dock leveler and lift combo is in Leveler Mode with lock pins engaged. Follow the Operation section of this manual to achieve this position. b. Press and hold the RAISE button on the leveler side of the control panel so the leveler is fully raised. Maintenance struts Fig. 34 Raised position c. Use the second person to raise two maintenance struts to the vertical position. d. Release the RAISE button. 2. If the lip is extended, or you need it extended, and the leveler is on the maintenance struts: a. Push and hold the LIP EXTEND pushbutton. b. Rotate the lip maintenance bar up to the lock position. c. Release the lip and ensure the lip is supported by the lip maintenance bar. 3. Before lowering the maintenance struts, disengage the lip maintenance bar: a. Push and hold the LIP EXTEND pushbutton and rotate the lip maintenance bar down to release. Lowered position b. Carefully lower the lip. NOTE: Avoid pressing the RAISE pushbutton with the lip maintenance bar in the raised position, as this can damage the maintenance bar. 28 6009080C — Dock Leveler and Lift Combo ©2012 4Front Engineered Solutions, Inc. May 2012 Service tools, continued 4. To disengage the maintenance struts from its locked upright position, two people are needed: a) Push and hold the RAISE button on the control panel. b) Second person shall lift each maintenance strut up from its locked position. c) Rotate the maintenance struts toward the rear of the unit to lower them. d) Release the RAISE button. It is important to always engage the lip maintenance bar mechanism whenever working under the leveler with the lip extended. Any upward force on the lip could release the lip latch bar allowing the lip to fall. May 2012 6009080C — Dock Leveler and Lift Combo 29 ©2012 4Front Engineered Solutions, Inc. components and specifications The main components of the dock leveler and lift combo are shown below. See the parts list for specific part numbers. Fig. 35 Lip plate assembly Top plate assembly Auxiliary port Lip rod Deck subframe assembly Telescopic toe guards Lock pin Main deck cylinder Lip keeper/deck support assembly Leveler power unit Curtain support bracket Maintenance strut Pushrod support bracket (left and right-hand) Scissor assembly Scissor stop blocks Scissor lift cylinders 30 Scissor frame assembly 6009080C — Dock Leveler and Lift Combo ©2012 4Front Engineered Solutions, Inc. May 2012 components and specifications, continued Fig. 36 Strobe light Lift mode pushbutton selector switch and indicator light OFF ON Leveler mode pushbutton selector switch and indicator light Leveler raise pushbutton Lift raise pushbutton Lift lower pushbutton Lip extend pushbutton Silence alarm pushbutton System stop pushbutton MLS selector switch May 2012 6009080C — Dock Leveler and Lift Combo 31 ©2012 4Front Engineered Solutions, Inc. components and specifications Control Panel – NEMA 12, automatic motor starter, thermal overload, 2 amp resettable control circuit breaker. C.S.A. and/or U.L. approved. Lift Motor – NEMA standard T.E.N.V. frame, 7.5 h.p., three phase. Lift Pump – Fixed displacement gear pump, 5 gpm, primary relief valve set at factory. Lift Reservoir Capacity – 10 U.S. gallons ( lit.) level measured by sight gauge. Leveler Motor – NEMA standard T.E.N.V. / 56C frame, 1 h.p., three phase. Leveler Pump – Fixed displacement gear pump, 1 gpm, primary relief valve set at 2000 psi. Leveler Reservoir Capacity – 1 U.S. gallons (3.8 lit.) level measured by dipstick. Hydraulic Fluid – An all weather hydraulic fluid with a viscosity of 15 CSt at 40ºC (100ºF), such as: Shell Tellus T 15 Mobil Aero HFA (49011) Exxon Univis: HV13, N15, J13 Texaco Aircraft Oil #1554 U.S. Oil Co., Inc. # ZFI-5606 (low temp.) 32 6009080C — Dock Leveler and Lift Combo ©2012 4Front Engineered Solutions, Inc. May 2012 hydraulic system operation — leveler Fig. 37 Leveler Mode (white leveler indicator light is on) OFF ON Raise • Pump starts and shuttle valve shifts • Main lift cylinder extends and lip cylinder retracts • Pilot check valve opens Fully raised • Pressure increases • Sequence valve shifts • Lip cylinder extends Stop raise • Sequence valve and shuttle valve return • Top plate floats down forcing fluid to reservoir • Speed controlled by flow control in shuttle valve Lip extend • With leveler above dock height, pump starts as above • Solenoid valve shifts locking main cylinder in partial raised position • Pressure increases, sequence valve shifts and lip extends Stop • Solenoid valve shifts, locking main cylinder and lip cylinder • Power cut off from motor control circuit May 2012 6009080C — Dock Leveler and Lift Combo 33 ©2012 4Front Engineered Solutions, Inc. hydraulic system operation — lift Fig. 38 Lift Mode (white leveler indicator light is on) Raise • Pump starts and solenoid shifts allowing lift to rise Raising from below dock • Lift will continue to rise while holding the RAISE button until reaching dock height. • At dock height, the solenoid valve will shift • The unit will then stop. OFF ON Raising from dock height (Service Mode only) • Lift will rise approximately 4" to 6" while holding the RAISE button. • Hydraulic lift cylinders will reach the maximum stroke and unit will stop. Lower • Solenoid shifts allowing lift to lower. • Hydraulic fluid is displaced from the lift cylinders to the reservoir as the unit has a controlled descent. • Lift will continue to lower while holding the LOWER button until reaching grade level. • Release of the LOWER button at any point of travel shifts the solenoid and stops the unit. Lip extend • Solenoid valve shifts allowing the lip to extend • Lip will stay extended while the lift LOWER button is pressed STOP • Solenoid valve shifts, locking main cylinder and lip cylinder • Power cut off from motor control circuit NOTE: Strobe light will flash when the unit is away from dock level. Alarm will sound if the unit is below dock for more than ten minutes. Press the silence alarm button to silence alarm if desired. 34 6009080C — Dock Leveler and Lift Combo ©2012 4Front Engineered Solutions, Inc. May 2012 hydraulic system operation — pendant Fig. 39 UP • Raise solenoid shifts and lift motor starts allowing the lift to rise. • Lift will continue to rise while holding the UP button until reaching dock height or the UP button is released • At dock height, the raise solenoid valve will shift. • The unit will then stop DOWN • Lower solenoid shifts allowing lift to lower • Hydraulic fluid is displaced from the lift cylinders to the reservoir as the unit has a controlled descent. • Lift will continue to lower while holding the LOWER button until reaching grade level. • Release of the LOWER button at any point of travel shifts the solenoid and stops the unit. LIP EXTEND ON LOWER • Rapidly press the DOWN button twice and hold. • The lip solenoid valve shifts allowing the lip to fully extend. • The unit will then lower while the lip stays extended. • Release of the LOWER button at any point of travel shifts the solenoid and stops the unit. The lip solenoid shifts and the lip rotates to the pendant position. • Label 6009318 is located on the side of the pendant. This label explains operation of the lip extend on lower function. NOTE: The pendant duplicates the LIFT, RAISE and LOWER functions. May 2012 6009080C — Dock Leveler and Lift Combo 35 ©2012 4Front Engineered Solutions, Inc. operation Before operating the dock leveler and lift combo, read and follow the Safety Practices on pages 3-4. Use of dock leveler restricted to trained operators. Follow procedures on placard posted near dock leveler. DO NOT USE THE DOCK LEVELER IF IT LOOKS BROKEN, OR DOES NOT SEEM TO WORK RIGHT. Tell your supervisor it needs repair right away, or contact your local Serco distributor. Before pressing button, ensure lip avoids contact with vehicle platform sides and cargo. If lip does not lower to vehicle platform, reposition vehicle platform. Stay clear of leveler unless lip is supported by vehicle platform or the leveler is stored at dock level. Visually check that the lip is supported by the vehicle platform or the ramp is supported by both lip keepers or safety legs before driving or walking on the ramp. Unsupported dock levelers can lower unexpectedly. Before chocking wheels or engaging vehicle restraint, dump air from air ride suspensions and set parking brakes. Always be certain that the vehicle wheels are chocked, or that the vehicle is locked in place by a vehicle restraining device and the brakes are set before loading or unloading. Vehicles pulling away from the dock unexpectedly can cause uncontrolled drop of the dock leveler which can result in death or serious injury. Visually check that the lip is supported by the vehicle platform or the ramp is supported by both front lip keepers or deck support leg before driving or walking on the ramp. The maximum uncontrolled drop of a dock leveler under load is 4" from the vehicle platform height from which the dock leveler was positioned. Always return the dock leveler to its dock level (stored) position before allowing the vehicle to leave the dock. If the vehicle pulls away from the dock before the dock leveler is stored, the lip will fall to its pendant position and the ramp will drop. In addition, failure to properly store the leveler may leave the leveler in a position below the level of the dock floor. This condition may result in unexpected drop of personnel or material handling equipment and result in death or serious injury. Failure to follow these instructions could result in death or serious injury to operators and/or bystanders. 36 INTRODUCTION The dock leveler and lift combo is a combination dock leveler and lift table. It has been assembled as a self-contained unit which requires installation in a pit and electrical connection to the control panel. The dock leveler portion is designed to span and compensate for the space and height differences between a loading dock and freight carrier to allow safe, efficient freight transfers. The dock leveler uses a pushbutton control to position the ramp. Pushing and holding the leveler RAISE button operates a hydraulic cylinder to raise the ramp. Releasing the leveler RAISE button allows the ramp to lower. When the dock leveler reaches its full raised position, a second hydraulic cylinder extends the lip. The dock leveler with its lip extended settles onto the vehicle platform forming a bridge. After loading, pressing and holding the leveler RAISE button allows the ramp to rise. The lip will retract as the leveler is raised. Releasing the leveler RAISE button lowers the ramp into its level, stored position. For below dock end loading, press the leveler Raise pushbutton until the leveler is about 6" above dock. Press the lip extend pushbutton until the lip extends 2-3", clearing the lip keepers. Release the lip extend pushbutton and the leveler will float down for end loading. The lift table portion is designed to lower or raise a load up to the rated lifting capacity between dock and grade level. The lift table uses pushbuttons to control the position of the lift. Pushing and holding the lift RAISE button operates two hydraulic cylinders to raise the lift. The lift will continue to rise while holding the lift RAISE button until the unit reaches dock level and will stop. Pushing and holding the lift LOWER button will displace the hydraulic fluid from the cylinders and allow the lift to lower. The lift will continue to lower while holding the lift LOWER button until the unit reaches grade level. Releasing the button while raising or lowering the lift will stop the unit at that height. In Leveler Mode, the dock leveler is in its stored position at dock height with the lock pins engaged and the ramp being supported by both lip keepers. In Lift Mode, the lift is in its stored position with the lock pins retracted and the ramp being supported by the deck support legs on the lip end. 6009080C — Dock Leveler and Lift Combo ©2012 4Front Engineered Solutions, Inc. May 2012 operatinG instructions — leveler mode Fig. 40 Always secure the vehicle with a vehicle restraint or wheel chocks before operating the dock leveler. Do not operate the dock leveler and lift combo with anyone standing on or in front of the unit. Do not drive on the lip until it is fully extended and supported by the vehicle bed or by the drive surface at grade level. Do not drive on the leveler when the STOP button is pressed in. Always keep hands and feet clear of all moving parts. Open Always restore the dock leveler and lift combo to its safe dock level position after servicing the vehicle. RAISING LEVELER Ensure a vehicle restraining device is engaged or wheel chocks in place before operating the dock leveler. Ensure the dock leveler and lift combo is in Leveler Mode. When the unit is in Leveler Mode the Leveler Mode lighted pushbutton will be lit. Verify the lock pins are engaged and lip is supported by both lip keepers. If the unit is not in Leveler Mode, rotate the Light Communications (MLS) switch to DO NOT ENTER TRUCK and press the LEVELER pushbutton. The unit will lower approximately 8" and then rise back to dock level. This step ensures that the unit is at dock level. After this step the leveler will rise, then the lock pins engage and the lip keepers will rotate into place. 1. Remove the rear chains, swing gate or any other device blocking traffic access to the dock leveler and lift combo. See Fig. 40. 2. Rotate the MLS switch to ENTER VEHICLE. This will change the inside light to green and the outside light to flashing red. May 2012 6009080C — Dock Leveler and Lift Combo 37 ©2012 4Front Engineered Solutions, Inc. operatinG instructions — leveler mode, continued 3. Press the RAISE button on the control panel to raise leveler. See Fig. 41. Fig. 41 Press to raise 4. Continue to press the RAISE button. The lip will automatically extend when the leveler is fully raised. Raise NOTE: To extend the lip earlier, press and hold the lip extend pushbutton. The deck will hold in position and the lip will extend fully. Do not drive on dock leveler or lip until it is fully extended and supported by the vehicle bed. Never use a fork truck or other material handling equipment to lower the ramp and lip section. 5. When lip is fully extended release the button. The leveler will slowly float down to the vehicle bed. See Fig. 43. NOTE: If an obstruction prevents the lip from deploying properly, press and hold the leveler RAISE button to raise and retract the lip. Restore the leveler to safe dock level position with the lip in both lip keepers for end loading. Fig. 42 Press to extend Lip extend Fig. 43 Release to lower Float down 38 6009080C — Dock Leveler and Lift Combo ©2012 4Front Engineered Solutions, Inc. May 2012 operatinG instructions — leveler mode, continued STORING LEVELER 1. To return the leveler to the stored position, press and hold the leveler RAISE button. As the leveler rises the lip will retract. When the lip is fully retracted, release the button. The leveler will float down to the stored position with the lip supported by both lip keepers. Fig. 44 Press to raise, release to lower Before allowing vehicle to leave, always return the dock leveler to its dock level (stored) position with the lip supported by both lip keepers and ensure no equipment, material or people are on the dock leveler. See Fig. 44. Failure to do so may leave the dock leveler in a position below the level of the dock floor. This condition may result in unexpected drop of personnel or material handling equipment and could result in death or serious injury. 2. Reapply the rear chains or close the swing gate or any other device blocking traffic access. See Fig. 46. 3. After the dock leveler is stored, rotate the MLS switch to DO NOT SERVICE VEHICLE. This will change the inside light to red and the outside light to flashing green. BELOW DOCK END LOADING 1. Press and hold the leveler RAISE button until the leveler is fully raised and the lip starts to extend. When the lip has extended 2 to 3" to clear the front of the keepers, release the button. Leveler will float down for end loading, See Fig. 45. Make sure END LOADING is done with the MLS switch in the ENTER VEHICLE position. May 2012 Fig. 45 Press to raise Press to extend lip 6009080C — Dock Leveler and Lift Combo 39 ©2012 4Front Engineered Solutions, Inc. operatinG instructions — lift mode Fig. 46 Always secure the vehicle with a vehicle restraint or wheel chocks before operating the dock leveler. Do not operate the dock leveler and lift combo with anyone standing on or in front of the unit. Do not drive on the lip until it is fully extended and supported by the vehicle bed or by the drive surface at grade level. Always keep hands and feet clear of all moving parts. Always restore the dock leveler and lift combo to its safe dock level position after servicing the vehicle. Close NOTE: Strobe light will flash when the unit is away from dock level. The strobe light will stop flashing when the unit returns to dock level. An alarm will sound if the unit stays below dock level for more than ten minutes. Return the unit to dock level or press the silence alarm button to silence alarm if desired. LOWERING LIFT Before operating the lift onto a truck bed, ensure a vehicle restraining device is engaged or wheel chocks in place. Before lowering the lift onto the driveway, ensure that there are no obstructions impeding the downward travel of the lift. Ensure the dock leveler and lift combo is in Lift Mode. Verify the lock pins are retracted and deck is supported by both deck support legs. When the unit is in Lift Mode the Lift Mode lighted pushbutton will be lit. If the unit is not in Lift Mode, rotate the Light Communication (MLS) switch to DO NOT ENTER TRUCK and press the LIFT pushbutton. The leveler will rise, then the lock pins disengage and the deck support legs will rotate into place. 1. Remove the rear chains, swing gate or any other device blocking traffic access to the dock leveler and lift combo. See Fig. 40. 2. Rotate the MLS switch to ENTER VEHICLE. This should change the inside light to green and the outside light to flashing red. 3. Drive lift truck onto leveler deck and set brakes. 4. After the load is on the lift platform, reapply the rear chains or close the swing gate or any other device blocking traffic access. See Fig. 46. 40 6009080C — Dock Leveler and Lift Combo ©2012 4Front Engineered Solutions, Inc. May 2012 operatinG instructions — lift mode, continued 5. Fully extend the leveler lip by pressing and holding the lip extend pushbutton. Fig. 47 Press to lower 6. Press and hold the lift LOWER button to lower the lift to a position where the leveler lip is supported either by the driveway surface or by a vehicle bed. See Fig. 47. RAISING LIFT 1. Press and hold the lift RAISE button to raise the lift from a lowered position. The unit will continue to rise while holding the RAISE button until the unit reaches dock level, the unit will then stop. See Fig. 48 and 49. LOWER 2. Remove the rear chains, swing gate or any other device blocking traffic access to the dock leveler and lift combo. See Fig. 40. 3. Drive the lift truck into the building and completely remove the load from the dock leveler and lift combo. Before allowing vehicle to leave, always return the dock leveler and lift combo to its dock level (stored) position at dock height with the lip stored in both lip keepers and ensure no equipment, material or people are on the dock leveler. Failure to do so may leave the dock leveler in a position below the level of the dock floor. This condition may result in unexpected drop of personnel or material handling equipment and could result in death or serious injury. 4. Reapply the rear chains or close the swing gate or any other device blocking traffic access. See Fig. 46. 5. With the dock leveler and lift combo at dock level, rotate the MLS switch to DO NOT ENTER VEHICLE. This will change the inside light to red and the outside light to flashing green. Fig. 48 Press to raise to stored position Raise to stored Fig. 49 Press to raise 6. If desired, press the LEVELER mode pushbutton and store the unit in Leveler Mode. When the unit is in Leveler Mode the Leveler Mode lighted pushbutton will be lit. May 2012 Raise 6009080C — Dock Leveler and Lift Combo 41 ©2012 4Front Engineered Solutions, Inc. operatinG instructions — Auto return to dock A.R.T.D. The A.R.T.D. automatically resets the leveler whenever a vehicle pulls away from the loading dock with the lip resting on the vehicle. This function performs in this manner: Fig. 50 1. If the vehicle pulls away, the leveler will float down to the lowest position and the lip will fall. When the light communication switch is in the DO NOT SERVICE VEHICLE position the leveler will automatically raise, retract the lip, and then float down to the stored position. See Fig. 50. 42 6009080C — Dock Leveler and Lift Combo ©2012 4Front Engineered Solutions, Inc. May 2012 planned maintenance To ensure proper operation of your dock leveler and lift combo, perform the following planned maintenance procedures. QUARTERLY 1. Inspect all warning labels and placards. See page 44. Replace as necessary. Be certain, before entering the dock leveler and lift combo pit or doing any maintenance or repair under the dock leveler and lift combo that: 1) The safety blocks are in place on the scissor frame. 2) The maintenance struts are securely supporting the leveler portion. 3) The power is disconnected and properly tagged or locked out. 2. Clean out the inside of the pit area. Take care not to spray any electrical parts. Before servicing the dock leveler and lift combo, read and follow the Safety Practices on pages 3-4 and the Operation section of this manual. Place barricades on the dock floor around the dock leveler and lift combo pit and in the driveway in front of the pit while installing, maintaining or repairing the unit. WEEKLY 1. Clean the upper portion of the lip plate hinge with a brush and blow away all dirt and debris. 2. Inspect for debris in rear hinge area of the dock leveler and lift combo. Also check for debris between the unit and the side pit walls to ensure smooth operation. Clean as required. 3. Inspect and lubricate all mechanical pivot points on the dock leveler and lift combo with S.A.E 30 oil. Cycle the unit when lubricating. See page 44. 4. Inspect the hydraulic cylinders and hoses for any fluid loss. Check the hoses for signs of excessive wear. 5. Inspect the reservoir level of the leveler power unit. Check the reservoir level with the leveler fully extended. Add fluid as required. See page 44. 6. Inspect the reservoir level of the scissor lift power unit. Check the reservoir level with the unit fully extended. Add fluid as required. See page 44. 7. Inspect all welds under the dock leveler and lift combo for fatigue or failure, particularly the lip plate hinge, top plate beams, front hinge bar and the scissor cylinder support weldments. 8. Check the full operation of the dock leveler and lift combo. Make any adjustments as required. 3. Check the full operation of the dock leveler and lift combo to ensure there is no hesitation in the hydraulic system. Any loss of fluid will affect the safety valve operation. 9. Lubricate the lip plate tubes and the main scissor bearings with a Molydenum Disulfide NLGI#2 grease. Do not over grease. For the lip hinge tubes, stop when grease starts to ooze from the hinge tube ends. Wipe off excess grease. See page 44. 4. Inspect the operation of the telescopic toe guards to ensure they are not distorted or binding when the leveler is operating. 10. Inspect dock bumpers. 4” of bumper protection is required. Worn, torn, loose or missing bumpers must be replaced. 5. Clean the area that accesses the drain located at the bottom of the pit to remove any build up of debris. Hydraulic Fluid – An all weather hydraulic fluid with a viscosity of 15 CSt at 40ºC (100ºF), such as: Shell Tellus T 15 Mobil Aero HFA (49011) Exxon Univis: HV13, N15, J13 Texaco Aircraft Oil #1554 U.S. Oil Co., Inc. # ZFI-5606 (Low Temp.) May 2012 6009080C — Dock Leveler and Lift Combo 43 ©2012 4Front Engineered Solutions, Inc. planned maintenance, continued Fig. 51 Legend Symbol Description Lubricate - Oil Light oil - SAE 30 Lubricate - Grease Molybdenum disulfide NLGI #2 Rear hinge pins (4 places) Cleaning (Location - frequency) Visually Inspect (Replace damaged or worn) Clean pit quarterly 44 Visually inspect holes and cables (not shown) 6009080C — Dock Leveler and Lift Combo ©2012 4Front Engineered Solutions, Inc. Hydraulic reservoir (replace oil annually and inspect level quarterly.) May 2012 planned maintenance, continued Every 90 days (quarterly) inspect all safety labels and tags to ensure they are on the dock leveler and lift combo and are easily legible. If any are missing or require replacement, please call 1-800-525-2010 or 972-466-0707 for replacements. 921-217 (x2) 6008485 (x2) Fig. 52 921-075 921-074 (x2) 921-070 6007121 (x2) 6003451 (x2) 6008547 Serco (x2) 6008548 Kelley (x2) 921-050 921-052 921-053 (Located on power unit) 921-147 921-027 6008834 921-234 (x2) OPERATING INSTRUCTIONS Warning and operation placard (Mounted on wall near leveler) May 2012 6008880 (x4) 6007074(x2) 6009318 6009080C — Dock Leveler and Lift Combo 45 ©2012 4Front Engineered Solutions, Inc. Troubleshooting Fig. 53 46 6009080C — Dock Leveler and Lift Combo ©2012 4Front Engineered Solutions, Inc. May 2012 Troubleshooting, continued Use the Troubleshooting Guide if ever the dock leveler and lift combo fails to perform properly. Find the condition that most closely matches your situation and make the recommended adjustments. Observe all safety warnings before attempting any maintenance procedure. Before servicing the dock leveler and lift combo, read and follow the Safety Practices on pages 3-4 and the Operation section of this manual. The PLC will display real time diagnostics using the Lift/ Leveler pilot lamps located on the front face of the control panel. Static errors flash both pilot lamps simultaneously indicating a specific failure condition. Dynamic errors flash only one pilot lamp (the lamp associated with the current transition mode) and indicate a logging of the last attempted step in a given transition mode prior to failure. Example: if the error occurs while the Lift acquisition mode was executing, the Lift pilot lamp will flash the trouble code. The number in parentheses represents the number of lamp flashes. These dynamic trouble codes store information that is lost once the motor run time has elapsed. LIFT pilot lamp flashing lift acquisition timeout (20 seconds) Flash Count Problem Category 2 Deck Raise 3 Pins In/Legs Up Possible Cause Solution a) Load on Leveler Press RESET push button b) Leveler Power Unit malfunction a) Sensors incorrectly positioned or malfunctioning Press RESET push button b) Leveler Power Unit malfunction LEVELER pilot lamp flashing Leveler acquisition timeout (30 seconds) Flash Count Problem Condition 2 Lift Lower 3 Lift Raise 4 Deck Raise 5 Pins Out/ Legs Down Possible Cause Solution a) Scissor stop blocks are preventing the unit from lowering Press RESET push button b) Lift Power Unit malfunction a) Lift Power Unit malfunction Press RESET push button a) Load on Leveler Press RESET push button b) Leveler Power Unit malfunction a) Pins not aligned with latch blocks Press RESET push button b) Sensors incorrectly positioned or malfunctioning c) Leveler PowerUnit malfunction LIFT/LEVELER pilot lamps flashing (both simultaneously) Flash Count Problem Condition Possible Cause Solution 2 Lock Pin Sensors Lock Pins Engaged and Disengaged sensors are ON at the same time 3 Leg/Keeper Assy Lip Keepers and Deck Support Leg sensors are ON at the same time 4 Deck Level Deck not level while in LIFT mode unless lowering with lip retracted (> 0 degrees) May5 2012 Flooded 6 Lift motor Flood condition, power6009080C to motors and— solenoid is removed Dockvalves Leveler and Lift Lift motor timeout (1 minute), possible power unit malfunction. investigate cause for sensor malfunction investigate cause for sensor malfunction check for any interference check for flooding in pit Combo ©2012 4Front Engineered Solutions, Inc. Press RESET push button 47 LEVELER pilot lamp flashing Leveler acquisition timeout (30 seconds) Flash Count Problem Condition 2 Lift Lower 3 Lift Raise 4 Deck Raise Possible Cause a) Scissor stop blocks are preventing the unit from lowering b) Lift Power Unit malfunction a) Lift Power Unit malfunction Troubleshooting, continued a) Load on Leveler b) Leveler Power Unit malfunction Solution Press RESET push button Press RESET push button Press RESET push button a) Pins not aligned with latch blocks Before servicing Pins Out/the dock leveler and lift combo, read Sensors incorrectly positioned or malfunctioning and5 follow Legs theDown Safety b)Practices on pages 3-4 and the Operation section of this manual. c) Leveler PowerUnit malfunction Press RESET push button LIFT/LEVELER pilot lamps flashing (both simultaneously) Flash Count Problem Condition Possible Cause 2 Lock Pin Sensors Lock Pins Engaged and Disengaged sensors are ON at the same time 3 Leg/Keeper Assy Lip Keepers and Deck Support Leg sensors are ON at the same time 4 Deck Level Deck not level while in LIFT mode unless lowering with lip retracted (> 0 degrees) 5 Flooded 6 Lift motor 7 Leveler motor Solution investigate cause for sensor malfunction investigate cause for sensor malfunction check for any interference Flood condition, power to motors and solenoid valves is removed check for flooding in pit Lift motor timeout (1 minute), possible power unit malfunction. Press RESET push button Leveler motor timeout (1 minute), possible power unit malfu nction. Press RESET push button The dock leveler and lift combo is supplied with connectivity products to ease installatio n and troubleshooting. The 8-port junction box, located where shown below, has signal LED display. Page 49 and 50 will detail the standard LED display when the unit is stored in LIFT and LEVELER mode. Fig. 54 4-port solenoid junction box 8-port sensor junction box 48 6009080C — Dock Leveler and Lift Combo ©2012 4Front Engineered Solutions, Inc. May 2012 Troubleshooting, continued Before servicing the dock leveler and lift combo, read and follow the Safety Practices on pages 3-4 and the Operation section of this manual. Leveler mode led display The LED display below represents the standard LEVELER MODE condition with the deck raised and resting on the maintenance struts and the lip pendant. This can be used as a troubleshooting starting point to help diagnose the area of concern. Fig. 55 LS8 (lip keepers up) amber light illuminated LS6 (lock pins extended) amber light illuminated LS3 (lip pendant) amber light illuminated LS4 (dock height indicator) amber light illuminated Power indicator green light illuminated LS1 and LS2 (deck level indicator) if the leveler is not raised and resting on the maintenance struts, both LS1 and LS2 will have the amber light illuminated. May 2012 6009080C — Dock Leveler and Lift Combo 49 ©2012 4Front Engineered Solutions, Inc. Troubleshooting, continued Before servicing the dock leveler and lift combo, read and follow the Safety Practices on pages 3-4 and the Operation section of this manual. lift mode led display The LED display below represents the standard LIFT MODE condition at dock height with the deck raised and resting on the maintenance struts and the lip pendant. This can be used as a troubleshooting starting point to help diagnose the area of concern. Fig. 56 LS7 (lock pins retracted) amber light illuminated LS3 (lip pendant) amber light illuminated LS9 (deck support legs up) amber light illuminated LS4 (dock height indicator) amber light illuminated Power indicator green light illuminated LS1 and LS2 (deck level indicator) if the leveler is not raised and resting on the maintenance struts, both LS1 and LS2 will have the amber light illuminated. 50 6009080C — Dock Leveler and Lift Combo ©2012 4Front Engineered Solutions, Inc. May 2012 Troubleshooting, continued Use the Troubleshooting Guide if ever the leveler fails to perform properly. Find the condition that most closely matches your situation and make the recommended adjustments. Observe all safety warnings before attempting any maintenance procedure. PROBLEM 1. Leveler does not raise. Motor is silent. 2. Leveler does not raise; motor starts then stops, motor starter relay chatters. 3. Leveler does not raise. Motor hums. 4. Leveler does not raise. Motor runs. May 2012 Before servicing the dock leveler, read and follow the Safety Practices on Pages 3-4 and the Operation section in this manual. POSSIBLE CAUSE SOLUTION a) No electrical power to control panel. a) Check that voltage is present at terminal connections to the control panel. b) Electrical connections incorrect or broken. b) Check that wiring matches the wiring diagram. a) Overload relay, main circuit breaker or leveler control circuit breaker tripping out. a) Check overload setting and current draw. b) Voltage drop due to long wiring distance from power source. b) Check voltage when motor is started. Voltage drop is more often a problem on single phase motors. Acquire conductor specifications from your distributor. a) Voltage drop. a) Check voltage when motor is started. Voltage drop is more often a problem on single phase motors. Acquire conductor specifications from your distributor. b) Loss of 1 phase. b) Check for voltage at all three motor connections (T1, T2, T3) in control panel. a) Low fluid level in reservoir. a) The hydraulic fluid level should be checked when the leveler is resting on the maintenance strut with the lip pendant. Add fluid if required and check for leaks. See page 54, Fig. 58. b) Pump not running or pressure insufficient. b) Remove the hose from main lift cylinder and point free end into reservoir opening. If no oil is pumped, replace pump. c) Pump running in reverse. c) Check motor rotation and change electrical connections if necessary. See motor name plate. d) Primary relief valve setting too low. d) Set primary relief valve setting to 2000 PSI. See page 54. Note: Requires use of pressure gauge or pump will be severely damaged. 6009080C — Dock Leveler and Lift Combo 51 ©2012 4Front Engineered Solutions, Inc. Troubleshooting, continued Before servicing the dock leveler, read and follow the Safety Practices on Pages 3-4 and the Operation section in this manual. PROBLEM 5. Overload relay tripping. POSSIBLE CAUSE SOLUTION a) Overload relay set too low. a) Check motor full load amperage and overload relay setting. b) Loss of one phase. b) Check for voltage at all three motor connections (T1,T2,T3) in control panel. 6. Leveler will not lower. a) Automatic safety stop (velocity fuse) is locked. a) If a load was on the leveler, remove the load and jog the RAISE button to unlock the leveler. If no load was on the leveler, adjust the flow control valve to reduce drop speed. See page 54. 7. Leveler floats down too slowly. a) Flow control requires adjustment. a) Adjust flow shuttle valve for faster flow. Turn counterclockwise to increase speed. See page 54. 8. Lip plate will not extend, or extends too slowly. a) Low fluid level in reservoir. a) Check fluid level with leveler fully raised. Add fluid if required and check for leaks. See page 54, Fig. 58. b) Sequence valve set too high. b) Decrease sequence valve setting. See page 54. c) Lip hinge binding. c) Inspect hinge area for damage or trapped debris. Lubricate hinge. d) Primary relief valve set too low. d) Set primary relief valve to 2000 PSI. See page 54. Note: Requires use of pressure gauge or pump will be severely damaged. 9. Lip plate extends too soon. a) Sequence valve set too low. a) Turn clockwise to increase pressure so that the lip plate does not extend until the deck is fully raised. 10. Lip plate will not stay out / falls as leveler is lowering. a) Pilot operated check valve / valve not closing. a) Remove and inspect for foreign matter. Clean as required. b) Lip cylinder damaged. b) Replace lip cylinder piston seal, or replace cylinder. 52 6009080C — Dock Leveler and Lift Combo ©2012 4Front Engineered Solutions, Inc. May 2012 PLC DIAGNOSTICS Do not service this product unless you have read and followed the Safety Practices, Warnings, and Operating Instructions in this manual. Failure to follow these safety practices could result in death or serious injury. The level lift is controlled by a programmable logic controller (PLC) which reads input signals from pushbuttons and proximity sensors, and closes the appropriate output relays to the motor, solenoid valves, audible alarm and warning lights. CONTROLLER FAULT CONDITIONS LIFT MODE Normal operating sequence; at any floor level and ready to operate. LEVELER MODE Normal operating sequence; stored and ready to operate adjustments — leveler hydraulic power unit Fig. 57 Be certain, before entering the dock leveler and lift combo pit or doing any maintenance or repair under the dock leveler and lift combo that: 1) The safety blocks are in place on the scissor frame. 2) The maintenance struts are securely supporting the leveler portion. 3) The power is disconnected and properly tagged or locked out. Motor Sequence valve Before servicing the dock leveler and lift combo, read and follow the Safety Practices on pages 3-4 and the Operation section of this manual. Place barricades on the dock floor around the dock leveler and lift combo pit and in the driveway in front of the pit while installing, maintaining or repairing the unit. Secondary relief valve Reservoir Breather cap (with dip stick) Sequence valve Shuttle valve Secondary relief valve Reservoir May 2012 6009080C — Dock Leveler and Lift Combo Primary relief valve 53 ©2012 4Front Engineered Solutions, Inc. adjustments — Leveler hydraulic power, continued DescriptionPurposeAdjustment Primary Relief Valve Controls maximum pressure in the hydraulic Remove threaded cap. Turn screw clockwise to system and protects the other components increase relief pressure. Relief pressure will be from excessive force. factory set at 2000 PSI and should not require adjustment. Note: a suitable hydraulic pressure gauge MUST BE USED when adjusting. Flow Control and Shuttle Valve Controls the lowering speed of the ramp Remove threaded cap. Turn the screw plate and directs fluid to the cylinders when clockwise to decrease lowering speed. Adjust the pump is running. the lowering speed to approximately equal the ramp raise speed. Sequence Valve Controls lip plate retraction and extension. Solenoid Valve Stops the fall of the top plate when either the No adjustment required. LIP EXTEND or LEVELER STOP button is pushed. Secondary Relief Valve Controls the force and speed of lip retraction when the power unit is running. (Does not affect speed of lip closing when power unit is not running.) Hydraulic Fluid Level The hydraulic fluid level should be checked when the leveler is resting on the maintenance strut with the lip pendant. The fluid level in reservoir should be approximately 1/2 full (3-1/4" plus or minus 1/2" down from breather cap when measured on the dipstick). See Fig. 58. If the level is low, fill to the halfway point using an approved oil from the list on page 32. Remove threaded cap. If the lip extends before the ramp is fully raised, the valve should be turned clockwise. Tightening the valve too far will cause very slow lip extension, or no extension at all. Remove threaded cap. If the lip is closing too forcefully, turn the adjusting screw clockwise. If the lip is not closing fully when the lip is above the keepers, turn the adjusting screw counterclockwise. Fig. 58 3-1/4" ± 1/2" 3-1/4" ± 1/2" 54 6009080C — Dock Leveler and Lift Combo ©2012 4Front Engineered Solutions, Inc. May 2012 hydraulic schematic — leveler Fig. 59 SV5 C Lock pin cylinders D SV4 SV3 Main cylinder Check valve B Velocity fuse Deck support leg cylinders SV1 Lip cylinder Sequence valve SV2 Shuttle valve 60 PSI Primary relieve valve (2000 PSI) May 2012 6009080C — Dock Leveler and Lift Combo 55 ©2012 4Front Engineered Solutions, Inc. Hydraulic valve Cross section — leveler Fig. 60 Lip extend port Main port Adjustable sequence valve Lip retract port Shuttle valve Secondary relief valve Primary relief valve (2000 PSI) Pilot check valve 56 6009080C — Dock Leveler and Lift Combo ©2012 4Front Engineered Solutions, Inc. May 2012 adjustments — LIFT hydraulic power unit Be certain, before entering the dock leveler and lift combo pit or doing any maintenance or repair under the dock leveler and lift combo that: 1) The safety blocks are in place on the scissor frame. 2) The maintenance struts are securely supporting the leveler portion. 3) The power is disconnected and properly tagged or locked out. Before servicing the dock leveler and lift combo, read and follow the Safety Practices on pages 3-4 and the Operation section of this manual. Place barricades on the dock floor around the dock leveler and lift combo pit and in the driveway in front of the pit while installing, maintaining or repairing the unit. Fig. 61 Detail view from opposite side To lifting cylinder hose Junction box Solenoid valve (lower) Solenoid valve (raise) Cap Check valve Reservoir tank Gauge port Fluid control valve (set at factory) Fluid level sight gauge Drain plug Relief valve (set at factory) May 2012 6009080C — Dock Leveler and Lift Combo 57 ©2012 4Front Engineered Solutions, Inc. adjustements — LIFT hydraulic power unit, continued DescriptionPurposeAdjustment Relief Valve Controls maximum pressure in the hydraulic Factory Set, No adjustment required lift system and prevents other components from excessive force. Relief Valve pressure is set at the factory, contact your local distributor if there is belief adjustment is required. Fluid Control Valve Controls the lower speed of the unit and Factory Set, No adjustment required directs fluid to the cylinders when the pump is running. Solenoid Valve, Raise Stops the unit from rising once the lift RAISE No adjustment required button is released. Solenoid Valve, Lower Stops the unit from lowering when the lift No adjustment required LOWER button is released. Hydraulic Fluid Level - REmote mounted The hydraulic fluid level for the remote mounted lift power unit should be checked when the dock leveler and lift combo is in the fully lowered position at grade level. See Fig. 61. Check the fluid level sight gauge on the lift power unit. Ensure the fluid level is 2" above the bottom of the sight glass. If the fluid level is low, fill to the appropriate level using approved oil from the list on page 32. Hydraulic Fluid Level - pit mounted The hydraulic fluid level for the pit mounted lift power unit should be checked when the dock leveler and lift combo is in the fully lowered position at grade level. See Fig. 61. Check the fluid level sight gauge on the lift power unit. Ensure the fluid level is 1" above the bottom of the sight glass. If the fluid level is low, fill to the appropriate levelt using approved oil from the list on page 32. 58 6009080C — Dock Leveler and Lift Combo ©2012 4Front Engineered Solutions, Inc. May 2012 adjustements — proximity switches There are a total of 9 proximity switches used on the Dock Leveler and Lift Combo. See Fig. 62 for location of these proximity switches on the unit. Check the separation of the proximity switch and the respective target. Also ensure the electrical cable connector is seated firmly on the switch. This should be done quarterly and included with other scheduled maintenance. See Fig. 64 on page 62 for separation detail. Fig. 62 Lock pins extended proximity swtiches Lock pins extended proximity swtiches Lip pendant proximity switch Deck level proximity swtiches Keeper/leg proximity swtiches May 2012 6009080C — Dock Leveler and Lift Combo 59 ©2012 4Front Engineered Solutions, Inc. adjustements — proximity switches, continued The following table shows which maintenance devices need to be in place while adjusting the proximity switches. This chart also shows what mode the unit needs to be positioned in for servicing a certain proximity switch. NOTE: Certain positions can only be achieved in Service Mode. Do not enter the pit area under the Dock Leveler and Lift Combo to make switch adjustments unless the scissor motor is off and safety devices are in place per the table below. Deck Level & Above (LS1) Deck Level & Below (LS2) Lip Pendant (LS3) Lock Pins Extended (LS6A & LS6B) Lock Pins Retracted (LS7A & LS7B) Lip Keepers Up (LS8) Deck Support Legs Up (LS9) Serviced in Lift Mode X* X* X X X* X* X X X X X X X X X X X X X** X X** Lip Maintenance Prop Serviced in Leveler Mode Deck Maintenance Struts Proximity Switch Safety Stop Blocks Safety Devices In Place not required not required not used not required not required not required not required X* - adjusted in either mode, see Fig. 63 on page 61 for proper sensor location. X** - position can only be achieved in Service Mode 60 6009080C — Dock Leveler and Lift Combo ©2012 4Front Engineered Solutions, Inc. May 2012 adjustements — proximity switches, continued The deck position sensors must be positioned correctly for the Dock Leveler and Lift Combo to function properly. See Fig. 63 for correct position for the LS1 and LS2 sensors. Fig. 63 Deck position arm Top plate Rear hinge end 3-7/8" 1-1/4" (washers and nuts are removed for clarity) LS2 sensor LS1 sensor With the sensors positioned correctly, the sensors should be ON under the following conditions: Sensor Deck Level (0°) 3° Above and Beyond Below Dock LS1 ON LS2 ON May 2012 ON 6009080C — Dock Leveler and Lift Combo 61 ©2012 4Front Engineered Solutions, Inc. adjustements — proximity switches, continued Fig. 64 1/16" to 1/8" separation Proximity switch Quck disconnect cable There are 9 proximity switches used on the Dock Leveler and Lift Combo. See Fig. 64. These switches need to be checked quarterly to ensure proper separation, proper connection to the electrical cable and proper fitting to the mounting bracket. PROXIMITY SWITCH SEPARATION The separation range should be 1/16” to 1/8” between the target and switch. PROXIMITY SWITCH CONNECTION TO CABLE The proximity switches are connected to an electrical cable. This is a threaded connection and needs to be checked quarterly to ensure proper connection. There should be a solid connection between the switch and cable, tighten if needed by hand. PROXIMITY FITTING TO MOUNTING BRACKET There are two nuts attaching the proximity switch to the mounting bracket. Ensure this is a tight connection, use two 15/16” open end wrenches to tighten if needed. 62 6009080C — Dock Leveler and Lift Combo ©2012 4Front Engineered Solutions, Inc. May 2012 hydraulic schematic — lift Fig. 65 Lift cylinder Lift cylinder Velocity fuse Velocity fuse SV7 (raise solenoid) SV6 (lower solenoid) 5 GPM Primary Relief valve May 2012 6009080C — Dock Leveler and Lift Combo 63 ©2012 4Front Engineered Solutions, Inc. electrical schematic Fig. 66 208V, 3 Phase, 60 Hz NOTE: Power to control panel must be from fused disconnect supplied by others. Max (Type CC) fuse size shown above. Before doing any electrical work, make certain the power is disconnected and properly tagged or locked off. All electrical work must be done by a qualified technician and meet all applicable codes. If it is necessary to make troubleshooting checks inside the control box with the power on, USE EXTREME CAUTION. Do not place your fingers or uninsulated tools inside the control box. Touching wires or other parts inside the control box could result in electrical shock, death or serious injury. 64 6009080C — Dock Leveler and Lift Combo ©2012 4Front Engineered Solutions, Inc. May 2012 electrical schematic, continued Fig. 67 240V, 3 Phase, 60 Hz NOTE: Power to control panel must be from fused disconnect supplied by others. Max (Type CC) fuse size shown above. May 2012 6009080C — Dock Leveler and Lift Combo 65 ©2012 4Front Engineered Solutions, Inc. electrical schematic, continued Fig. 68 380V, 3 Phase, 50 Hz NOTE: Power to control panel must be from fused disconnect supplied by others. Max (Type CC) fuse size shown above. 66 6009080C — Dock Leveler and Lift Combo ©2012 4Front Engineered Solutions, Inc. May 2012 electrical schematic, continued Fig. 69 480V, 3 Phase, 60 Hz NOTE: Power to control panel must be from fused disconnect supplied by others. Max (Type CC) fuse size shown above. May 2012 6009080C — Dock Leveler and Lift Combo 67 ©2012 4Front Engineered Solutions, Inc. electrical schematic, continued Fig. 70 600V, 3 Phase, 50 Hz NOTE: Power to control panel must be from fused disconnect supplied by others. Max (Type CC) fuse size shown above. 68 6009080C — Dock Leveler and Lift Combo ©2012 4Front Engineered Solutions, Inc. May 2012 parts list Top plate and lip plate assembly To ensure proper function, durability and safety of the product, only replacement parts that do not interfere with the safe, normal operation of the product must be used. Incorporation of replacement parts or modifications that weaken the structural integrity of the product, or in any way alter the product from its normal working condition at the time of purchase from 4Front Engineered Solutions, Inc. could result in product malfunction, breakdown, premature wear, death or serious injury. Fig. 71 3 2 10 9 11 1 12 8 13 14 15 16 6 4 7 17 18 19 15 5 May 2012 6009080C — Dock Leveler and Lift Combo 69 ©2012 4Front Engineered Solutions, Inc. parts list, continued Top plate and lip plate assembly Item Qty.Part DescriptionPart Number 1 1 1 1 1 1 1 1 1 1 1 1 1 1 1 1 Top Plate Assembly, 6 ft. wide x 8 ft. long Top Plate Assembly, 6.5 ft. wide x 8 ft. long Top Plate Assembly, 7 ft. wide x 8 ft. long Top Plate Assembly, 6 ft. wide x 10 ft. long Top Plate Assembly, 6.5 ft. wide x 10 ft. long Top Plate Assembly, 7 ft. wide x 10 ft. long Top Plate Assembly, 6 ft. wide x 12 ft. long Top Plate Assembly, 6.5 ft. wide x 12 ft. long Top Plate Assembly, 7 ft. wide x 12 ft. long Top Plate Assembly, 6 ft. wide x 10 ft. long (DGL) Top Plate Assembly, 6.5 ft. wide x 10 ft. long (DGL) Top Plate Assembly, 7 ft. wide x 10 ft. long (DGL) Top Plate Assembly, 6 ft. wide x 12 ft. long (DGL) Top Plate Assembly, 6.5 ft. wide x 12 ft. long (DGL) Top Plate Assembly, 7 ft. wide x 12 ft. long (DGL) 6008866 6005402 6008867 6008868 6008308 6008869 6008870 6005568 6008871 6008881 6008882 6008883 6008884 6008885 6008886 2 1 1 1 1 1 1 1 1 1 1 1 1 Lip Plate Assembly, 6 ft. wide x 18 in. long Lip Plate Assembly, 6 ft. wide x 20 in. long Lip Plate Assembly, 6.5 ft. wide x 18 in. long Lip Plate Assembly, 6.5 ft. wide x 20 in. long Lip Plate Assembly, 7 ft. wide x 18 in. long Lip Plate Assembly, 7 ft. wide x 20 in. long Lip Plate Assembly, 6 ft. wide x 18 in. long, DGL Lip Plate Assembly, 6 ft. wide x 20 in. long, DGL Lip Plate Assembly, 6.5 ft. wide x 18 in. long, DGL Lip Plate Assembly, 6.5 ft. wide x 20 in. long, DGL Lip Plate Assembly, 7 ft. wide x 18 in. long, DGL Lip Plate Assembly, 7 ft. wide x 20 in. long, DGL 6009291 6009292 6005459 6005583 6009293 6009294 6009295 6009296 6009297 6009298 6009299 6009300 3 1 1 1 Lip Hinge Pin, 6 ft. wide Lip Hinge Pin, 6.5 ft. wide Lip Hinge Pin, 7 ft. wide 5860287 5861495 5860392 4 1 1 1 1 1 1 Toe Guard, 1st Stage, LH, 8 ft. long Toe Guard, 1st Stage, RH, 8 ft. long Toe Guard, 1st Stage, LH, 10 ft. long Toe Guard, 1st Stage, RH, 10 ft. long Toe Guard, 1st Stage, LH, 12 ft. long Toe Guard, 1st Stage, RH, 12 ft. long 5860438 5860439 5861043 5861042 5862737 5862738 5 6 1 1 1 1 1 1 6 Toe Guard, 2nd Stage, LH, 8 ft. long Toe Guard, 2nd Stage, RH, 8 ft. long Toe Guard, 2nd Stage, LH, 10 ft. long Toe Guard, 2nd Stage, RH, 10 ft. long Toe Guard, 2nd Stage, LH, 12 ft. long Toe Guard, 2nd Stage, RH, 12 ft. long Plain Washer, 7/16" I.D. 5860440 5860441 5861045 5861044 5862739 5862740 234101 7 2 Hex Nut, 3/8" Nylock 214538 8 1 Cover, Auxilliary Port 6008349 9 2 Flat Head Cap Screw, 1/4-20 x 1" Long 70 6009080C — Dock Leveler and Lift Combo ©2012 4Front Engineered Solutions, Inc. 211710 May 2012 parts list, continued Top plate and lip plate assembly Item Qty.Part DescriptionPart Number 10 1 Clevis Pin, 1/2" Dia. X 2-3/4" Long 231502 11 1 Lip Plate Maintenance Bar 5862969 12 1 Plain Washer, 9/16" I.D. 234121 13 1 Compression Spring 332069 14 1 Hitch Pin Clip 231503 15 2 Label, Danger, Maintenance Struts 921217 16 1 Label, Warning, A.R.T.D. 921075 17 1 Serial Tag 6009761 18 1 Label, Danger, Safety Instructions 6008485 19 1 1 Label, Lift Rated Capacity, Serco Label, Lift Rated Capacity, Kelley 6008547 6008548 May 2012 6009080C — Dock Leveler and Lift Combo 71 ©2012 4Front Engineered Solutions, Inc. parts list, continued Deck subframe assembly Fig. 72 3 9 10 1 4 5 2 7 8 20 11 4 6 5 19 12 11 13 15 14 16 19 17 12 17 17 14 17 13 16 18 15 Item Qty.Part DescriptionPart Number 1 1 1 1 1 1 1 1 1 1 Deck Subframe Assembly, 6 ft. wide x 8 ft. long Deck Subframe Assembly, 6.5 ft. wide x 8 ft. long Deck Subframe Assembly, 7 ft. wide x 8 ft. long Deck Subframe Assembly, 6 ft. wide x 10 ft. long Deck Subframe Assembly, 6.5 ft. wide x 10 ft. long Deck Subframe Assembly, 7 ft. wide x 10 ft. long Deck Subframe Assembly, 6 ft. wide x 12 ft. long Deck Subframe Assembly, 6.5 ft. wide x 12 ft. long Deck Subframe Assembly, 7 ft. wide x 12 ft. long 6009309 6005445 6009312 6009310 6008304 6009313 6009311 6005880 6009314 2 1 Lock Pin Adapter, Right 6005484 3 1 Lock Pin Adapter, Left 6005486 4 2 Lock Pin 6005480 5 4 Socket Head Cap Screw, 5/8-11 x 3" long 000466 6 1 Deck Level Target Assembly 6008322 7 1 Cap Tube, Deck Level 6008325 8 1 Cotter Pin, 5/32" x 2" long 6001832 9 4 Deck Pivot Pin, 3/4" Dia. 5861467 72 6009080C — Dock Leveler and Lift Combo ©2012 4Front Engineered Solutions, Inc. May 2012 parts list, continued Deck subframe assembly Item Qty.Part DescriptionPart Number 10 4 Hitch Pin Clip 231503 11 2 Maintenance Strut 6005417 12 4 Clevis Pin, 1/2" Dia. x 2-1/4" long 231506 13 4 Cotter Pin, 1/8" x 3/4" long 231341 14 8 Plain Washer, 9/16" I.D. 234121 15 2 2 Pin, Deck Support Leg / Keeper Assy, 8 ft. units Pin, Deck Support Leg / Keeper Assy, 10 and 12 ft. units 6005496 6008407 16 2 Socket Head Cap Screw, 1/4-20 x 1-3/4" long 131300 17 4 DU Bearing, 1" I.D. 6005495 18 1 1 1 1 Deck Support Leg / Keeper Assy, 18" Lip, 8 ft. units Deck Support Leg / Keeper Assy, 20" Lip, 8 ft. units Deck Support Leg / Keeper Assy, 18" Lip, 10 and 12 ft. units Deck Support Leg / Keeper Assy, 20" Lip, 10 and 12 ft. units 6008339 6008887 6008346 6008392 19 2 Label, Danger, Maintenance Strut 921074 20 1 Label, Danger, Entering Pit 921070 May 2012 6009080C — Dock Leveler and Lift Combo 73 ©2012 4Front Engineered Solutions, Inc. parts list, continued Scissor assembly Fig. 73 Rotated view 12 3 2 1 2 13 11 10 3 14 15 4 16 5 13 5 14 19 15 9 20 18 2 17 3 4 9 4 5 17 8 5 7 8 4 6 7 18 Item Qty.Part DescriptionPart Number 1 1 1 1 Scissor Assembly, 8 ft. long Scissor Assembly, 10 ft. long Scissor Assembly, 12 ft. long 6008380 6008401 6008388 2 4 DU Bearing, 1-1/4" I.D. 6005147 3 4 Pin, Rear Scissor, 1-1/4" Dia. 6008327 4 4 4 Cam Follower, 2-1/2" Roller Dia, 8 ft. units Cam Follower, 3" Roller Dia, 10 and 12 ft. units 6005190 6005493 5 4 4 Hex Nut, 1-14 Thread, 8 ft. units Hex Nut, 1-1/4-12 Thread, 10 and 12 ft. units 6008378 6008384 6* 1 Scissor Frame Assembly, 8 ft. long, Remote Mount 6005401 74 6009080C — Dock Leveler and Lift Combo ©2012 4Front Engineered Solutions, Inc. May 2012 parts list, continued Scissor assembly Item Qty.Part DescriptionPart Number 6* 1 1 1 1 1 1 Scissor Frame Assembly, 8 ft. long, Remote Mount Scissor Frame Assembly, 10 ft. long, Remote Mount Scissor Frame Assembly, 12 ft. long, Remote Mount Scissor Frame Assembly, 8 ft. long, Pit Mount Scissor Frame Assembly, 10 ft. long, Pit Mount Scissor Frame Assembly, 12 ft. long, Pit Mount 6005401 6005591 6005588 6008877 6008878 6008879 7 2 Safety Stop Block Assembly, 8 ft. units 6008419 2 Safety Stop Block Assembly, 10 ft. units 6008790 2 Safety Stop Block Assembly, 12 ft. units 6008443 8 2 Label, Maintenance Device 921234 9 2 Label, Danger, Use of Maintenance Device 6007074 10 2 Label, Danger, Lift 6003451 11 2 Label, Pinch Point 6007121 12 2 Retaining Ring, Main Scissor Pin 6008377 13 4 Deck Support Leg / Keeper Assy, 20" Lip, 10 and 12 ft. units 6008392 14 4 Label, Danger, Maintenance Strut 921074 15 4 Label, Danger, Entering Pit 921070 16** 2 Shipping Rod, Rear, 5/8-11 x 21" long 6008445 17** 4 Lifting Nut Assembly 6008368 18** 4 Pin, Lifting, 1" Dia. 6008415 19** 6 Hex Head Machine Bolt, 3/4-10 x 4" Long 212321 20** 2 Shipping Rod, Front, 5/8-11 x 25" long 6008446 * Note: Item 6 is referenced by the location of the scissor power unit; remote mounted or pit mounted. **Note: Items 16-20 are used for shipping and installing purposes only. May 2012 6009080C — Dock Leveler and Lift Combo 75 ©2012 4Front Engineered Solutions, Inc. parts list, continued Roller curtain and push rod Fig. 74 9 2 3 8 7 8 15 3 4 1 5 6 13 9 12 10 14 11 5 Item Qty.Part DescriptionPart Number 1 1 1 1 Roller Curtain, 6 ft. wide Roller Curtain, 6.5 ft. wide Roller Curtain, 7 ft. wide 6008408 6008409 6008410 2 1 1 1 Curtain Rod, 6 ft. wide Curtain Rod, 6.5 ft. wide Curtain Rod, 7 ft. wide 6008335 6008411 6008412 3 2 Curtain Hook 6008338 4 1 1 1 1 1 Pushrod, 6 ft. wide, 18" lip Pushrod, 6.5 ft. wide, 18" lip Pushrod, 7 ft. wide, 18" lip Pushrod, 6 ft. wide, 20" lip Pushrod, 6.5 ft. wide, 20" lip 6009344 6009345 6009346 6009347 6009348 1 Pushrod, 7 ft. wide, 20" lip 6009349 5 2 Curtain Mounting Plate 6008444 6 1 Pushrod Support Angle, Lower, Left 6005174 7 1 Pushrod Support Angle, Mid, Left 6005171 8 2 Pushrod Cross Support 6005177 76 6009080C — Dock Leveler and Lift Combo ©2012 4Front Engineered Solutions, Inc. May 2012 parts list, continued Roller curtain and push rod Item Qty.Part DescriptionPart Number 9 2 Pushrod Support Plate, Upper 6005179 10 1 Pushrod Support Angle, Lower, Right 6005178 11 1 Pushrod Support Angle, Mid, Right 6005172 12 42 Plain Washer, 3/8" 000214 13 12 Bolt, Hex Head, 3/8-16 x 1-1/4" long 000357 14 4 Socket Head Cap Screw, 3/8-16 x 3/4" long 000860 15 12 Lock Nut, 3/8-16 000030 May 2012 6009080C — Dock Leveler and Lift Combo 77 ©2012 4Front Engineered Solutions, Inc. parts list, continued Hydraulic and electrical Fig. 75 11 13 3 12 10 9 2 8 7 61 2 1 5 6 Conduit 8 7 10 10 5 4 2 10 4 78 6009080C — Dock Leveler and Lift Combo ©2012 4Front Engineered Solutions, Inc. May 2012 parts list, continued Hydraulic and electrical Fig. 76 23 35 39 36 39 24 31 31 25 17 14 31 31 16 26 43 29 46 23 22 31 23 45 41 42 19 16 23 39 38 21 22 31 34 20 30 18 33 35 33 15 31 44 37 27 42 30 43 31 17 28 42 46 23 40 32 46 30 16 31 45 46 44 May 2012 6009080C — Dock Leveler and Lift Combo 79 ©2012 4Front Engineered Solutions, Inc. parts list, continued Hydraulic and electrical Fig. 77 49 55 56 50 51 50 60 47 57 52 54 B 59 7 8 A B 5 6 A 58 B 3 4 A B 1 2 A 48 53 50 80 6009080C — Dock Leveler and Lift Combo ©2012 4Front Engineered Solutions, Inc. May 2012 parts list, continued Hydraulic and electrical Item Qty.Part DescriptionPart Number 1 2 2 2 Scissor Lift Cylinder, 8 ft. long Scissor Lift Cylinder, 10 ft. long Scissor Lift Cylinder, 12 ft. long 6005439 6005461 6005462 2 4 Pin, Scissor Cylinder, 1-1/4" Dia. 6005277 3 1 Remote Mounted Scissor Power Unit, 208 Volt 6009350 1 1 1 1 1 1 1 Remote Mounted Scissor Power Unit, 240 Volt Remote Mounted Scissor Power Unit, 480 Volt Remote Mounted Scissor Power Unit, 600 Volt Pit Mounted Scissor Power Unit, 208 Volt (not shown) Pit Mounted Scissor Power Unit, 240 Volt (not shown) Pit Mounted Scissor Power Unit, 480 Volt (not shown) Pit Mounted Scissor Power Unit, 600 Volt (not shown) 6009351 6008423 6009352 6009353 6009354 6008739 6009355 4 4 DU Bearing, 1-1/4" I.D. 6005147 5 2 Spherical Bearing, 1-1/4" I.D. 6008320 6 2 Fitting, Street Elbow 313102 7 2 Velocity Fuse, 10 G.P.M. 313239 8 2 Hydraulic Hose, 1/2" I.D., 30" long 6001899 9 1 1 1 Hydraulic Hose, 1/2" I.D., Remote mount, 8 ft. units Hydraulic Hose, 1/2" I.D., Remote mount, 10 and 12 ft. units Hydraulic Hose, 1/2" I.D., Pit mount, all units (not shown) 711229 711228 6006897 10 4 Socket Head Cap Screw, 1/4-20 x 2" long 000369 11 1 1 Electrical Cable, Lift Solenoids, Remote Mounted Electrical Cable, Lift Solenoids, Pit Mounted (not shown) 6008734 6008735 12 1 Lift Solenoid, Lower 6009356 13 1 Lift Solenoid, Raise 6009357 14 1 1 Leveler Hydraulic Power Unit, 208 - 480V / Three Phase Leveler Hydraulic Power Unit, 575V / Three Phase 313549 313550 15 1 1 Deck Lift Cylinder, 8 ft. units Deck Lift Cylinder, 10 and 12 ft. units 313046 313563 16 3 Lip / Keeper Cylinder 313043 17 2 Lock Pin Cylinder 6003030 18 1 1 1 Hose Assy, Keeper Cylinder, Retract Tee, 6 ft. wide units Hose Assy, Keeper Cylinder, Retract Tee, 6.5 ft. wide units Hose Assy, Keeper Cylinder, Retract Tee, 7 ft. wide units 35482 35482 34521 19 1 1 1 Hose Assy, Keeper Cylinder, Extend Tee, 6 ft. wide units Hose Assy, Keeper Cylinder, Extend Tee, 6.5 ft. wide units Hose Assy, Keeper Cylinder, Extend Tee, 7 ft. wide units 35482 35482 34521 May 2012 6009080C — Dock Leveler and Lift Combo 81 ©2012 4Front Engineered Solutions, Inc. parts list, continued Hydraulic and electrical Item Qty.Part DescriptionPart Number 20 1 1 1 Hose Assy, Keeper Retract to Manifold, 8 ft. units Hose Assy, Keeper Retract to Manifold, 10 ft. units Hose Assy, Keeper Retract to Manifold, 12 ft. units 35482 34521 31357 21 1 1 1 Hose Assy, Keeper Extend to Manifold, 8 ft. units Hose Assy, Keeper Extend to Manifold, 10 ft. units Hose Assy, Keeper Extend to Manifold, 12 ft. units 33637 35482 34521 22 2 Hose Assy, Manifold to Lock Pin Tee 31961 23 5 Hose Assy, Lock Pin to Tee / Manifold to Power Unit 31955 24 1 1 1 Hose Assy, Lip Retract, 8 ft. units Hose Assy, Lip Retract, 10 ft. units Hose Assy, Lip Retract, 12 ft. units 33637 35482 35483 25 1 1 1 Hose Assy, Lip Extend, 8 ft. units Hose Assy, Lip Extend, 10 ft. units Hose Assy, Lip Extend, 12 ft. units 33637 35482 34521 26 1 1 Hose Assy, Main Cylinder, 8 ft. units Hose Assy, Main Cylinder, 10 and 12 ft. units 313544 313545 27 1 1 1 Hose Assy, Main Cylinder to Manifold, 8 ft. units Hose Assy, Main Cylinder to Manifold, 10 ft. units Hose Assy, Main Cylinder to Manifold, 12 ft. units 6000724 6000724 33641 28 1 Velocity Fuse, 10 G.P.M 313239 29 1 Fitting, Street Elbow 313102 30 3 Fitting, Run Tee 313105 31 12 Fitting, Elbow 313106 32 1 Fitting, Male, 45º Elbow 313219 33 2 Fitting, Tee, Male 6000595 34 2 Fitting, Swivel Nut Branch Tee 313246 35 2 Solenoid Valve Assy (SV1 and SV3) 6008755 36 1 Solenoid Valve Assy (SV2) 6003815 37 1 Solenoid Valve Assy (SV4) 6008756 38 1 Solenoid Valve Assy (SV5) 6008757 39 3 Electrical Cable, Solenoid, .3 meter 6008052 40 1 Electrical Cable, Solenoid, 1.2 meter 6008054 41 2 Pin, Deck Cylinder 5861066 42 4 Cotter Pin, 5/32" x 2" long 6001832 43 2 Pin, Lip Cylinder 5861063 82 6009080C — Dock Leveler and Lift Combo ©2012 4Front Engineered Solutions, Inc. May 2012 parts list, continued Hydraulic and electrical Item Qty.Part DescriptionPart Number 44 2 2 Pin, Lip Keeper, Front, 8 ft. units Pin, Lip Keeper, Front, 10 and 12 ft. units 6005496 6008407 45 2 2 Pin, Lip Keeper, Rear, 8 ft. units Pin, Lip Keeper, Rear, 10 and 12 ft. units 6008328 6008405 46 4 Socket Head Cap Screw, 1/4-20 x 2" long 000369 47 2 Plain Washer, 3/8" 234101 48 1 8 Port Sensor Junction Box 6008672 49 1 4 Port Solenoid Junction Box 6008051 50 9 18 mm Proximity Switch 6008404 51 1 Lip Pendant Cable, QD, 4 meters long, 8 ft. units Lip Pendant Cable, QD, 5 meters long, 8 ft. units Lip Pendant Cable, QD, 7 meters long, 8 ft. units 6008695 6008696 6008698 52 1 Dock Height Sensor Cable, QD, 2 meters long, all units 6008692 53 1 Keeper / Leg Sensor Cable, QD, all units 6000595 54 2 Deck Level Sensor Cable, QD, 2 meters long, all units 6008692 55 1 Lock Pins Extended Sensor Cable, all units 6008738 56 1 Lock Pins Retracted Sensor Cable, all units 6008737 57 1 Mount Plate, Dock Height Switch 6008440 58 2 Socket Head Cap Screw, 8-32 x 1" long 000342 59 1 Dock Height Limit Switch 6008438 60 2 Socket Head Cap Screw, 3/8-16 x 1" Long 000114 61 1 Fitting, Tee, Male 1/2" 031390 May 2012 6009080C — Dock Leveler and Lift Combo 83 ©2012 4Front Engineered Solutions, Inc. parts list, continued Guard Rail Fig. 78 1 2 Item Qty.Part DescriptionPart Number 1 4 Guard Rail, 800, 31" Rail Length Guard Rail, 1000, 43" Rail Length Guard Rail, 1200, 55" Rail Length 6008420 6008421 6008422 Label, Warning, Guard Rail 6008880 2 4 84 6009080C — Dock Leveler and Lift Combo ©2012 4Front Engineered Solutions, Inc. May 2012 parts list, continued Control Panel and Pendant Fig. 79 25 21 22 ON 55 23 24 OFF 56 37 38 32 30 31 33 34 36 42 39 44 45 43 46 49 50 9 10 51 52 15 16 17 27 18 19 20 41 47 48 35 26 28 7 8 12 14 40 53 13 29 6 2 11 1 3 5 4 54 May 2012 6009080C — Dock Leveler and Lift Combo 85 ©2012 4Front Engineered Solutions, Inc. parts list, continued Control Panel and Pendant Item Qty.Part DescriptionPart Number 1 1 Audible Alarm, 10-48 VAC 823109 2 1 Panel Receptacle, 4-Pin, Leveler Power 6009533 3 1 Panel Receptacle, 8-Pin, Leveler Solenoid Signals 6009534 4 1 Panel Receptacle, 19-Pin, Sensor Signals 6009535 5 1 Panel Receptacle, 4-Pin, Lift Solenoid Signals 6009536 6 1 Ground Bar 6000559 7 1 Relay, 2 Pole, 24 VAC 6000518 8 1 Relay Base, 2 Pole 6000522 9 1 Rotary Disconnect, 30 Amp 6008283 10 3 Fuse, LP-CC-30 (208 V & 240 V units) Fuse, LP-CC-20 (380 V & 480 V units) Fuse, LP-CC-15 (600 V units) 6009537 6009538 6009539 11 1 Flasher, 4 Wire, 10-30 VAC/VDC 6009541 12 1 Fuse Block, 3 Pole BC633P 13 3 Fuse, LP-CC-5 (208 V & 240 V units) Fuse, LP-CC-4 (380 V & 480 V units) Fuse, LP-CC-2 (600 V units) 6009542 6009543 6009544 14 2 Fuse, FNQ-R-4 (208 V & 240 V units) Fuse, FNQ-R-2 (380 V, 480 V units & 600 V units) 6009545 6009546 15 9 Terminal Block, Fused Disconnect 6000538 16 1 Fuse, AGC-1/4 6009547 17 1 Fuse, MDA-1 6009548 18 5 Fuse, MDA-2 6009549 19 1 Fuse, MDA-3 6009550 20 1 Fuse, MDA-8 6009551 21 1 LRU, Green, 10-28 VAC/VDC 6006377 22 1 Oval base (green lens) 823111 23 1 Rectangle base (red lens) 823107 24 1 LRU, Red, 10-28 VAC/VDC 6006375 25 1 Strobe, Amber, 120 VAC 6009552 26 1 Contactor, Leveler Motor 6000457 27 1 Contactor, Lift Motor 6000458 86 6009080C — Dock Leveler and Lift Combo ©2012 4Front Engineered Solutions, Inc. May 2012 parts list, continued Control Panel and Pendant Item Qty.Part DescriptionPart Number 28 1 Relay, Overload, 1.6 - 2.5 Amp 6000473 29 1 Relay, Overload, 9 - 13 Amp 6000477 30 1 Push Button, Lift Raise, Blue 6000506 31 1 Push Button, Lift Lower, Yellow 6000506 32 1 Push Button, Leveler Raise, Blue 6000506 33 1 Push Button, Lip Extend, Green 6000506 34 1 Push Button, Silence Alarm, Black 6000506 35 1 Push Button, Reset, Red 6000506 36 1 Push Button, Mushroom Style, Stop 632215 37 1 Push Button, Illuminated, Leveler Mode, White 6007728 38 1 Push Button, Illuminated, Lift Mode, White 6007728 39 1 Selector Switch, Maintained, 2 Position 632217 40 10 Body, Mounting Collar 6000515 41 9 Block, Contact, Normally Open 632228 42 2 Block, Contact, Normally Closed (Stop Button) 632229 43 1 Pendant Station, Up / Down Controller 6009553 44 1 Cord Grip, 1/2" Conduit, Pendant 6006860 45 1 Lock Nut, 1/2", Pendant 6006864 46 1 Twido PLC, 6008746 47 11 Terminal Block, 4 Conductor 6006846 48 3 Terminal Block, 2 Conductor 6000542 49 1 Transformer, 208 V to 120 / 24 V (208 V units) 6006830 50 1 Transformer, 240/480 V to 120 / 24 V (240 & 480 V units) 6006814 51 1 Transformer, 380 V to 120 / 24 V (208 V units) 6009554 52 1 Transformer, 600 V to 120 / 24 V (208 V units) 6006818 53 1 Fuse Block 6008859 54 1 Label, pendant operation 6009318 55 1 Green lens AP0027 56 1 Red lens 823100 May 2012 6009080C — Dock Leveler and Lift Combo 87 ©2012 4Front Engineered Solutions, Inc. parts list, continued Lights and Signs Fig. 80 1 3 24" 11.44" 2 4 6.322" 9" Item 3.913" QuantityPart DescriptionPart Number 1 1 Outside Sign – Normal and Reverse Lettering 709-832 2 1 Light Assembly - Complete (LEDs) 6007798 3* 1 Red LED Light Assy. 6007800 4* 1 Green LED Light Assy. 6007801 * Part of Item 2 (Light Assembly – Complete). 88 6009080C — Dock Leveler and Lift Combo ©2012 4Front Engineered Solutions, Inc. May 2012 NOTES May 2012 6009080C — Dock Leveler and Lift Combo 89 ©2012 4Front Engineered Solutions, Inc. NOTES 90 6009080C — Dock Leveler and Lift Combo ©2012 4Front Engineered Solutions, Inc. May 2012 Limited warranty THIS LIMITED WARRANTY IS 4FRONT’S SOLE AND EXCLUSIVE WARRANTY WITH RESPECT TO THE DOCK LEVELER AND LIFT COMBO AND IS IN LIEU OF ANY OTHER GUARANTEES OR WARRANTIES, EXPRESS OR IMPLIED 4FRONT warrants that this DOCK LEVELER AND LIFT COMBO will be free from flaws in material and workmanship under normal use for a period of one (1) year from the earlier of 1) 60 days after the date of initial shipment by 4FRONT, or 2) the date of installation of the DOCK LEVELER AND LIFT COMBO by the original purchaser, provided that the owner maintains and operates the DOCK LEVELER AND LIFT COMBO in accordance with this Owner’s Manual. 4FRONT expressly warrants that the MOTOR, GASKETS, FITTINGS and SEALS will be free from flaws in material and workmanship under normal use for a period of five (5) years from the earlier of 1) 60 days after date of shipment, or 2) the date of installation of the DOCK LEVELER AND LIFT COMBO by the original purchaser, provided the purchaser maintains and operates the DOCK LEVELER AND LIFT COMBO in accordance with the Owner’s Manual. In the event that this DOCK LEVELER AND LIFT COMBO proves deficient in material or workmanship within the applicable Limited Warranty period, owner shall so notify 4FRONT, and 4 Front will, at its option: 1. Replace the DOCK LEVELER AND LIFT COMBO, or the deficient portion(s) thereof, without charge to the owner; or 2. Alter or repair the DOCK LEVELER AND LIFT COMBO, on site or elsewhere, without charge to the owner. This Limited Warranty does not cover any failure caused by improper installation, abuse, improper operation, negligence, or failure to maintain and adjust the DOCK LEVELER AND LIFT COMBO properly. Parts requiring replacement due to damage resulting from vehicle impact, abuse, or improper operation are not covered by this warranty. 4FRONT DISCLAIMS ANY RESPONSIBILITY OR LIABILITY FOR ANY LOSS OR DAMAGE OF ANY KIND (INCLUDING WITHOUT LIMITATION, DIRECT, INDIRECT, CONSEQUENTIAL OR PUNITIVE DAMAGES, OR LOST PROFITS OR LOST PRODUCTION) arising out of or related to the use, installation or maintenance of the DOCK LEVELER AND LIFT COMBO (including premature product wear, product failure, property damage or bodily injury resulting from use of unauthorized replacement parts or modification of the DOCK LEVELER AND LIFT COMBO). 4FRONT’s sole obligation with regard to a DOCK LEVELER AND LIFT COMBO that is claimed to be deficient in material or workmanship shall be as set forth in this Limited Warranty. This Limited Warranty will be null and void if the original purchaser does not notify 4FRONT’s warranty department within ninety (90) days after the product deficiency is discovered. . THERE ARE NO WARRANTIES, EXPRESS OR IMPLIED, WHICH EXTEND BEYOND THE DESCRIPTION ON THE FACE HEREOF, INCLUDING, BUT NOT LIMITED TO, A WARRANTY OF MERCHANTABILITY OR OF FITNESS FOR A PARTICULAR PURPOSE, ALL OF WHICH 4FRONT HEREBY DISCLAIMS. May 2012 6009080C — Dock Leveler and Lift Combo 91 ©2012 4Front Engineered Solutions, Inc. Please direct questions about your dock leveler and lift combo to your local distributor or to 4Front Engineered Solutions, Inc. Your local 4Front Engineered Solutions, Inc. distributor is: Corporate Head Office: 1612 Hutton Dr. Suite 140 Carrollton, TX. 75006 Tel. (972) 466-0707 Fax (972) 323-2661 ©2012 4Front Engineered Solutions, Inc. Part No. 6009080C