1
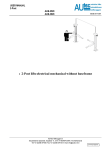
17-20 Table of contents 1. INTRODUCTION ....................................................................................................................... 2 1.1. PURPOSE ............................................................................................................................ 2 1.2. TECHNICAL SPECIFICATIONS ...................................................................................... 2 1.3. DESIGN OF THE DEVICE ................................................................................................ 4 1.4. MAIN MODULES............................................................................................................... 5 1.5. SAFETY DEVICES........................................................................................................... 14 2. INSTALLATION ...................................................................................................................... 21 2.1. UNPACKING .................................................................................................................... 21 2.2. WITHDRAWAL FROM USE AND STORAGE .............................................................. 21 3. FUNCTIONAL DESCRIPTION ............................................................................................... 22 3.1. HANDLING IN ROLL ON – ROLL OFF ........................................................................ 22 3.2. HANDLING IN TIPPING ................................................................................................. 24 3.3. OPERATION WHEN DRIVING ...................................................................................... 25 3.4. ELECTRICAL SYSTEM .................................................................................................. 26 3.5. HYDRAULICAL SYSTEM .............................................................................................. 28 4. SAFETY INSTRUCTIONS....................................................................................................... 30 4.1. GENERAL ......................................................................................................................... 30 4.2. WORKING AT EXTREME CONDITIONS ..................................................................... 32 4.3. ACTING IN DANGEROUS SITUATION ....................................................................... 32 5. MAINTENANCE / SPARE PARTS ......................................................................................... 33 MAINTENANCE SCHEDULE ........................................................................................ 33 5.1. 5.2. MAINTENANCE OPERATIONS .................................................................................... 34 5.3. SPARE PARTS .................................................................................................................. 39 6. TROUBLESHOOTING ............................................................................................................. 48 CONTACT INFORMATION: Factory: AS FORS MW Tule 30 765 05 Saue Estonia Tel: + 372 679 00 00 Fax: + 372 679 00 01 E – mail: [email protected] © 2009 Ver. 2 Fors MW Ltd Aftermarket: Language spoken is English and Swedish. FMW Farma Norden AB Hornsväg 2 605 97 Norrköping Sweden Tel: + 46 (0) 165 770 Fax: + 46 (0) 128 370 E – mail: [email protected] www.forsmw.com 1 17-20 1. INTRODUCTION 1.1. PURPOSE Bigab hook lift trailers exist in 11 different types of modules with a variety of additional extras which all has its own purpose but with the same unique flexibility. The flexibility lays in its ability to handle different kinds of loads on one and the same chassed. This allows the Bigab to be used at a wide range of different user applications. Bigab 17 – 20 is the hook lift trailer for the farmer and/or entrepreneur with varying transport needs. The trailer is fully equipped to handle long and hard working hours in the most convenient way. The trailer is possible to combine with lorry transports. For your safety, it is extremely important that you follow the instructions presented in this instruction manual for your particular BIGAB model. The unique flexible system gives operators the most cost effective and flexible transport system available. Behind the Bigab trailers lays more then forty year of knowledge and 25 years of product development. We understand that you are anxious to get to work the trailer, but stop for a bit and take time to carefully read through this instruction book. The Bigab trailer is unique which also if not used properly could turn out to be dangerous. A few moments reading through the instruction book might save you time and money in the future. We congratulate you at your chose of trailer and wish you and your Bigab all the best for the future! EU declaration of conformity with Directive 2006/42 EC 1.2. TECHNICAL SPECIFICATIONS © 2009 Ver. 2 Fors MW Ltd www.forsmw.com 2 17-20 Technical specifications. Table 1. Hooklift trailer 17-20 250*100 Axel distance 1470 mm Suspension bogie 100*100, 10 bolts 600/50-22,5 Frame:Hollow sections Axle distance between wheels: Bogie type: Hubs: Wheels: Brake: Hydraulic drum *Depending on market Towing eyelet: Support leg: Manual Light system:12 volt Tractor hydraulic equipped with: *For brakes Tractor oil volume: With trailer system filled up Type for hitch hook Hydraulic yes El on/off, *1 single action 19 L Press 72,5 L,draw 54,5 L 60 – 120 L/min 22 Mpa 52 degrees Oil volume cylinders: Oil flow: Hydraulic pressure: Tipp angle: Chassi weight (±1%): Standart equipped 4500 kg Chassi length (±50mm): Distance eyelet to centred bogie (±20mm): Distance eyelet to ground surface: Height at skid surface: Wide over tyres (±30mm): Container length: Total weight (±1%): Max load including container (±1%): Max hooking load including container (±1%): Pressure on eyelet: depending of lenght of container and load Max tipping capacity: Max speed: © 2009 Ver. 2 Fors MW Ltd 400*120 on 4 wheels www.forsmw.com 7300 mm 5700 mm 450 mm 1140 mm excluding the hook frame 2600 mm 5500-6500 mm 18700 kg 18000 kg 17000kg 2600 – 3500 kg 18000 kg 40 km/h 3 17-20 1.3. DESIGN OF THE DEVICE The Trailer is constructed out of cold hollow steel sections. Through this construction the trailer receives maximum endurance and stiffness regarding both bending as well as twisting. The trailer is steady both in the tip as well as in the changing movement. The trailer is equipped with a spring suspension pendulum bogie that has been equipped with brakes on all wheels. Hook Rollers Back frame Hook frame Flexible tower Frame lock Wheels El. On-off unit Chassis Support leg Towing eyelet Roll on – roll off position Tipping position Figure 1. Design of the device © 2009 Ver. 2 Fors MW Ltd www.forsmw.com 4 17-20 1.4. MAIN MODULES The trailer consists of the following subassemblies and functional devices. 1.4.1. Chassis Chassis is constructed out of cold hollow steel sections. Guide Towing eyelet Spring suspension pendulum bogie brackets Rear beam Coupling hitch Brackets for frame locking system Figure 2. Chassis with frame locking system © 2009 Ver. 2 Fors MW Ltd www.forsmw.com 5 17-20 1.4.2. Back frame Back frame is constructed out of cold hollow steel sections Frame Figure 3. Back frame 1.4.3. Hook frame The hooking frame is constructed from cold hollow steel sections Hook Flexible tower Cylinder Frame Figure 4. Hooking frame © 2009 Ver. 2 Fors MW Ltd www.forsmw.com 6 17-20 1.4.4. Bogie The trailer is equipped with a spring suspension pendulum bogie that has been equipped with brakes on all wheels. Mounting bracket Brake lever Axle with brake Figure 5. Bogie 1.4.5. Hook The Trailer is equipped with adjustable hook for two different standard heights. Standard height: 1450 mm Standard height: 1570 mm Figure 6. Hook © 2009 Ver. 2 Fors MW Ltd www.forsmw.com 7 17-20 1.4.6. Parking support leg Hydraulic support leg is designed to be of supporting use when the trailer is under maintenance, when trailer is not in use or when connecting / disconnecting trailer. Before driving the support leg must be lifted up and fixed with the pin. NOTE! This parking position is not allowed! Connecting / disconnecting trailer Parking position Working position Figure 7. Support leg Technical information Art. No Type Length mm Weight kg Capacity liter 3900295H 3530/85 250 21 1,5 © 2009 Ver. 2 Fors MW Ltd www.forsmw.com Working pressure 100 Bar Working pressure 150 Bar 5,67 t 8,5 t Max Working pressure 250 Bar 8 17-20 1.4.7. Changing operation unit This unit is designed for changing operation from rolling on - rolling off to tipping. Unit is located on the left side of the trailer. Hook frame Changing operation unit Back frame 2 pins Chassis Pin Hydraulic cylinder Adjustment bolts Pusher End of stroke valve Figure 8. Changing operation unit © 2009 Ver. 2 Fors MW Ltd www.forsmw.com 9 17-20 1.4.8. Towing eyelet The eyelet is used to hitch the trailer to the pulling vehicle. It is extremely important that the towing eyelet is checked for defaults every time the trailer is used. The towing eyelet needs to be replaced at least once a year. It is up to the users responsibility to see to that this is done. Chassis Towing eyelet Figure 9. Towing eyelet 1.4.9. Coupling hitch The coupling hitch is used for coupling other trailed devices to the trailer. Coupling hitch is also used for coupling reflector. Rear beam Pin NB! Max load 10 ton Figure 10. Reflector © 2009 Ver. 2 Fors MW Ltd Figure 11. Coupling hitch www.forsmw.com 10 17-20 1.4.10. Steering rollers The steering rollers are designed to guide the container. During handling roll on – roll off the container frame must be inside the rollers. Steering roller Steering roller Chassis Figure 12. Steering rollers 1.4.11. Frame locking The hydraulic frame lock is used to lock the frame during the exchange function. The manometer is present to indicate the tensile force on the cylinder. The manometer is set at 100 bar on delivery, but can subsequently be adjusted either up or down according to the size of the tractor. Manometer Frame lock hydraulical cylinder Chain to the tractor Figure 13. Frame lock © 2009 Ver. 2 Fors MW Ltd www.forsmw.com 11 17-20 1.4.12. Wheels Wheels for different trailer types Table 2. Trailer type Standard wheel type 17-20 600/50R-22,5 Alternative wheel type 445/65R-22,5 385/65R-22,5 600/55-22,5-12PR Air pressure (bar) 3,5 9,0 9,0 4,0 Speed (km/h) 40 40 40 40 1.4.13. Hydraulic system The trailer is equipped with a hydraulic system for working movements. See chapter 3.5 1.4.14. Electrical system The trailer is manufactured with 12V electrical system. See chapter 3.4 1.4.15. Brake system The trailer is equipped with hydraulic brake system. Also is available pneumatic brake system as an additional extra. The hydraulic pressure in the brake line is not allowed to raise over 16 Mpa. If using to high of a hydraulic pressure the tappet of the brake arm might go from centum and lock the brakes. © 2009 Ver. 2 Fors MW Ltd www.forsmw.com 12 17-20 1.4.16. Electric on-off control unit The trailer is equipped with hydraulic system witch valves are controlled with electric remote control unit. 1 2 3 4 5 6 Figure 14. Control unit Table 3. Nr. 1 2 3 4 5 6 Function description Tipping / Rolling Foldable tower / Telescope Changing operation unit Bogie lift Extra Extra © 2009 Ver. 2 Fors MW Ltd www.forsmw.com 13 17-20 1.5. SAFETY DEVICES 1.5.1. Security post Always use the safety support when carrying out service work in the tipped position. The safety support may not be used under any circumstances when the container bridge is loaded. Security post Chassis Figure 15. Security post 1.5.2. Location on decals on the trailer The trailer is equipped with a range of signs relating both to safety and information. Check that all the signs are in the correct positions. Figure 16. Location of the decals on the trailer © 2009 Ver. 2 Fors MW Ltd www.forsmw.com 14 17-20 1.5.3. Presentation of decals Figure 17. Warning triangle and instruction manual decal. The trailer is supplied with a warning triangle alongside the instruction manual decal in order to reinforce the requirement for the user to read the entire instruction manual carefully before starting to use the trailer. Ignoring this can entail a danger to life. Figure 18. Decal for the use of safety equipment. These decals challenge the user to employ appropriate safety equipment in order to avoid injury when using the trailer. Figure 19. Risk of clamping injuries There is a risk of clamping or crushing injuries during work and maintenance. Figure 20. Hazardous area Standing between the trailer and the towing vehicle when the trailer is being operated, moved with frame steering or when other functions are activated between trailer and tractor, can be potentially fatal. As the driver, you must always ensure that the area around the machine is free of people. © 2009 Ver. 2 Fors MW Ltd www.forsmw.com 15 17-20 Figure 21. Risk of slipping There is a risk of slipping as the surfaces of the trailer can be slippery due to precipitation in combination with pre-existing oil and/or clay on the surface. The ground around the trailer can also become slippery, as the tyres can tear up the surface and expose clay and soil. Figure 22. Hydraulic fluid under pressure Hot hydraulic fluid at high pressure levels can occur in the hydraulic system. Take care when connecting, and replace poor quality hoses. Figure 23. Using the exchange unit The exchange unit may not be operated unless the frame is folded down. During transport with the trailer, the hook must be folded down in the parking position. © 2009 Ver. 2 Fors MW Ltd www.forsmw.com 16 17-20 Figure 24. Use the safety support during all service Leaning under the raised frame is absolutely prohibited unless it is blocked with the safety support. Under no circumstances may the trailer be carrying either a load or a container when using the safety support. Figure 25. Max. load It is absolutely prohibited to load more than the amount your model is intended to handle. This can result in danger to you and your surroundings. Figure 26. Max. pressure on towing eyelet Ensure that you do not load in such a way that the pressure on the towing eyelet exceeds the permitted laws and regulations. The trailer is designed for a maximum pressure of 3,500 kg on the towing eyelet. The pressure is largely determined by the way the load is distributed on the container bridge, and it is the user’s responsibility to ensure that this is not exceeded. © 2009 Ver. 2 Fors MW Ltd www.forsmw.com 17 17-20 Figure 27. Tyre inspection The tyres must be tightened and the brakes checked regularly at a minimum interval of 40–50 kilometres. Figure 28. Lubrication. This decal is used to show the importance of regular lubrication of the trailer. Figure 29. Data plate © 2009 Ver. 2 Fors MW Ltd www.forsmw.com 18 17-20 Tightening torque for nuts Table 4. Thread Nuts with spherical collar,conical nuts. Screws with spherical collar. Flat collar nut with lock washer Nut with flat seat captive washer Screwed connection disc/rim on track adjustable wheels M18x1,5 M20x1,5 M22x1,5 M18x1,5 M20x1,5 M22x1,5 M18x1,5 M20x1,5 M22x1,5 Thread M18x1,5 Flat discs (St37) Screw Class. 8.8 N.m. 310 330 490 630 210 270 360 460 260 350 450 Flat discs Screw Class. 8.8 260-330 Dished discs Flat discs (St52) Screw Class. 10.9 460 630 740 360 450 550 360 500 650 Figure 30. Lubricate points. All of the hydraulic hoses of the trailer are marked with colored labels. See table below for more detailed information. Functions depend of the hydraulic system configuration. Figure 31. Hydraulic hose label (example tipping cylinder) © 2009 Ver. 2 Fors MW Ltd www.forsmw.com 19 17-20 Hose label colors: • Red - oil from pump. • Blue - oil to tank. • Yellow - Brake Marking for hydraulic hoses Table 5. No. 1 10 11 12 13 14 15 16 17 18 19 20 21 22 23 24 25 26 27 28 Color mark Yellow Red Blue Red Blue Red Blue Red Blue Red Blue Red Blue Red Blue Red Blue Red Blue Blue © 2009 Ver. 2 Fors MW Ltd Function Brake Tipping cyl. ( up ) Tipping cyl. ( down ) Tower ( front ) Tower ( back ) Telescope ( in ) Telescope ( out ) Frame-lock for tipping Frame-lock for hooking Bogie-block ( on ) Bogie-block ( off ) Bogie-lift ( on ) Bogie-lift ( off ) Extra port ( a ) Extra port ( b ) Rear tailgate ( a ) Rear tailgate ( b ) Steering control ( p ) Steering control ( t ) Straight steering control (t) www.forsmw.com 20 17-20 2. INSTALLATION 2.1. UNPACKING Before unpacking, check visually that the trailer is not damaged during transportation. If the trailer is damaged, inform about this to the company that transported the trailer and the manufacturer of the product immediately. • • • • • • 2.2. • • Usage of the trailer is strictly forbidden if safety devices of the trailer are damaged. For more detailed information about safety devices see 1.5 When you are unpacking the trailer be careful: do not damage sensitive components, do not change factory settings or damage paint or other surface finishes. Lift up the trailer from transportation frame. Lower the trailer to the floor. Be careful when lifting so that cables, connectors or other components are not damaged for instance between lift work and trailer frame. Weight depends see technical information for data. WITHDRAWAL FROM USE AND STORAGE It is not allowed to store the trailer in a cold and/or damp environment for a long period. All metal parts are recyclable and should when time comes be handed over to a recycler. © 2009 Ver. 2 Fors MW Ltd www.forsmw.com 21 17-20 3. FUNCTIONAL DESCRIPTION 3.1. HANDLING IN ROLL ON – ROLL OFF If your BIGAB is equipped with suspension there is no bogie blocking. Exchange and tipping must be operated from the operator’s seat in the towing vehicle! Figure 1 Ensure that the position selector for exchange or tipping is in the exchange position, not in the tipping position. Figure 2 Place the hooklift trailer on a flat surface. The sideways incline may not exceed 5 degrees. Failure to read this instruction manual can be potentially fatal! Under no circumstances may you reverse/exert pressure with the towing vehicle in order to facilitate exchange. This entails an immediately risk of the trailer or the towing vehicle being damaged, which can be potentially fatal. The load must be pulled on and the trailer and the towing vehicle must roll in under the freely suspended load. © 2009 Ver. 2 Fors MW Ltd www.forsmw.com 22 17-20 STOP Stop if the tractor lifts off the ground! Figure 3 Check that the hook hitches around the loop. On-loading! Check that the frame lock and bogie blocking are activated. Check that the load carrier is inside the discs. Release the brakes on both the towing vehicle and the trailer to make it easier to roll on the load. Check the position of the tower during on-loading so that the container bridge’s frame does not catch on the rollers from behind. The tower must be fully retracted when rolling on the container bridge in order to increase lifting force and reduce the strain on the towing eyelet. Ensure that the container frame does not catch in the rollers at the back of the trailer. Adjust the tower upwards continually during exchange in order to move past the rollers. If the tower is not adjusted upwards during onloading, there is a considerable risk of the exchange’s lock being damaged if the container frame catches in the rollers. IMPORTANT! Follow the movement with the retractable tower so that the front of the hooklift trailer’s frame does not catch on the rollers. When you have passed the rollers, always keep the hooklift trailer’s frame close to the rollers. Figure 4 Off-loading! Release the brakes on both the towing vehicle and the trailer to make it easier to roll off the load. Check the position of the tower during off-loading so that the container bridge’s frame does not catch on the rollers from above. Lock the frame and activate bogie blocking between the towing vehicle and trailer. 1. Raise the hooklift frame slightly so that the container bridge does not scrape against the frame when off-loading the container bridge. 2. Then retract the tower so that the locking rails/wings on the container bridge frame move freely and cannot be damaged. 3. Adjust the tower upwards continually so that the container frame does not catch on the rollers at the back of the trailer during off-loading. 4. If the tower is not adjusted upwards during off-loading, there is a considerable risk of the exchange’s lock being damaged if the container frame catches in the rollers. © 2009 Ver. 2 Fors MW Ltd www.forsmw.com 23 17-20 3.2. HANDLING IN TIPPING Note! For the models mentioned in this instruction manual, the maximum container bridge length is 6.0 m during tipping. Ensure that the towing vehicle and the trailer are securely coupled before tipping. Figure 1 Ensure that the trailer is in the tipping position and not the exchange position before commencing tipping! Figure 2 Place the hooklift trailer on a flat surface. The sideways incline may not exceed 5 degrees. Figure 3 At maximum tipping – drive slowly forwards until the container bridge is empty. Lower the container bridge before continuing to drive. Important! Ensure that the container bridge is locked in the correct position before driving. IMPORTANT! When tipping, use the brakes to ensure that the machine does not roll away when the load slides off. © 2009 Ver. 2 Fors MW Ltd www.forsmw.com 24 17-20 3.3. OPERATION WHEN DRIVING It is the responsibility of the user to ensure that a sufficiently powerful and heavy towing vehicle is coupled to the trailer in all situations. The use of a towing vehicle that is too small and insufficiently powerful can entails risks for the user and the surrounding environment, as well as leading to damage to the vehicle and trailer. Load* (excl. the container’s dead weight) Load Kg/m³ 14 m³ 21 m³ 27 m³ 800 Full container 7 m³ 5,600 kg Peas, Wheat, water content 15% Rye, water content 15% Barley, water content 15% Oats, water content 15% 11,200 16,800 21,600 750 680 560 5,250 kg 4,760 kg 3,920 kg 10,500 9,520 7,840 15,750 14,280 11,760 20,250 18,360 15,120 Silage, newly harvested 850 5,950 kg 11,900 17,850 22,950 Macadam Gravel 1400 1550 9,800 kg 10,850 kg 19,600 21,700 29,400 32,550 37,800 41,850 Clay 1800 12,600 kg 25,200 37,800 48,600 Wood chips (50% moisture content) 350 2,450 kg 4,900 7,350 9,450 *The higher the moisture content of the load, the heaver the load, a fact that the user has to take into consideration. This table is only an approximate estimate of the weights that can occur, and it is the responsibility of the user to ensure that the vehicle’s limits and the applicable legislation are not being exceeded. The specified values are not exact values, just examples. Figure 32. Example of weight with different types of load For information purposes and for examples of how much different loads can weigh, please refer to the above table. This table should only be viewed as guidance and information. The manufacturer cannot be held responsible for dimensions or volumes specified in the table, and the table may only be viewed as a recommendation. 3.3.1. Load on towing eyelet and coupling Always adapt your driving to the load, road conditions and your level of experience. Do not exceed the maximum speed specified for the trailer. Ensure that you have the correct pressure on the tow hook when you are driving. Ensure that you do not exceed the intended upwards and downwards pressures on the trailer’s towing eyelet and the coupling to the hook device. The given ideal conditions and theoretical calculations indicate the following maximum load values, and it is recommended that the user observes these load values. Max. load upwards in kg BIGAB 17 - 20 4150kg Max. load distributed evenly over the container. Max. load downwards in kg BIGAB 17 - 20 © 2009 Ver. 2 Fors MW Ltd 3500kg www.forsmw.com 25 17-20 3.4. ELECTRICAL SYSTEM 3.4.1. Basic electrical system The trailer is manufactured with 12V electrical system. Configuration depends of options, example reversing light, border light or additional cable connector. 7 pool connection to pulling vehicle Figure 32. Electrical diagram Electrical components. Table 6. Pos. 1 1 2 3 4 5 Art. No. 920765 920766 920770 920715 920695 920180 Title Rear light Rear light with reversing light - special Border light 111x40 (orange) - special Cable terminal Cable Connector 7 pools (male) Cable Connector 7 pools (female) -special Connections of the cables and lamps. Table 7. Nr. 1 2 2 3 4 5 5 6 7 7 Color Red Brown Brown Yellow Blue Grey Brown Black Green Brown © 2009 Ver. 2 Fors MW Ltd Function Flashing left Reversing light Spare (without reversing light) Earth Flashing right Rear right Side marking Brake light Rear left Side marking www.forsmw.com Lamp 12V-21W (L1) 12V-21W (L5) 12V-21W (L1) 12V-21W (L2) 12V-5W (L4) 12V-10W (L3) 12V-21W (L2) 12V-5W (L4) 26 17-20 3.4.2. Electrical on - off system The electrical on-off is manufactured with 12V electrical system. Configuration depends of options. Figure 33. Electrical diagram Table 8. Pos. 1 2 3 4 5 Art. No. 915181E 91581CS 91581ES 91581RP 915181CC © 2009 Ver. 2 Fors MW Ltd Title Electric on-off control unit Cable set Electrical switch Rubber protection Cable connector www.forsmw.com 27 17-20 3.5. HYDRAULICAL SYSTEM 3.5.1. Main hydraulic system The trailer is delivered with filled up and tested hydraulic system. The hydraulic system consists of the functional components showed in the figure below. Technical data and configuration depends on the type of trailer (see table 1). The hydraulic system is filled up with hydraulic oil VMGZ or SAE100R16. It is applied as a working fluid of the hydraulic systems for operating in the open air at temperatures ranging from -50°C up to +60°C at a continuous operation service. For hydraulic system maintenance see chapter 5. Figure 34. Hydraulic system. Hydraulic components Table 9. Pos. 1 2 3 4 5 6 7 8 9 10 11 12 Art. No. 940810 940815 940820 940825 940830 940835 913265 913240 913640 915201 913230 913210 © 2009 Ver. 2 Fors MW Ltd Title Release valve Security valve Logic valve 4-way valve Valve block 4-way valve Tipping / Rolling cylinder with pilot operated valve Tower cylinder End of stroke valve (Note! only with pos. 11) Pilot operated double check valve (Note! only with pos. 11) Operation changing cylinder Brake cylinder www.forsmw.com 28 17-20 3.5.2. Frame lock hydraulic system 5 1 2 6 3 4 7 Figure 35. Frame lock hydraulic system. Hydraulic components for frame lock Table 10. Pos. 1 2 3 4 5 6 7 8 Art. No. 313134 915275 915271 915266 915280 915265 914570 9145702 © 2009 Ver. 2 Fors MW Ltd Title Cylinder 90/40-300 Manometer Pilot operated check valve Pressure reducing/relieving valve Hydro-pneumatic accumulator Manifold Bayonet coupling male Bayonet coupling female www.forsmw.com 29 17-20 4. SAFETY INSTRUCTIONS IMPORTANT: READ AND UNDERSTAND THE USER MANUAL CAREFULLY BEFORE USING THE DEVICE. CONSULT THE USER MANUAL TO SOLVE YOUR PROBLEMS. THE DEVICE HAS AN IDENTIFICATION LABEL ON IT. BEFORE USING THE TRAILER, ENSURE THAT FACTORY SETTINGS HAVE NOT CHANGED AND THERE ARE NO PARTS BECOME LOOSE DURING TRANSPORTATION. MAKE SURE THAT ALL WARNING SIGNS LABELS AND TAPES ARE IN THE APPROPRIATE PLACES. THE TOWING EYELET MUST BE CONTROLLED FOR DEFAULTS EVERY TIME BEFORE THE TRAILER IS USED. THE TOWING EYELET NEEDS TO BE CHANGED AT LEAST ONCE A YEAR. IT IS UP TO THE USER OF THE TRAILER TO SEE IT THAT THIS IS DONE. 4.1. GENERAL Before you start to work: • • • • • • • • • • • • • • • • • Carefully examine the trailer. Check that all joints are connected tightly. Check that the trailer is located on hitch hook. Check the towing eyelet for defaults. Control brakes. Control the lights. Check that the brakes are functioning. Check that hydraulic hoses and couplings are intact and free from cracks. Check that all hydraulic functions are working. Remember that it is not allowed to use this unit for functions not confirmed by producer. Be aware that a long container needs enough working space and turning area. Respect the safety distance. Never stand by the drawbar when connecting and disconnecting or when functions between the towing vehicle and trailer are activated. Be sure that nobody is in the working area of the trailer. Do not exceed maximum loading values. Always engage the base machines parking brakes before loading. If necessary put some obstacles in front of wheels. Study safety instruction. During maintenance: • • • • Be sure that the trailer is standing on a flat surface. Be sure that the trailer can’t move. When lubrication or servicing the trailer, turn off the vehicle engine. Be sure that the trailer can’t slip when using support leg, jack or similar equipment © 2009 Ver. 2 Fors MW Ltd www.forsmw.com 30 17-20 • • • • • Always use the security post in tipping position when servicing. The safety support must always be used when carrying out service work in the tipped position. There must not be any load on the trailer when carrying out service work in the tipped position. See figure below. Never attempt to do maintenance work on the hydraulic system before you are sure there is no pressure. Do not tighten or repair leaking hydraulic couplings while the system is pressurized. Never attempt to localize a leakage from hoses or connections by feeling with hand. The high-pressure oil jet can penetrate skin and cause serious burns and damages. Highpressure oil is also highly flammable. Avoid getting oil into eyes. Use safety goggles and gloves. If oil has got into eyes flush them with cool water and immediately contact a doctor. Figure 36. Safety Note! It is strictly forbidden to lean under the container body without using the security post! Figure 37. Raised container bridge Never drive under obstacles such as bridges, electrical cables, etc., with the container bridge raised. © 2009 Ver. 2 Fors MW Ltd www.forsmw.com 31 17-20 Driving: • • • • • • • 4.2. Don’t forget to lift the support leg up before driving. Do not exceed maximum travel speed. Never make sharp turns at great travel speed. Long container needs enough working space and turning area. Do not exceed maximum loading values Be sure that the container is firmly fixed before driving. Recommended load placement - symmetrical. WORKING AT EXTREME CONDITIONS Recommended working temperature range for a Bigab trailer is –30°C up to +40°C. Note that working at low temperatures accelerates hydraulic gaskets wearing and increases hydraulic hoses exposure to damages and steel constructions exposure to brittle fracture. When working at lower temperature than recommended, lift lighter loads than usual. Before starting to work in cold conditions let the oil circulate freely through the system a few minutes. Slowly work every action through several times so that gaskets come pliable before they receive full pressure. At exceptionally warm conditions beware of hydraulic oils excessive heating. Too high oil temperature (higher +80°C) degrades oil and damages gaskets. 4.3. ACTING IN DANGEROUS SITUATION If the trailer comes into contact with high voltage electric wires comply with the following instructions: IF YOU ARE OUTSIDE THE MACHINE Do not attempt to get into the machine. Keep everybody out from the machines vicinity. Do not touch any part of machine. IF YOU ARE INSIDE THE MACHINE Get out of it by JUMPING. Avoid touching any conducting parts. Do not make yourself a wire through which electricity may flow. Get away from the machine by JUMPING so that both feet do not touch the ground at the same time. Electric field at ground can cause fatal voltage between legs. At about 20 meters away you should be safe but this is of course a question of circumstances. © 2009 Ver. 2 Fors MW Ltd www.forsmw.com 32 17-20 5. MAINTENANCE / SPARE PARTS 5.1. MAINTENANCE SCHEDULE All kinds of maintenance work are subdivided into two groups: operating (preventive) and compulsory (scheduled). The need for operating maintenance is determined based on the results of checking. General • • • • • • • Maintenance works must be carried out regularly to ensure safe and malfunction-free operations. Maintenance works does not require any special tools. The user can perform most of the operations. Use correct tools. Attempt to localize the defects as clearly as possible; you should have to avoid opening the system unnecessarily. Keep disassembled parts and repair area protected from dirt. Keep spare parts in their packages until needed for installation. Valve adjustments and repairs are recommended to be handled by service personnel. Daily inspections: • • • • Examine visually the loader. Note defects and failures that might affect safety. Repair possible defects and failures. Check so there is no leakages on hydraulic system, or damaged hoses. Work through every function to its extreme position. Check the oil level. Weekly maintenance: • • • • • • • Clean the trailer regularly with sponge and soap. When cleaning never use hot water under high pressure, it will remove the grease from bearings. Check the operation of the device. Check hydraulic pressure. Check the brake condition. Control wheel nut tightness. When tightening the locking force must be 330-370 Nm. Check the lights, reflectors and bulbs. Monthly maintenance: • • • • Check the air pressure in tires. Check if there is enough lubricant on glide surfaces. Clean and lubricate hydraulic cylinders. Check hydraulic hoses for damages. © 2009 Ver. 2 Fors MW Ltd www.forsmw.com 33 17-20 Recommended lubricants: BRAND BP ESSO MOBIL SHELL UNION/TEXACO 5.2. TYPE Energrease LS-EP2, L2M Beacon EP2, Multipurpose GR Moly Mobilux EP2, Mobil Grease MP Special Alvania EP Grease 2 Marfak Multi-Purpose 2, Molytex Grease 2 MAINTENANCE OPERATIONS IMPORTANT: BEFORE MAINTENANCE AND SERVICE OPERATIONS READ AND UNDERSTAND THE SAFETY INSTRUCTION. During maintenance: • • • • • • • • • Be sure that the trailer is standing on a flat surface. Be sure that the trailer can’t move. When lubrication or servicing the trailer, turn off the vehicle engine. Be sure that the trailer can’t slip when you using support leg, jack or similar equipment. Always use the security post in tipping position when servicing. Never attempt to do maintenance works on the hydraulic system before you are sure there is no pressure. Do not tighten or repair leaking hydraulic couplings while the system is pressurized. Never attempt to localize a leakage from hoses or connections by feeling with hand. The high-pressure oil jet can penetrate skin and cause serious burns and damages. Highpressure oil is also highly flammable. Avoid getting oil into eyes. Use safety goggles and gloves. If oil has got into eyes flush them with cool water, after contact the doctor. 5.2.1. Surface cleaning Remove accumulated dust and dirt. Painted outer surfaces should be cleaned regularly with sponge and soap. When cleaning never use hot water under high pressure, it will remove the grease from bearings. © 2009 Ver. 2 Fors MW Ltd www.forsmw.com 34 17-20 5.2.2. Maintenance of the hydraulic units Hydraulic system is shown in chapter 3.4. • • Clean and lubricate piston rods of hydraulic cylinders. Check the hydraulic valves: Check visually hydraulic valves. In case of leaking replace the damaged valve. • Check hydraulic hoses: Check visually hydraulic hoses and union pipe connections. Replace a hose in case of leaking or if there are ruptures or slashes on it. • Check the level of oil, add and replace oil. • Check the operation of the device. When replacing hydraulic components such as hoses, gaskets etc, make sure they correspond with original parts. To avoid malfunctions and ensure safe operation use original spare parts. Changing the seals Change all cylinder seals at the same time. The piston cannot be split. The seals must be slipped over the piston edge. Be careful not to break the seals when fitting them in place. • After removing the old seals clean the grooves carefully before fitting the new seals into place. • Lubricate the new seals with hydraulic oil. • Open the pistons lock nut. • Screw the piston off. • Withdraw the guide piece from the rod. • Change the guide piece seals; make sure that the piston rod seal is the right way round, i.e. the lip against the pressure. NB: Never operate the hydraulic system with the level of oil dropping below the lower mark. 5.2.3. Maintenance of the pneumatic units • • Clean and lubricate piston rods of pneumatic cylinders. Emptying the water collector: Condensed water is removed from the air tank located in the side of trailer. • Check the pneumatic valves: Check the pneumatic valves by listening to the working sound. In case of leaking replace the damaged valve. • Check pneumatic hoses: Check visually pneumatic hoses and union pipe connections. Replace a hose if there are ruptures or slashes on it. • Check the operation of the device. © 2009 Ver. 2 Fors MW Ltd www.forsmw.com 35 17-20 5.2.4. Maintenance of the electrical components The trailer is manufactured with 12V electrical system. Electrical system is shown in chapter 3.3. The wires to the electrical equipment are of different colors, which facilitate the location of the wire leads connecting individual items of the electrical equipment. Refer to the electrical diagram (figure 23) to ensure a correct subsequent reconnection of the electrical units and also when checking the operation of the equipments and individual electric circuits. • Clean and check the lights: In case of fault replace the lamp. If the lamp keeps on braking repeatedly, find out the case of the matter. • Check electrical connectors: Clean them of dirt and dust. • Check wires insulation: Check wire insulation, wire joints and protection of insulation against rubbing during jolting and contacting the trailer parts. Protect the wires from oil and fuel, which ruin insulation. Wipe dirty wires. NB: Join and disjoin plug connectors only with dead circuits. 5.2.5. Maintenance of the brake system The trailer is manufactured with a hydraulically functioned brake system. Air brake system with negative or positive action is optional. Control the brakes regularly. Test the brakes at least once per week while trailer is working. See to it that no lubricant penetrates into the brakes. Any lubricant, which has penetrated the brake, causes greasing of the disks, thereby reducing friction between their working surfaces. A poor operation of the brakes is the result of such happening. In such a case dismantle the brake, eliminate the oil leakage, wash the greasy disks with gasoline and let them dry out. Control always the brake control linkage after the drum being dismantled, adjust if needed. For adjusting the brakes you need to lift up the bogie-frame from the ground and adjust the brake levers. You do this by spinning the wheel while adjusting. The brakes are correctly adjusted when they spin freely without any scraping noises from the wheel. After all kinds of adjusting in regards to the brakes, always carry out a practical brake test before driving away. If the brakes seems to work grainy, found the brakes, pull the trailer maintaining low speed for a couple of hundred meters, try again through braking the vehicle while driving in a normal speed. Keep on reiterate until the brakes functional normally. If necessary contact our service department! BIGAB models 7 – 10, 8 – 12 and 10 – 14 – the brake show distance to the drum needs to be adjusted through loosening and by doing so adjusting the brake control linkage. BIGAB models 12 – 15, 15 – 19, 17 - 20 and 20 – 24 – the brake show distance to the drum on the brake cylinder needs to be adjusted through loosening or vice versa tightening the adaptable screw on the brake. © 2009 Ver. 2 Fors MW Ltd www.forsmw.com 36 17-20 5.2.6. Maintenance of wheels The maintenance of the wheels before proceeding to work consists in watching over the condition of the threaded joints and timely tightening there of and in observance of the rules for use and maintenance of tires. • • Check the threaded joints. Check the pressure of air in the tires. Wheels pressures see table 2. Tightening torque for nuts see table 4. 5.2.7. Maintenance undercarriage Every day It is necessary to visually check the nuts on the bogie side each time the customer uses the trailer. Weekly Once per week (or nor later then 20 hours) it is needed to lubricate the grease nipples You need to lean under the trailer to be able to grease the glide bearings. This will be easier to do if the trailer is without load. © 2009 Ver. 2 Fors MW Ltd www.forsmw.com 37 17-20 5.2.8. Lubrication Recommended lubrication cycle is once per week or after 20 working hours. Lubricate points equipped with grease nipples by using a grease gun. See chapter 5.1 for recommended lubricants. • • • Ensure regularity of lubrication by following the lubricating schedule. Keep flammable material away from heat, sparks and open fire. Do not let oil run into the nature. Oil spilled into ground pollutes environment. Towing eyelet Link bearing; 2pcs Link bearing; 3pcs Glide bearing; 2pcs Link bearing; 1pcs Link bearing; 1pcs Glide bearing; 2pcs Glide bearing; 1pcs Glide bearing; 1pcs Glide bearing left; 1pcs Glide bearing right; 1pcs Glide bearing; 1pcs Glide bearing; 1pcs Glide bearing left; 1pcs Glide bearing right; 1pcs Glide bearing left; 1pcs Glide bearing right; 1pcs Figure 38. Lubrication points © 2009 Ver. 2 Fors MW Ltd www.forsmw.com 38 17-20 5.3. SPARE PARTS 5.3.1. Back and Hook frames 3 1 2 Figure 39. Cylinder coupling Figure 40. Back and hook frame coupling 5, 7 6, 7 4 Figure 41. Flexible tower © 2009 Ver. 2 Fors MW Ltd www.forsmw.com 39 17-20 Back and rolling frame spare parts Table 11. Pos. 1 2 3 4 5 6 7 Art. No. 37211111 37211183 37211110 37211112 37211115 37211120 37211180 Description Note Axle Distance ring Axle Axle Axle Axle Distance ring 5.3.2. Bogie 2 5 3 4 Figure 42. Spring suspension bogie Spring suspension bogie spare parts Table 12. Pos. 2 3 4 5 Art. No. 916831 916831-A 916831-S 916480 916466 Description Spring suspension bogie comp. Axle Spring suspension Ring nut M20 Brake arm © 2009 Ver. 2 Fors MW Ltd www.forsmw.com Note 40 17-20 5.3.3. Frame locking Figure 43. Frame lock Frame locking spare parts Table 13. Pos. 3 4 5 6 12 14 15 16 17 22 23 24 26 28 29 30 32 © 2009 Ver. 2 Fors MW Ltd Art. No. 391519 37121520 37121525 37121530 37121535 37121522 37121527 37121532 37121532 37024378 908110 911250 920030 920223 930105 915280 915280C 313134 Title Hydr. frame lock system Link Link Link Support Axle Pin Pin Pin Pin Split 4x45 DIN 94 Stopper ring 20 DIN 471 Locking pin 6x40 DIN 11023 Chain (8 link) Grease nipple Hydro pneumatic accumulator Fixation clamp Cylinder 90x40x300 www.forsmw.com 41 17-20 5.3.4. Steering rollers 1, 3 1, 3 2 4 Figure 44. Steering roller spare parts Rollers spare parts Table 14. Pos. 1 2 3 4 Art. No. 320340/320341 37203045 909115 320360 Description Roller comp. (left, right) Axle Slide bearings Ø100 Tipper axle Note 5.3.5. Changing operating unit 2 9 4 1 8 5 3 5 6 7 Figure 45. Changing operation unit © 2009 Ver. 2 Fors MW Ltd www.forsmw.com 42 17-20 Changing operating unit spare parts Table 15. Pos. Art. No. 37211007 913230 37211787 37211788 37211789 37211790 37211791 913640 37211792 37211793 1 2 3 4 5 6 7 8 9 Description Changing unit compl. Operation changing cylinder Pin Pin Axle Lever Pusher End of stroke valve Axle Axle Note 5.3.6. Hydraulic components For hydraulic diagram see chapter 3.5.1 Hydraulic components spare parts Table 16. Pos. 1 2 3 4 5 6 Art. No. 940810 940815 940820 940825 940830 940835 7 913265 8 9 10 11 12 37913265 37913266 37913268 913240 37913240 37913241 37913243 913640 915201 913230 37913230 37913232 37913233 913210 37913210 37913212 37913213 Description Release valve Security valve Logic valve 4-way valve Valve block 4-way valve Tipping / Rolling cylinder 200/100-2300 with pilot operated valve Sealing kit for hydraulic cyl. 200/100 Front bush for hydraulic cyl. 200/100 Piston for hydraulic cyl. 200/100 Tower cylinder 125/63-450 Sealing kit for hydraulic cyl. 125/63 Front bush for hydraulic cyl. 125/63 Piston for hydraulic cyl. 125/63 End of stroke valve Pilot operated double check valve Operation changing cylinder 50/32-70 Sealing kit for hydraulic cyl. 50/32 Front bush for hydraulic cyl. 50/32 Piston for hydraulic cyl. 50/32 Brake cylinder 40/20-60 Sealing kit for hydraulic cyl. 40/20 Front bush for hydraulic cyl. 40/20 Piston for hydraulic cyl. 40/20 © 2009 Ver. 2 Fors MW Ltd www.forsmw.com Note 43 17-20 For frame lock hydraulic diagram see chapter 3.4.2 Frame lock hydraulic components spare parts Table 17. Pos. 1 2 3 4 5 6 7 8 Art. No. 313134 37313940 37313942 37313944 915275 915271 915266 915280 915265 914570 9145702 Title Cylinder 90/40-300 Sealing kit for hydraulic cyl. 90/40 Front bush for hydraulic cyl. 90/40 Piston for hydraulic cyl. 90/40 Manometer Pilot operated check valve Pressure reducing/relieving valve Hydro-pneumatic accumulator Manifold Bayonet coupling male Bayonet coupling female 5.3.7. Cylinder description 16 13 17 8 4 12 9 2 10 11 6 7 14 15 3 5 1 Figure 46.Cylinder description Table 18. Pos. 1 2 3 4 5 6 7 8 9 © 2009 Ver. 2 Fors MW Ltd Description Piston rod Cylinder tube Front bush Piston Scrape ring Sealing Bush ring Sealing O-ring Note Spec. order Spec. order Included in sealing kit Included in sealing kit Included in sealing kit Included in sealing kit Included in sealing kit www.forsmw.com 44 17-20 10 11 12 13 14 15 16 17 O-ring Sealing Sealing Locking ring Locking ring Locking ring Grease nipple Link bearing Included in sealing kit Included in sealing kit Included in sealing kit Included in sealing kit Included in sealing kit 5.3.8. Electrical system For electrical scheme see chapter 3.3 Pos. 5-8 concerning spare parts table is not shown in electrical scheme. 1 Figure 47. Rear lamp Electrical spare parts. Table 19. Pos. 1 1 2 3 4 5 6 7 8 Art. No. 920764L/R 920766 920770 920715 920695 920180 920723 920745 920725 Description Note Rear lamp Rear light with reversing light - special Border light 111x40 (orange) - special Cable terminal Cable Connector 7 pools (male) Cable Connector 7 pools (female) -special Lamp 12V, 5W Lamp 12V, 21W Lamp 12V, 10W © 2009 Ver. 2 Fors MW Ltd www.forsmw.com 45 17-20 5.3.9. Electrical on-off system For electrical on-off system diagram see chapter 3.3.2 Electrical on - off components spare parts (see also chapter 5.3.6) Table 16. Pos. 1 2 3 4 5 6 7 8 9 10 11 Art. No. 940810 940815 940820 940825 940830 940835 915181E 91581CS 91581ES 91581RP 915181CC Title Release valve Security valve Logic valve 4-way valve Valve block 4-way valve Electric on-off control unit Cable set Electrical switch Rubber protection Cable connector 10 5 9 7 1; 2; 3 4 6 8 11 © 2009 Ver. 2 Fors MW Ltd Figure 48. Electrical on – off system www.forsmw.com 46 17-20 5.3.10. Other parts 9 8 3 4 2 1 Figure 49. Other spare parts Other spare parts Table 20. Pos. 1 2 3 4 6 8 8 9 Art. No. 930105 920120 37221002 920822H 37203085 37203181 37203183 920155 Description Grease nipple Towing eyelet Hook Hydraulic Support leg Security post Rear lamp compl. with bracket Rear lamp compl. with bracket Reflector 3-angle (red) © 2009 Ver. 2 Fors MW Ltd www.forsmw.com Note Right Left 47 17-20 6. TROUBLESHOOTING These troubleshooting instructions are provided to help you to determine the cause for a malfunction. Electrical equipment troubles Fault symptoms Reason and action Lamp born out. Replace lamp. Check and clean electrical connectors. Check and repair wire. Lights fault Wire broken. Hydraulic equipment troubles Fault symptoms Too slow lift of implement or cylinders will not return from working position to neutral. Ingress air into hydraulic system. Excessive leakage of oil in pump. Low oil pressure. Hydraulic cylinder piston packing out of order. Hydraulic system noise Distributor safety valve maladjusted. Oil leaking Oil leaks through final drive labyrinth seals. Brake system troubles Fault symptoms Poor operation of brakes Greasy or worn-out drive disk linings. Maladjustment of brake control linkage. © 2009 Ver. 2 Fors MW Ltd Reason and action Valve stuck. Clean valve parts. Valve should move freely without seizure. Locate leaky point and eliminate defect. Check oil level. Replace pump Adjust oil pressure. Replace packing. Air entrapped into system. Locate air suction and eliminate defect. Adjust valve. Replace ruptured hose or tighten hose connection. Rubber packing between track sprockets and hub or labyrinth seals worn. Replace rubber rings. Reason and action Wash linings with gasoline or replace from spares Adjust brake control linkage. www.forsmw.com 48