1
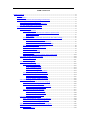
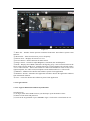
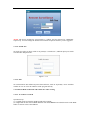
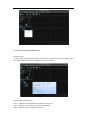
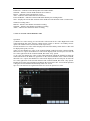
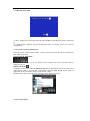
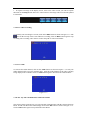
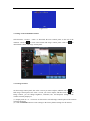
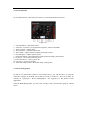
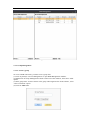
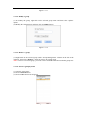
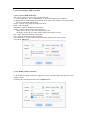
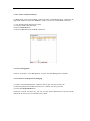
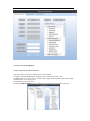
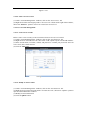
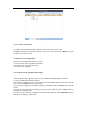
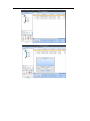
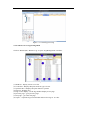
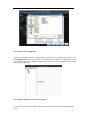
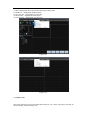
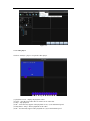
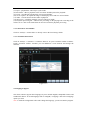
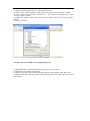
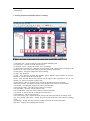
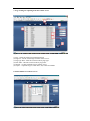
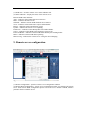
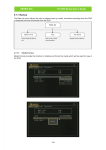
DVR4Lite DVR System
Remote Client Manual
Including IE Access Guide
USER’S MANUAL
USER’S MANUAL................................................................................................................................ 3
Preface ...................................................................................................................................... 3
1. Introduction .......................................................................................................................... 3
2. System requirement and executing environment ................................................................ 3
2.1. Supported operating System: ..................................................................................... 3
2.2. Hardware requirement (recommend):....................................................................... 3
2.3. Web bandwidth requirement:.................................................................................... 3
3. Functions and Operation Instruction ................................................................................... 3
3.1. Remote view............................................................................................................... 3
3.1.1. Login and exit .................................................................................................. 4
3.1.1.1. Login to Remote Surveillance System Client ........................................ 4
3.1.1.2. Switch user ........................................................................................... 5
3.1.1.3. Exit ........................................................................................................ 5
3.1.2. Remote DVR connection and remote live video viewing ................................ 5
3.1.2.1. To connect to a DVR ............................................................................. 5
3.1.2.2. To view the remote DVR status ............................................................ 6
3.1.2.3. To view the remote DVR live video....................................................... 7
3.1.3 Remote client OSD ........................................................................................... 8
3.1.4. Screen Layout and Full Screen ........................................................................ 8
3.1.5. Screen Capture ................................................................................................ 9
3.1.6. Live video recording ........................................................................................ 9
3.1.7. Live audio ........................................................................................................ 9
3.1.8. Tow way talk communication with remote DVR ........................................... 10
3.2. Image control and PTZ Function .............................................................................. 10
3.2.1. Image Control ................................................................................................ 10
3.2.2. PTZ Function .................................................................................................. 11
3.3. Device management ................................................................................................ 11
3.3.1. Group Management ...................................................................................... 12
3.3.1.1. Create a group .................................................................................... 12
3.3.1.2. Modify a group ................................................................................... 13
3.3.1.3. remove a group .................................................................................. 13
3.3.1.4. Search a group by name ..................................................................... 13
3.3.2. Create/modify a DVR connection .................................................................. 14
3.3.2.1. Create a DVR connection .................................................................... 14
3.3.2.2. Modify a DVR connection ................................................................... 15
3.3.2.3. remove a DVR connection .................................................................. 15
3.4. Users management .................................................................................................. 16
3.4.1. Current account password changing ............................................................. 16
3.4.2. User access management.............................................................................. 16
3.4.2.1. create a new user access level ........................................................... 17
3.4.2.2. remove an access level ....................................................................... 17
3.4.3. User account management ........................................................................... 17
3.4.3.1. create a new account ......................................................................... 17
3.4.3.2. modify a exist account........................................................................ 18
3.4.3.3. remove an account ............................................................................. 18
3.5. Remote server management .................................................................................... 19
3.5.1. remote Search, playback and backup............................................................ 19
3.5.2. remote server’s logs management................................................................ 20
3.5.3. remote server configuration ......................................................................... 21
3.6. customize the interface of the client program ......................................................... 22
3.7. add-on tools ............................................................................................................. 23
3.7.1. video player ................................................................................................... 23
3.7.2. shortcut for Local Folder ............................................................................... 24
3.7.3. customize shortcut bar .................................................................................. 24
3.8. languages support .................................................................................................... 25
USER’S MANUAL
Remote Surveillance System Client Software
Preface
Remote Surveillance System Client Software (short for RSSC below) is a typical client
management program whose main function is to manage small quantity security surveillance
devices. It releases with the device and does not support the products from other manufacturers.
This manual will help you to familiarize with the software and master its operation methods.
Notice:
A. As product update, the contents of this manual are subject to change without notice.
B. Some part functions and symbols may not be completely same with what you get due to
the continuous revision of this software.
1. Introduction
Remote Surveillance System Client Software is a client program designed for embedded digital
video recorder to realize remote surveillance management. In the video surveillance system, the
administrator can control video input devices and conduct all possible rights such as setting up
cameras, PTZ, etc through configuring parameters, viewing the live site to achieve the purpose of
live site surveillance, video record and record file backup and so on. It possesses three main
functions: preview the live site, system configuration and video search, which will be presented
specifically in the third function part.
2. System requirement and executing environment
2.1. Supported operating System:
Windows 2000/2003/XP(Need Microsoft .NET Framework 2.0 or later version installed);
Windows vista;
2.2. Hardware requirement (recommend):
CPU: Intel Core 2 Duo 2.4 or above.
Memory: 2GB or above.
Graphics card: independent 128M graphics card or above.
Network card: 10/100/1000M.
2.3. Web bandwidth requirement:
To obtain smoother A/V playing effect, the minimum web bandwidth requirement is:
Main stream connection needs 333 Kbps/channel;
Secondary stream connection needs 44 Kbps/channel.
3. Functions and Operation Instruction
3.1. Remote view
After installing the Remote Surveillance System Client Software (available in the CD
Installer) on the PC, you can connect to the remote DVR by the remote access to the DVR
Server.
Figure 3.1
① Menu bar – includes almost operation command for Remote Surveillance System Client
Software.
② Shortcut bar – shows shortcut icons you use frequently.
③ Remote View – Displays the remote live view.
④ P.T.Z. Function – Shows functions for PTZ control.
⑤ Image Control – Controls to adjust Brightness, Saturation, Hue and Sharpness.
⑥ DVRs – Displays list of DVR connections arranged by group. Once connected it shows the
list of cameras for the DVR server. Double-clicking on a camera displays the selected camera.
⑦ Live video tools bar – shows some useful live video tools include live video record, screen
capture/snapshot, live audio on/off, microphone on/off and disconnect live video stream.
⑧ Minimize – Minimizes the Remote Surveillance System Client application.
⑨ Maximize / Restore –Maximize the application windows/ Restore the application windows
from maximized windows.
⑩ Close – Closes the Remote Surveillance System Client application.
3.1.1. Login and exit
3.1.1.1. Login to Remote Surveillance System Client
Operation steps:
(1) To login, click on the DVR Client on your desktop to open the Remote Client.
(2) Enter account name and password.
(3) Click on the Login button or press ENTER to login. Click on the Cancel button to exit.
Figure 3.1.1.1
NOTE: The factory default for account name is “admin” and for password is “88888888”
respectively. You can change the default account name and password once you are logged in.
3.1.1.2. Switch user
To switch user after you login, Click on “System(S) > Switch User”, and then input your switch
account name and password.
Figure 3.1.1.2
3.1.1.3. Exit
To exit the Remote Surveillance System Client Software, click on “System(S) > Exit” and then
confirm to exit. Or close the windows of the program directly.
3.1.2. Remote DVR connection and remote live video viewing
3.1.2.1. To connect to a DVR
Operation steps:
(1) Unfold group list from the DVR list and Select a DVR.
(2) Right-click on the selected DVR and then click the Connect item or double-click on the DVR
Name to connect to the selected DVR.
Figure 3.1.2.1
3.1.2.2. To view the remote DVR status
Operation steps:
(1) After connected to the remote DVR, move the mouse cursor on the connected DVR name,
the remote DVR status indicator will popup as shown as follow.
Figure 3.1.2.2
Remote DVR status indicator:
Cruise – indicates remote DVR P.T.Z automatic cruise on/off.
VGA – indicates remote DVR VGA output enable/disable.
Menu – indicates remote DVR menu operating.
Panel Lock – indicates remote DVR panel lock enable/disable.
Schedule – indicates remote DVR schedule active/inactive.
Buzzer – indicates remote DVR buzzer on/off.
Alert – indicates remote DVR alert active/inactive
Prerecord Buffer – indicates remote DVR enable/disable prerecording buffer.
Time – displays the current date and time of the DVR Server the Remote Client is connected to.
Channel recording status:
Manual – indicates the channel in manual recording.
Schedule – indicates the channel in schedule recording.
Alarm – indicates the channel in alarm recording.
3.1.2.3. To view the remote DVR live video
Operation:
(1) Before live video viewing, we can select the video stream for live video. Right-click on the
connected DVR, then click “Stream > Main stream” option or “Stream > Secondary stream”
option. All channel can be selected the stream respectively.
In main stream the live video will be displayed in CIF. In Secondary stream the live video will
be displayed in QCIF (1/4 CIF).
(2)To view all channel live video of the connected DVR, right-click on the connected DVR,
then click “live” option, all channel live video will be display in the screen layout. To close all
live video, right-click on the connected DVR, then click “stop” option.
(3) To view one channel live video of the connected DVR, unfold the channel list from the
connected DVR on the DVR list, right-click on the selected channel of the connected DVR,
then click “live” option, the channel live video will be display in the screen layout. To close the
live video, right-click on the selected channel of the connected DVR, then click “stop” option.
Double-click on the selected channel will display the selected live also. A convenient operation
is drag the selected channel and then drop to the view screen.
Tips: it is convenient to use right-click on the live screen to operate live video.
Figure 3.1.2.3
3.1.3 Remote client OSD
Figure 3.1.3
① Time – displays the current date and time of the DVR Server the Remote Client is connected
to.
② Channel name– Indicates camera label/channel name. To modify, please go to remote
configuration.
3.1.4. Screen Layout and Full Screen
Click sub option “Screen Layout” under “view(V)” item on the menu bar, the View Screens in
Split Mode will popup.
View Screens in Split Mode:
Switch from 1, 4, 9, 16, 36, 64, etc channel views. Simply click on your selected layout to
change the layout.
Full Screen Mode:
To display in full screen, click the Full Screen button or right-click on the screen then select
“Full Screen” option. To exit full screen mode, click the Full Screen button again or
right-click on the screen then unselect “Full Screen” option.
Double click on the screen can switch to single screen, full screen in turn.
Figure 3.1.4
3.1.5. Screen Capture
1. To capture an image of the display screen, select a live video screen you want to capture
then click on the Snap button on the live video tools bar. The image will be saved in the path of
Local Folder.
Figure 3.1.5
3.1.6. Live video recording
To manually start recording live stream, click on the REC button as shown in Figure 3.1.5. The
label on the left-top of the screen indicates recording. Click on REC button again to stop
recording. The recording video will be saved in the path of video Local Folder.
Figure 3.1.6
3.1.7. Live audio
To activate the audio channel, click on the Audio button as shown in Figure 3.1.5. Only one
audio channel can be on at any particular time. Only the audio channels of the video currently
being displayed are available. Click on Audio button again to deactivate the audio channel.
Figure 3.1.7
3.1.8. Tow way talk communication with remote DVR
The client software supports tow way real-time talk communication with the connected remote
DVR. To talk with the remote DVR simply click on the Mic button as shown in Figure 3.1.5.
Click on Mic button again to stop talk with remote DVR.
Figure 3.1.8
3.2. Image control and PTZ Function
Select/unselect “View(V) > PTZ” to show/hide the PTZ Control panel in the left of the
windows. Click on
to lock PTZ Control and image control panel. Click on
unlock PTZ Control and image control panel.
to
Figure 3.2
3.2.1. Image Control
To show image control panel, first select a screen you want to adjust, and then click on
. To
hide image control panel, first select a screen you want to adjust, and then click on . Via
Image Control, you can change brightness, saturation, hue, and sharpness settings of the
cameras currently displayed.
(1) Simply click on + or – to increase or decrease the selected image control option on the cameras
currently displayed.
(2) Click the Default button to return settings to the factory default settings for all cameras.
3.2.2. PTZ Function
To use PTZ Function, ensure that your camera is a PTZ (Pan/Tilt/Zoom) camera.
Figure 3.2.1
1. Pan/Tilt buttons – Pans/Tilts camera
2. Auto Pan – Executes a pre-programmed sequence of PTZ commands
3. Focus Control – Adjusts focus
4. Zoom Control – Zooms In/Zooms Out
5. Iris Control – Adjusts amount of light entering the camera
6. Pan/Tilt Speed – Adjusts pan/tilt speed
7. Panel lock/unlock –lock/unlock PTZ control panel and image control panel
8. Set preset – set current position to preset
9. Preset ID selector – select a preset ID
10. Get preset – get preset position
11. show/hide image control –show/hide image control panel
3.3. Device management
In order to use the Remote Client to access DVR servers, you will first have to setup the
connection settings of the DVR servers that you want to connect to. This can be done by
clicking on “System(S) > Device Management” once logged in to the Remote Client
application.
From the DVR Management, you can create, modify, remove and search a group or a DVR
device.
Figure 3.3
3.3.1. Group Management
3.3.1.1. Create a group
To create a DVR connection, you must create a group first.
(1) Click “System(S) > Device Management” to open DVR Management windows.
(2) Right-click on Group Management column on the left of the windows, then select “Add”
option.
(3) Enter group name. To auto connect to the group when login into the client software, select
“Auto Connection” option.
(4) Click on Add button.
Figure 3.3.1.1
3.3.1.2. Modify a group
(1) To modify the group, right-click on the selected group name and then select “update”
option.
(2) Modify the configuration, and then click on Update button.
Figure 3.3.1.2
3.3.1.3. Remove a group
(1) Right-click on the selected group under “Group Management” column on the left of the
windows, then select “Remove” option to remove an existed group.
Note: to remove an existed group, you must remove all DVR connection under this group first.
3.3.1.4. Search a group by name
(1) enter the group name.
(2) click on Search button.
(3) click on All button to list all group.
Figure 3.3.1.4
3.3.2. Create/modify a DVR connection
3.3.2.1. Create a DVR connection
After create a group, you can create a DVR connection.
(1) Click “System(S) > Device Management” to open DVR Management windows.
(2) Right-click on DVR Management column on the right of the windows, then select “Add”
option to open DVR add windows.
Group – select an exist group for the DVR location.
Name – name the DVR.
IP/Domain – input the IP/Domain of the DVR.
Stream – select a video stream for the connection.
Main stream -the live video will be displayed in CIF.
Secondary stream -the live video will be displayed in QCIF (1/4 CIF)
Port – input control port number of the DVR.
Pwd – input the password for this connection.
Auto Connection - To auto connect to the DVR when login into the client software.
(3) Click on Add button.
Figure 3.3.2.1
3.3.2.2. Modify a DVR connection
(1) To modify the DVR connection, right-click on the selected DVR name and then select
“update” option.
(2) Modify the configuration, then click on Update button.
Figure 3.3.2.2
3.3.2.3. remove a DVR connection
(1) Right-click on the selected DVR connection under “DVR Management” column on the
right of the windows, then select “Remove” option to remove an existed DVR connection.
3.3.2.4. Search a DVR connection by name
(1) enter the DVR connection name.
(2) click on Search button.
(3) click on All button to list all DVR connection.
Figure 3.3.2.4
3.4. Users management
Click on “System(S) > User Management” to open “Account Management” windows.
3.4.1. Current account password changing
(1) Under “Account Management” windows, click on the “Current Account” tab.
(2) Enter Original password and new Password. Confirm your new password.
(3) Click on Change PWD button.
Under the “Current Account” tab, you can view the detail information of current account
include the account access level and the access detail.
Figure 3.4.1
3.4.2. User access management
3.4.2.1. create a new user access level
You must create a access level before create a new account.
(1) Under “Account Management” windows, click on the “User Access” tab.
(2) Right-click on “Access Level” column on the right of the windows, then select “Add”
option to create a new access level.
(3) rename the new access level.
(4) click on Add(A)/Del(D) button to edit the access rights for the selected Access level.
Figure 3.4.2.1
3.4.2.2. remove an access level
(1) Under “Account Management” windows, click on the “User Access” tab.
(2) Right-click on the selected group under “Access Level” column on the right of the windows,
then select “Remove” option to remove an existed user access level.
3.4.3. User account management
3.4.3.1. create a new account
Before create a new account you must confirm at least one access level existed.
(1) Under “Account Management” windows, click on the “Accounts List” tab.
(2) Right-click on “Accounts List” tab , then select “Add” option to open account add windows.
(3) Enter account name, real name, remark, and password. Confirm your password. Select an
access level, date of birth and sex.
(4) Click on Add button.
Figure 3.4.3..1
3.4.3.2. modify an exist account
(1) Under “Account Management” windows, click on the “Accounts List” tab.
(2) Right-click on a selected account under “Accounts List” tab , then select “Update” option to
open account modification windows.
(3) Modify account information.
(4) Click on update button.
Figure 3.4.3.2
3.4.3.3. remove an account
(1) Under “Account Management” windows, click on the “User Access” tab.
(2) Right-click on the selected account under “Access Level” tab, then select “Remove” option
to remove an existed account.
3.5. Remote server management
Remote server management include 3 section:
(1) remote video search, playback and backup
(2) remote server logs view and export
(3) remote server configure
3.5.1. remote Search, playback and backup
Click on “Remote(M) > Remote video” to open “DVR Video Management” windows.
(1) select a DVR/channel from DVR List.
(2) to search recordings by time, select the date from calendar then input the start time and stop
time, click on search button to list the results.
(3) to search recordings by card number, input the card ID then click on search button to list the
results.
(4) select or multi-select the recording(s) from the search results list, click on play button to
playback the recording video.
(5) select or multi-select the recording(s) from the search results list, click on Backup button to
backup the recording to local folder.
Figure 3.5.1.1 search results by time
Figure 3.5.1.2 backup the selected recording clip
Figure 3.5.1.3 backup processing
3.5.2. remote server’s logs management
Click on “Remote(M) > Remote Log” to open “Log Management” windows.
Figure 3.5.2.1
(1) DVR list – display remote server list.
(2) event filter - Displays drop list menu for type of event.
(3) operator filter - Displays drop list menu for operator.
(4) logs list - displays logs.
(5) logs viewer display - set the logs number display in one page.
(6) previous page – go to previous page.
(7) next page – go to the next page.
(8) export – export the logs to local folder and save the logs as .csv files.
Figure 3.5.2.2
3.5.3. remote server configuration
Click on “Remote(M) > Remote Configuration” to open “Remote Configuration” windows. Click
on Configuration button to open remote server configuration windows. To configure the remote
server under remote server configuration please refer to the user’s manual of DVR, which is packed
in the box with the device.
Figure 3.5.3
3.6. customize the interface of the client program
To customize the interface of the client program, select/unselect the options under View(V)
menu.
(1) PTZ- display/hide PTZ control panel and image control panel.
(2) DVR List – display/hide DVR list panel.
(3) live tools bar – display/hide live tools bar.
(4) shortcut bar – display/hide shortcut bar.
(5) screen layout – display/hide screen layout.
Figure 3.6.1
Figure 3.6.1
3.7. add-on tools
This client software provide some useful add-on tools for you, such as video player, shortcut for
the local folder, shortcut manage tool.
Figure 3.7
3.7.1. video player
Click on “Tool(T) > player” to open the video player.
Figure 3.7.1
(1) playback screen – display the playback video.
(2) open – open the local video files or remote server video files.
(3) stop – stop playback.
(4) SF – slow forward, support video playback in 1/2,1/4,1/8 and normal speed.
(5) Play/Pause – Plays / Pauses playback of the video.
(6) FF – fast forward, support video playback in 2,4,8,32 and normal speed.
(7) repeat – playback the video clip in cyclic mode.
(8) Next Frame – Moves playback to the next frame and then pauses the playback.
(9) record – recording the playing back screen in local folder.
(10) screen capture - To capture an image of the display screen and save in local folder.
(11) audio – activate/ deactivate the audio in playback.
(12) full screen – switch the playback screen to full screen mode.
(13) Playback processing bar – indicates the percentage of the playing back recording of the
remote server. Click on the slide button to move the local files playback processing.
3.7.2. shortcut for Local Folder
Click on “Tool(T) > Local Folder” to directly enter to the local storage folder.
3.7.3. customize shortcut bar
Click on “Tool(T) > Customize > Customize shortcut” to open “customize toolbar” windows.
Under “customize toolbar” windows you can add/delete a tools shortcut and arrange the
shortcuts.
Figure 3.7.3
3.8. languages support
The client software support three languages by now include English, Simplified Chinese and
Traditional Chinese. To switch language click on “Help(H) > Language” then select a language
option you want.
Note: to make the configuration effect after change the language, you must restart the program.
Access to remote DVR from IE
USER’S MANUAL
CONTENT
USER’S MANUAL .......................................................................................................................... 2
Preface....................................................................................................................................... 2
1. Introduction ........................................................................................................................... 2
2. System requirement and executing environment ................................................................. 2
2.1. Supported operating System: ..................................................................................... 2
2.2. Hardware requirement (recommend): ........................................................................ 2
2.3. Web bandwidth requirement: ..................................................................................... 2
3. IE configuration .................................................................................................................... 2
4. Login to the remote DVR server through IE browser ........................................................... 3
5. Live view and control of the remote server........................................................................... 4
5.1. remote live viewing .................................................................................................... 4
5.2. P.T.Z. control function ................................................................................................ 5
5.3 image control function ................................................................................................ 5
5.4. Remote client OSD .................................................................................................... 5
6. Search, playback and backup remote recordings .................................................................. 6
7. Logs viewing an exporting from the remote server .............................................................. 7
8. Status indicator of remote server........................................................................................... 7
9. Remote server configuration ................................................................................................. 8
Access to remote DVR from IE
USER’S MANUAL
Preface
You can access to remote DVR with remote surveillance without a client software installed. Our
DVR supports IE control. The main function of IE control is to view the remote live, playback and
backup remote recordings, view and export remote server’s logs, etc.
This manual will help you to familiarize with the IE controller and master its operation methods.
Notice:
A. As product update, the contents of this manual are subject to change without notice.
B. Some part functions and symbols may not be completely same with what you get due to
the continuous revision of this software.
1. Introduction
To use IE controller you have to use IE connect to DVR to download and install the ActiceX
controls for remote controlling the DVR. The IE controller designed for embedded digital video
recorder to realize remote surveillance management. In the video surveillance system, the
administrator can control PTZ, etc through configuring parameters, viewing the live site to achieve
the purpose of live site surveillance, video record and record file backup and so on. It possesses
three main functions: preview the live site, system configuration and video search. DVR supports
multi-users logging in and operating the network client synchronously.
2. System requirement and executing environment
2.1. Supported operating System:
Windows 2000/2003/XP(Need Microsoft .NET Framework 2.0 or later version installed);
Windows vista;
2.2. Hardware requirement (recommend):
CPU: Intel Core 2 Duo 2.4 or above.
Memory: 2GB or above.
Graphics card: independent 128M graphics card or above.
Network card: 10/100/1000M.
2.3. Web bandwidth requirement:
To obtain smoother A/V playing effect, the minimum web bandwidth requirement is:
Main stream connection needs 333 Kbps/channel;
Secondary stream connection needs 44 Kbps/channel.
3. IE configuration
You have to configure the safety certificate of your IE browser before connect to the remote
DVR.
Operation steps:
(1) Double-click the IE browser icon to open the IE browser.
(2) Select “tools > Internet Options” in the menu bar to pop up “internet options” window.
(3) Click “security” tab, then click “custom level…” in “security level for this zone” to open
“security settings” window.
(4) Enable the options which relate with ActiveX controls under the “security settings”
window.
(5) Click “ok” button.
Figure 3
4. Login to the remote DVR server through IE browser
(1) Input IP/domain of the DVR in IE textbox, then press “enter” button.
(2) Install ActiveX controls automatically.
(3) After the ActiveX controls installed the login window will be display in the IE browser.
(4) Input the user name, password and control port then click on the “OK” button to access to
remote DVR.
Figure 4
5. Live view and control of the remote server
Figure 5
5.1. remote live viewing
(1) View - Remote view tab.
(2) Camera list – camera list of the remote server.
(3) Screen – live view screen.
(4) Screen layout - Switch from 1, 4, 9, 16, 36, 64, etc channel views. Simply click on your
selected layout to change the layout.
(5) Live start/stop – start/stop live view of the remote camera.
(6) Screen capture - To capture an image of the display screen, the image will be saved in the
path of local folder.
(7) Live video recording - To manually start recording live stream, the recording video will be
saved in the path of video local folder.
(8) Talk – to activate/deactivate tow way real-time talk communication with the connected
remote DVR.
5.2. P.T.Z. control function
(9) Pan/Tilt buttons – Pans/Tilts camera
(10) Auto Pan – Executes a pre-programmed sequence of PTZ commands
(11) Assistant1 – assistant function for the PTZ control.
(12) Pan/Tilt Speed – Adjusts pan/tilt speed.
(13) Assistant2 – another assistant function for the PTZ control.
(14) Preset – set current position to preset
(15) Preset ID selector – select a preset ID
(16) Get preset – get preset position
(17) Focus Control – Adjusts focus
(18) Zoom Control – Zooms In/Zooms Out
(19) Iris Control – Adjusts amount of light entering the camera
Note: some DVR model without P.T.Z. control panel.
5.3.
5.3 image control function
(20) ~ (23) Via Image Control, you can change brightness, saturation, hue, and sharpness settings of
the cameras currently displayed. Simply click on + or – to increase or decrease the selected image
control option on the cameras currently displayed.
(24) Click the Default button to return settings to the factory default settings for all cameras.
Tips: right-click on the live screen to access shortcut operations as shown as following figure.
Figure 5.3
5.4. Remote client OSD
(25) Time – displays the current date and time of the DVR Server the Remote Client is
connected to.
(26) Channel name– Indicates camera label/channel name. To modify, please go to remote
configuration.
6. Search, playback and backup remote recordings
Figure 6
(1) Playback tab – switch to remote search, playback and backup tab.
(2) Camera list – camera list of the remote server.
(3) Playback screen – display the remote server recordings.
(4) Playback processing bar – indicates the percentage of the playing back recording of the
remote server. Click on the slide button to move the playback processing.
(5) Play/pause - start/pause playback remote recording.
(6) Stop - stop playback.
(7) SF – slow forward, decrease the playback speed. Support video playback in 32,8,4,2,
normal,1/2,1/4 and 1/8 speed switch in turn.
(8) FF - slow forward, increase the playback speed. Support video playback in 1/8, 1/4, 1/2,
normal, 2, 4, 8 and 32 speed up switch in turn.
(9) Next Frame – Moves playback to the next frame and then pauses the playback.
(10) Screen capture - To capture an image of the display screen and save in local folder.
(11) Record – recording the playing back screen in local folder.
(12) Event type filter – filter the search results by event type.
(13) Time filter – filter the search results by time.
(14) Card ID filter - filter the search results by ATM card number.
(15) Search – to start search the recordings in remote server.
(16) Results list – list the search results.
(17) Local storage path – display the local storage path where the backup recordings saved.
(18) Local storage path setup – change the local storage path where the backup recordings
saved.
(19) Backup – backup the selected item(s) under the results list to the local folder.
(20) Time - displays the recording date and time.
7. Logs viewing an exporting from the remote server
Figure 7
(1) log – switch to remote logs management tab.
(2) logs list – list the results logs from the remote server.
(3) logs type filter - filter the search results by logs type.
(4) time filter - filter the search results by logs time.
(5) Search – to start search the logs in remote server.
(6) export – export the logs as excel files (.xls) to the local folder.
8. Status indicator of remote server
Figure 8
(1) DVR state - switch to remote server status indicator tab.
(2) Status indicator – display the status of the remote server.
Remote DVR status indicator:
Alert – indicates remote DVR alert active/inactive
Mute – indicates the mute on/off
Schedule – indicates remote DVR schedule active/inactive.
VGA – indicates remote DVR VGA output enable/disable.
Buzzer – indicates remote DVR buzzer on/off.
Update – indicates the remote server updating.
Panel Lock – indicates remote DVR panel lock enable/disable.
Cruise – indicates remote DVR P.T.Z automatic cruise on/off.
Prerecord Buffer – indicates remote DVR enable/disable prerecording buffer.
Menu – indicates remote DVR menu operating.
Menu saving – indicates the remote server saving the menu changing.
9. Remote server configuration
Figure 9
(1) Remote configuration - open the remote server configuration window.
(2) Remote DVR configuration – remote server configuration widow. To configure the remote
server under remote DVR configuration please refer to the user’s manual of DVR, which is
packed in the box with the device.