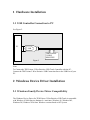
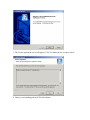
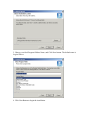
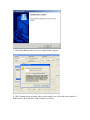
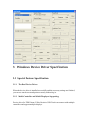
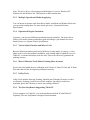
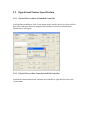
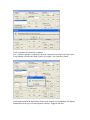
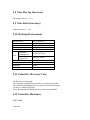
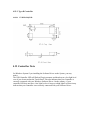
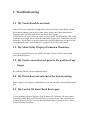
1
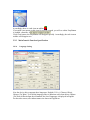
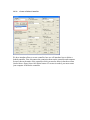
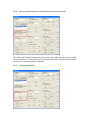
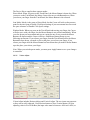
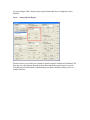
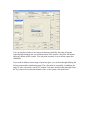
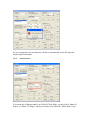
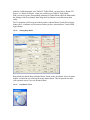
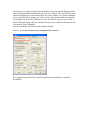
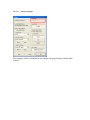
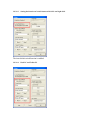
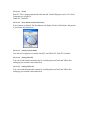
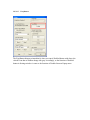
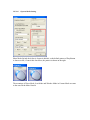
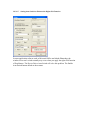
TEKVISIONS 5-WIRE USB RESISTIVE
General Driver for Windows
User’s Manual
Version 0.7
Hardware & Software Installation
Troubleshooting & Specification
1 Hardware Installation
1.1 USB Controller Connection to PC
See Figure 2.
PC
USB
TEKVISIONS
5-WIRE
RESISTIVE
Figure 2
Note:
To Connect the TEKVisions 5-Wire Resistive USB Touch Controller with the PC,
Connect the TEKVisions 5-Wire Resistive USB Connection line to the USB Port of your
PC.
2 Windows Device Driver Installation
2.1 Windows Family Device Driver Compatibility
The Windows Device Driver for TEKVisions 5-Wire Resistive USB Touch is compatible
with Windows 95 OEM Service Release 2.1 and later, Windows 98, Windows Me,
Windows 2K, Windows XP & later Windows versions based on NT System.
2.2 Windows Family Device Driver Installation
Note: The pictures in the following Installation specification are all captured on
Windows 2000 and Windows XP. These pictures may look different on different
operating system.
1. When installing from the Driver CD click the install button that matches your
operation system. If you are installing the driver from the TEKVisions web site.
Select the correct driver for the operating system you are using, unzip the file and
double click or open the SetupFull.exe program.
2. This is the installation Welcome window, when prompted Click the Next button.
3. The License agreement screen will appear, Click Yes button if you are agree with it.
4. Choose your installing path and Click Next button.
5. Choose your ideal Program Folders Name, and Click Next button. The default name is
Logical Driver.
6. Click Next Button to begin the installation.
7. Click Finish Button, then the screen as figured below appears.
8. Click Continue Anyway button, after several seconds, you will see the main console of
TEKVisions 5-Wire Resistive USB Touch Device Driver.
3 Windows Device Driver Specification
3.1 Special Feature Specification
3.1.1
The Real Device Driver
When the device driver is installed successfully and the necessary settings are finished,
you can use touch screen and point accurately without log in.
3.1.2
Multi-Controller and Multi-Displayer Supporting
Device driver for TEKVisions 5-Wire Resistive USB Touch can connect with multiple
controllers and support multiple displays.
Note: The device driver will not support multi-displayer if you use Windows NT,
Windows 98 and Windows Me. This function is under construction.
3.1.3
Multiple Operational Modes Supplying
You can choose an operate mode from Direct Mode, Icon Mode and Window Mode and
you can switch among them. For more details, please see ‘Operational Feature
Specification’.
3.1.4
Operational Region Customize
In practice, you may need different operational regions sometimes. The device driver
allows you to make custom operational regions according to your demand. For more
details, please see ‘Operate Feature Specification’.
3.1.5
Vision Adjust, Rotation and Mirror Tools
Because different orientation may lead to different viewing angles, we supply a ‘vision
adjust’ tool to solve this problem. In addition, some settings must be adjusted if you use
Tablet PC, so rotation and mirror tools are used. These tools effectively guarantee the
pointing accuracy.
3.1.6
More Calibration Tools Makes Pointing More Accurate
Device driver has added the new calibration tools 9 Point, 16 Point, 25 Point and 25 Point
Plus other than 4 Point for improving calibration accuracy.
3.1.7
Utility Tools
Utility Tools includes Drawing, Pointing, Speeding and Vibrating. Drawing is used to
test linearity, Pointing is used to test real time response, Speeding is used to test
maximum speed, and Vibrating is used to test pointing vibration.
3.1.8 The New EasyButton Supporting Tablet PC
If your computer is a Tablet PC, you need switch between Desk PC and Tablet PC
frequently. The new EasyButton is designed for this demand.
3.2 Operational Feature Specification
3.2.1
Device Driver with an ill Installed Controller
After finishing installation, click Create button on the console, the device driver will not
start if the connection between computer and controller is incorrect. Information as
figured below will appear.
3.2.2
Device Driver with a Correctly Installed Controller
Confirm the connection between computer and controller is right and firm, then click
Create button.
Click yes button, the controller is enabled.
Now, if all the controllers connected with your computer have been found, click on the
Create Button will make the Main Console will report: ‘No Controllers found’.
Click Open button in the EasyButton Tools on the console, the EasyButton will display
immediately on the top of all non-topmost windows. It appears like this:
Accordingly, there is a task icon on taskbar.
If you make your mouse on this icon for several seconds, you will see a hint: EasyButton
is enabled, controller: 0.
Click Close button, the EasyButton will disappear quickly. Accordingly, the task icon on
taskbar will disappear too.
3.2.3
3.2.3.1
MainConsole Function Specification
Language Setting
Now the device driver supports three languages: English (U.S.A.), Chinese (China),
Chinese (Tai Wan). To avoid the language name is unknown code when choose Chinese
(Tai Wan), different from the old manual, the list of languages is displayed in English.
For the same reason, all windows names are shown in English too.
3.2.3.2
Create or Delete Controller
We have introduced how to create controller, here we will introduce how to delete a
loaded controller. First, disconnect the connection between the controller and computer.
Second, choose the name of the controller which you need to delete in hardware items
(look at above figure), then click Delete button. If a restart is needed, you must restart
your computer to delete the controller.
3.2.3.3
How to get the Information about the currently selected controller
The content of Controller Information tells user the status information about the currently
chosen controller. You can get the type of information about the controller and the touch
screen that is connecting with the controller.
3.2.3.4
About Operate Mode
The Device Driver supplies three operate modes.
Direct Mode: When you press on the Touch Panel, the Mouse Button is down also. When
you move on the Touch Panel, the Mouse Cursor also moves with Button down. When
you release your finger from the Touch Panel, the Mouse Button is also released.
Icon Mode: Mostly is the same as Direct Mode, but the Cursor will stick on the pressure
point for the time span of Double Click Speed settings if your movements has not exceed
the space tolerance of Double Click Space settings.
Window Mode: When you press on the Touch Panel and moving your finger, the Cursor
will also move with your finger, but the Mouse Button is not pressed immediately. When
you slow down your movements and stop at a point for one or two seconds the Mouse
Button will depress and the Cursor will move with Mouse Button Down at your
following movements. If you release your finger from the Touch Panel before the Mouse
Button has been down, you make a click at the place you release your finger; if you
release your finger after the Mouse Button has been down then you make a Mouse Button
up at the place your release your finger.
Note: When you switch operate mode, you must press Apply button to save your changes
in controller.
3.2.3.5
Vision Adjust
Vision Adjust includes Horizon Adjust and Vertical Adjust. The two items can cooperate
or they can be solely adjusted. Press Horizon button or Press Vertical button, fill your
adjusting value in Level Edit Box (the input value must be between -4096 and +4096, or
it is out of range). Don’t forget to press Apply button after above settings have been
finished
3.2.3.6
Setting Operate Region
The device driver can let the user customize operate region according to his demand. The
first step is to click Operate Region list box, then choose the operate region you need.
The Interactive Define button is enabled when you choose Desktop Custom, press it, a
window like this:
You can drag this window to any region on desktop and define the range of operate
region through changing the size and the position of the window, then click OK button
and Apply button on the console. You can point accurately in your define region after
calibration.
If you want to define accurate range of operate region, you can do it through defining the
left-top point and the right-bottom point. The value must be reasonable, in addition, the
range of value is between 0 and 65535, and the Left value must less than the Right value,
the Top value must less than the Bottom value, or the system will report Errors
So, we recommend you to use Interactive Define to automatically set the left-top point
and the right-bottom point.
3.2.3.7
About Rotation
If you make the Calibration under your Tablet PC Desk Mode, you need select ’Rotate 90
Degree’ or ‘Rotate 270 Degree’ when you switch to your Tablet PC Tablet Mode. If you
make the Calibration under your Tablet PC Tablet Mode, you need select ‘Rotate 270
Degree’ or ’Rotate 90 Degree’ when you switch to your Table PC Desk Mode.
Hint: you can set up the corresponding rotations for Tablet Mode and Desk Mode under
the Settings of the Easy Button, then using the Easy Button to switch between them
easily.
The X-coordinate will be mirrored when you have chosen Mirror X and clicked Apply
button, the Y-coordinate will be mirrored when you have chosen Mirror Y and clicked
Apply button.
3.2.3.8
Setting Beep Mode
Beep Mode has added ‘Beep at Button Down’ based on the old edition. Just as its name
implies, its function is to sound at the mouse button down. This beep mode can make
your operation easier if you use Window Mode.
3.2.3.9
EasyButton Tools
The EasyButton appears if you click Open button. Its default pattern as figured above, its
size changes along with the size of operate region you define. If you don’t want it, click
Close button. The EasyButton will automatically display at startup if you have chosen
Auto Load at Startup.
The device driver supports multi-controllers and multi-displayers; each controller has a
corresponding EasyButton, and each EasyButton has a corresponding task icon on the
Status Bar, the hint will show which controller this EasyButton belongs.
You will see the EasyButton disappear immediately if you use right-click of the
EasyButton to click the icon and cancel Enabled on the Popup Menu. Accordingly, the
icon changes into gray. The EasyButton will restore the default value of size and position
if you choose Reposition on the Popup Menu. If you choose Exit, the EasyButton and the
icon on the taskbar all disappear. A window displays when you selected Settings on the
Popup Menu.
We have introduced the device driver supports multi-controllers and multi-displayers,
each controller have an EasyButton. And each has a corresponding icon on the Status
Bar. If there are several EasyButtons at the same time, how to know the corresponding
relation-ship between these EasyButtons and controllers? The answer is checking the
Right Button calling function of the EasyButton, only the right Controller can satisfy the
Right Button request. This brings us two new questions: A. How to set the corresponding
relation-ship between Controllers and Displayers? B. How to know the corresponding
relation-ship between Controllers and the items in hardware list on the Main Console?
The answer to A is that you should choose Desktop Custom in Operate Region to make
Interactive Define button enabled, then you will see a window after you click the button,
choose the Monitor you want in Monitor list box in the window, use 4 Point Calibration
when you finished these settings, you will see only on the monitor which correspond to
the controller can do 4 Point Calibration. It is so easy that all you have to do is click 4
Point Calibration button, only the controller which you have chosen in the hardware list
box can do 4 Point Calibration.
Next let’s introduce the function of the Settings Window.
3.2.3.9.1
Show the relation between EasyButton and Controller
The rectangle region shows the controller name that corresponding to current the
EasyButton.
3.2.3.9.2
Setting Language
The Language list box is disabled for get a unique Language Settings with the Main
Console.
3.2.3.9.3
Setting the function of switch between left-click and right-click
The item default switch function is enabled.
3.2.3.9.4
Desk PC and Tablet PC
3.2.3.9.4.1
Terms
Desk PC: The Computer that has the Horizon and Vertical Displayer ratio of 4:3. Most
Computers are a Desk PC.
Tablet PC: Tablet PC.
3.2.3.9.4.2
Show Mode Switch (Check box)
It isn’t chosen on default. The EasyButton will display Desk or Tablet below the pattern
if you choose this check box.
3.2.3.9.4.3
Setting Current Mode
Now the driver supports two modes: Desk PC and Tablet PC. Desk PC is default.
3.2.3.9.4.4
Setting Desk PC
You can switch rotation automatically by switching between Desk and Tablet after
setting up your rotation value and mirror.
3.2.3.9.4.5
Setting Tablet PC
You can switch automatically rotation by switching between Desk and Tablet after
setting up your rotation value and mirror.
3.2.3.9.5
EasyButton
The EasyButton disappear immediately when you cancel Enabled button with down, the
colorful icon that on taskbar change into gray accordingly, so the function of Enabled
button in Settings window is same to the function of Enabled item on Popup menu
3.2.3.9.6
Operate Mode Setting
Show Mode Switch check box is chosen in default, so the default pattern of EasyButton
is shown on left, if cancel this check box, the pattern is shown on the right.
The meanings of Direct Mode, Icon Mode and Window Mode in Current Mode are same
to the ones on the Main Console
3.2.3.9.7
Setting Auto Switch to Enhance the Right-click Function
In some application software such as Microsoft Office and Adobe Photoshop, the
window focus can’t switch normally may occur when you apply the right-click function
of EasyButton. The Device Driver Auto Switch will solve this problem. The Enable
Auto Switch button default at down status.
3.2.3.9.8
Get Help
Please click Help button if you have difficult in using Device Driver.
3.2.3.10 Calibration Tools
3.2.3.10.1 Fast Calculate Mode
You need select it if your CPU is poor. This function can reduce the CPU resource
spending. You must click Apply button to make it effective
3.2.3.10.2
4 Point Calibration
This gray interface is drawn with two horizon faint gray lines and two vertical faint gray
lines, they make four intersections by vertically cross, the four intersections are
Calibration Point.
The new driver has added a yellow arrow to direct Calibration Point.
We don’t repeat about how to do calibration here, if you want to know, please see
Software Driver Specification.
Press ESC to cancel 4 Point Calibration. It’s same to the following Calibration tools.
3.2.3.10.3
16 Point Calibration
Similar to the 4 Point Calibration, the interface of 16 Point Calibration is drawn with four
horizon and four vertical faint gray lines, they make sixteen intersections by vertically
cross, and the sixteen intersections are Calibration Point
It’s clear that the calibration accuracy of 16 Point Calibration higher than the one of 4
Point Calibration.
3.2.3.10.4
9 Point Calibration
Its calibration accuracy is between 4 Point Calibration and 16 Point Calibration.
3.2.3.10.5
25 Point Calibration
We strongly recommend you using 25 Point Calibration if your Touch Screen type is 5
Wire.
3.2.3.10.6 25 Point Calibration Plus
The interface of 25 Point Calibration Plus is same to 25 Point Calibration. A little
difference lies in the former has more four calibration points than the later. In other
words, 25 Point Calibration Plus is integrated by 4 Point Calibration and 25 Point
Calibration.
3.2.3.11 Utility Tools
3.2.3.11.1 Drawing Test
If you want redraw the screen you can press the Enter Key on your keyboard.
If you want exit or cancel the drawing test, you may press ESC key on your keyboard or
double-click on your touch panel. It’s same to the following utility tools.
3.2.3.11.2 Pointing Test
You will see a blank interface when you click Pointing Test button, a red mark as below
figure appears if you press your finger on your touch panel, it can move with your finger
movement. If its performance moving with your finger movement is good, it means the
performance of the controller response to your pointing is good.
3.2.3.11.3 Speeding Test
This tool is used to test the maximum speed of drawing line. The value means the
average speed. The value has a relationship with your computer and the size of your
touch panel. The testing results are valid only you do the test and contrast results on the
same conditions such as using the same type of touch screen or controller.
3.2.3.11.4 Vibrating Test
We have introduced the Vibrating Test is used to test controller whether it’s vibrating
performance that response to your pointing are good or not. The testing results are valid
only you do the test on the same conditions such as using the same type of touch screen
or controller.
It is the Vibrating Test interface. You will see a blank screen when you click Vibrating
Test button, the red information appears only you press your finger on the touch panel.
You must remember the following rules when you do this test. 1. Your finger must be
vertically and stably when you press on the touch panel. 2. Once your finger lies at a
point, your pressure on the touch panel must be firm. 3. Release your finger from the
touch panel in a same length time. Release direction is contrary to the pressure direction.
The information displays after each of your pressure. It is a relative vibrating value. The
larger the value is, the more acute the vibrating is. Accordingly, the smaller the value is,
the gentler the vibrating is. The value has a relationship with your computer and the size
of your touch panel. The testing results are valid only you do the test and contrast results
on the same conditions.
3.2.3.12 About
Click About button, then a screen will display to tell you some information about
TEKVisions 5-Wire Resistive USB Touch Device Driver. It disappears after 4 seconds.
3.2.3.13 Flash
Click Flash button if you want to reread the data in the controller.
3.2.3.14 Apply
You must click Apply button to save your changes in controller. But ‘Language’,
‘EasyButton Tools’, ‘Calibration (Fast calculate Mode is excluded), ‘Utility Tools’ take
effect without clicking Apply button. About button, Flash button, Default button are
amount to the same thing.
3.2.3.15 Default
Click the Default button then all settings will restore to default.
4 TEKVisions 5-Wire Resistive USB Touch
Electronic & Mechanic Specification
4.1 Touch Board Interface
5 Wire Resistive Type 2.8’~21’
4.2 Computer Communication Interface
USB V1.1 Low Speed
4.3 Power Supply
Voltage: +5V
Current: 50mA~100mA (depend on the different Glass Touch Panel Specifications)
4.4 Sampling Speed
Sampling Speed: 45~100 times per second.
4.5 Resolutions
4096*4096 pixels logical
4.6 Max Pressure time Delay
Delay: <0.02 seconds
4.7 Max Release time Delay
Delay: <0.02 seconds
4.8 Max Moving Inaccuracy
Moving Inaccuracy: <= 5%
4.9 Max Static Inaccuracy
Static Inaccuracy: <= 1%
4.10 Working Environment
Main Features
Linear
Transparency
Haze
Clarity
Minimum
Pointing Life
Life
Minimum
Lining Life
Resistance Range
Temperature
Humidity
Altitude
5-Wire-Resistive
<1.5%
77%~83%
H<6%
C>82%
35,000,000 Times
5,000,000 Times
100~1KΏ
-10~+60°C
0~90%
<4500m
4.11 Controller Discovery Time
On Normal or Fast System:
The Controller installing discovery time is less than 20 seconds.
The Controller uninstalling discovery time is less than 20 seconds.
On Slow or Unknown System:
The installing and uninstalling discovery time is not specified.
4.12 Controller Mechanics
4.12.1 Unit
Unit: mm
4.12.2 Type B Controller
4.12.2.1 ET-R5-RS232/USB
4.13 Controller Note
On Windows System if you installing the Software Driver on the System, you may
notice:
The USB Controller LED will flash at Plug-in moment, and then keep at a low light level
even if you do not touches the Touch Panel. This also indicates that your Controller is
correctly connected with your Windows Software Driver. On the contrary, if your
controller LED does not have a low light level or it keeps at a high light level then it may
indicate that your Controller is not correctly connected with your Software Driver.
5 Troubleshooting
5.1 My Touch Board do not work
If the LED on your Controller is bright when you pressed on the Touch Board, but the
driver that is running is not in active status, please check your Connection between
Computer and Controller, make it firm and restart the Computer.
If your Driver is in active status, but when you press on the Touch Board the LED on the
Controller is not bright, please check the connection between your Touch Board and your
Controller. If your Driver is in active status and your LED lights when you press on the
Touch Board, but the Cursor do not move, please do the 4 Point Adjust Again.
5.2 My Main Utility Displays Unknown Characters
If you are a Taiwan Character user, please select the Chinese (Taiwan) in the fourth
selection in the list box.
5.3 My Touch screen does not point to the position of my
finger
Re-Calibrate with the 4 Point Adjustment again.
5.4 My Driver does not auto run at the System startup
Please request your Computer Administrator log in and check the Load at OS Start Check
box.
5.5 My Load at OS Start Check Box is gray
If your operating system is Windows 2000, Windows NT, Windows XP or any future
Operating systems Base on NT Security Policy, you may see this. This is because your
accounts priority is too low; you may need an Administrator’s priority to have a active
Load at OS Start Check Box.
5.6 My Driver does not save My Settings
This also happens if you are running the Driver on a NT Security Based System; your
accounts priority is too low to write file objects. You may need an Administrator or a
Power User’s priority to save settings successfully.
5.7 My Driver frequently becomes active and inactive
Your connection between your Controller and your Computer may not be correct. Plug
the ports again and make sure they are firmly connected.
5.8 My Touch Screen does not draw lines smoothly
This happens if your Driver is set to Desktop Mode, change it to Drawing Mode and try
again. To change the Mode, you can open the Main Utility Window and Select Drawing
Mode, or Click the Desktop text on the Easy Button, and then the text Desktop will
became Drawing.
5.9 If above can not solve your problem
Please contact us: [email protected] or call technical support at (800) 827-0127.
6 Company Information
6.1 TEKVisions, Inc. (Web-Site: www.tekvisions.com)
6.2 TEKVisions, Inc.
43397 Business Park Drive, D-5
Temecula, CA 92590
Phone: 800-466-8005
Fax: 909-506-4035
3435 Breckinridge Blvd., Suite #120
Duluth, GA 30096-0127
Phone: 800-827-0127
Fax: 770-923-1762
16736 SW 72nd Ave.
Portland, OR 97224-7758
Phone: 888-682-4840
Fax: 503-620-9274