1
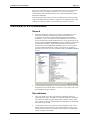
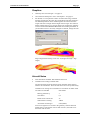
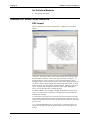
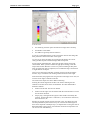
SoundPLAN Update News 6.4 Braunstein + Berndt GmbH / SoundPLAN LLC July 2006 Page i Contents Contents News in SoundPLAN 6.4 1 Highlights ................................................................................................................1 Installation ...............................................................................................................2 Overview to 6.4 innovations .....................................................................................3 General.......................................................................................................3 Geo-database ..............................................................................................3 Calculation core..........................................................................................6 SoundPLAN Spreadsheet ............................................................................8 Graphics .....................................................................................................9 Aircraft Noise .............................................................................................9 Air Pollution Modules...............................................................................10 Details for some new features .................................................................................10 DXF-import..............................................................................................10 Import and filtering of grid elevation data..................................................11 Geo tool creates embankments for roads....................................................14 File assignment to templates in the SoundPLAN Spreadsheet ....................15 Geo-referenced bitmaps in 3D-Graphics....................................................16 Save grid operations..................................................................................16 Animated noise map (3D Graphics Animation)..........................................17 Calculation standards implemented.........................................................................19 Updates News SoundPLAN 6.4 Page 1 Highlights News in SoundPLAN 6.4 Highlights Scroll wheel and hand tool available in the Geodatabase Display bridges in the Geo-database DXF-import with layer preview New import for laser-scan data Recalculate Grid Noise Maps Store grid operations Accelerate entering data in Spreadsheet templates New format command to renumber the receivers in the spreadsheet in sequential order Show geo-referenced bitmaps in the 3D-Graphics Updates News SoundPLAN 6.4 Page 2 Installation Installation SoundPLAN 6.4 can be installed parallel to SoundPLAN 6.3. The previous version does not have to be de-installed. The installation generates a new folder in „my documents,“ called „SoundPLAN 6.4.“ When installing SoundPLAN, please log on as the administrator. Start the installation by clicking on the INSTALL SOUNDPLAN 6.4 button. The installation program guides you through the installation. During the installation, the computer must find the installation file (BAB?xxxx.006), which may take a moment. When the license file is located, the path to it will be presented, but you can enter a different path at this time if you want. Before the installation is complete, please select the language of the user interface and the online help, and the country for templates and libraries. The language selection is performed in accordance to the language and country settings of Windows. The templates (pre-settings for the Geo-database and the standards, templates for the Result tables, Spreadsheet and Graphics) and the Libraries can be dependent on language and on the country selection. Important: If you are asked to restart the PC after the installation, please leave the CD in the CD-drive and log on with the same user name as for the installation (with administrator privileges). When opening SoundPLAN 6.4 for the first time, you will be asked if you want to copy the globdata from a previous version to the new location. If you have customized the global set-ups (object definitions, colors, libraries etc.), it makes sense to copy them to the new globdata. If not, it is better to start with a fresh set of templates and global definitions. It is also possible to copy individual files to the new SoundPLAN 6.4 globdata using the Windows explorer. As it is possible to install multiple sets of languages, libraries and templates, you must tell the program in the beginning, which language, help, libraries and templates to use. Once SoundPLAN has generated a user profile, these questions do not need to be answered again. Some of the data structures in 6.4 are different than in previous versions, so when you open a 6.3 project with SoundPLAN 6.4, the program asks if you want to convert the project to the new formats of 6.4. It is recommended to Updates News SoundPLAN 6.4 Page 3 Overview to 6.4 innovations keep a copy of the data in the 6.3 structure because once a project has been opened in 6.4, it can no longer be opened in 6.3 or an earlier version. Unfortunately, data structures tend to be only upwards compatible and not backwards compatible. Projects processed with earlier versions are marked in the project selection as gray SoundPLAN project folders. 6.4 projects are depicted in blue. After clicking on an earlier project, you are asked if you want to convert it. Overview to 6.4 innovations General Because SoundPLAN supports more and more standards, the list of calculation standards was becoming cluttered and needed to be reorganized. In the setup in the SoundPLAN Manager (OPTIONS -> SETTINGS), you can now deactivate the standards you do not want to have included in the normal standard selection. In the global part of the settings under ENABLED STANDARDS, select the standards you might use and deactivate all others. Deactivated standards are reactivated by marking them in the ENABLED STANDARDS section. For new projects, only the enabled standards are visible, but if others are needed in a particular project, the list can be extended under the CURRENT PROJECT section. In the SoundPLAN Manager you can now generate copies of the project through the menu selection FILE -> SAVE AS. You no longer need to do this through the project selection. Geo-database Area type objects can now be generated as rectangular objects by pulling open the object. This feature is especially useful for calculation areas which are often rectangles with a north orientation. If the object type requires elevation(s) and attributes these dialogues are started after the object was generated. Use the hand and the scroll-wheel in the Geo-database! Click on the hand to grab and move the data in the Geo-database. Press the scroll wheel to move the data in any mode. Zoom in and out using the mouse wheel (available in all modes). Updates News SoundPLAN 6.4 Page 4 Overview to 6.4 innovations The menus „Edit“ and „Geo-tools“ were reorganized. SELECT OBJECTS WITH ELEVATION, LENGTH AND AREA <= X are now under the „Edit“ menu. Road and railway bridges are now visualized in the Geo-database. Walls on bridges for roads and railways, as well as floating screens, can now be defined in their reflective properties, even with different properties for the inside and outside. You can also declare the wall elements on the bridge to be of a constant or a varying height (see wall height, chapter objects). For spectral assessment of the reflection loss for standards that calculate the noise in frequency bands rather than as a mean frequency, the absorption spectra from the library are used. Activate the selection list for which you want to assign an absorption spectrum and click on the library button. DXF-import was redesigned (see page 10). Tiling: For the Shape-file and ASCII import accessible in the Geodatabase situation manager under the menu topic TOOLS, you can now distribute the data to different files in a tiled environment. Select the geo-referenced bitmap in the tiling manager and select the area for which you want to import the data. Enter a text which will be used as the prefix in front of the coordinate area. The text and the coordinate range will be used for naming the geofiles. The text “building_“ will generate geo-files with the names building_X30Y25 building_X30Y26 building_X31Y26 building_X31Y26(1) .... For the sake of the file names, the kilometers are truncated. In case you plan to read and distribute data from multiple imported files for the same tiles using the same prefix, the new files will be amended with a successive number (1)..(n). The standard settings of the objects can not be set at this location. The screen for defining the settings cannot be started from outside the edit facilities of the Geo-database. Please define these standard settings with attribute functions at a later stage. Updates News SoundPLAN 6.4 A DGM calculated for the entire area in a non tiled fashion is now loaded by tiles to decrease loading time. Page 5 Overview to 6.4 innovations PREPARE BUILDINGS: For buildings with a height less than 2.8 meters, the building height was reset to zero in the section where the number of floors was calculated. Now the building reference plane is lowered. In the section „prepare buildings,“ the program no longer uses the 2.8 meters, but uses the floor height defined in the building properties. Import of DOS data. When importing DOS data, the building reference plane for buildings with receivers is re-assessed and the receivers are automatically referenced to the buildings. The import generates situations from existing calculation runs with the files in them (to be implemented very soon). The Geo-tool height/width (h/w) will soon be retrofit. The geo-tool h/w is now available to estimate the influence of multiple reflections in a street canyon for roads and railways. Blocks of buildings to the left and right are polled and the average portion of buildings and gaps is assessed as well as the average height of the buildings. Geo-tool for berms and cuttings (see page 10). Geo-tool for the location correction of the road master alignment. Road alignments are available from various sources and in various qualities. For example, it is common that road alignments are divided into sections with common traffic characteristics and cross-sections, but they lack the accuracy of the master alignment. The accuracy of the road alignments can be improved by combining the alignment with other geometrical data. The higher quality alignment data must be available as object type lines (or converted to lines). Mark the road and invoke GEOTOOLS -> ADAPT ROAD COURSE (ALIGNMENT). Enter the maximum displacement within which the road alignment is corrected and fit to the geometrical course of the lines. Road coordinates that are not moved because of spacing, are marked. Under HELP -> PROTOCOL both the moved and not moved coordinates are documented. The Geo-database, via the object-ID, now finds embedded objects with the function EDIT -> SEARCH OBJECT. This allows you to find errors more easily (i.e. errors of sources included in the object industrial buildings). If an error is posted in the calculation core, you can trace the object ID in the Geo-database all the way to the source. For the emission calculation in accordance to the NMPB (Lden), speed and traffic volume are now stored separately for each time slot. For the signal addition, the program now searches at loading time to the calculations for roads affected by the signal rather than taking the roads present in the Geo-database. This means the error messages in the calculation core that are dispatched when the connection between road and signal cannot be established are obsolete. Via FUNDAMENTALS -> DGM -> CREATE TEMPORARY DGM you can now generate a local DGM within an open situation. This DGM only consists of elevation lines, spot heights and elevation break lines. Neither the road edges nor the middle of buildings are used for this DGM. The DGM is not stored with the situation and is overwritten every time a new temporary DGM is generated or the Geo-tool „Create embankments from roads“ is used. If you want to use the DGM to place new objects on a triangulated surface, you can use the local DGM. This saves the detour of storing the data in the Geo-database, defining a DGM calculation run, running it and afterwards opening the DGM in the Geo-database. Updates News SoundPLAN 6.4 Page 6 Overview to 6.4 innovations QSI interface (DIN 45687). The QSI exchange format was developed to exchange model data between different noise modeling programs. The format is based on the ESRI Shapefile format. A Shapefile is generated for each object type. The database connected to the Shapefile contains all descriptive data and has been agreed upon by the manufacturers of the participating noise modeling software. For a complete definition of the interface, please read amendment #1 of the DIN 45687. With the QSI format, entire situations can be imported or exported. A QSI model file contains all object types and the file names of all Shapefiles containing the information. SoundPLAN supports import and export of these files. Aside from Industry Noise which will be amended soon, the format is completely implemented. Import and thinning of elevation data (i.e. for data from laser scanning) - see page11. Calculation core It is now possible to obtain good quality elevation information in digital format. Because of this, in undulating terrain it is recommended to start work on the acoustical modeling with a digital ground (terrain) model (DGM). In SoundPLAN 6.4 this is especially true because of the new filtering tools which reduce the amount of extra data and thus reduce calculation time. The filtering of digital grid based elevation data has been rewritten to deliver better quality faster. Additional objects are entered after the DGM is established, and they obtain the elevation information directly from the DGM. We recommend using the DGM for the propagation calculation. For Grid Noise Maps, the DGM used to be used to establish the elevation of the grid points and thus to determine the elevation of the receivers. In the past this could lead to the following problems: o A DGM was calculated for each noise, which greatly increased the number of extra files in the project. o Elevation spot heights were used in the DGM to establish the location of the receiver but had no influence on the propagation. This was often a source of errors. Only when the spot heights are run through the triangulation of the DGM and this data is handed over to the calculation core, did the spot heights have any relevance in the propagation calculation. Because of these insufficiencies, the user guidance in the run file has been changed. To date, the Grid Noise Map and City Noise Map created a new DGM for each calculation run if not explicitly told to "Use DGM" with a specific number. This prolonged the calculation time and increased the number of files in the project. Because of the extra files, the handling in the settings of the Grid Noise Map and City Noise Map was changed. With version 6.4 it is no longer necessary to select or request a DGM. If a DGM is included in the data, it will be used; otherwise a temporary DGM is generated for the calculation and discarded afterwards. Updates News SoundPLAN 6.4 Re-calculating Grid Noise Maps is supported again. Click on RE-CALCULATE GRID MAP and select the new calculation area for the recalculation. Enter the situation or the geo-file that contains your calculation area. Page 7 Overview to 6.4 innovations The results are re-calculated in a rectangle within the original calculation area. In the graphic above, the original calculation area is depicted with a thin yellow line. The calculation area for the recalculation is shown with a thin black line. In the lower section of the noise map you can see the re-calculation area contains grid points outside the original calculation area which will be ignored in the recalculation. The program now allows generating acoustically hard surfaces from the road surfaces. To do this, mark the box in the run properties under the tab settings. Problems with communications that prevented some users/PCs from participating in Distributed Computing (i.e. the Grid Noise Map was not finished in the calculations or some PCs did not respond in time to prevent a time-out) are now solved. For networks that have problems with the name-server, it is now possible to enter the IP- address directly instead of using the symbolic name. The calculation speed using DGM was greatly accelerated. Facade Noise Map: The options „Additional points 2 meters in front of the facade (EU Directive)“ and „points in a distance of …“ can now be used at the same time. Receivers 2 meters in front of the façade contain the reflection on the “own” facade. Modifications in the reflection calculation of the British road (CoRTN): A reflection from „opposite facades“ is only calculated when the distance between the source and the facade is less than 25,5 meters and the height of the reflecting object is at least 1,5 meters. Animated noise map - see page 17. New calculation standards are TNM for roads and industry and Russian road and railway, VBUSCH, VBUS. The VBUI can be modeled using the ISO 9613. The VBUF is modeled using the AzB - see page 9. RVS 4.02: The emission is now split into the time slots for the Lden (day, evening and night). ÖNorm S5011 was renamed into the ONR305011 City Noise Map: point, line and area sources now influence the generation of the receiver positions: o Around point sources, the program sets 4 receivers one meter from the point source o Along line sources, the program generates receivers left and right at a distance of 1.25 meters from the line source. o The points of an area source are used as receivers for area sources. Free field points lying on road bands or within area sources are not included in the list of receivers. Updates News SoundPLAN 6.4 Page 8 Overview to 6.4 innovations Terrain checking: Within the iterative distance checking, the program interpolates and uses the DGM to check the height of the middle between 2 receivers. If the interpolated and actual elevation varies by more than the set height of the map above the ground, the program includes the point in the list or receivers. This allows more thinning of receivers in the free field than before (bigger grid size factor in the free field). SoundPLAN Spreadsheet It is now possible to simultaneously insert data from multiple files into the spreadsheet - see page 15. New commands FIRSTROW and PR (prior row). Example: If you want to renumber buildings with consecutive numbers and column 7 is the building ID and the column for the consecutive is 28 (this is also the column where the formula is present), request a new integer column with TABLE -> ADD COLUMN and write the following formula for column 28 If FIRSTROW then 1 else if x7 =PR7 then PR28 else PR28+1; The first line of the table is set to 1. After setting the first value, the formula checks if the building ID is the same as in the previous line. If it is, the consecutive number is copied from the last line. If not, it is incremented by one. Requests to „Save“ should only occur when some content or formatting has actually been modified. New settings for the document settings: This feature fills gaps in the receiver numbering that will occur, for example, when a Facade Noise Map is calculated only within a calculation area. This setting is required if you want to amend results to existing files. In the City Noise Map, no grid columns can be defined before the grid result columns exist. Therefore the question about the grid size was obsolete and removed. Level tables difference in the graphics: As the graphics only have provisions to select level tables but not to choose which part, a new method is available in the spreadsheet to help with this. Generate new level columns with the command FILE -> LOAD RESULTS AND ADDITIONAL INFORMATION -> ADD RESULTS. The result file number is irrelevant here. Now open FILE -> TABLE CONTENT and delete the reference to the result file with the left arrow. The columns in the table remain and can be redefined with a formula. Use the right mouse button menu -> FORMULA to enter a new formula. Hint: If you have to display differences in level tables often, save the tables as a template. Updates News SoundPLAN 6.4 If the column setup has been set to „- for values < 0“, then values < 0 are ignored for table statistics (i.e. for the average). Swiss Cost/Benefit Index: A description and sample projects will be delivered later. Page 9 Overview to 6.4 innovations Graphics Grid maps can be stored again - see page 16. Geo-referenced bitmaps are now in 3D-Graphics - see page 15. For DGMs, it is now possible to filter out some of the long, stretched triangles generated on the outer edge of the DGM. The filter employs a user defined parameter that is checked against the ratio between the longest side of the triangle and the height of the triangle. This removes border triangles that are very narrow and do not represent the geometry. Activate the box FILTER EDGE TRIANGLES when loading the DGM. If you find that too few or too many triangles are filtered, change the ratio. Unfiltered: Edge triangles filtered using a ratio of 1:10 (height of triangle : edge length): Aircraft Noise New calculation standards: DIN 45684 and ÖAL 24. Calculations according to VBUF-AzB: The aircraft classes from the draft of Ulrich Isermann from 1999 are used for the calculations. These aircraft classes are in the system library. Calculation run settings for a calculation in accordance to VBUF-AzB: Aircraft noise standard DIN 45643 Halving parameter q 3 Time factor 0,5 Border noise contour line 55 Table border according VBUF Assessment according to Lden(VBUF) If receiver heights are to be used or the geometry contains distances smaller than 31.6 m between sources and receivers, this needs to be discussed with the client. Updates News SoundPLAN 6.4 Page 10 Details for some new features Air Pollution Modules see separate description Details for some new features DXF-import Select a DXF file and click on the OK button. A DXF pre-view window appears. „All layers“ presents the entire content of the dxf file, the coordinate range and the number of objects. If the cursor is positioned on „All layers,“ it blocks the import. Use the arrow keys or the left mouse button to move through the layer list and view the content of each layer. Highlight the layers you want to import. Mark a single layer with the left mouse button or mark an area of layers with shift and the left mouse button. Multiple single layers can be activated with ctrl and the left mouse button. After selecting the layers, click on the OK button to import the data. Via EDIT -> SELECT ALL and EDIT -> INVERT SELECTION you can mark all layers or reverse the layer selection (i.e. marked layers get unmarked and unmarked get marked). Use the mouse to pull open a box on the preview panel with the result that only the data contained within the box are imported. To cancel the box and import data from the entire area, click on the red cancel symbol on top of the preview panel. Use „Load all highlighted layers to one Geo-file” to import all layers to a single geo-file which can then be defined in the section to the right of the control. Updates News SoundPLAN 6.4 Page 11 Details for some new features The functions of the objects have not changed in version 6.4. The objects relevant for SoundPLAN use the AutoCAD 2002 format specification. Import and filtering of grid elevation data More and more often SoundPLAN users are able to find grid based elevation information to model the terrain. This information is often generated by over flight of radar equipped aircraft and is often available in resolutions of 1x1 meters. Usually the files contain a grid of 1 square kilometer (i.e. 1001x1001 spot heights). This raw information exceeds what SoundPLAN needs, and it can easily overload the calculations if multiple square kilometer grids would be required for a calculation. We have developed tools to assist you in removing redundant data. To use the tools most efficiently, apply them to areas of 1 square kilometer at a time. If, for example, 10x10 km would be inside the grid elevation file, the program would have to „tile“ the filtering process in areas of 1x1 km. This means the file is read and polled over and over again. You have 3 ways to open the new tools: 1. While importing elevation data from the ASCII-data interface if you only need to import one file at a time (activate field FILTER GRID ELEVATIONS) 2. Under GEOTOOLS -> FILTER TERRAIN POINTS if the points were contained in a DXF file rather than in an ASCII file. 3. Via FILE-> IMPORT -> ASCII ELEVATION GRID to import multiple files at the same time The entry box contains 2 tabs; the first defines the filtering, the second shows a graphical preview of the results. With the new import access, the first tab was divided; the left side is to select the files to be imported, the right side can be used to screen the content of the file. First, select the folder where the files are located. You must have the right (from Windows) to write in this folder. During the import, SoundPLAN will generate temporary files. The recommended practice is to create a folder for this import. Copy all importable files to this folder so you can select them easily with <Ctrl+A>. On the right side you can preview the content of the file. For the filtering itself you have the following options: Updates News SoundPLAN 6.4 Page 12 Details for some new features Enter the maximum permitted displacement between the original points and the resulting spot heights. Enter the sensitivity for the search of terrain edges (far left side means no terrain edges will be identified; far right means even for the slightest unevenness in the terrain, the program will attempt to find terrain edges.) Because filtering the data takes many steps, explaining the algorithms behind the process goes beyond the user’s manual, so we document only the effects of the controls upon the outcome of the 3D model. After filtering, the program calculates a DGM from the remaining spot heights and the terrain edges generated during the filtering. The program then takes the originally imported spot heights and interpolates the elevation for them from the DGM. The program generates a grid difference map between the original and the filtered data. If the differences exceed the entered tolerance, the program inserts local elevation points in order to rectify the problem. This procedure is repeated until all original elevation points are within the declared tolerance of the DGM. Searching for terrain edges: As the triangulation of the DGM in a fixed grid system has an element of random (the 2 possible sets of triangles in a square are equal), the program forces the generation of terrain edges in order to create a more realistic DGM. The terrain edges extracted from the grid elevation information do not necessarily represent the exact terrain edge. Their job is to help in selecting triangles. Our experience shows if the slider for the search of terrain edges is moved far to the right, the terrain becomes more realistic and berms and other structures are represented better, but the number of remaining elevation points is much bigger. In order for you to get a feeling for the settings and the resulting DGM, the scan tab of the filter box shows the result grid elevation filtering. Updates News SoundPLAN 6.4 Page 13 Details for some new features You can view: the remaining elevation points and the terrain edges in the site map the DGM as a 3D-model the difference grid map with the statistics If you are not satisfied with the results, activate the first tab and change the filter parameters and start the filter action again. As soon as you leave the dialog by pressing the OK button, the current setting of filtered points and terrain edges will be imported. For the import of multiple files, please test the filter settings with some selected files. When you have reached an appropriate setting, restart the import with all files. Because it can be very time consuming if many files with one square km each are imported, we recommend using a lunch break or night time for the import. This tool can also import and filter grid files written in the Scop-Winputformat (.wnp). This format can contain grid data and also terrain edges. With this format, the program does not generate terrain edges of its own, but uses the terrain edges contained in the file. The slider in the import now has a different meaning: Filtering the terrain edges from the file is the same as filtering the line elements in the Geo-Tools of the Geo-Database. The filter bandwidth is defined as follows: Slider to the far left: lines are not filtered. Slider to the far right: lines are filtered with the same tolerance as set for the elevation deviation. Step by step, starting from the right, the filter width is divided by the position. On the right side it is tolerance/1, one to the left is tolerance/2, then tolerance/3, etc. Because of program specific reasons, the files in the .wnp format are read and interpreted file by file and not tile by tile. This has the advantage that files can be imported in multiple steps. (A complete file covering the state of Rheinland-Pfalz in the grid size 10x10 meters could not be imported in one set on a PC with 1GB memory). Updates News SoundPLAN 6.4 Page 14 Details for some new features Geo tool creates embankments for roads This geo tool fits the master alignment of a road into a DGM. The program creates a local DGM and generates elevation lines using the settings "slope of cutting/berm" and "distance from road edge". One elevation line is created parallel to the road alignment. A secondary line is created using the road edge as a starting point and intersecting the given terrain from the road edge with a given slope. The new lines for the road edge and the edge of the cutting/berm are inserted into the data replacing the existing elevation information. Original road with elevation information: Select a road and activate the GEOTOOLS -> CREATE EMBANKMENTS FROM RAODS. Cuttings (slope up) and berms (slope down) can have different construction related slopes, therefore there are 2 settings. The slope is calculated from the factor 1:m. As the slope usually does not start directly at the edge of the road, the program allows you to enter the extra distance for ditches, etc. In the example above, the program set elevation lines parallel to the road edge and the terrain. The result of the embankment procedure can be seen below. The new elevation lines are stored in the active Geo-file and elevation information within the road band is deleted. Updates News SoundPLAN 6.4 Page 15 Details for some new features This geo tool can also be used to generate elevation lines parallel to the road marking the road edge. No cutting or berm situations are required to use this tool. File assignment to templates in the SoundPLAN Spreadsheet The new box TABLE CONTENT is used to assign files to a template, to attach results, to change the reference road axis and in general to gain a better overview of the files associated with the spreadsheet. As soon as you select a template to generate a new table, the new selection box opens where you assign all connections simultaneously. Activate the results for the different variants contained in the template by double clicking or using the arrow to the right. The reference road axis is automatically selected from the geometry of the first result file. Click on the column labelled reference line in order to select reference axis from a different situation. Additional result files for the variants can be attached using the + sign. Updates News SoundPLAN 6.4 Page 16 Details for some new features The screen table content is automatically opened when a new table is generated from a template. If you want to open this later, use the menu FILE > TABLE CONTENT. With this new procedure, some small details were changed in the handling. in the column header is now only available for columns referencing to other point and area tables. With ADD RESULTS, the assignment of existing result columns is obsolete; results are always inserted as a new variant. CHANGE CONTENT Geo-referenced bitmaps in 3D-Graphics Geo-referenced bitmaps can now be used in 3D Graphics with some restrictions: o Only a single bitmap can be present at any time for the 3D display. o The bitmap is only projected to a DGM, Grid Noise Map or City Noise Map, but not to objects such as roofs and roads. o The border of the bitmap shows some distortion, so make the area bigger than the area upon which the bitmap is projected. Important: The 3D-Graphics (OpenGL) can only use bitmaps with sizes that are a multitude of 2 (1024, 2048, 4096, …). SoundPLAN automatically enlarges the bitmap to the next size so that, for example, a bitmap of the size 1025 x 1025 pixels will become a bitmap of the size 2048 x 2048, in this case almost 4 times the size! The enlarged area is preset in white so that it will not be visible on screen. In the plan-object types, the bitmap must be enabled in the 3D-graphics section. If you activate the bitmap after you open the 3D-graphics in EDIT MAP, the bitmap must be rendered before it is visible. To do this, click on the button for new rendering (paintbrush symbol). Hint: If you have a very large grid map and want to project a bitmap onto it, it is advisable to first select the proper view port of the 3D-graphics and then load the bitmap. The usual method with the bitmap preloaded will slow down the screen movement considerably. Save grid operations The results of grid operations can again be stored as a grid map. The filename for the new file will be RROPxxxx.GM, where xxxx stands for a 4 digit number that must be different than the number of the calculation run. The first grid map loaded in the grid operations determines the time slots and the names of the time slots. Updates News SoundPLAN 6.4 Details for some new features Page 17 When you save the file, first select the number under which the file operation is to be saved. On the right side you see all existing file numbers. The first free result number is suggested as the result file number, but you can select any other file number. Afterwards you can enter a file description and select the time slot for which the result grid is to be saved. You can save multiple time slots in the new grid map. To make it easier for you to compile additional time slots, mark the box to KEEP FORMULA TO ADDADDITIONAL TIME SLICES as long as it takes to save all time slots you need. When you deactivate the box, the file name will be saved instead of the formula. If you select an existing file to save your data, you will be asked if you want to overwrite the existing file or if you want to insert the new grid operation as a new time slot into the existing file. Select the time slot for which you want to save the result grid map. The file description cannot be altered any more at this time. The grid spacing must be identical for all time slots. Animated noise map (3D Graphics Animation) For the time being, the animated noise map is now available for railway noise. The railway must be entered using a standard that utilizes the maximum noise level (for example, the 1996 Nordic train). In the Geo-Database, provisions for the maximum noise level must be made; trains must be selected that constitute the maximum noise level. In the Updates News SoundPLAN 6.4 Page 18 Details for some new features calculations, the calculation run for the maximum noise level must have an assessment that enables the maximum noise level. Storage for the maximum noise level must be enabled under the tab „assessment.” Under the section RESULTS in the tab index card "grid noise map," the ANIMATED NOISE MAP (TRAIN PASSBY) box must be checked. During the calculations, the animated noise map generates very big files. Be prepared that the calculation will take longer. Because the interpolation of the results is disabled (unlike for the Grid Noise Map), the calculation time will be much more than for a normal Grid Noise Map. Load the calculated grid noise map along with the geometry data in the file selection manager of the graphics. Double clicking on the map opens the EDIT MAP section. Here you must load the level-time file containing the charts of the noise level over time. Open EDIT -> DATA -> RRLKXXXX.RES. The animation control bar is displayed. Start the on-line animation with the green arrow. While the animation is in progress, the stop and pause buttons are active. After the animation is run, you can move the slider to visualize a particular time of the animated noise map. If you left click on the noise map, the program opens a box with the leveltime histogram. Clicking the red button on the animation controls saves the animation as an AVI file. Caution: Depending on the operating system, the size of the AVI files are restricted to 2 respective 4 GB. This size can be reached easily with high resolution animated maps of some kilometers of train tracks in urban area. When the level time charts are loaded, a left click on the map will open the chart for the area where you are clicking. Updates News SoundPLAN 6.4 Page 19 Calculation standards implemented Calculation standards implemented Unfortunately, not all standards have third party test examples available. We consider a standard tested when it fulfills official test examples or the important components have been calculated and compared by hand (Excel). As this requires an enormous amount of work, not all calculation standards are tested to the same degree. When a standard has been marked as tested, it participates in an automatic testing routine that runs all test questions prior to a new release and generates a test protocol. If differences are found, they are investigated. Road RLS-90 (D), the test questions are fulfilled and are present on the CD. The SoundPLAN testing, however, goes beyond the test questions on the CD. DIN 18005 (D) road tested VBUS (D) - in test RVS 3.02 (A), tested, the test examples are fulfilled and are on the CD. NMPB 96 (F/EU) tested using examples contained in the standard EMPA StL 86, StL 95, StL 97 (CH), tested CoRTN (GB), tested FHWA (USA) tested with examples contained in the standard TNM Straße (USA) testing. So far it does not show 100% compliance with the US DoT. There is an ongoing debate about internal errors of the original TNM. Statens planverk report no. 48 (DK), 1980 tested ASJ RTN Model B 1998 (Japan) Quality assurance calculations by Onosokki, SoundPLAN partner for Japan ASJ RTN Model B 2003 (Japan) Quality assurance calculations by Onosokki, SoundPLAN partner for Japan Nordic Traffic Noise Prediction 1996 tested Nord2000 road, tests not finished Emission calculation for Hungarian roads Russian roads Railway SCHALL-03 (D), the test examples are fulfilled and are on the CD. Transrapid (D), the test examples are fulfilled DIN 18005 (D) with emission calculation railway, tested VBUSCH (D) - testing Calculation of Rail Noise CRN 99 (GB) tested ONR 305011(A), tested RMR 2002 (NL/EU), no official test examples are available, in comparative calculations with other programs differences are found. SEMIBEL (CH) tested Nordic Prediction Method for Train Noise NMT 98 (Skandinavien) tested Updates News SoundPLAN 6.4 Page 20 Calculation standards implemented Nordic Rail Prediction Method Kilde Report 130 (Skandinavien) tested Nord2000 rail, tests not finished Japan Narrow Gauge Railways (Japan), Quality assurance calculations by Onosokki, SoundPLAN partner for Japan Emission calculation Hungarian rail Russian rail Industry DIN ISO 9613-2 tested DIN 18005 Gewerbe (D) tested VDI 2714/2720 tested TA Lärm simplified procedure tested ÖAL-28 (A) / General Prediction Method for Industrial Plants (DK) was verified on the basis of the results published by Braunstein + Berndt for the testing of version 4.2. For the multiple screening with the „rubber band“ method for the ÖAL 28 the test questions were adapted. Nord2000 industry noise (Scandinavia), tests not finished yet Construction Noise (Hong Kong) tested BS5228 (GB) untested – no official test procedure available ASJ CN Model 2002 (Japan), Quality assurance calculations by Onosokki, SoundPLAN partner for Japan Concawe (NL): untested TNM Industry (USA) This model is not verified in accordance to the US DoT. VDI 3760 (D), tested Aircraft Noise The aircraft noise module was tested by the German Umweltbundesamt in Berlin (German EPD) in accordance to the AzB. The calculations were found to be compliant for single receivers, grid noise maps and noise contour calculations. ECAC Doc 29 DIN 45684 ÖAL 24 Air pollution Updates News SoundPLAN 6.4 TA-Luft (Gauss-Model) tested MISKAM und MISKAM Screening; tested AUSTAL 2000