1
Oracle®Virtual Compute Appliance X3-2
Administrator's Guide for Release 1.0
E40647-02
January 2014
Oracle®Virtual Compute Appliance X3-2: Administrator's Guide for Release
1.0
Copyright © 2008, 2014, Oracle and/or its affiliates. All rights reserved.
Oracle and Java are registered trademarks of Oracle and/or its affiliates. Other names may be trademarks of their respective owners.
Intel and Intel Xeon are trademarks or registered trademarks of Intel Corporation. All SPARC trademarks are used under license and are
trademarks or registered trademarks of SPARC International, Inc. AMD, Opteron, the AMD logo, and the AMD Opteron logo are trademarks or
registered trademarks of Advanced Micro Devices. UNIX is a registered trademark of The Open Group.
This software and related documentation are provided under a license agreement containing restrictions on use and disclosure and are protected
by intellectual property laws. Except as expressly permitted in your license agreement or allowed by law, you may not use, copy, reproduce,
translate, broadcast, modify, license, transmit, distribute, exhibit, perform, publish, or display any part, in any form, or by any means. Reverse
engineering, disassembly, or decompilation of this software, unless required by law for interoperability, is prohibited.
The information contained herein is subject to change without notice and is not warranted to be error-free. If you find any errors, please report them
to us in writing.
If this is software or related documentation that is delivered to the U.S. Government or anyone licensing it on behalf of the U.S. Government, the
following notice is applicable:
U.S. GOVERNMENT END USERS: Oracle programs, including any operating system, integrated software, any programs installed on the hardware,
and/or documentation, delivered to U.S. Government end users are "commercial computer software" pursuant to the applicable Federal Acquisition
Regulation and agency-specific supplemental regulations. As such, use, duplication, disclosure, modification, and adaptation of the programs,
including any operating system, integrated software, any programs installed on the hardware, and/or documentation, shall be subject to license
terms and license restrictions applicable to the programs. No other rights are granted to the U.S. Government.
This software or hardware is developed for general use in a variety of information management applications. It is not developed or intended for
use in any inherently dangerous applications, including applications that may create a risk of personal injury. If you use this software or hardware
in dangerous applications, then you shall be responsible to take all appropriate fail-safe, backup, redundancy, and other measures to ensure its
safe use. Oracle Corporation and its affiliates disclaim any liability for any damages caused by use of this software or hardware in dangerous
applications.
This software or hardware and documentation may provide access to or information on content, products, and services from third parties. Oracle
Corporation and its affiliates are not responsible for and expressly disclaim all warranties of any kind with respect to third-party content, products,
and services. Oracle Corporation and its affiliates will not be responsible for any loss, costs, or damages incurred due to your access to or use of
third-party content, products, or services.
Table of Contents
Preface .............................................................................................................................................. v
1 Concept, Architecture and Life Cycle of Oracle Virtual Compute Appliance X3-2 ................................. 1
1.1 What is Oracle Virtual Compute Appliance X3-2 .................................................................... 1
1.2 Hardware Components ......................................................................................................... 2
1.2.1 Management Nodes ................................................................................................... 3
1.2.2 Compute Nodes ......................................................................................................... 3
1.2.3 Storage Appliance ...................................................................................................... 4
1.2.4 Network Infrastructure ................................................................................................ 5
1.3 Software Components ........................................................................................................... 7
1.3.1 Oracle Virtual Compute Appliance Dashboard ............................................................. 7
1.3.2 Password Manager (Wallet) ....................................................................................... 7
1.3.3 Oracle VM Manager ................................................................................................... 8
1.3.4 Operating Systems .................................................................................................... 8
1.3.5 Databases ................................................................................................................. 8
1.3.6 Oracle Virtual Compute Appliance Management Software .......................................... 10
1.3.7 Oracle Virtual Compute Appliance Configuration Script .............................................. 11
1.4 Provisioning and Orchestration ............................................................................................ 11
1.4.1 Appliance Management Initialization ......................................................................... 11
1.4.2 Compute Node Discovery and Provisioning ............................................................... 12
1.4.3 Server Pool Readiness ............................................................................................. 13
1.5 High Availability .................................................................................................................. 13
1.6 Oracle Virtual Compute Appliance X3-2 Backup ................................................................... 14
1.7 Oracle Virtual Compute Appliance X3-2 Software Update ..................................................... 15
2 Monitoring and Managing Oracle Virtual Compute Appliance X3-2 ................................................... 17
2.1 Connecting and Logging in to the Oracle Virtual Compute Appliance Dashboard .................... 18
2.2 Hardware View ................................................................................................................... 18
2.3 Network View ..................................................................................................................... 21
2.4 Network Setup .................................................................................................................... 21
2.5 Update ............................................................................................................................... 23
3 Managing the Oracle VM Virtual Infrastructure ................................................................................ 27
3.1 Guidelines and Limitations .................................................................................................. 28
3.2 Logging into the Oracle VM Manager Web UI ...................................................................... 28
3.3 Monitoring Health and Performance in Oracle VM ................................................................ 29
3.4 Creating and Managing Virtual Machines ............................................................................. 29
3.5 Managing Virtual Machine Resources .................................................................................. 32
3.6 Configuring Network Resources For Virtual Machines ........................................................... 34
3.7 Viewing and Managing Storage Resources .......................................................................... 36
3.8 Tagging of Resources in Oracle VM Manager ...................................................................... 37
3.9 Managing Jobs and Events ................................................................................................. 37
4 Servicing Oracle Virtual Compute Appliance X3-2 Components ....................................................... 39
4.1 Replaceable Components ................................................................................................... 39
4.1.1 Rack Components ................................................................................................... 40
4.1.2 Sun Server X3-2 Components .................................................................................. 40
4.1.3 Sun ZFS Storage Appliance 7320 Components ......................................................... 41
4.1.4 Oracle Switch ES1-24 Components .......................................................................... 43
4.1.5 NM2-36P Sun Datacenter InfiniBand Expansion Switch Components .......................... 43
4.1.6 Oracle Fabric Interconnect F1-15 Director Switch Components ................................... 44
4.2 Preparing Oracle Virtual Compute Appliance X3-2 for Service ............................................... 44
4.3 Servicing the Oracle Virtual Compute Appliance X3-2 Rack System ...................................... 45
4.3.1 Powering Down Oracle Virtual Compute Appliance X3-2 (When Required) .................. 45
4.3.2 Service Procedures for Rack System Components .................................................... 46
iii
Oracle®Virtual Compute Appliance X3-2
4.4 Servicing a Sun Server X3-2 ............................................................................................... 47
4.4.1 Powering Down Sun Server X3-2 for Service (When Required) ................................... 47
4.4.2 Service Procedures for Sun Server X3-2 Components ............................................... 48
4.5 Servicing the Sun ZFS Storage Appliance 7320 ................................................................... 49
4.5.1 Powering Down the Sun ZFS Storage Appliance 7320 for Service (When Required) ..... 49
4.5.2 Service Procedures for Sun ZFS Storage Appliance 7320 Components ....................... 50
4.6 Servicing an Oracle Switch ES1-24 ..................................................................................... 51
4.6.1 Powering Down the Oracle Switch ES1-24 for Service (When Required) ..................... 51
4.6.2 Service Procedures for Oracle Switch ES1-24 Components ....................................... 52
4.7 Servicing an NM2-36P Sun Datacenter InfiniBand Expansion Switch ..................................... 52
4.7.1 Powering Down the NM2-36P Sun Datacenter InfiniBand Expansion Switch for
Service (When Required) .................................................................................................. 52
4.7.2 Service Procedures for NM2-36P Sun Datacenter InfiniBand Expansion Switch
Components ..................................................................................................................... 53
4.8 Servicing an Oracle Fabric Interconnect F1-15 Director Switch .............................................. 53
4.8.1 Powering Down the Oracle Fabric Interconnect F1-15 Director Switch for Service
(When Required) .............................................................................................................. 53
4.8.2 Service Procedures for Oracle Fabric Interconnect F1-15 Director Switch
Components ..................................................................................................................... 54
5 Troubleshooting ............................................................................................................................. 57
5.1 Adding Proxy Settings for Oracle Virtual Compute Appliance Updates ................................... 57
5.2 Setting the Oracle Virtual Compute Appliance Log Level ....................................................... 58
5.3 Configuring Data Center Switches for VLAN Traffic .............................................................. 58
5.4 Enabling SNMP Server Monitoring ....................................................................................... 59
5.5 Changing Oracle WebLogic Server Passwords ..................................................................... 60
5.6 Using a Custom CA Certificate for SSL Encryption ............................................................... 61
5.7 A Compute Node Fails to Complete Provisioning ................................................................. 62
5.8 Oracle VM Server Pool Is Offline After Network Services Restart .......................................... 63
A Licenses ....................................................................................................................................... 65
A.1 Oracle Virtual Compute Appliance Controller Software ......................................................... 65
A.2 Oracle Linux ....................................................................................................................... 70
A.3 Oracle Hardware with Pre-Installed Oracle VM Server .......................................................... 73
A.4 License Information for Software Components ..................................................................... 82
A.4.1 Hardware Management Pack ................................................................................... 82
A.4.2 Java Runtime Environment ...................................................................................... 82
A.4.3 Tinyproxy ................................................................................................................ 83
A.4.4 Pexpect ................................................................................................................... 88
A.4.5 Oracle Fabric Manager ............................................................................................ 88
A.4.6 Oracle VM ............................................................................................................... 88
A.5 License Information for Hardware Components .................................................................... 88
Index ................................................................................................................................................ 91
iv
Preface
This document is part of the documentation library for Oracle Virtual Compute Appliance X3-2 Release 1.0,
which is available at:
http://docs.oracle.com/cd/E40371_01
The documentation library consists of the following items:
Oracle Virtual Compute Appliance X3-2 Release Notes
The release notes provide a summary of the new features, changes, fixed bugs and known issues in
Oracle Virtual Compute Appliance X3-2.
Oracle Virtual Compute Appliance X3-2 Installation Guide
The installation guide provides detailed instructions to prepare the installation site and install Oracle
Virtual Compute Appliance X3-2. It also includes the procedure to install an additional compute node.
Oracle Virtual Compute Appliance X3-2 Safety and Compliance Guide
The safety and compliance guide is a supplemental guide to the safety aspects of Oracle Virtual
Compute Appliance X3-2. It conforms to Compliance Model No. OCA1A.
Oracle Virtual Compute Appliance X3-2 Administrator's Guide
The administrator's guide provides instructions for using the management software. It is a
comprehensive guide to how to configure, monitor and administer Oracle Virtual Compute Appliance
X3-2.
Oracle Virtual Compute Appliance Quick Start Poster
The quick start poster provides a step-by-step description of the hardware installation and initial
software configuration of Oracle Virtual Compute Appliance X3-2. A printed quick start poster is
shipped with each Oracle Virtual Compute Appliance base rack, and is intended for data center
operators and administrators who are new to the product.
The quick start poster is also available in the documentation library as an HTML guide, which contains
alternate text for ADA 508 compliance.
Oracle Virtual Compute Appliance Expansion Node Setup Poster
The expansion node setup poster provides a step-by-step description of the installation procedure
for an Oracle Virtual Compute Appliance expansion node. A printed expansion node setup poster is
shipped with each Oracle Virtual Compute Appliance expansion node.
The expansion node setup poster is also available in the documentation library as an HTML guide,
which contains alternate text for ADA 508 compliance.
Audience
The Oracle Virtual Compute Appliance X3-2 documentation is written for technicians, authorized service
providers, data center operators and system administrators who want to install, configure and maintain a
virtual compute environment in order to deploy virtual machines for users. It is assumed that readers have
experience installing and troubleshooting hardware, are familiar with web and virtualization technologies
and have a general understanding of operating systems such as UNIX (including Linux) and Windows.
The Oracle Virtual Compute Appliance makes use of Oracle Linux and Oracle Solaris operating systems
within its component configuration. It is advisable that administrators have experience of these operating
systems at the very least. Oracle Virtual Compute Appliance is capable of running virtual machines with a
variety of operating systems including Oracle Solaris and other UNIXes, Linux and Microsoft Windows. The
v
Related Documentation
selection of operating systems deployed in guests on Oracle Virtual Compute Appliance determines the
requirements of your administrative knowledge.
Related Documentation
Additional documentation for components related to Oracle Virtual Compute Appliance X3-2 is available as
follows:
• All Oracle products
http://www.oracle.com/documentation
• Sun Rack II 1042 and 1242
http://docs.oracle.com/cd/E19844-01/index.html
• Sun Server X3-2
http://docs.oracle.com/cd/E22368_01/index.html
• Sun ZFS Storage Appliance 7320
http://docs.oracle.com/cd/E28317_01/index.html
• Oracle Switch ES1-24
http://docs.oracle.com/cd/E39109_01/index.html
• NM2-36P Sun Datacenter InfiniBand Expansion Switch
http://docs.oracle.com/cd/E26698_01/index.html
• Oracle Fabric Interconnect F1-15 Director Switch
http://docs.oracle.com/cd/E38500_01/index.html
• Oracle Integrated Lights Out Manager (ILOM) 3.1
http://docs.oracle.com/cd/E24707_01/index.html
• Oracle VM
http://docs.oracle.com/cd/E35328_01/index.html
Documentation Accessibility
For information about Oracle's commitment to accessibility, visit the Oracle Accessibility Program website
at http://www.oracle.com/pls/topic/lookup?ctx=acc&id=docacc.
Access to Oracle Support
Oracle customers have access to electronic support through My Oracle Support. For information, visit
http://www.oracle.com/pls/topic/lookup?ctx=acc&id=info or visit http://www.oracle.com/pls/topic/lookup?
ctx=acc&id=trs if you are hearing impaired.
Feedback
Provide feedback about this documentation at:
vi
Conventions
http://www.oracle.com/goto/docfeedback
Conventions
The following text conventions are used in this document:
Convention
Meaning
boldface
Boldface type indicates graphical user interface elements associated with an
action, or terms defined in text or the glossary.
italic
Italic type indicates book titles, emphasis, or placeholder variables for which
you supply particular values.
monospace
Monospace type indicates commands within a paragraph, URLs, code in
examples, text that appears on the screen, or text that you enter.
Document Revision
Document generated on: 2014-01-24 (revision: 391)
vii
viii
Chapter 1 Concept, Architecture and Life Cycle of Oracle Virtual
Compute Appliance X3-2
Table of Contents
1.1 What is Oracle Virtual Compute Appliance X3-2 ............................................................................ 1
1.2 Hardware Components ................................................................................................................. 2
1.2.1 Management Nodes ........................................................................................................... 3
1.2.2 Compute Nodes ................................................................................................................. 3
1.2.3 Storage Appliance .............................................................................................................. 4
1.2.4 Network Infrastructure ........................................................................................................ 5
1.3 Software Components ................................................................................................................... 7
1.3.1 Oracle Virtual Compute Appliance Dashboard ..................................................................... 7
1.3.2 Password Manager (Wallet) ............................................................................................... 7
1.3.3 Oracle VM Manager ........................................................................................................... 8
1.3.4 Operating Systems ............................................................................................................ 8
1.3.5 Databases ......................................................................................................................... 8
1.3.6 Oracle Virtual Compute Appliance Management Software .................................................. 10
1.3.7 Oracle Virtual Compute Appliance Configuration Script ...................................................... 11
1.4 Provisioning and Orchestration .................................................................................................... 11
1.4.1 Appliance Management Initialization ................................................................................. 11
1.4.2 Compute Node Discovery and Provisioning ....................................................................... 12
1.4.3 Server Pool Readiness ..................................................................................................... 13
1.5 High Availability .......................................................................................................................... 13
1.6 Oracle Virtual Compute Appliance X3-2 Backup ........................................................................... 14
1.7 Oracle Virtual Compute Appliance X3-2 Software Update ............................................................. 15
This chapter describes what Oracle Virtual Compute Appliance X3-2 is, which hardware and software it
consists of, and how it is deployed as a virtualization platform.
1.1 What is Oracle Virtual Compute Appliance X3-2
Responding to the Cloud Challenges
Cloud architectures and virtualization solutions have become highly sophisticated and complex to
implement. They require a skill set that no single administrator has had to master in traditional data
centers: system hardware, operating systems, network administration, storage management, applications.
Without expertise in every single one of those domains, an administrator is unable to take full advantage
of the features and benefits of virtualization technology. This often leads to poor implementations with suboptimal performance and reliability, which impairs the flexibility of a business.
Aside from the risks created by technical complexity and lack of expertise, companies also suffer from
an inability to deploy new infrastructure quickly enough to suit their business needs. The administration
involved in the deployment of new systems, and the time and effort to configure these systems, can
amount to weeks. Provisioning new applications into flexible virtualized environments, in a fraction of the
time required for physical deployments, generates substantial financial benefits.
Fast Deployment of Converged Infrastructure
Oracle Virtual Compute Appliance X3-2 is an offering that industry analysts refer to as a Converged
Infrastructure Appliance: an infrastructure solution in the form of a hardware appliance that comes from
1
Modular Implementation of a Complete Stack
the factory pre-configured. It enables the operation of the entire system as a single unit, not a series of
individual servers, network hardware and storage providers. Installation, configuration, high availability,
expansion and upgrading are automated and orchestrated as much as possible. Within approximately
three hours after power-on, or one hour with up to 10 compute nodes, the appliance is ready to create
virtual servers. Virtual servers are commonly deployed from Oracle VM templates (individual preconfigured VMs) and assemblies (interconnected groups of pre-configured VMs).
Modular Implementation of a Complete Stack
With Oracle Virtual Compute Appliance X3-2, Oracle offers a unique full stack of hardware, software,
virtualization technology and rapid application deployment through assemblies. All this is packaged
in a single modular and extensible product. The minimum configuration consists of a base rack with
infrastructure components, a pair of management nodes, and two compute nodes. This configuration can
be extended by one compute node at a time. All rack units, whether populated or not, are pre-cabled and
pre-configured at the factory in order to facilitate the installation of expansion compute nodes on-site at a
later time.
Ease of Use
The primary value proposition of Oracle Virtual Compute Appliance X3-2 is the integration of components
and resources for the purpose of ease of use and rapid deployment. It should be considered a general
purpose solution in the sense that it supports the widest variety of operating systems, including Windows,
and any application they might host. Customers can attach their existing storage or provide storage
solutions from Oracle or third parties.
1.2 Hardware Components
The Oracle Virtual Compute Appliance X3-2 consists of a Sun Rack II 1242 base, populated with the
hardware components identified in Figure 1.1.
Figure 1.1 Components of an Oracle Virtual Compute Appliance X3-2 Rack
2
Management Nodes
Table 1.1 Figure Legend
Item
Quantity
Description
A
1
Sun ZFS Storage Appliance 7320
B
2
Sun Server X3-2, used as management nodes
C
2-25
Sun Server X3-2, used as virtualization compute nodes
D
2
Oracle Fabric Interconnect F1-15 Director Switch
E
2
NM2-36P Sun Datacenter InfiniBand Expansion Switch
F
2
Oracle Switch ES1-24
1.2.1 Management Nodes
At the heart of each Oracle Virtual Compute Appliance X3-2 installation is a pair of management nodes.
They are installed in rack units 5 and 6 and form a cluster in active/standby configuration for high
availability: both servers are capable of running the same services and have equal access to the system
configuration, but one operates as the master while the other is ready to take over the master functions
in case a failure occurs. The master management node runs the full set of services required, while the
standby management node runs a subset of services until it is promoted to the master role. The master
role is determined at boot through OCFS2 Distributed Lock Management on an iSCSI LUN, which both
management nodes share on the Sun ZFS storage appliance installed at the bottom of the rack. Because
rack units are numbered from the bottom up, the master management node is typically the Sun Server
X3-2 in rack unit 5. It is the only server that must be powered on by the administrator in the entire process
to bring the appliance online.
For details about how high availability is achieved with Oracle Virtual Compute Appliance X3-2, refer to
Section 1.5, “High Availability”.
When you power on the Oracle Virtual Compute Appliance X3-2 for the first time, you can change the
factory default IP configuration of the management node cluster, so that they can be easily reached
from your data center network. The management nodes share a Virtual IP, where the management
web interface can be accessed. During system initialization, after the management cluster is set up
successfully, the master management node loads a number of Oracle Linux 6 services, in addition to
Oracle VM and its associated MySQL database – including network, sshd, ntpd, iscsi initiator, dhcpd –
to be able to orchestrate the provisioning of all system components. During provisioning, all networking
and storage is configured, and all compute nodes are discovered, installed and added to an Oracle VM
server pool. All provisioning configurations are preloaded at the factory and should not be modified by the
customer.
For details about the provisioning process, refer to Section 1.4, “Provisioning and Orchestration”.
1.2.2 Compute Nodes
The compute nodes in the Oracle Virtual Compute Appliance X3-2 constitute the virtualization platform.
The compute nodes provide the processing power and memory capacity for the virtual servers they host.
The entire provisioning process is orchestrated by the management nodes: compute nodes are installed
with Oracle VM Server 3.2.5 and additional packages for InfiniBand and Software Defined Networking.
When provisioning is complete, the Oracle Virtual Compute Appliance software expects all compute nodes
in the same rack to be part of the same Oracle VM server pool.
For hardware configuration details of the Sun Server X3-2 compute nodes, refer to Server Components in
the Oracle Virtual Compute Appliance X3-2 Installation Guide.
3
Storage Appliance
The Oracle Virtual Compute Appliance Dashboard allows the administrator to monitor the health and status
of the compute nodes, as well as all other rack components, and perform certain system operations. The
virtual infrastructure is configured and managed with Oracle VM Manager.
The compute capacity of the Oracle Virtual Compute Appliance X3-2 can be built up in a modular way,
in accordance with business needs. The minimum configuration of the base rack contains just two
compute nodes, but it can be expanded by one node at a time up to 25 compute nodes. Apart from the
hardware installation, adding compute nodes requires no intervention by the administrator. New nodes are
discovered, powered on, installed and provisioned automatically by the master management node. The
additional compute nodes are integrated into the existing configuration, and as a result, the Oracle VM
server pool offers increased capacity for more or larger virtual machines.
Since it is difficult to quantify the compute capacity as a number of virtual machines, it is suggested that
you base calculations on the amount of RAM as a rule of thumb. With 256GB per Sun Server X3-2 and
a minimal dom0 overhead, it is safe to assume that each compute node can host 60 virtual machines
with 4GB RAM, or 30 virtual machines with 8GB RAM, or 15 virtual machines with 16GB RAM, or any
combination that adds up to an amount of RAM just a couple of GB under the server's physical memory.
1.2.3 Storage Appliance
The Sun ZFS Storage Appliance 7320 installed at the bottom of the appliance rack should be considered
a 'system disk' for the entire appliance. Its main purpose is to provide storage space for the Oracle Virtual
Compute Appliance software. A portion of the disk space is made available for customer use and is
sufficient for an Oracle VM storage repository with a limited number of virtual machines, templates and
assemblies.
The hardware configuration of the Sun ZFS Storage Appliance 7320 is as follows:
• Two clustered storage heads with four 73GB SSDs each, used exclusively for cache and logging
• One fully populated disk chassis with twenty 900GB SATA hard disks
• RAID-Z2 configuration, for best balance between performance and data protection, with a total usable
space of 11.3TB
The storage appliance is connected to the management subnet ( 192.168.4.0/24 ) and the InfiniBand
(IPoIB) storage subnet ( 192.168.40.0/24 ). Because both heads form a cluster, they share a single IP
in each subnet. The RAID-Z2 storage pool contains two projects, named OVCA and OVM .
The OVCA project contains all LUNs and file systems used by the Oracle Virtual Compute Appliance
software:
• LUNs
• Locks (12GB) – to be used exclusively for cluster locking on the two management nodes
• Manager (200GB) – to be used exclusively as an additional file system on both management nodes
• File systems:
• MGMT_ROOT – to be used for storage of all files specific to the Oracle Virtual Compute Appliance:
• ovmm_mysql – to be used for the MySQL database
• db – to be used for all other databases
• incoming (20GB) – to be used for FTP file transfers, primarily for Oracle Virtual Compute Appliance
component backups
4
Network Infrastructure
• templates – placeholder file system for future use
• user – placeholder file system for future use
• yum – placeholder file system for future use
The OVM project contains all LUNs and file systems used by Oracle VM:
• LUNs
• iscsi_repository1 (300GB) – to be used as Oracle VM storage repository
• iscsi_serverpool1 (12GB) – to be used as server pool file system for the Oracle VM clustered
server pool
• File systems:
• nfs_repository1 (300GB) – to be used as Oracle VM storage repository in case NFS is preferred
over iSCSI
• nfs_serverpool1 (12GB) – to be used as server pool file system for the Oracle VM clustered server
pool in case NFS is preferred over iSCSI
In addition to offering storage, the Sun ZFS Storage Appliance 7320 also runs the xinetd and tftpd
services. These complement the Oracle Linux services on the master management node in order to
orchestrate the provisioning of all Oracle Virtual Compute Appliance system components.
1.2.4 Network Infrastructure
The Oracle Virtual Compute Appliance relies on a combination of Ethernet connectivity and an InfiniBand
network fabric. The appliance rack contains redundant network hardware components, which are precabled at the factory to help ensure continuity of service in case a failure should occur.
Ethernet
The Ethernet network relies on two interconnected Oracle ES1-24 switches, to which all other rack
components are connected with CAT6 Ethernet cables. This network serves as the appliance management
network, in which every component has a predefined IP address in the 192.168.4.0/24 range. In
addition, all Sun Server X3-2 management and compute nodes have a second IP address in this range,
which is used for Oracle Integrated Lights Out Manager (ILOM) connectivity.
While the appliance is initializing, the InfiniBand fabric is not accessible, which means that the
management network is the only way to connect to the system. Therefore, one of the Oracle ES1-24
switches has an Ethernet cable attached to port 24, which the administrator should use to connect a
workstation with fixed IP address 192.168.4.254 . From this workstation, the administrator opens a
1
browser connection to the web server on the master management node at http://192.168.4.3 , in
order to monitor the initialization process and perform the initial configuration steps when the appliance is
powered on for the first time.
InfiniBand
The Oracle Virtual Compute Appliance rack contains two NM2-36P Sun Datacenter InfiniBand Expansion
Switches. These redundant switches have redundant cable connections to both InfiniBand ports in each
1
It is possible that the other management node, in the rack unit just above, assumes the master role. In this case, the web page continues to display the
message "Oracle Virtual Compute Appliance is still initializing... Please wait..." The administrator should connect to http://192.168.4.4 instead.
5
Network Infrastructure
management node, compute node and storage head. Both InfiniBand switches, in turn, have redundant
cable connections to both Oracle Fabric Interconnect F1-15 Director Switches in the rack. All these
components combine to form a physical InfiniBand backplane with a 40Gbit (Quad Data Rate) bandwidth.
When the appliance initialization is complete, all necessary Oracle Virtual Compute Appliance software
packages, including host drivers and InfiniBand kernel modules, have been installed and configured
on each component. At this point, the system is capable of using software defined networking (SDN)
configured on top of the physical InfiniBand fabric. SDN is implemented through the Oracle Fabric
Interconnect F1-15 Director Switches.
Fabric Interconnect
All Oracle Virtual Compute Appliance network connectivity is managed through the Oracle Fabric
Interconnect F1-15 Director Switches. Data is transferred across the physical InfiniBand fabric, but
connectivity is implemented in the form of Software Defined Networks (SDN) – sometimes referred
to as 'clouds'. The physical InfiniBand backplane is capable of hosting thousands of virtual networks.
These Private Virtual Interconnects (PVI) dynamically connect virtual machines and bare metal servers
to networks, storage and other virtual machines, while maintaining the traffic separation of hard-wired
connections and exceeding their performance.
During the initialization process of the Oracle Virtual Compute Appliance, five essential SDNs are
configured: a storage network, an Oracle VM management network, a management Ethernet network, and
two VLAN-enabled virtual machine networks..
• The storage network is a bonded IPoIB connection between the management nodes and the ZFS
storage appliance, and uses the 192.168.40.0/24 subnet.
• The Oracle VM management network is a PVI that connects the management nodes and compute
nodes in the 192.168.140.0/24 subnet. It is used for all network traffic inherent to Oracle VM
Manager, Oracle VM Server and the Oracle VM Agents.
• The management Ethernet network is a bonded Ethernet connection between the compute nodes.
The primary function of this network is to provide access to the management nodes from the data center
network, and enable the management nodes to run a number of system services. Since all compute
nodes are also connected to this network, Oracle VM can use it for virtual machine connectivity, with
access to and from data center public network. This subnet is configurable through the Network Setup
tab in the Oracle Virtual Compute Appliance Dashboard. VLANs are not supported on this network.
• The public virtual machine network is a bonded Ethernet connection between the compute nodes.
Oracle VM uses this network for virtual machine connectivity, where external access is required. VLAN
1 is automatically configured for this network. Customers can add their own VLANs to the Oracle VM
network configuration, and define the subnet(s) appropriate for IP address assignment at the virtual
machine level. For external connectivity, the next-level data center switches must be configured to
accept your tagged VLAN traffic.
• The private virtual machine network is a bonded Ethernet connection between the compute nodes.
Oracle VM uses this network for virtual machine connectivity, where only internal access is required.
VLAN 1 is automatically configured for this network. Customers can add VLANs of their choice to the
Oracle VM network configuration, and define the subnet(s) appropriate for IP address assignment at the
virtual machine level.
Finally, the Oracle Fabric Interconnect F1-15 Director Switches also manage the physical public network
connectivity of the Oracle Virtual Compute Appliance. Two 10GbE ports on each Fabric Director switch
must be connected to redundant next-level data center switches. At the end of the initialization process,
the administrator assigns three reserved IP addresses from the data center (public) network range to the
management node cluster of the Oracle Virtual Compute Appliance: one for each management node,
6
Software Components
and an additional Virtual IP shared by the clustered nodes. From this point forward, the Virtual IP is used
to connect to the master management node's web server, which hosts both the Oracle Virtual Compute
Appliance Dashboard and the Oracle VM Manager web interface.
Caution
It is critical that both Oracle Fabric Interconnect F1-15 Director Switches have
two 10GbE connections each to separate next-level data center switches. This
configuration with four cross-connected cables provides redundancy and load
splitting at the level of the Fabric Director switches, the 10GbE ports and the data
center switches. In addition, it plays a key role in the continuation of service during
failover scenarios involving Fabric Director switch outages and other components.
1.3 Software Components
This section describes the main software components the Oracle Virtual Compute Appliance uses for
operation and configuration.
1.3.1 Oracle Virtual Compute Appliance Dashboard
The Oracle Virtual Compute Appliance X3-2 provides its own web-based graphical user interface that
can be used to perform a variety of administrative tasks specific to the appliance. The Oracle Virtual
Compute Appliance Dashboard is a WebLogic application that is available via the active management
node. It is installed on top of the Oracle WebLogic Server 11g that is packaged with Oracle VM Manager,
as described in Section 1.3.3, “Oracle VM Manager”.
Use the Dashboard to perform the following tasks:
• Appliance system monitoring and component identification
• Monitoring and identifying physical network connections
• Initial configuration of management node networking data
• Resetting of the global password for Oracle Virtual Compute Appliance components
After the initial mandatory software update from Release 1.0.1 to Release 1.0.2, the Oracle Virtual
Compute Appliance Dashboard should be used to configure the management node networking data.
Use the Oracle Virtual Compute Appliance Dashboard to perform regular appliance maintenance such as
password resets or hardware monitoring. The Oracle Virtual Compute Appliance Dashboard is described in
detail in Chapter 2, Monitoring and Managing Oracle Virtual Compute Appliance X3-2.
1.3.2 Password Manager (Wallet)
All components of Oracle Virtual Compute Appliance X3-2 have administrator accounts with a default
password. It is recommended that you modify this password after initialization through the Oracle Virtual
Compute Appliance Dashboard. The Network Setup tab allows you to set a new password, which is
applied system-wide.
Caution
The Oracle WebLogic Server password cannot be set from the Dashboard. Please
change the password in the Oracle WebLogic Server Administration Console.
Make sure it matches the password configured in the Dashboard. For details, see
Section 5.5, “Changing Oracle WebLogic Server Passwords”.
7
Oracle VM Manager
Passwords are stored in a global Wallet in an obfuscated way. When expansion compute nodes are
installed, the default password is overwritten with the current system password during the provisioning
process. No further administrative action is required.
1.3.3 Oracle VM Manager
All virtual machine management tasks are performed within Oracle VM Manager, a WebLogic application
that is installed on each of the management nodes and which provides a web-based management user
interface and a command line interface that allows you to manage your Oracle VM infrastructure within the
Oracle Virtual Compute Appliance.
Oracle VM Manager is comprised of the following software components:
• Oracle VM Manager application: provided as an Oracle WebLogic Server domain and container.
• Oracle WebLogic Server 11g: including Application Development Framework (ADF) Release 11g, used
to host and run the Oracle VM Manager application
• MySQL 5.5 Enterprise Edition Server: for the exclusive use of the Oracle VM Manager application as
a management repository and installed on the Database file system hosted on the Sun ZFS Storage
Appliance 7320.
Administration of virtual machines is performed using the Oracle VM Manager web user interface, as
described in Chapter 3, Managing the Oracle VM Virtual Infrastructure. While it is possible to use the
command line interface provided with Oracle VM Manager, this is considered an advanced activity that
should only be performed with a thorough understanding of the limitations of Oracle VM Manager running
in the context of an Oracle Virtual Compute Appliance.
1.3.4 Operating Systems
Hardware components of the Oracle Virtual Compute Appliance X3-2 run their own operating systems:
• Management Nodes: Oracle Linux 6 with UEK2
• Compute Nodes: Oracle Linux 5 with UEK2
• Sun ZFS Storage Appliance 7320: Oracle Solaris 11
All other components run a particular revision of their respective firmware. All operating software has been
selected and developed to work together as part of the Oracle Virtual Compute Appliance X3-2. When an
update is released, the appropriate versions of all software components are bundled. When a new software
release is activated, all component operating software is updated accordingly. You should not attempt to
update individual components unless Oracle explicitly instructs you to.
1.3.5 Databases
The Oracle Virtual Compute Appliance uses a number of databases to track system states, handle
configuration and provisioning, and for Oracle VM Manager. All databases are stored on the Sun ZFS
Storage Appliance 7320 and are exported via an NFS file system. The databases are accessible to each
management node to ensure high availability.
The following table provides a listing of each of the different databases used by the Oracle Virtual Compute
Appliance.
8
Databases
Table 1.2 Oracle Virtual Compute Appliance Databases
Item
Description
Oracle Virtual Compute
Appliance Node Database
Contains information on every compute node and management node in
the rack, including the state used to drive the provisioning of compute
nodes and data required to handle software updates.
Type: BerkeleyDB
Location: MGMT_ROOT/db/node on the ZFS, accessible via /nfs/
shared_storage/db/node on each management node
Oracle Fabric Interconnect
Database
Contains IP and host name data for the Oracle Fabric Interconnect F1-15
Director Switches.
Type: BerkeleyDB
Location: MGMT_ROOT/db/infrastructure on the ZFS, accessible
via /nfs/shared_storage/db/infrastructure on each
management node
Oracle Virtual Compute
Predefines Ethernet and bond device names for all possible networks
Appliance Netbundle Database that can be configured throughout the system, and which are allocated
dynamically.
Type: BerkeleyDB
Location: MGMT_ROOT/db/netbundle on the ZFS, accessible via /
nfs/shared_storage/db/netbundle on each management node
Oracle Switch ES1-24 Ports
Database
Defines the factory-configured map of Oracle Switch ES1-24 ports to the
rack unit or element to which that port is connected. It is used to map
Oracle Switch ES1-24 ports to machine names.
Type: BerkeleyDB
Location: MGMT_ROOT/db/opus_ports on the ZFS, accessible via /
nfs/shared_storage/db/opus_ports on each management node
Oracle Virtual Compute
Appliance DHCP Database
Contains information on the assignment of DHCP addresses to newly
detected compute nodes.
Type: BerkeleyDB
Location: MGMT_ROOT/db/dhcp on the ZFS, accessible via /nfs/
shared_storage/db/dhcp on each management node
Oracle Virtual Compute
Appliance Mini Database
A multi-purpose database used to map compute node hardware
profiles to onboard disk size information. It also contains valid hardware
configurations that servers must comply with in order to be accepted as
an Oracle Virtual Compute Appliance component.
Type: BerkeleyDB
Location: MGMT_ROOT/db/mini_db on the ZFS, accessible via /nfs/
shared_storage/db/mini_db on each management node
Oracle Virtual Compute
Appliance Setup Database
Contains the data set by the Oracle Virtual Compute Appliance
Dashboard setup facility. The data in this database is automatically
9
Oracle Virtual Compute Appliance Management Software
Item
Description
applied by both the active and passive management nodes when a
change is detected.
Type: BerkeleyDB
Location: MGMT_ROOT/db/setup on the ZFS, accessible via /nfs/
shared_storage/db/setup on each management node
Oracle Virtual Compute
Appliance Task Database
Contains state data for all of the asynchronous tasks that have been
dispatched within the Oracle Virtual Compute Appliance.
Type: BerkeleyDB
Location: MGMT_ROOT/db/task on the ZFS, accessible via /nfs/
shared_storage/db/task on each management node
Oracle Virtual Compute
Appliance Update Database
Used to track the two-node coordinated management node update
process.
Type: BerkeleyDB
Location: MGMT_ROOT/db/update on the ZFS, accessible via /nfs/
shared_storage/db/update on each management node
Oracle VM Manager Database Used on each management node as the management database for
Oracle VM Manager. It contains all configuration details of the Oracle VM
environment (including servers, pools, storage and networking), as well
as the virtualized systems hosted by the environment.
Type: MySQL Database
Location: MGMT_ROOT/ovmm_mysql/data/ on the ZFS, accessible via
/nfs/shared_storage/ovmm_mysql/data/ on each management
node
1.3.6 Oracle Virtual Compute Appliance Management Software
The Oracle Virtual Compute Appliance includes software that designed for the provisioning, management
and maintenance of all of the components within the appliance.
Important
This software is not designed for human interaction. All configuration and
management tasks must be performed using the Oracle Virtual Compute Appliance
Dashboard. Do not attempt to run any of these processes directly without explicit
instruction from an Oracle Support representative. Attempting to do so may render
your appliance unusable.
This software largely consists of a number of Python applications that run on the active management node.
These applications are found in /usr/sbin on each management node and are listed as follows:
• ovca-backup: the script responsible for performing backups of the appliance configuration as described
in Section 1.6, “Oracle Virtual Compute Appliance X3-2 Backup”
• ovca-daemon: the core provisioning and management daemon for the Oracle Virtual Compute
Appliance
10
Oracle Virtual Compute Appliance Configuration Script
• ovca-dhcpd: a helper script to assist the DHCP daemon with the registration of compute nodes
• ovca-factory-init: the appliance initialization script used to set the appliance to its factory
configuration
• ovca-helper: a support script used to perform particular configuration tasks and to assist with
appliance configuration
• ovca-node-db: a script used to maintain and update the Oracle Virtual Compute Appliance Node
Database described in Section 1.3.5, “Databases”
• ovca-redirect: a script to redirect HTTP or HTTPS requests to the Oracle Virtual Compute Appliance
Dashboard described in Section 1.3.1, “Oracle Virtual Compute Appliance Dashboard”
• ovca-remote-rpc: a script that allows other components to communicate with the various
management scripts available on the management node
• ovca-rpc: a script that allows the Oracle Virtual Compute Appliance Dashboard to communicate
directly with the underlying management scripts running on the management node
• ovca-updater: the script that allows you to download updated software for the Oracle Virtual Compute
Appliance. It also allows you to activate the update, as described in Section 1.7, “Oracle Virtual Compute
Appliance X3-2 Software Update”
• ovca-update-password: a script that controls password updates for each different component on the
appliance
Many of these applications use a specific Oracle Virtual Compute Appliance library that is installed in /
usr/lib/python2.6/site-packages/ovca/ on each management node.
1.3.7 Oracle Virtual Compute Appliance Configuration Script
The Oracle Virtual Compute Appliance includes a configuration script that can be run to configure
additional settings that are not catered for within the Oracle Virtual Compute Appliance Dashboard. This
script is located at /usr/sbin/ovca-config.py on each management node.
The script allows you to configure proxy settings that allow the management nodes access to web-based
or FTP-based resources on the Internet via a proxy server configured within your environment. See
Section 5.1, “Adding Proxy Settings for Oracle Virtual Compute Appliance Updates” for more information.
The script also allows you to configure the log level and log path for the Oracle Virtual Compute Appliance.
These settings can be used to help troubleshoot problems and to assist with data gathering for support
queries. See Section 5.2, “Setting the Oracle Virtual Compute Appliance Log Level” for more information.
1.4 Provisioning and Orchestration
As a converged infrastructure solution, the Oracle Virtual Compute Appliance X3-2 aims to eliminate many
of the intricacies of optimizing the system configuration. Hardware components are installed and cabled
at the factory. Configuration settings and installation software are preloaded onto the system. Once the
appliance is connected to the data center power source and public network, the provisioning process
between the administrator pressing the power button of the first management node and the appliance
reaching its Deployment Readiness state is entirely orchestrated by the master management node. This
section explains what happens behind the curtains as the Oracle Virtual Compute Appliance X3-2 is
initialized and all nodes are provisioned.
1.4.1 Appliance Management Initialization
11
Compute Node Discovery and Provisioning
Boot Sequence and Health Checks
When power is applied to the first management node, it takes approximately five minutes for the server to
boot. While the Oracle Linux 6 operating system is loading, an Apache web server is started, which serves
a static welcome page the administrator can browse to from the workstation connected to the appliance
management network.
The necessary Oracle Linux services are started as the server comes up to runlevel 3 (multi-user mode
with networking). At this point, the management node executes a series of system health checks. It verifies
that all expected infrastructure components are present on the appliance management network and in the
correct predefined location, identified by the rack unit number and fixed IP address. Next, the management
node probes the ZFS storage appliance for a management NFS export and a management iSCSI LUN with
OCFS2 file system. The storage and its access groups have been configured at the factory. If the health
checks reveal no problems, the ocfs2 and o2cb services are started up automatically.
Management Cluster Setup
When the OCFS2 file system on the shared iSCSI LUN is ready, and the o2cb services have started
successfully, the management nodes can join the cluster. In the meantime, the first management node
has also started the second management node, which will come up with an identical configuration. Both
management nodes eventually join the cluster, but the first management node will take an exclusive lock
on the shared OCFS2 file system using Distributed Lock Management (DLM). The second management
node remains in permanent standby and takes over the lock only in case the first management node goes
down or otherwise releases its lock.
With mutual exclusion established between both members of the management cluster, the master
management node continues to load the remaining Oracle Virtual Compute Appliance services, including
tftp, dhcpd, Oracle VM Manager and the Oracle Virtual Compute Appliance databases. The virtual IP
address of the management cluster is also brought online, and the Oracle Virtual Compute Appliance
Dashboard is started within WebLogic. The static Apache web server now redirects to the Dashboard at
the virtual IP, where the administrator can access a live view of the appliance rack component status.
Once the dhcpd service is started, the system state changes to Provision Readiness, which means it is
ready to discover non-infrastructure components.
1.4.2 Compute Node Discovery and Provisioning
Node Manager
To discover compute nodes, the Node Manager on the master management node uses a DHCP
server and the node database. The node database is a single-access MySQL database, located on
the management NFS share, containing the state and configuration details of each node in the system,
including MAC addresses, IP addresses and host names. The discovery process of a node begins with
a DHCP request from the ILOM. All discovery and provisioning actions are asynchronous and occur in
parallel. The DHCP server hands out pre-assigned IP addresses on the appliance management network
( 192.168.4.0/24 ). When the Node Manager has verified that a node has a valid service tag for use
with Oracle Virtual Compute Appliance, it launches a series of provisioning tasks. All required software
resources have been loaded onto the ZFS storage appliance at the factory.
Provisioning Tasks
The provisioning process is tracked in the node database by means of status changes. The next
provisioning task can only be started if the node status indicates that the previous task has completed
successfully. For each valid node, the Node Manager begins by building a PXE configuration and forces
the node to boot using Oracle Virtual Compute Appliance runtime services. After the hardware RAID-1
12
Server Pool Readiness
configuration is applied, the node is restarted to perform a kickstart installation of Oracle VM Server.
Crucial kernel modules and host drivers for InfiniBand and IO Director support are added to the installation.
At the end of the installation process, the network configuration files are updated to allow all necessary
network interfaces and bonds to be brought up.
Now that the PVI for the Oracle VM management network exists, the compute node is rebooted one last
time to reconfigure the Oracle VM Agent to communicate over the PVI. At this point, the node is ready for
Oracle VM Manager discovery.
1.4.3 Server Pool Readiness
Oracle VM Server Pool
When the Node Manager detects a fully installed compute node that is ready to join the Oracle VM
environment, it issues the necessary Oracle VM CLI commands to add the new node to the Oracle VM
server pool. With the discovery of the first node, the system also configures the clustered Oracle VM
server pool with the appropriate networking, access to the shared storage, and a virtual IP. Oracle Virtual
Compute Appliance X3-2 expects that all compute nodes in one rack belong to a single clustered server
pool with High Availability (HA) and Distributed Resource Scheduling (DRS) enabled. When all compute
nodes have joined the Oracle VM server pool, the appliance is in Ready state, meaning virtual machines
(VMs) can be deployed.
Expansion Compute Nodes
When an expansion compute node is installed, its presence is detected based on the DHCP request
from its ILOM. If the new server is identified as an Oracle Virtual Compute Appliance node, an entry is
added in the node database with "new" state. This triggers the initialization and provisioning process. New
compute nodes are integrated seamlessly to expand the capacity of the running system, without the need
for manual reconfiguration by an administrator.
1.5 High Availability
The Oracle Virtual Compute Appliance X3-2 is designed for high availability at every level of its component
make-up.
Management Node Failover
During the factory installation of Oracle Virtual Compute Appliance X3-2, the management nodes are
configured as a cluster. The cluster relies on an OCFS2 file system exported as a LUN from the ZFS
storage to perform the heartbeat function and to store a lock file that each management node attempts to
take control of. The management node that has control over the lock file automatically becomes the master
or active node in the cluster.
When the Oracle Virtual Compute Appliance X3-2 is first initialized, the o2cb service is started on each
management node. This service is the default cluster stack for the OCFS2 file system. It includes a node
manager that keeps track of the nodes in the cluster, a heartbeat agent to detect live nodes, a network
agent for intra-cluster node communication and a distributed lock manager to keep track of lock resources.
All these components are in-kernel.
Additionally, the ovca service is started on each management node. The management node that obtains
control over the cluster lock and is thereby promoted to the master or active management node, runs the
full complement of Oracle Virtual Compute Appliance services. This process also configures the Virtual IP,
that is used to access the active management node, so that it is 'up' on the active management node and
'down' on the standby management node. This ensures that, when attempting to connect to the Virtual IP
13
Oracle VM Management Database Failover
address that you configured for the management nodes, you are always accessing the active management
node.
In the case where the active management node fails, the cluster detects the failure and the lock is
released. Since the standby management node is constantly polling for control over the lock file, it detects
when it has control of this file and the ovca service brings up all of the required Oracle Virtual Compute
Appliance services. The Virtual IP on the standby management node is brought up as it is promoted to the
active role.
When the management node that failed comes back online, it no longer has control of the cluster lock file
and is automatically put into standby mode, and the Virtual IP is configured as 'down'.
This means that one of the two management nodes in the rack is always available via the same IP address
and is always correctly configured.
The management node failover process takes up to 5 minutes to complete.
Oracle VM Management Database Failover
The Oracle VM Manager database files are located on a shared file system exposed by the Sun ZFS
Storage Appliance 7320. The active management node runs the MySQL database server, which accesses
the database files on the shared storage. In the event that the management node fails, the standby
management node is promoted and the MySQL database server on the promoted node is started so that
the service can resume as normal. The database contents are available to the newly running MySQL
database server.
Compute Node Failover
High availability of compute nodes within the Oracle Virtual Compute Appliance is enabled through the
clustered server pool that is created automatically in Oracle VM Manager during the compute node
provisioning process. Since the server pool is configured as a cluster using an underlying OCFS2 file
system, virtual machines running on any compute nodes can be live-migrated automatically to an alternate
compute node in the event of failure.
Storage Redundancy
Further redundancy is provided through the use of the Sun ZFS Storage Appliance 7320 to host storage.
This component is configured to support RAID-Z2 providing integrated redundancy with a fault tolerance of
up to two failed drives with zero data loss. Furthermore, the storage appliance includes two storage heads
or controllers that are interconnected in a clustered configuration. In the event of failure, either storage
head can continue handling traffic for the other without an interruption in service.
Network Redundancy
All of the customer-usable networking within the Oracle Virtual Compute Appliance is configured for
redundancy. Only the internal administrative Ethernet network, which is used for initialization and ILOM
connectivity, is not redundant. There are two of each switch type to ensure that there is no single point
of failure. Networking cabling is equally duplicated and switches are interconnected as described in
Section 1.2.4, “Network Infrastructure”.
1.6 Oracle Virtual Compute Appliance X3-2 Backup
The configuration of all components within Oracle Virtual Compute Appliance X3-2 is automatically backed
up and stored on the Sun ZFS Storage Appliance 7320 as a set of archives. Backups are named with a
time stamp for when the backup is run.
14
Oracle Virtual Compute Appliance X3-2 Software Update
During initialization, a crontab entry is created on each management node to perform a global backup twice
in every 24 hours. The first backup runs at 09h00 and the second at 21h00. Only the active management
node actually runs the backup process when it is triggered.
Backups are stored on the MGMT_ROOT file system on the Sun ZFS Storage Appliance 7320 and are
accessible on each management node at /nfs/shared_storage/backups. When the backup process
is triggered, it creates a directory named with the time stamp for the current backup process. Within this
directory several subdirectories are also created:
• nm2: contains the Sun Datacenter InfiniBand NM2-36P Expansion Switch configuration data
• opus: contains the Oracle ES1-24 switch configuration data
• ovca: contains all of the configuration information relevant to the deployment of the management
nodes such as the password wallet, the network configuration of the management nodes, configuration
databases for the Oracle Virtual Compute Appliance services, and DHCP configuration.
• ovmm: contains the most recent backup of the Oracle VM Manager database, the actual source data
files for the current database, and the UUID information for the Oracle VM Manager installation. Note
that the actual backup process for the Oracle VM Manager database is handled automatically from within
Oracle VM Manager and is described in detail in the Oracle VM Installation and Upgrade Guide section
entitled Oracle VM Manager MySQL Backup.
• xsigo: contains the configuration data for the Oracle Fabric Interconnect F1-15 Director Switches.
• zfssa: contains all of the configuration information for the Sun ZFS Storage Appliance 7320
The backup process collects data for each component in the appliance and ensures that it is stored in a
2
way that makes it easy to restore that component to operation in the case of failure .
Taking regular backups is standard operating procedure for any production system. The internal backup
mechanism cannot protect against full system failure, site outage or disaster. Therefore, you should
consider implementing a backup strategy to copy key system data to external storage. This requires a
machine with connections to the internal appliance networks as well as the external (public) data center
network.
For a detailed description of the backup contents, and for guidelines to export internal backups outside the
appliance, refer to the Oracle technical white paper entitled Oracle Virtual Compute Appliance Backup and
Recovery Guide.
1.7 Oracle Virtual Compute Appliance X3-2 Software Update
Oracle Virtual Compute Appliance X3-2 includes the tools required to perform a full software update of the
appliance. On the master management node command line, commands are issued to download a new
version of the software stack from a specified URI and update all components to the latest version. For
step-by-step instructions, see Section 2.5, “Update”.
An Oracle Virtual Compute Appliance software stack image is provided in the form of a zip file,
approximately 4 GB in size. The zip file contains an automatically built ISO with the latest software updates
from Oracle.
3
The software image can be downloaded using the FTP, HTTP or HTTPS protocols . Once the image has
been downloaded it is extracted into the mgmt_image, hmp_image and ovm_image subdirectories of /
2
Restoration from backup must only be performed by Oracle Service Personnel.
It may be necessary to edit /etc/ovca.conf, on each management node, to ensure that the correct proxy settings are specified for the download
to succeed. See Section 5.1, “Adding Proxy Settings for Oracle Virtual Compute Appliance Updates” for more information.
3
15
Oracle Virtual Compute Appliance X3-2 Software Update
nfs/shared_storage, which resides in the MGMT_ROOT file system on the Sun ZFS Storage Appliance
7320.
From the command line, you are able to activate a downloaded software image. Activation starts a
coordinated process on the management nodes that relies on management node failover to succeed.
The activation process can be summarized in the following way:
• The current master begins the process by creating a database entry to include a message containing the
version number of the software that you are updating to; a time stamp and the node name of the inactive
management node.
• The current master reboots the inactive management node and provisions it with the new software
image in the same way that a compute node is provisioned at start up. The current software on the
inactive management node is wiped and the new software is installed directly from the ISO stored in /
nfs/shared_storage/mgmt_image on the storage appliance.
• After the install, the management node is rebooted and starts its ovca service. This causes it to re-enter
the remaster code and it finalizes its own database entry
• The current master detects the database update indicating that the installation has completed and the
newly installed management node is ready to resume service as the new master. It creates its own
database entry to indicate that it is now being updated, and then reboots.
• The newly installed management node is promoted to the cluster master and then proceeds to perform
the provisioning required to install the new software image on the rebooting management node.
• When installation is complete, the management node is rebooted and comes up in standby mode.
16
Chapter 2 Monitoring and Managing Oracle Virtual Compute
Appliance X3-2
Table of Contents
2.1
2.2
2.3
2.4
2.5
Connecting and Logging in to the Oracle Virtual Compute Appliance Dashboard ............................
Hardware View ...........................................................................................................................
Network View .............................................................................................................................
Network Setup ............................................................................................................................
Update .......................................................................................................................................
18
18
21
21
23
Monitoring and management of the Oracle Virtual Compute Appliance X3-2 is achieved using the Oracle
Virtual Compute Appliance Dashboard. This web-based graphical user interface is also used to perform the
initial configuration of the appliance beyond the instructions provided in the Quick Start poster included in
the packaging of the appliance.
Warning
Before starting the system and applying the initial configuration, read and
understand the Oracle Virtual Compute Appliance X3-2 Release Notes. The
section Known Limitations and Workarounds provides information that is critical for
correctly executing the procedures in this document. Ignoring the release notes may
cause you to configure the system incorrectly. Bringing the system back to normal
operation may require a complete factory reset.
The Oracle Virtual Compute Appliance Dashboard allows you to perform the following tasks:
• Initial software configuration for the appliance using the Network Setup tab, as described in Section 2.4,
“Network Setup”.
• Hardware monitoring and identification of each hardware component used in the appliance, accessed via
the Hardware View tab described in Section 2.2, “Hardware View”.
• Physical network monitoring and identification via the Network View tab described in Section 2.3,
“Network View”.
• Reconfiguration of appliance software, such as resetting the global password used for different
components within the appliance, via the Network Setup tab, as described in Section 2.4, “Network
Setup”.
The Oracle Virtual Compute Appliance software includes functionality that is currently not available through
the Dashboard user interface:
• Backup
The configuration of all components within Oracle Virtual Compute Appliance X3-2 is automatically
backed up based on a crontab entry. This functionality is not configurable. Restoring a backup requires
the intervention of an Oracle-qualified service person. For details, see Section 1.6, “Oracle Virtual
Compute Appliance X3-2 Backup”.
• Update
Immediately after power-on, the Oracle Virtual Compute Appliance X3-2 software must be updated from
Release 1.0.1 to Release 1.0.2. The update process is controlled from the command line of the master
17
Connecting and Logging in to the Oracle Virtual Compute Appliance Dashboard
management node. For details, see Section 1.7, “Oracle Virtual Compute Appliance X3-2 Software
Update”. For step-by-step instructions, see Section 2.5, “Update”.
2.1 Connecting and Logging in to the Oracle Virtual Compute
Appliance Dashboard
To open the Login page of the Oracle Virtual Compute Appliance Dashboard, enter the following address
in a Web browser:
https://IP:7002/ovca
Where, IP refers to the shared Virtual IP address that you have configured for your management nodes
during installation. By using the shared Virtual IP address, you ensure that you always access the Oracle
1
Virtual Compute Appliance Dashboard on the active management node. .
Important
You must ensure that if you are accessing Oracle Virtual Compute Appliance
Dashboard through a firewalled connection, the firewall is configured to allow TCP
traffic on the port that Oracle Virtual Compute Appliance Dashboard is using to
listen for connections.
Enter your Oracle Virtual Compute Appliance Dashboard administration user name in the Username field.
This is the administration user name you configured during installation. Enter the password for the Oracle
2
Virtual Compute Appliance Dashboard administration user name in the Password field .
Important
The Oracle Virtual Compute Appliance Dashboard makes use of cookies in order
to store session data. Therefore, to successfully login and use the Oracle Virtual
Compute Appliance Dashboard your web browser must accept cookies from the
Oracle Virtual Compute Appliance Dashboard host.
2.2 Hardware View
The Hardware View within the Oracle Virtual Compute Appliance Dashboard provides a graphical
representation of the hardware components as they are installed within the rack. Rolling over each item
with the mouse raises a pop-up window providing the name of the component, its type, and a summary
of configuration and status information. For compute nodes, the pop-up window includes a Reprovision
button, which allows you to restart the provisioning process if the node becomes stuck in an intermittent
state or goes into error status before it is added to the Oracle VM server pool. Instructions to reprovision a
compute node are provided in Section 5.7, “A Compute Node Fails to Complete Provisioning”.
Warning
The Reprovision button is to be used only for compute nodes that fail to complete
provisioning. Never use this function on a compute node that has been provisioned
1
If you are following the installation process and this is your first time accessing the Oracle Virtual Compute Appliance Dashboard, the Virtual IP
address still needs to be configured and the Dashboard is not available on the public network. In this case, your workstation must be patched directly
into the Oracle Switch ES1-24, using the supplied blue Ethernet cable connected to port 24. (Or use port 19 of the switch on the right if 100 Mbit/s
transfer rate is required.) The IP that should be used in the URL to connect to the Dashboard is 192.168.4.3 or 192.168.4.4 , depending on
which management node assumes the master role.
2
If you are following the installation process and this is your first time accessing the Oracle Virtual Compute Appliance Dashboard, the default user
name is ovcaadmin and the default password is Welcome1.
18
Hardware View
properly and/or hosts running virtual machines. Incorrect use of the Reprovision
button may lock compute nodes out of the environment permanently or otherwise
cause loss of functionality or data corruption.
Alongside each installed component within the appliance rack, a status icon provides an indication of the
health and running status of the component. See Table 2.1 for an overview of the different status icons and
their meaning.
Table 2.1 Table of Hardware Status Icons
Icon
Status
Description
OK
The component is running correctly and has passed all health
check operations.
Warning
The component is running, but has not passed all health check
operations and investigation may be required.
Error
The component is not running and has failed health check
operations. Component troubleshooting is required and the
component may need to be replaced.
If either of the Oracle Fabric Interconnect F1-15 Director Switches is clicked on in the Hardware View,
the view is changed to the I/O Ports tab in the Network View. See Section 2.3, “Network View” for more
information.
The Hardware View provides an accessible tool for troubleshooting hardware components within Oracle
Virtual Compute Appliance and identifying where these components are actually located within the rack.
Where components might need replacing, the new component must take the position of the old component
within the rack to maintain configuration.
19
Hardware View
Figure 2.1 The Hardware View
20
Network View
2.3 Network View
The Network View provides a graphical representation of the networking hardware within the Oracle
Virtual Compute Appliance rack. Specifically, the I/O modules and their network ports on the are shown on
a diagram depicting the back panel of the Oracle Fabric Interconnect F1-15 Director Switch.
Figure 2.2 Network View - IO Module Ports
2.4 Network Setup
The Network Setup tab is used to configure networking and service information for the management
nodes. The following fields are available for configuration:
• Management Node 1: Use this field to specify an IP address within your datacenter network that can be
used to directly access this management node.
• Hostname: Use this field to specify the host name for the first management node system.
• Management Node 2: Use this field to specify an IP address within your datacenter network that can be
used to directly access this management node.
• Hostname: Use this field to specify the host name for the second management node system.
• Domain Name: Use this field to specify the domain that each of the management node systems belong
to.
• Virtual IP: Use this field to specify the shared Virtual IP address that is used to always access the active
management node. This IP address must be in the same subnet as the IP addresses that you have
specified for each management node.
• Netmask: Use this field to specify the netmask for the network that the Virtual IP address and
management node IP addresses belong to.
21
Network Setup
• Default Gateway: Use this field to specify the default gateway for the network that the Virtual IP address
and management node IP addresses belong to.
• NTP: Use this field to specify the NTP server that the management nodes and other appliance
components must use to synchronize their clocks to.
• DNS: Use the fields provided here to specify at least one DNS server that the management nodes can
use for domain name resolution.
• Current OVCA Password: If changing the Oracle Virtual Compute Appliance password, it is necessary
to provide the current password in this field before specifying the new password in the OVCA Password
field.
• OVCA Password: Use this field to provide a new global Oracle Virtual Compute Appliance password, to
reset the password used for all components within the system.
• OVCA Password Confirmation: Use this field to confirm the new Oracle Virtual Compute Appliance
password and check that you have not mis-typed what you intended.
Clicking the OK button at the bottom of the page saves the settings that are currently displayed on the
page and updates the configuration on each of the management nodes.
If you used this form to reset the Oracle Virtual Compute Appliance password, every component within
the appliance is updated with the same password, except for the Oracle WebLogic Server, which must be
changed manually. For information about password management, see Section 1.3.2, “Password Manager
(Wallet)”. For instructions to change the Oracle WebLogic Server password, see Section 5.5, “Changing
Oracle WebLogic Server Passwords”.
22
Update
Figure 2.3 Network Setup
2.5 Update
The mandatory initial software update from Release 1.0.1 to Release 1.0.2, and any further update of
Oracle Virtual Compute Appliance X3-2, is performed from the command line of the master management
node. Software updates are a three-tier process. First, a zipped ISO containing the updated software
must be downloaded from MOS and made available on an HTTP or FTP server. From there, the ISO is
downloaded to the Sun ZFS Storage Appliance 7320. When the download is complete and the software is
unpacked in the appropriate directories, the update is activated and applied to each affected component.
Caution
If direct public access is not available within your data center and you make use of
proxy servers to facilitate HTTP, HTTPS and FTP traffic, it may be necessary to edit
23
Update
/etc/ovca.conf, on each management node, to ensure that the correct proxy
settings are specified for a download to succeed from the Internet. This depends on
the network location from where the download is served. See Section 5.1, “Adding
Proxy Settings for Oracle Virtual Compute Appliance Updates” for more information.
Tip
Updates are controlled with ovca-updater commands. To display usage options,
enter ovca-updater --help at the shell prompt of the management node.
Updating the Oracle Virtual Compute Appliance Software
1. Log into My Oracle Support and download the required Oracle Virtual Compute Appliance software
update.
You can find the update by searching for the product name “Oracle Virtual Compute Appliance”, or for
the Patch or Bug Number associated with the update you need.
2. Make the update, a zipped ISO, available on an HTTP or FTP server that is reachable from your Oracle
Virtual Compute Appliance.
3. Using SSH and an account with superuser privileges, log into the management node.
Note
The default root password is Welcome1.
Choose the option that applies to your environment:
• If you are performing the mandatory initial update from Release 1.0.1 to Release 1.0.2 on an
unconfigured and unprovisioned system, use a workstation connected to the provided cable attached
to port 24 of the Oracle Switch ES1-24 and statically assign IP address 192.168.4.254 to it. In this
internal appliance management network, the first management node IP address is 192.168.4.3 .
Caution
Port 24 of the Oracle Switch ES1-24 has a minimum transfer rate of 1000
Mbit/s (GbE). If your workstation requires a lower speed (Fast Ethernet, 100
Mbit/s), you may use port 19 of the second Oracle Switch ES1-24, which is
the one on the right hand side if you look from the rear of the rack. A Cat5
Ethernet cable is plugged in and coiled up on the side.
Caution
Before the mandatory initial update, you also need to power on the second
management node. You must log in to both management nodes using SSH to
create the file /tmp/install.log.
# ssh [email protected]
[email protected]'s password:
root@ovcamn05r1 ~]# touch /tmp/install.log
root@ovcamn05r1 ~]# ssh [email protected]
[email protected]'s password:
root@ovcamn06r1 ~]# touch /tmp/install.log
root@ovcamn06r1 ~]# exit
logout
Connection to 192.168.4.4 closed.
root@ovcamn05r1 ~]#
24
Update
• If you are updating a configured and provisioned system, connect to the management node using its
IP address in the data center network, as you configured it in the Network Setup tab of the Oracle
Virtual Compute Appliance Dashboard. For details, see Section 2.4, “Network Setup”.
Note
The data center IP address used in this procedure is an example.
# ssh [email protected]
[email protected]'s password:
root@ovcamn05r1 ~]#
4. Download the ISO to your Oracle Virtual Compute Appliance.
# ovca-updater -m download -s -u http://download-url.example.com/ovca-version-build.iso.zip
Download of http://download-url.example.com/ovca-version-build.iso.zip started successfully. \
Task id is 5ba4f1a09c9546b29a560e3d6682ce67
5. Check the progress of the ISO download. When the download is finished, proceed with the next step.
# ovca-updater -m download -l -i
Task ID
5ba4f1a09c9546b29a560e3d6682ce67
# ovca-updater -m download -l -i
Task ID
5ba4f1a09c9546b29a560e3d6682ce67
# ovca-updater -m download -l -i
Task ID
5ba4f1a09c9546b29a560e3d6682ce67
5ba4f1a09c9546b29a560e3d6682ce67
Pct
Elapsed time Status
60%
155.305 sec
RUNNING
5ba4f1a09c9546b29a560e3d6682ce67
Pct
Elapsed time Status
70%
285.904 sec
RUNNING
5ba4f1a09c9546b29a560e3d6682ce67
Pct
Elapsed time Status
100%
338.102 sec
SUCCESS
To list all downloads and their status, enter this command:
# ovca-updater -m download -l
Task ID
Pct
5ba4f1a09c9546b29a560e3d6682ce67 100%
Elapsed time Status
338.102 sec
SUCCESS
6. When the download has completed successfully, activate it by launching the update process.
# ovca-updater -m update -s
WARNING:root:Activating update process. Starting with nonmaster node 192.168.4.4
Once you issue this command, the update process is initiated as described in Section 1.7, “Oracle
Virtual Compute Appliance X3-2 Software Update”.
7. Check the progress of the software update.
# ovca-updater -m update -l
Mgmt Node IP
Update Started
Update Ended
Elapsed
192.168.4.4
2013-10-02 16:52:14 ------------------- 0:02:18
Note
At a certain point during the update process, the active management node is
rebooted. As a result, the SSH connection is lost. In addition, this may cause the
Dashboard to become unresponsive temporarily, and you may be required to
log back in.
When the master management node reboots, the secondary (updated) management node assumes
the master role. The original master management node is then also updated and becomes the backup
management node.
25
26
Chapter 3 Managing the Oracle VM Virtual Infrastructure
Table of Contents
3.1
3.2
3.3
3.4
3.5
3.6
3.7
3.8
3.9
Guidelines and Limitations ..........................................................................................................
Logging into the Oracle VM Manager Web UI ..............................................................................
Monitoring Health and Performance in Oracle VM ........................................................................
Creating and Managing Virtual Machines .....................................................................................
Managing Virtual Machine Resources ..........................................................................................
Configuring Network Resources For Virtual Machines ...................................................................
Viewing and Managing Storage Resources ..................................................................................
Tagging of Resources in Oracle VM Manager ..............................................................................
Managing Jobs and Events .........................................................................................................
28
28
29
29
32
34
36
37
37
Warning
Access to the Oracle VM Manager web user interface and command line interface
is provided without restrictions. The configuration of Oracle Virtual Compute
Appliance components within Oracle VM Manager is automatic and handled by the
Oracle Virtual Compute Appliance provisioning process. Altering the configuration
of these components directly within Oracle VM Manager is not supported and may
result in the malfunction of the appliance.
Use of Oracle VM Manager in the context of Oracle Virtual Compute Appliance
should be limited to the management and creation of virtual machines.
Configuring additional storage, creating repositories, and setting up additional
networks specifically for the use of virtual machines is possible. However, this
should be done carefully, to avoid disrupting the configuration specific to the Oracle
Virtual Compute Appliance.
Management of virtual machines and your Oracle VM environment is achieved using the Oracle VM
Manager Web UI (User Interface). While Oracle VM Manager does provide a command line interface,
use of this on your Oracle Virtual Compute Appliance should only be attempted by advanced users with
a thorough understanding of Oracle VM and the limitations of its usage within an Oracle Virtual Compute
Appliance context.
The information provided in here, is a description of the Oracle VM Manager Web UI within the context
of the Oracle Virtual Compute Appliance. Where particular actions within the Oracle VM Manager Web
UI are referenced, a link to the appropriate section within the Oracle VM User's Guide is provided. The
complete Oracle VM User's Guide is available at this URL: http://docs.oracle.com/cd/E35328_01/E35332/
html/index.html.
Note
When consulting the Oracle VM documentation directly, keep in mind the limitations
imposed by using it within Oracle Virtual Compute Appliance.
The Oracle VM Manager Web UI is available via the IP address that you configured for your management
nodes during installation. This virtual IP address is automatically assigned to whichever management
node is currently the active node within the cluster. If the management node becomes unavailable, the
standby management node is promoted to the active role and takes over the IP address automatically. See
Section 1.5, “High Availability” for more information on management node failover.
27
Guidelines and Limitations
The Oracle VM Manager Web UI is configured to listen for HTTPS requests on port 7002.
3.1 Guidelines and Limitations
The Oracle VM Manager Web User Interface is provided without any software limitation to its functionality.
Once your appliance has been provisioned, the Oracle VM environment is fully configured and ready to
use for the deployment and management of your virtual machines. In this section, the operations that are
explicitly not permitted, and those that may be attempted with due care, are presented as guidelines and
limitations that should be followed when working within Oracle VM Manager.
Do Not:
• attempt to discover or modify or remove servers or their configuration;
• attempt to add or modify or remove server pools or their configuration;
• attempt to move servers out of the existing server pool;
• attempt to add or modify or remove affinity groups or server processor compatibility groups;
• attempt to modify or remove the existing repository named Rack1-repository, or the local disk
repositories;
• attempt to delete or modify any of the preconfigured networks;
• attempt to connect virtual machines to the appliance management network;
• attempt to add or configure VLAN Groups, except to add VLAN tags to the default VLAN Group
configuration;
• attempt to modify or delete any existing Storage elements that are already configured within Oracle VM;
• attempt to configure global settings in the Tools and Resources tab, such as the NTP or YUM Update
configuration.
While unlikely to cause a problem with your appliance, the following actions are not recommended:
Not Recommended:
• configure additional external storage for Oracle VM Manager;
• add an additional repository within Oracle VM Manager;
• add or configure additional networks within Oracle VM Manager;
• use the Oracle VM Manager Command Line Interface or Utilities.
If you ignore this advice, the Oracle Virtual Compute Appliance automation, which uses specific naming
conventions to label and manage assets, may fail. Out-of-band configuration changes would not be known
to the orchestration software of the Oracle Virtual Compute Appliance.
3.2 Logging into the Oracle VM Manager Web UI
To open the Login page of the Oracle VM Manager Web UI, enter the following address in a Web browser:
https://manager-vip:7002/ovm/console
Where, manager-vip refers to the virtual IP address, or corresponding host name, that you have
configured for your management nodes during installation. By using the virtual IP address, you ensure that
you always access the Oracle VM Manager Web UI on the active management node.
28
Monitoring Health and Performance in Oracle VM
Important
You must ensure that if you are accessing Oracle VM Manager through a firewalled
connection, the firewall is configured to allow TCP traffic on the port that Oracle VM
Manager is using to listen for connections.
Enter your Oracle VM Manager administration user name in the Username field. This is the administration
user name you configured during installation. Enter the password for the Oracle VM Manager
administration user name in the Password field.
Important
The Oracle VM Manager Web UI makes use of cookies in order to store session
data. Therefore, to successfully login and use the Oracle VM Manager Web UI your
web browser must accept cookies from the Oracle VM Manager host.
3.3 Monitoring Health and Performance in Oracle VM
The Health tab provides a view of the health of the compute nodes and the server pool within your
environment. This information complements that Hardware View provided in the Oracle Virtual Compute
Appliance Dashboard. See Section 2.2, “Hardware View” for more information.
The Statistics subtab available on the Health tab provides statistical information, including real-time
graphs, for CPU and memory usage. These statistics can be viewed at a global scale to determine overall
usage, per server to see the performance of each individual compute node, or per virtual machine to help
track the usage and resource requirements for any of the virtual machines within your environment.
For detailed information on using the Health tab, please refer to the section entitled Health Tab in the
Oracle VM User's Guide.
3.4 Creating and Managing Virtual Machines
The Servers and VMs tab is used to create and manage your virtual machines. By default, compute
nodes are listed as belonging to a single server pool called Rack1_ServerPool. The configuration of this
server pool must not be altered. There is no need to discover servers, as compute nodes are automatically
provisioned and discovered within an Oracle Virtual Compute Appliance. Editing the configuration of the
server pool, servers, affinity groups and processor compatibility groups is not supported. The primary
purpose of this tab within the Oracle Virtual Compute Appliance context is to create and manage your
virtual machines.
Virtual machines can be created using:
• ISO files in a repository (hardware virtualized only)
• Mounted ISO files on an NFS, HTTP or FTP server (paravirtualized only)
• Virtual machine templates (by cloning a template)
• Existing virtual machine (by cloning the virtual machine)
• Virtual machine assemblies
Virtual machines require most installation resources to be located in the storage repository, managed by
Oracle VM Manager, with the exception of mounted ISO files for paravirtualized guests. See Section 3.5,
“Managing Virtual Machine Resources” for more information on importing these resources into the Oracle
Virtual Compute Appliance repository.
29
Managing Virtual Machines
Before you create a virtual machine that requires network connectivity, or a paravirtualized machine which
requires network connectivity to perform the operating system install, you must generate some virtual
network interfaces using the VNIC Manager. See Section 3.6, “Configuring Network Resources For Virtual
Machines” for information on using the VNIC Manager.
The following list provides an outline of actions that you can perform in this tab, with links to the relevant
documentation within the Oracle VM User's Guide:
Managing Virtual Machines
• Create a virtual machine
You can create a virtual machine following the instructions provided in the section entitled Creating a
Virtual Machine.
You do not need to create any additional server pools. You need only ensure that your installation media
has been correctly imported into the Oracle Virtual Compute Appliance repository.
• View virtual machine information and events
You can view information about your virtual machine or access virtual machine events by following the
information outlined in the section entitled Viewing Virtual Machine Information and Events.
• Edit a virtual machine
You can edit virtual machine parameters as described in the section entitled Editing a Virtual Machine.
You can also convert a virtual machine to use paravirtualization. This involves making changes to
the virtual machine itself, and then editing its Oracle VM Domain Type. Refer to the section entitled
Converting to Paravirtualized Guests or Installing Paravirtualized Drivers for information on converting a
virtual machine to use paravirtualization.
• Start a virtual machine
Further information is provided in the section entitled Starting Virtual Machines.
• Stop a virtual machine
Further information is provided in the section entitled Stopping (Shutting Down) Virtual Machines.
• Kill a virtual machine
Further information is provided in the section entitled Killing Virtual Machines.
• Restart a virtual machine
Further information is provided in the section entitled Restarting Virtual Machines.
• Suspend a virtual machine
Further information is provided in the section entitled Suspending Virtual Machines.
• Resume a virtual machine
Further information is provided in the section entitled Resuming a Virtual Machine.
• Move a virtual machine between repositories
30
Monitoring Compute Node Information and Events
It is possible to create alternate repositories using external storage, however this configuration is beyond
the scope of a normal Oracle Virtual Compute Appliance configuration and is not recommended. If you
have chosen to create an alternate repository, this function can be used to move a virtual machine
from one repository to another. It is important to understand that virtual machines hosted on alternate
repositories are outside of the scope of your support agreement. Refer to the section entitled Moving
Virtual Machines Between Repositories for more information.
• Move a virtual machine from one server to another
Further information is provided in the section entitled Moving Virtual Machines Between Oracle VM
Servers.
• Move a virtual machine to or from the Unassigned Virtual Machines folder
Further information is provided in the section entitled Moving Virtual Machines To/From Unassigned
Virtual Machines Folder.
• Migrate a virtual machine
Since there is only a single server pool available for Oracle Virtual Compute Appliance X3-2, migration
of virtual machines can only be achieved between servers and between a server and the Unassigned
Virtual Machines folder. All compute nodes use the same CPU architecture, so you do not need to
modify Server Processor Compatibility Groups.
Information on migrating virtual machines is provided in the section entitled Migrating Virtual Machines.
• Delete a virtual machine
Further information is provided in the section entitled Deleting Virtual Machines.
• Send a message to a virtual machine
If you have installed Oracle VM Guest Additions within your virtual machine, you can use the Oracle
VM Messaging framework to send messages to your virtual machines to trigger actions within a virtual
machine. Refer to the section entitled Sending Messages to Virtual Machines for more information.
• Connect to a virtual machine console
Further information is provided in the section entitled Connecting to a Virtual Machine.
Monitoring Compute Node Information and Events
• View Oracle VM Server information and events
For more information on the options available to you, refer to the section entitled Viewing Oracle VM
Server Information and Events.
31
Managing Virtual Machine Resources
Figure 3.1 A view of the Servers and VMs tab
3.5 Managing Virtual Machine Resources
The Repositories tab provides a view of the Oracle Virtual Compute Appliance repository. By default, a
shared repository is configured on the Sun ZFS Storage Appliance 7320 and named Rack1-repository.
Additional local repositories are configured using the free disk space of each compute node. None of the
default repository configurations may be altered.
Caution
Using local storage on the compute nodes has implications that you should take
into account when planning the deployment of your virtual environment. For
example:
• Virtual machines with resources in a local storage repository cannot be migrated
to another compute node.
• Templates, assemblies and ISOs in local storage repositories cannot be used to
create virtual machines on another compute node.
• If a compute node becomes unavailable, its locally stored virtual machines and
resources cannot be restored or migrated to another compute node for continued
service.
• The virtual machines and resources in local storage repositories are not protected
by automatic failover and high-availability mechanisms normally offered by a
clustered Oracle VM server pool with shared storage repository.
The Repositories tab is used to manage virtual machine resources, such as installation media and virtual
disks. From this tab, it is possible to create, import or clone Oracle VM templates, assemblies and ISO
image files. It is also possible to create, modify, or clone virtual disks here. The following list provides an
outline of actions that you can perform in this tab, with links to the relevant documentation within the Oracle
VM User's Guide:
32
Managing Virtual Machine Resources
• Manage Virtual Machine Templates
• Import a template
• Create a template
• Edit a template
• Delete a template
• Clone a template
• Move a template
• Manage a template clone customizer
All documentation for these actions can be found in the section entitled Virtual Machine Templates.
• Manage Virtual Machine Assemblies
• Import an assembly
• Create a template from an assembly
• Edit an assembly
• Delete an assembly
• Refresh an assembly
All documentation for these actions can be found in the section entitled Assemblies.
• Manage Virtual Machine ISO Image Files
• Import an ISO
• Edit an ISO
• Delete an ISO
• Clone an ISO
All documentation for these actions can be found in the section entitled ISO Files (CD/DVD Images).
• Manage Virtual Disks
• Create a virtual disk
• Import a virtual disk
• Edit a virtual disk
• Delete a virtual disk
• Clone a virtual disk
All documentation for these actions can be found in the section entitled Virtual Disks.
• View Virtual Machine Configuration Entries
33
Configuring Network Resources For Virtual Machines
For more information, refer to the section entitled Virtual Machine Configuration Files.
While it is possible to create additional repositories using alternate storage, this is beyond the scope of a
normal Oracle Virtual Compute Appliance configuration and is not recommended.
3.6 Configuring Network Resources For Virtual Machines
The Networking tab is used to manage networks within the Oracle VM environment running on the Oracle
Virtual Compute Appliance. By default, the following networks are already defined and must not be altered:
• 192.168.140.0 : the management network
This is a private network used exclusively for Oracle VM management traffic. Both management nodes
and all compute nodes are connected to this network through their bond0 interface.
• 192.168.40.0 : the storage network
This is a private IPoIB network used exclusively for traffic to and from the Sun ZFS Storage Appliance
7320. Both management nodes and both storage controllers are connected to this network through their
bond1 interface.
Additionally, three networks are listed with the VM Network role:
• vm_public_vlan
This default network is the standard choice for virtual machines requiring external network connectivity. It
uses VLAN 1 from the VLAN Group named vm_public_vlan_vgrp. To use the VLANs of your choice
configure them as follows:
1. Add the tags or IDs to the VLAN Group vm_public_vlan_vgrp.
The process for editing VLAN Groups is described in the Oracle VM User's Guide in the section
entitled Editing a VLAN Group.
2. Create a new VLAN-only network with the VM role for each VLAN tag you added to the VLAN Group.
Each new network should be configured like the vm_public_vlan network, but with a different
VLAN segment.
The process for creating VLAN-only networks is described in the Oracle VM User's Guide in the
section entitled Creating a Network.
3. Configure your data center network accordingly.
For details, see Section 5.3, “Configuring Data Center Switches for VLAN Traffic”.
• vm_private
This default network is intended for virtual machines requiring network connectivity to other virtual
machines hosted on the appliance, but not external to the appliance. It uses VLAN 1 from the VLAN
Group named vm_private_vgrp. To use the VLANs of your choice configure them as follows:
1. Add the tags or IDs to the VLAN Group vm_private_vgrp.
The process for editing VLAN Groups is described in the Oracle VM User's Guide in the section
entitled Editing a VLAN Group.
34
Configuring Network Resources For Virtual Machines
2. Create a new VLAN-only network with the VM role for each VLAN tag you added to the VLAN Group.
Each new network should be configured like the vm_private network, but with a different VLAN
segment.
The process for creating VLAN-only networks is described in the Oracle VM User's Guide in the
section entitled Creating a Network.
• mgmt_public_eth
This network is automatically created during the initial configuration of the appliance. It uses the public
network that you configured in the Oracle Virtual Compute Appliance Dashboard. The primary function
of this network is to provide access to the management nodes from the data center network, and
enable the management nodes to run a number of system services. Since all compute nodes are also
connected to this network, it may also be used to provide external network access to virtual machines
when no VLANs are required. The subnet associated with this network is the same as your data center
network.
For more information about Oracle Virtual Compute Appliance network configuration, see Section 1.2.4,
“Network Infrastructure”.
Caution
Do not create a new network in Oracle VM using the eth0 network ports of the
servers in the server pool. Those ports are assigned an IP address by the DHCP
server on the internal appliance management network (192.168.4.0). If virtual
machines are connected to this network, they are likely to cause IP conflicts and
security issues.
Do not edit or delete any of the networks listed here. Doing so may cause your appliance to malfunction.
In an Oracle Virtual Compute Appliance context, use the Networking tab to configure and manage Virtual
NICs and VLANs for use by your virtual machines.
The creation and management of Virtual NICs is important for the facilitation of networking within your
virtual machines. Use the Virtual NICs subtab to create batches of Virtual NICs that virtual machines are
able to use. The process for creating Virtual NICs is described in the Oracle VM User's Guide in the section
entitled Managing VNICs.
35
Viewing and Managing Storage Resources
Figure 3.2 A view of the Networking tab
3.7 Viewing and Managing Storage Resources
The storage resources underlying the Oracle Virtual Compute Appliance repository and the server pool
clustering file system are listed under the Storage tab within Oracle VM Manager. The ZFS storage is
exported through NFS and is listed under the File Servers folder. Do not modify or attempt to delete this
storage.
It is possible to attach additional storage for use within Oracle VM, if you intend to create an additional
repository to store virtual machine resources. This activity is beyond the scope of a normal Oracle Virtual
Compute Appliance configuration and is not recommended. Information on adding File Servers to your
Oracle VM environment is provided in the Oracle VM User's Guide in the section entitled Discovering File
Servers.
Note that only NFS storage is supported within Oracle Virtual Compute Appliance X3-2 Release 1.0.
You are fully capable of using other networked storage, available on the public network, within your own
Virtual Machines. The limitations described here apply only to storage used by the Oracle VM environment
running within your Oracle Virtual Compute Appliance.
36
Tagging of Resources in Oracle VM Manager
Figure 3.3 A view of the Storage tab
3.8 Tagging of Resources in Oracle VM Manager
The Tools and Resources tab is used to configure global settings for Oracle VM and to manage tags,
which can be used to identify and group resources. Since many of the global settings such as server
update management and NTP configuration are managed automatically within Oracle Virtual Compute
Appliance, you do not need to edit any settings here. Those configuration changes could cause the
appliance to malfunction.
You are able to create, edit and delete tags, by following the instructions in the section entitled Tags.
3.9 Managing Jobs and Events
The Jobs tab provides a view of the job history within Oracle VM Manager. It is used to track and audit
jobs and to help troubleshoot issues within the Oracle VM environment. Jobs and events are described in
detail within the Oracle VM User's Guide in the section entitled Working with the Jobs Framework.
Since the Recurring Jobs, described in the Oracle VM User's Guide, are all automated and handled directly
by the Oracle Virtual Compute Appliance, you must not edit any of the settings for recurring jobs.
37
38
Chapter 4 Servicing Oracle Virtual Compute Appliance X3-2
Components
Table of Contents
4.1 Replaceable Components ........................................................................................................... 39
4.1.1 Rack Components ........................................................................................................... 40
4.1.2 Sun Server X3-2 Components .......................................................................................... 40
4.1.3 Sun ZFS Storage Appliance 7320 Components ................................................................. 41
4.1.4 Oracle Switch ES1-24 Components .................................................................................. 43
4.1.5 NM2-36P Sun Datacenter InfiniBand Expansion Switch Components .................................. 43
4.1.6 Oracle Fabric Interconnect F1-15 Director Switch Components ........................................... 44
4.2 Preparing Oracle Virtual Compute Appliance X3-2 for Service ....................................................... 44
4.3 Servicing the Oracle Virtual Compute Appliance X3-2 Rack System .............................................. 45
4.3.1 Powering Down Oracle Virtual Compute Appliance X3-2 (When Required) .......................... 45
4.3.2 Service Procedures for Rack System Components ............................................................ 46
4.4 Servicing a Sun Server X3-2 ....................................................................................................... 47
4.4.1 Powering Down Sun Server X3-2 for Service (When Required) .......................................... 47
4.4.2 Service Procedures for Sun Server X3-2 Components ....................................................... 48
4.5 Servicing the Sun ZFS Storage Appliance 7320 ........................................................................... 49
4.5.1 Powering Down the Sun ZFS Storage Appliance 7320 for Service (When Required) ............. 49
4.5.2 Service Procedures for Sun ZFS Storage Appliance 7320 Components .............................. 50
4.6 Servicing an Oracle Switch ES1-24 ............................................................................................. 51
4.6.1 Powering Down the Oracle Switch ES1-24 for Service (When Required) ............................. 51
4.6.2 Service Procedures for Oracle Switch ES1-24 Components ............................................... 52
4.7 Servicing an NM2-36P Sun Datacenter InfiniBand Expansion Switch ............................................. 52
4.7.1 Powering Down the NM2-36P Sun Datacenter InfiniBand Expansion Switch for Service
(When Required) ...................................................................................................................... 52
4.7.2 Service Procedures for NM2-36P Sun Datacenter InfiniBand Expansion Switch
Components ............................................................................................................................. 53
4.8 Servicing an Oracle Fabric Interconnect F1-15 Director Switch ...................................................... 53
4.8.1 Powering Down the Oracle Fabric Interconnect F1-15 Director Switch for Service (When
Required) ................................................................................................................................. 53
4.8.2 Service Procedures for Oracle Fabric Interconnect F1-15 Director Switch Components ......... 54
This chapter contains an overview of replaceable components in your Oracle Virtual Compute Appliance
X3-2, and provides servicing instructions for customer-replaceable units.
4.1 Replaceable Components
According to Oracle's Component Replacement Policy, the replaceable components in your system are
designated as either field-replaceable units (FRUs) or customer-replaceable units (CRUs).
• A part designated as a FRU must be replaced by an Oracle-qualified service technician.
• A part designated as a CRU can be replaced by a person who is not an Oracle-qualified service
technician.
All CRUs and FRUs are listed and identified in this chapter, but only the servicing instructions for CRUs
are included in this Oracle Virtual Compute Appliance X3-2 Administrator's Guide. For FRU replacement,
please contact Oracle.
39
Rack Components
4.1.1 Rack Components
The following table lists the replaceable components of the Oracle Virtual Compute Appliance rack.
Note
For the current list of replacement parts and their manufacturing part numbers,
please refer to the Oracle Virtual Compute Appliance X3-2 components list in the
Oracle System Handbook.
You access the Oracle System Handbook using this link: https://support.oracle.com/
handbook_private/.
Click Current Systems, then click Oracle Virtual Compute Appliance X3-2 Hardware
to open the main product page in the System Handbook.
Table 4.1 Replaceable Oracle Virtual Compute Appliance Rack Components
Component Description
FRU/CRU
Hot-Swap
10Gbps QSFP to QSFP Cable, 3m
CRU
Yes
Ethernet Cable, Category 5/5E, RJ45 to RJ45, 10-Foot, Blue
CRU
Yes
Ethernet Cable, Category 5/5E, RJ45 to RJ45, 1m, Grey
CRU
Yes
Ethernet Cable, Category 5/5E, RJ45 to RJ45, 7' Black
CRU
Yes
Ethernet Cable, Category 5/5E, RJ45 to RJ45, 7-Foot, Green
CRU
Yes
Ethernet Cable, Category 5/5E, RJ45 to RJ45, 7-Foot, Yellow
CRU
Yes
Ethernet Cable, Category 6A, RJ45 to RJ45, 10-Foot, Black
CRU
Yes
Ethernet Cable, Category 6A, RJ45 to RJ45, 10-Foot, Blue
CRU
Yes
Cable Management Arm 1U
CRU
1U/2U Screw-Mount Slide Rail Kit
CRU
1U/2U Cable Management Arm (Snap-in)
CRU
10Gbps SFP+ TwinX Cable, 1m
CRU
1.25Gb/Sec Copper SFP Transceiver
CRU
10Gbps QSFP to QSFP Cable, 1m
CRU
Yes
15KVA Three-Phase PDU, North America
FRU
No
15KVA Three-Phase PDU, International
FRU
No
15KVA Single-Phase PDU, North America
FRU
No
22KVA Single-Phase PDU, North America
FRU
No
22KVA Single-Phase PDU, North America
FRU
No
24KVA Three-Phase PDU, North America
FRU
No
24KVA Three-Phase PDU, International
FRU
No
Sun Rack II 1242:
Yes
Power Distribution Units (PDUs):
For rack-level CRU servicing instructions, see Section 4.3, “Servicing the Oracle Virtual Compute
Appliance X3-2 Rack System”.
4.1.2 Sun Server X3-2 Components
40
Sun ZFS Storage Appliance 7320 Components
The following table lists the replaceable components of the Sun Server X3-2 management and compute
nodes.
Note
For the current list of replacement parts and their manufacturing part numbers,
please refer to the Oracle Virtual Compute Appliance X3-2 components list in the
Oracle System Handbook.
You access the Oracle System Handbook using this link: https://support.oracle.com/
handbook_private/.
Click Current Systems, then click Oracle Virtual Compute Appliance X3-2 Hardware
to open the main product page in the System Handbook.
Table 4.2 Replaceable Sun Server X3-2 Components
Component Description
FRU/CRU
Hot-Swap
System Board Assembly
FRU
No
Dual Counter Rotating Fan Module
CRU
Yes
1-Slot PCI Express Riser Assembly
FRU
No
2-Slot PCI Express Riser Assembly
FRU
No
A256 600 Watt AC Input Power Supply
CRU
Yes
2.2GHz Intel 8-core Xeon E5-2660, 95W
FRU
No
Pre-Greased CPU Heatsink
FRU
No
2.5" Disk Cage Front Indicator Module
FRU
No
4-Slot 2.5" Disk Backplane Assembly
FRU
No
900GB - 10000 RPM SAS Disk Assembly with 1 bracket
CRU
Yes
16GB DDR3-1600 DIMM, 1.35V
FRU
No
Dual 40Gbps InfiniBand 4x QDR PCI Express Low Profile Host Channel
Adapter
FRU
No
4GB USB 2.0 Flash Drive
FRU
No
8-Port 6Gbps SAS-2 RAID PCI Express HBA, B4 ASIC
FRU
No
1U/2U Remote Battery Assembly
CRU
No
ForSun Server X3-2 CRU servicing instructions, see Section 4.4, “Servicing a Sun Server X3-2”.
4.1.3 Sun ZFS Storage Appliance 7320 Components
The following table lists the replaceable components of the Sun ZFS Storage Appliance 7320.
Note
For the current list of replacement parts and their manufacturing part numbers,
please refer to the Oracle Virtual Compute Appliance X3-2 components list in the
Oracle System Handbook.
You access the Oracle System Handbook using this link: https://support.oracle.com/
handbook_private/.
41
Sun ZFS Storage Appliance 7320 Components
Click Current Systems, then click Oracle Virtual Compute Appliance X3-2 Hardware
to open the main product page in the System Handbook.
Table 4.3 Replaceable Sun ZFS Storage Appliance 7320 Components
Component Description
FRU/CRU
Hot-Swap
2.4GHz Intel Quad-Core Xeon E5620, 12MB, 80W
FRU
No
Xeon Heatsink
FRU
No
8GB Registered DDR3L-1333/DDR3L-1600 DIMM, 1.35V
CRU
No
512GB Solid State Drive SATA-2 Assembly
CRU
Yes
500GB - 10000 RPM SATA Disk Assembly with 1 bracket
CRU
Yes
USB Assembly
CRU
Yes
Dual 40Gbps InfiniBand 4x QDR PCI Express Low Profile Host Channel
Adapter
CRU
No
4GB USB 2.0 Flash Drive
CRU
No
1-Slot x8 PCI Express Riser Assembly
CRU
No
1-Slot x16 PCI Express Riser Assembly
CRU
No
Power Distribution Board
FRU
No
8-Slot Disk Backplane, SATA DVD
FRU
No
PDB to System Board Ribbon Cable
CRU
SFF8087 to SFF8087 Mini-SAS Cable, 690mm
CRU
6-Pin Fan Power Cable
CRU
Fan Data Ribbon Cable
CRU
Bus Bar Set
CRU
Fan Board Assembly
CRU
Connector Board Assembly, SATA DVD
FRU
Fan Module
CRU
Yes
System Board Assembly
FRU
No
3V Lithium Coin Cell Battery
CRU
No
Type A247A 760 Watt AC Input Power Supply
CRU
Yes
Cluster Heartbeat Assembly
CRU
8-Port 6Gbps SAS-2 RAID HBA
CRU
No
580 Watt AC Input Power Supply
CRU
Yes
6Gbps SAS-2 I/O Controller Module
CRU
Yes
2RU Chassis Assembly with Midplane
FRU
No
4X Mini SAS Cable, SFF-8088 to SFF-8088, 2M
CRU
4X Mini SAS Cable, SFF-8088 to SFF-8088, 0.5M
CRU
DE2-24P Mounting Rail Kit
CRU
900GB 10000 RPM SAS Disk Drive Assembly
CRU
Sun ZFS 7320 Storage Head:
Oracle Storage DE2-24P Disk Shelf:
42
Yes
Oracle Switch ES1-24 Components
Component Description
FRU/CRU
Hot-Swap
73GB SAS Solid State Drive Assembly
CRU
Yes
For Sun ZFS Storage Appliance 7320 CRU servicing instructions, see Section 4.5, “Servicing the Sun ZFS
Storage Appliance 7320”.
4.1.4 Oracle Switch ES1-24 Components
The following table lists the replaceable components of the Oracle Switch ES1-24.
Note
For the current list of replacement parts and their manufacturing part numbers,
please refer to the Oracle Virtual Compute Appliance X3-2 components list in the
Oracle System Handbook.
You access the Oracle System Handbook using this link: https://support.oracle.com/
handbook_private/.
Click Current Systems, then click Oracle Virtual Compute Appliance X3-2 Hardware
to open the main product page in the System Handbook.
Table 4.4 Replaceable Oracle Switch ES1-24 Components
Component Description
FRU/CRU
Hot-Swap
24-Port ES1-24 Switch Assembly
FRU
No
Rear-to-Front Airflow Fan Module
FRU
Yes
Type A247A 760 Watt AC Input Power Supply
CRU
Yes
For Oracle Switch ES1-24 CRU servicing instructions, see Section 4.6, “Servicing an Oracle Switch
ES1-24”.
4.1.5 NM2-36P Sun Datacenter InfiniBand Expansion Switch Components
The following table lists the replaceable components of the Sun Datacenter InfiniBand Expansion Switch
NM2-36P.
Note
For the current list of replacement parts and their manufacturing part numbers,
please refer to the Oracle Virtual Compute Appliance X3-2 components list in the
Oracle System Handbook.
You access the Oracle System Handbook using this link: https://support.oracle.com/
handbook_private/.
Click Current Systems, then click Oracle Virtual Compute Appliance X3-2 Hardware
to open the main product page in the System Handbook.
Table 4.5 Replaceable NM2-36P Sun Datacenter InfiniBand Expansion Switch Components
Component Description
FRU/CRU
Hot-Swap
Datacenter InfiniBand Switch 36 Subassembly
FRU
No
Type A247A 760 Watt AC Input Power Supply
CRU
Yes
43
Oracle Fabric Interconnect F1-15 Director Switch Components
Component Description
FRU/CRU
Hot-Swap
Rear-to-Front Airflow Fan Module
CRU
Yes
For NM2-36P Sun Datacenter InfiniBand Expansion Switch CRU servicing instructions, see Section 4.7,
“Servicing an NM2-36P Sun Datacenter InfiniBand Expansion Switch”.
4.1.6 Oracle Fabric Interconnect F1-15 Director Switch Components
The following table lists the replaceable components of the Oracle Fabric Interconnect F1-15 Director
Switch.
Note
For the current list of replacement parts and their manufacturing part numbers,
please refer to the Oracle Virtual Compute Appliance X3-2 components list in the
Oracle System Handbook.
You access the Oracle System Handbook using this link: https://support.oracle.com/
handbook_private/.
Click Current Systems, then click Oracle Virtual Compute Appliance X3-2 Hardware
to open the main product page in the System Handbook.
Table 4.6 Replaceable Oracle Fabric Interconnect F1-15 Director Switch Components
Component Description
FRU/CRU
Hot-Swap
F1-15 Power Supply
CRU
Yes
QDR Fabric Board
CRU
No
2U/4U Front Panel G2 (Com-X i7)
FRU
No
F1-15 I/O Management Module
CRU
No
F1-15 Fan Tray
CRU
Yes
Quad Port 10 Gigabit Ethernet (GbE) Module
CRU
Yes
Dual Port 2 × 8 Gigabit Fibre Channel I/O Module
CRU
Yes
F1-15 Chassis without Power Supply, Fan, Fabric Board, Front Panel
FRU
No
For Oracle Fabric Interconnect F1-15 Director Switch CRU servicing instructions, see Section 4.8,
“Servicing an Oracle Fabric Interconnect F1-15 Director Switch”.
4.2 Preparing Oracle Virtual Compute Appliance X3-2 for Service
This section describes safety considerations and prerequisites for component replacement procedures.
Safety Precautions
For your protection, observe the following safety precautions when servicing your equipment:
• Follow all standard cautions, warnings, and instructions marked on the equipment and described in the
following documents:
• The printed document Important Safety Information for Sun Hardware Systems (7063567)
• The Oracle Virtual Compute Appliance X3-2 Safety and Compliance Guide (E39921-02)
44
Electrostatic Discharge Safety
• Follow the safety guidelines described in the Oracle Virtual Compute Appliance X3-2 Installation Guide
(E39907-03):
• Electrical Power Requirements
• Rack-mount Safety Precautions
• Follow the electrostatic discharge safety practices as described in this section.
• Disconnect all power supply cords before servicing components.
Electrostatic Discharge Safety
Devices that are sensitive to electrostatic discharge (ESD), such as motherboards, PCIe cards, drives,
processors, and memory cards require special handling.
Caution
Equipment Damage
Take antistatic measures and do not touch components along their connector
edges.
• Use an antistatic wrist strap.
Wear an antistatic wrist strap and use an antistatic mat when handling components such as drive
assemblies, boards, or cards. When servicing or removing rack node components, attach an antistatic
strap to your wrist and then to a metal area on the chassis. Then disconnect the power cords from the
component. Following this practice equalizes the electrical potentials between you and the component.
An antistatic wrist strap is not included in the Oracle Virtual Compute Appliance shipment.
• Use an antistatic mat.
Place ESD-sensitive components such as the motherboard, memory, and other PCB cards on an
antistatic mat.
The following items can be used as an antistatic mat:
• Antistatic bag used to wrap an Oracle replacement part
• An ESD mat (orderable from Oracle)
• A disposable ESD mat (shipped with some replacement parts or optional system components)
4.3 Servicing the Oracle Virtual Compute Appliance X3-2 Rack
System
This section provides instructions to service customer-replaceable units (CRUs) in the appliance rack.
Before starting any service procedure, read and follow the guidelines in Section 4.2, “Preparing Oracle
Virtual Compute Appliance X3-2 for Service”.
4.3.1 Powering Down Oracle Virtual Compute Appliance X3-2 (When Required)
Some service procedures may require you to power down Oracle Virtual Compute Appliance X3-2.
Perform the following steps to manually power down the system.
45
Service Procedures for Rack System Components
Powering down the system
1. Press the Power button on the Sun Server X3-2 compute nodes in order to shut them down gracefully.
2. Press the Power button on the Sun Server X3-2 management nodes in order to shut them down
gracefully.
Once the Sun Server X3-2 machines are powered off, you can proceed to power off the storage
appliance.
3. Press the Power button on the storage server heads attached to the chassis of the storage device.
4. Press the Power button on both Oracle Fabric Interconnect F1-15 Director Switches.
5. Toggle the rack Power switches to the Off position.
Note
The Ethernet and InfiniBand switches do not have power switches. They power
off when power is removed, by way of the power distribution unit (PDU) or at the
breaker in the data center.
Returning the system to operation
1. Toggle the power distribution unit (PDU) circuit breakers of both PDUs to the On position.
2. Wait at least two minutes to allow the PDUs to complete their power-on sequence.
The Ethernet and InfiniBand switches and storage server heads are powered on with the PDUs.
3. Press the Power button on each Oracle Fabric Interconnect F1-15 Director Switch.
Wait until the Status LED stops blinking and is solid green, indicating the system has finished booting.
4. Press the Power button on the Sun Server X3-2 management nodes.
The management node that completes booting first assumes the master role.
5. When the management nodes are up, press the Power button on the Sun Server X3-2 compute nodes.
When all compute nodes are up, verify the status of all system components in Oracle VM Manager.
If no components are in error state, the appliance is ready to resume normal operation.
4.3.2 Service Procedures for Rack System Components
Table 4.7 Service Instructions for Rack System Components
Replaceable Part(s)
Hot-Swap
Instructions
Power cables
Ethernet cables
InfiniBand cables
SFP transceivers
Cable management arms
(CMAs)
For removal and installation of a cable management arm,
refer to the Sun Server X3-2 Installation Guide (part no.
E22359).
46
Servicing a Sun Server X3-2
Replaceable Part(s)
Hot-Swap
Instructions
• “Remove the Second-Generation Cable Management
Arm”
• “Install the Second-Generation Cable Management
Arm”
Slide rails
To service the slide rails, the Sun Server X3-2 must be
removed from the rack. For instructions, refer to the Sun
Server X3-2 Service Manual (part no. E22313).
• “Remove the Server From the Rack”
• “Reinstall the Server Chassis Into the Rack”
For slide rail installation instructions, refer to the section
Attach Tool-less Slide-Rail Assemblies in the Sun Server
X3-2 Installation Guide (part no. E22359). To remove the
slide rails, reverse the installation steps.
4.4 Servicing a Sun Server X3-2
This section provides instructions to service customer-replaceable units (CRUs) in a Sun Server X3-2
management node or compute node. Before starting any service procedure, read and follow the guidelines
in Section 4.2, “Preparing Oracle Virtual Compute Appliance X3-2 for Service”.
4.4.1 Powering Down Sun Server X3-2 for Service (When Required)
If you need to execute a service procedure that requires the Sun Server X3-2 to be powered down, follow
these instructions:
Note
The management nodes are not placed in maintenance node for servicing. If you
need to power down the master management node, bring it offline as described
below and wait for the other management node to take over the master role. If you
need to power down the secondary management node, no additional steps are
required.
Placing a compute node into maintenance mode
Before a Sun Server X3-2 compute node can be powered down, it must be placed into maintenance
mode from within Oracle VM Manager. As a result, all virtual machines running on the compute node are
automatically migrated to other servers in the Oracle VM server pool, if they are available. For details, refer
to the section “Placing an Oracle VM Server into Maintenance Mode” in the Oracle VM User's Guide.
1. Log in to the Oracle VM Manager Web UI.
For details, refer to the section “Section 3.2, “Logging into the Oracle VM Manager Web UI”” in the
Oracle Virtual Compute Appliance X3-2 Administrator's Guide.
a. Enter the following address in a Web browser: https://manager-vip:7002/ovm/console.
Replace manager-vip with the virtual IP address, or corresponding host name, that you have
configured for your management nodes during installation.
b. Enter the Oracle VM Manager user name and password in the respective fields and click OK.
47
Service Procedures for Sun Server X3-2 Components
2. In the Servers and VMs tab, select the Oracle VM Server in the navigation pane. Click Edit Server in
the management pane toolbar.
The Edit Server dialog box is displayed.
3. Select the Maintenance Mode check box to place the Oracle VM Server into maintenance mode. Click
OK.
The Oracle VM Server is in maintenance mode and ready for servicing.
4. When the Sun Server X3-2 is ready to rejoin the Oracle VM server pool, perform the same procedure
and clear the Maintenance Mode check box.
Powering down the system
These steps briefly describe the procedure. For detailed instructions, refer to the chapter “Preparing for
Service” in the Sun Server X3-2 Service Manual (part no. E22313).
1. Power down the server gracefully whenever possible.
The easiest way is to press and quickly release the Power button on the front panel.
2. Perform immediate shutdown only if the system does not respond to graceful power-down tasks.
Caution
System data may become corrupted during an immediate power down. Use this
task only after attempting to power down the server gracefully.
3. Disconnect the power cables and data cables from the server.
4. Extend the server to the maintenance position.
5. If necessary, remove the cable management arm (CMA) and pull the server out of the rack.
Caution
The server weighs approximately 18.1 kg (39.9 lb). Two people are required to
dismount and carry the chassis.
Returning the system to operation
These steps briefly describe the procedure. For detailed instructions, refer to the chapter “Returning the
Server to Operation” in the Sun Server X3-2 Service Manual (part no. E22313).
1. If the top cover was removed to service a component, reinstall the top cover on the server.
2. Reinstall the server chassis into the rack, making sure the CMA is correctly installed when you return
the server to its normal rack position.
3. Reconnect data cables and power cords.
4. Power on the server.
4.4.2 Service Procedures for Sun Server X3-2 Components
For parts that are not hot-swappable, power down the Sun Server X3-2 before starting the service
procedure. If the server is in use in the Oracle VM environment, place it in maintenance mode first. This
protects your virtual infrastructure against data corruption, and allows it to remain in service as long as the
configuration of your environment allows it.
48
Servicing the Sun ZFS Storage Appliance 7320
Generally speaking, hot-swappable components can be serviced without specific additional steps for
Oracle Virtual Compute Appliance. Follow the applicable procedure in the Service Manual. The following
table provides links to each service procedure and indicates whether parts are hot-swappable or require
the component to be taken offline and powered down.
Table 4.8 Service Procedures for Sun Server X3-2 Components
Replaceable Part(s)
Hot-Swap
URL
Storage drives
Yes
http://docs.oracle.com/cd/E22368_01/html/E27242/
z40000091011460.html#scrolltoc
Fan Modules
Yes
http://docs.oracle.com/cd/E22368_01/html/E27242/
z40000091014194.html#scrolltoc
Power supplies
Yes
http://docs.oracle.com/cd/E22368_01/html/E27242/
z40000091014153.html#scrolltoc
DIMMs
No
http://docs.oracle.com/cd/E22368_01/html/E27242/
z40003f01425075.html#scrolltoc
No
http://docs.oracle.com/cd/E22368_01/html/E27242/
z40000f91037394.html#scrolltoc
No
http://docs.oracle.com/cd/E22368_01/html/E27242/
z40000f91037409.html#scrolltoc
DVD drive
No
http://docs.oracle.com/cd/E22368_01/html/E27242/
z40002671423025.html#scrolltoc
Internal USB flash drives
No
http://docs.oracle.com/cd/E22368_01/html/E27242/
z4000a6d1442801.html#scrolltoc
No
http://docs.oracle.com/cd/E22368_01/html/E27242/
z40003f01423753.html#scrolltoc
(Oracle-qualified service
technician only)
PCI Express risers
(Oracle-qualified service
technician only)
PCI Express cards
(Oracle-qualified service
technician only)
(Oracle-qualified service
technician only)
Battery
4.5 Servicing the Sun ZFS Storage Appliance 7320
This section provides instructions to service customer-replaceable units (CRUs) in the Sun ZFS Storage
Appliance 7320. Before starting any service procedure, read and follow the guidelines in Section 4.2,
“Preparing Oracle Virtual Compute Appliance X3-2 for Service”.
4.5.1 Powering Down the Sun ZFS Storage Appliance 7320 for Service (When
Required)
If you need to execute a service procedure that requires the Sun ZFS Storage Appliance 7320 to be
powered down, follow these instructions:
Powering down the storage head/controller
Powering down or removing all SAS chains from a disk shelf will cause the controllers to panic to prevent
data loss. To avoid this, shut down the controllers before decommissioning the shelf.
1. Log in to the BUI.
49
Service Procedures for Sun ZFS Storage Appliance 7320 Components
2. Click the Power icon on the left side of the masthead.
If the BUI is not accessible, select one of the following options:
Note
In a configuration with clustered storage heads, always shut down the standby head
before the active head.
• SSH into the appliance and issue the maintenance system poweroff command.
• SSH or serial console into the service processor (SP) and issue the stop /SYS command.
• Use a pen or non-conducting pointed object to press and release the Power button on the front panel.
Caution
To initiate emergency shutdown during which all applications and files will be
closed abruptly without saving, press and hold the power button for at least four
seconds until the Power/OK status indicator on the front panel flashes, indicating
that the storage controller is in standby power mode.
Powering down the disk shelf
Do not remove a component if you do not have an immediate replacement. The disk shelf must not be
operated without all components in place. Powering down or removing all SAS chains from a disk shelf
will cause the controllers to panic to prevent data loss. To avoid this, shut down the controllers before
decommissioning the shelf.
1. Stop all input and output to and from the disk shelf.
2. Wait approximately two minutes until all disk activity indicators have stopped flashing.
3. Place the power supply on/off switches to the "O" off position.
4. Disconnect the power cords from the external power source.
Powering on the storage appliance
The disk shelf must not be operated without all components in place.
1. Reconnect the disk shelf power and data cables you removed to service a component.
2. Place the power supply on/off switches on the disk shelf to the "I" on position.
3. Wait several minutes until the boot process is complete, at which time the Power LED should be solid
green.
4. Connect the storage head power cables and wait approximately two minutes until the Power/OK LED
on the front panel next to the Power button lights and remains lit.
4.5.2 Service Procedures for Sun ZFS Storage Appliance 7320 Components
For parts that are not hot-swappable, power down the Sun ZFS Storage Appliance 7320 before starting the
service procedure.
Warning
If you need to execute a service procedure that interrupts the connection between
virtual machines and their virtual disks, shut down the virtual machines in Oracle
50
Servicing an Oracle Switch ES1-24
VM Manager prior to servicing the storage hardware. Disconnecting a running
virtual machine from its disks may cause data corruption.
Generally speaking, hot-swappable components can be serviced without specific additional steps for
Oracle Virtual Compute Appliance. Follow the applicable procedure in the Service Manual. The following
table provides links to each service procedure and indicates whether parts are hot-swappable or require
the component to be taken offline and powered down.
Table 4.9 Service Procedures for Sun ZFS Storage Appliance 7320 Components
Replaceable Part(s)
Hot-Swap
URL
Storage head HDDs or SSDs
Yes
http://docs.oracle.com/cd/E28317_01/html/E38247/
maintenance__hardware__details__7x20.html#maintenance__hard
Disk shelf drives
Yes
Refer to the section “Replacing a Drive” on this page:
http://docs.oracle.com/cd/E28317_01/html/E38247/
maintenance__hardware__procedures__shelf.html
Fan modules
Yes
http://docs.oracle.com/cd/E28317_01/html/E38247/
maintenance__hardware__details__7x20.html#maintenance__hard
Storage head power supplies
Yes
http://docs.oracle.com/cd/E28317_01/html/E38247/
maintenance__hardware__details__7x20.html#maintenance__hard
Disk shelf power supplies
Yes
Refer to the section “Replacing a Power Supply” on this
page: http://docs.oracle.com/cd/E28317_01/html/E38247/
maintenance__hardware__procedures__shelf.html
Memory modules
No
http://docs.oracle.com/cd/E28317_01/html/E38247/
maintenance__hardware__details__7x20.html#maintenance__hard
PCI Express risers and cards
No
http://docs.oracle.com/cd/E28317_01/html/E38247/
maintenance__hardware__details__7x20.html#maintenance__hard
Battery
No
http://docs.oracle.com/cd/E28317_01/html/E38247/
maintenance__hardware__details__7x20.html#maintenance__hard
System indicator boards
Yes
http://docs.oracle.com/cd/E26765_01/html/E26399/
maintenance__hardware__details__7x20.html#maintenance__hard
Disk shelf I/O modules
Yes
Refer to the section “Replacing an I/O Module” on this
page: http://docs.oracle.com/cd/E28317_01/html/E38247/
maintenance__hardware__procedures__shelf.html
Disk shelf SIM boards
Yes
Refer to the section “Replacing a SIM Board” on this
page: http://docs.oracle.com/cd/E28317_01/html/E38247/
maintenance__hardware__procedures__shelf.html
4.6 Servicing an Oracle Switch ES1-24
This section provides instructions to service customer-replaceable units (CRUs) in an Oracle Switch
ES1-24. Before starting any service procedure, read and follow the guidelines in Section 4.2, “Preparing
Oracle Virtual Compute Appliance X3-2 for Service”.
4.6.1 Powering Down the Oracle Switch ES1-24 for Service (When Required)
If you need to execute a service procedure that requires the Oracle Switch ES1-24 to be powered down,
follow these instructions:
Powering down the switch
1. To power down an individual power supply, remove its power cord.
51
Service Procedures for Oracle Switch ES1-24 Components
2. To power down the switch, remove the power cords from both power supplies.
Returning the switch to operation
1. Reconnect the power cords to both power supplies.
2. Verify that the switch has power by checking the status LEDs.
The AC LED lights green to indicate the power supply is connected to line power. A moment later, the
OK LED lights green to indicate the power supply is fully operational.
4.6.2 Service Procedures for Oracle Switch ES1-24 Components
For parts that are not hot-swappable, power down the Oracle Switch ES1-24 before starting the service
procedure.
Warning
Internal Ethernet connectivity is affected while the component is out of service.
Please take the necessary precautions.
Caution
When replacing the entire switch assembly, begin by saving the configuration from
the existing component, so that you can restore the configuration after replacement.
Generally speaking, hot-swappable components can be serviced without specific additional steps for
Oracle Virtual Compute Appliance. Follow the applicable procedure in the Service Manual. The following
table provides links to each service procedure and indicates whether parts are hot-swappable or require
the component to be taken offline and powered down.
Table 4.10 Service Procedures for Oracle Switch ES1-24 Components
Replaceable Part(s)
Hot-Swap
URL
Power supplies
Yes
http://docs.oracle.com/cd/E39109_01/html/E39116/
z40000349112.html#scrolltoc
Fan module
Yes
http://docs.oracle.com/cd/E39109_01/html/E39116/
z40000369112.html#scrolltoc
(Oracle-qualified service
technician only)
4.7 Servicing an NM2-36P Sun Datacenter InfiniBand Expansion
Switch
This section provides instructions to service customer-replaceable units (CRUs) in a NM2-36P Sun
Datacenter InfiniBand Expansion Switch. Before starting any service procedure, read and follow the
guidelines in Section 4.2, “Preparing Oracle Virtual Compute Appliance X3-2 for Service”.
4.7.1 Powering Down the NM2-36P Sun Datacenter InfiniBand Expansion
Switch for Service (When Required)
If you need to execute a service procedure that requires the NM2-36P Sun Datacenter InfiniBand
Expansion Switch to be powered down, follow these instructions:
Powering down the switch
1. To power down an individual power supply, remove its power cord.
52
Service Procedures for NM2-36P Sun Datacenter InfiniBand Expansion Switch Components
2. To power down the switch, remove the power cords from both power supplies.
Returning the switch to operation
1. Reconnect the power cords to both power supplies.
2. Verify that the switch has power by checking the status LEDs.
The AC LED lights green to indicate the power supply is connected to line power. A moment later, the
OK LED lights green to indicate the power supply is fully operational.
4.7.2 Service Procedures for NM2-36P Sun Datacenter InfiniBand Expansion
Switch Components
For parts that are not hot-swappable, power down the NM2-36P Sun Datacenter InfiniBand Expansion
Switch before starting the service procedure.
Caution
InfiniBand connectivity may be affected while the component is out of service.
Please take the necessary precautions.
Caution
When replacing the entire switch assembly, begin by saving the configuration from
the existing component, so that you can restore the configuration after replacement.
Generally speaking, hot-swappable components can be serviced without specific additional steps for
Oracle Virtual Compute Appliance. Follow the applicable procedure in the Service Manual. The following
table provides links to each service procedure and indicates whether parts are hot-swappable or require
the component to be taken offline and powered down.
Table 4.11 Service Procedures for NM2-36P Sun Datacenter InfiniBand Expansion Switch
Components
Replaceable Part(s)
Hot-Swap
URL
Power supplies
Yes
http://docs.oracle.com/cd/E26698_01/html/E26434/
z40001f49112.html#scrolltoc
Fans
Yes
http://docs.oracle.com/cd/E26698_01/html/E26434/
z40001f59112.html#scrolltoc
Data cables
Yes
http://docs.oracle.com/cd/E26698_01/html/E26434/
z40001f69112.html#scrolltoc
4.8 Servicing an Oracle Fabric Interconnect F1-15 Director Switch
This section provides instructions to service customer-replaceable units (CRUs) in an Oracle Fabric
Interconnect F1-15 Director Switch. Before starting any service procedure, read and follow the guidelines
in Section 4.2, “Preparing Oracle Virtual Compute Appliance X3-2 for Service”.
4.8.1 Powering Down the Oracle Fabric Interconnect F1-15 Director Switch for
Service (When Required)
If you need to execute a service procedure that requires the Oracle Fabric Interconnect F1-15 Director
Switch to be powered down, follow these instructions:
53
Service Procedures for Oracle Fabric Interconnect F1-15 Director Switch Components
Powering down the fabric director switch
1. Press the Power button to power down the Oracle Fabric Interconnect F1-15 Director Switch gracefully.
2. Wait for the Status LED to switch off, indicating that the component has been powered down
successfully.
Returning the fabric director switch to operation
1. Press the Power button to power on the Oracle Fabric Interconnect F1-15 Director Switch.
The Status LED blinks green, indicating that the system control processor is booting.
2. Wait until the Status LED is solid green.
This indicates that the system control processor has finished booting and the fabric director is ready for
operation.
4.8.2 Service Procedures for Oracle Fabric Interconnect F1-15 Director Switch
Components
For parts that are not hot-swappable, power down the Oracle Fabric Interconnect F1-15 Director Switch
before starting the service procedure.
Caution
Management, storage, VM and external network connectivity may be affected
while the fabric director switch or an I/O module is out of service. Please take the
necessary precautions.
Caution
When replacing the entire switch assembly, begin by saving the configuration from
the existing component, so that you can restore the configuration after replacement.
Generally speaking, hot-swappable components can be serviced without specific additional steps for
Oracle Virtual Compute Appliance. Follow the applicable procedure in the Service Manual. The following
table provides links to each service procedure and indicates whether parts are hot-swappable or require
the component to be taken offline and powered down.
Table 4.12 Service Procedures for Oracle Fabric Interconnect F1-15 Director Switch Components
Replaceable Part(s)
Hot-Swap
URL
Power supplies
Yes
In the Oracle Fabric Director Hardware and Host Drivers
Installation Guide, refer to the following section:
Chapter 7 (page 179): “Performing Service Tasks”, page
189: “Removing VP780 Power Supplies”.
Installation is the reverse of this procedure.
Fan modules
Yes
In the Oracle Fabric Director Hardware and Host Drivers
Installation Guide, refer to the following section:
Chapter 7 (page 179): “Performing Service Tasks”, page
184: “Removing VP780 Fan Modules”.
54
Service Procedures for Oracle Fabric Interconnect F1-15 Director Switch Components
Replaceable Part(s)
Hot-Swap
URL
Installation is the reverse of this procedure.
Fabric board
No
In the Oracle Fabric Director Hardware and Host Drivers
Installation Guide, refer to the following section:
Chapter 7 (page 179): “Performing Service Tasks”, page
202: “Replacing the VP780 QDR Fabric Board”.
Management module
No
In the Oracle Fabric Director Hardware and Host Drivers
Installation Guide, refer to the following section:
Chapter 7 (page 179): “Performing Service Tasks”, page
235: “Removing and Installing a VP780 Management
Module”.
I/O modules
Yes
In the Oracle Fabric Director Hardware and Host Drivers
Installation Guide, refer to the following section:
Chapter 7 (page 179): “Performing Service Tasks”, page
224: “Removing and Installing VP780 I/O Modules”.
Caution
The latest generation I/O modules
have no Eject button and are
powered down from the CLI. For
detailed instructions, please refer
to the support note with Doc ID
1518778.1.
Front panel assembly,
including system control
processor
(Oracle-qualified service
technician only)
No
In the Oracle Fabric Director Hardware and Host Drivers
Installation Guide, refer to the following section:
Chapter 7 (page 179): “Performing Service Tasks”, page
250: “Removing and Installing a VP780 Front Panel
Assembly”.
Caution
When replacing the system
control processor (SCP), which
is included in the front panel
assembly, begin by saving the
configuration from the existing
SCP, so that you can restore the
configuration after replacement.
55
56
Chapter 5 Troubleshooting
Table of Contents
5.1
5.2
5.3
5.4
5.5
5.6
5.7
5.8
Adding Proxy Settings for Oracle Virtual Compute Appliance Updates ...........................................
Setting the Oracle Virtual Compute Appliance Log Level ..............................................................
Configuring Data Center Switches for VLAN Traffic ......................................................................
Enabling SNMP Server Monitoring ..............................................................................................
Changing Oracle WebLogic Server Passwords ............................................................................
Using a Custom CA Certificate for SSL Encryption .......................................................................
A Compute Node Fails to Complete Provisioning .........................................................................
Oracle VM Server Pool Is Offline After Network Services Restart ..................................................
57
58
58
59
60
61
62
63
This chapter describes how to resolve a number of common problem scenarios.
5.1 Adding Proxy Settings for Oracle Virtual Compute Appliance
Updates
If your data center does not provide unlimited internet access and has a proxy server in place to control
HTTP, HTTPS or FTP traffic, you may need to configure your management nodes to be able to access
external resources for the purpose of performing software updates.
The following instructions must be followed for each of the two management nodes in your environment.
Adding Proxy Settings for a Management Node
1. Gain command line access to the management node. Usually this is achieved using SSH and logging
in as the root user with the global Oracle Virtual Compute Appliance password.
2. Use the /usr/sbin/ovca-config.py script to add, view or modify your proxy settings. This
script safely reads and edits the /etc/ovca.conf file, to prevent the possibility of configuration file
corruption.
To view the current values for the configurable settings in the configuration file run the script as follows:
# /usr/sbin/ovca-config.py -r
To set an HTTP proxy:
# /usr/sbin/ovca-config.py --http "http://IP:PORT"
Where IP is the IP address of your proxy server, and PORT is the TCP port on which it is listening. If
your proxy server expects a user name and password, this can be specified in the following format:
"http://username:password@IP:PORT"
To set an HTTPS proxy:
# /usr/sbin/ovca-config.py --https "http://IP:PORT"
To set an FTP proxy:
# /usr/sbin/ovca-config.py --ftp "http://IP:PORT"
Proxy options can be chained together into a single command:
57
Setting the Oracle Virtual Compute Appliance Log Level
# /usr/sbin/ovca-config.py --http "http://IP:PORT" --ftp "http://IP:PORT"
Finally, to view the /usr/sbin/ovca-config.py help, use the -h parameter.
3. Setting any single parameter automatically rewrites the configuration file and the proxy settings become
active immediately.
5.2 Setting the Oracle Virtual Compute Appliance Log Level
When troubleshooting or if you have a support query open, you may be required to change the log level for
your Oracle Virtual Compute Appliance. The settings for this are contained in /etc/ovca.conf, and can
be changed using the /usr/sbin/ovca-config.py script.
The following instructions must be followed for each of the two management nodes in your environment.
Changing the Oracle Virtual Compute Appliance Log Level for a Management Node
1. Gain command line access to the management node. Usually this is achieved using SSH and logging
in as the root user with the global Oracle Virtual Compute Appliance password.
2. Use the /usr/sbin/ovca-config.py script to add, view or modify your appliance log settings. This
script safely reads and edits the /etc/ovca.conf file, to prevent the possibility of configuration file
corruption.
To view the current values for the configurable settings in the configuration file run the script as follows:
# /usr/sbin/ovca-config.py -r
To change the log level:
# /usr/sbin/ovca-config.py --loglevel LEVEL
Where LEVEL is one of the following: DEBUG, INFO, WARNING, ERROR, CRITICAL.
While it is possible to change the log path using this tool, it is not generally recommended.
3. The new log level setting only takes effect after a management node has been rebooted.
5.3 Configuring Data Center Switches for VLAN Traffic
The Oracle Virtual Compute Appliance network infrastructure supports the use of VLANs by default. For
this purpose, the Oracle Fabric Interconnect F1-15 Director Switches are set to trunking mode to allow
tagged data traffic. You may implement VLANs for logical separation of different network segments, or to
define security boundaries between networks with different applications – just as you would with physical
servers instead of virtual machines.
However, to allow virtual machines hosted by the Oracle Virtual Compute Appliance to communicate
with systems external to the appliance, you must update the configuration of your next-level data center
switches accordingly.
• The switch ports on the receiving end of the outbound appliance connections must be part of each VLAN
used within the Oracle Virtual Compute Appliance environment.
• The same ports must also be part of the network(s) connecting the external systems that your virtual
machines need to access. For example, WAN connectivity implies that virtual machines are able to
reach the public gateway in your data center. As an alternative to VLAN tagging, Layer 3 routing can be
used to connect to Oracle Virtual Compute Appliance.
58
Enabling SNMP Server Monitoring
5.4 Enabling SNMP Server Monitoring
For troubleshooting or hardware monitoring, it may be useful to enable SNMP on the servers in your
Oracle Virtual Compute Appliance. While the tools for SNMP are available, the protocol is not enabled by
default. This section explains how to enable SNMP with the standard Oracle Linux and additional Oracle
Virtual Compute Appliance Management Information Bases (MIBs).
Enabling SNMP on the Management Nodes
1. Using SSH and an account with superuser privileges, log into the management node.
Note
The data center IP address used in this procedure is an example.
# ssh [email protected]
[email protected]'s password:
root@ovcamn05r1 ~]#
2. Locate the necessary rpm packages in the mounted directory /nfs/shared_storage, which resides
in the MGMT_ROOT file system on the Sun ZFS Storage Appliance 7320. The following packages are
part of the Oracle Virtual Compute Appliance ISO image downloaded and unpacked on the shared
storage during the update process:
• ovca-snmp-0.9-1.el6.x86_64.rpm
• net-snmp-libs-5.5-44.0.1.el6.x86_64.rpm
• net-snmp-5.5-44.0.1.el6.x86_64.rpm
• lm_sensors-libs-3.1.1-17.el6.x86_64.rpm
• net-snmp-utils-5.5-44.0.1.el6.x86_64.rpm
3. Install these packages by running the following command:
# rpm -ivh ovca-snmp-0.9-1.el6.x86_64.rpm net-snmp-libs-5.5-44.0.1.el6.x86_64.rpm \
net-snmp-5.5-44.0.1.el6.x86_64.rpm lm_sensors-libs-3.1.1-17.el6.x86_64.rpm \
net-snmp-utils-5.5-44.0.1.el6.x86_64.rpm
4. Create an SNMP configuration file: /etc/snmp/snmpd.conf.
This is a standard sample configuration:
rocommunity public
syslocation MyDataCenter
dlmod ovca /usr/lib64/ovca-snmp/ovca.so
5. Enable the snmpd service.
# service snmpd start
6. If desired, enable the snmpd service on boot.
# chkconfig snmpd on
7. Open the SNMP ports on the firewall.
# iptables -I INPUT -p udp -m udp --dport 161 -j ACCEPT
# iptables -I INPUT -p udp -m udp --dport 162 -j ACCEPT
59
Changing Oracle WebLogic Server Passwords
# iptables-save > /etc/sysconfig/iptables
SNMP is now ready for use on this management node. Besides the standard Oracle Linux MIBs, these
are also available:
• ORACLE-OVCA-MIB::ovcaVersion
• ORACLE-OVCA-MIB::ovcaSerial
• ORACLE-OVCA-MIB::ovcaType
• ORACLE-OVCA-MIB::ovcaStatus
• ORACLE-OVCA-MIB::nodeTable
Usage examples:
# snmpwalk
# snmpwalk
# snmpwalk
-v 1 -c public -O e 130.35.70.186 ORACLE-OVCA-MIB::ovcaVersion
-v 1 -c public -O e 130.35.70.111 ORACLE-OVCA-MIB::ovcaStatus
-v 1 -c public -O e 130.35.70.111 ORACLE-OVCA-MIB::nodeTable
8. Repeat this procedure on the second management node.
Enabling SNMP on the Compute Nodes
Note
On Oracle Virtual Compute Appliance compute nodes, net-snmp and net-snmputils are already installed at the factory, but the SNMP service is not enabled or
configured.
1. Using SSH and an account with superuser privileges, log into the compute node. It can be accessed
through the appliance internal management network.
ssh [email protected]
[email protected]'s password:
root@ovcacn27r1 ~]#
2. Create an SNMP configuration file: /etc/snmp/snmpd.conf and make sure this line is included:
rocommunity public
3. Enable the snmpd service.
# service snmpd start
SNMP is now ready for use on this compute node.
4. If desired, enable the snmpd service on boot.
# chkconfig snmpd on
5. Repeat this procedure on all other compute nodes installed in your Oracle Virtual Compute Appliance
environment.
5.5 Changing Oracle WebLogic Server Passwords
The Password Manager, or Wallet, does not have the functionality to manage the Oracle WebLogic
Server passwords. When you change the Oracle Virtual Compute Appliance system password through the
Dashboard, you must reconfigure Oracle WebLogic Server accordingly.
60
Using a Custom CA Certificate for SSL Encryption
Changing the Oracle WebLogic Server Passwords
1. In your browser, enter the address https://IP:7002/console .
In the address, IP refers to the IP address that you have configured for each of the management nodes
during installation.
2. Log in with the user name weblogic and the global password.
1
3. Change the password of the user named "weblogic" by executing the steps described in the section
“Change user passwords” in the Oracle WebLogic Server Administration Console Online Help.
4. Repeat the procedure for the Oracle WebLogic Server instance running on the other management
node.
Caution
Keep Oracle WebLogic Server in sync with the Password Manager. Global
password changes through the Dashboard, which apply to all other components of
Oracle Virtual Compute Appliance, are described in Section 2.4, “Network Setup”.
5.6 Using a Custom CA Certificate for SSL Encryption
By default, Oracle Virtual Compute Appliance and Oracle VM Manager use a self-signed SSL certificate.
While it serves to provide SSL encryption for all HTTP traffic, it is recommended that you obtain and install
your own custom trusted certificate from a well-known and recognized Certificate Authority (CA).
Both the Oracle Virtual Compute Appliance Dashboard and the Oracle VM Manager web interface run on
Oracle WebLogic Server. Oracle WebLogic Server provides the functionality to update the digital certificate
and keystore. To add your own trusted CA certificate and keystore, see the procedures set out in the
Oracle WebLogic documentation:
• Configuring Keystores: http://docs.oracle.com/cd/E17904_01/apirefs.1111/e13952/taskhelp/security/
ConfigureKeystoresAndSSL.html
• Configuring Identity and Trust: http://docs.oracle.com/cd/E23943_01/web.1111/e13707/identity_trust.htm
Caution
Each Oracle Virtual Compute Appliance management node runs its own instance
of Oracle WebLogic Server. You must apply the same changes separately to the
master and backup management node.
Accessing the Oracle WebLogic Server Administration Console
1. In your browser, enter the address https://IP:7002/console .
In the address, IP refers to the IP address that you have configured for each of the management nodes
during installation.
2. Log in with the user name weblogic and the global password.
1
If you have already changed the default password, enter the password you configured by following the
instructions in Section 5.5, “Changing Oracle WebLogic Server Passwords”.
1
The factory-default global password is Welcome1 .
61
A Compute Node Fails to Complete Provisioning
5.7 A Compute Node Fails to Complete Provisioning
Compute node provisioning is a complex orchestrated process involving various configuration and
installation steps and several reboots. Due to connectivity fluctuations, timing issues or other unexpected
events, a compute node may become stuck in an intermittent state or go into error status. The solution is to
reprovision the compute node.
Warning
Reprovisioning is to be applied only to compute nodes that fail to complete
provisioning. Never use this function on a compute node that has been provisioned
properly and/or hosts running virtual machines. Incorrect use may lock compute
nodes out of the environment permanently or otherwise cause loss of functionality
or data corruption.
Reprovisioning a Compute Node when Provisioning Fails
1. Log in to the Oracle Virtual Compute Appliance Dashboard.
2. Go to the Hardware View tab.
3. Roll over the compute nodes in Warning or Error status.
A pop-up window displays a summary of configuration and status information.
Figure 5.1 Compute Node Information and Reprovision Button in Hardware View
4. If the compute node provisioning is incomplete and the server is in error status or stuck in an
intermittent state for several hours, click the Reprovision button in the pop-up window.
5. When the confirmation dialog box appears, click OK to start reprovisioning the compute node.
If compute node provisioning should fail after the server was added to the Oracle VM server pool,
additional recovery steps are required. The cleanup mechanism associated with reprovisioning cannot
remove the compute node from the Oracle VM configuration. Therefore you need to perform operations in
Oracle VM Manager that are otherwise not permitted. You may also need to power on the compute node
manually.
Removing a Compute Node from the Oracle VM Configuration
1. Log into the Oracle VM Manager user interface.
For detailed instructions, see Section 3.2, “Logging into the Oracle VM Manager Web UI”.
62
Oracle VM Server Pool Is Offline After Network Services Restart
2. Go to the Servers and VMs tab and verify that the server pool named Rack1_ServerPool does
indeed contain the compute node that fails to provision correctly.
3. If the compute node is locked due to a running job, abort it in the Jobs tab of Oracle VM Manager.
Detailed information about the use of jobs in Oracle VM can be found in the Oracle VM User's Guide.
Refer to the sections entitled Jobs Tab and Working with the Jobs Framework.
4. Remove the compute node from the Oracle VM server pool.
Refer to the Oracle VM User's Guide and follow the instructions in the section entitled Removing an
Oracle VM Server from a Server Pool.
5. Delete the compute node from Oracle VM Manager.
Refer to the Oracle VM User's Guide and follow the instructions in the section entitled Deleting Oracle
VM Servers from Oracle VM Manager.
When the failing compute node has been removed from the Oracle VM configuration, return to the
Oracle Virtual Compute Appliance Dashboard, to reprovision it. If the compute node is powered off and
reprovisioning cannot be started, power on the server manually.
5.8 Oracle VM Server Pool Is Offline After Network Services Restart
When network services are restarted on the master management node, the connection to the Oracle VM
management network ( bond0 ) is lost. By design, the bond0 interface is not brought up automatically on
boot, so that the virtual IP of the management cluster can be configured on the correct node, depending on
which management node assumes the master role. While the master management node is disconnected
from the Oracle VM management network, the Oracle VM Manager user interface reports that the compute
nodes in the server pool are offline.
The management node that becomes the master, runs the Oracle VM services necessary to bring up the
bond0 interface and configure the virtual IP within a few minutes. It is expected that the compute nodes in
the Oracle VM server pool return to their normal online status in the Oracle VM Manager user interface. If
the master management node does not reconnect automatically to the Oracle VM management network,
bring the bond0 interface up manually from the Oracle Linux shell.
Warning
Execute this procedure ONLY when so instructed by Oracle Support. This should
only be necessary in rare situations where the master management node fails to
connect automatically. You should never manually disconnect or restart networking
on any node.
Manually Reconnecting the Master Management Node to the Oracle VM Management Network
1. Using SSH and an account with superuser privileges, log into the disconnected master management
node on the appliance management network.
# ssh [email protected]
[email protected]'s password:
root@ovcamn05r1 ~]#
2. Check the configuration of the bond0 interface.
If the interface is down, the console output looks similar to this:
# ifconfig bond0
63
Oracle VM Server Pool Is Offline After Network Services Restart
bond0
Link encap:Ethernet HWaddr 00:13:97:4E:B0:02
BROADCAST MULTICAST MTU:1500 Metric:1
RX packets:0 errors:0 dropped:0 overruns:0 frame:0
TX packets:0 errors:0 dropped:0 overruns:0 carrier:0
collisions:0 txqueuelen:0
RX bytes:0 (0.0 B) TX bytes:0 (0.0 B)
3. Bring the bond0 interface up.
# ifconfig bond0 up
4. Check the configuration of the bond0 interface again.
When the interface reconnects successfully to the Oracle VM management network, the console output
looks similar to this:
# ifconfig bond0
bond0
Link encap:Ethernet HWaddr 00:13:97:4E:B0:02
inet addr:192.168.140.4 Bcast:192.168.140.255 Mask:255.255.255.0
inet6 addr: fe80::213:97ff:fe4e:b002/64 Scope:Link
UP BROADCAST RUNNING MASTER MULTICAST MTU:1500 Metric:1
RX packets:62191 errors:0 dropped:0 overruns:0 frame:0
TX packets:9183 errors:0 dropped:0 overruns:0 carrier:0
collisions:0 txqueuelen:0
RX bytes:4539474 (4.33 MB) TX bytes:1853641 (1.77 MB)
64
Appendix A Licenses
Table of Contents
A.1
A.2
A.3
A.4
Oracle Virtual Compute Appliance Controller Software .................................................................
Oracle Linux ...............................................................................................................................
Oracle Hardware with Pre-Installed Oracle VM Server ..................................................................
License Information for Software Components .............................................................................
A.4.1 Hardware Management Pack ...........................................................................................
A.4.2 Java Runtime Environment ..............................................................................................
A.4.3 Tinyproxy ........................................................................................................................
A.4.4 Pexpect ...........................................................................................................................
A.4.5 Oracle Fabric Manager ....................................................................................................
A.4.6 Oracle VM .......................................................................................................................
A.5 License Information for Hardware Components ............................................................................
65
70
73
82
82
82
83
88
88
88
88
This appendix contains license information applicable to Oracle Virtual Compute Appliance X3-2 and its
hardware and software components.
A.1 Oracle Virtual Compute Appliance Controller Software
Document Part Number: 7082362
Oracle Software License Agreement and Entitlement
READ THE TERMS OF THIS AGREEMENT ("AGREEMENT") CAREFULLY BEFORE OPENING THE
SOFTWARE MEDIA PACKAGE OR USING THE SOFTWARE. BY OPENING THE SOFTWARE MEDIA
PACKAGE OR USING THE SOFTWARE, YOU AGREE TO THE TERMS OF THIS AGREEMENT.
IF YOU ARE ACCESSING SOFTWARE ELECTRONICALLY, INDICATE YOUR ACCEPTANCE OF
THESE TERMS BY SELECTING THE "ACCEPT" (OR EQUIVALENT) BUTTON AT THE END OF
THIS AGREEMENT. IF YOU DO NOT AGREE TO ALL OF THE TERMS, PROMPTLY RETURN THE
UNUSED SOFTWARE TO YOUR PLACE OF PURCHASE FOR A REFUND OR, IF SOFTWARE
IS ACCESSED ELECTRONICALLY, SELECT THE "DECLINE" (OR "EXIT") BUTTON AT THE END
OF THIS AGREEMENT. IF YOU HAVE SEPARATELY AGREED TO LICENSE TERMS ("MASTER
TERMS") FOR YOUR LICENSE TO THIS SOFTWARE, THEN SECTIONS 1-6 OF THIS AGREEMENT
("SUPPLEMENTAL LICENSE TERMS") SHALL SUPPLEMENT AND SUPERSEDE THE MASTER
TERMS IN RELATION TO THIS SOFTWARE.
1. Definitions.
(a) "Entitlement" means the collective set of applicable documents authorized by Oracle evidencing your
obligation to pay associated fees (if any) for the license, associated Services, and the authorized scope of
use of Software under this Agreement.
(b) "Licensed Unit" means the unit of measure by which your use of Software and/or Service is licensed, as
described in your Entitlement.
(c) “License Term” means the period of time by which your use of Software and/or Service is licensed, as
described in your Entitlement.
(d) "Permitted Use" means the licensed Software use(s) authorized in this Agreement as specified in your
Entitlement. The Permitted Use for any bundled Oracle software not specified in your Entitlement will be
evaluation use as provided in Section 3.
65
Oracle Software License Agreement and Entitlement
(e) "Service" means the service(s) that Oracle or its delegate will provide, if any, as selected in your
Entitlement and as further described in the applicable service listings at www.Oracle.com/services.
(f) "Software" means the Oracle software described in your Entitlement. Also, certain software may be
included for evaluation use under Section 3.
(g) "You" and "Your" means the individual or legal entity specified in the Entitlement, or for evaluation
purposes, the entity performing the evaluation.
2. License Grant and Entitlement.
Subject to the terms of your Entitlement, Oracle grants you a nonexclusive, nontransferable limited license
to use Software for its Permitted Use for the License Term. Your Entitlement will specify (a) Software
licensed, (b) the Permitted Use, (c) the License Term, and (d) the Licensed Units.
Additionally, if your Entitlement includes Services, then it will also specify the (e) Service and (f) service
term.
If your rights to Software or Services are limited in duration and the date such rights begin is other than the
purchase date, your Entitlement will provide that beginning date(s).
The Entitlement may be delivered to you in various ways depending on the manner in which you obtain
Software and Services, for example, the Entitlement may be provided in your receipt, invoice or your
contract with Oracle or authorized Oracle reseller. It may also be in electronic format if you download
Software.
3. Permitted Use.
As selected in your Entitlement, one or more of the following Permitted Uses will apply to your use of
Software. Unless you have an Entitlement that expressly permits it, you may not use Software for any of
the other Permitted Uses. If you don't have an Entitlement, or if your Entitlement doesn't cover additional
software delivered to you, then such software is for your Evaluation Use.
(a) Evaluation Use. You may evaluate Software internally for a period of 90 days from your first use.
(b) Research and Instructional Use. You may use Software internally to design, develop and test, and also
to provide instruction on such uses.
(c) Individual Use. You may use Software internally for personal, individual use.
(d) Commercial Use. You may use Software internally for your own commercial purposes.
(e) Service Provider Use. You may make Software functionality accessible (but not by providing Software
itself or through outsourcing services) to your end users in an extranet deployment, but not to your affiliated
companies or to government agencies.
4. Licensed Units.
Your Permitted Use is limited to the number of Licensed Units stated in your Entitlement. If you require
additional Licensed Units, you will need additional Entitlement(s).
5. Restrictions.
(a) The copies of Software provided to you under this Agreement are licensed, not sold, to you by
Oracle. Oracle reserves all rights not expressly granted. (b) You may make a single archival copy of
66
Oracle Software License Agreement and Entitlement
Software, but otherwise may not copy, modify, or distribute Software. However if the Oracle documentation
accompanying Software lists specific portions of Software, such as header files, class libraries, reference
source code, and/or redistributable files, that may be handled differently, you may do so only as provided
in the Oracle documentation. (c) You may not rent, lease, lend or encumber Software. (d) Unless
enforcement is prohibited by applicable law, you may not decompile, or reverse engineer Software. (e)
The terms and conditions of this Agreement will apply to any Software updates, provided to you at Oracle's
discretion, that replace and/or supplement the original Software, unless such update contains a separate
license. (f) You may not publish or provide the results of any benchmark or comparison tests run on
Software to any third party without the prior written consent of Oracle. (g) Software is confidential and
copyrighted. (h) Unless otherwise specified, if Software is delivered with embedded or bundled software
that enables functionality of Software, you may not use such software on a stand-alone basis or use any
portion of such software to interoperate with any program(s) other than Software. (i) Software may contain
programs that perform automated collection of system data and/or automated software updating services.
System data collected through such programs may be used by Oracle, its subcontractors, and its service
delivery partners for the purpose of providing you with remote system services and/or improving Oracle's
software and systems. (j) Software is not designed, licensed or intended for use in the design, construction,
operation or maintenance of any nuclear facility and Oracle and its licensors disclaim any express or
implied warranty of fitness for such uses. (k) No right, title or interest in or to any trademark, service mark,
logo or trade name of Oracle or its licensors is granted under this Agreement.
6. Java Compatibility and Open Source.
Software may contain Java technology. You may not create additional classes to, or modifications of, the
Java technology, except under compatibility requirements available under a separate agreement available
at www.java.net.
Oracle supports and benefits from the global community of open source developers, and thanks the
community for its important contributions and open standards-based technology, which Oracle has adopted
into many of its products.
Please note that portions of Software may be provided with notices and open source licenses from such
communities and third parties that govern the use of those portions, and any licenses granted hereunder
do not alter any rights and obligations you may have under such open source licenses, however, the
disclaimer of warranty and limitation of liability provisions in this Agreement will apply to all Software in this
distribution.
7. Term and Termination.
The license and service term are set forth in your Entitlement(s). Your rights under this Agreement will
terminate immediately without notice from Oracle if you materially breach it or take any action in derogation
of Oracle's and/or its licensors' rights to Software. Oracle may terminate this Agreement should any
Software become, or in Oracle's reasonable opinion likely to become, the subject of a claim of intellectual
property infringement or trade secret misappropriation. Upon termination, you will cease use of, and
destroy, Software and confirm compliance in writing to Oracle. Sections 1, 5, 6, 7, and 9-15 will survive
termination of the Agreement.
8. Limited Warranty.
Oracle warrants to you that for a period of 90 days from the date of purchase, as evidenced by a copy
of the receipt, the media on which Software is furnished (if any) will be free of defects in materials and
workmanship under normal use. Except for the foregoing, Software is provided "AS IS". Your exclusive
remedy and Oracle's entire liability under this limited warranty will be at Oracle's option to replace
Software media or refund the fee paid for Software. Some states do not allow limitations on certain implied
warranties, so the above may not apply to you. This limited warranty gives you specific legal rights. You
may have others, which vary from state to state.
67
Oracle Software License Agreement and Entitlement
9. Disclaimer of Warranty.
UNLESS SPECIFIED IN THIS AGREEMENT, ALL EXPRESS OR IMPLIED CONDITIONS,
REPRESENTATIONS AND WARRANTIES, INCLUDING ANY IMPLIED WARRANTY OF
MERCHANTABILITY, FITNESS FOR A PARTICULAR PURPOSE OR NON-INFRINGEMENT ARE
DISCLAIMED, EXCEPT TO THE EXTENT THAT THESE DISCLAIMERS ARE HELD TO BE LEGALLY
INVALID.
10. Limitation of Liability.
TO THE EXTENT NOT PROHIBITED BY LAW, IN NO EVENT WILL ORACLE OR ITS LICENSORS
BE LIABLE FOR ANY LOST REVENUE, PROFIT OR DATA, OR FOR SPECIAL, INDIRECT,
CONSEQUENTIAL, INCIDENTAL OR PUNITIVE DAMAGES, HOWEVER CAUSED REGARDLESS OF
THE THEORY OF LIABILITY, ARISING OUT OF OR RELATED TO THE USE OF OR INABILITY TO USE
SOFTWARE, EVEN IF ORACLE HAS BEEN ADVISED OF THE POSSIBILITY OF SUCH DAMAGES. In
no event will Oracle's liability to you, whether in contract, tort (including negligence), or otherwise, exceed
the amount paid by you for Software under this Agreement. The foregoing limitations will apply even if the
above stated warranty fails of its essential purpose. Some states do not allow the exclusion of incidental or
consequential damages, so some of the terms above may not be applicable to you.
11. Export Regulations.
All Software, documents, technical data, and any other materials delivered under this Agreement are
subject to U.S. export control laws and may be subject to export or import regulations in other countries.
You agree to comply strictly with these laws and regulations and acknowledge that you have the
responsibility to obtain any licenses to export, re-export, or import as may be required after delivery to you.
12. U.S. Government End Users.
Oracle programs, including the operating system, Software, any programs installed on the hardware,
and/or documentation, delivered to U.S. Government end users are “commercial computer software”
pursuant to the applicable Federal Acquisition Regulation and agency-specific supplemental regulations.
As such, use, duplication, disclosure, modification, and adaptation of the programs, including the operating
system, Software, any programs installed on the hardware, and/or documentation, shall be subject to the
license terms and license restrictions set forth in this agreement. No other rights are granted to the U.S.
Government.
13. Governing Law.
Any action related to this Agreement will be governed by California law and controlling U.S. federal law. No
choice of law rules of any jurisdiction will apply.
14. Severability.
If any provision of this Agreement is held to be unenforceable, this Agreement will remain in effect with the
provision omitted, unless omission would frustrate the intent of the parties, in which case this Agreement
will immediately terminate.
15. Integration.
This Agreement, including any terms contained in your Entitlement, is the entire agreement between
you and Oracle relating to its subject matter. It supersedes all prior or contemporaneous oral or written
communications, proposals, representations and warranties and prevails over any conflicting or additional
68
Oracle Software License Agreement and Entitlement
terms of any quote, order, acknowledgment, or other communication between the parties relating to its
subject matter during the term of this Agreement. No modification of this Agreement will be binding, unless
in writing and signed by an authorized representative of each party.
Please contact Oracle America, Inc. 500 Oracle Parkway, Redwood City, CA 94065 if you have questions.
Last updated 22 September 2011
Oracle Software License Agreement and Entitlement
THIS ENTITLEMENT EVIDENCES YOUR AUTHORIZED SCOPE OF USE UNDER THE TERMS OF THE
SOFTWARE LICENSE AGREEMENT PROVIDED WITH THE COMPUTER EQUIPMENT (THE “SLA”).
CAPITALIZED TERMS NOT DEFINED IN THIS ENTITLEMENT SHALL HAVE THE MEANING GIVEN TO
THEM IN THE SLA.
Licensor: Oracle America, Inc. (“Oracle”)
Licensee/Company (“You” or “you”): Entity and/or individual receiving Computer Equipment.
Computer Equipment: The Oracle Virtual Compute Appliance hardware system, including components
thereof, which You received with this SLA and Entitlement and any other related computer equipment,
spare or replacement parts, or updates or additions to that system. The Computer Equipment may include
components or hardware capacity requiring activation prior to use (collectively, “Optional Components”),
as described in the Computer Equipment’s product documentation and/or part number description; any
Optional Components may be used only upon Oracle’s acceptance of Your separately placed order,
subject to additional fees, and activation of each such purchased Optional Component via an applicable
Hardware Activation File provided by Oracle.
Effective Date: The date Oracle and/or its authorized channel partner deliver the Computer Equipment to
You. For Optional Components or Integrated Software Options separately ordered by You, the date Oracle
accepts Your applicable order.
Hardware Activation File: A software file or key to activate Computer Equipment Optional Components
that is separately provided by Oracle. Hardware Activation Files are Software subject to this SLA and
Entitlement and may be used only to activate Optional Components that You have separately ordered for
additional fees.
Integrated Software: Any software or programmable code (1) embedded or integrated in the Computer
Equipment that enables the functionality of the Computer Equipment, and/or (2) specifically provided to
You by Oracle under this Entitlement, as expressly stated in accompanying documentation, an Oracle
webpage, and/or a mechanism that facilitates installation for use with Your Computer Equipment.
Integrated Software includes Oracle SDN (Software Defined Networking) software and Oracle Fabric
Manager software. In addition, Integrated Software includes related versions, updates or patches that may
be distributed separately from the Computer Equipment. Except as expressly specified in this Entitlement,
Integrated Software does not include and You do not have rights to:
1. Code or functionality for diagnostic, maintenance, repair or technical support services; or
69
Oracle Linux
2. Separately licensed applications, operating systems, development tools, or system management
software, or other code that is separately licensed, including Hardware Activation Files and those
Integrated Software features that are designated as an Integrated Software Option and may be
embedded in, installed on, or activated on the Computer Equipment but are ordered separately for an
additional fee.
Integrated Software Option: Software or programmable code embedded in, installed on, or activated
on the Computer Equipment that requires one or more unit licenses that You must separately order for
additional fees. Refer to the Oracle Integrated Software Options License Definitions, Rules and Metrics
accessible at www.oracle.com/contracts (“License Rules”) for the specific Integrated Software Options that
apply to the Computer Equipment. Any Integrated Software Option separately ordered by You, including
updates or patches that may be distributed separately from the Computer Equipment, is Software subject
to this SLA and Entitlement and the License Rules, which are incorporated in and made a part of this SLA
and Entitlement. To fully understand Your license grant to any Integrated Software Options separately
ordered by You, You need to review the License Rules. In the event of any conflict between this SLA and
Entitlement and the License Rules, the License Rules shall apply. Oracle reserves the right to designate
new software features as Integrated Software Options in subsequent releases, such designation will be
specified in the applicable product documentation and the License Rules.
License Term: The period during which You own, borrow, or lease the Computer Equipment.
Licensed Units: For Hardware Activation Files, one per Optional Component separately ordered by You;
the Computer Equipment must be owned, borrowed, or leased by You. For Integrated Software, one
per unit of Computer Equipment owned, borrowed, or leased by You. For Integrated Software Options
separately ordered by You, one per unit of Computer Equipment owned, borrowed, or leased by You
except as may be set forth in the License Rules.
Permitted Use: Unless otherwise expressly licensed to You, You are licensed to use Software, including
Oracle SDN (Software Defined Networking) and Oracle Fabric Manager, for Your own Commercial,
Individual, Research and Instructional Uses only in operating the Computer Equipment .
Software: All Integrated Software, Hardware Activation File(s) for Optional Components separately
ordered by You, and Integrated Software Option(s) separately ordered by You.
Any open source or third party licenses for the accompanying product, and any associated source code
(or a description of how to obtain any associated source code), may be found in readme or similar files
or notices included with Software or Computer Equipment documentation and/or distributed with the
Software.
Last updated 22 August 2013
Oracle Virtual Compute Appliance
A.2 Oracle Linux
Document Part Number: 7082365
Oracle Linux License Agreement
“We,” “us,” “our” and “Oracle” refers to Oracle America, Inc. “You” and “your” refers to the individual or
entity that has acquired the Oracle Linux programs. “Oracle Linux programs” refers to the Linux software
product which you have acquired. “License” refers to your right to use the Oracle Linux programs under
the terms of this Agreement and the licenses referenced herein. This Agreement is governed by the
substantive and procedural laws of the United States and the State of California and you and Oracle agree
70
Oracle Linux License Agreement
to submit to the exclusive jurisdiction of, and venue in, the courts of San Francisco or Santa Clara counties
in California in any dispute arising out of or relating to this Agreement.
We are willing to provide a copy of the Oracle Linux programs to you only upon the condition that you
accept all of the terms contained in this Agreement. Read the terms carefully and indicate your acceptance
by either selecting the “Accept” button at the bottom of the page to confirm your acceptance, if you are
downloading the Oracle Linux programs, or continuing to install the Oracle Linux programs, if you have
received this Agreement during the installation process. If you are not willing to be bound by these terms,
select the “Do Not Accept” button or discontinue the installation process.
1. Grant of Licenses to the Oracle Linux programs.
Subject to the terms of this Agreement, Oracle grants to you a license to the Oracle Linux programs under
the GNU General Public License version 2.0. The Oracle Linux programs contain many components
developed by Oracle and various third parties. The license for each component is located in the licensing
documentation and/or in the component's source code. In addition, a list of components may be delivered
with the Oracle Linux programs and the Additional Oracle Linux programs (as defined below) or accessed
online at http://oss.oracle.com/linux/legal/oracle-list.html. The source code for the Oracle Linux Programs
and the Additional Oracle Linux programs can be found and accessed online at https://oss.oracle.com/
sources/. This agreement does not limit, supersede or modify your rights under the license associated with
any separately licensed individual component.
2. Licenses to Additional Oracle Linux programs.
Certain third-party technology (collectively the “Additional Oracle Linux programs”) may be included on
the same medium or as part of the download of Oracle Linux programs you receive, but is not part of
the Oracle Linux programs. Each Additional Oracle Linux program is licensed solely under the terms
of the Mozilla Public License, Apache License, Common Public License, GNU Lesser General Public
License, Netscape Public License or similar license that is included with the relevant Additional Oracle
Linux program.
3. Ownership.
The Oracle Linux programs and their components and the Additional Oracle Linux programs are owned by
Oracle or its licensors. Subject to the licenses granted and/or referenced herein, title to the Oracle Linux
programs and their components and the Additional Oracle Linux programs remains with Oracle and/or its
licensors.
4. Trademark License.
You are permitted to distribute unmodified Oracle Linux programs or unmodified Additional Oracle Linux
programs without removing the trademark(s) owned by Oracle or its affiliates that are included in the
unmodified Oracle Linux programs or unmodified Additional Oracle Linux programs (the “Oracle Oracle
Linux trademarks”). You may only distribute modified Oracle Linux programs or modified Additional Oracle
Linux programs if you remove relevant images containing the Oracle Linux trademarks. Certain files,
identified in http://oss.oracle.com/linux/legal/oracle-list.html, include such trademarks. Do not delete these
files, as deletion may corrupt the Oracle Linux programs or Additional Oracle Linux programs. You are
not granted any other rights to Oracle Linux trademarks, and you acknowledge that you shall not gain
any proprietary interest in the Oracle Linux trademarks. All goodwill arising out of use of the Oracle Linux
trademarks shall inure to the benefit of Oracle or its affiliates. You may not use any trademarks owned
by Oracle or its affiliates (including “ORACLE”) or potentially confusing variations (such as, “ORA”) as a
part of your logo(s), product name(s), service name(s), company name, or domain name(s) even if such
products, services or domains include, or are related to, the Oracle Linux programs or Additional Oracle
Linux programs.
71
Oracle Linux License Agreement
5. Limited Warranty.
THE ORACLE LINUX PROGRAMS AND ADDITIONAL ORACLE LINUX PROGRAMS ARE PROVIDED
"AS IS" WITHOUT WARRANTY OF ANY KIND. WE FURTHER DISCLAIM ALL WARRANTIES,
EXPRESS AND IMPLIED, INCLUDING WITHOUT LIMITATION, ANY IMPLIED WARRANTIES OF
MERCHANTABILITY OR FITNESS FOR A PARTICULAR PURPOSE.
6. Limitation of Liability.
IN NO EVENT SHALL WE BE LIABLE FOR ANY INDIRECT, INCIDENTAL, SPECIAL, PUNITIVE OR
CONSEQUENTIAL DAMAGES, OR DAMAGES FOR LOSS OF PROFITS, REVENUE, DATA OR DATA
USE, INCURRED BY YOU OR ANY THIRD PARTY, WHETHER IN AN ACTION IN CONTRACT OR
TORT, EVEN IF WE HAVE BEEN ADVISED OF THE POSSIBILITY OF SUCH DAMAGES. OUR ENTIRE
LIABILITY FOR DAMAGES HEREUNDER SHALL IN NO EVENT EXCEED ONE HUNDRED DOLLARS
(U.S.).
7. No Technical Support.
Our technical support organization will not provide technical support, phone support, or updates to you for
the materials licensed under this Agreement. Technical support, if available, may be acquired from Oracle
or its affiliates under a separate agreement.
8. Relationship Between the Parties.
The relationship between you and us is that of licensee/licensor. Neither party will represent that it has
any authority to assume or create any obligation, express or implied, on behalf of the other party, nor
to represent the other party as agent, employee, franchisee, or in any other capacity. Nothing in this
Agreement shall be construed to limit either party's right to independently develop or distribute programs
that are functionally similar to the other party’s products, so long as proprietary information of the other
party is not included in such programs.
9. Entire Agreement.
You agree that this Agreement is the complete Agreement for the Oracle Linux programs and the
Additional Oracle Linux programs, and this Agreement supersedes all prior or contemporaneous
Agreements or representations. If any term of this Agreement is found to be invalid or unenforceable, the
remaining provisions will remain effective. Neither the Uniform Computer Information Transactions Act nor
the United Nations Convention on the International Sale of Goods applies to this agreement.
You can find a copy of the GNU General Public License version 2.0 in the “copying” or “license” file
included with the Oracle Linux programs or here: http://oss.oracle.com/licenses/GPL-2.
OFFER TO PROVIDE SOURCE CODE
For software that you receive from Oracle in binary form that is licensed under an open source license
that gives you the right to receive the source code for that binary, you can obtain a copy of the applicable
source code from https://oss.oracle.com/sources/ or http://www.oracle.com/goto/opensourcecode.
Alternatively, if the source code for the technology was not provided to you with the binary, you can also
receive a copy of the source code on physical media by submitting a written request to:
Oracle America, Inc.
Attn: Associate General Counsel
72
Oracle Hardware with Pre-Installed Oracle VM Server
Development and Engineering Legal
500 Oracle Parkway, 10th Floor
Redwood Shores, CA 94065
Or, you may send an email to Oracle using the form linked from http://www.oracle.com/goto/
opensourcecode. Your written or emailed request should include:
• The name of the component or binary file(s) for which you are requesting the source code
• The name and version number of the Oracle product
• The date you received the Oracle product
• Your name
• Your company name (if applicable)
• Your return mailing address and email
• A telephone number in the event we need to reach you.
We may charge you a fee to cover the cost of physical media and processing. Your request must be sent
(i) within three (3) years of the date you received the Oracle product that included the component or binary
file(s) that are the subject of your request, or (ii) in the case of code licensed under the GPL v3, for as long
as Oracle offers spare parts or customer support for that product model or version.
Last updated 22 August 2013
A.3 Oracle Hardware with Pre-Installed Oracle VM Server
Document Part Number: 7082364
Software License Agreement for Oracle Hardware with Pre-Installed Oracle
VM Server
This Agreement includes license terms for certain software products that may be installed on the Oracle
hardware you have acquired. The Oracle VM Server program launched when you powered the machine
or is pre-installed on the machine. As you proceed through the installation or set-up process you will have
the option to deploy one or more of the virtual machine images that are pre-installed on the machine. By
deploying any of these virtual machine images, you acknowledge that your use of the Oracle VM Server
program and any included software programs referenced below are subject to the terms of this Agreement.
Section A: Terms for Oracle VM Server
Section B: Terms for Oracle VM Manager
Section C: Terms for Oracle Solaris
Section D: Terms for Oracle Linux
This Agreement is governed by the substantive and procedural laws of the United States and the State
of California and you and Oracle agree to submit to the exclusive jurisdiction of, and venue in, the courts
73
Section A: Terms for Oracle VM Server
of San Francisco or Santa Clara counties in California in any dispute arising out of or relating to this
Agreement.
We are willing to provide a copy of the programs to you only upon the condition that you accept all of the
terms contained in the applicable sections of this Agreement. Please read the terms carefully and indicate
your acceptance. By clicking the “Yes, I accept” button (or the equivalent) or by continuing to advance
through the set-up process, you acknowledge your acceptance of the terms for the program(s) you deploy
on this hardware. If you are not willing to be bound by these terms, select the "Do Not Accept" button (or
the equivalent) or discontinue the installation or set-up process and do not use the programs.
Section A: Terms for Oracle VM Server
"We," "us," "our" and "Oracle" refers to Oracle America, Inc. "You" and "your" refers to the individual or
entity that has acquired the Oracle VM Server programs. "Oracle VM Server programs" refers to the Oracle
VM Server software product. "License" refers to your right to use the Oracle VM Server programs under the
terms of this Agreement and the licenses referenced herein.
1. Grant of Licenses to the Oracle VM Server programs.
Subject to the terms of this Agreement, Oracle America, Inc. ("Oracle") grants to the user ("Customer") a
license to the Oracle VM Server programs under the GNU General Public License version 2. The Oracle
VM Server programs contain many Oracle VM Server programs components developed by Oracle and
various third parties. The license for each component is located in the documentation, which may be
delivered with the Oracle VM Server programs or accessed online at http://oss.oracle.com/linux/legal/
oracle-list.html and/or in the component's source code. This agreement does not limit, supersede or modify
your rights under the license associated with an individual component.
2. Licenses to Additional Oracle VM Server programs.
Certain third-party programs that are not Oracle VM Server programs may be included with or as part of
the Oracle VM Server software product (collectively the "Additional Oracle VM Server programs"). Each
Additional Oracle VM Server program is licensed solely under the terms of the Mozilla Public License,
Apache License, Common Public License, GNU Lesser General Public License, Netscape Public License
or similar license (collectively, the "Additional Oracle VM Server Programs Licenses") that is included with
the relevant Additional Oracle VM Server programs and the associated documentation.
3. Ownership.
The Oracle VM Server programs and their components and the Additional Oracle VM Server programs are
owned by Oracle or the relevant third party. Subject to the licenses granted and/or referenced herein, title
to the Oracle VM Server programs and their components and the Additional Oracle VM Server programs
remains with Oracle and/or the third party, as appropriate.
4. Trademark License.
You are permitted to distribute unmodified Oracle VM Server programs or unmodified Additional Oracle
VM Server programs without removing the trademark(s) owned by Oracle or its affiliates that are included
in the unmodified Oracle VM Server programs or unmodified Additional Oracle VM Server programs
(the " Oracle VM Server trademarks"). You may only distribute modified Oracle VM Server programs or
modified Additional Oracle VM Server programs if you remove relevant images containing the Oracle
VM Server trademarks. Certain files, identified as http://oss.oracle.com/linux/legal/pkg-list.html, include
such trademarks. Do not delete these files, as deletion may corrupt the Oracle VM Server programs
or Additional Oracle VM Server programs. You are not granted any other rights to Oracle VM Server
trademarks, and you acknowledge that you shall not gain any proprietary interest in the Oracle VM Server
74
Section B: Terms for Oracle VM Manager
trademarks. All goodwill arising out of use of the Oracle VM Server trademarks shall inure to the benefit
of Oracle or its affiliates. You may not use any trademarks owned by Oracle or its affiliates (including
"ORACLE") or potentially confusing variations (such as, "ORA") as a part of your logo(s), product name(s),
service name(s), company name, or domain name(s) even if such products, services or domains include,
or are related to, the Oracle VM Server programs or Additional Oracle VM Server programs.
5. Limited Warranty.
THE ORACLE VM SERVER PROGRAMS AND ADDITIONAL ORACLE VM SERVER PROGRAMS
ARE PROVIDED "AS IS" WITHOUT WARRANTY OF ANY KIND. WE FURTHER DISCLAIM ALL
WARRANTIES, EXPRESS AND IMPLIED, INCLUDING WITHOUT LIMITATION, ANY IMPLIED
WARRANTIES OF MERCHANTABILITY OR FITNESS FOR A PARTICULAR PURPOSE.
6. Limitation of Liability.
IN NO EVENT SHALL WE BE LIABLE FOR ANY INDIRECT, INCIDENTAL, SPECIAL, PUNITIVE OR
CONSEQUENTIAL DAMAGES, OR DAMAGES FOR LOSS OF PROFITS, REVENUE, DATA OR DATA
USE, INCURRED BY YOU OR ANY THIRD PARTY, WHETHER IN AN ACTION IN CONTRACT OR
TORT, EVEN IF WE HAVE BEEN ADVISED OF THE POSSIBILITY OF SUCH DAMAGES. OUR ENTIRE
LIABILITY FOR DAMAGES HEREUNDER SHALL IN NO EVENT EXCEED ONE HUNDRED DOLLARS
(U.S.).
7. No Technical Support.
Our technical support organization will not provide technical support, phone support, or updates to you for
the materials licensed under this Agreement. Technical support, if available, may be acquired from Oracle
or its affiliates under a separate agreement.
8. Relationship Between the Parties.
The relationship between you and us is that of licensee/licensor. Neither party will represent that it has
any authority to assume or create any obligation, express or implied, on behalf of the other party, nor
to represent the other party as agent, employee, franchisee, or in any other capacity. Nothing in this
Agreement shall be construed to limit either party's right to independently develop or distribute Oracle VM
Server programs that is functionally similar to the other party's products, so long as proprietary information
of the other party is not included in such Oracle VM Server programs.
9. Entire Agreement.
You agree that this Agreement is the complete Agreement for the Oracle VM Server programs, Additional
Oracle VM Server programs and licenses, and this Agreement supersedes all prior or contemporaneous
Agreements or representations. If any term of this Agreement is found to be invalid or unenforceable, the
remaining provisions will remain effective. Neither the Uniform Computer Information Transactions Act nor
the United Nations Convention on the International Sale of Goods applies to this agreement.
Section B: Terms for Oracle VM Manager
"We," "us," "our" and "Oracle" refers to Oracle America, Inc. "You" and "your" refers to the individual or
entity that has acquired the Oracle VM Manager programs. "Oracle VM Manager programs" or "programs"
refers to the Oracle VM Manager software product, program documentation, and any Oracle VM Manager
programs updates acquired through technical support. "Program documentation" refers to the Oracle VM
Manager programs user manual and installation manuals. Program documentation may be delivered with
Oracle VM Manager programs and may be accessed online at http://www.oracle.com/documentation.
75
Section B: Terms for Oracle VM Manager
"License" refers to your right to use the Oracle VM Manager programs under the terms of this Agreement,
including any definitions and rules in the program documentation and any related order documents, and
the licenses referenced herein. "Separate terms" refers to separate license terms that are specified in
the program documentation, readmes or notice files and that apply to separately licensed third party
technology. "Separately licensed third party technology" refers to third party technology that is licensed
under separate terms and not under the terms of this Agreement.
1. License Rights.
Subject to the terms of this Agreement, including any definitions and rules set forth in the program
documentation and any related order documents, we grant you a nonexclusive, nontransferable limited
license to use the Oracle VM Manager programs for: (a) purposes of developing, prototyping and running
your applications for your own internal data processing operations; (b) you may also distribute the
programs with your applications; (c) you may use the programs to provide third party demonstrations and
training; and d) you may copy and distribute the programs to your licensees provided that distribution is
solely under and each such licensee agrees to abide by the terms of this Section C of this Agreement for
Oracle VM Manager. You are not permitted to use the programs for any purpose other than as permitted
under this Agreement. We may audit your use of the programs.
2. Trademarks and Copyrights.
You agree not to use Oracle trademarks (including "ORACLE") or potentially confusing variations
( including "ORA") as a part of your product name(s), service name(s), company name, or domain name(s).
In marketing, promoting, or distributing the programs, you agree to make it clear that Oracle is the source
of the programs. You shall include on all copies of the programs used or distributed by you:
1. A reproduction of Oracle's copyright notice; or
2. A copyright notice indicating that the copyright is vested in you containing the following:
a. A "c" in a circle and the word "copyright";
b. Your name;
c. The date of copyright; and
d. The words "All rights reserved."
Such notices shall be placed on the documentation, the sign-on screen for any software incorporating
the programs, and any media containing the programs.
3. Ownership and Restrictions.
We retain all ownership and intellectual property rights in the programs. The programs may be installed on
multiple systems provided that you adhere to this Agreement for all use and distribution of the programs.
You may not:
1. remove or modify any program markings or any notice of our proprietary rights;
2. assign this agreement or give or transfer the programs or an interest in them to another individual or
entity;
3. cause or permit reverse engineering (unless required by law for interoperability), disassembly or
decompilation of the programs;
4. disclose results of any program benchmark tests without our prior consent; or,
76
Section B: Terms for Oracle VM Manager
5. use any Oracle name, trademark or logo, except as expressly required herein.
4. Export.
You agree that U.S. export control laws and other applicable export and import laws govern your use
of the programs, including technical data; additional information can be found on Oracle's Global Trade
Compliance web site located at http://www.oracle.com/products/export/index.html. You agree that neither
the programs nor any direct product thereof will be exported, directly, or indirectly, in violation of these
laws, or will be used for any purpose prohibited by these laws including, without limitation, nuclear,
chemical, or biological weapons proliferation.
5. Disclaimer of Warranty and Exclusive Remedies.
Limited Warranty. THE ORACLE VM MANAGER PROGRAMS ARE PROVIDED "AS IS" WITHOUT
WARRANTY OF ANY KIND. WE FURTHER DISCLAIM ALL WARRANTIES, EXPRESS AND IMPLIED,
INCLUDING WITHOUT LIMITATION, ANY IMPLIED WARRANTIES OF MERCHANTABILITY OR
FITNESS FOR A PARTICULAR PURPOSE.
ORACLE DOES NOT GUARANTEE THAT THE PROGRAMS WILL PERFORM ERROR-FREE OR
UNINTERRUPTED OR THAT ORACLE WILL CORRECT ALL PROGRAM ERRORS.
IN NO EVENT SHALL WE BE LIABLE FOR ANY INDIRECT, INCIDENTAL, SPECIAL, PUNITIVE OR
CONSEQUENTIAL DAMAGES, OR DAMAGES FOR LOSS OF PROFITS, REVENUE, DATA OR DATA
USE, INCURRED BY YOU OR ANY THIRD PARTY, WHETHER IN AN ACTION IN CONTRACT OR
TORT, EVEN IF WE HAVE BEEN ADVISED OF THE POSSIBILITY OF SUCH DAMAGES. OUR ENTIRE
LIABILITY FOR DAMAGES HEREUNDER SHALL IN NO EVENT EXCEED ONE THOUSAND DOLLARS
(U.S. $1,000).
6. Technical Support.
Our technical support organization will not provide technical support, phone support, or updates to you for
the materials licensed under this Agreement. Technical support, if available, may be acquired from Oracle
or its affiliates under a separate agreement.
7. End of Agreement.
You may terminate this agreement by destroying all copies of the programs. We have the right to terminate
your right to use the programs if you fail to comply with any of the terms of this agreement, in which case
you shall destroy all copies of the programs.
8. Relationship Between the Parties.
The relationship between you and us is that of licensee/licensor. Neither party will represent that it has
any authority to assume or create any obligation, express or implied, on behalf of the other party, nor
to represent the other party as agent, employee, franchisee, or in any other capacity. Nothing in this
agreement shall be construed to limit either party's right to independently develop or distribute software
that is functionally similar to the other party's products, so long as proprietary information of the other party
is not included in such software.
9. Entire Agreement.
You agree that this agreement is the complete agreement for the programs and licenses, and this
agreement supersedes all prior or contemporaneous agreements or representations. If any term of this
agreement is found to be invalid or unenforceable, the remaining provisions will remain effective.
77
Section C: Terms for Oracle Solaris
Section C: Terms for Oracle Solaris
"We," "us," "our" and "Oracle" refers to Oracle America, Inc. "You" and "your" refers to the individual or
entity that has acquired the hardware with pre-installed Oracle Solaris programs. "Oracle Solaris programs"
refers to the Oracle Solaris operating system (including related program documentation) and the separately
licensed third-party technology (as defined below). "License" refers to your right to use the Oracle Solaris
programs under the terms of this Agreement and the licenses referenced herein.
1. License Rights.
We grant you a non-exclusive, royalty free, non-assignable limited license to use the Oracle Solaris
programs only as pre-installed on the hardware you purchased. Certain third-party technology may be
included on the same hardware as the Oracle Solaris programs. Such third-party technology will be
licensed to you either under the terms of the Agreement, or if specified in the program documentation
and/or in certain "notice" or "readme" files distributed with such third-party technology, under separate
license terms ("separate terms") and not under the terms of the Agreement ("separately licensed thirdparty technology"). Your rights to use separately licensed third-party technology under the separate
terms are not restricted in any way by the Agreement. The Oracle Solaris programs may include or be
distributed with certain separately licensed components that are part of Java SE (“Java SE”). Java SE and
all components associated with it are licensed to you under the terms of the Oracle Binary Code License
Agreement for the Java SE Platform Products, and not under this Agreement. A copy of the Oracle Binary
Code License Agreement for the Java SE Platform Products can be found at http://www.oracle.com/
technetwork/java/javase/terms/license/index.html.
2. Trademarks and Copyrights.
You agree not to use Oracle trademarks (including "ORACLE") or potentially confusing variations (including
"ORA") as a part of your product name(s), service name(s), company name, or domain name(s). In
marketing, promoting, or distributing the Oracle Solaris programs, you agree to make it clear that Oracle is
the source of the Oracle Solaris programs. You shall include on all copies of the Oracle Solaris programs
used or distributed by you:
1. A reproduction of Oracle's copyright notice; or
2. A copyright notice indicating that the copyright is vested in you containing the following:
a. A "c" in a circle and the word "copyright";
b. Your name;
c. The date of copyright; and
d. The words "All rights reserved."
Such notices shall be placed on the documentation, the sign-on screen for any software incorporating
the Oracle Solaris programs, and any media containing the Oracle Solaris programs.
3. Ownership and Restrictions.
The Oracle Solaris programs and the separately licensed third-party technology are owned by Oracle or
the relevant third party. Subject to the licenses granted and/or referenced herein, title to the Oracle Solaris
programs remains with Oracle and/or the third party. With respect to the Oracle Solaris programs you may
not:
1. Remove or modify any program markings or any notice of our proprietary rights;
78
Section C: Terms for Oracle Solaris
2. Assign this Agreement or give or transfer the programs or an interest in them to another individual or
entity;
3. Cause or permit reverse engineering (unless required by law for interoperability), disassembly or
decompilation of the Oracle Solaris programs;
4. Disclose results of any program benchmark tests without our prior consent; or,
5. Use any Oracle name, trademark or logo, except as expressly required herein.
4. Export.
You agree that U.S. export control laws and other applicable export and import laws govern your use of
the Oracle Solaris programs and the separately licensed third-party technology, including technical data
(collectively “programs”); additional information can be found on Oracle's Global Trade Compliance web
site located at http://www.oracle.com/products/export/index.html?content.html. You agree that neither the
programs nor any direct product thereof will be exported, directly, or indirectly, in violation of these laws,
or will be used for any purpose prohibited by these laws including, without limitation, nuclear, chemical, or
biological weapons proliferation.
5. Disclaimer of Warranty and Exclusive Remedies.
Limited Warranty. THE ORACLE SOLARIS PROGRAMS ARE PROVIDED "AS IS" WITHOUT
WARRANTY OF ANY KIND. WE FURTHER DISCLAIM ALL WARRANTIES, EXPRESS AND IMPLIED,
INCLUDING WITHOUT LIMITATION, ANY IMPLIED WARRANTIES OF MERCHANTABILITY OR
FITNESS FOR A PARTICULAR PURPOSE.
ORACLE DOES NOT GUARANTEE THAT THE ORACLE SOLARIS PROGRAMS WILL PERFORM
ERROR-FREE OR UNINTERRUPTED OR THAT ORACLE WILL CORRECT ALL ERRORS.
IN NO EVENT SHALL WE BE LIABLE FOR ANY INDIRECT, INCIDENTAL, SPECIAL, PUNITIVE OR
CONSEQUENTIAL DAMAGES, OR DAMAGES FOR LOSS OF PROFITS, REVENUE, DATA OR DATA
USE, INCURRED BY YOU OR ANY THIRD PARTY, WHETHER IN AN ACTION IN CONTRACT OR
TORT, EVEN IF WE HAVE BEEN ADVISED OF THE POSSIBILITY OF SUCH DAMAGES. OUR ENTIRE
LIABILITY FOR DAMAGES HEREUNDER SHALL IN NO EVENT EXCEED ONE THOUSAND DOLLARS
(U.S. $1,000).
6. Technical Support.
Our technical support organization will not provide technical support, phone support, or updates to you for
the materials licensed under this Agreement. Technical support, if available, may be acquired from Oracle
or its affiliates under a separate agreement.
7. End of Agreement.
You may terminate this Agreement by destroying all copies of the Oracle Solaris programs. We have the
right to terminate your right to use the Oracle Solaris programs if you fail to comply with any of the terms of
this Agreement, in which case you shall destroy all copies of the Oracle Solaris programs.
8. Relationship Between the Parties.
The relationship between you and us is that of licensee/licensor. Neither party will represent that it has
any authority to assume or create any obligation, express or implied, on behalf of the other party, nor
to represent the other party as agent, employee, franchisee, or in any other capacity. Nothing in this
Agreement shall be construed to limit either party's right to independently develop or distribute software
79
Section D: Terms for Oracle Linux
that is functionally similar to the other party's products, so long as proprietary information of the other party
is not included in such software.
9. Entire Agreement.
You agree that this Agreement is the complete agreement for the Oracle Solaris programs, and separately
licensed third-party technology, and this Agreement supersedes all prior or contemporaneous agreements
or representations. If any term of this Agreement is found to be invalid or unenforceable, the remaining
provisions will remain effective.
Section D: Terms for Oracle Linux
“We,” “us,” “our” and “Oracle” refers to Oracle America, Inc. “You” and “your” refers to the individual or
entity that has acquired the Oracle Linux programs. “Oracle Linux programs” refers to the Linux software
product which you have acquired. “License” refers to your right to use the Oracle Linux programs under the
terms of this Agreement and the licenses referenced herein.
1. Grant of Licenses to the Oracle Linux programs.
Subject to the terms of this Agreement, Oracle grants to you a license to the Oracle Linux programs under
the GNU General Public License version 2.0. The Oracle Linux programs contain many components
developed by Oracle and various third parties. The license for each component is located in the licensing
documentation and/or in the component's source code. In addition, a list of components may be delivered
with the Oracle Linux programs and the Additional Oracle Linux programs (as defined below) or accessed
online at http://oss.oracle.com/linux/legal/oracle-list.html. The source code for the Oracle Linux Programs
and the Additional Oracle Linux programs can be found and accessed online at https://oss.oracle.com/
sources/. This agreement does not limit, supersede or modify your rights under the license associated with
any separately licensed individual component.
2. Licenses to Additional Oracle Linux programs.
Certain third-party programs that are not Oracle Linux programs may be included with or as part of the
Oracle Linux software product (collectively the “Additional Oracle Linux programs”). Each Additional Oracle
Linux program is licensed solely under the terms of the Mozilla Public License, Apache License, Common
Public License, GNU Lesser General Public License, Netscape Public License or similar license that is
included with the relevant Additional Oracle Linux program.
3. Ownership.
The Oracle Linux programs and their components and the Additional Oracle Linux programs are owned by
Oracle or its licensors. Subject to the licenses granted and/or referenced herein, title to the Oracle Linux
programs and their components and the Additional Oracle Linux programs remains with Oracle and/or its
licensors.
4. Trademark License.
You are permitted to distribute unmodified Oracle Linux programs or unmodified Additional Oracle Linux
programs without removing the trademark(s) owned by Oracle or its affiliates that are included in the
unmodified Oracle Linux programs or unmodified Additional Oracle Linux programs (the “Oracle Oracle
Linux trademarks”). You may only distribute modified Oracle Linux programs or modified Additional Oracle
Linux programs if you remove relevant images containing the Oracle Linux trademarks. Certain files,
identified in http://oss.oracle.com/linux/legal/oracle-list.html, include such trademarks. Do not delete these
files, as deletion may corrupt the Oracle Linux programs or Additional Oracle Linux programs. You are
not granted any other rights to Oracle Linux trademarks, and you acknowledge that you shall not gain
80
Section D: Terms for Oracle Linux
any proprietary interest in the Oracle Linux trademarks. All goodwill arising out of use of the Oracle Linux
trademarks shall inure to the benefit of Oracle or its affiliates. You may not use any trademarks owned
by Oracle or its affiliates (including “ORACLE”) or potentially confusing variations (such as, “ORA”) as a
part of your logo(s), product name(s), service name(s), company name, or domain name(s) even if such
products, services or domains include, or are related to, the Oracle Linux programs or Additional Oracle
Linux programs.
5. Limited Warranty.
THE ORACLE LINUX PROGRAMS AND ADDITIONAL ORACLE LINUX PROGRAMS ARE PROVIDED
"AS IS" WITHOUT WARRANTY OF ANY KIND. WE FURTHER DISCLAIM ALL WARRANTIES,
EXPRESS AND IMPLIED, INCLUDING WITHOUT LIMITATION, ANY IMPLIED WARRANTIES OF
MERCHANTABILITY OR FITNESS FOR A PARTICULAR PURPOSE.
6. Limitation of Liability.
IN NO EVENT SHALL WE BE LIABLE FOR ANY INDIRECT, INCIDENTAL, SPECIAL, PUNITIVE OR
CONSEQUENTIAL DAMAGES, OR DAMAGES FOR LOSS OF PROFITS, REVENUE, DATA OR DATA
USE, INCURRED BY YOU OR ANY THIRD PARTY, WHETHER IN AN ACTION IN CONTRACT OR
TORT, EVEN IF WE HAVE BEEN ADVISED OF THE POSSIBILITY OF SUCH DAMAGES. OUR ENTIRE
LIABILITY FOR DAMAGES HEREUNDER SHALL IN NO EVENT EXCEED ONE HUNDRED DOLLARS
(U.S.).
7. No Technical Support.
Our technical support organization will not provide technical support, phone support, or updates to you for
the materials licensed under this Agreement. Technical support, if available, may be acquired from Oracle
or its affiliates under a separate agreement.
8. Relationship Between the Parties.
The relationship between you and us is that of licensee/licensor. Neither party will represent that it has
any authority to assume or create any obligation, express or implied, on behalf of the other party, nor
to represent the other party as agent, employee, franchisee, or in any other capacity. Nothing in this
Agreement shall be construed to limit either party's right to independently develop or distribute programs
that are functionally similar to the other party’s products, so long as proprietary information of the other
party is not included in such programs.
9. Entire Agreement.
You agree that this Agreement is the complete Agreement for the Oracle Linux programs and the
Additional Oracle Linux programs, and this Agreement supersedes all prior or contemporaneous
Agreements or representations. If any term of this Agreement is found to be invalid or unenforceable, the
remaining provisions will remain effective. Neither the Uniform Computer Information Transactions Act nor
the United Nations Convention on the International Sale of Goods applies to this agreement.
You can find a copy of the GNU General Public License version 2.0 in the “copying” or “license” file
included with the Oracle Linux programs or here: http://oss.oracle.com/licenses/GPL-2.
OFFER TO PROVIDE SOURCE CODE
For software that you receive from Oracle in binary form that is licensed under an open source license
that gives you the right to receive the source code for that binary, you can obtain a copy of the applicable
source code from https://oss.oracle.com/sources/ or http://www.oracle.com/goto/opensourcecode.
81
License Information for Software Components
Alternatively, if the source code for the technology was not provided to you with the binary, you can also
receive a copy of the source code on physical media by submitting a written request to:
Oracle America, Inc.
Attn: Associate General Counsel
Development and Engineering Legal
500 Oracle Parkway, 10th Floor
Redwood Shores, CA 94065
Or, you may send an email to Oracle using the form linked from http://www.oracle.com/goto/
opensourcecode. Your written or emailed request should include:
• The name of the component or binary file(s) for which you are requesting the source code
• The name and version number of the Oracle product
• The date you received the Oracle product
• Your name
• Your company name (if applicable)
• Your return mailing address and email
• A telephone number in the event we need to reach you.
We may charge you a fee to cover the cost of physical media and processing. Your request must be sent
(i) within three (3) years of the date you received the Oracle product that included the component or binary
file(s) that are the subject of your request, or (ii) in the case of code licensed under the GPL v3, for as long
as Oracle offers spare parts or customer support for that product model or version.
Last updated: 30 August 2013
A.4 License Information for Software Components
This section provides additional license information for specific software components.
A.4.1 Hardware Management Pack
The Hardware Management Pack (HMP) is included with the Oracle Virtual Compute Appliance X3-2
controller software.
The license is available at the following location:
http://docs.oracle.com/cd/E20451_01/html/E28370/index.html
A.4.2 Java Runtime Environment
The Java Runtime Environment (JRE) is included with the Oracle Virtual Compute Appliance X3-2
controller software.
The license is available at the following location:
http://www.oracle.com/technetwork/java/javase/terms/license/index.html
82
Tinyproxy
A.4.3 Tinyproxy
Tinyproxy is included with the Oracle Virtual Compute Appliance X3-2 controller software under the GPL
(GNU General Public License) version 2.
GNU GENERAL PUBLIC LICENSE
Version 2, June 1991
Copyright (C) 1989, 1991 Free Software Foundation, Inc.,
51 Franklin Street, Fifth Floor, Boston, MA 02110-1301 USA
Everyone is permitted to copy and distribute verbatim copies
of this license document, but changing it is not allowed.
Preamble
The licenses for most software are designed to take away your
freedom to share and change it. By contrast, the GNU General Public
License is intended to guarantee your freedom to share and change free
software--to make sure the software is free for all its users. This
General Public License applies to most of the Free Software
Foundation's software and to any other program whose authors commit to
using it. (Some other Free Software Foundation software is covered by
the GNU Lesser General Public License instead.) You can apply it to
your programs, too.
When we speak of free software, we are referring to freedom, not
price. Our General Public Licenses are designed to make sure that you
have the freedom to distribute copies of free software (and charge for
this service if you wish), that you receive source code or can get it
if you want it, that you can change the software or use pieces of it
in new free programs; and that you know you can do these things.
To protect your rights, we need to make restrictions that forbid
anyone to deny you these rights or to ask you to surrender the rights.
These restrictions translate to certain responsibilities for you if you
distribute copies of the software, or if you modify it.
For example, if you distribute copies of such a program, whether
gratis or for a fee, you must give the recipients all the rights that
you have. You must make sure that they, too, receive or can get the
source code. And you must show them these terms so they know their
rights.
We protect your rights with two steps: (1) copyright the software, and
(2) offer you this license which gives you legal permission to copy,
distribute and/or modify the software.
Also, for each author's protection and ours, we want to make certain
that everyone understands that there is no warranty for this free
software. If the software is modified by someone else and passed on, we
want its recipients to know that what they have is not the original, so
that any problems introduced by others will not reflect on the original
authors' reputations.
Finally, any free program is threatened constantly by software
patents. We wish to avoid the danger that redistributors of a free
program will individually obtain patent licenses, in effect making the
program proprietary. To prevent this, we have made it clear that any
patent must be licensed for everyone's free use or not licensed at all.
The precise terms and conditions for copying, distribution and
modification follow.
GNU GENERAL PUBLIC LICENSE
TERMS AND CONDITIONS FOR COPYING, DISTRIBUTION AND MODIFICATION
83
Tinyproxy
0. This License applies to any program or other work which contains
a notice placed by the copyright holder saying it may be distributed
under the terms of this General Public License. The "Program", below,
refers to any such program or work, and a "work based on the Program"
means either the Program or any derivative work under copyright law:
that is to say, a work containing the Program or a portion of it,
either verbatim or with modifications and/or translated into another
language. (Hereinafter, translation is included without limitation in
the term "modification".) Each licensee is addressed as "you".
Activities other than copying, distribution and modification are not
covered by this License; they are outside its scope. The act of
running the Program is not restricted, and the output from the Program
is covered only if its contents constitute a work based on the
Program (independent of having been made by running the Program).
Whether that is true depends on what the Program does.
1. You may copy and distribute verbatim copies of the Program's
source code as you receive it, in any medium, provided that you
conspicuously and appropriately publish on each copy an appropriate
copyright notice and disclaimer of warranty; keep intact all the
notices that refer to this License and to the absence of any warranty;
and give any other recipients of the Program a copy of this License
along with the Program.
You may charge a fee for the physical act of transferring a copy, and
you may at your option offer warranty protection in exchange for a fee.
2. You may modify your copy or copies of the Program or any portion
of it, thus forming a work based on the Program, and copy and
distribute such modifications or work under the terms of Section 1
above, provided that you also meet all of these conditions:
a) You must cause the modified files to carry prominent notices
stating that you changed the files and the date of any change.
b) You must cause any work that
whole or in part contains or is
part thereof, to be licensed as
parties under the terms of this
you distribute or publish, that in
derived from the Program or any
a whole at no charge to all third
License.
c) If the modified program normally reads commands interactively
when run, you must cause it, when started running for such
interactive use in the most ordinary way, to print or display an
announcement including an appropriate copyright notice and a
notice that there is no warranty (or else, saying that you provide
a warranty) and that users may redistribute the program under
these conditions, and telling the user how to view a copy of this
License. (Exception: if the Program itself is interactive but
does not normally print such an announcement, your work based on
the Program is not required to print an announcement.)
These requirements apply to the modified work as a whole. If
identifiable sections of that work are not derived from the Program,
and can be reasonably considered independent and separate works in
themselves, then this License, and its terms, do not apply to those
sections when you distribute them as separate works. But when you
distribute the same sections as part of a whole which is a work based
on the Program, the distribution of the whole must be on the terms of
this License, whose permissions for other licensees extend to the
entire whole, and thus to each and every part regardless of who wrote it.
Thus, it is not the intent of this section to claim rights or contest
your rights to work written entirely by you; rather, the intent is to
exercise the right to control the distribution of derivative or
collective works based on the Program.
84
Tinyproxy
In addition, mere aggregation of another work not based on the Program
with the Program (or with a work based on the Program) on a volume of
a storage or distribution medium does not bring the other work under
the scope of this License.
3. You may copy and distribute the Program (or a work based on it,
under Section 2) in object code or executable form under the terms of
Sections 1 and 2 above provided that you also do one of the following:
a) Accompany it with the complete corresponding machine-readable
source code, which must be distributed under the terms of Sections
1 and 2 above on a medium customarily used for software interchange; or,
b) Accompany it with a written offer, valid for at least three
years, to give any third party, for a charge no more than your
cost of physically performing source distribution, a complete
machine-readable copy of the corresponding source code, to be
distributed under the terms of Sections 1 and 2 above on a medium
customarily used for software interchange; or,
c) Accompany it with the information you received as to the offer
to distribute corresponding source code. (This alternative is
allowed only for noncommercial distribution and only if you
received the program in object code or executable form with such
an offer, in accord with Subsection b above.)
The source code for a work means the preferred form of the work for
making modifications to it. For an executable work, complete source
code means all the source code for all modules it contains, plus any
associated interface definition files, plus the scripts used to
control compilation and installation of the executable. However, as a
special exception, the source code distributed need not include
anything that is normally distributed (in either source or binary
form) with the major components (compiler, kernel, and so on) of the
operating system on which the executable runs, unless that component
itself accompanies the executable.
If distribution of executable or object code is made by offering
access to copy from a designated place, then offering equivalent
access to copy the source code from the same place counts as
distribution of the source code, even though third parties are not
compelled to copy the source along with the object code.
4. You may not copy, modify, sublicense, or distribute the Program
except as expressly provided under this License. Any attempt
otherwise to copy, modify, sublicense or distribute the Program is
void, and will automatically terminate your rights under this License.
However, parties who have received copies, or rights, from you under
this License will not have their licenses terminated so long as such
parties remain in full compliance.
5. You are not required to accept this License, since you have not
signed it. However, nothing else grants you permission to modify or
distribute the Program or its derivative works. These actions are
prohibited by law if you do not accept this License. Therefore, by
modifying or distributing the Program (or any work based on the
Program), you indicate your acceptance of this License to do so, and
all its terms and conditions for copying, distributing or modifying
the Program or works based on it.
6. Each time you redistribute the Program (or any work based on the
Program), the recipient automatically receives a license from the
original licensor to copy, distribute or modify the Program subject to
these terms and conditions. You may not impose any further
restrictions on the recipients' exercise of the rights granted herein.
You are not responsible for enforcing compliance by third parties to
this License.
85
Tinyproxy
7. If, as a consequence of a court judgment or allegation of patent
infringement or for any other reason (not limited to patent issues),
conditions are imposed on you (whether by court order, agreement or
otherwise) that contradict the conditions of this License, they do not
excuse you from the conditions of this License. If you cannot
distribute so as to satisfy simultaneously your obligations under this
License and any other pertinent obligations, then as a consequence you
may not distribute the Program at all. For example, if a patent
license would not permit royalty-free redistribution of the Program by
all those who receive copies directly or indirectly through you, then
the only way you could satisfy both it and this License would be to
refrain entirely from distribution of the Program.
If any portion of this section is held invalid or unenforceable under
any particular circumstance, the balance of the section is intended to
apply and the section as a whole is intended to apply in other
circumstances.
It is not the purpose of this section to induce you to infringe any
patents or other property right claims or to contest validity of any
such claims; this section has the sole purpose of protecting the
integrity of the free software distribution system, which is
implemented by public license practices. Many people have made
generous contributions to the wide range of software distributed
through that system in reliance on consistent application of that
system; it is up to the author/donor to decide if he or she is willing
to distribute software through any other system and a licensee cannot
impose that choice.
This section is intended to make thoroughly clear what is believed to
be a consequence of the rest of this License.
8. If the distribution and/or use of the Program is restricted in
certain countries either by patents or by copyrighted interfaces, the
original copyright holder who places the Program under this License
may add an explicit geographical distribution limitation excluding
those countries, so that distribution is permitted only in or among
countries not thus excluded. In such case, this License incorporates
the limitation as if written in the body of this License.
9. The Free Software Foundation may publish revised and/or new versions
of the General Public License from time to time. Such new versions will
be similar in spirit to the present version, but may differ in detail to
address new problems or concerns.
Each version is given a distinguishing version number. If the Program
specifies a version number of this License which applies to it and "any
later version", you have the option of following the terms and conditions
either of that version or of any later version published by the Free
Software Foundation. If the Program does not specify a version number of
this License, you may choose any version ever published by the Free Software
Foundation.
10. If you wish to incorporate parts of the Program into other free
programs whose distribution conditions are different, write to the author
to ask for permission. For software which is copyrighted by the Free
Software Foundation, write to the Free Software Foundation; we sometimes
make exceptions for this. Our decision will be guided by the two goals
of preserving the free status of all derivatives of our free software and
of promoting the sharing and reuse of software generally.
NO WARRANTY
11. BECAUSE THE PROGRAM IS LICENSED FREE OF CHARGE, THERE IS NO WARRANTY
FOR THE PROGRAM, TO THE EXTENT PERMITTED BY APPLICABLE LAW. EXCEPT WHEN
OTHERWISE STATED IN WRITING THE COPYRIGHT HOLDERS AND/OR OTHER PARTIES
86
Tinyproxy
PROVIDE THE PROGRAM "AS IS" WITHOUT WARRANTY OF ANY KIND, EITHER EXPRESSED
OR IMPLIED, INCLUDING, BUT NOT LIMITED TO, THE IMPLIED WARRANTIES OF
MERCHANTABILITY AND FITNESS FOR A PARTICULAR PURPOSE. THE ENTIRE RISK AS
TO THE QUALITY AND PERFORMANCE OF THE PROGRAM IS WITH YOU. SHOULD THE
PROGRAM PROVE DEFECTIVE, YOU ASSUME THE COST OF ALL NECESSARY SERVICING,
REPAIR OR CORRECTION.
12. IN NO EVENT UNLESS REQUIRED BY APPLICABLE LAW OR AGREED TO IN WRITING
WILL ANY COPYRIGHT HOLDER, OR ANY OTHER PARTY WHO MAY MODIFY AND/OR
REDISTRIBUTE THE PROGRAM AS PERMITTED ABOVE, BE LIABLE TO YOU FOR DAMAGES,
INCLUDING ANY GENERAL, SPECIAL, INCIDENTAL OR CONSEQUENTIAL DAMAGES ARISING
OUT OF THE USE OR INABILITY TO USE THE PROGRAM (INCLUDING BUT NOT LIMITED
TO LOSS OF DATA OR DATA BEING RENDERED INACCURATE OR LOSSES SUSTAINED BY
YOU OR THIRD PARTIES OR A FAILURE OF THE PROGRAM TO OPERATE WITH ANY OTHER
PROGRAMS), EVEN IF SUCH HOLDER OR OTHER PARTY HAS BEEN ADVISED OF THE
POSSIBILITY OF SUCH DAMAGES.
END OF TERMS AND CONDITIONS
How to Apply These Terms to Your New Programs
If you develop a new program, and you want it to be of the greatest
possible use to the public, the best way to achieve this is to make it
free software which everyone can redistribute and change under these terms.
To do so, attach the following notices to the
to attach them to the start of each source file
convey the exclusion of warranty; and each file
the "copyright" line and a pointer to where the
program. It is safest
to most effectively
should have at least
full notice is found.
<one line to give the program's name and a brief idea of what it does.>
Copyright (C) <year> <name of author>
This program is free software; you can redistribute it and/or modify
it under the terms of the GNU General Public License as published by
the Free Software Foundation; either version 2 of the License, or
(at your option) any later version.
This program is distributed in the hope that it will be useful,
but WITHOUT ANY WARRANTY; without even the implied warranty of
MERCHANTABILITY or FITNESS FOR A PARTICULAR PURPOSE. See the
GNU General Public License for more details.
You should have received a copy of the GNU General Public License along
with this program; if not, write to the Free Software Foundation, Inc.,
51 Franklin Street, Fifth Floor, Boston, MA 02110-1301 USA.
Also add information on how to contact you by electronic and paper mail.
If the program is interactive, make it output a short notice like this
when it starts in an interactive mode:
Gnomovision version 69, Copyright (C) year name of author
Gnomovision comes with ABSOLUTELY NO WARRANTY; for details type `show w'.
This is free software, and you are welcome to redistribute it
under certain conditions; type `show c' for details.
The hypothetical commands `show w' and `show c' should show the appropriate
parts of the General Public License. Of course, the commands you use may
be called something other than `show w' and `show c'; they could even be
mouse-clicks or menu items--whatever suits your program.
You should also get your employer (if you work as a programmer) or your
school, if any, to sign a "copyright disclaimer" for the program, if
necessary. Here is a sample; alter the names:
Yoyodyne, Inc., hereby disclaims all copyright interest in the program
87
Pexpect
`Gnomovision' (which makes passes at compilers) written by James Hacker.
<signature of Ty Coon>, 1 April 1989
Ty Coon, President of Vice
This General Public License does not permit incorporating your program into
proprietary programs. If your program is a subroutine library, you may
consider it more useful to permit linking proprietary applications with the
library. If this is what you want to do, use the GNU Lesser General
Public License instead of this License.
A.4.4 Pexpect
Pexpect is included with the Oracle Virtual Compute Appliance X3-2 controller software.
Pexpect Copyright (c) 2008 Noah Spurrier
Permission is hereby granted, free of charge, to any person obtaining a copy
of this software and associated documentation files (the "Software"), to deal
in the Software without restriction, including without limitation the rights
to use, copy, modify, merge, publish, distribute, sublicense, and/or sell
copies of the Software, and to permit persons to whom the Software is
furnished to do so, subject to the following conditions:
The above copyright notice and this permission notice shall be included in all
copies or substantial portions of the Software.
THE SOFTWARE IS PROVIDED "AS IS", WITHOUT WARRANTY OF ANY KIND,
EXPRESS OR IMPLIED, INCLUDING BUT NOT LIMITED TO THE WARRANTIES OF
MERCHANTABILITY, FITNESS FOR A PARTICULAR PURPOSE AND NONINFRINGEMENT.
IN NO EVENT SHALL THE AUTHORS OR COPYRIGHT HOLDERS BE LIABLE FOR ANY CLAIM,
DAMAGES OR OTHER LIABILITY, WHETHER IN AN ACTION OF CONTRACT, TORT OR
OTHERWISE, ARISING FROM, OUT OF OR IN CONNECTION WITH THE SOFTWARE OR THE
USE OR OTHER DEALINGS IN THE SOFTWARE.
A.4.5 Oracle Fabric Manager
Oracle Fabric Manager is included with Oracle Virtual Compute Appliance X3-2.
License information is available at the following location:
http://docs.oracle.com/cd/E38500_01/pdf/E50996.pdf
A.4.6 Oracle VM
Oracle VM is included with Oracle Virtual Compute Appliance X3-2.
License information is available at the following location:
http://docs.oracle.com/cd/E35328_01/E35332/html/vmusg-licenses.html
A.5 License Information for Hardware Components
The following list provides access to license information for each hardware component.
• Oracle Fabric Interconnect F1-15 Director Switch:
URL: http://docs.oracle.com/cd/E38500_01/index.html
• Oracle Switch ES1-24:
88
License Information for Hardware Components
URL: http://docs.oracle.com/cd/E39109_01/html/E39115/index.html
• NM2-36P Sun Datacenter InfiniBand Expansion Switch:
URL: http://docs.oracle.com/cd/E26698_01/html/E23541/index.html
• Sun Server X3-2
URL: http://docs.oracle.com/cd/E22368_01/html/E28850/index.html
• Sun ZFS Storage Appliance 7320:
URL: http://docs.oracle.com/cd/E26765_01/html/E26047/index.html
89
90
Index
ES1-24 switch
CRU servicing instructions, 51
A
F
Appliance
Architecture, 1
Backup, 14
Hardware, 1, 2
High Availability, 13
Overview, 1, 1
Provisioning, 1, 11
Software, 1, 7
Software Update, 15
Fabric Interconnect F1-15
CRU servicing instructions, 53
replaceable components, 44
Failover
compute node, 14
database, 14
management node, 13
networking, 14
storage, 14
B
H
Backup, 14, 17
Hardware, 2
Compute Nodes, 3
Management Nodes, 3
Networking, 5
Storage, 4
hardware
identifying, 18
monitoring, 18
status, 18
view, 18
High Availability, 13
C
Compute Node
failover, 14
provisioning, 12
Compute Nodes
Hardware, 3
Configuration, 17, 21, 21, 21, 21, 21
logging, 58
proxy, 57
CRU servicing
NM2-36P Sun Datacenter InfiniBand Expansion
Switch, 52
Oracle Fabric Interconnect F1-15 Director Switch, 53
Oracle Switch ES1-24, 51
rack parts, 45
Sun Server X3-2, 47
Sun ZFS Storage Appliance 7320, 49
I
InfiniBand switch
CRU servicing instructions, 52
replaceable components, 43
Initial Setup, 17, 21, 23
J
Jobs and Events, 37
D
L
Dashboard, 17, 21
hardware view, 18
login, 18
Network View, 21
Software, 7
Database
failover, 14
Databases
Software, 8
Director Switch F1-15
CRU servicing instructions, 53
replaceable components, 44
DNS, 21
logging
configure, 58
M
Management Node, 21
failover, 13
provisioning, 11
Management Nodes
Hardware, 3
monitoring
enabling SNMP, 59
hardware, 17, 18, 29
Network, 21
Oracle VM, 29
virtual machine, 29
E
electrostatic discharge safety, 44
91
N
R
Network
configuration, 17
hardware, 21
identifying, 21
monitoring, 17, 21
view, 21
Network Setup, 21
Networking
failover, 14
Hardware, 5
networking
proxy, 57
using VLANs, 58
NM2-36P InfiniBand switch
CRU servicing instructions, 52
replaceable components, 43
NTP, 21
rack
CRU servicing instructions, 45
replaceable components, 40
replaceable components
NM2-36P Sun Datacenter InfiniBand Expansion
Switch, 43
Oracle Fabric Interconnect F1-15 Director Switch, 44
Oracle Switch ES1-24, 43
rack infrastructure, 40
Sun Server X3-2, 40
Sun ZFS Storage Appliance 7320, 41
reset, 21
S
safety
electrostatic discharge, 44
service precautions, 44
Server
information, 29
service, 39
electrostatic discharge, 44
preparations, 44
replaceable components, 39
safety precautions, 44
servicing NM2-36P Sun Datacenter InfiniBand
Expansion Switch parts, 52
servicing Oracle Fabric Interconnect F1-15 Director
Switch parts, 53
servicing Oracle Switch ES1-24 parts, 51
servicing rack parts, 45
servicing Sun Server X3-2 parts, 47
servicing Sun ZFS Storage Appliance 7320 parts, 49
servicing the system
powering down, 45
SNMP
enable, 59
Software, 7
Dashboard, 7
Databases, 8
Operating Systems, 8
Oracle VM Manager, 8
Wallet, 7
Software Update, 15, 17, 23
Storage
adding, 36
configuration, 36
failover, 14
Hardware, 4
Storage Appliance
CRU servicing instructions, 49
replaceable components, 41
Sun Server X3-2, 3
O
Operating Systems
Software, 8
Oracle VM, 27
Events, 37
Health, 29
Jobs, 37
login, 28
monitoring, 29
Networking, 34
Repositories, 32
Servers and VMs, 29
Storage, 36
tagging, 37
Tools and Resources, 37
Oracle VM Manager
adding expansion nodes, 13
server pool, 13
Software, 8
P
Password, 21
Password Manager, 7
power off procedure
servicing, 45
Provisioning, 11
compute node discovery, 12
expansion node, 13
initialization, 11
server pool configuration, 13
proxy
configure, 57
Public Network, 21
92
CRU servicing instructions, 47
replaceable components, 41
Sun ZFS Storage Appliance 7320, 4
CRU servicing instructions, 49
switch ES1-24
CRU servicing instructions, 51
replaceable components, 43
T
Tagging, 37
U
Update, 17, 23
V
Virtual Machine
assemblies, 32
clone, 29
clone customizer, 32
console, 29
create, 29
delete, 29
import, 29
installation media, 32
ISOs, 32
manage, 27, 29
message, 29
migrate, 29
resources, 32
templates, 32
virtual disks, 32
VNICs, 34
VLAN
enabling VLAN traffic, 58
W
Wallet
Software, 7
Z
ZFS Storage Appliance
CRU servicing instructions, 49
replaceable components, 41
93
94


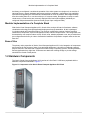


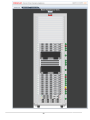
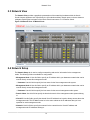


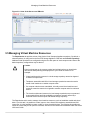

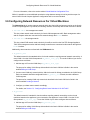


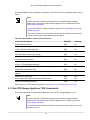


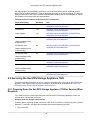

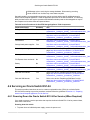
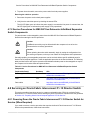


![[1]StorageTek Linear Tape File System, Open Edition](http://vs1.manualzilla.com/store/data/005641506_1-83def2383162ce3771fdbc891794971f-150x150.png)