1
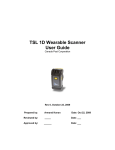
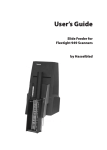
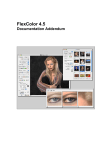
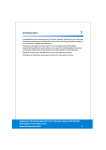
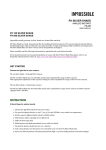
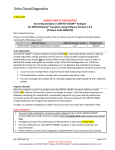
USER MANUALS
FILM MAGAZINE HM 16-32
Item no.: 3033016
LCD panel
HM 16-32 Film Magazine
A
The HM 16-32 film magazine is a sophisticated semi-independent
unit within the modular H-system. It has its own power supply for
individual information storage, LCD panel, illumination, etc.
B
Much information is transmitted and received between the magazine and the camera body, so ensure the databus connection is kept
clean and not damaged in any way. It is advisable to fit the magazine protective cover when storing a film magazine to protect both
the databus connection and the darkslide.
LCD illumination button
The features include:
•
Automatic120/220compatibility
•
Automaticwindon/windoff
•
Automaticfilmadvance
•
LCDinformationpanel
•
Integraldarkslide
•
Customizabledataimprinting
•
IlluminatedLCD
A
The various functions are accessed by repeatedly pressing the
function selector button (loop menu) and changes made by the
‘change-up’ and ‘change-down’ buttons. Any settings are automatically saved. At very low temperatures the LCD will require a
few seconds to display new settings.
C
D
B
The LCD can be illuminated by pressing the display illumination
button, which is accessible when the magazine is not attached to
the camera. The LCD will remain illuminated all the time you keep
thebuttondepressed,uptoamaximumof10seconds.After10
seconds has expired, you must release the pressure on the button
andpressagaintoobtainafurther10secondperiodofillumination. Remember that using the illumination function very often
will noticeably shorten the life of the battery in the magazine.
When the magazine is attached to the camera, the button on the
magazine is inaccessible but you can still illuminate the LCD by
pressing the illumination button on the grip instead.
Change up button
•
Barcoderecognition
•
Count-uporcount-downfilmframereminderchoice
•
Multishotoption
F
E
C
Can change the settings ‘upwards’. For example, to increase the
film speed setting. Toggle action.
Change down button
D
Can change the settings ‘downwards’. For example, to decrease
the film speed setting. Toggle action.
Function selector
A
F G H
B
I
J
K
G
L
H
E
Selects the four functions that can be set on the magazine. The
functions are on a menu loop so that repeated pressing of the selectorbuttonwillsuccessivelyaccessallfunctionsinturn.Aftera
time-out of five seconds of non-activity, the display returns to the
main screen.
Film plane index
C
D
F
Provides a measuring point for the actual position of the film plane
in the magazine. Used for calculations in critical applications.
E
Darkslide key
G
Withdraws and replaces the darkslide. Fold out the key and turn it
counter-clockwise360°(towardstheopen symbol) to withdraw
itandclockwise360°(towardstheclosed symbol) to replace it.
Darkslide indicator
Note
Parts and components
A.
I
LCD panel
G.
B.
LCD illumination button
H.
Darkslide indicator
C.
Change up button
I.
Film tab holder
D.
Change down button
J.
Film holder key
E.
Function selector
K.
Magazine settings lock
F.
Film plane index
L.
Databus interface
J
Changes can only be made when the settings lock switch is in
the unlocked position.
Darkslide key
Film tab holder
Note
3
L
K
J
4
1
Operation
If you attempt to make an exposure when the darkslide is closed,
however, you will receive a warning message in the viewfinder and
grip LCDs – ‘The darkslide is closed’.
3, 4
Removal
Ensure that the darkslide indicator on the magazine shows red (signifying that the darkslide is closed). Firstly push the lever of the
magazinereleasebuttontotheright(fig.4/1)andwhilemaintaining that position press the centre of the button firmly inwards towardsthecamerabody(fig.4/2)tofinallyreleasethemagazine.
2
Battery
The magazine uses a battery to retain information and settings
when unattached from the camera. When attached to the camera
body,themagazinetakesitspowerrequirementsfromthecamerabatteries.Themagazinebatterywillnormallybeeffectivefor
1-2yearsdependingonuse(offcameraillumination,forexample).
When the battery is in a very low condition, (approx. 1 month of
use left), a low-battery symbol appears on the magazine LCD as a
warning. The magazine will continue to function with no battery
power left as long as it remains attached to the camera body. However, when detached, the settings will not be stored.
Battery replacement
2
= exposure CAN be made
(magazine cannot be removed from camera)
You can attach and remove the magazine with or without the film
holder in place. If you just want to change to a new film, you can
remove and reload the film holder without having to remove the
whole magazine.
L
Data interface between magazine and camera. Ensure the contacts
are kept clean and protected from damage. Keep the protective
cover on when the magazine is being stored or transported.
1
(magazine can be removed from camera)
ok !
Attachment
Position the magazine retention groove onto the magazine support on the camera body ensuring that they are correctly positioned. Swing the magazine towards the camera body and firmly
press into place with a click. If there is resistance, the magazine
retaining catch on the camera has probably been inadvertently
released. In that case, push the release button again to reset the
catch.
K
Allsettingscanbelockedtoavoidinadvertentchanges.Tochange
the settings, slide the settings lock (see illus) to the right until it
stops.Afterthechangeshavebeenmade,slidethesettingslockto
the left (see symbol on magazine) again to secure the new settings.
Databus interface
stop ! = exposure CANNOT be made
You cannot remove a magazine from the camera body if the magazine darkslide is not in place, (when the magazine darkslide indicator on the magazine shows white). Neither can you withdraw
the magazine darkslide when the magazine is not attached to the
camera. Both these restrictions therefore prevent accidental film
loss caused by fogging.
Secures the film holder in the magazine. Fold out the key and turn
counter-clockwise 90° to remove the film holder and turn clockwise90˚tolockthefilmholderinplace.
Magazine settings lock
=
Attaching and removing the magazine
I
Holds an ID tab from the film roll pack as a reminder of the type of
film loaded. Don’t forget to change it if you change film type!
Film holder key
RED
WHITE =
The darkslide can only be withdrawn when the magazine is
attached to the camera.
H
Indicates whether the darkslide is in place or withdrawn:
1, 2
Release the film holder by folding out the film holder key and
rotatingit90°inacounter-clockwisedirection.Withdrawthe
film holder completely. On the bottom plate on the inside of the
film magazine housing you will find a slotted circular battery
cover. Insert a small coin or similar into the slot and rotate the
coverabout20°inacounter-clockwisedirection.Thecoverwill
be freed and the battery can be removed. Replace with a fresh
CR2032/3Vlithium(orequivalent)battery.Observethepolarity and ensure the positive (+) face is uppermost and replace the
cover (ensure the retaining lugs are inserted in the battery compartment slots), locking it into place by rotating it in a clockwise
direction until it stops. If you inadvertently insert the battery
incorrectly, the film magazine will not be damaged though it will
not function. Try to avoid touching the surface of the battery with
your bare fingers as sweat residue can decrease the electrical
conductivity of the battery casing and might cause corrosion.
Note
Note
If the film holder is inadvertently removed mid-film, then
exposed frames will naturally be lost due to light fogging.
However, if the film holder is re-inserted, the film will automatically be advanced by three frames to position fresh
unexposed film. The film counter will also correspondingly
add on three frames to the original number recorded before
the film holder was removed.
You cannot remove a magazine if the darkslide is not closed.
Note
Film settings (ISO / film length) are automatic only if the
magazine is set at Barcode automatic. That is, a barcoded
film cannot override a manual film speed setting but a manual setting can override the film speed of a barcoded film.
Note
Films without a barcode must have their speed set manually. A manual setting must also be made if you want to
override the speed setting of a barcoded film.
After battery replacement, the magazine’s parameters return to
thedefaultsettings(Barcode,120,Data-on,Countup).
1/2
Note
Ensure you press on the centre of the button, not on the lever.
www.hasselblad.com
Film magazine HM 16-32 – 3033016 – 2011 – v1
USER MANUALS
FILM MAGAZINE HM 16-32
Item no.: 3033016
Magazine settings
Press the function selector (
access:
Frame counter setting
button ) repeatedly to successively
A. Filmspeed(ISO/BarCode)
C
A
B. Filmlength(120/220/Numberofframes)
D. Framecounter(countdown/countup)
D
E. Low-battery warning symbol
E
1
2
4
3
220filmlength
setting.
Manual film
speed setting.
C. Data(on/off)
B
Film speed setting / Barcode
To access frame counter setting:
The film speed (ISO / ASA) can be set automatically or manually.
AutomaticsettingusesaBarcode(onlysomefilmshavethisfeature, notably Fujifilm). This is the default setting.
1) Ensure the magazine settings lock is in the unlocked position.
2) Press the button until Remain appears.
3) Press either the button or the button to reach the
desired setting (toggle function).
•‘on’willshowthenumberofframesremainingontheroll.
•‘oFF’willshowthenumberofthenextframeintheseries.
4) The new setting will be saved automatically after a time out
of five seconds.
5) Return the magazine settings lock to the locked position.
To access Manual setting:
Data imprinting
setting.
1) Ensure the magazine settings lock is in the unlocked position.
2) Press the button until a figure (or barcode symbol) appears
together with ISO.
3) Press either the or the button to reach the required setting.
4) The new setting will be saved automatically after a time out of
five seconds.
5) Return the LCD settings lock to the locked position.
EXAMPLE
‘Frames remaining’
counter setting.
Note
Operation and changes made to the data imprinting function are accessed through the camera menu. Please see separate section in camera User Manual for full details.
Film length/number of frames
Both 120 and 220 films can be used. 120 film will produce 8 (for
usewith‘half-length’120filmsonly)or16framesand220filmwill
produce 32 frames.
The low-battery symbol only appears on the magazine LCD when
the battery needs changing.
In the example shown here:
If, however, the film has no barcode then proceed as follows:
Film speed
Low-battery symbol
Example
If the film has a barcode, then film length setting (and film speed
setting) is automatic. The LCD will automatically show the barcode
symbol and the appropriate film length. (Note that film speed can
be overridden with barcoded films, but not film length).
5
The frame counter can be set to show either how many unexposed frames remain on a film or how many frames have already
been exposed. The LCD shows your choice of setting by adding
the word Remain as a reminder of the number of frames remaining or ‘countdown’. Absence of this word implies the opposite,
namely, ‘count-up’, so it denotes the number of the next frame
to be used (for example, the figure 4 means three frames have
already been exposed). This information is also automatically displayed on the grip LCD and viewfinder LCD though only as a figure above a symbol.
To access film type setting:
Film length
1) Ensure the magazine settings lock is in the unlocked position.
2) Press the button until the 120 or 220 symbol appears.
3) Press either the or the button to change the desired
setting.
4) The new setting will be saved automatically after timeout.
5) Return the magazine settings lock to the locked position.
Data
Frame counter
• 120filmlengthsetmanually
• thefilmspeed(ISO160)hasbeensetmanually
• 5frameshavealreadybeenexposed(thereforewithregular
120 film, 11 frames remain)
• thebatteryisfunctional
Data imprint setting
Data imprinting can be activated or deactivated through the magazine menu.
To access data setting:
Note
If you use both standard and barcoded films (or overridden
barcoded films), check that you have changed the settings
accordingly.
1)
2)
3)
4)
Ensure the magazine settings lock is in the unlocked position.
Press the button until the Data symbol appears.
Press either the or the button to reach On or Off.
The new setting will be saved automatically after a time out of
five seconds.
5) Return the magazine settings lock to the locked position.
Film loading
1
2
1
2
4
3
5
1
Thefilmmagazinecanbeloadedeitheronoroffthecamera.Regularly check the interior of the magazine and remove dust, particles
or any scraps of paper from previous rolls of film. Load and unload
film magazines away from direct light sources.
FRA
1) Fold out the film holder key and turn it counter-clockwise 90°.
Withdraw the film holder completely.
2) Place an empty take-up spool in the upper spool holder by
placing one end over the fixed stud in the holder and the other
end underneath the sprung spool retaining arm. Rotate the
spool a little if necessary until it clicks into position.
3) Completely remove the retaining paper band from a new roll
of film and place it in the lower spool holder. See diagram for
correct orientation. Ensure you do not place the film spool the
wrong way around!
4) Pull 8–10 cm (3–4 in.) of paper backing from the film roll and
insert the tongue of the backing paper into the slot in the
take-up spool. Turn the spool one complete turn to ensure the
tongue is firmly held in place by the overlying paper backing.
5) Re-insert the film holder into the main body of the film magazine ensuring the correct orientation. Press firmly inwards
towards the magazine and pay particular attention to see that
both sides are level with the magazine body before turning the
film holder key clockwise 90˚ to lock the film holder in place
and fold the key back into its stored position. You might find
that increased pressure on the left hand side of the film holder
will more easily ensure a positive and correct positioning in the
magazine.
If the camera is active or in standby mode the film will be
wound automatically by the camera to position the first frame
(this function can be changed in Custom Options so that
the film is advanced only when the shutter release button is
pressed the first time).
DEU
ESP
ITA
PRT
SWE
NLD
7
Hasselblad A/S.
The text in this manual cannot be reprinted or reused without the express permission o
Victor Hasselblad AB & Hasselblad A/S.
The images in this manual cannot be reprinted or reused without the express permission o
the photographers who took them.
Victor Hasselblad AB & Hasselblad A/S assumes no responsibility or liability for any errors o
inaccuracies that may appear in this manual.
Victor Hasselblad AB & Hasselblad A/S assumes no responsibility or liability for loss or dam
Este texto na sua língua?
Usar “Google Translate” na Internet.
Denna text på ditt språk?
Använd “Google Translate”på Internet.
Deze tekst in uw taal?
Gebruik ‘Google Translate’ op het internet.
age incurred during or as a result of using Hasselblad products.
Hasselblad, Imacon, Ixpress, FlexColor and Phocus are trademarks of Victor Hasselblad A
& Hasselblad A/S. Adobe, Adobe Photoshop is a trademark of Adobe Systems.
Copyright © 2011
Victor Hasselblad AB & Hasselblad A/S
All rights reserved.
IND
6, 7
Wind on: See ‘Film wind-on’ under Custom Options for a setting
choice.
6
without notice, and should not be construed as a commitment by Victor Hasselblad AB
CHN
The beeper sounds immediately after the last-but-one frame has
beenexposed.ThisfunctioncanbeturnedoffinCustom Options.
Film wind on and off
The information in this manual is furnished for informational use only, is subject to chang
JPN
Beeper
2
Ce texte dans votre langue?
Utilisez “Google Translate” sur Internet.
Diesen Text in Ihrer Sprache?
Verwenden Sie “Google Translate” im Internet.
Este texto en su idioma?
El uso de “Google Translate” en Internet.
Questo testo nella tua lingua?
Utilizzare ‘Google Translate’ su Internet.
RUS
Windoff:Whenthelastframehasbeenexposed,thefilmwillautomaticallybewoundoff.However,towindoffafilmsooner,press
thefilmwindoffbutton(fig.6).Useaballpointpenorsimilarto
activate it. You must also confirm the message on the grip LCD (fig.
7)beforethefilmwindsoff.
Visit www.hasselblad.com to download user manuals, datasheets, product brochures, technical information, technical
articles, software and firmware updates etc., as well as news
about the latest developments at Hasselblad.
SAU
41
Unloading a magazine
To remove a film, remove the film holder in the same manner as
when loading a film. Grip the exposed roll of film firmly and remove. Ensure the paper backing is wound tightly and that it is
sealed with the band properly (the band may need to be moistened to activate the adhesive depending on type). Store exposed
films away from strong light sources and contact with sharp objects. Move the remaining empty spool to the take-up spool
compartment.
Visit www.hasselblad.com to download user manuals, datasheets, product brochures, technical
Ce texte dans votre langue?
information, technical articles, software and firmware updates etc. as well as to read FRA
about the latest
Utilisez “Google Translate” sur Internet.
developments at Hasselblad.
Diesen Text in Ihrer Sprache?
Verwenden Sie “Google Translate” im Internet.
Este texto en su idioma?
ESP
El uso de “Google Translate” en Internet.
Questo testo nella tua lingua?
ITA
Utilizzare
‘Google
Translate’ su Internet.
The information in this manual is furnished for informational use only, is subject to change without notice, and should not be construed as a commitment by Victor Hasselblad AB & Hasselblad A/S. The text and images in this manual cannot be reprinted or reused without the express permission of Victor Hasselblad AB & Hasselblad
A/S. Victor
Hasselblad
DEU
AB & Hasselblad A/S assume no responsibility or liability for any errors or inaccuracies that may appear in this manual. Victor Hasselblad AB & Hasselblad A/S assume no responsibility or liability for loss or damage incurred during or as a result of using Hasselblad products. Copyright © 2011 - Victor Hasselblad AB & Hasselblad A/S. All rights reserved.
2/2
www.hasselblad.com
Film magazine HM 16-32 – 3033016 – 2011 – v1