1
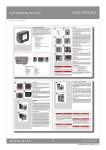
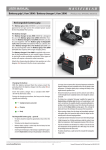
silvestri DIGITAL REMOTE CONTROL UNIT 7020K user manual INTRODUCTION Congratulations on having chosen the Silvestri Remote Control Unit for electronic shutters. The D.R.C.U. must be connected using only the special peripherals supplied by Silvestri, such as the magnetic shutter, battery charger, the flexible electrical shot mechanism, the digital back adapter, and cables to connect to other peripherals. The D.R.C.U. is fed by Ni MH rechargeable batteries, so you can therefore work comfortably outdoors without the need of a 220V power supply. On the illuminated display you can visualize the required photographic data: number of consecutive shots, intershot delay, exposure time, etc Using the keyboard you can access the functions menu to vary all the possible data. NOTES MEASUREMENTS: 93x152x26 mm WEIGHT: 335 gr. REAR LABEL: On the back of the D.R.C.U. there is an identifying label. To the top and bottom there are indications of the connector functions. At the centre you can see the serial number. There is also the power feed data: 12Vdc 0,5A. As already indicated, use of the specific power supply adaptor supplied with the D.R.C.U. is recommended. This adaptor is not just a simple power feed, but in fact a specific battery charger for the internal Ni-Mh batteries. When the batteries reach a charge level close to that of no longer functioning, the message (BATTERY LOW) will appear on the display. INDEX Page 1 INTRODUCTION Page 2 USER INSTRUCTIONS Page 3 PROGRAMMING AND PREFERENCES MENU Page 4 T SHUTTER FUNCTION Page 5 SUMMARY DESIGN Page 6 GENERAL NOTES The Ni-Mh batteries do not have a memory so if they are always recharged in the correct way they will last for many years. Should battery capacity be exhausted, or in the case of any other kind of fault, it is recommended that you do not attempt repair on your own, but to seek technical assistance from the sales outlet where the equipment was purchased. SUMMARY DESIGN Summarized in this design are the keyboard functions and possible external connections. USER INSTRUCTIONS POWER ON AND OFF To turn on the D.R.C.U. it is sufficient to keep the POWER button pressed for around 1 second. After the beep a message will appear on the display for around 3 seconds; the message indicates the name of the camera and the software version resident in the microprocessor: TO THE DIGITAL BACK MAGNETIC SHUTTER CABLE DIGITAL CONTROL UNIT REV. 1.5.1 After this message the main screen will appear, showing the current work data and camera status. To turn off the equipment it is sufficient to keep the POWER button pressed for a few seconds. N.B.: After power on it is necessary to wait at least 10 seconds before powering off. POWER ON / OFF MENU SCROLL & VALUE CHANGE SHUTTER OPENING / CLOSING MENU OPENING / CLOSING FUNCTION CONFIRMATION AND ENTER TO SHOT BATTERY CHARGER CABLE PROGRAMMING MAIN SCREEN SHOTS: 0/1 EXP. T: 1/60 DELAY: 1/15 STATUS: READY The figure on the left represents the main screen. Here you can view your work data and therefore shoot if the status shows READY. SHOTS indicates the number of sequential shots programmed. EXP. T indicates the exposure time programmed in seconds. DELAY indicates the intershot delay time programmed (functions only if two or more sequential shots are programmed). STATUS indicates the current status of the D.R.C.U. If it reads READY, all is well and you can work. If it reads WAITING it means there is a peripheral connection problem: the D.R.C.U. has sent a signal to the digital back and has not received a response. N.B.: during vision of this screen you will note that the READY message will sometimes, for a fraction of a second, read CHARGE; do not think there is a problem; it is ELECTRIC CABLE RELEASE It is recommended once again to not connect cables that are not supplied by Silvestri. PROGRAMMING AND PREFERENCES MENU To access the menu for changing work data and user preferences it is sufficient to press the MENU key and the following screen will appear: MENU 1 > NUMBER OF SHOTS EXPOSURE TIME INTERSHOT DELAY MENU 2 > DIGITAL BACK SLEEP TIME BEEP The heading will read MENU1, and means that you are at the first page of the menu. The cursor in the left margin may be moved using keys + and - , in this way you can move to the required item and at the end of the page pass to the second menu screen. The heading will ready MENU2, and means that you are at the second page of the menu. To return to the main screen just press the MENU key again. PROGRAMMING EXAMPLE: 1) PRESS THE MENU KEY 2) SCROLL DOWN THE MENU USING THE + / - KEYS 3) PRESS THE ENTER / START KEY TO ACCESS THE SPECIFIC FUNCTION. 4) CHANGE THE VALUE THAT APPEARS USING THE + / - KEYS. 5) PRESS ENTER/START TO CONFIRM. YOU WILL AUTOMATICALLY RETURN TO THE MENU SCREENS. MEANINGS OF FUNCTIONS: NUMBER OF SHOTS indicates the number of sequential shots programmable. EXPOSURE TIME indicates the exposure time programmable in seconds. INTERSHOT DELAY indicates the intershot time programmable (functions only if two or more sequential shots are programmed). DIGITAL BACK Select the correct digital back in use from the Menu. CONNECTIONS TO DIGITAL BACK SINAR: 1) Connect the electronic shutters cable to the DRCU. 2) Connect the sync flash cable supplied with the Sinar back (Sinar code 551.43.111) to the shutter. 3) Connect the Sinar backs cable (code 7040K) between the DRCU and the Sinar back plus the Sinar cable for Hasselblad CW (Sinar code 551.63.063). 4) Set Hasselblad as the camera type on Sinar software. 5) When setting Hasselblad MASTER on the software, set MANUAL on the DRCU. When setting Hasselblad SLAVE on the software, set SINAR on the DRCU. Attention: The 4 and 16 shots can only be made in the HASSELBLAD SLAVE mode. PHASE ONE: 1) Connect the electronic shutters cable to the DRCU. 2) Set PHASE ONE 2 in the directory DIGITAL BACK of the DRCU. 3) Connect the cable code 7048K between the DRCU - digital back and the sync. LEAF: As for PHASE ONE (or set on MANUAL) EYELIKE MF: 1) Connect the electronic shutters cable to the DRCU. 2) Connect the cable (code 7042K) between the DRCU and the digital back. 3) Connect the sync flash cable between the digital back and the shutter. 4) Set EYELIKE on the DRCU. EYELIKE PRECISION: 1) Connect the electronic shutters cable to the DRCU. 2) Connect the cable (code 7045K) between the DRCU and the digital back. 3) Connect the sync flash cable between the digital back and the shutter. 4) Set EYELIKE on the DRCU. HASSELBLAD / IMACON C series: 1) Connect the electronic shutters cable to the DRCU. 2) Connect the cable (code 7047K) between the digital back and the DRCU. 3) Set IMACON on the DRCU. PHASE ONE P65: 1) Connect the electronic shutters cable to the DRCU. 2) Set Phase One P65 in the "digital back" directory of the DRCU. 3) Connect the cable code7032K & code7034K between the digital back and the DRCU. 4) Set camera mode 1 on Digital back 5) Set zero latency on the digital back. HASSELBLAD H3DII: 1) Connect the electronic shutters cable to the DRCU. 2) Set Hasselblad H3DII in the "digital back" directory of the DRCU. 3) Connect the cable code7092K between the digital back and the DRCU. HASSELBLAD CF: 1) Connect the electronic shutters cable to the DRCU. 2) Set Hasselblad H3DII in the "digital back" directory of the DRCU. 3) Connect the cable code 7090K between the digital back and the DRCU. MANUAL: With this option the DRCU contrls the electronic shutter in spite of the digital back used. Attention: When working with the computer, select HASSELBLAD ELD as camera type. SLEEP TIME indicates the time that the D.R.C.U. will remain on after the last operation has been carried out, and when this time expires the control unit will turn itself off. If the time is set to 0, the D.R.C.U. will turn itself off only when the batteries are exhausted. SETTING TIMES: The D.R.C.U. allows exposure time to be set from 60 seconds to 1/125 of a second. This operation may only be carried out from the main work screen. On pressing the Open/Close key the shutter will open and the following message will appear on the display: SHUTTER OPEN. The opening of the diaphragm is not controlled by the D.R.C.U. and you will therefore need to manually adjust the lens. To close the shutter it is sufficient to press the Open/Close key a second time. The main work screen will reappear.