1
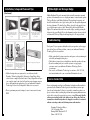
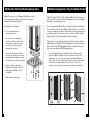
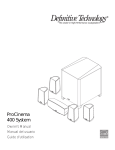
Mythos Two,
MythosThree
Mythos Eight
& Mythos Ten
®
®
®
®
Table-Top and Wall-Mount Loudspeakers
For Vertical or Horizontal Mounting
Owner’s Manual
Congratulations!
Mythos Loudspeakers with Mythos Two, Mythos Three, Mythos Eight and Mythos
Ten High Performance Loudspeakers are the perfect complement to your hi-tech video
display. These state-of-the-art loudspeakers feature:
• The groundbreaking Mythos look: hand-polished, aircraft grade aluminum enclosure:
non-resonant and internally braced for lifelike sound quality.
• High Definition Drivers and Pure Aluminum Dome Tweeters; voice matched
with the whole Mythos Series for convenient mix-and-match system building,
and an uninterrupted, realistic surround sound environment.
• Built-in Wall Mounting Brackets (Mythos Two features Tempered Glass
Bases for table-top placement).
• Use Mythos Two vertically, either as main or surround speakers. Use Mythos Three
horizontally as a center channel speaker.
• Use Mythos Eight and Mythos Ten either vertically, as main or surround speakers,
or horizontally, as a center channel.
11433 Cronridge Drive • Owings Mills, Maryland 21117
410-363-7148
Visit us at www.definitivetech.com
• Combine Mythos Loudspeakers with Definitive Technology SuperCube® Subwoofers
to build super high performance Mythos sound systems for music or movies.
To ensure that you only experience the finest performance possible from your new speakers, we
encourage you to take a moment (or a few) to read through this manual and familiarize yourself
with the recommended hookup methods for these Mythos Loudspeakers.
Limited USA Warranty:
5-Years for Drivers and Cabinets
3-Years for Electronic Components
Definitive Technology warrants to the original retail purchaser only that this Definitive
Technology Loudspeaker Product (the “Product”) will be free from defects in materials and
workmanship for a period of five (5) years covering the drivers and cabinets, and three (3)
years for the electronic components from the date of the original purchase from a Definitive
Technology Franchised Dealer. However, this warranty will automatically terminate prior
to the expiration of five (5) years for the drivers and cabinets if the original retail purchaser
sells or otherwise transfers the Product to any other party. The original retail purchaser shall
hereinafter be referred to as “you.” To obtain the warranty protection for your Definitive
Technology Product(s), you must fill out and mail the Warranty Registration Card(s), within
ten days of the date of purchase.
Defective Products must be shipped, together with proof of date of purchase, prepaid insured
to the Franchised Dealer from whom you purchased the Product, or to the nearest
factory service center. Product(s) must be shipped in the original shipping container or its
equivalent; in any case the risk of loss or damage in transit is to be borne by you. If, upon
examination at the Factory or a Definitive Technology Franchised Dealer, it is determined that
the unit was defective in materials or workmanship at any time during this Warranty period,
Definitive Technology or the Definitive Technology Franchised Dealer will, at its option,
repair or replace this Product at no additional charge, except as set forth below. All replaced
parts and Product(s) become the property of Definitive Technology. Product(s) replaced or
repaired under this Warranty will be returned to you, within a reasonable time, freight collect.
This Warranty does not include service or parts to repair damage caused by accident,
misuse, abuse, negligence, inadequate packing or shipping procedures, commercial use,
voltage in excess of the rated maximum of the unit, cosmetic appearance of cabinetry
not directly attributable to defects in materials or workmanship, or service, or repair or
modification of the Product which has not been authorized by Definitive Technology.
Definitive Technology makes no Warranty with respect to its Products purchased from dealers
or outlets other than Definitive Technology Franchised Dealers.
This Warranty is in lieu of all other expressed Warranties. If this Product is defective in
material or workmanship as warranted above, your sole remedy shall be repair or replacement
as provided above. In no event will Definitive Technology be liable to you for any incidental or
consequential damages arising out of the use or inability to use the Product, even if Definitive
Technology or a Definitive Technology Franchised Dealer has been advised of the possibility
of such damages, or for any claim by any other party. Some states do not allow the exclusion
or limitation of consequential damages, so the above limitation may not apply to you.
All implied warranties on the Product are limited to the duration of this expressed Warranty.
Some states do not allow limitation on how long an implied Warranty lasts, so the above
limitations may not apply to you. This Warranty gives you specific legal rights, and you also
may have other rights which vary from state to state.
This product complies with the essential requirements of
EMC directives 89/336/EEC and 73/23/EEC (inclusive of
93/68/EEC) and carries the CE mark accordingly.
CKAT041107
11
Mythos Loudspeakers Specifications
Mythos Two
Dimensions:
Driver Complement:
Frequency Response:
Efficiency:
Nominal Impedance:
Rec. Amplification:
41/4" W x 57/16" D x 251/4" H (261/4" H w/Base)
Base: 8" W x 61/2" D x 1/2" H
One 1" Dome Tweeter
Two 41/2" Bass/Midrange Drivers
Two 41/2" Sub Radiators
45 Hz – 30 kHz
91 db
4 – 8 ohms
10 – 200 Watts/channel
Mythos Three
Dimensions:
Driver Complement:
Frequency Response:
Efficiency:
Nominal Impedance:
Rec. Amplification:
257/16" W x 41/4" D x 57/16" H
One 1" Dome Tweeter
Two 41/2" Bass/Midrange Drivers
Two 41/2" Sub Radiators
45 Hz – 30 kHz
91 db
4 – 8 ohms
10 – 200 Watts/channel
Mythos Eight
Dimensions:
Driver Complement:
Frequency Response:
Efficiency:
Nominal Impedance:
Rec. Amplification:
281/2" W x 43/8" D x 61/16" H
One 1" Dome Tweeter
Two 51/4" Bass/Midrange Drivers
Two 51/4" Sub Radiators
38 Hz – 30 kHz
91 db
4 – 8 ohms
10 – 250 Watts/channel
Mythos Ten
Dimensions:
Driver Complement:
Frequency Response:
Efficiency:
Nominal Impedance:
Rec. Amplification:
10
341/2" W x 43/8" D x 61/16" H
One 1" Pure Aluminum Dome Tweeter
Two 51/4" Bass/Midrange Drivers
Two 5" x 8" Sub Bass Radiators
31 Hz – 30 kHz
92 db
4 – 8 ohms
10 – 300 Watts/channel
Unpacking Your Mythos Loudspeakers
Each loudspeaker leaves our plant in perfect condition. Any visible or
concealed damage is most likely to occur in handling and should be reported
at once to your Definitive Technology Dealer or to the delivery company that
delivered your loudspeakers. Save all cartons and packing material when you
have unpacked your loudspeakers. They will do the best job of protecting your
speakers if they need to be shipped or transported. Record the serial numbers
found on the rear panels of your speakers in the appropriate place on your
Warranty Cards and mail your Warranty Cards within 10 days of purchase.
Installation, Setup and Placement Tips
• Your speakers will work well with a variety of electronic components.
As little as 10 Watts (RMS) per channel will deliver adequate listening
levels in most rooms. If you plan to play your system at loud listening
levels, you’ll be better served by more power.
• Damage to loudspeakers can occur when an amplifier, regardless of its
wattage, is made to play at higher listening levels than its power can
cleanly produce (usually beyond the “1 to 2 o’clock” position on the
volume control). This can result in distortion, originating in the
amplifier. If you hear distortion, turn it down!
• Break-in is very important with any high-end loudspeaker, including
Definitive Technology speakers. While they sound great right out of
the box, the sound quality of the speaker will change noticeably after
the speaker has been played for a length of time (about 20 hours).
There’s no special procedure, just play ’em. Loud dynamic music
with lots of highs and lots of bass will work its magic faster.
3
Installation, Setup and Placement Tips
(Continued)
Mythos Two, Eight or Ten positioned
for use as the Main (Front) Left and
Right Speaker next to a flat screen
television.
Mythos Three, Eight or Ten positioned
for use as a wall mounted Center
Channel Speaker under a flat
screen television.
Mythos Three, Eight or Ten positioned
for use as a wall mount Center
Channel Speaker above a flat
screen television.
Mythos Eight and Ten Logo Badge
Mythos Eight and Ten can be mounted either vertically as main or surround
speakers, or horizontally for use as a high performance center channel speaker.
The Logo Badge for the Mythos Eight and Ten is packaged separately, and
should be affixed in the correct place on the grille once the speaker alignment
has been determined. To affix the Logo Badge, place the badge upside down
on a solid flat surface such as a table. Remove the grille from the Mythos
Eight or Ten and turn it flat-side-down onto the badge, carefully pressing the
badge into the correct Badge Slot for the alignment you have chosen (vertical
or horizontal). The Logo Badge should snap into place. Do not press hard.
Troubleshooting
Don’t panic! If you experience difficulties with your speakers, try the suggestions below. If you still have problems, contact your Authorized Definitive
Technology Dealer for assistance.
Mythos Two features a stable
Tempered Glass Base for
table-top mounting next to
table-mounted televisions.
Adjust the vertical angle of the
Mythos Three, Eight or Ten using
the screw foot (included) for better
imaging when positioned on a
horizontal surface (such as the top
of the television).
Adjustable foot for angling the Mythos Eight and Ten.
• Mythos Loudspeakers are engineered to excel when used with
Definitive Technology SuperCube Subwoofers. SuperCubes deliver
radical bass in compact stylish enclosures. Using a SuperCube will give
you complete signal control and will result in greater dynamic range in
stereo and home theater applications. See your authorized Definitive
Technology Dealer to hear a SuperCube Subwoofer for yourself.
• Before performing any wire hookups, be sure to turn your electronics
OFF.
4
• Make certain that all system connections and power cords are undamaged,
and solidly and snugly in their places.
• Check that no foreign objects or liquids have entered the speaker enclosure.
• If you hear nothing and you’re sure the system is set up properly,
you must contact your Authorized Definitive Technology Dealer
for assistance.
• You can also call Definitive Technology for assistance: 410-363-7148,
visit www.definitivetech.com, or email [email protected].
Service Contact Info
Service and warranty work on your Definitive loudspeakers will normally be
performed by the Definitive Technology dealer from whom you have purchased your loudspeakers. If, however, you wish to return the speaker to us,
please contact us first, describing the problem and requesting authorization as
well as the location of the nearest factory service center. Please note that the
address given in this booklet is the address of our offices only. Under no
circumstances should loudspeakers be shipped to our offices or returned
without contacting us first and obtaining return authorization.
Definitive Technology Offices
11433 Cronridge Drive
Owings Mills, Maryland 21117
Phone: 410-363-7148
9
Wall Mounting Speakers Using The Mythos Bracket
Channel Balance & Bass Management
(Continued)
• Mark the location of pilot holes noted on the Mounting Template, and
pre-drill for mounting screws (not included). Use screws rated to hold
securely in the wall material (we recommend #10 screws).
• If there is no stud behind the chosen location, be certain to use wall
anchors (not included) to secure the bracket screws. Follow the wall
anchor manufacturer’s directions.
• For masonry walls, use a masonry drill bit to pre-drill holes, and use
#10 masonry anchors and screws (not included).
• When the Wall Mounting Bracket is securely screwed to the wall,
insert the Mounting Screws into the rear panel of the speaker by
removing the plastic plugs on the Mounting Screw Holes.
• Line up the speaker’s protruding Mounting Screws with the keyhole
slots on the Wall Mounting Bracket, and let the speaker slide straight
down, allowing the screw heads to slip behind the smaller end of the
keyhole slots for a secure mount.
Mythos Three, Eight and Ten Vertical Angle
Adjustment
Your Mythos Three has a simple built-in device which stabilizes it and
allows you to adjust the vertical angle when the system is placed on a flat
horizontal surface. If the foot is not screwed in, screw it into the threaded
hole on the bottom of the speaker. Your Mythos Eight or Ten has a simple
bracket with foot which screws into the wall bracket to stabilize the speaker
and allows you to adjust the vertical angle when the system is placed on a
flat horizontal surface. When you set the speaker down, the speaker will lean
back and rest on the foot. By varying how far you screw in the foot, you can
adjust the vertical angle of the speaker. We suggest that you aim the speaker
so that it points directly towards the height of the listeners’ ears.
8
• Multichannel (Dolby Digital & DTS) receivers and processors have a
critical Channel Balancing Procedure for each speaker and the subwoofer
(connected via LFE or “Sub Out” low-level). This balancing procedure
must be followed in order to ensure proper performance from your speakers. See your receiver/processor user’s manual for this information.
• Multichannel (Dolby Digital & DTS) receivers and processors also
have Bass Management Procedures that help direct the correct
frequencies to the correct speakers. Bass Management can vary from
unit to unit. This frequency-setting procedure must be followed in
order to ensure proper performance from your system. See your
receiver/processor user’s manual for this information.
Speaker Wire Connections
When making Speaker Wire connections, use high quality, large gauge
speaker wire to ensure the best performance. Note that one of the input
terminals on the rear of your loudspeakers is red (+) and the other is black (-).
To ensure correct polarity, make certain that you connect wire from the red
(+) terminal of your receiver to the red (+)
terminal of your loudspeakers, and the
wire from the black (-) terminal of your
receiver to the black (-) terminal of your
loudspeakers. Most speaker wire has
indicator markings on one conductor to
help you maintain consistency. If your
sound seems “thin,” check your
connections for correct polarity.
5
Mythos Two: Table-Top Mounting Using Glass
Wall Mounting Speakers Using The Mythos Bracket
Mythos Two features a solid Tempered Glass Base for stable
table-top positioning. Follow these directions for securely
mounting the Tempered Glass Base.
Mythos Two, Mythos Three, Mythos Eight and Mythos Ten Loudspeakers
each come with a custom designed wall mounting bracket and wall template
that makes secure mounting a breeze.
Attach Speaker to Glass Base:
It is recommended that Mythos Three be installed horizontally and Mythos
Two be installed vertically, while Mythos Eight and Ten can be used either
vertically (as mains or surrounds) or horizontally (as a high performance center channel speaker). See the next section to see how to install the Mythos
Eight and Ten Logo Badge depending on speaker alignment.
1. For easy installation, turn
speaker upside down.
2. Place the silver bottom pad (A)
over the screw holes on the bottom
of the speaker, and place the glass
base (B) over the silver pad (A),
lining up the screw holes.
3. Line up the Cap Screws (C) with
the screw holes in the glass base (B),
inserting them through the silver pad
(A), and into the bottom of the speaker.
4. Secure assembly to Speaker by
tightening the four Cap Screws (C)
firmly using the Hex Key. Do not
overtighten.
The rear panel of each speaker features threaded inserts for the adjustable
Mounting Screws (included). These Mounting Screws then fit easily into the
Keyhole Slots on the Wall Mounting Bracket, also included. Follow these
directions for installing the Wall Mounting Bracket.
A
B
• Use the Mounting Template (included) to help you judge speaker
placement. Make certain the locations you have selected for wallmounting do not conceal electrical wiring or plumbing. Make sure
the speaker clears the ceiling, adjacent walls, corners, beams, lighting
fixtures and door/windowframes. Leave at least 11/2” above the
speaker location to allow the speaker to slide down onto its bracket.
C
5. Turn assembly right-side-up.
6
7
Wall Mounting Speakers Using The Mythos Bracket
Channel Balance & Bass Management
(Continued)
• Mark the location of pilot holes noted on the Mounting Template, and
pre-drill for mounting screws (not included). Use screws rated to hold
securely in the wall material (we recommend #10 screws).
• If there is no stud behind the chosen location, be certain to use wall
anchors (not included) to secure the bracket screws. Follow the wall
anchor manufacturer’s directions.
• For masonry walls, use a masonry drill bit to pre-drill holes, and use
#10 masonry anchors and screws (not included).
• When the Wall Mounting Bracket is securely screwed to the wall,
insert the Mounting Screws into the rear panel of the speaker by
removing the plastic plugs on the Mounting Screw Holes.
• Line up the speaker’s protruding Mounting Screws with the keyhole
slots on the Wall Mounting Bracket, and let the speaker slide straight
down, allowing the screw heads to slip behind the smaller end of the
keyhole slots for a secure mount.
Mythos Three, Eight and Ten Vertical Angle
Adjustment
Your Mythos Three has a simple built-in device which stabilizes it and
allows you to adjust the vertical angle when the system is placed on a flat
horizontal surface. If the foot is not screwed in, screw it into the threaded
hole on the bottom of the speaker. Your Mythos Eight or Ten has a simple
bracket with foot which screws into the wall bracket to stabilize the speaker
and allows you to adjust the vertical angle when the system is placed on a
flat horizontal surface. When you set the speaker down, the speaker will lean
back and rest on the foot. By varying how far you screw in the foot, you can
adjust the vertical angle of the speaker. We suggest that you aim the speaker
so that it points directly towards the height of the listeners’ ears.
8
• Multichannel (Dolby Digital & DTS) receivers and processors have a
critical Channel Balancing Procedure for each speaker and the subwoofer
(connected via LFE or “Sub Out” low-level). This balancing procedure
must be followed in order to ensure proper performance from your speakers. See your receiver/processor user’s manual for this information.
• Multichannel (Dolby Digital & DTS) receivers and processors also
have Bass Management Procedures that help direct the correct
frequencies to the correct speakers. Bass Management can vary from
unit to unit. This frequency-setting procedure must be followed in
order to ensure proper performance from your system. See your
receiver/processor user’s manual for this information.
Speaker Wire Connections
When making Speaker Wire connections, use high quality, large gauge
speaker wire to ensure the best performance. Note that one of the input
terminals on the rear of your loudspeakers is red (+) and the other is black (-).
To ensure correct polarity, make certain that you connect wire from the red
(+) terminal of your receiver to the red (+)
terminal of your loudspeakers, and the
wire from the black (-) terminal of your
receiver to the black (-) terminal of your
loudspeakers. Most speaker wire has
indicator markings on one conductor to
help you maintain consistency. If your
sound seems “thin,” check your
connections for correct polarity.
5
Installation, Setup and Placement Tips
(Continued)
Mythos Two, Eight or Ten positioned
for use as the Main (Front) Left and
Right Speaker next to a flat screen
television.
Mythos Three, Eight or Ten positioned
for use as a wall mounted Center
Channel Speaker under a flat
screen television.
Mythos Three, Eight or Ten positioned
for use as a wall mount Center
Channel Speaker above a flat
screen television.
Mythos Eight and Ten Logo Badge
Mythos Eight and Ten can be mounted either vertically as main or surround
speakers, or horizontally for use as a high performance center channel speaker.
The Logo Badge for the Mythos Eight and Ten is packaged separately, and
should be affixed in the correct place on the grille once the speaker alignment
has been determined. To affix the Logo Badge, place the badge upside down
on a solid flat surface such as a table. Remove the grille from the Mythos
Eight or Ten and turn it flat-side-down onto the badge, carefully pressing the
badge into the correct Badge Slot for the alignment you have chosen (vertical
or horizontal). The Logo Badge should snap into place. Do not press hard.
Troubleshooting
Don’t panic! If you experience difficulties with your speakers, try the suggestions below. If you still have problems, contact your Authorized Definitive
Technology Dealer for assistance.
Mythos Two features a stable
Tempered Glass Base for
table-top mounting next to
table-mounted televisions.
Adjust the vertical angle of the
Mythos Three, Eight or Ten using
the screw foot (included) for better
imaging when positioned on a
horizontal surface (such as the top
of the television).
Adjustable foot for angling the Mythos Eight and Ten.
• Mythos Loudspeakers are engineered to excel when used with
Definitive Technology SuperCube Subwoofers. SuperCubes deliver
radical bass in compact stylish enclosures. Using a SuperCube will give
you complete signal control and will result in greater dynamic range in
stereo and home theater applications. See your authorized Definitive
Technology Dealer to hear a SuperCube Subwoofer for yourself.
• Before performing any wire hookups, be sure to turn your electronics
OFF.
4
• Make certain that all system connections and power cords are undamaged,
and solidly and snugly in their places.
• Check that no foreign objects or liquids have entered the speaker enclosure.
• If you hear nothing and you’re sure the system is set up properly,
you must contact your Authorized Definitive Technology Dealer
for assistance.
• You can also call Definitive Technology for assistance: 410-363-7148,
visit www.definitivetech.com, or email [email protected].
Service Contact Info
Service and warranty work on your Definitive loudspeakers will normally be
performed by the Definitive Technology dealer from whom you have purchased your loudspeakers. If, however, you wish to return the speaker to us,
please contact us first, describing the problem and requesting authorization as
well as the location of the nearest factory service center. Please note that the
address given in this booklet is the address of our offices only. Under no
circumstances should loudspeakers be shipped to our offices or returned
without contacting us first and obtaining return authorization.
Definitive Technology Offices
11433 Cronridge Drive
Owings Mills, Maryland 21117
Phone: 410-363-7148
9
Mythos Loudspeakers Specifications
Mythos Two
Dimensions:
Driver Complement:
Frequency Response:
Efficiency:
Nominal Impedance:
Rec. Amplification:
41/4" W x 57/16" D x 251/4" H (261/4" H w/Base)
Base: 8" W x 61/2" D x 1/2" H
One 1" Dome Tweeter
Two 41/2" Bass/Midrange Drivers
Two 41/2" Sub Radiators
45 Hz – 30 kHz
91 db
4 – 8 ohms
10 – 200 Watts/channel
Mythos Three
Dimensions:
Driver Complement:
Frequency Response:
Efficiency:
Nominal Impedance:
Rec. Amplification:
257/16" W x 41/4" D x 57/16" H
One 1" Dome Tweeter
Two 41/2" Bass/Midrange Drivers
Two 41/2" Sub Radiators
45 Hz – 30 kHz
91 db
4 – 8 ohms
10 – 200 Watts/channel
Mythos Eight
Dimensions:
Driver Complement:
Frequency Response:
Efficiency:
Nominal Impedance:
Rec. Amplification:
281/2" W x 43/8" D x 61/16" H
One 1" Dome Tweeter
Two 51/4" Bass/Midrange Drivers
Two 51/4" Sub Radiators
38 Hz – 30 kHz
91 db
4 – 8 ohms
10 – 250 Watts/channel
Mythos Ten
Dimensions:
Driver Complement:
Frequency Response:
Efficiency:
Nominal Impedance:
Rec. Amplification:
10
341/2" W x 43/8" D x 61/16" H
One 1" Pure Aluminum Dome Tweeter
Two 51/4" Bass/Midrange Drivers
Two 5" x 8" Sub Bass Radiators
31 Hz – 30 kHz
92 db
4 – 8 ohms
10 – 300 Watts/channel
Unpacking Your Mythos Loudspeakers
Each loudspeaker leaves our plant in perfect condition. Any visible or
concealed damage is most likely to occur in handling and should be reported
at once to your Definitive Technology Dealer or to the delivery company that
delivered your loudspeakers. Save all cartons and packing material when you
have unpacked your loudspeakers. They will do the best job of protecting your
speakers if they need to be shipped or transported. Record the serial numbers
found on the rear panels of your speakers in the appropriate place on your
Warranty Cards and mail your Warranty Cards within 10 days of purchase.
Installation, Setup and Placement Tips
• Your speakers will work well with a variety of electronic components.
As little as 10 Watts (RMS) per channel will deliver adequate listening
levels in most rooms. If you plan to play your system at loud listening
levels, you’ll be better served by more power.
• Damage to loudspeakers can occur when an amplifier, regardless of its
wattage, is made to play at higher listening levels than its power can
cleanly produce (usually beyond the “1 to 2 o’clock” position on the
volume control). This can result in distortion, originating in the
amplifier. If you hear distortion, turn it down!
• Break-in is very important with any high-end loudspeaker, including
Definitive Technology speakers. While they sound great right out of
the box, the sound quality of the speaker will change noticeably after
the speaker has been played for a length of time (about 20 hours).
There’s no special procedure, just play ’em. Loud dynamic music
with lots of highs and lots of bass will work its magic faster.
3
Limited USA Warranty:
5-Years for Drivers and Cabinets
3-Years for Electronic Components
Definitive Technology warrants to the original retail purchaser only that this Definitive
Technology Loudspeaker Product (the “Product”) will be free from defects in materials and
workmanship for a period of five (5) years covering the drivers and cabinets, and three (3)
years for the electronic components from the date of the original purchase from a Definitive
Technology Franchised Dealer. However, this warranty will automatically terminate prior
to the expiration of five (5) years for the drivers and cabinets if the original retail purchaser
sells or otherwise transfers the Product to any other party. The original retail purchaser shall
hereinafter be referred to as “you.” To obtain the warranty protection for your Definitive
Technology Product(s), you must fill out and mail the Warranty Registration Card(s), within
ten days of the date of purchase.
Defective Products must be shipped, together with proof of date of purchase, prepaid insured
to the Franchised Dealer from whom you purchased the Product, or to the nearest
factory service center. Product(s) must be shipped in the original shipping container or its
equivalent; in any case the risk of loss or damage in transit is to be borne by you. If, upon
examination at the Factory or a Definitive Technology Franchised Dealer, it is determined that
the unit was defective in materials or workmanship at any time during this Warranty period,
Definitive Technology or the Definitive Technology Franchised Dealer will, at its option,
repair or replace this Product at no additional charge, except as set forth below. All replaced
parts and Product(s) become the property of Definitive Technology. Product(s) replaced or
repaired under this Warranty will be returned to you, within a reasonable time, freight collect.
This Warranty does not include service or parts to repair damage caused by accident,
misuse, abuse, negligence, inadequate packing or shipping procedures, commercial use,
voltage in excess of the rated maximum of the unit, cosmetic appearance of cabinetry
not directly attributable to defects in materials or workmanship, or service, or repair or
modification of the Product which has not been authorized by Definitive Technology.
Definitive Technology makes no Warranty with respect to its Products purchased from dealers
or outlets other than Definitive Technology Franchised Dealers.
This Warranty is in lieu of all other expressed Warranties. If this Product is defective in
material or workmanship as warranted above, your sole remedy shall be repair or replacement
as provided above. In no event will Definitive Technology be liable to you for any incidental or
consequential damages arising out of the use or inability to use the Product, even if Definitive
Technology or a Definitive Technology Franchised Dealer has been advised of the possibility
of such damages, or for any claim by any other party. Some states do not allow the exclusion
or limitation of consequential damages, so the above limitation may not apply to you.
All implied warranties on the Product are limited to the duration of this expressed Warranty.
Some states do not allow limitation on how long an implied Warranty lasts, so the above
limitations may not apply to you. This Warranty gives you specific legal rights, and you also
may have other rights which vary from state to state.
This product complies with the essential requirements of
EMC directives 89/336/EEC and 73/23/EEC (inclusive of
93/68/EEC) and carries the CE mark accordingly.
CKAT041107
11
Mythos Two,
MythosThree
Mythos Eight
& Mythos Ten
®
®
®
®
Table-Top and Wall-Mount Loudspeakers
For Vertical or Horizontal Mounting
Owner’s Manual
Congratulations!
Mythos Loudspeakers with Mythos Two, Mythos Three, Mythos Eight and Mythos
Ten High Performance Loudspeakers are the perfect complement to your hi-tech video
display. These state-of-the-art loudspeakers feature:
• The groundbreaking Mythos look: hand-polished, aircraft grade aluminum enclosure:
non-resonant and internally braced for lifelike sound quality.
• High Definition Drivers and Pure Aluminum Dome Tweeters; voice matched
with the whole Mythos Series for convenient mix-and-match system building,
and an uninterrupted, realistic surround sound environment.
• Built-in Wall Mounting Brackets (Mythos Two features Tempered Glass
Bases for table-top placement).
• Use Mythos Two vertically, either as main or surround speakers. Use Mythos Three
horizontally as a center channel speaker.
• Use Mythos Eight and Mythos Ten either vertically, as main or surround speakers,
or horizontally, as a center channel.
11433 Cronridge Drive • Owings Mills, Maryland 21117
410-363-7148
Visit us at www.definitivetech.com
• Combine Mythos Loudspeakers with Definitive Technology SuperCube® Subwoofers
to build super high performance Mythos sound systems for music or movies.
To ensure that you only experience the finest performance possible from your new speakers, we
encourage you to take a moment (or a few) to read through this manual and familiarize yourself
with the recommended hookup methods for these Mythos Loudspeakers.