1
AB-100 User Manual
Sept 18, 2003
Axxcelera Broadband Wireless
175 Science Parkway
Rochester, New York 14620
Telephone
Telephone
Fax
(716) 242-9600
(877) 557-4001
(716) 242-9620
Revision History
Version
1
2
3
4
5
Date
16-June-03
18-Aug-03
21-Aug-03
27-Aug-03
18-Sep-03
Axxcelera Broadband
Author
Matt Olson
Matt Olson
Matt Olson
Matt Olson
Matt Olson
Comments
Created
Updated
Updated
Updated
Updated
AB-100 Manual
Version 5
Page 2 of 111
Table of Contents
REVISION HISTORY .................................................................................................................................... 2
TABLE OF CONTENTS ............................................................................................................................... 3
1
OVERVIEW .......................................................................................................................................... 7
2
INSTALLATION ................................................................................................................................... 8
2.1
Factory Defaults.............................................................................................................. 8
2.2
Back Panel ...................................................................................................................... 8
2.2.1
ATM........................................................................................................................ 8
2.2.2
Ethernet ................................................................................................................... 8
2.2.3
MNGMT ................................................................................................................. 8
2.2.4
LED......................................................................................................................... 8
2.2.5
PWR........................................................................................................................ 8
2.2.6
Ground .................................................................................................................... 8
2.3
Technical Specifications ................................................................................................. 9
2.4
Console Port.................................................................................................................... 9
3
WEB-BASED CONFIGURATION...................................................................................................... 10
3.1
Status............................................................................................................................. 10
3.2
Quick Start .................................................................................................................... 10
3.3
System........................................................................................................................... 10
3.3.1
Event Log.............................................................................................................. 10
3.3.2
One-click update ................................................................................................... 11
3.3.3
Remote Access...................................................................................................... 12
3.3.4
Firmware Update .................................................................................................. 13
3.3.5
Backup/Restore ..................................................................................................... 13
3.3.5.1 Backing up your configuration ......................................................................... 13
3.3.5.2 Restoring your configuration ........................................................................... 14
3.3.6
Restart Router ....................................................................................................... 14
3.4
Configuration ................................................................................................................ 15
3.4.1
Save config............................................................................................................ 15
3.4.2
Authentication....................................................................................................... 16
3.4.2.1 Creating a new login account............................................................................ 16
3.4.2.2 Editing/deleting a login account ....................................................................... 17
3.4.3
LAN connection.................................................................................................... 17
3.4.3.1 Advanced… ...................................................................................................... 18
3.4.3.2 Creating virtual interfaces................................................................................. 18
3.4.4
Security ................................................................................................................. 19
3.4.4.1 Enabling Security.............................................................................................. 20
3.4.4.2 Enabling Firewall and/or Intrusion Detection................................................... 21
3.4.4.3 Setting a default security level.......................................................................... 21
3.4.4.4 Configuring security interfaces......................................................................... 21
3.4.4.5 Configuring NAT.............................................................................................. 22
3.4.4.6 Configuring NAT global addresses .................................................................. 23
3.4.4.7 Configuring NAT reserved mapping ................................................................ 25
3.4.4.8 Configuring Security policies ........................................................................... 26
Axxcelera Broadband
AB-100 Manual
Version 5
Page 3 of 111
3.4.4.9 Configuring portfilters ...................................................................................... 28
3.4.4.10
Configuring validators .................................................................................. 30
3.4.4.11
Configuring triggers...................................................................................... 31
3.4.4.12
Configuring Intrusion Detection Settings ..................................................... 33
3.4.5
WAN connections................................................................................................. 34
3.4.5.1 Creating a WAN service ................................................................................... 34
3.4.5.2 Editing a WAN service ..................................................................................... 35
3.4.5.3 Deleting a WAN service ................................................................................... 35
3.4.5.4 Creating a virtual interface (routed services only)............................................ 35
3.4.6
IP routes ................................................................................................................ 35
3.4.6.1 Creating an IP V4 Route ................................................................................... 36
3.4.6.2 Editing a route................................................................................................... 37
3.4.6.3 Deleting a route................................................................................................. 37
3.4.7
DHCP server ......................................................................................................... 37
3.4.7.1 Enabling/disabling the DHCP server ................................................................ 38
3.4.7.2 Creating a DHCP server subnet ........................................................................ 38
3.4.7.3 Editing a DHCP subnet..................................................................................... 39
3.4.7.4 Creating a fixed host ......................................................................................... 40
3.4.8
DHCP relay........................................................................................................... 41
3.4.8.1 Enabling/disabling DHCP relay........................................................................ 41
3.4.8.2 Adding a DHCP server to the DHCP relay list................................................. 42
3.4.8.3 Editing/deleting entries in the DHCP relay list................................................. 42
3.4.9
DNS client............................................................................................................. 42
3.4.9.1 Configuring DNS servers.................................................................................. 42
3.4.9.2 Configuring DNS search domains .................................................................... 43
3.4.10
DNS relay.............................................................................................................. 43
3.4.10.1
Configuring the DNS relay list ..................................................................... 43
3.5
Ports .............................................................................................................................. 44
3.5.1
Configuring ports .................................................................................................. 44
3.5.1.1 Ethernet ............................................................................................................. 44
3.5.1.2 ATM.................................................................................................................. 44
3.5.1.3 View advanced attributes.................................................................................. 45
4
ADVANCED OPTIONS...................................................................................................................... 46
4.1
4.2
4.3
4.4
4.5
4.6
4.7
4.8
4.9
4.10
4.11
4.12
4.13
Edit ‘Service’ ................................................................................................................ 46
Edit ‘IPoA’.................................................................................................................... 46
Edit ‘Atm Channel’....................................................................................................... 47
Edit ‘Ip Interface’.......................................................................................................... 49
Edit ‘Tcp Mss Clamp’................................................................................................... 49
Edit ‘Rip Versions’ ....................................................................................................... 50
Edit ‘NAT’ .................................................................................................................... 51
Edit ‘RFC1483’............................................................................................................. 52
Edit ‘Bridge’ ................................................................................................................. 52
Edit ‘Bridge Interface’ .................................................................................................. 53
Edit Spanning Bridge Interface’ ................................................................................... 54
Edit ‘Spanning Bridge Config’ ..................................................................................... 55
Edit ‘Auto Bridge’ ........................................................................................................ 56
Axxcelera Broadband
AB-100 Manual
Version 5
Page 4 of 111
4.14
4.15
Edit ‘Ethernet’............................................................................................................... 57
Edit ‘Ether Channel’ ..................................................................................................... 58
5
CONFIGURING 1483 (BRIDGED)..................................................................................................... 59
6
CONFIGURING CLIP (IPOA) ............................................................................................................ 61
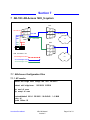
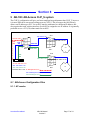
7
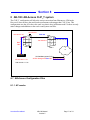
AB-100 / AB-ACCESS 1483_S SYSTEM ......................................................................................... 63
7.1
AB-Access Configuration Files .................................................................................... 63
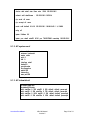
7.1.1
AP resolve............................................................................................................. 63
7.1.2
AP system.conf ..................................................................................................... 64
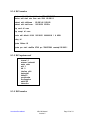
7.1.3
AP initbridge......................................................................................................... 64
7.1.4
SU2 initr1483........................................................................................................ 64
7.1.5
AP initswitchcli..................................................................................................... 64
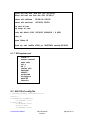
7.1.6
SU1 resolve........................................................................................................... 64
7.1.7
SU1 initbridge....................................................................................................... 65
7.1.8
SU1 system.conf ................................................................................................... 65
7.1.9
SU1 initr1483........................................................................................................ 65
7.1.10
SU2 resolve........................................................................................................... 65
7.1.11
SU2 initbridge....................................................................................................... 66
7.1.12
SU2 system.conf ................................................................................................... 66
7.1.13
SU2 initr1483........................................................................................................ 66
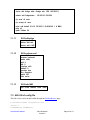
7.2
AB-100 icf config file................................................................................................... 66
8
AB-100 / AB-ACCESS CLIP_T SYSTEM ......................................................................................... 71
8.1
AB-Access Configuration Files .................................................................................... 71
8.1.1
AP resolve............................................................................................................. 71
8.1.2
AP system.conf ..................................................................................................... 72
8.1.3
SU resolve............................................................................................................. 73
8.1.4
SU system.conf ..................................................................................................... 73
8.2
AB-100 icf config file................................................................................................... 73
9
AB-100 / AB-ACCESS CLIP_S SYSTEM ......................................................................................... 77
9.1
AB-Access Configuration Files .................................................................................... 77
9.1.1
AP resolve............................................................................................................. 77
9.1.2
AP system.conf ..................................................................................................... 78
9.1.3
AP initswitchcli..................................................................................................... 78
9.1.4
SU1 resolve........................................................................................................... 79
9.1.5
SU1 system.conf ................................................................................................... 79
9.1.6
SU2 resolve........................................................................................................... 79
9.1.7
SU2 system.conf ................................................................................................... 80
9.2
AB-100 icf config file................................................................................................... 80
10
AB-100 / AB-ACCESS NATIVE_ATM (BACKHAUL) SYSTEM....................................................... 86
10.1 AB-Access Configuration Files .................................................................................... 86
10.1.1
AP resolve............................................................................................................. 86
10.1.2
AP system.conf ..................................................................................................... 87
10.1.3
AP initswitchcli..................................................................................................... 87
10.1.4
SU resolve............................................................................................................. 88
Axxcelera Broadband
AB-100 Manual
Version 5
Page 5 of 111
10.1.5
SU system.conf ..................................................................................................... 88
10.1.6
SU initswitchcli..................................................................................................... 89
10.2 AB-100 icf config file(AP) ........................................................................................... 89
10.3 AB-100 icf config file (SU) .......................................................................................... 92
11
CONVERTING TO ATM..................................................................................................................... 97
11.1
11.2
11.3
12
CLIP_T ......................................................................................................................... 97
CLIP_S........................................................................................................................ 100
1483_S ........................................................................................................................ 105
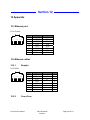
APPENDIX ....................................................................................................................................... 109
12.1 Ethernet port................................................................................................................ 109
12.2 Ethernet cables ............................................................................................................ 109
12.2.1
Straight................................................................................................................ 109
12.2.2
Cross-Over .......................................................................................................... 109
12.3 ATM port .................................................................................................................... 110
12.4 ATM cables................................................................................................................. 110
12.4.1
Straight................................................................................................................ 110
12.4.2
Cross-Over .......................................................................................................... 111
Axxcelera Broadband
AB-100 Manual
Version 5
Page 6 of 111
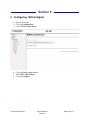
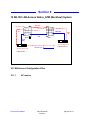
Section 1
1 Overview
ATM networks have certain specific advantages over Ethernet networks but Ethernet networks
have certain advantages over ATM networks. At the heart of these advantages is the acceptance
of ATM as a core network technology and the acceptance of Ethernet as an end-consumer
protocol. Interfacing these two disparate network protocols typically involves the use of
expensive ATM switches and/or Ethernet routers with ATM interface modules.
Axxcelera's AB-Access wireless point-to-multipoint, LAN/WAN appliances are unique in the
industry in that they are able to provide either an ATM terrestrial network interface or an
Ethernet terrestrial network. Throughput and performance of the AB-Access product is
maximized when the Access Point (basestation device) is deployed with an ATM (ATM25)
terrestrial interface. Flexibility in the AB-Access product allows an ATM Access Point to
communicate with Subscriber Units (customer premise equipment) with Ethernet
interfaces. Thus, AB-Access itself serves as a network technology bridge between ATM and
Ethernet. But not everyone who deploys AB-Access desires to deploy ATM to the basestation.
AB-100 provides an inexpensive and effective means of performing ATM-to-Ethernet network
protocol conversions. Whether deploying the AB-100 as a way to make the most of an ABAccess deployment in a "pure Ethernet" network or as a means of providing wireline ATM25 to
Ethernet (10/100 Base-T) conversions, AB-100 serves this task without requiring additional,
expensive ATM switches or Ethernet routers.
Ethernet over ATM is not new. Standards exist within the ATM world to coordinate how these
networks are to interoperate. These standards define how to terminate ATM networks at
Ethernet bridges (layer 2) as well as how to terminate them at IP routers (layer 3). AB-100
supports both of these varieties via the RFC 1483 and RFC 1577 ATM standards and thus is
compatible with standard ATM and Ethernet appliances. Because the AB-100 is both an
Ethernet device as well as an ATM device, other services such as firewall, NAT, DHCP server,
and DNS relay are also supported.
Axxcelera Broadband
AB-100 Manual
Version 5
Page 7 of 111
Section 2
2 Installation
2.1 Factory Defaults
Username: atmos
Password: atmos
Ethernet IP Address: 192.168.4.2 /24
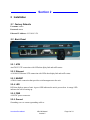
2.2 Back Panel
2.2.1 ATM
AnATM 25 UTP connection with LEDs that diplay link and traffic status.
2.2.2 Ethernet
A 10/100 BT Ethernet UTP connection with LEDs that display link and traffic status.
2.2.3 MNGMT
A DB-9 female connection that provides serial management to the unit.
2.2.4 LED
LED that displays status of unit. A green LED indicates the unit is powered on. A orange LED
indicates the unit is booting up.
2.2.5 PWR
A 48VDC power connector.
2.2.6 Ground
Grounding screw to connect grounding cable to.
Axxcelera Broadband
AB-100 Manual
Version 5
Page 8 of 111
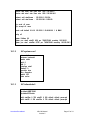
2.3 Technical Specifications
Temperature Range:
Humidity:
Primary Power:
External Power Supply Options:
Weight:
Case:
-20°C to +50°C
95% at +40°C (104°F); non-condensing
40-70 VDC (+48VDC) typ: 48V (max 150mA, typ: 85mA)
100-240V/100-120VA (50/60Hz)
0.9 kg / 2 lb
Cast Aluminum
NOTE: AB-100 should only be used with the provided power supply unless you have consulted
with an Axxcelera Engineer first. Using another power source could damage the unit if not
connected properly.
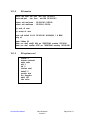
2.4 Console Port
AB-100 has a DB-9 female serial port on it. The serial cable should be a straight DB-9 male to
DB-9 female. To gain access to the console of your AB-100, configure your terminal console
software with the following settings.
Name
Bps
Data Bits
Parity
Stop bits
Flow Control
Axxcelera Broadband
Value
9600
8
None
1
None
AB-100 Manual
Version 5
Page 9 of 111
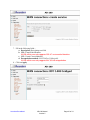
Section 3
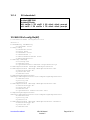
3 Web-based Configuration
The web interface can be accessed by entering the IP address of the unit in the URL box. The
factory default IP address is 192.168.4.2.
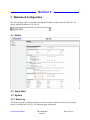
3.1 Status
3.2 Quick Start
3.3 System
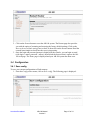
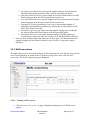
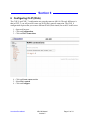
3.3.1 Event Log
The Event Log page is displayed whenever an error occurs or can be accessed via the System
menu by clicking on Event Log. The following page is displayed:
Axxcelera Broadband
AB-100 Manual
Version 5
Page 10 of 111
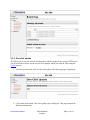
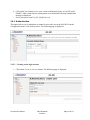
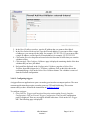
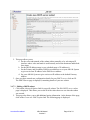
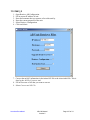
3.3.2 One-click update
This allows you to use one-click to download new AB-100 images from a remote HTTP server.
You do not need to browse for the correct file to upload, which you must do when using the
Update process.
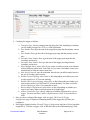
1. From the System menu, click on One-click update. The following page is displayed:
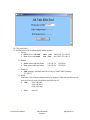
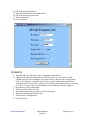
2. Click on the Next button. The Auto Update page is displayed. This page contains the
following information:
Axxcelera Broadband
AB-100 Manual
Version 5
Page 11 of 111
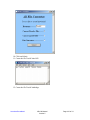
•
•
•
•
Existing software version: the software version that you are currently using.
Available software version: the software version available for download.
Download from: the available software version’s source address.
Overview: URL that can be linked to a web page detailing additional information
about this software version.
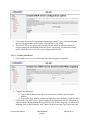
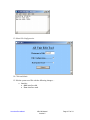
3. To update device firmware, click on OK. The Firmware Update page is refreshed. The
page contains two progress bars:
• The first progress bar displays how long it is taking to fetch the new software
version from the web server.
• Once the software has been retrieved, the second progress bar displays how long
it is taking to write the new software version to Flash.
4. Once the file has been written to Flash, the Auto Update page is refreshed. The page
confirms completion of the update and asks you to restart your AB-100 in order to use the
new firmware. Click on Restart.
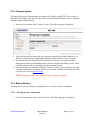
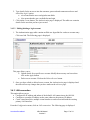
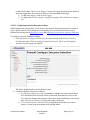
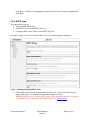
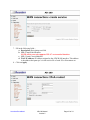
3.3.3 Remote Access
This allows you to enable temporary remote access to your AB-100 using Network Address
Translation (NAT).
NOTE: In order to configure remote access, you first need to enable the firewall and create an
external to internal firewall policy. For more information, see Security.
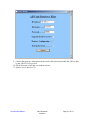
1. Once you have configured Security, from the System menu, click on Remote Access to
display the following.
2. Type in the length of time that you want to allow remote access for. Click on Enable.
3. The Remote Access page is displayed, confirming the number of seconds remaining for
remote access. There is also a Disable button that allows you to stop remote access before
the specified time ends.
Axxcelera Broadband
AB-100 Manual
Version 5
Page 12 of 111
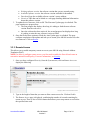
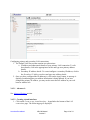
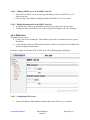
3.3.4 Firmware Update
This option allows you to upload firmware images to the AB-100 using HTTP. A .tar archive is
uploaded to the RAM of your AB-100. The archive is unpacked automatically, files are validated
and then written to Flash memory.
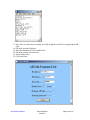
1. From the System menu, click Firmware Update. The following page is displayed:
2. Type in the network location of the new firmware image that you want to upload, or use
the Browse button to browse through the network and select the file. Click on Update.
3. Once the file has been uploaded to the RAM of your AB-100, it is written to Flash. A
status page is displayed confirming that the upload is complete and telling you how much
of the file (in bytes and as a percentage) has been written to Flash.
4. Once the file has been written to Flash, the Firmware Update page is refreshed. The page
confirms completion to the update and asks you to restart your AB-100 in order to use the
new firmware. Click on Restart Router.
NOTE: Updating your firmware could take up to 4 minutes to complete.
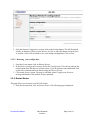
3.3.5 Backup/Restore
This page allows you to backup your configuration to, or restore it from your computer.
3.3.5.1 Backing up your configuration
1. From the System menu, click on Backup/Restore. The following page is displayed:
Axxcelera Broadband
AB-100 Manual
Version 5
Page 13 of 111
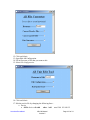
2. From the Backup Configuration section, click on the Backup button. The File Download
window is displayed. Click to select the Save this file to disk radio button. From the Save
As window, select a file in which to save your backup configuration. Click on Save.
3.3.5.2 Restoring your configuration
1. From the System menu, click on Backup/Restore.
2. In the Restore Configuration section, click in the Configuration File text box and type the
network path of the file that you wish to restore. If you do not know the path details, click
on the Browse button and locate the file using the Choose file box.
3. Click on the Restore button. The page is refreshed with a Configuration Restored
message and details of the number of bytes uploaded.
3.3.6 Restart Router
This page allows you to restart your AB-100 System.
1. From the System menu, click on Restart Router. The following page is displayed:
Axxcelera Broadband
AB-100 Manual
Version 5
Page 14 of 111
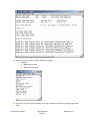
2. Click on the Restart button to reset the AB-100 system. The Restart page also provides
you with the option of restarting and restoring the factory default settings. Click on the
Reset to factory default settings box to check it, then click on the Restart button. Read the
console status output to check how the reset is progressing.
3. Once the login and password prompt is displayed at the console, you can login as usual
(with login = atmos, password = atmos), then refresh the browser that is open to the AB100 web page. The Status page is displayed and your AB-100 system has been reset.
3.4 Configuration
3.4.1 Save config
To save your current configuration to Flash memory:
1. From the Configuration menu, click on Save config. The following page is displayed:
Axxcelera Broadband
AB-100 Manual
Version 5
Page 15 of 111
2. Click on the Save button to save your current configuration in the im.conf file in the
FlashFS. After a short time the configuration is saved and the following confirmation
message is displayed:
Saved information model to file //flashfs/im.conf
3.4.2 Authentication
This option allows you to administer accounts for users who access the AB-100. From the
Configuration menu, click Authentication. The following page is displayed:
3.4.2.1 Creating a new login account
1. Click on the Create a new user button. The following page is displayed:
Axxcelera Broadband
AB-100 Manual
Version 5
Page 16 of 111
2. Type details for the new user into the username, password and comment text boxes and
select May login? option:
• true means that the user can login but not dialin
• false means that the user can dialin but not login
3. Click on the Create button. The Authentication page is displayed. The table now contains
details for the user that you have just created.
3.4.2.2 Editing/deleting a login account
1. The Authentication page table contains an Edit user hyperlink for each user account entry.
Click on a link. The following page is displayed:
This page allows you to:
• Update details for a specific user account. Modify the necessary text boxes then
click on the Apply button.
• Delete a user account. Click on the Delete this user button.
2. Once you have edited or deleted a user account, the Authentication page is displayed and
the table reflects any changes that you have made on the edit user page.
3.4.3 LAN connection
This option allows you to:
• Configure the IP address and subnet of the default LAN connection to the AB-100.
• Configure a secondary IP address on the same subnet as the primary IP address.
• Create virtual interfaces; multiple virtual interfaces can be associated with the existing
primary LAN interface.
From the Configuration menu, click on LAN connections. The following page is displayed:
Axxcelera Broadband
AB-100 Manual
Version 5
Page 17 of 111
Configuring primary and secondary LAN connections
1. The Default LAN Port section contains two subsections:
a. IP address and subnet mask details of your primary LAN connection. To edit
these details, click in the appropriate text box and type new primary address
details.
b. Secondary IP address details. To create/configure a secondary IP address, click in
the Secondary IP Address text box and type new address details.
2. Once you have configured the IP address(es), click on the Apply button. A message is
displayed confirming that your address information is being updated. If you have
changed the primary IP address, you may need to enter the new address in your web
browser address box.
3.4.3.1 Advanced…
See Advanced Options section.
3.4.3.2 Creating virtual interfaces
1. Click on the Create a new virtual interface… hyperlink at the bottom of the LAN
connections page. The following page is displayed:
Axxcelera Broadband
AB-100 Manual
Version 5
Page 18 of 111
2. On the Create virtual interface page, type the IP address and netmask of the virtual
interface, then click on the Apply button.
3. The LAN connections page is displayed. The virtual interfaces section contains a table
listing the names of the virtual interface(s). Each virtual interface is called item# by
default.
4. Each virtual interface name has an Edit and Delete link associated with it.
To edit a service:
a. Click on the Edit link.
b. Change the options for the existing virtual interface, then click on Change. The
page is reset and the new values are displayed.
NOTE: All options are explained in detail in section Advanced Options.
To delete a service:
a. Click on the Delete link.
b. Check the details displayed, then click on the Delete this connection button.
3.4.4 Security
This option allows you to configure Security, NAT and Firewall:
• Security – AB-100 allows you to:
Enable Security, see Enabling Security.
Configure Security interfaces; Configuring security interfaces.
Configure triggers, see Configuring triggers.
• NAT – AB-100 allows you to:
Enable NAT between interfaces; see Configuring NAT.
Configure global addresses; see Configuring NAT global addresses.
Configure reserved mapping; see Configuring NAT reserved mapping.
• Firewall – AB-100 allows you to:
Enable Firewall and Firewall Intrusion Detection settings; see Enabling Firewall
and/or Intrusion Detection.
Set the Firewall security level; see Setting a default security level.
Axxcelera Broadband
AB-100 Manual
Version 5
Page 19 of 111
Configuring Firewall policies, portfilters and validators; see Configuring Security
policies, Configuring portfilters, and Configuring validators.
Configure Intrusion Detection settings: see Configuring Intrusion Detection
Settings.
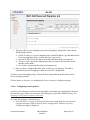
From the Configuration menu, click on Security. The following page is displayed:
This page contains the default Security settings.
3.4.4.1 Enabling Security
You must enable Security before you can enable Firewall and/or Intrusion Detection. In the
Security State section:
1. Click on Security Enable radio button.
2. Click on Change State to update the Security State section.
Axxcelera Broadband
AB-100 Manual
Version 5
Page 20 of 111
3.4.4.2 Enabling Firewall and/or Intrusion Detection
You must create a security interface before you can enable Firewall and/or Intrusion Detection.
See Configuring security interfaces.
Once you have created a security interface:
1. Click on the Firewall Enabled and/or Intrusion Detection Enabled radio buttons.
2. Click on Change State to update the Security State section.
3.4.4.3 Setting a default security level
You must have Security and Firewall enabled in order to set a default Security level. See
Enabling Security and Enabling Firewall and/or Intrusion Detection.
1. From the Security Level section, click on the Security Level drop-down list.
2. Click on the level that you want to set; none, high, medium or low.
3. Click on the Change Level button.
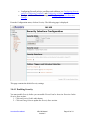
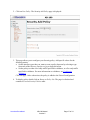
3.4.4.4 Configuring security interfaces
Security interfaces are based on existing LAN services. You must create a LAN service for every
secutity interface that you want to configure. For details on how to create LAN services, see LAN
connections.
1. From the Security Interfaces section, click on Add Interface. The Firewall: Add Interface
page is displayed:
2. Click on the Name drop-down list and select the LAN service that you want to base your
security interface on.
Axxcelera Broadband
AB-100 Manual
Version 5
Page 21 of 111
3. Click on the Interface Type drop-down list and specify what kind of interface it is
depending on how it connects to the network; external, internal, or DMZ.
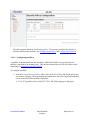
4. Click on Apply. The Security page is displayed. The Security Interface section contains a
table that displays information about each security interface that you have created:
• Name – name of LAN service that the security interface is based on.
• Type of network connection specified.
• NAT setting. It contains hyperlinks that allow you to configure NAT. See Configuring
NAT.
• Delete Interface… hyperlink. Click on this to display the Security: Delete Interface
page. Check the interface details, then click on the Delete button.
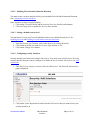
3.4.4.5 Configuring NAT
To configure NAT, you need to:
1. Enable Security; see Enabling Security.
2. Create at least two different security interface types based on existing LAN services; see
Configuring security interfaces.
3. Once you have created more than one security interface, the NAT column in the Security
Interface table tells you that you can enable NAT between the existing security interface
and a network interface type. For example, if you create an external interface and an
internal interface, your table will look like this:
Axxcelera Broadband
AB-100 Manual
Version 5
Page 22 of 111
The NAT column for the external interface tells you that you can enable NAT to internal
interfaces. If you had a DMZ interface configured, this column would also include an
Enable NAT to DMZ interfaces button.
4. To enable NAT between the external interface and the internal interface type, click on
Enable NAT to internal interfaces. The Security page is refreshed and NAT is enabled.
To disable NAT between interfaces, click on Disable NAT to internal interfaces.
Once you have enabled NAT between interfaces, you can:
• Configure global addresses; see Configuring NAT global addresses.
• Configure reserved mapping; see Configure NAT reserved mapping.
3.4.4.6 Configuring NAT global addresses
Global address pools allow you to create a pool of outside network addresses that is visible
outside your network. Before you can configure global addresses, you need to configure NAT.
See Configuring NAT.
If you want to set up a global address pool on your existing NAT enabled interfaces:
1. From the NAT Security Interfaces table, click on the Advanced NAT Configuration
hyperlink for the interface that you want to add a global pool to. The following page is
displayed:
Axxcelera Broadband
AB-100 Manual
Version 5
Page 23 of 111
2. Click on Add Global Address Pool the following page is displayed:
Axxcelera Broadband
AB-100 Manual
Version 5
Page 24 of 111
3. This page allows you to create a pool of network IP addresses that are visible outside
your network. Add values for the following table entries:
• Interface type; the internal address type that you want to map your external global IP
addresses to. Click on the drop-down list and select an interface type.
• Use Subnet Configuration; there are two ways to specify a range of IP addresses. You
can either Use Subnet Mask (specify the subnet mask address of the IP address) or
Use IP Address Range (specify the first and last IP address in the range). Click on the
drop-down list and select a method.
• Type in the IP Address that is visible outside the network.
• Subnet Mask/IP Address 2; the value you specify here depends on the subnet
configuration that you are using. If you chose Use Subnet Mask, type in the subnet
mask of the IP address. If you chose Use IP Address Range, type in the last IP
address in the range of addresses that make up the global address pool.
4. Once you have configured the table, click on Add global address pool. The table is
refreshed and the global address is added to your NAT configuration.
To delete a global address pool, click on the Delete hyperlink, then click on the Delete Global
Address Pool button.
Click on Return to Interface List to display the Security Interface Configuration page.
To create a reserved mapping, click on the Add Reserved Mapping hyperlink. See Configuring
NAT reserved mappings.
3.4.4.7 Configuring NAT reserved mapping
Reserved mapping allows you to map an outside security interface or an IP address from a global
pool to an individual IP address inside the network. Mapping is based on transport type and port
number. Before you can configure reserved mapping, you need to configure NAT. See
Configuring NAT.
If you want to setup a reserved mapping on your existing NAT enabled interface:
1. From the NAT Security Interfaces table, click on the Advanced NAT Configuration
hyperlink for the interface that you want to add reserved mapping to. The Advanced NAT
Configuration page is displayed.
2. Click on the Add Reserved Mapping hyperlink. The follow page is displayed:
Axxcelera Broadband
AB-100 Manual
Version 5
Page 25 of 111
3. This page allows you to configure your reserved mapping. Add specific values for the
following table entries:
• Global IP Address; if you are mapping from a global IP address, type the address here.
If you are mapping g from a security interface , type 0.0.0.0.
• Internal IP Address; the IP address of an individual host inside your network.
• Transport Type; specify the transport type that you want to map from the outside
interface to the inside.
• Port Number; the port number that your transport uses.
4. Once you have configured the table, click on Add reserved mapping. The table is
refreshed and reserved mapping is added to your NAT configuration.
To delete a reserved mapping setup, click on the Delete hyperlink, then click on the Delete
Reserved Mapping button.
Click on Return to Interface List to display the Security Interface Configuration page.
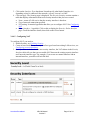
3.4.4.8 Configuring Security policies
A policy is the collective term for the rules that apply to incoming and outgoing traffic between
two interface types. Before you can create a Security policy, you need to enable Security. See
Enabling Firewall and/or Intrusion Detection.
To create and configure a Firewall policy:
1. Go to the Policies, Triggers and Intrusion Detection section of the Security Interface
Configuration page. Click on Security Policy Configuration. The Security Policy
Configuration page is displayed.
Axxcelera Broadband
AB-100 Manual
Version 5
Page 26 of 111
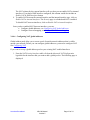
2. Click on New Policy. The Security Add Policy page is displayed:
3. This page allows you to configure your Security policy. Add specific values for the
following entries.
• Set the interface types that you want to create a policy between by selecting a type
from each of the Between interfaces of types drop down lists.
• Set the policy to either block only traffic specified in validators, or allow only traffic
specified in validators. For more information on validators, see Configuring
validators.
Click on Apply. After a short time, the policy is added to the Firewall configuration.
4. To display policy details click on Return to Policy List. The page is refreshed and
contains a Current Security Policies table:
Axxcelera Broadband
AB-100 Manual
Version 5
Page 27 of 111
The table contains details of each Security policy. You can now configure the policies to
include portfilters and validators. See Configuring portfilters and Configuring validators.
3.4.4.9 Configuring portfilters
A portfilter is an individual rule that determines what kind of traffic can pass between two
interfaces specified in an existing policy. This section assumes that you will have followed the
instructions in Configuring Security Policies.
To configure portfilter:
1. From the Current Security Policies table, click on the Port Filters link for the policy that
you want to configure. The page displayed contains three Add Filter hyperlinks that allow
you to create three different kinds of portfilter:
• For a TCP portfilter click on Add TCP Filter. The following page is displayed:
Axxcelera Broadband
AB-100 Manual
Version 5
Page 28 of 111
•
•
Specify the start and end of the port range for the TCP protocol that you want to filter.
For information on application port numbers, see ftp://ftp.rfc-editor.org/innotes/rfc1700.txt. Then use the Direction drop-down lists to specify whether you
want to allow/block outbound traffic. Click on Apply. The Firewall Port Filters page
is displayed, containing details of the TCP portfilter that you have just added.
For a UDP portfilter click on Add UDP Filter. The Firewall Add UDP Port Filter
page is displayed. For details on how to complete the table, follow the above
instructions for adding a TCP portfilter.
For a non-TCP/UDP portfilter click on Add Raw IP Filter. The following page is
displayed:
Axxcelera Broadband
AB-100 Manual
Version 5
Page 29 of 111
Specify the protocol number in the Transport Type text box, for example, for IGMP,
enter protocol number 2. For more information on protocol numbers, see ftp://ftp.rfceditor.org/in-notes/rfc1700.txt. Then use the Direction drop-down lists to specify
whether you want to allow/block inbound traffic, and allow/block outbound traffic.
Click on Apply. The Firewall Port Filters page is displayed, containing details of the
IP portfilter that you have just added.
2. Each portfilter displayed in the Firewall Port Filters page has a Delete hyperlink
assigned to it. To delete a portfilter, click on this link, then at the confirmation page, click
on the Delete button. The portfilter is removed from the Firewall configuration.
3.4.4.10 Configuring validators
A validator allows/blocks traffic based on the source/destination IP address and netmask. Traffic
will be allowed or blocked depending on the validator configuration specified when the policy
was created. See Configuring Security policies. This section assumes that you have previously
followed the instructions in Configuring Security policies.
To configure validator:
1. From the Current Firewall Policies table, click on Host Validators link for the policy that
you want to configure. The Configure Validators page is displayed. Click on the Add
Host Validator link. The following page is displayed:
Axxcelera Broadband
AB-100 Manual
Version 5
Page 30 of 111
2. In the Host IP Address text box, type the IP address that you want to allow/block.
3. In the Host Subnet Mask text box, type the IP mask address. If you want to filter a range
of addresses, you can specify the mask, for example, 255.255.255.0. If you want to filter
a single IP address, use the specific IP mask address, for example, 255.255.255.255.
4. Click on the Direction drop-down list and select the direction of traffic that you want the
validator to filter.
5. Click on Apply. The Configure Validators page is displayed containing details of the host
validator that you have just added.
6. Each portfilter displayed in the Configuration Validators page has a Delete Host
Validator hyperlink assigned to it. To delete a validator, click on this link, then at the
confirmation page, click on the Delete Host Validator button. The validator is removed
from the Firewall configuration.
3.4.4.11 Configuring triggers
A trigger allows an application to open a secondary port in order to transport packets. The most
common applications that require secondary ports are FTP and NetMeeting. This section
assumes that you have followed the instructions in Enabling Security.
To configure a trigger:
1. Go to Policies, Triggers and Intrusion Detection section on the Security Interface
Configuration. Click on Firewall Trigger Configuration. The Firewall Configuration
pages is displayed. There are no triggers defined at this time. Click on the New Trigger
link. The following page is displayed:
Axxcelera Broadband
AB-100 Manual
Version 5
Page 31 of 111
2. Configure the trigger as follows:
a. Transport Type; select a transport from the drop-down list, depending on whether
you are adding a trigger for a TCP or a UDP application.
b. Port Number Start; type the start of the trigger port range that the primary session
uses.
c. Port Number End; type the end of the trigger port range that the primary session
uses.
d. Secondary Port Number Start; type the start of the trigger port range that the
secondary session uses.
e. Secondary Port Number End; type the start of the trigger port range that the
secondary session uses.
f. Allow Multiple Hosts; select allow if you want a secondary session to be initiated
to/from different remote hosts. Select block if you want a secondary session to be
initiated only to/from the same remote host.
g. Max Activity Interval; type the maximum interval time (in milliseconds) between
the use of secondary port sessions.
h. Enable Session Chaining; select Allow or Block depending on whether you want
to allow multi-level TCP session chaining.
i. Enable UDP Session Chaining; select Allow or Block depending on whether you
want to allow multi-level UDP and TCP session chaining. You must set Enable
Session Chaining to Allow if you want this to work.
j. Binary Address Replacement; select Allow or Block depending on whether you
want to use binary address replacement on an existing trigger.
k. Address Translation Type; specify what type of address replacement is set on a
trigger. You must set Binary Address Replacement to Allow if you want this to
work.
3. Once you have configured the trigger, click on Apply. The Firewall Trigger
Configuration page is displayed, containing details of the trigger that you have just
configured.
4. Each trigger displayed on the Firewall Trigger Configuration page has a Delete hyperlink
assigned to it. To delete a trigger, click on this link, then at the confirmation page, click
Axxcelera Broadband
AB-100 Manual
Version 5
Page 32 of 111
on the Delete button. The Firewall Trigger Configuration page is displayed and details of
the delete trigger have been removed. There are two hyperlinks on the page:
a. To add a new trigger, click on New Trigger.
b. To display the Security Interface Configuration page, click on Return to Interface
List.
3.4.4.12 Configuring Intrusion Detection Settings
Intrusion Detection settings allow you to protect your network from intrusions such as denial of
service (DOS) attacks, port scanning and web spoofing. This section assumes that you have
followed the instructions in Enabling Security and Enabling Firewall and/or Intrusion Detection.
To configure Intrusion Detection settings:
1. Go to the Policies, Triggers and Intrusion Detection section of the Security Interface
Configuration page. Click on Configure Intrusion Detection. The Firewall Configure
Intrusion Detection page is displayed:
The values displayed above are the default values.
2. Configure Intrusion Detection as follows:
a. Use Blacklist; select true or false depending on whether you want external hosts
to be blacklisted if the Firewall detects an intrusion from that host. Click on the
Clear Blacklist button at the bottom of the page to clear blacklisting of an external
host. The Security Interface Configuration page is displayed.
b. Use Victim Protection; select true of false depending on whether you want to
protect a victim from an attempted web spoofing attack.
Axxcelera Broadband
AB-100 Manual
Version 5
Page 33 of 111
c. Victim Protection Block Duration; type the length of time (in seconds) that the
Firewall blocks packets destined for the victim of a spoofing style attack.
d. DOS Attack Block Duration; type the length of time (in seconds) that the Firewall
blocks suspicious hosts for after it has detected scan activity.
e. Scan Attack Block Duration; type the length of time (in seconds) that the Firewall
blocks suspicious hosts for after it has detected scan activity.
f. Maximum TCP Open Handshaking Count; type in the maximum number of
unfinished TCP handshaking sessions (per second) that are allowed by Firewall
before SYN Flood is detected.
g. Maximum Ping Count; type in the maximum number of pings (per second) that
are allowed before the Firewall detects an Echo Storm DOS attack.
h. Maximum ICMP Count; type in the maximum number of ICMP packets (per
second) that are allowed by the Firewall before an ICMP Flood DOS is detected.
3. Once you have configured Intrusion Detection, click on Apply. The Intrusion Detection
settings are applied to the Firewall, and the Security Interface Configuration page is
displayed.
3.4.5 WAN connections
This option allows you to create and configure WAN connections for your AB-100. You can also
create virtual interfaces on routed services. From the Configuration menu, click on WAN
connections. The WAN connections page is displayed:
3.4.5.1 Creating a WAN service
1. Click on Create a new service. A page is displayed containing a list of WAN service
options.
Axxcelera Broadband
AB-100 Manual
Version 5
Page 34 of 111
2. Select an option, then click on Configure. You need to add detailed configuration
information about the WAN service that you are creating.
3. Click on Apply. The WAN connections page is displayed. The table now contains details
of the service that you have just created.
3.4.5.2 Editing a WAN service
1. Click on the Edit link for a specific service. The WAN connections: edit page is displayed.
2. Change the values for the existing service. If you want to carry out advanced editing,
click on the links at the top of the edit page. The links that appear depend on the type of
service that you are configuring.
3. Click on Change. The edit page is displayed and changes are applied to the service.
3.4.5.3 Deleting a WAN service
1. At the WAN connections page, click on the Delete link for a specific service. The WAN
connection: delete page is displayed.
2. Check the details displayed, then click on the Delete this connection button.
3.4.5.4 Creating a virtual interface (routed services only)
1. Click on the Virtual I/f link for a specific service. The Virtual interface page is displayed.
2. Click on the Create a new virtual interface… hyperlink. On the Create virtual interface
page, type the IP address and netmask of the virtual interface, then click on the Apply
button.
3. The WAN connections page is displayed. If you click on the Virtual I/f link, the Virtual
interface page displays a table listing the names of existing virtual interfaces. Each virtual
interface is called item# by default.
3.4.6 IP routes
This option allows you to create static IP routes to destination addresses via an IP interface name
or a Gateway address. From the Configuration menu, click on IP routes. The Edit Routes page is
displayed:
Axxcelera Broadband
AB-100 Manual
Version 5
Page 35 of 111
This page lists the following information about the existing routes:
•
•
•
•
•
Whether the route is valid
or invalid
Destination IP address
Gateway address
Netmask
Whether the route is advertised via RIP (true or false)
3.4.6.1 Creating an IP V4 Route
1. Click on Create new IP V4 Route hyperlink. The following page is displayed:
Axxcelera Broadband
AB-100 Manual
Version 5
Page 36 of 111
2. Complete the Create Ip V4Route form in order to configure the route.
3. When you have filled in the details, click on OK. The Edit Routes page is displayed. The
table now contains details of the route that you have just created.
3.4.6.2 Editing a route
1. To edit the destination, gateway and netmask address or a route, click in the relevant text
box, update the information then click on Apply.
2. To edit the cost, interface setting or advertise status for the route, click on the Advanced
Options hyperlink for a specific route and update the relevant information. Click on OK.
3.4.6.3 Deleting a route
1. To delete an exiting route, check the Delete? Box for a specific route.
2. Click on Apply.
3.4.7 DHCP server
This option allows you to enable/disable the DHCP server and create, configure and delete
DHCP server subnets and DHCP fixed IP/MAC mappings.
From the Configuration menu, click on DHCP server. The following page is displayed:
Axxcelera Broadband
AB-100 Manual
Version 5
Page 37 of 111
3.4.7.1 Enabling/disabling the DHCP server
1. Click on the Enable/Disable button at the top of the page.
2. The DHCP server is enabled by default. If you click on the Disable button, DHCP server
is disabled and the button changes to Enable.
NOTE: If DHCP is enabled, DHCP server will be disabled by default. You can not
enable DHCP server unless you disable DHCP relay. See DHCP Relay.
3.4.7.2 Creating a DHCP server subnet
1. Click on the Create new Subnet link. The following page is displayed:
Axxcelera Broadband
AB-100 Manual
Version 5
Page 38 of 111
2. This page allows you to:
a. Set the value and netmask of the subnet (either manually or by selecting an IP
interface whose value and mask is used instead), and set the maximum and default
lease times.
b. Set the DHCP address range (or use a default range of 20 addresses).
c. Set the Primary and Secondary DNS Server addresses or set your AB-100 System
to give out its own IP address as the DNS Server address.
d. Set your AB-100 System to give out its own IP address as the default Gateway
address.
3. Once you have entered new configuration details for your DHCP server, click on OK.
The DHCP Server page is displayed, containing details of your new subnet.
3.4.7.3 Editing a DHCP subnet
1. Click on the Advanced Options link for a specific subnet. The Edit DHCP server subnet
page is displayed. This allows you to edit all of the values that were set when the subnet
was created.
2. This page also allows you to add additional option information. At the bottom of the page,
click on the Create new DHCP option link. The following page is displayed:
Axxcelera Broadband
AB-100 Manual
Version 5
Page 39 of 111
3. Click on the Option name drop-down list and select a name. Type a value that matches
the selected option name in the Option value text box. Click on OK.
4. The Edit DHCP server subnet page is displayed, and details of your new option are
displayed under the sub-heading Additional option information. To delete an existing
option, check the Delete? box for a specific option and click OK.
3.4.7.4 Creating a fixed host
1. Click on the Create new Fixed Host link. The following page is displayed:
2. Complete the following:
a. Type in the IP address that will be given to the host with the specific MAC
address.
b. Type in the MAC address and the maximum lease time (default is 86400 seconds).
3. Click on OK. The DHCP Server page is displayed, and details of your new fixed host are
displayed under the sub-heading Existing DHCP fixed IP/MAC mappings. To edit a fixed
mapping, click on the IP address, MAC address or max lease time, type a new entry and
Axxcelera Broadband
AB-100 Manual
Version 5
Page 40 of 111
click Apply. To delete a fixed mapping, check the Delete? box for specific mapping and
click Apply.
3.4.8 DHCP relay
This option allows you to:
• Enable/disable DHCP relay.
• Add DHCP servers to the DHCP relay list.
• Configure/delete server entries on the DHCP relay list.
From the Configuration menu, click on DHCP relay. The following page is displayed:
3.4.8.1 Enabling/disabling DHCP relay
1. Click on the Enable/Disable button at the top of the page. If you click on the Disable
button, DHCP server is disabled and the button changes to Enable.
NOTE: If DHCP server is enabled, DHCP relay will be disabled by default. You can not
enable DHCP relays unless you disable DHCP server. See DHCP Server.
Axxcelera Broadband
AB-100 Manual
Version 5
Page 41 of 111
3.4.8.2 Adding a DHCP server to the DHCP relay list
1. In the Add new DHCP server section, type an address in the New DHCP server IP
address text box.
2. Click on Apply. The address is displayed in the Edit DHCP server list section.
3.4.8.3 Editing/deleting entries in the DHCP relay list
1. To edit an entry, click on an IP address and type a new entry, then click on Apply.
2. To delete an entry, check the Delete? box for a specific IP address, the click on Apply.
3.4.9 DNS client
This option allows you to:
• Create a list of server addresses. This enables you to retrieve a domain name for a given
IP address.
• Create domain search list. DNS client uses this list when a user asks for the IP address list
for an incomplete domain name.
From the Configuration menu, click on DNS client. The following page is displayed:
3.4.9.1 Configuring DNS servers
1. Type the IP address of the unknown domain name in the DNS servers: text box.
Axxcelera Broadband
AB-100 Manual
Version 5
Page 42 of 111
2. Click Add. The IP address appears in the DNS server table. You can add a maximum of
three server IP addresses. Each IP address entry has a Delete button associated with it.
Click on Delete to remove an IP address from this list.
3.4.9.2 Configuring DNS search domains
1. Type a search string in the Domain search order: text box.
2. Click Add. The search string is displayed in the Domain search order table. You can add
a maximum of six search strings. Each search string entry has a Delete button associated
with it. Click on Delete to remove a string from this list.
3.4.10
DNS relay
This option allows you to create, configure, and delete DNS relay’s primary and secondary DNS
servers. DNS relay can forward DNS queries to the DNS servers on this list.
From the Configuration menu, click on DNS Relay. The following page is displayed:
3.4.10.1 Configuring the DNS relay list
1. In the Add new DNS server section, type an address in the New DNS server IP address
text box.
2. Click on Apply. The address is displayed in the Edit DNS server list section.
3. To delete an entry, check Delete? box for a IP address, then click on Apply.
Axxcelera Broadband
AB-100 Manual
Version 5
Page 43 of 111
3.5 Ports
This option allows you to configure the ports available on your AB-100 system. AB-100 has two
ports one Ethernet port and one ATM port.
3.5.1 Configuring ports
1. From the left-hand menu, click on Configuration. From the Configuration menu, click on
Ports. A sub-list of ports available on your AB-100 is displayed. The following ports are
available on the AB-100:
• Ethernet
• ATM
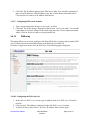
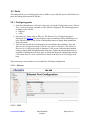
2. From the Ports menu, click on Ethernet. The Ethernet Port Configuration page is
displayed: See Ethernet. The page displays basic port attributes for the Ethernet port on
your AB-100 system. Click on one of the attribute names to display help information
about each entry.
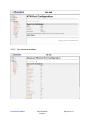
3. You can carry out advanced configuration of your Ethernet port attributes. From the
Ethernet Port Configuration page, click on View advanced attributes. The Advanced
Ethernet Port Configuration page is displayed. Click on one of the advanced attribute
names to display help information about each entry. Update the port attributes that are
available for editing, then click on Apply to update the advanced configuration settings.
Click on the Return to basic attribute list to return to the Ethernet Port Configuration
page
These same steps can be taken to review/modify the ATM port configuration.
3.5.1.1 Ethernet
3.5.1.2 ATM
Axxcelera Broadband
AB-100 Manual
Version 5
Page 44 of 111
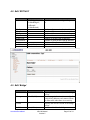
3.5.1.3 View advanced attributes
Axxcelera Broadband
AB-100 Manual
Version 5
Page 45 of 111
Section 4
4 Advanced Options
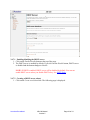
4.1 Edit ‘Service’
Name
Creator
Value
{WebAdmin | CLI}
Desctiption
Text field
Description
Displays the name of the config interface
in which the service was created.
Text field that can be used to help identify
the item.
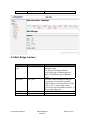
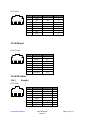
4.2 Edit ‘IPoA’
Name
SVC
Atmarp
Value
{true | false}
{here | <a.b.c.d>
Lifetime
{0-x}
If In Octets
If Out Octets
If In Errors
If Out Errors
#
#
#
#
Axxcelera Broadband
Description
Enables Switched Virtual Circuits.
Sets the Atmarp server, for the local
machine use “here” for a remote machine
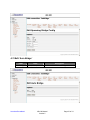
use its IP Address.
ATM cell lifetime in seconds. Similar to
the TTL in an Ethernet frame.
Number or bytes received on interface.
Number of bytes transmitted on interface.
Number of errors received on interface.
Number of errors transmitted on interface.
AB-100 Manual
Version 5
Page 46 of 111
Packets Sent
Good Packets
Version
Enabled
Termination
#
#
#
{true | false}
N/A
Number of packets sent on interface.
Number of good packets sent on interface.
Current version of the IPoA driver.
Enables or disables interface.
Currently not used.
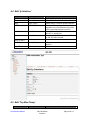
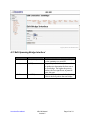
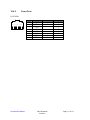
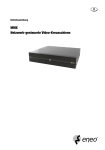
4.3 Edit ‘Atm Channel’
Name
TX VCI
TX VPI
RX VCI
RX VPI
Peak Cell Rate
Value
{0-65536}
{0-256}
{0-65536}
{0-256}
{0-70000}
Burst Tolerance
{0-100}
Axxcelera Broadband
Description
Transmit Virtual Circuit Identifier
Transmit Virtual Path Identifier
Receive Virtual Circuit Identifier
Receive Virtual Path Identifier
The maximum number of cells allowed to
pass through the PVC in a second.
Controls the duration of traffic bursts on
VBR (Variable Bit Rate) and VBR RT
(VBR Real Time) channels.
AB-100 Manual
Version 5
Page 47 of 111
Max Cell Rate
#
Max Burst Size
{0-100}
Sustainable Cell
Rate
Any positive number
that is less than the
PortSpeed and the
PCR for the channel.
#
Packet Priority
Levels
ATM Traffic
Class
Port
{UBR | CBR | VBRrt | VBR | ABR |
UBRPlus | QFC}
atm
Port Class
atm
Axxcelera Broadband
Determines the maximum rate at which
ATM cells are allowed to be sent along
the PPPoA transport.
Controls the maximum burst size for VBR
and VBR-rt channels. This value
overrides an existing BT value (if set).
The average cell rate for a VBR or VBR
RT connection.
The number of priority levels available on
an ATM transport.
Set the traffic class for the channel.
Channels connected to AB-Access should
always use the default of UBR.
Allows user to set the type of port, which
will always be atm.
Displays the type of port.
AB-100 Manual
Version 5
Page 48 of 111
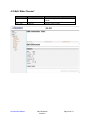
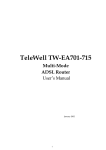
4.4 Edit ‘Ip Interface’
Name
Ipaddr
Mask
Dhcp
MTU
Value
{a.b.c.d}
{a.b.c.d}
{true | false}
{576-1500}
Real Interface
Interface name
Name
Interface name
Snmp If Index
Enabled
{true | false}
Layer2Session
N/A
Description
IP Address for the defined interface.
Subnet Mask for the defined interface.
Enable DHCP client on defined interface.
Maximum Transmission Unit sets the
maximum size of an Ethernet frame that
will be passed through the interface.
Displays the real interface that a virtual
interface is attached to.
The name of the WAN service as defined
by AB-100 when created.
Allows user to enable or disable the
interface.
N/A
4.5 Edit ‘Tcp Mss Clamp’
Name
Axxcelera Broadband
Value
AB-100 Manual
Version 5
Description
Page 49 of 111
TCP MSS Clamp
{true | false}
Enables or disables TCP MSS (Maximum
Segment Size) Clamp functionality on an
existing IP interface. When TCP MSS
Clamp is enable on an interface, all TCP
traffic routed through that interface will
be examined. If a TCP SYN
(synchronize/start) segment is sent with a
maximum segment size larger than the
interface MTU, the MSS option will be
rewritten in order to allow TCP traffic to
pass through the interface without
requiring fragmentation.
4.6 Edit ‘Rip Versions’
Name
Accept V1
Value
{true | false}
Accept V2
{true | false}
Send V1
{true | false}
Send V2
{true | false}
Send Multicast
{true | false}
Axxcelera Broadband
Description
Controls whether the interface will accept
any RIP V1 updates from other devices.
Controls whether the interface will accept
any RIP V2 updates from other devices.
Controls whether the interface will send
any RIP V1 updates to other devices.
Controls whether the interface will send
any RIP V2 updates to other devices.
Send RIP updates via multicast.
AB-100 Manual
Version 5
Page 50 of 111
4.7 Edit ‘NAT’
Name
Nat Enabled
Axxcelera Broadband
Value
{true | false}
Description
Set whether NAT (Network Address
Translation) is set on the interface.
AB-100 Manual
Version 5
Page 51 of 111
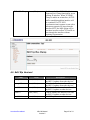
4.8 Edit ‘RFC1483’
Name
Mode
If In Octets
If Out Octets
If In Errors
If Out Errors
Packets Sent
Good Packets
Version
Enabled
Termination
Value
{LlcBridged |
VcMuxBridged |
LlcRouted |
VcMuxRouted}
#
#
#
#
#
#
#
{true | false}
N/A
Description
Sets the mode that the bridge will operate
in.
Number or bytes received on interface.
Number of bytes transmitted on interface.
Number of errors received on interface.
Number of errors transmitted on interface.
Number of packets sent on interface.
Number of good packets sent on interface.
Displays current version of 1483 drivers.
Enables or disables interface.
N/A
4.9 Edit ‘Bridge’
Name
Version
#
Filterage
{10-100,000}
Version
#
Enabled
{true | false}
Axxcelera Broadband
Value
Description
Displays the current version of the bridge
drivers.
The filter age is the time (in seconds) after
which MAC addresses are removed from
the filter table when there is no activity.
Displays the current version of the bridge
drivers.
Enables or disables the bridge.
AB-100 Manual
Version 5
Page 52 of 111
Termination
N/A
N/A
4.10 Edit ‘Bridge Interface’
Name
Ether Filter
Type
Value
{All | Ip | Pppoe}
Port Filter
{all | port}
Enabled
Layer2Session
{true | false}
N/A
Axxcelera Broadband
Description
Allows these type of Ethernet packets
through the port.
All ; all type of Ethernet packets.
Ip; all ip/arp type of Ethernet packets.
Pppoe; only PPPoE types of Ethernet
packts.
The name of the existing port that you
wan packets, received on a specified
bridge interface, to be forwarded to. If the
value is “all” it will forward packets,
received on a specified bridge interface, to
all existing bridge ports.
Enables or disables this feature.
N/A
AB-100 Manual
Version 5
Page 53 of 111
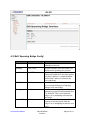
4.11 Edit Spanning Bridge Interface’
Name
Enabled
Value
{true | false}
Priority
{0-255}
Path Cost
{1-65535}
Axxcelera Broadband
Description
Enables or disables the bridge’s ability to
use the spanning tree protocol.
The priority is used in conjunction with
the pathcost to determine the best root to
the root bridge. The higher the priority
number, the less significant, in protocol
terms, the port.
The cost of the port is used when deciding
which is the best path to the root bridge.
AB-100 Manual
Version 5
Page 54 of 111
4.12 Edit ‘Spanning Bridge Config’
Name
Version
Value
#
Spanning
{true | false}
Span Priority
{0-65535}
Hello Time
{1-10}
Max Age
{6-40}
Forward Delay {4-30}
Axxcelera Broadband
Description
Displays the current version of the
spanning tree drivers.
Specifies whether or not the bridge is to
implement the spanning tree protocol.
Sets the spanning tree protocol priority.
Where two bridges have the same priority,
their MAC address is compared and the
smaller MAC address is treated as the
most significant.
Sets the time after which the spanning tree
process sends notification of topology
changes to the root bridge.
Sets the maximum age of received
spanning tree protocol information before
it is discarded. This is used when the
bridge is or is attempting to become the
root bridge.
Sets the time that the bridge spends in
listening or learning states when the
bridge is or is attempting become the root
bridge.
AB-100 Manual
Version 5
Page 55 of 111
4.13 Edit ‘Auto Bridge’
Name
Auto Bridge
Axxcelera Broadband
Value
{true | false}
Description
Enables or disables auto bridge.
AB-100 Manual
Version 5
Page 56 of 111
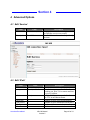
4.14 Edit ‘Ethernet’
Name
If In Octets
If Out Octets
If In Errors
If Out Errors
Packets Sent
Good Packets
Version
Enabled
Termination
Axxcelera Broadband
Value
#
#
#
#
#
#
#
{true | false}
N/A
Description
Number or bytes received on interface.
Number of bytes transmitted on interface.
Number of errors received on interface.
Number of errors transmitted on interface.
Number of packets sent on interface.
Number of good packets sent on interface.
Current version of Ethernet driver.
Enables or disables interface.
N/A
AB-100 Manual
Version 5
Page 57 of 111
4.15 Edit ‘Ether Channel’
Port
Name
Value
{text field}
Port Class
Ethernet
Axxcelera Broadband
Description
Enter class of port. Should be left to
default.
Displays class of port.
AB-100 Manual
Version 5
Page 58 of 111
Section 5
5 Configuring 1483 (bridged)
1. Open web browser.
2. Click on Configuration.
3. Click on WAN connections.
4. Click on Create a new service.
5. Select RFC 1483 bridged
6. Click on Configure.
Axxcelera Broadband
AB-100 Manual
Version 5
Page 59 of 111
7. Fill in the following fields…
a. Description: Description text field.
b. VPI: Virtual Path Identifier.
NOTE: AB-Access only supports VPI 0-7 on terrestrial interface.
c. VCI: Virtual Circuit Identifier.
d. Encapsulation method: LLC/SNAP or VcMux(null).
NOTE: AB-Access only supports LLC/SNAP encapsulation.
8. Click on Apply.
Axxcelera Broadband
AB-100 Manual
Version 5
Page 60 of 111
Section 6
6 Configuring CLIP (IPoA)
The CLIP_S and CLIP_T configuration are setup the same on AB-100. The only difference is
that in CLIP_T you only need to create one WAN (IPoA routed) connection. The CLIP_S
configuration requires that you create a different WAN (IPoA routed) for each SU in the sector.
1. Open web browser.
2. Click on Configuration.
3. Click on WAN connections.
4. Click on Create a new service.
5. Select IPoA routed.
6. Click on Configure.
Axxcelera Broadband
AB-100 Manual
Version 5
Page 61 of 111
7. Fill in the following fields…
a. Description: Description text field.
b. VPI: Virtual Path Identifier.
NOTE: AB-Access only supports VPI 0-7 on terrestrial interface.
c. VCI: Virtual Circuit Identifier.
d. WAN IP address: IP address assigned to the ATM WAN interface. This address
is the address the ipatm pvc’s in the resolve file of each SU will terminate on.
8. Click on Apply.
Axxcelera Broadband
AB-100 Manual
Version 5
Page 62 of 111
Section 7
7 AB-100 / AB-Access 1483_S system
SU1
BL
PVC
200
PVC
300
RL
RL
192.168.3.2
BL
SL
SL
A
192.168.3.10
PVC 768
E
MID 0
PVC 1024
PVC
101
MID 3
LAN
SU2
RL
AB-100
192.168.3.11
BL
SL
LAN 192.168.3.1 /24
E
MID 4
AP Management PVC
LAN
SU1 Data/Mgmt PVC
SU2 Data/Mgmt PVC
7.1 AB-Access Configuration Files
7.1.1 AP resolve
device add bridge ether //bridge mtu 1500 192.168.3.2
subnet add bridge.home . 192.168.3.0 ff:ff:ff:00
rip send all none
rip accept all none
route add default 0.0.0.0 192.168.3.1 00:00:00:00 1 # MAN
relay all
ipatm lifetime 60
Axxcelera Broadband
AB-100 Manual
Version 5
Page 63 of 111
7.1.2 AP system.conf
channel 0
antenna horizontal
mode static
mid 0
bid 0
interface atm0
backoff 0
provider abw
key Axxcelera
mask 1ffff
leds active
max_mid 254
7.1.3 AP initbridge
spanning disable
device add edd
device add r1483
7.1.4 AP initr1483
pvc 0/101 atm25i 70000 70000
7.1.5 AP initswitchcli
tp default UBR 70000
sp default 256 stats
add atm25m 0 768 atm25i 0 200 default default perm epd
add atm25i 0 200 atm25m 0 768 default default perm epd
add atm25m 0 1024 atm25i 0 300 default default perm epd
add atm25i 0 300 atm25m 0 1024 default default perm epd
7.1.6 SU1 resolve
Axxcelera Broadband
AB-100 Manual
Version 5
Page 64 of 111
device add bridge ether //bridge mtu 1500 192.168.3.10
subnet add bridge.home . 192.168.3.0 ff:ff:ff:00
rip send all none
rip accept all none
route add default 0.0.0.0 192.168.3.1 00:00:00:00 1 # MAN
relay all
ipatm lifetime 60
7.1.7 SU1 initbridge
spanning disable
device add edd
device add r1483
7.1.8 SU1 system.conf
channel 0
antenna horizontal
mode static
mid 3
bid 0
interface eth0
backoff 0
provider abw
key Axxcelera
mask 1ffff
leds active
7.1.9 SU1 initr1483
pvc 0/768 atm25m 70000 70000
7.1.10
SU2 resolve
Axxcelera Broadband
AB-100 Manual
Version 5
Page 65 of 111
device add bridge ether //bridge mtu 1500 192.168.3.11
subnet add bridge.home . 192.168.3.0 ff:ff:ff:00
rip send all none
rip accept all none
route add default 0.0.0.0 192.168.3.1 00:00:00:00 1 # MAN
relay all
ipatm lifetime 60
7.1.11
SU2 initbridge
spanning disable
device add edd
device add r1483
7.1.12
SU2 system.conf
channel 0
antenna horizontal
mode static
mid 4
bid 0
interface eth0
backoff 0
provider abw
key Axxcelera
mask 1ffff
leds active
7.1.13
SU2 initr1483
pvc 0/1024 atm25m 70000 70000
7.2 AB-100 icf config file
This file can be retrieved and loaded through the Backup/Restore page.
# Information Model configuration file
version 4
N ImIGMPProxy ImIGMPProxy
Axxcelera Broadband
AB-100 Manual
Version 5
Page 66 of 111
A forwardAll false
N ImRip ImRip
A hostRoutes false
A poison false
A authEnable false
A authPassword ''
A advertiseDefaultRoute false
A defaultRouteCost 1
N ImBridge ImBridge
A filterage 300
A enabled false
A layer2SessionUser ImRouter.ImIpInterfaces.ip1
N ImBridgeInterfaces ImBridge.ImBridgeInterfaces
N ImBridgeInterface ImBridge.ImBridgeInterfaces.eth1
A etherFilterType All
A portFilter All
A enabled false
N ImSpanningBridgeInterface
ImBridge.ImBridgeInterfaces.eth1.ImSpanningBridgeInterface
A enabled false
A priority 128
A pathCost 10
N ImBridgeInterface ImBridge.ImBridgeInterfaces.eth1
A etherFilterType All
A portFilter All
A enabled true
A layer2Session ImServices.eth1.eth1
N ImSpanningBridgeInterface
ImBridge.ImBridgeInterfaces.eth1.ImSpanningBridgeInterface
A enabled false
A priority 128
A pathCost 10
N ImBridgeInterface ImBridge.ImBridgeInterfaces.rfc1483-0
A etherFilterType All
A portFilter All
A enabled true
A layer2Session ImServices.rfc1483-0.item0
N ImSpanningBridgeInterface ImBridge.ImBridgeInterfaces.rfc14830.ImSpanningBridgeInterface
A enabled false
A priority 128
A pathCost 10
N ImBridgeInterface ImBridge.ImBridgeInterfaces.rfc1483-1
A etherFilterType All
A portFilter All
A enabled true
A layer2Session ImServices.rfc1483-1.item0
N ImSpanningBridgeInterface ImBridge.ImBridgeInterfaces.rfc14831.ImSpanningBridgeInterface
A enabled false
A priority 128
A pathCost 10
N ImSpanningBridgeConfig ImBridge.ImSpanningBridgeConfig
A spanning false
A spanPriority 32768
A helloTime 2
A maxAge 20
Axxcelera Broadband
AB-100 Manual
Version 5
Page 67 of 111
A forwardDelay 15
N ImDhcpClient ImDhcpClient
A reboot 10
A retry 300
A backoffCutoff 120
N ImDhcpServer ImDhcpServer
A defaultLeaseTime 43200
A allowBootp true
A maxLeaseTime 86400
A allowUnknownClients true
A enabled false
N ImDhcpRelay ImDhcpRelay
A enabled false
N ImDnsRelay ImDnsRelay
A relayDomainName ''
N ImDnsClient ImDnsClient
N ImFireWall ImFireWall
A security_enable false
A firewall_level none
A firewall_enable false
A IDS false
A ClearIDSBlacklist true
A sessionlog true
A blockinglog true
A IntrusionLog false
N ImFwIDS ImFireWall.ImFwIDS
A UseBlackList false
A UseVictimProtection false
A DosAttackBlockDuration 1800
A ScanAttackBlockDuration 86400
A VictimProtectionBlockDuration 600
A MaxTcpOpenHandshakingCount 100
A MaxPingCount 15
A MaxICMPCount 100
N ImProcessLogFilters ImProcessLogFilters
N ImDevice ImDevice
A saveconfig false
N ImServices ImServices
N ImService ImServices.eth1
A creator CLI
A description eth1
N ImEthernet ImServices.eth1.eth1
A enabled true
A layer2SessionUser ImBridge.ImBridgeInterfaces.eth1
N ImChannels ImServices.eth1.eth1.ImChannels
N ImEtherChannel ImServices.eth1.eth1.ImChannels.item0
A port ethernet
N ImService ImServices.rfc1483-0
A creator WebAdmin
A description SU1
N ImRfc1483 ImServices.rfc1483-0.item0
A mode LlcBridged
A enabled true
A layer2SessionUser ImBridge.ImBridgeInterfaces.rfc1483-0
N ImChannels ImServices.rfc1483-0.item0.ImChannels
N ImAtmChannel ImServices.rfc1483-0.item0.ImChannels.item0
A txVci 200
Axxcelera Broadband
AB-100 Manual
Version 5
Page 68 of 111
N
N
N
N
N
N
N
N
N
N
N
N
N
N
N
A rxVci 200
A pcr 2000
A class UBR
A port atm
ImService ImServices.rfc1483-1
A creator WebAdmin
A description SU2
ImRfc1483 ImServices.rfc1483-1.item0
A mode LlcBridged
A enabled true
A layer2SessionUser ImBridge.ImBridgeInterfaces.rfc1483-1
ImChannels ImServices.rfc1483-1.item0.ImChannels
ImAtmChannel ImServices.rfc1483-1.item0.ImChannels.item0
A txVci 300
A rxVci 300
A pcr 2000
A class UBR
A port atm
ImService ImServices.ipoa-0
A creator WebAdmin
A description 'AP MGMT'
ImIpoa ImServices.ipoa-0.item0
A svc false
A atmarp here
A lifetime 60
A enabled true
A layer2SessionUser ImRouter.ImIpInterfaces.ipoa-0
ImChannels ImServices.ipoa-0.item0.ImChannels
ImAtmChannel ImServices.ipoa-0.item0.ImChannels.item0
A txVci 101
A rxVci 101
A pcr 2000
A class UBR
A port atm
ImUsers ImUsers
ImUser ImUsers.atmos
A username atmos
A password atmos
A comment 'Created by CLI'
A accessLevel superuser
A mayConfigure true
A mayDialIn true
A pppLoginAuth none
ImRouter ImRouter
ImIpInterfaces ImRouter.ImIpInterfaces
ImIpInterface ImRouter.ImIpInterfaces.ip1
A ipaddr 192.168.3.1
A mask 255.255.255.0
A dhcp false
A mtu 1500
A enabled true
A layer2Session ImBridge
ImTcpMssClamp ImRouter.ImIpInterfaces.ip1.ImTcpMssClamp
A enabled false
ImRipVersions ImRouter.ImIpInterfaces.ip1.ImRipVersions
A acceptV1 false
A acceptV2 false
Axxcelera Broadband
AB-100 Manual
Version 5
Page 69 of 111
N
N
N
N
N
N
N
#
A sendV1 false
A sendV2 false
A sendMulticast false
ImIpInterface ImRouter.ImIpInterfaces.ipoa-0
A ipaddr 192.168.100.1
A mask 255.255.255.0
A dhcp false
A mtu 1500
A enabled true
A layer2Session ImServices.ipoa-0.item0
ImTcpMssClamp ImRouter.ImIpInterfaces.ipoa-0.ImTcpMssClamp
A enabled false
ImRipVersions ImRouter.ImIpInterfaces.ipoa-0.ImRipVersions
A acceptV1 false
A acceptV2 false
A sendV1 false
A sendV2 false
A sendMulticast false
ImPorts ImPorts
ethernet ImPorts.ethernet
A resetDefaults false
atm ImPorts.atm
A resetDefaults false
ImWebserver ImWebserver
A httpPort 80
A upnpPort 2800
A telnetPort 23
A interface ip1
A enabled true
A mgmtIp 0.0.0.0
A archive //expand/isfs/derived_data.dat
A enableAuxillaryPort true
end
Axxcelera Broadband
AB-100 Manual
Version 5
Page 70 of 111
Section 8
8 AB-100 / AB-Access CLIP_T system
The CLIP_T configuration will allow the easiest conversion from Ethernet to ATM mode.
However it does not have the small packet performance advantages that CLIP_S has. This
configuration uses the AP in the exact same way that it does in Ethernet mode. So there are only
minor changes and additions to the resolve and system.conf files.
192.168.100.1
PVC 768
192.168.2.2 /30
RL
BL
PVC
100
RL
192.168.100.3
SL
A
192.168.3.65 /29
BL
SL
E
MID 0
MID 3
LAN
AB-100
AP 192.168.2.1 /30
SU Data/Management PVC
AP/SU Management/Data Path
LAN 192.168.1.1 /24
8.1 AB-Access Configuration Files
8.1.1 AP resolve
Axxcelera Broadband
AB-100 Manual
Version 5
Page 71 of 111
device add atm0 atm //bun mtu 1500 192.168.2.2
device add atm1 atm //bun mtu 1500 192.168.100.1
subnet add atm0.home . 192.168.2.0 ff:ff:ff:fc
subnet add atm1.home . 192.168.100.0 ff:ff:ff:00
rip send all none
rip accept all none
route add default 0.0.0.0 192.168.2.1 00:00:00:00 1 # MAN
route add su1 192.168.3.64 192.168.100.3 ff:ff:ff:f8 1 # MAN
relay all
ipatm pvc lifetime 60
ipatm pvc atm0 atm25i 0/50 pcr 70000/70000 remoteip 192.168.2.1
ipatm pvc atm1 atm25m 0/768 pcr 70000/70000 remoteip 192.168.100.3
8.1.2 AP system.conf
channel 0
antenna horizontal
mode static
mid 0
bid 0
interface atm0
duplex half
backoff 0
provider abw
key Axxcelera
mask 1ffff
leds active
max_mid 254
Axxcelera Broadband
AB-100 Manual
Version 5
Page 72 of 111
8.1.3 SU resolve
device add eth0 ether //edd mtu 1500 192.168.3.65
device add atm1 atm //bun mtu 1500 192.168.100.3
subnet add eth0.home . 192.168.3.64 ff:ff:ff:f8
subnet add atm1.home . 192.168.100.0 ff:ff:ff:00
rip send all none
rip accept all none
route add default 0.0.0.0 192.168.100.1 00:00:00:00 1 # MAN
relay all
ipatm lifetime 60
ipatm pvc atm1 atm25m 0/768 pcr 70000/70000 remoteip 192.168.100.1
8.1.4 SU system.conf
channel 0
antenna horizontal
mode static
mid 3
bid 0
interface eth0
duplex half
backoff 0
provider abw
key Axxcelera
mask 1ffff
leds active
8.2 AB-100 icf config file
# Information Model configuration file
version 4
N ImIGMPProxy ImIGMPProxy
A forwardAll false
N ImRip ImRip
A hostRoutes false
A poison false
Axxcelera Broadband
AB-100 Manual
Version 5
Page 73 of 111
A authEnable false
A authPassword ''
A advertiseDefaultRoute false
A defaultRouteCost 1
N ImBridge ImBridge
A filterage 300
A enabled false
A layer2SessionUser ImRouter.ImIpInterfaces.ip1
N ImBridgeInterfaces ImBridge.ImBridgeInterfaces
N ImBridgeInterface ImBridge.ImBridgeInterfaces.eth1
A etherFilterType All
A portFilter All
A enabled false
N ImSpanningBridgeInterface
ImBridge.ImBridgeInterfaces.eth1.ImSpanningBridgeInterface
A enabled false
A priority 128
A pathCost 10
N ImBridgeInterface ImBridge.ImBridgeInterfaces.eth1
A etherFilterType All
A portFilter All
A enabled true
A layer2Session ImServices.eth1.eth1
N ImSpanningBridgeInterface
ImBridge.ImBridgeInterfaces.eth1.ImSpanningBridgeInterface
A enabled false
A priority 128
A pathCost 10
N ImSpanningBridgeConfig ImBridge.ImSpanningBridgeConfig
A spanning false
A spanPriority 32768
A helloTime 2
A maxAge 20
A forwardDelay 15
N ImDhcpClient ImDhcpClient
A reboot 10
A retry 300
A backoffCutoff 120
N ImDhcpServer ImDhcpServer
A defaultLeaseTime 43200
A allowBootp true
A maxLeaseTime 86400
A allowUnknownClients true
A enabled false
N ImDhcpRelay ImDhcpRelay
A enabled false
N ImDnsRelay ImDnsRelay
A relayDomainName ''
N ImDnsClient ImDnsClient
N ImFireWall ImFireWall
A security_enable false
A firewall_level none
A firewall_enable false
A IDS false
A ClearIDSBlacklist true
A sessionlog true
A blockinglog true
Axxcelera Broadband
AB-100 Manual
Version 5
Page 74 of 111
A IntrusionLog false
N ImFwIDS ImFireWall.ImFwIDS
A UseBlackList false
A UseVictimProtection false
A DosAttackBlockDuration 1800
A ScanAttackBlockDuration 86400
A VictimProtectionBlockDuration 600
A MaxTcpOpenHandshakingCount 100
A MaxPingCount 15
A MaxICMPCount 100
N ImProcessLogFilters ImProcessLogFilters
N ImDevice ImDevice
A saveconfig false
N ImServices ImServices
N ImService ImServices.eth1
A creator CLI
A description eth1
N ImEthernet ImServices.eth1.eth1
A enabled true
A layer2SessionUser ImBridge.ImBridgeInterfaces.eth1
N ImChannels ImServices.eth1.eth1.ImChannels
N ImEtherChannel ImServices.eth1.eth1.ImChannels.item0
A port ethernet
N ImService ImServices.ipoa-0
A creator WebAdmin
A description 'AP MGMT'
N ImIpoa ImServices.ipoa-0.item0
A svc false
A atmarp here
A lifetime 60
A enabled true
A layer2SessionUser ImRouter.ImIpInterfaces.ipoa-0
N ImChannels ImServices.ipoa-0.item0.ImChannels
N ImAtmChannel ImServices.ipoa-0.item0.ImChannels.item0
A txVci 100
A rxVci 100
A pcr 2000
A class UBR
A port atm
N ImUsers ImUsers
N ImUser ImUsers.atmos
A username atmos
A password atmos
A comment 'Created by CLI'
A accessLevel superuser
A mayConfigure true
A mayDialIn true
A pppLoginAuth none
N ImRouter ImRouter
N ImIpInterfaces ImRouter.ImIpInterfaces
N ImIpInterface ImRouter.ImIpInterfaces.ip1
A ipaddr 192.168.1.1
A mask 255.255.255.0
A dhcp false
A mtu 1500
A enabled true
A layer2Session ImBridge
Axxcelera Broadband
AB-100 Manual
Version 5
Page 75 of 111
N ImTcpMssClamp ImRouter.ImIpInterfaces.ip1.ImTcpMssClamp
A enabled false
N ImRipVersions ImRouter.ImIpInterfaces.ip1.ImRipVersions
A acceptV1 false
A acceptV2 false
A sendV1 false
A sendV2 false
A sendMulticast false
N ImIpInterface ImRouter.ImIpInterfaces.ipoa-0
A ipaddr 192.168.2.1
A mask 255.255.255.252
A dhcp false
A mtu 1500
A realInterface ''
A enabled true
A layer2Session ImServices.ipoa-0.item0
N ImTcpMssClamp ImRouter.ImIpInterfaces.ipoa-0.ImTcpMssClamp
A enabled false
N ImRipVersions ImRouter.ImIpInterfaces.ipoa-0.ImRipVersions
A acceptV1 false
A acceptV2 false
A sendV1 false
A sendV2 false
A sendMulticast false
N ImRoutes ImRouter.ImRoutes
N ImIpV4Route ImRouter.ImRoutes.item0
A destination 192.168.100.0
A gateway 192.168.2.2
A netmask 255.255.255.0
A cost 1
A timeout 0
A interface ''
A advertise false
N ImIpV4Route ImRouter.ImRoutes.item1
A destination 192.168.3.64
A gateway 192.168.2.2
A netmask 255.255.255.248
A cost 1
A timeout 0
A interface ''
A advertise false
N ImPorts ImPorts
N ethernet ImPorts.ethernet
A resetDefaults false
N atm ImPorts.atm
A resetDefaults false
N ImWebserver ImWebserver
A httpPort 80
A upnpPort 2800
A telnetPort 23
A interface ip1
A enabled true
A mgmtIp 0.0.0.0
A archive //expand/isfs/derived_data.dat
A enableAuxillaryPort true
# end
Axxcelera Broadband
AB-100 Manual
Version 5
Page 76 of 111
Section 8
9 AB-100 / AB-Access CLIP_S system
The CLIP_S configuration will give you better small packet performance than CLIP_T, however
it is more difficult to convert an existing sector to CLIP_S. This is because the AB-100 only
allows one IP address per PVC. So each SU must be terminated to a different IP address, this
also requires that each wireless interface of each SU be assigned a new IP address. It is generally
preferable to use a 252 (/30) subnet mask for each SU.
192.168.5.2 /30
192.168.100.2
PVC
101
PVC
200
SU1
RL
RL
BL
BL
PVC 768
192.168.3.65 /29
SL
SL
E
A
MID 0
PVC
300
PVC 1024
LAN
MID 3
SU2
192.168.5.6 /30
RL
192.168.3.73 /29
BL
AB-100
AP 192.168.100.1 /30
SU1 192.168.5.1 /30
SU2 192.168.5.5 /30
LAN 192.168.1.1 /24 AP Management PVC
SL
E
MID 4
LAN
SU1 Data/Mgmt PVC
SU2 Data/Mgmt PVC
9.1 AB-Access Configuration Files
9.1.1 AP resolve
Axxcelera Broadband
AB-100 Manual
Version 5
Page 77 of 111
device add atm0 atm //bun mtu 1500 192.168.100.2
subnet add atm0.home . 192.168.100.0 ff:ff:ff:fc
rip send all none
rip accept all none
route add default 0.0.0.0 192.168.100.1 00:00:00:00 1 # MAN
relay all
ipatm lifetime 60
ipatm pvc atm0 atm25i 0/101 pcr 70000/70000 remoteip 192.168.100.1
9.1.2 AP system.conf
channel 0
antenna horizontal
mode static
mid 0
bid 0
interface atm0
backoff 0
provider abw
key Axxcelera
mask 1ffff
leds active
max_mid 254
9.1.3 AP initswitchcli
tp default UBR 2667
sp default 256 stats
add atm25m 0 768 atm25i 0 200 default default perm epd
add atm25i 0 200 atm25m 0 768 default default perm epd
add atm25m 0 1024 atm25i 0 300 default default perm epd
add atm25i 0 300 atm25m 0 1024 default default perm epd
Axxcelera Broadband
AB-100 Manual
Version 5
Page 78 of 111
9.1.4 SU1 resolve
device add eth0 ether //edd mtu 1500 192.168.3.65
device add atm1 atm //bun mtu 1500 192.168.5.2
subnet add eth0.home . 192.168.3.64 ff:ff:ff:f8
subnet add atm1.home . 192.168.5.0 ff:ff:ff:fc
rip send all none
rip accept all none
route add default 0.0.0.0 192.168.5.1 00:00:00:00 1 # MAN
relay all
ipatm lifetime 60
ipatm pvc atm1 atm25m 0/768 pcr 70000/70000 remoteip 192.168.5.1
9.1.5 SU1 system.conf
channel 0
antenna horizontal
mode static
mid 3
bid 0
interface eth0
duplex half
backoff 0
provider abw
key Axxcelera
mask 1ffff
leds active
9.1.6 SU2 resolve
Axxcelera Broadband
AB-100 Manual
Version 5
Page 79 of 111
device add eth0 ether //edd mtu 1500 192.168.3.65
device add atm1 atm //bun mtu 1500 192.168.5.6
subnet add eth0.home . 192.168.3.64 ff:ff:ff:f8
subnet add atm1.home . 192.168.5.4 ff:ff:ff:fc
rip send all none
rip accept all none
route add default 0.0.0.0 192.168.5.5 00:00:00:00 1 # MAN
relay all
ipatm lifetime 60
ipatm pvc atm1 atm25m 0/1024 pcr 70000/70000 remoteip 192.168.5.5
9.1.7 SU2 system.conf
channel 0
antenna horizontal
mode static
mid 4
bid 0
interface eth0
duplex half
backoff 0
provider abw
key Axxcelera
mask 1ffff
leds active
9.2 AB-100 icf config file
# Information Model configuration file
version 4
N ImIGMPProxy ImIGMPProxy
A forwardAll false
N ImRip ImRip
A hostRoutes false
A poison false
A authEnable false
Axxcelera Broadband
AB-100 Manual
Version 5
Page 80 of 111
A authPassword ''
A advertiseDefaultRoute false
A defaultRouteCost 1
N ImBridge ImBridge
A filterage 300
A enabled false
A layer2SessionUser ImRouter.ImIpInterfaces.ip1
N ImBridgeInterfaces ImBridge.ImBridgeInterfaces
N ImBridgeInterface ImBridge.ImBridgeInterfaces.eth1
A etherFilterType All
A portFilter All
A enabled false
N ImSpanningBridgeInterface
ImBridge.ImBridgeInterfaces.eth1.ImSpanningBridgeInterface
A enabled false
A priority 128
A pathCost 10
N ImBridgeInterface ImBridge.ImBridgeInterfaces.eth1
A etherFilterType All
A portFilter All
A enabled true
A layer2Session ImServices.eth1.eth1
N ImSpanningBridgeInterface
ImBridge.ImBridgeInterfaces.eth1.ImSpanningBridgeInterface
A enabled false
A priority 128
A pathCost 10
N ImSpanningBridgeConfig ImBridge.ImSpanningBridgeConfig
A spanning false
A spanPriority 32768
A helloTime 2
A maxAge 20
A forwardDelay 15
N ImDhcpClient ImDhcpClient
A reboot 10
A retry 300
A backoffCutoff 120
N ImDhcpServer ImDhcpServer
A defaultLeaseTime 43200
A allowBootp true
A maxLeaseTime 86400
A allowUnknownClients true
A enabled false
N ImDhcpRelay ImDhcpRelay
A enabled false
N ImDnsRelay ImDnsRelay
A relayDomainName ''
N ImDnsClient ImDnsClient
N ImFireWall ImFireWall
A security_enable false
A firewall_level none
A firewall_enable false
A IDS false
A ClearIDSBlacklist true
A sessionlog true
A blockinglog true
A IntrusionLog false
Axxcelera Broadband
AB-100 Manual
Version 5
Page 81 of 111
N ImFwIDS ImFireWall.ImFwIDS
A UseBlackList false
A UseVictimProtection false
A DosAttackBlockDuration 1800
A ScanAttackBlockDuration 86400
A VictimProtectionBlockDuration 600
A MaxTcpOpenHandshakingCount 100
A MaxPingCount 15
A MaxICMPCount 100
N ImProcessLogFilters ImProcessLogFilters
N ImDevice ImDevice
A saveconfig false
N ImServices ImServices
N ImService ImServices.eth1
A creator CLI
A description eth1
N ImEthernet ImServices.eth1.eth1
A enabled true
A layer2SessionUser ImBridge.ImBridgeInterfaces.eth1
N ImChannels ImServices.eth1.eth1.ImChannels
N ImEtherChannel ImServices.eth1.eth1.ImChannels.item0
A port ethernet
N ImService ImServices.ipoa-0
A creator WebAdmin
A description 'AP MGMT'
N ImIpoa ImServices.ipoa-0.item0
A svc false
A atmarp here
A lifetime 60
A enabled true
A layer2SessionUser ImRouter.ImIpInterfaces.ipoa-0
N ImChannels ImServices.ipoa-0.item0.ImChannels
N ImAtmChannel ImServices.ipoa-0.item0.ImChannels.item0
A txVci 101
A rxVci 101
A pcr 2000
A class UBR
A port atm
N ImService ImServices.ipoa-1
A creator WebAdmin
A description 'SU1 Data'
N ImIpoa ImServices.ipoa-1.item0
A svc false
A atmarp here
A lifetime 60
A enabled true
A layer2SessionUser ImRouter.ImIpInterfaces.ipoa-1
N ImChannels ImServices.ipoa-1.item0.ImChannels
N ImAtmChannel ImServices.ipoa-1.item0.ImChannels.item0
A txVci 200
A rxVci 200
A pcr 2000
A class UBR
A port atm
N ImService ImServices.ipoa-2
A creator WebAdmin
A description 'SU2 Data'
Axxcelera Broadband
AB-100 Manual
Version 5
Page 82 of 111
N ImIpoa ImServices.ipoa-2.item0
A svc false
A atmarp here
A lifetime 60
A enabled true
A layer2SessionUser ImRouter.ImIpInterfaces.ipoa-2
N ImChannels ImServices.ipoa-2.item0.ImChannels
N ImAtmChannel ImServices.ipoa-2.item0.ImChannels.item0
A txVci 300
A rxVci 300
A pcr 2000
A class UBR
A port atm
N ImUsers ImUsers
N ImUser ImUsers.atmos
A username atmos
A password atmos
A comment 'Created by CLI'
A accessLevel superuser
A mayConfigure true
A mayDialIn true
A pppLoginAuth none
N ImRouter ImRouter
N ImIpInterfaces ImRouter.ImIpInterfaces
N ImIpInterface ImRouter.ImIpInterfaces.ip1
A ipaddr 192.168.1.1
A mask 255.255.255.0
A dhcp false
A mtu 1500
A enabled true
A layer2Session ImBridge
N ImTcpMssClamp ImRouter.ImIpInterfaces.ip1.ImTcpMssClamp
A enabled false
N ImRipVersions ImRouter.ImIpInterfaces.ip1.ImRipVersions
A acceptV1 false
A acceptV2 false
A sendV1 false
A sendV2 false
A sendMulticast false
N ImIpInterface ImRouter.ImIpInterfaces.ipoa-0
A ipaddr 192.168.100.1
A mask 255.255.255.252
A dhcp false
A mtu 1500
A realInterface ''
A enabled true
A layer2Session ImServices.ipoa-0.item0
N ImTcpMssClamp ImRouter.ImIpInterfaces.ipoa-0.ImTcpMssClamp
A enabled false
N ImRipVersions ImRouter.ImIpInterfaces.ipoa-0.ImRipVersions
A acceptV1 false
A acceptV2 false
A sendV1 false
A sendV2 false
A sendMulticast false
N ImIpInterface ImRouter.ImIpInterfaces.ipoa-1
A ipaddr 192.168.5.1
Axxcelera Broadband
AB-100 Manual
Version 5
Page 83 of 111
N
N
N
N
N
N
N
N
N
N
N
N
A mask 255.255.255.252
A dhcp false
A mtu 1500
A realInterface ''
A enabled true
A layer2Session ImServices.ipoa-1.item0
ImTcpMssClamp ImRouter.ImIpInterfaces.ipoa-1.ImTcpMssClamp
A enabled false
ImRipVersions ImRouter.ImIpInterfaces.ipoa-1.ImRipVersions
A acceptV1 false
A acceptV2 false
A sendV1 false
A sendV2 false
A sendMulticast false
ImIpInterface ImRouter.ImIpInterfaces.ipoa-2
A ipaddr 192.168.5.5
A mask 255.255.255.252
A dhcp false
A mtu 1500
A realInterface ''
A enabled true
A layer2Session ImServices.ipoa-2.item0
ImTcpMssClamp ImRouter.ImIpInterfaces.ipoa-2.ImTcpMssClamp
A enabled false
ImRipVersions ImRouter.ImIpInterfaces.ipoa-2.ImRipVersions
A acceptV1 false
A acceptV2 false
A sendV1 false
A sendV2 false
A sendMulticast false
ImRoutes ImRouter.ImRoutes
ImIpV4Route ImRouter.ImRoutes.item0
A destination 192.168.3.64
A gateway 192.168.5.2
A netmask 255.255.255.248
A cost 1
A timeout 0
A interface ''
A advertise false
ImIpV4Route ImRouter.ImRoutes.item1
A destination 192.168.3.72
A gateway 192.168.5.6
A netmask 255.255.255.248
A cost 1
A timeout 0
A interface ''
A advertise false
ImPorts ImPorts
ethernet ImPorts.ethernet
A resetDefaults false
atm ImPorts.atm
A resetDefaults false
ImWebserver ImWebserver
A httpPort 80
A upnpPort 2800
A telnetPort 23
A interface ip1
Axxcelera Broadband
AB-100 Manual
Version 5
Page 84 of 111
# end
A
A
A
A
enabled true
mgmtIp 0.0.0.0
archive //expand/isfs/derived_data.dat
enableAuxillaryPort true
Axxcelera Broadband
AB-100 Manual
Version 5
Page 85 of 111
Section 9
10 AB-100 / AB-Access Native_ATM (Backhaul) System
PVC 768
192.168.2.2 /30
RL
PVC
99
192.168.100.3
192.168.100.1
BL
SL
A
MID 0
PVC
769
RL
192.168.9.2
BL
PVC 200
PVC
99
SL
A
MID 3
PV C
200
AB-100
AP/SU Management PVC
AB-100
SU Data PVC
SU 192.168.9.1 /30
LAN 192.168.1.2
AP 192.168.2.1 /30
LAN 192.168.1.1
10.1 AB-Access Configuration Files
10.1.1
AP resolve
Axxcelera Broadband
AB-100 Manual
Version 5
Page 86 of 111
device add atm0 atm //bun mtu 1500 192.168.2.2
device add atm1 atm //bun mtu 1500 192.168.100.1
subnet add atm0.home . 192.168.2.0 ff:ff:ff:fc
subnet add atm1.home . 192.168.100.0 ff:ff:ff:00
rip send all none
rip accept all none
route add default 0.0.0.0 192.168.2.1 00:00:00:00 1 # MAN
relay all
ipatm lifetime 60
ipatm pvc atm0 atm25i 0/99 pcr 70000/70000 remoteip 192.168.2.1
ipatm pvc atm1 atm25m 0/768 pcr 70000/70000 remoteip 192.168.100.3
10.1.2
AP system.conf
channel 0
antenna horizontal
mode static
mid 0
bid 0
interface atm0
backoff 0
provider abw
key Axxcelera
mask 1ffff
leds active
10.1.3
AP initswitchcli
tp default UBR 70000
sp default 256 stats
add atm25m 0 769 atm25i 0 200 default default perm epd
add atm25i 0 200 atm25m 0 769 default default perm epd
Axxcelera Broadband
AB-100 Manual
Version 5
Page 87 of 111
10.1.4
SU resolve
device add atm0 atm //bun mtu 1500 192.168.9.2
device add atm1
atm //bun mtu 1500 192.168.100.3
subnet add atm1.home . 192.168.100.0 ff:ff:ff:00
subnet add atm0.home . 192.168.9.0 ff:ff:ff:fc
rip send all none
rip accept all none
route add default 0.0.0.0 192.168.100.1 00:00:00:00 1 # MAN
relay all
ipatm lifetime 60
ipatm pvc atm0 atm25i 0/99 pcr 70000/70000 remoteip 192.168.9.1
ipatm pvc atm1 atm25m 0/768 pcr 70000/70000 remoteip 192.168.100.1
10.1.5
SU system.conf
channel 0
antenna horizontal
mode static
mid 3
bid 0
interface atm0
backoff 0
provider abw
key Axxcelera
mask 1ffff
leds active
Axxcelera Broadband
AB-100 Manual
Version 5
Page 88 of 111
10.1.6
SU initswitchcli
tp default UBR 70000
sp default 256 stats
add atm25m 0 769 atm25i 0 200 default default perm epd
add atm25i 0 200 atm25m 0 769 default default perm epd
10.2 AB-100 icf config file(AP)
# Information Model configuration file
version 4
N ImIGMPProxy ImIGMPProxy
A forwardAll false
N ImRip ImRip
A hostRoutes false
A poison false
A authEnable false
A authPassword ''
A advertiseDefaultRoute false
A defaultRouteCost 1
N ImBridge ImBridge
A filterage 300
A enabled false
A layer2SessionUser ImRouter.ImIpInterfaces.ip1
N ImBridgeInterfaces ImBridge.ImBridgeInterfaces
N ImBridgeInterface ImBridge.ImBridgeInterfaces.eth1
A etherFilterType All
A portFilter All
A enabled false
N ImSpanningBridgeInterface
ImBridge.ImBridgeInterfaces.eth1.ImSpanningBridgeInterface
A enabled false
A priority 128
A pathCost 10
N ImBridgeInterface ImBridge.ImBridgeInterfaces.eth1
A etherFilterType All
A portFilter All
A enabled true
A layer2Session ImServices.eth1.eth1
N ImSpanningBridgeInterface
ImBridge.ImBridgeInterfaces.eth1.ImSpanningBridgeInterface
A enabled false
A priority 128
A pathCost 10
N ImBridgeInterface ImBridge.ImBridgeInterfaces.rfc1483-0
A etherFilterType All
A portFilter All
A enabled true
Axxcelera Broadband
AB-100 Manual
Version 5
Page 89 of 111
A layer2Session ImServices.rfc1483-0.item0
N ImSpanningBridgeInterface ImBridge.ImBridgeInterfaces.rfc14830.ImSpanningBridgeInterface
A enabled false
A priority 128
A pathCost 10
N ImSpanningBridgeConfig ImBridge.ImSpanningBridgeConfig
A spanning false
A spanPriority 32768
A helloTime 2
A maxAge 20
A forwardDelay 15
N ImDhcpClient ImDhcpClient
A reboot 10
A retry 300
A backoffCutoff 120
N ImDhcpServer ImDhcpServer
A defaultLeaseTime 43200
A allowBootp true
A maxLeaseTime 86400
A allowUnknownClients true
A enabled false
N ImDhcpRelay ImDhcpRelay
A enabled false
N ImDnsRelay ImDnsRelay
A relayDomainName ''
N ImDnsClient ImDnsClient
N ImFireWall ImFireWall
A security_enable false
A firewall_level none
A firewall_enable false
A IDS false
A ClearIDSBlacklist true
A sessionlog true
A blockinglog true
A IntrusionLog false
N ImFwIDS ImFireWall.ImFwIDS
A UseBlackList false
A UseVictimProtection false
A DosAttackBlockDuration 1800
A ScanAttackBlockDuration 86400
A VictimProtectionBlockDuration 600
A MaxTcpOpenHandshakingCount 100
A MaxPingCount 15
A MaxICMPCount 100
N ImProcessLogFilters ImProcessLogFilters
N ImDevice ImDevice
A saveconfig false
N ImServices ImServices
N ImService ImServices.eth1
A creator CLI
A description eth1
N ImEthernet ImServices.eth1.eth1
A enabled true
A layer2SessionUser ImBridge.ImBridgeInterfaces.eth1
N ImChannels ImServices.eth1.eth1.ImChannels
N ImEtherChannel ImServices.eth1.eth1.ImChannels.item0
Axxcelera Broadband
AB-100 Manual
Version 5
Page 90 of 111
A port ethernet
N ImService ImServices.ipoa-0
A creator WebAdmin
A description 'AP MGMT'
N ImIpoa ImServices.ipoa-0.item0
A svc false
A atmarp here
A lifetime 60
A enabled true
A layer2SessionUser ImRouter.ImIpInterfaces.ipoa-0
N ImChannels ImServices.ipoa-0.item0.ImChannels
N ImAtmChannel ImServices.ipoa-0.item0.ImChannels.item0
A txVci 99
A rxVci 99
A class UBR
A port atm
N ImService ImServices.rfc1483-0
A creator WebAdmin
A description DATA
N ImRfc1483 ImServices.rfc1483-0.item0
A mode LlcBridged
A enabled true
A layer2SessionUser ImBridge.ImBridgeInterfaces.rfc1483-0
N ImChannels ImServices.rfc1483-0.item0.ImChannels
N ImAtmChannel ImServices.rfc1483-0.item0.ImChannels.item0
A txVci 200
A rxVci 200
A pcr 2000
A class UBR
A port atm
N ImUsers ImUsers
N ImUser ImUsers.atmos
A username atmos
A password atmos
A comment 'Created by CLI'
A accessLevel superuser
A mayConfigure true
A mayDialIn true
A pppLoginAuth none
N ImRouter ImRouter
N ImIpInterfaces ImRouter.ImIpInterfaces
N ImIpInterface ImRouter.ImIpInterfaces.ip1
A ipaddr 192.168.1.1
A mask 255.255.255.0
A dhcp false
A mtu 1500
A enabled true
A layer2Session ImBridge
N ImTcpMssClamp ImRouter.ImIpInterfaces.ip1.ImTcpMssClamp
A enabled false
N ImRipVersions ImRouter.ImIpInterfaces.ip1.ImRipVersions
A acceptV1 false
A acceptV2 false
A sendV1 false
A sendV2 false
A sendMulticast false
N ImIpInterface ImRouter.ImIpInterfaces.ipoa-0
Axxcelera Broadband
AB-100 Manual
Version 5
Page 91 of 111
N
N
N
N
N
N
N
N
#
A ipaddr 192.168.2.1
A mask 255.255.255.252
A dhcp false
A mtu 1500
A realInterface ''
A enabled true
A layer2Session ImServices.ipoa-0.item0
ImTcpMssClamp ImRouter.ImIpInterfaces.ipoa-0.ImTcpMssClamp
A enabled false
ImRipVersions ImRouter.ImIpInterfaces.ipoa-0.ImRipVersions
A acceptV1 false
A acceptV2 false
A sendV1 false
A sendV2 false
A sendMulticast false
ImRoutes ImRouter.ImRoutes
ImIpV4Route ImRouter.ImRoutes.item0
A destination 192.168.100.0
A gateway 192.168.2.2
A netmask 255.255.255.0
A cost 1
A timeout 0
A interface ''
A advertise false
ImPorts ImPorts
ethernet ImPorts.ethernet
A resetDefaults false
atm ImPorts.atm
A resetDefaults false
ImWebserver ImWebserver
A httpPort 80
A upnpPort 2800
A telnetPort 23
A interface ip1
A enabled true
A mgmtIp 0.0.0.0
A archive //expand/isfs/derived_data.dat
A enableAuxillaryPort true
end
10.3 AB-100 icf config file (SU)
# Information Model configuration file
version 4
N ImIGMPProxy ImIGMPProxy
A forwardAll false
N ImRip ImRip
A hostRoutes false
A poison false
A authEnable false
A authPassword ''
A advertiseDefaultRoute false
A defaultRouteCost 1
N ImBridge ImBridge
Axxcelera Broadband
AB-100 Manual
Version 5
Page 92 of 111
A filterage 300
A enabled false
A layer2SessionUser ImRouter.ImIpInterfaces.ip1
N ImBridgeInterfaces ImBridge.ImBridgeInterfaces
N ImBridgeInterface ImBridge.ImBridgeInterfaces.eth1
A etherFilterType All
A portFilter All
A enabled false
N ImSpanningBridgeInterface
ImBridge.ImBridgeInterfaces.eth1.ImSpanningBridgeInterface
A enabled false
A priority 128
A pathCost 10
N ImBridgeInterface ImBridge.ImBridgeInterfaces.eth1
A etherFilterType All
A portFilter All
A enabled true
A layer2Session ImServices.eth1.eth1
N ImSpanningBridgeInterface
ImBridge.ImBridgeInterfaces.eth1.ImSpanningBridgeInterface
A enabled false
A priority 128
A pathCost 10
N ImBridgeInterface ImBridge.ImBridgeInterfaces.rfc1483-0
A etherFilterType All
A portFilter All
A enabled true
A layer2Session ImServices.rfc1483-0.item0
N ImSpanningBridgeInterface ImBridge.ImBridgeInterfaces.rfc14830.ImSpanningBridgeInterface
A enabled false
A priority 128
A pathCost 10
N ImSpanningBridgeConfig ImBridge.ImSpanningBridgeConfig
A spanning false
A spanPriority 32768
A helloTime 2
A maxAge 20
A forwardDelay 15
N ImDhcpClient ImDhcpClient
A reboot 10
A retry 300
A backoffCutoff 120
N ImDhcpServer ImDhcpServer
A defaultLeaseTime 43200
A allowBootp true
A maxLeaseTime 86400
A allowUnknownClients true
A enabled false
N ImDhcpRelay ImDhcpRelay
A enabled false
N ImDnsRelay ImDnsRelay
A relayDomainName ''
N ImDnsClient ImDnsClient
N ImFireWall ImFireWall
A security_enable false
A firewall_level none
Axxcelera Broadband
AB-100 Manual
Version 5
Page 93 of 111
N
N
N
N
N
N
N
N
N
N
N
N
N
N
N
N
A firewall_enable false
A IDS false
A ClearIDSBlacklist true
A sessionlog true
A blockinglog true
A IntrusionLog false
ImFwIDS ImFireWall.ImFwIDS
A UseBlackList false
A UseVictimProtection false
A DosAttackBlockDuration 1800
A ScanAttackBlockDuration 86400
A VictimProtectionBlockDuration 600
A MaxTcpOpenHandshakingCount 100
A MaxPingCount 15
A MaxICMPCount 100
ImProcessLogFilters ImProcessLogFilters
ImDevice ImDevice
A saveconfig false
ImServices ImServices
ImService ImServices.eth1
A creator CLI
A description eth1
ImEthernet ImServices.eth1.eth1
A enabled true
A layer2SessionUser ImBridge.ImBridgeInterfaces.eth1
ImChannels ImServices.eth1.eth1.ImChannels
ImEtherChannel ImServices.eth1.eth1.ImChannels.item0
A port ethernet
ImService ImServices.ipoa-0
A creator WebAdmin
A description 'SU MGMT'
ImIpoa ImServices.ipoa-0.item0
A svc false
A atmarp here
A lifetime 60
A enabled true
A layer2SessionUser ImRouter.ImIpInterfaces.ipoa-0
ImChannels ImServices.ipoa-0.item0.ImChannels
ImAtmChannel ImServices.ipoa-0.item0.ImChannels.item0
A txVci 99
A rxVci 99
A class UBR
A port atm
ImService ImServices.rfc1483-0
A creator WebAdmin
A description DATA
ImRfc1483 ImServices.rfc1483-0.item0
A mode LlcBridged
A enabled true
A layer2SessionUser ImBridge.ImBridgeInterfaces.rfc1483-0
ImChannels ImServices.rfc1483-0.item0.ImChannels
ImAtmChannel ImServices.rfc1483-0.item0.ImChannels.item0
A txVci 200
A rxVci 200
A pcr 2000
A class UBR
A port atm
Axxcelera Broadband
AB-100 Manual
Version 5
Page 94 of 111
N ImUsers ImUsers
N ImUser ImUsers.atmos
A username atmos
A password atmos
A comment 'Created by CLI'
A accessLevel superuser
A mayConfigure true
A mayDialIn true
A pppLoginAuth none
N ImRouter ImRouter
N ImIpInterfaces ImRouter.ImIpInterfaces
N ImIpInterface ImRouter.ImIpInterfaces.ip1
A ipaddr 192.168.1.2
A mask 255.255.255.0
A dhcp false
A mtu 1500
A enabled true
A layer2Session ImBridge
N ImTcpMssClamp ImRouter.ImIpInterfaces.ip1.ImTcpMssClamp
A enabled false
N ImRipVersions ImRouter.ImIpInterfaces.ip1.ImRipVersions
A acceptV1 false
A acceptV2 false
A sendV1 false
A sendV2 false
A sendMulticast false
N ImIpInterface ImRouter.ImIpInterfaces.ipoa-0
A ipaddr 192.168.9.1
A mask 255.255.255.252
A dhcp false
A mtu 1500
A realInterface ''
A enabled true
A layer2Session ImServices.ipoa-0.item0
N ImTcpMssClamp ImRouter.ImIpInterfaces.ipoa-0.ImTcpMssClamp
A enabled false
N ImRipVersions ImRouter.ImIpInterfaces.ipoa-0.ImRipVersions
A acceptV1 false
A acceptV2 false
A sendV1 false
A sendV2 false
A sendMulticast false
N ImRoutes ImRouter.ImRoutes
N ImIpV4Route ImRouter.ImRoutes.item0
A destination 192.168.100.0
A gateway 192.168.9.2
A netmask 255.255.255.0
A cost 1
A timeout 0
A interface ''
A advertise false
N ImPorts ImPorts
N ethernet ImPorts.ethernet
A resetDefaults false
N atm ImPorts.atm
A resetDefaults false
N ImWebserver ImWebserver
Axxcelera Broadband
AB-100 Manual
Version 5
Page 95 of 111
# end
A
A
A
A
A
A
A
A
httpPort 80
upnpPort 2800
telnetPort 23
interface ip1
enabled true
mgmtIp 0.0.0.0
archive //expand/isfs/derived_data.dat
enableAuxillaryPort true
Axxcelera Broadband
AB-100 Manual
Version 5
Page 96 of 111
Section 10
11 Converting to ATM
Before you install the AB-100 at an existing sector you will need to convert the AP from a
terminated Ethernet configuration to an ATM configuration. All of these configuration changes
will be done on the AP and are slightly different for CLIP_T, CLIP_S and 1483_S modes. All
instructions use the AB-Express tool. For further instructions on how to use this tool refer to the
AB-Express User Manual.
11.1 CLIP_T
1.
2.
3.
4.
5.
6.
Open Retrieve AB Configuration.
Fill in current IP address of unit.
Enter the hostname that you want to refer to this unit by.
Enter the current password of the unit.
Select Retrieve Configuration.
Click on Submit.
7. Open Edit AB Configuration.
8. Fill in Hostname of AP that you want to edit.
9. Select Edit Configuration.
Axxcelera Broadband
AB-100 Manual
Version 5
Page 97 of 111
10. Click on Submit.
11. Edit the resolve file by changing the following lines…
a. Device
• OLD: device add eth0
ether //edd
mtu 1500 192.168.2.2
• New: device add atm0
atm //bun
mtu 1500 192.168.2.2
b. Subnet
• OLD: subnet add eth0.home
• New: subnet add atm0.home
. 192.168.2.0
. 192.168.2.0
ff:ff:ff:00
ff:ff:ff:00
c. Ipatm pvc
• Add: ipatmpvc add atm0 atm25m 0/100 pcr 70000/70000 remoteip
192.168.2.1
d. Relay
If the unit relay all then nothing needs to be changed. If the unit specifies specific
devices all relays need to be deleted and add relay all.
• Old:
relay eth0 eth0
relay eth0 atm1
relay atm1 atm1
•
New:
Axxcelera Broadband
relay all
AB-100 Manual
Version 5
Page 98 of 111
12. Edit the system.conf file with the following changes…
a. Interface
• Old: interface eth0
• New: interface atm0
13. Once files are edited and saved they are ready to upload to the AP by using Program AB
Unit.
Axxcelera Broadband
AB-100 Manual
Version 5
Page 99 of 111
14. Fill in the current IP address.
15. Enter the Hostname for the modified files.
16. Fill in the current unit password.
17. Select Reboot Now.
18. Click on Submit.
11.2 CLIP_S
1. Setup the AB-100 with all necessary configuration information.
2. Change all IP addresses information on all SUs in the sector. All wireless SU IP
addresses will need to be changed. The reason for this is that AB-100 can only bind 1
PVC to an IP address, so each SU must be on a separate subnet and terminated on a
different interface on AB-100. Contact your Axxcelera representative before converting
to CLIP_S if you do not fully understand how the IP addresses must be assigned.
3. Open Retrieve AB Configuration.
4. Fill in current IP address of unit.
5. Enter the hostname that you want to refer to this unit by.
6. Enter the current password of the unit.
7. Select Retrieve Configuration.
8. Click on Submit.
Axxcelera Broadband
AB-100 Manual
Version 5
Page 100 of 111
9. Convert the ipatm pvc information in the resolve file to the initswitchcli file. This is done
by the AB File Converter tool.
10. Fill in Hostname of AP that you want to convert.
11. Select Convert Resolve File.
Axxcelera Broadband
AB-100 Manual
Version 5
Page 101 of 111
12. Click on Submit.
13. Open Edit AB Configuration.
14. Fill in Hostname of AP that you want to edit.
15. Select Edit Configuration.
16. Click on Submit.
17. Edit the resolve file by changing the following lines…
a. Device
• OLD: device add eth0
ether //edd
mtu 1500 192.168.2.2
Axxcelera Broadband
AB-100 Manual
Version 5
Page 102 of 111
•
•
New: device add atm0
atm //bun
Delete: device delete atm1
mtu 1500 192.168.2.2
b. Subnet
• OLD: subnet add eth0.home
. 192.168.2.0
• New: subnet add atm0.home
. 192.168.2.0
• Delete: subnet delete atm0.home
ff:ff:ff:00
ff:ff:ff:00
c. Ipatm pvc
• Add: ipatm pvc add atm0 atm25m 0/100 pcr 70000/70000 remoteip
192.168.2.1
e. Relay
If the unit relay all then nothing needs to be changed. If the unit specifies specific
devices all relays need to be deleted and add relay all.
• Old:
relay eth0 eth0
relay eth0 atm1
relay atm1 atm1
•
New:
relay all
18. Edit the system.conf file with the following changes…
a. Interface
• Old: interface eth0
• New: interface atm0
Axxcelera Broadband
AB-100 Manual
Version 5
Page 103 of 111
17. Once files are edited and saved they are ready to upload to the AP by using Program AB
Unit.
18. Fill in the current IP address.
19. Enter the Hostname for the modified files.
20. Fill in the current unit password.
21. Select Reboot Now.
22. Click on Submit.
Axxcelera Broadband
AB-100 Manual
Version 5
Page 104 of 111
11.3 1483_S
1.
2.
3.
4.
5.
6.
Open Retrieve AB Configuration.
Fill in current IP address of unit.
Enter the hostname that you want to refer to this unit by.
Enter the current password of the unit.
Select Retrieve Configuration.
Click on Submit.
7. Convert the mr1483 information in the initmr1483 file to the initswitchcli file. This is
done by the AB File Converter tool.
8. Fill in Hostname of AP that you want to convert.
9. Select Convert mr1483 File.
Axxcelera Broadband
AB-100 Manual
Version 5
Page 105 of 111
10. Click on Submit.
11. Create the file TestAP.initr1483.
12. Create the file TestAP.initbridge.
Axxcelera Broadband
AB-100 Manual
Version 5
Page 106 of 111
13. Select Edit Configuration.
14. Click on Submit.
15. Edit the system.conf file with the following changes…
a. Interface
• Old: interface eth0
• New: interface atm0
Axxcelera Broadband
AB-100 Manual
Version 5
Page 107 of 111
17. Once files are edited and saved they are ready to upload to the AP by using Program AB
Unit.
18. Fill in the current IP address.
19. Enter the Hostname for the modified files.
20. Fill in the current unit password.
21. Select Reboot Now.
22. Click on Submit.
Axxcelera Broadband
AB-100 Manual
Version 5
Page 108 of 111
Section 12
12 Appendix
12.1 Ethernet port
RJ-45 Female
8 7 6 5 4 3 2 1
PIN
1
2
3
4
5
6
7
8
TYPE
OUTPUT
OUTPUT
INPUT
N/A
N/A
INPUT
N/A
N/A
SIGNAL
RX+
RXTX+
N/A
N/A
TXN/A
N/A
SIGNAL
TX+
TXRX+
N/A
N/A
RXN/A
N/A
Direction
Æ
Æ
Å
12.2 Ethernet cables
12.2.1
Straight
RJ-45 Male
8 7 6 5 4 3 2 1
12.2.2
PIN
1
2
3
4
5
6
7
8
Å
PIN
1
2
3
4
5
6
7
8
Cross-Over
Axxcelera Broadband
AB-100 Manual
Version 5
Page 109 of 111
RJ-45 Male
8 7 6 5 4 3 2 1
PIN
1
2
3
4
5
6
7
8
SIGNAL
TX+
TXRX+
N/A
N/A
RXN/A
N/A
Direction
Æ
Æ
Å
PIN
1
2
3
4
5
6
7
8
TYPE
INPUT
INPUT
N/A
N/A
N/A
N/A
OUTPUT
OUTPUT
SIGNAL
RX+
RXN/A
N/A
N/A
N/A
TX+
TX-
SIGNAL
RX+
RXN/A
N/A
N/A
N/A
TX+
TX-
Direction
Å
Å
PIN
3
6
1
4
5
2
7
8
Å
12.3 ATM port
RJ-45 Female
8 7 6 5 4 3 2 1
12.4 ATM cables
12.4.1
Straight
RJ-45 Male
8 7 6 5 4 3 2 1
Axxcelera Broadband
PIN
1
2
3
4
5
6
7
8
Æ
Æ
AB-100 Manual
Version 5
PIN
1
2
3
4
5
6
7
8
Page 110 of 111
12.4.2
Cross-Over
RJ-45 Male
8 7 6 5 4 3 2 1
Axxcelera Broadband
PIN
1
2
3
4
5
6
7
8
SIGNAL
RX+
RXN/A
N/A
N/A
N/A
TX+
TX-
Direction
Å
Å
Æ
Æ
AB-100 Manual
Version 5
PIN
7
8
3
4
5
6
1
2
Page 111 of 111