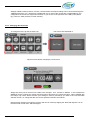
1
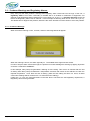
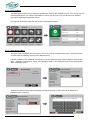
Q3 USER MANUAL Dairy Cheq Q3 – User Manual V2.2 October 2014 Preface Thank you for purchasing Dairy Cheq® Q3. We are confident that you will value the improved capabilities. We have developed Dairy Cheq Q3 with the experience of over 10,000 previously installed monitoring devices. You will quickly discover how effortlessly Dairy Cheq Q3 will save you time, milk and therefore money. This manual has been made for the end-user, the dairy producer. The manual aims to assist you in using your Dairy Cheq Q3 to its full range of capabilities. The new user interface will allow you to go through the different menus with ease and confidence. Please remember: You will get the most out of your investment by reading this manual in its entirety. Follow the instructions and suggestions in order to maximize the value of the data that Dairy Cheq Q3 can provide. Keep this manual in a dry location in the vicinity of the Q3 for quick reference. A copy of this manual will be available on the Dairy Cheq website - www.dairycheq.com Introducing Q3 Data Analyzer Software Dairy Cheq Q3 Data Analyzer software is available so you can easily transfer data stored in your Q3 to your PC. The software will also allow you to view and analyze your data in real-time as well as record and print your CQM Record 17. Please visit www.dairycheq.com for more information. Q3 Graphic Analysis CQM Record 17 Dairy Cheq® Q3 is a trademark of Dairy Cheq Inc. Page – 2 Dairy Cheq Q3 – User Manual V2.2 October 2014 Table of Contents: 1.0 Introduction ................................................................................................................... 4 1.1 Disclaimer ......................................................................................................... 4 2 Operation.......................................................................................................................... 5 2.0 General Information.......................................................................................... 5 2.1 Initial start-up of the Dairy Cheq Q3 ................................................................. 6 2.2 The Home (Main) Screen ................................................................................. 7 2.3. Producer Warnings and Regulatory Alarms ................................................... 8 2.3.1 Producer Warnings ............................................................................. 8 2.3.2 Regulatory Alarms .............................................................................. 9 2.4 Changing Language ……………………………………………………. .............. 10 2.5 Menu Choices .................................................................................................. 11 2.5.1 Pickup Report...................................................................................... 11 2.5.2 Sensors Menu ..................................................................................... 12 2.5.3 Alarm History....................................................................................... 12 2.5.4 Data and Reports ................................................................................ 13 2.5.5 Settings …………………………………………………………………… 13 2.5.6 Changing date and time ...................................................................... 15 Overview Producer setting menu chart ……………………………………….. 16 2.6 Other features ………………………………………………………………………. 17 2.6.1. Modem ……………………………………………………………………. 17 2.7 Operation with Milking Robots ……………………………………………………. 18 3 Table 1: Overview Producer Warnings ............................................................................ 20 Table 2: Overview Regulatory Alarms ............................................................................. 24 4 Troubleshooting .............................................................................................................. 27 5 Safety …….. ..................................................................................................................... 28 6 Transport and Storage .................................................................................................... 28 7 Maintenance ..................................................................................................................... 29 8 Waste Material ................................................................................................................. 29 9 Warning Symbols ............................................................................................................. 29 Appendices: A. Technical specifications ................................................................................................ 30 Dairy Cheq Q3 – User Manual V2.2 October 2014 Page - 3 1.0 - Introduction Dairy Cheq Q3 has been designed to monitor processes involved in the harvesting of milk on the farm. No matter what type of operation you may have, Dairy Cheq Q3 will monitor these processes accurately and reliably. Dairy Cheq Q3 is a powerful management tool for the producer and will help in shipping consistently high-quality milk from your farm. It is also an excellent tool for the dairy processor to recognize the highest possible quality of the milk collected. The Dairy Cheq Q3 monitors, among other things, the temperature of the milk during storage, the agitation process in the tank, as well as a number of cleaning conditions during the tank and pipe line cleaning processes. 1.1 - Disclaimer The area where Dairy Cheq Q3 will be installed must be clean and dry. Do not clean Dairy Cheq Q3 using running or high-pressure water. Any use of Dairy Cheq Q3, other than described in this manual, is strictly prohibited due to possible unforeseen hazardous situations. The area in which the Dairy Cheq Q3 is being used must be properly ventilated, clean and free of dust, caustic and corrosive gases and substances, and with air humidity between 10 and 90%. Power supply must also meet the specifications shown in the appendix. The unit operates on 100-240VAC power. We urge you to use caution with the electrical parts of Dairy Cheq Q3. A certified electrician is to provide the receptacle when applicable in your installation of Dairy Cheq Q3. A certified Dairy Cheq technician can assist you with the installation and start-up of the unit. The manufacturer will not assume any liability for adjustments or modifications made to the operation, principle or controls of the Dairy Cheq Q3. Any form of claim under warranty and manufacturer liability is excluded if any or all of the above terms and conditions are not adhered to. The producer will remain responsible for the storage of milk in the tank and consequently for the quality of the milk at all times. That is the reason why you should act appropriately on every “warning or alarm” message from Dairy Cheq Q3, check the temperature of the milk after every milking cycle, and visually inspect the cleanliness of the inside of the tank after every cleaning cycle. Dairy Cheq Inc. cannot be held responsible for any loss of milk. For further information, contact: Dairy Cheq Inc. 60 Northland Road, Unit 7A Waterloo, ON N2V 2B8 Canada Page – 4 Toll free: 1 866.849.3610 Local: 519.746.6150 Email: [email protected] www.dairycheq.com Dairy Cheq Q3 – User Manual V2.2 October 2014 2 - Operation 2.0 – General Information: 5 4 3 2 1 Dairy Cheq Q3 is equipped with a full colour touch screen. As in the picture above, the temperature of the milk in tank is clearly displayed and easy to read from a distance when entering the milk house. The screen colours give the following indication: Green indicates milk is in tank Blue indicates wash cycle Producer Warnings will be indicated with a yellow screen (see page 8) Regulatory Alarms will be indicated with a red screen (see page 9) As shown above, the side access panel allows easy and safe access to: 1. On/off button 2. Memory card 3. USB port 4. USB port 5. Breaker reset switch In normal operation the main front door of Dairy Cheq Q3, should remain closed at all times. Only a certified technician is allowed to work in the area where 100 – 240 VAC comes into Dairy Cheq Q3. Please do not open the front door of Dairy Cheq Q3. When not in use, the side door should also be securely closed to avoid any moisture, liquid and/or dust from entering into Dairy Cheq Q3. Dairy Cheq Q3 – User Manual V2.2 October 2014 Page - 5 Dairy Cheq Q3 can monitor the following processes based on the sensors installed: The cooling of the milk during and after milking The temperature of wash cycles for both the pipeline(s) and the tank(s) The functionality of the plate cooler(s) The agitation processes in the tank An indication of detergent in the wash water All these signals are logged and stored in the internal memory. These processes are monitored and compared to the boundaries that are established by settings in the unit. When boundaries are crossed, Dairy Cheq Q3 will generate either a producer warning, or a regulatory alarm. These are explained in chapter 2.3. 2.1 – Initial Start-up of the Dairy Cheq Q3 When Dairy Cheq Q3 is installed, a certified Dairy Cheq Technician installs the sensors and calibrates the tank sensor. When you first turn on and begin using the Dairy Cheq Q3, calibration has already been conducted by the technician and processes will be monitored. The unit is designed to monitor your milking processes 24/7, all year around. Therefore, the power needs to remain on at all times. If power is lost due to a power outage or a breaker fault in the main hydro panel, the unit will start up automatically when power resumes and or breaker is reset, assuming it wasn’t turned off. When power resumes, the screen will show a little figurine on the top left corner (the “Linux Penguin”) which indicates that the unit is being initialized. Within 30 – 60 seconds the main screen is displayed and immediately gives you the current data as well as the recent wash temperatures of the wash cycles. Attention! Dairy Cheq strongly recommends the installation of a 120 VAC surge protection between the receptacle and the plug of the power cord of the Dairy Cheq Q3. The closer this surge protector is to the unit, the lower the risk for lightning damage becomes. Note: There is no warranty on the unit when damage occurred due to a lightning strike or ill use of an emergency power generator. These events may be covered under your general insurance. Page – 6 Dairy Cheq Q3 – User Manual V2.2 October 2014 2.2 – The Home (Main) Screen: When all settings are within the boundaries and the milk in the tank is cooled to required temperature, the display screen of the Q3 will look like the image below. You can observe the following information: The date and time at the top left Language icon on the top right, which allows you to select the preferred language Milk is in the tank Current temperature is 3.6 Celsius (38 °F) The previous Tank wash (which impacts the quality of this milk) was 45.9 °C (115°F) The previous Pipe Line wash (which impacts the quality of this milk) was 54.4 °C (130 °F) The menu buttons at the bottom (from left to right): Pick up report: provides the data belonging to this tank of milk to the Bulk Tank Milk Grader Sensors: all information about the sensors is found here Alarm History: the most recent 100 alarms are stored here Data and reports: here you will be able to retrieve all kinds of data, both in numerical and graphical format. It can give an overview of the performance of the various systems in the milk house. Settings: these are the menus to set the various parameters. You will find that the service and regulatory settings are shielded by a password which changes daily. If your Q3 is set up to monitor 2 tanks, then the display screen will look like the image below: Dairy Cheq Q3 – User Manual V2.2 October 2014 Page - 7 2.3 – Producer Warnings and Regulatory Alarms: Dairy Cheq Q3 has both producer warnings and regulatory alarm levels built into the logic of the unit. A regulatory alarm occurs when a boundary is violated due to an incident or malfunction of equipment. For example; milk temperature during storage may not go below 0.5 °C (33 °F). A producer warning can be set before the Regulatory Alarm level is reached. In this example the warning level can be set at 1.0°C (34 °F). This allows time to diagnose the problem, determine the cause and take corrective action to solve the problem. 2.3.1 – Producer Warnings When a Producer warning occurs, a screen, similar to the image below will appear. When this warning is shown, the alarm light stay on. The audible alarm signal will also sound. In order to stop the alarm tone and the light, the producer must acknowledge the warning by tapping anywhere on the bar “TURN OFF WARNING”. In this example, Dairy Cheq Q3 generated a warning of slow cooling. This occurs 10 minutes after the end of milking when Dairy Cheq Q3 detected a temperature decrease that would not be sufficient to reach the required temperature 1 hour after the end of milking. (After the first milking this time is 2 hours, all other consecutive milkings will be monitored for 1 hr. after the end of milking). If after the 1 or 2 hrs. the milk temperature in the bulk tank is not below the set Regulatory requirement, a Regulatory alarm will be generated. Page – 8 Dairy Cheq Q3 – User Manual V2.2 October 2014 When the warning is acknowledged the following screen will be displayed. The alarm sound will stop and the alarm light will turn off. To go back to the main screen tap the “GO BACK TO HOME” button. This will bring you straight back to the main screen as shown on page 7. For more information related to the warning, tap the “MORE INFO ON ALARM” button. All producer warnings are displayed the same way as the “slow cooling” warning. In the table on pages 18- 22 you can find an overview of all the warnings, their settings and the description of these warnings. In this table you can also find a list of possible causes and solutions. 2.3.2 – Regulatory Alarms When a Regulatory Alarms occurs, a screen similar to the image below will appear. When an alarm occurs, the alarm light will blink on and off. The audible alarm signal will sound. In order to stop the alarm tone and the alarm light, the producers must acknowledge the alarm by tapping anywhere on the bar “TURN OFF ALARM”. Dairy Cheq Q3 – User Manual V2.2 October 2014 Page - 9 When the bar “TURN OFF ALARM” is touched, the following screen will be displayed. The warning sound will stop and the light will turn off. All alarms are displayed the same as this “POWER OUTAGE” warning. In the table on pages 23-24 you can find an overview of all the alarms, their settings and the description of these warnings. In this table you can also find a list of possible causes and solutions. To go back to the main screen, tap “GO BACK TO HOME” button. This will bring you straight back to the main screen as shown on page 7. For more information related to the alarm, touch the “MORE INFO ON ALARM” button. 2.4 – Changing language in the main screen The language can be changed by tapping the language icon. The next screen will be displayed as follows: Tap on the up or down button to find the language required – English, French or Spanish - and tap “SAVE SETTING” to save your selection and bring you back to the main screen. Tapping the “CANCEL” button will return you to the main screen without saving changes. Page – 10 Dairy Cheq Q3 – User Manual V2.2 October 2014 2.5 - The menu icons: The icons on the bottom will guide you to the specific menus as mentioned. The five menus contain the following information: 2.5.1 - Pickup Report Menu Pickup Report provides the following information for the Bulk Tank Milk Grader current temperature of the milk in the tank wash temperatures of both pipeline and tank any Regulatory Alarms that occurred during the harvest of this tank of milk If your Q3 monitors 2 tanks, you will be prompted to select which tank you wish to see the pickup report for, as per the image below: Dairy Cheq Q3 – User Manual V2.2 October 2014 Page - 11 2.5.2 – Sensors Menu This menu gives present sensor readings regarding the status of the installed sensors. You can tap the icon for the specific sensor you need the information on. When you tap on an icon you will see more detailed information regarding that particular sensor. For example, information about the tank sensor is displayed as follows: 2.5.3 – Alarm History Menu 2.5.3 – Alarm History Menu The most recent 100 alarms and warnings are shown and can be reviewed in this menu. The date and time for each alarm and warning occurrence are displayed here. It is also possible to view additional information such as the notes that were made in relation to that specific alarm. Tapping on the Alarm i.e. “MILK TOO WARM IN TANK 1” on the left side of the screen, displays the alarm information screen. Tapping the “ADD A NOTE” button will display the keyboard screen so that notes can be added for a particular alarm or warning. Page – 12 Dairy Cheq Q3 – User Manual V2.2 October 2014 It could be useful to add a note to this alarm for future reference. In some regions it is mandatory to show corrective action against Regulatory Alarms. With this function the producer can store it right on their Dairy Cheq Q3. If an audit takes place and the Regulatory Alarms are downloaded, the notes belonging to the Regulatory Alarms will be shown conveniently beside the specific Regulatory Alarms. With Dairy Cheq Q3 Data Analyzer software you can easily download the information stored in Q3. Using the USB port located on the side panel of Q3, you can transfer data to your PC to review all your data with customizable views. Please visit www.dairycheq.com for more information. 2.5.4- Data and Reports In “Data and Report” menu you will be able to retrieve data in numerical and graph form. For example, tapping on the the tank icon will graphically display the tank temperature history. Graphs can also be displayed for pipelines. 2.5.5– Settings This menu allows access to the settings of Dairy Cheq Q3. They are divided in three levels of accessibility 1. User level 2. Service level 3. Regulatory level For example: To modify settings related to the Tank Cooling. Tap on the “Tank Cooling” icon in this menu will display the “Tank cooling settings” screen: Dairy Cheq Q3 – User Manual V2.2 October 2014 Page - 13 Tapping on the setting information i.e. “Tank 1 Start Cooling Time” on the left side of screen will bring you to the next screen that allows you to modify the boundary for this producer warning. The same steps can be followed in changing “user” settings for other parameters in this menu. All other menus are displayed in the same manner. An overview of all the producer settings can be found on page 16. The User level parameters are accessible for the user without any restrictions. Service and regulatory (REG) settings are restricted by passwords that change daily. Tapping on the Service or REG button will reveal the password screen. Additional Sensors Icon: Page – 14 Dairy Cheq Q3 – User Manual V2.2 October 2014 Settings related to water pressure, vacuum, communication and import settings can be accessed through the “Additional Sensors” icon. Note that is possible that one or more of the choices are not applicable for your configuration as the sensors might not have been in your choice of the purchase of the Dairy Cheq Q3 kit. (E.g. Vacuum, water pressure or other sensors) 2.5.6 - Changing date and Time: To change the time, tap the set clock icon. The next screen displayed is: Tap the set time button to display the next screen. . Simply tap which part in the time box needs to be changed: hour, minutes or AM/PM. In this example the AM/PM is chosen. Change the values with the arrows to decrease or increase the value. When satisfied with the change, tap “Save” which will save your settings in memory and brings you back to the Time and Date selection screen. To change the date, the service password needs to be entered. Note that time changes are logged in memory and can be viewed by tapping the “Data and Reports” icon on the home/main screen then “Clock Changes”. Dairy Cheq Q3 – User Manual V2.2 October 2014 Page - 15 Overview Producer Settings Menus Number 1 4 5 23 24 25 26 27 28 29 30 31 32 33 56 57 58 59 60 61 66 79 80 97 107 108 109 110 111 112 117 130 131 148 177 178 206 207 235 236 264 265 Page – 16 Name-English Hour Format Language Temperature Units Maximum Milk Temperature Minimum Milk Temperature Minimum Milk Temperature Evaluation Period Maximum Blend Temperature Maximum Blend Temperature Evaluation Period Max Cooling Time from Beginning of Milking Max Cooling Time from End of First Milking Max Cooling Time from End of 2nd Milking Maximum Non Agitation time Maximum Continuous Agitation Time Maximum Power Off Time Tank 1 Start Cooling Time Tank 1 No Fill Time Tank 1 No Clean Time Tank 1 Max Cooling Time From Beginning of Milking Tank 1 Minimum Wash Temperature Tank 1 Minimum Wash Time Tank 1 Washing Time Tank 1 Minimum Soap Level Tank 1 Minimum Acid Level Tank 1 First Milking Agitation Alarm Delay Tank 2 Start Cooling Time Tank 2 No Fill Time Tank 2 No Clean Time Tank 2 Max Cooling Time From Beginning of Milking Tank 2 Minimum Wash Temperature Tank 2 Minimum Wash Time Tank 2 Washing Time Tank 2 Minimum Soap Level Tank 2 Minimum Acid Level Tank 2 First Milking Agitation Alarm Delay Pipe 1 Minimum Soap Level Pipe 1 Minimum Acid Level Pipe 2 Minimum Soap Level Pipe 2 Minimum Acid Level Pipe 3 Minimum Soap Level Pipe 3 Minimum Acid Level Pipe 4 Minimum Soap Level Pipe 4 Minimum Acid Level Subsection of Settings menu General General General Tank Cooling Tank Cooling Tank Cooling Tank Cooling Tank Cooling Tank Cooling Tank Cooling Tank Cooling Tank Cooling Tank Cooling General Tank Cooling Tank Cooling Tank Wash Permission Level Producer Producer Producer Producer Producer Producer Producer Producer Producer Producer Producer Producer Producer Producer Producer Producer Producer Tank Cooling Tank Wash Tank Wash Tank Wash Conductivity Acid Tank Cooling Tank Cooling Tank Cooling Tank Wash Producer Producer Producer Producer Producer Producer Producer Producer Producer Producer Tank Cooling Tank Wash Tank Wash Tank Wash Conductivity Acid Tank Cooling Conductivity Acid Conductivity Acid Conductivity Acid Conductivity Acid Producer Producer Producer Producer Producer Producer Producer Producer Producer Producer Producer Producer Producer Producer Producer Dairy Cheq Q3 – User Manual V2.2 October 2014 2.6 Other Features: 2.6.1. Modem In order for Dairy Cheq Q3 to send you alerts when an alarm occurs, you need to tell it what phone numbers or email addresses you want the messages to be sent to. You also need to enable the email and/or SMS service. To enter a phone number, navigate to Settings Additional Sensors Communications. You will need to contact Dairy Cheq and get the service password for the day. Enter the password and go into the Service Menu. You may enter up to 5 phone numbers and email addresses by tapping on setting 11 through 15 and 18 through 22 respectively. SMS and email may be enabled by changing menus 10 “SMS Enabled” and 16 “Email Enabled” from No to Yes. Menu 17 “Email Server” is not currently used. If you are not receiving SMS or email messages after enabling the features, navigate to Sensors Connectivity Modem. The third line “RSSI (BARS)” should be at 3,4 or 5. If it is at 0,1 or 2, you will need to contact Dairy Cheq to discuss if your modem can be moved to another location to improve cellular reception. Please note that notications require a cellular network connection, which is not operated by Daiy Cheq. We recommend to check Dairy Cheq Q3’s modem status screen periodically. Dairy Cheq Q3 – User Manual V2.2 October 2014 Page - 17 2.7 Operation with milking robots: Q3 Operation with Milking Robots: The Q3 is designed to work with milk parlours, tie-stalls and up to 6 milking robots. The overall operation of the unit is very similar in each of these cases and the user will not experience any great difference in how to navigate the menus and what information is available. However, there are some important differences in regards to the internal operation that affect what conditions may trigger alarms and what signals are required during installation. Q3 Alarm Differences – Robot vs other installations: MILK TOO WARM ALARM: In Canada, milk must be cooled below 5C within 2 hours of the end of a first milking and within 1 hour of the end of a subsequent milking. However, in a robot setup, there is no “end of milking” in the conventional sense since robots can milk almost continuously. For this reason, a Q3 configured for Robot operation will monitor milk cooling from the moment that milk firsts enters an empty tank. Measured from that moment, the milk in the tank must be cooled below 5C within 4 hours. If a robot enters wash mode after these initial 4 hours plus 1 additional hour (i.e. 5 hours total) have passed, then that moment is considered to be the end of the first milking cycle. Once the robot exits its wash cycle, a subsequent milking cycle begins. From the beginning of the subsequent milking cycle, the milk must again be cooled to below 5C within 4 hours. SLOW COOLING WARNING: In milk parlour and tie-stall setups, the slow cooling warning was based on a prediction from the end of milking that the milk would not be cooled fast enough to prevent a “milk too warm” alarm or warning. Since the “End of Milking” is not used to determine “milk too warm” conditions for a robot setup, the slow cooling warning is not active in robot mode BLEND TEMPERATURE TOO HIGH ALARM: This alarm occurs if the milk temperature is over 10C on a subsequent milking. The Q3 will determine that the tank is in a subsequent milking mode if a robot has entered and exited wash mode and milk has been in the tank for at least 5 hours. TOO MUCH AGITATION ALARM: In milk parlour and tie-stall setups, the “Too Much Agitation” alarm is triggered if the vacuum is off and there has been continuous agitation in the tank for 5 hours. The reason for requiring the vacuum to be off is that during milking, the vacuum would be on and agitation could occur continuously as the cooling system is running. However, once milking has completed, the vacuum would be off and cooling should be completed within 2 hours. Therefore, if the vacuum is off (thus milking has finished) but if agitation continued for 5 hours, it is highly likely that there is a problem with the agitation timer or the cooling system. As in other cases listed above, there is no equivalent “non-milking time” for a robot system and there is no vacuum signal to monitor when milking is not happening. Therefore, in a robot setup, the “Too Much Agitation” alarm will only trigger if the milk temperature is below 5C and the agitation has been on continuously for 5 hours. NO COOLING DETECTED / START COOLING WARNING: The No Cooling Detected warning serves as a reminder to producers to start their cooling system when working in a milk parlour or tie-stall setup. Since the cooling initiation is automated in robotic milking setups, this warming is not active in robot mode. NO MILK DETECTED WARNING: The No Milk Detected warning serves as a warning to producers to check if the tank valve is open if the vacuum has been on for a certain amount of time and no milk has been detected in the tank. Since the valve control is automated and there is no vacuum signal in a robotic milking setup, this warning is not active in robot mode. Q3 Milking Times – Robot versus other installations In a parlour or tie-stall setup, the start of milking is detected if the vacuum has been on for at least 30 minutes and milk has been detected in the tank. The end of milking is detected when the vacuum is turned off. Since a robot setup does not have a vacuum sensor, a different method had to be used. If the tank is empty and clean, then the milk start time is judged as the moment that milk is detected in the tank. If milk has been in the tank for at least 5 hours and then a robot enters wash mode, that moment is judged as the end of the first milking period. When the robot exits wash mode, that moments is the start of the Page – 18 Dairy Cheq Q3 – User Manual V2.2 October 2014 subsequent milking period. The end of the subsequent milk period will be judged as the moment, at least 5 hours later that a robot enters wash mode. Q3 Robot Installation When a Q3 is installed in a robot setup, the main difference versus a parlour or tie-stall setup is that no vacuum sensor is used and that, instead, a wash signal must be supplied from a robot. In Ontario, each individual robot pipeline must be monitored using a pipeline sensor and, a wash signal must be supplied from each robot. If 1, 2, or 3 robots are to be monitored, then all the signals are run into the Q3 enclosure. If 4 to 6 robots are to be monitored, then an additional expansion box must be installed to accept the additional sensors. The Q3 is also capable of monitoring the milk and wash cycles of buffer tanks. If a buffer tank is to be monitored, then the additional expansion box must be installed. Please note that a single expansion box is sufficient to monitor 4 to 6 robots AND a buffer tank. Dairy Cheq Q3 – User Manual V2.2 October 2014 Page - 19 3. Table 1: Overview Producer Warnings # 1 2 3A Page – 20 Name of Producer Warning Slow Cooling Blend temperature too high Milk too warm More details For milking times 4hrs: a prediction that milk will not reach 5°C (or 45°F) 120 minutes after the end of the 1st milking or 60 minutes after the end of the 2nd+ milkings Possible causes Cooling stopped functioning properly or not at all, possibly due to: Cooler not turned on Power outage or breaker switch Freon pressure low Blockage of cooling radiators with dust and/ or dirt Plate cooler malfunction during milking Radiator inlet doors closed or blocked Cooling capacity is unable to keep milk temperatures Warning that the milk temperature is below 11°C or 50°F, > 10°C for more possibly due to: than 15 minutes All compressors not during a 2nd milking turned on or not Milk temperature is functioning properly > 50°F for more Power outage or breaker switch than 15 minutes (Only on 2nd milking) Freon pressure low Blockage of cooling radiators Plate cooler malfunction during milking Milk temperature Same as above has been over 4.5ºC(Canadian Regulations) 45°F (US Regulations) for more than two hours after the first milking cycle or more than 4 hours from the beginning of milking for Milkings that go beyond this time OR milk temperature has been over 4.5°C for more than one hour after any subsequent milking cycle Possible solutions Check if cooler is running Check compressor level Check radiator on cleanliness and free access of air Check functioning of plate cooler when applicable Note: Always have trained personal do the repair on cooling equipment and/ or electrical components Check if cooler is turned on Check if breaker is tripped Check Freon pressure Check that cooling radiators are cleaned Check the functionality of plate cooler – cleanliness, valves, etc Settings (Here you can change the level on which the alarm will occur. The range and default values are displayed in this menu) Default: 5°C or 45°F 180 min Setting range: 1 -5°C, 3445°F Time range: 1-300 min Default: 10 °C or 50°F for 15 min. Setting range: 1-40°C or 34104°F Time evaluation time range: 1-300min Default: 5.0 °C or 41°F Same as above Dairy Cheq Q3 – User Manual V2.2 October 2014 OR over 11°C (52°F) 1 hour after the end of milking 3B 4 5 6 7 Tank temperatures dropped too low that could lead to freezing of milk on tank surfaces. Low temperatures possibly due to: Low volume of milk in tank when tank is on full cooling capacity Too little agitation or no during cooling of low volumes of milk Thermostat set too low Faulty thermostat Milk too cold Milk temperature is lower than 1°C or 34 °F for more than 15 minutes Insufficient agitation Failure to turn on agitation while milking One of multiple agitators has stopped working Less than 4 minutes of agitation Mechanical breakage of detected during a agitator(s): sheared pins, period of 70 gear boxes, broken minutes paddle Timer mechanism of agitator(s) is(are) malfunctioning Adjust setting on thermostat Replace thermostat Check for proper agitation action in the tank Turn on cooler Check (both) agitator(s) shaft(s) turning Check that milk is properly agitated inside tank Check agitator assembly Check functioning of timer Default: 1°C or 33.9°F Setting range: 0°C - 5°C or 32°F- 41°F Default: 4 minutes during a period of 70 minutes Setting range: 0-60 minutes of agitation during a period of 10-300 min Slow cooling (if agitation and cooling are linked) Timer mechanism of agitator is bad (causing agitation to stay on) Manual Switch is on Check if setting is on timer (no manual) Service agitation system Check proper fucnctioning of the cooler Default: 300 min Setting range: 10-900 min Too much agitation Agitation has been continuous for more than 300 minutes and vacuum is not on (between milking periods) Tank empty too long without washing 120 minutes have passed since milk was picked up and tank wash has not started yet Tank washing was not initiated Tank washing was initiated but washer malfunctioned Circulation pump malfunctioned Start the wash Check functioning of the washer unit Check functioning of the circulation pump Default: 80 Hrs Setting range: 12 -100 hrs Maximum conductivity of hot wash cycle was less than set value (Default=20) Detergent barrel empty Pinched hose Hole on line Fuse blown (automatic washer) Orientation of sensor cup and sensor probes Dirty probes – i.e. calcium build up Broken or nicked wire Check supply barrels Check equipment Clean probes with soft brush if needed Check wiring from sensor to the Q3 unit Pending on the type of soap and the instructions of the soap supplier, settings value should be over 25 after a successful wash Insufficient soap during tank wash Dairy Cheq Q3 – User Manual V2.2 October 2014 Page - 21 8 Insufficient soap during pipe wash 9 No Pipeline cleaning detected 10 Tank 1 sensor fault detected 11 12 13 14 Page – 22 Maximum conductivity detergent was less than than set value (Default=20) No pipe wash detected within 1 hour of the end of milking Temp reading has been too high or too low for 15 minutes >85°C or < -5°C OR Sensor has failed No pipe wash detected 18 hrs have passed since last pipeline wash Pipe 1 sensor fault detected Temperature reading >85°C (185 °F ) or < -5°C (23 °F) for 15 minutes Vacuum sensor fault detected No cooling detected No change in sensor reading for 24 hours During 1st milking, if milk temperature is >14°C(57°F) after 30 minutes after the tank sensor detects milk and there was not a 0.5°C- 0.8°C within the last 10 minutes OR tank temperature >45°F for more than 15 minutes without agitation Detergent barrel empty Pinched hose Hole on line Fuse blown (automatic washer) Orientation of sensor cup and sensor probes Dirty probes – i.e. calcium build up Broken or nicked wire Check supply barrels with detergent Check equipment Clean probes with soft brush if needed Check wiring from sensor to the Q3 unit Pending on the type of detergent and the instructions of the soap supplier, settings value should be over 25 after a successful wash Wash was not initiated Power Outage Malfunction of pump Check if power is present Check functions Default 80hrs Setting range: 12 -100 hrs Call Dealer Delayed pipe wash due to increased milking time Skipped pipeline wash Pipeline wash started, but system trapped out prior to circulation Faulty diverter valve dumped wash cycle prior Adjust settings Check functions Call Dealer Elbow plugged up with debries Sticky switch – milk, oil, water Partly or complete sheered wire Sensor part breakdown Cooling not switch on by the operator/ milker Malfunction of cooling equipment Inefficient or no airflow through the radiator Agitation is not functioning and cooled milk is only at the bottom of the tank Check if elbow is clear of debries Call Dealer Switch on cooling Check cooling proper functioning of equipment Check for good airflow through the radiator of the cooling system, No obstruction or build up of dust and debris Check proper functioning of agitation system(s) Dairy Cheq Q3 – User Manual V2.2 October 2014 Default: 45 min Setting range: 1-120 min 15 16 17 18 Valve left open after the wash cycle of the bulk tank Milk line is not above the bulkbtank inlet and safety switch is malfunctioning Milk line is leaking after the pump at the receiving unit. No milk detected in tank During 1st milking into empty tank, no milk has been detected in the tank (at sensor) AND the vacuum has been on for 30 minutes No Pre-cooling detected 5 minutes after milk is detected in tank, tank temp is Pre-cooling not turned on above 27°C (81 °F) Malfunction of pre-cooling the pre-set value. valves/ solenoids OR during 2nd Malfunction in the supply, milking, tank temp or temperature, of coolant (water or glycol) is > 5°C (41 °F) AND pipeline temp is > 27°C (80°F) Low battery Voltage is below 2.5 volts Power was off Power was off between 30 seconds and 5 hours Dairy Cheq Q3 – User Manual V2.2 October 2014 Battery drained Breaker tripped Lighting strike close to the building Main power loss Close Valve of the bulk tank Insure milk line output is above the inlet of the bulk tank. Check proper functioning of the safety switch Check if precooler is activated Check solenoids and valves Check coolant supply and/or the temperature of the coolant when entering the precooling system Default : 45 mins Setting range: 1-120 mins. Battery needs to be checked or replaced Call Dealer Default alarm setting at 2.5 Volts or lower Check for power shorts of the cicuit Reset the bracker at the side panel Use generator according to the proper procedures Page - 23 Default 27°C or 80°F. Setting range: 2 – 35 °C Note: Damage to the Dairy Cheq Q3 unit due to power shorts, brown outs, lightning strikes or malfunctions of generators are not covered under warranty! 3. Table 2: Overview Regulatory Alarm # 1 2 3 4 Name of Regulatroy Alarm MILK TOO WARM More details Possible causes Possible solutions Milk temperature has been over 5.0ºC(Canadian Regulations) 45°F (US Regulations) for more than two hours after the first milking cycle or more than 4 hours from the beginning of milking for Milkings that go beyond this time OR milk temperature has been over 5.0°C for more than one hour after any subsequent milking cycle OR over 11°C 1 hour after the end of milking (Canadian Regulations- 5°C) (US Regulations - 45°F) Cooling stopped functioning properly or not at all, possibly due to: Cooler not turned on Power outage or breaker switch Freon pressure low Blockage of cooling radiators Plate cooler malfunction during milking Faulty vacuum switch – the TTR does not know that milking is taking place Check if cooler is running Check compressor level Check radiator on cleanliness Check functioning of plate cooler when applicable Always have trained personal do the repair on cooling equipment and/ or electrical components Cooling capacity is unable to keep milk temperatures below 11 °C or 50°F, possibly due to: All compressors not turned on or not functioning properly Power outage or breaker switch Freon pressure low Milk temperature is higher Blockage of cooling radiators BLEND than 11 °C(Can)/ 50°F (US) Plate cooler malfunction during TEMPERATURE for more than 15 minutes milking TOO HIGH during a second or Capacity of the condensing unit subsequent milking is maxed out while milk production has increased Milking speed has increased either by the herd due to improvement of genetics or expansion of the capacity of the milk equipment Tank temperatures dropped too low that could lead to freezing on tank surfaces or freezing of milk in tank. Low temperatures Milk temperature is lower possibly due to: than 0.5°C or 33°F for more MILK TOO Low volume of milk in tank than 15 minutes COLD when tank is on full cooling Not a regulatory parameter in capacity US Too little agitation during cooling of low volumes of milk Thermostat set too low INSUFFICIENT AGITATION* This could be US regulatory PMO states it must be agitated Page – 24 Agitation time is less than 4 minutes during a period of 70 min OR the time between agitation cycles is > 70 minutes This doesn’t necessarily meet PMO at this time. Failure to turn on agitation while milking One of multiple agitators has stopped working Mechanical breakage of agitator(s): sheared pins, gear boxes, broken paddle, stretched belt Timer mechanism of agitator(s) is failing Check functioning of compressors Check breaker Check freon level Check radiators Check functioning of plate cooler Update cooling equipment Run tank on part cooling capacity Set thermostat higher Check that switch is turned on Check that all agitators are running Check agitator assembly Check functioning of the timer Dairy Cheq Q3 – User Manual V2.2 October 2014 5 TOO MUCH AGITATION 6 MILK IN TANK FOR TOO LONG Slow cooling (if agitation and Agitation time is longer than cooling are linked) 300 minutes and vacuum is Timer mechanism of agitator is NOT on. (Typically when not bad (causing agitation to stay milking) on) Not a regulatory parameter in Switch is turned on (manual) US Faulty vacuum switch Milk has been in the tank for more than 80 hours This doesn’t necessarily meet PMO at this time. Delayed milk pickup due to e.g. weather conditions Partial pickups 2 hrs haved passed since the tank was emptied and no wash has been detected . Possible causes: Delayed milk pickup Skipped tank washes Failure of tank wash detection due to malfunction of tank washer (pump motor, impeller, spray ball clogged up,etc.) 8 INSUFFICIENT Maximum wash temperature TANK WASH did not reach a minimum TEMPERATURE threshold of 40°C OR 104°F Not enough hot water to reach desired temperature Volume of water too small to heat stainless steel tank Lack of circulation during wash cycle – malfunctioning pump, spray ball or impeller Not fully draining tank between wash cycles Malfunction of controlled washer unit Cold and hot mixing due to faulty solenoid valve 9 TANK WASH Wash temp did not stay INSUFFICIENT above minimum temp TIME OVER threshold of (Default 40°C or MINIMUM 104°F) for at least 4 minutes TEMPERATURE (Default= 4min) Overall wash temperature was too low, reducing the amount of time the temperature was over the threshold limit Volume of water too small to heat stainless steel tank Not fully draining tank between wash cycles 7 TANK EMPTY TOO LONG WITHOUT WASHING Dairy Cheq Q3 – User Manual V2.2 October 2014 Check cooling unit Check timer Check that timer is in auto Check vacuum N.A. Check procedures Check proper functioning of wash equipment (pumps, soap dispensers when applicable, distribution lines of water and soap, screens in water, spray balls lines etc) Check if there was hot water usage overlap (such as washing the tank too soon after the pipeline) Check to see if drain leaks during fill-up, reducing water volume Determine if restrictors reduce water volume too much during fill Check to see if pump circulates water Check to see if impeller or spray balls are plugged and if the back wall is reached Check to see if drain fully opens between cycles and all water drains before next cycle fill begins Check settings on washer control unit Check if there was hot water usage overlap (such as washing the tank too soon after the pipeline) Check to see if drain leaks during fill-up, reducing water volume Page - 25 Malfunction of controlled washer unit Overall wash temperature was too low, reducing the amount of time the temperature was over the threshold limit Volume of water too small to heat stainless steel tank Not fully draining tank between wash cycles Malfunction of controlled washer unit 10 PIPE WASH Wash temp did not stay INSUFFICIENT above minimum temp TIME OVER threshold of (Default 40°C or MINIMUM 104°F) for at least 4 minutes TEMPERATURE (Default= 4min) 11 INSUFFICIENT PIPE WASH TEMPERATURE Maximum wash temperature did not reach the minimum threshold of (Default 40°C or 104°F) Malfuction with water heater Too slow filling of sink Malfunction of the check valve Ambient temperature too low 12 POWER WAS OFF Power was off for more than 5 hours Breaker tripped Lighting strike close to the building Main power loss Page – 26 Check to see if drain fully opens between cycles and all water drains before next cycle fill begins Check settings on washer control unit Check if there was hot water usage overlap (such as washing the tank too soon after the pipeline) Check to see if drain leaks during fill-up, reducing water volume Check to see if drain fully opens between cycles and all water drains before next cycle fill begins Check settings on washer control unit Check water heater Insulate sink Repair valve Increase temp of the water heater Check for power shorts of the cicuit Reset the breaker at the side panel Use generator according to the proper procedures Dairy Cheq Q3 – User Manual V2.2 October 2014 4. Trouble Shooting Issue Dairy Cheq Q3 is not responding Cause Power outage. Breaker trip due to overload, lightning, incorrect usage of power generator. Producer warnings go off too much Setting of warning boundary is too close to the actual levels reached Touch screen is not responding Screen requires calibration correctly Alarm memory card full Data filled up the memory card Battery low Alarm light does not come on during an alarm Temperature alarm when tank is being emptied or agitated Start cooler alarm when cooler is on and agitator is moving The backup battery inside the Dairy Cheq Q3 is below 2.5 Volts Lamp malfunction Wire issue (broken or pinched) Relay issue in Q3 Possible ice on the bottom of the tank Alarm is set to soon. Milk has not reached the sensor yet. Possible solution Check power source at receptacle. Check cause of power outage and try to restore power or use an appropriate power generator. Check breaker of the Q3 at the side door. Reset by pushing the button. If the breaker trips again call your local service technician for assistance. Check boundary in the settings menu of the specific process and adjust to a more flexible range Go to “Settings” menu and find under “General” the Screen Calibration Keep the existing memory card in a safe and dry place and replace it with a new card Replace the battery by shutting down the Dairy Cheq Q3 and disconnecting it from the receptacle. Open the front door of the Q3 and find the battery on the bottom right. Battery type: CR2032 Call service technician for assistance Check thermostat settings or call cooling technician for Bulk Tank Increase the alarm time in the settings menu / Tank/ Start cooling Alarm with 10 minutes All alarms have specific explanations via the display of Dairy Cheq Q3. When an alarm is acknowledged, tap “’More Info on Alarm” and the Alarm Information screen is displayed (see page 12 for reference). Never attempt any service on the Dairy Cheq Q3 outside the guidelines of the unit. Be aware that this can void your warranty. Skilled personnel can assist you with possible issues and will be more then wiling to assist you in restoring the situation back to normal as soon as possible. Dairy Cheq Q3 – User Manual V2.2 October 2014 Page - 27 5. Safety Always observe the following safety instructions: Operation: All operators must be familiar with this manual. Hygiene: Observe the usual sanitation regulations in terms of milk processing for human consumption. Electricity: Allow only qualified Dairy Cheq trained technician to work on Dairy Cheq Q3. Use a licenced electrician for all your electrical work. Water: Do not use a high-pressure cleaner for cleaning parts. Do not rinse the Q3 parts with water. Do not use caustic or corrosive cleaning agents for cleaning the equipment. Only use a damp cloth for cleaning Dairy Cheq Q3. Doors and latches: Do not remove the doors/ latches or open enclosure other than for maintenance. In that case, always observe the safety measures. When using the side door of the main enclosure, do close right after the required procedures are finished General safety: In the event of repairs to Dairy Cheq Q3, big or small, remember the following warning: Always turn the main power supply of the Dairy Cheq Q3 off before doing any work on the unit. 6. Transport and storage During transport and storage the equipment must be adequately packed, i.e. impact resistant and protected against moisture, dust or other harmful substances. The minimum storage conditions are as follows: Clean and dust-free environment Away from caustic and corrosive substances and gases Air humidity between 10 and 90% Any transport and storage activities other than ordered by Dairy Cheq are at the owner’s risk and are not covered by the Dairy Cheq warranty. Page – 28 Dairy Cheq Q3 – User Manual V2.2 October 2014 7. Maintenance For maintenance of Dairy Cheq Q3, please observe the following general rules: Keep the area for Dairy Cheq Q3 frost-free Keep the area clean and dust-free Keep the air humidity between 10 and 90%. Make sure the area is properly ventilated, keeping the electrical parts dry Make sure that all components remain dry and avoid splashing water and dirt Keep Dairy Cheq Q3 away from caustic or corrosive agents Do not clean Dairy Cheq Q3 with running water, use a damp cloth instead Your dealer will be able to give professional maintenance advice; regular checks by your dealer are recommended 8. Waste Material Discard any waste material in compliance with the current local regulations for waste materials. 9. Warning Symbol Symbol Meaning This symbol is intended to alert the user to the presence of important operating and servicing instructions This symbol is intended to alert the user to the presence of dangerous voltage within the inside of the product that can cause electric shock, severe injury and/or death Dairy Cheq Q3 – User Manual V2.2 October 2014 Page - 29 Appendix A: Technical specifications General: Casing material : Weight : Dairy Cheq Q3 general enclosure Fibre enforced Polycarbonate 5 lbs. Approximate dimensions: Electrical: Supply voltage 100-240 VAC +/-10%, 50/60Hz, N+L+Ground 45W 1A 12V, 1A Power consumption Breaker Output relay Expansion box: Modem: 2 ½” - 60 mm 4 ½” - 110 mm 4 ¾” - 120 mm 12” - 305 mm 7 ½” – 195 mm 9 ¼” – 245 mm 6” – 155 mm Page – 30 Dairy Cheq Q3 – User Manual V2.2 October 2014