1
Using ColorBlend six-color printing technology
Océ | Arizona 600
User Manual
Revision E • December 9, 2004
Océ Display Graphics Systems
© 2004 All Rights Reserved
Copyright and Trademarks
0.1
Copyright and Trademarks
© 2004 Océ Display Graphics Systems. All rights reserved.
This document contains information proprietary to Océ, to its subsidiaries, or to third
parties to which Océ may have a legal obligation to protect the information from
unauthorized disclosure, use, or duplication. Any disclosure, use, or duplication of this
document or of any of the information contained herein for other than the specific purpose
for which it was disclosed is expressly prohibited, except as Océ may otherwise agree to in
writing. Due to continuing research and product improvements, features or product
specifications may change at any time without notice.
Arizona 600 is a trademark of Océ Display Graphics Systems. ColorBlend is a registered
trademark of Océ Display Graphics Systems. PosterShop is a registered trademark of Onyx
Graphics, Inc.
Plexiglas is a registered trademark of Röhm GmbH & Co. Centronics is a registered
trademark of Centronics Data Computer Corp.
Teflon is a registered trademark of E.I. DuPont Corp.
0.2
Current Document Version
12/9/04
Date
Release
Doc. Number
Revision
Summary
04-09-04
Initial
3012001919
A
Engineering Services/
Technical Publications
05-12-04
First
Revision
Same
B
Various updates and
corrections
06-30-04
Second
Revision
Same
C
Additional information and
corrections, including
additional printer
maintenance (Chapter 5)
iii
Océ|Current Document Version
iv
Date
Release
Doc. Number
Revision
Summary
11-19-04
Third
Revision
Same
D
Information about 440-series
inks, maximum image width
specification change,
cancellation of printing in
Print & Go mode (Firmware
3.2 or higher), halogen lamp
temperature control menu
with Other media (Firmware
3.2 or higher), and additional
minor corrections
12-09-04
Fourth
Revision
Same
E
Additional maximum image
width specification change,
halogen lamp temperature
control change (Firmware
3.3 or higher), added
warning to not access the
carriage during printing
Product Support and Documentation
0.3
Product Support and Documentation
For further information on the Arizona 600 printer or for information on other Océ Display
Graphics Systems products, please contact:
Océ Display Graphics Systems
2811 Orchard Parkway
San Jose, CA 95134
U.S.A.
Phone: 408-232-4000
Fax: 408-232-4100
0.3.1
Comments on this manual?
Please forward to the above address, marked Attention: S & S Department.
0.4
Arizona 600 Printer Warranty
Contact your Customer Service representative for information about your warranty.
0.5
Annual Maintenance Agreement
Océ Display Graphics Systems recommends the purchase of an Annual Maintenance
Agreement to ensure optimum performance, the highest quality prints, and highest reliability.
Please contact your Océ service manager for more information.
The supplies used in the Arizona 600 printer must meet Océ Display Graphics Systems
qualifications and must be purchased from Océ Display Graphics Systems or its authorized
agent. The use of any unauthorized ink and/or media is not supported by Océ Display
Graphics Systems and may invalidate the Arizona 600 printer Warranty and/or Maintenance
Agreement. If unauthorized supplies are used, Océ Display Graphics Systems reserves the right
to charge the customer to restore the printer to the operating condition in which it left the
factory.
0.6
Ordering Printer Supplies
Océ Display Graphics Systems works closely with the manufacturers of imaging media to
characterize the properties that work best with ink and media used by Océ Display Graphics
Systems printers. Océ Display Graphics Systems supplies are extensively tested in our
laboratory before being approved for shipment to our customers.
Océ Display Graphics Systems recommends that you use only approved supplies. Contact
your local representative for information about ordering supplies.
12/9/04
v
Océ|Ordering Printer Supplies
vi
Table of Contents
Table of Contents
1 Product Overview
Product Description .......................................... 1-1
Unique Features .............................................1-1
Operator Requirements .................................... 1-4
Consumable Supplies....................................... 1-4
Cleaning Supplies ...........................................1-4
Switching On or Off .......................................... 1-5
Precautionary Measures...................................1-5
Arizona 600 Technical Specifications............... 1-7
Components Reference.................................... 1-9
Safety Information ............................................ 1-9
2 Ink System
Handling Inks.................................................... 2-1
Ink Supply Tray ...............................................2-1
Cleaning Fluid or Capping Fluid and
Waste Bottles .........................................2-2
Ink Supply Changes ......................................... 2-2
Ink Filter Changes ............................................ 2-4
3 Media System
Media Specifications......................................... 3-1
Media Handling................................................. 3-1
Opening the Door............................................3-2
Closing the Door .............................................3-2
Media Support System....................................3-2
Mandrel Assembly ..........................................3-4
Roll-to-Roll Media Installation........................... 3-5
Installing Supply Media ...................................3-5
Loading New Supply Roll ...............................3-8
Take-up Roll Reattachment ..........................3-16
Print & Go Media Installation .......................... 3-17
Installing Supply Media .................................3-18
Loading New Supply Roll..............................3-18
EMTU Take-up Roll Reattachment ...............3-28
12/9/04
vii
Océ|Table of Contents
4 Control Panel
Overview........................................................... 4-1
Control Panel Buttons .....................................4-1
Cancel Printing ...............................................4-3
Status Lights ...................................................4-3
Navigating from the Main Menu........................ 4-4
Copies/Reprints ................................................ 4-4
Reprint Copies of a Previously Printed
Image......................................................4-4
Operator ........................................................... 4-5
Print Parameters .............................................4-6
Test Prints.......................................................4-8
Maintenance .................................................4-13
Media Menu ..................................................4-20
About Printer .................................................4-25
Units..............................................................4-26
Set Clock ......................................................4-27
Ink Menu......................................................... 4-28
Ink Bottle Installation.....................................4-28
Configure I/0 ................................................... 4-31
Parallel Port Configuration ............................4-31
LVD-SCSI-3 Port Configuration ....................4-31
5 Printer Maintenance
Maintenance Guidelines ................................... 5-1
Cleaning Fluid/Capping Fluid Usage ..............5-1
Print Head Maintenance and Nozzle
Recovery ...................................................... 5-1
Operator Maintenance Schedule...................... 5-2
Automated Maintenance................................... 5-4
Operator-Performed Maintenance.................... 5-5
Waste Bottle Full.............................................5-5
Cleaning Fluid/Capping Fluid Empty...............5-5
Cleaning the Media Drive Roller .....................5-5
Capping Station Maintenance.........................5-8
Maintenance Cloth Station ............................. 5-11
Blotting Cloth Installation ..............................5-11
Carriage Cable ............................................... 5-16
Adjusting the Carriage Cable ........................5-16
Cleaning the Carriage Cable.........................5-17
Printer Filters .................................................. 5-18
viii
Table of Contents
Purolator Hi-40 Filters ...................................5-18
Air Pressure Pump Line Filter .......................5-19
6 Error Messages and Troubleshooting
Overview........................................................... 6-1
User-Correctable Errors..................................6-1
If Problems Persist..........................................6-2
Calling for Service...........................................6-2
System Errors................................................... 6-3
A Menus
B Printer Maintenance
Materials .......................................................... B-1
Cleaning Fluid/Capping Fluid Usage ............. B-1
Material Usage............................................... B-2
General Recommendations for the Operator .. B-2
Cleaning the Capping Station.......................... B-2
Cleaning the Carriage Face Plate ................... B-3
Cleaning the Print Head Nozzle Plates ........... B-3
Flushing a Print Head ...................................... B-5
C Printer Features Description
Blotting Cloth Usage........................................ C-1
Optimal versus Wide Writing Gap – Default
“Optimal”...................................................... C-1
Conserve Media – Default “ON” ...................... C-1
Feed Adjustment – Default “0”......................... C-2
Condition Media – Default “OFF”..................... C-2
D Two-Sided Printing and Double Print
Two-Sided Printing .......................................... D-1
Double Print..................................................... D-1
Preparing the Arizona 600 Printer.................. D-1
Marking the Platen ......................................... D-1
12/9/04
ix
Océ|List of Figures
List of Figures
Figure 1-1 Print & Go Roller or Mandrel Holder ........... 1-3
Figure 1-2 Circuit Breaker Switch Location .................. 1-5
Figure 1-3 Battery Back-up Option ............................... 1-6
Figure 1-4 Clearance Requirements (Footprint)........... 1-9
Figure 2-1 Ink Tray (1-Gallon Bottles Shown) .............. 2-1
Figure 2-2 Cleaning Fluid or Capping Fluid
Container and Waste Container .............. 2-2
Figure 2-3 Supply Ink ................................................... 2-3
Figure 2-4 Scanning the Ink Barcode ........................... 2-3
Figure 2-5 Remove the Top Tube from the Old Filter... 2-4
Figure 2-6 Attach Tube to the New Filter...................... 2-5
Figure 2-7 Allow the Ink to Drain from the Filter
into the Supply Bottle............................... 2-5
Figure 2-8 Moving the Supply Tube from the Bottom
of the Old Filter to the New Filter............. 2-6
Figure 3-1 Left Clip Closed........................................... 3-2
Figure 3-2 Left Clip Open ............................................. 3-2
Figure 3-3 Media Support System and Installing
Media on the Mandrel .............................. 3-3
Figure 3-4 Mandrel Assembly....................................... 3-4
Figure 3-5 Mandrel/Media Assembly on the
Support Arms........................................... 3-5
Figure 3-6 Secure the Mandrel/Media Assembly ......... 3-6
Figure 3-7 Loading Mechanism Lock Lever
in the Correct Position ............................. 3-7
Figure 3-8 Loading Mechanism Lock Lever
Out of Position ......................................... 3-7
Figure 3-9 Feeding Media Over the Platen .................. 3-8
Figure 3-10 Pinch Roller Handle .................................. 3-9
Figure 3-11 Feeding Media Over the Drive Roll ........... 3-9
Figure 3-12 Wrap Media Around the
Take-up Core......................................... 3-10
Figure 3-13 Align and Tape the Media ....................... 3-10
Figure 3-14 Rotate the Take-up Core......................... 3-11
Figure 3-15 Cutting Media Above
Take-up Dancer .................................... 3-16
Figure 3-16 Media Routing ......................................... 3-19
Figure 3-17 Media Edges Aligned .............................. 3-20
x
List of Figures
Figure 3-18 Open Paper-Feed Access Door .............. 3-20
Figure 3-19 Paper-Feed Access Door Lock
and Handle ............................................ 3-21
Figure 3-20 Closed Paper-Feed Access Door............3-21
Figure 3-21 Correct Position of the Left Side
of the EMTU .......................................... 3-22
Figure 3-22 Attaching Media to the EMTU Core ........ 3-23
Figure 4-1 Control Panel .............................................. 4-1
Figure 4-2 Menu Button................................................ 4-1
Figure 4-3 Minus and Plus Buttons .............................. 4-1
Figure 4-4 Accept Button.............................................. 4-2
Figure 4-5 Load Media Button ...................................... 4-2
Figure 4-6 Advance Media Button ................................ 4-2
Figure 4-7 Online Button .............................................. 4-2
Figure 4-8 Cancel Button.............................................. 4-2
Figure 4-9 Nozzle Print................................................. 4-9
Figure 4-10 Configuration Print .................................. 4-11
Figure 5-1 Cleaning the Media Drive Roller ................. 5-5
Figure 5-2 Take-up and Supply Dancer Bar
and Nylon Support Bearing ..................... 5-6
Figure 5-3 Press Fresh Tape on the Encoder Wheel ...5-7
Figure 5-4 Debris on the Tape...................................... 5-7
Figure 5-5 Debris on the Media Driver Roller ............... 5-8
Figure 5-6 Cleaning the Drain Slots and Drain Holes...5-9
Figure 5-7 Capping Station........................................... 5-9
Figure 5-8 Maintenance Cloth Station ........................ 5-11
Figure 5-9 Blotting Cloth Release Handle .................. 5-12
Figure 5-10 Lever Arms.............................................. 5-13
Figure 5-11 Blotting Cloth Sheet and Support
Foam ..................................................... 5-13
Figure 5-12 Blotting Cloth Hubs .................................5-14
Figure 5-13 Feeding the Cloth (Step 1) ......................5-14
Figure 5-14 Feeding the Cloth (Step 2) ......................5-15
Figure 5-15 Attach the Cloth to the
Take-up Core......................................... 5-15
Figure 5-16 Adjusting the Carriage Cable
Tension.................................................. 5-16
Figure 5-17 Purolator Hi-40 System Filters ................ 5-18
Figure 5-18 Air Pressure Pump Line Filter ................. 5-19
Figure A-1 Copies/Reprints Menu ............................... A-2
Figure A-2 Print Parameters Menu.............................. A-3
12/9/04
xi
Océ|List of Tables
Figure A-3 Test Prints Menu........................................ A-4
Figure A-4 Maintenance Menu (Part 1) ....................... A-5
Figure A-5 Maintenance Menu (Part 2) ....................... A-6
Figure A-6 Media Menu ............................................... A-7
Figure A-7 About Printer Menu.................................... A-8
Figure A-8 Units Menu................................................. A-9
Figure A-9 Set Clock Menu ....................................... A-10
Figure A-10 Ink Menu ................................................ A-11
Figure A-11 Configure I/O Menu ............................... A-12
List of Tables
Table 5-1 Operator Maintenance Schedule
Guidelines ............................................... 5-2
Table 6-1 Error Message Explanations and Actions ... 6-3
xii
1
Product Overview
Product Description
1.1
Thank you for selecting the Arizona 600 printer from Océ Display Graphics Systems.
The Arizona 600 printer is a precision-crafted printer and must be operated in accordance
with environmental and safety requirements as noted in this document. You must comply
with these requirements as a condition of receipt and installation of the printer.
The Arizona 600 printer is a 1.9 m (75-inch) wide format printer that delivers resolutions
up to 617 DPI using ColorBlend™ six-color (Super CMYK) color-print technology.
Print speeds are 11.6 m2 (125 square feet) per hour to 46.5 m2 (500 square feet) per hour.
The self-contained Arizona 600 printer uses solvent-based pigmented inks and is designed
to minimize fume exposure. The printer can print on a variety of roll-based uncoated vinyl
and paper-based ink-jet media. Some of the uses for this printer include:
•
Outdoor backlit kiosks
•
Exhibit graphics
•
Banners
•
Posters
•
Backlit displays
•
Point-of-purchase advertising
•
Vehicle wraps
The internal hard drive enables reprinting without reprocessing (printing of multiple
copies) from the easy-to-use push-button control panel located on the upper right side of
the unit.
1.1.1
Unique Features
The printer utilizes four print heads per color, enabling production-speed printing. The
print heads are positioned on a covered carriage assembly in six parallel rows. The color
order on the print head carriage from top to bottom as viewed from the front of the
printer is cyan, magenta, yellow, black, light magenta, and light cyan.
Other features include:
12/9/04
•
High Speed/High Quality Printing: With 504 nozzles per color (total of
3024 nozzles), the Arizona 600 printer delivers fast print speeds with highquality text and bold, vivid graphics.
•
Semi-Enclosed: Semi-contained and ventilated, this configuration speeds
the drying process and minimizes operator exposure to ink fumes.
1-1
Océ | Product Overview
•
Automated Maintenance Routines: Automatic functions reduce the typical
manual maintenance required by the operator.
•
Auto-Gap Control: Automatically adjusts the print gap to optimize output
quality, based on media profiles.
•
20-Micron (Average) Feed Accuracy: A patented system automatically
positions the heads to the media between passes to accommodate any variation
in the media, delivering superb image quality.
•
Piezo Print-Head Technology: Industrial-grade print heads are designed for
high-speed production printing.
•
ColorBlend Six-Color Technology: Adds light cyan and light magenta to
widen the color gamut and provide over-all smoothness and increased detail in
light- to mid-tone colors.
•
Hot-Swap Ink Delivery System: Enables ink bottles to be replaced on-the-fly
without stopping the printer.
•
On-Board 74-GB Hard Drive: Enables the printing, and reprinting of
multiple copies without reprocessing.
•
Low-Voltage Differential SCSI-3: Communication from a host computer
enables fast data transmission using a cable up to 12 meters (40 feet) long.
•
Two-Sided Printing Capability: The media drive and take-up path enables
manual refeeding for duplex printing on select media.
•
Media Versatility: Accepts media from 0.91 meters to 1.9 meters (36 inches to
75 inches) wide.
•
IR Heater
The IR heater is an infrared device that promotes the ink drying process inside
the printer. The heater operates automatically and does not require operator
intervention.
When the IR heater is active during printing, the control panel displays a
status message on the far right, such as IR:135°.
As a safety precaution, an interlock powers Off the IR heater when the front
door is opened.
•
Print & Go
The media loading procedure for Print & Go mode is documented in "Print
& Go Media Installation" on page 3-17.
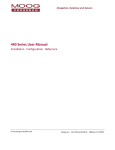
The Print & Go feature includes an external media take-up unit (EMTU).
Also included is a rubber feed roller and a pinch roller assembly inside the
printer to guide printed media onto the external media take-up unit. The
Arizona 600 printer can be run with media routed to the EMTU or to the
1-2
Product Description
conventional internal take-up roll mandrel. The EMTU contains a holder for
either component that is not in use (see Figure 1-1).
Print & Go
Roller Holder
Figure 1-1 Print & Go Roller or Mandrel Holder
Firmware changes that accommodate the Print & Go feature present a few operational
changes, including:
•
Whenever the ADVANCE MEDIA button is used to reposition the media, no
readjustment of the position occurs at the beginning of the next print. The
effect of this button is the same as if the user pressed the CANCEL button to
terminate the ADVANCE MEDIA function.
•
Océ strongly recommends that only a small amount of media be rewound
using the ADVANCE MEDIA button because the exposed media may not
track smoothly back through the printer.
•
When loading media in Print & Go mode, the operator can ignore the take-up
roll diameter question because that diameter is not used.
•
The MEDIA USED value (feet/meters) is not displayed on the control panel.
•
Every print should pass through the dry cycle to prevent wet ink from
offsetting onto the lower black roller. If another print is in the queue prior to
a print being cancelled, the operator is given the option to continue drying or
to cancel the print and allow the next image to begin printing.
Important: If the operator cancels a print before the drying cycle is complete, the media
must not be advanced. Otherwise, ink will be transferred to the lower black
roller.
12/9/04
1-3
Océ | Product Overview
1.2
Operator Requirements
Operators are responsible for the operation and, from time to time, performance of routine
printer maintenance. Operator maintenance schedule guidelines are included in this
manual (see "Maintenance Guidelines" on page 5-1 and Appendix B). The diligent
application of these guidelines is essential to the optimum performance from your printer.
Important: The Arizona 600 printer requires two individuals for loading and unloading
media.
1.3
Consumable Supplies
In addition to ink, a number of consumable supplies are required to maintain optimal print
quality. These items can be obtained from the Supplies department. You will be provided a
contact name and phone number when your printer is installed. The consumable items
include the following:
1.3.1
1-4
•
Ink filters (OIN #3012001622), refer to "Ink Filter Changes" on page 2-4
•
Capping station pads (OIN #3012001442), refer to "Capping Station
Maintenance" on page 5-8
•
System Air Filters (OIN #3011570041), refer to "Purolator Hi-40 Filters" on
page 5-18
•
Air Pressure Pump Line Filter (OIN #3011695043), refer to "Air Pressure
Pump Line Filter" on page 5-19
•
Blotting Cloth (OIN #3012000247), refer to "Blotting Cloth Installation" on
page 5-11
Cleaning Supplies
•
50-ml Syringe Kit (OIN #3010100747)
•
Swabs (OIN #3011620285)
•
Safety Glasses (OIN #3011620274)
•
Lint-Free Cloth (OIN #3011620283)
•
Butyl Gloves (OIN #3011620273)
•
For use with 5500-series and 6600-series inks only,
CGS-50 Cleaning Fluid, 1 Gallon (OIN #3012000798)
•
For use with 440-series inks only,
Capping Fluid (OIN #3012002981)
Flushing Fluid (OIN #3012002982)
Switching On or Off
Switching On or Off
1.4
The printer is to be powered On/Off only by a trained and qualified service technician (see
Figure 1-2). Position the power cord so that it does not pose a hazard when someone walks
around or accesses the doors on the printer
Important: Full-time AC power is required to maintain negative pressure on the inkjet
heads. Without this pressure, ink will drain out of the heads until the ink
reservoirs are empty. If not rectified, permanent damage to the heads could
occur.
The printer may contain a battery back-up vacuum control option to
maintain negative pressure for approximately 48 to 72 hours. This vacuum
backup is intended for emergency use only during power outage.
Figure 1-2 Circuit Breaker Switch Location
Precautionary Measures
1.5
The battery back-up vacuum control option prevents ink from draining out of the reservoirs
for 48 to 72 hours if an AC power outage occurs. This back-up option is intended for
emergency use only. If the printer will be without power for a longer period of time, all ink
must be flushed from the system. Contact your Customer Service representative to perform
this function.
The battery back-up unit power switch should always be in the ON (up) position to protect
the system and charge the battery. The battery should maintain the printer vacuum for 48
to 72 hours. It is normal for the vacuum pump to run continuously when the printer has
12/9/04
1-5
Océ | Product Overview
lost power and running on battery back-up. If the power switch is left in the OFF (down)
position, the printer will not be protected and the battery will eventually discharge (see
Figure 1-3).
Power Switch
B
Figure 1-3 Battery Back-up Option
To verify the battery back-up unit is functional, perform the following steps:
1.
Power down the printer.
The battery back-up unit should power up the vacuum pump immediately upon
losing power. If the vacuum pump does not start running, check the position of the
battery back-up power switch. If the vacuum pump fails to run with the switch in
either position, the battery may be discharged and require charging.
2.
Power the printer back up.
The battery back-up unit should power down the vacuum pump immediately upon
the return of system power.
If the printer does not have the battery back-up vacuum control option and must be
powered off for more than two hours, you must call your Customer Service representative
to flush all ink from the system.
Though powered on, if the printer will not be printing for a period longer than two weeks,
contact your Customer Service representative to flush all ink from the system.
1-6
Arizona 600 Technical Specifications
Arizona 600 Technical Specifications
1.6
Writing Technology .......................Piezoelectric inkjet with 504 nozzles per
color, six colors (C, M, Y, K, LM, LC)
Resolution.....................................Up to 617 x 617 dpi
Print Mode/Speed .........................• Up to 46.5 metres2 (500 square feet) per
hour in 2-pass mode
• Up to 23.2 metres2 (250 square feet) per
hour in 4-pass mode
• Up to 18.6 metres2 (200 square feet) per
hour in 8-pass mode
Inks ..............................................• 5500-series and 6600-series inks in Cyan,
Magenta, Yellow, Black, Light Magenta, and
Light Cyan solvent-based pigmented inks,
packaged in 3.78-liter (1-gallon) bottles
• 440-series inks packaged in 3-liter bottles
Color Handling..............................ColorBlend Technology for overall
smoothness and increased detail in light to
midtone colors
Image Processing.........................Accepts proprietary bit-level image data,
Onyx PosterShop® Server Color Production
Software (RIP) available as an option
Media Type ...................................Variety of uncoated vinyl films and inkjet
paper-based media
Media Handling.............................Roll-fed, reel-to-reel direct imaging process,
or reel-to-sheet with the Print & Go feature
Media Specifications
Width .....................................• Minimum: 91.4 cm (36 inches)
• Maximum: 190.5 cm (75 inches)
Thickness ..............................• Minimum: 5 mils (.13 mm/.005 inches)
• Maximum: 30 mils (.76 mm/.030 inches)
Supply roll diameter ..............• Maximum: 17.8 cm (7.00 inches)
Image Width..................................• Media width minus 2.97 cm (1.17 inches)
when printing single spit stripe
• Media width minus 4.93 cm (1.94 inches)
when printing dual spit stripes
On Board Hard Drive ....................One 74-Gigabyte hard drive
Connectivity ..................................LVD-SCSI-3 for long-length communications
(maximum 12 meters/40 feet)
12/9/04
1-7
Océ | Product Overview
Power Requirements
North America ....................... 200-240 VAC, 3-phase, 40 amps per phase,
60 Hz
Europe .................................. 380-415 VAC, 3-phase, 40 amps per phase,
50 Hz
Print & Go Power Requirements .. 100-240 VAC, 0.4 amps, 50/60 Hz
Environment ................................. Optimum
Storage
Operating Range Temperature
Temperature.......................... 18.3°C to 26.7°C
15.6°C to 32.2°C
(65°F to 80°F)
(60°F to 90°F)
Humidity ................................ 40% to 60% RH
10% to 80% RH
noncondensing
noncondensing
Altitude.......................................... Up to 2,438 meters/8,000 feet
Printer Dimensions ....................... 350.52 cm W x 111.76 cm D x 147.78 cm
(H138 in. W x 44 in. D x 57 in. H) with casters
Printer Weight............................... 1093.2 kg/2410 lbs
1-8
Components Reference
Components Reference
Panel Mount AC
Connector Location
Access Doors
Min. 4 ' (1.2 m)
1.7
20' (6.1 m)
87.50" (222.25 cm) 2x
Supply Mandrel & Media
6" (15.24 cm) Dia. Exhaust Duct
SCSI
Port Plate
Removable Caster 4x
Machine
Stop
Machine
Stop
Access Doors
Control Panel
External Media
Takeup Unit
Top View
Recommended Ceiling
Height = 8'6" (2.59 m)
Take-up Mandrel & Media
13' (3.96 m)
Clearance Requirements (Footprint)
Note: drawing not to scale
10-08-03
Figure 1-4 Clearance Requirements (Footprint)
Safety Information
1.8
MSDS
Read and practice safety guidelines as outlined in the Material Safety Data Sheet (MSDS)
for each ink. Post the document in the work area as required by prevailing law.
Personal Safety
The operator should wear butyl rubber gloves, a protective apron, an NIOSH-approved
respirator (half-mask organic vapor respirator), and safety glasses with side shields when
handling inks.
12/9/04
1-9
Océ | Product Overview
Risks Associated with Handling Inks
The Arizona 600 printer uses solvent-based inks; the liquid and the fumes are combustible.
The inks may cause eye irritation or skin irritation upon prolonged or repeated contact. The
inks may be absorbed through the skin and may cause respiratory system irritation and
nervous system impairment.
What to do with Ink Spills on Surfaces
Observe precautions as noted above, then:
1.
Ventilate the area
2.
Contain the spill
3.
Cover with absorbent material
4.
Collect spilled absorbent material
5.
Place in a closed container
6.
Clean up residue with water (do not release to waterways or sewer)
7.
Incinerate in a permitted hazardous waste incinerator
What to do with Ink Spills on Persons
1-10
•
Eye contact: Immediately flush eyes with large amounts of water. Get
immediate medical attention.
•
Skin contact: Flush skin with large amounts of water and wash with soap. If
irritation persists, get medical attention.
•
Inhalation: Remove person to fresh air. If not breathing, get immediate
medical attention and give artificial respiration. If breathing is difficult, get
immediate medical attention.
•
If swallowed: Call a physician immediately. Only induce vomiting at the
instructions of a physician. Never give anything by mouth to an unconscious
person.
2
Ink System
Handling Inks
2.1
The Arizona 600 printer uses solvent-based pigmented inks in cyan (C), magenta (M),
yellow (Y), black (K), light magenta (LM) and light cyan (LC) in 1-gallon (3.78-liter)
replaceable supply bottles for 5500-series and 6600-series inks. The 440-series inks are in
3-liter bottles. Bottles should be visually checked daily. Read and practice the safety
guidelines as outlined in the Material Safety Data Sheet (MSDS) for each ink, and post
the document in the work area as required by prevailing law.
For personal safety, the operator must wear the following safety gear when handling inks:
•
Rubber gloves
•
Protective apron
•
NIOSH-approved respirator (half-mask organic vapor respirator)
•
Safety glasses with side shields
The liquid ink and its fumes are combustible. They may also cause eye and skin irritation
upon prolonged or repeated contact. Ink may be absorbed through the skin and the fumes
cause respiratory system irritation and nervous system impairment.
2.1.1
Ink Supply Tray
The ink supply tray is located at the lower left end of the printer (see Figure 2-1). Observe
all bottle locations and warning labels on and around the ink supply tray.
Figure 2-1 Ink Tray (1-Gallon Bottles Shown)
12/9/04
2-1
Océ | Ink System
2.1.2
Cleaning Fluid or Capping Fluid and Waste Bottles
The cleaning fluid (for 5500/6600-series inks) or capping fluid (for 440-series inks) is used
to supply and preserve the capping station foam pads during operation of the printer (see
Figure 2-2). The cleaning fluid (for 5500/6600-series inks) or capping fluid (for 440-series
inks) tray has a level sensing device to detect when the bottle is empty. When notification
is received from the printer, the operator must refill the cleaning fluid (for 5500/6600-series
inks) or capping fluid (for 440-series inks) bottle.
The waste bottle collects the purged ink from the capping station. The waste bottle tray has
a level sensing device to detect when the bottle is full. If the waste bottle appears full or the
printer control panel is signaling that the bottle requires emptying, then do so in accordance
with state and local laws or in accordance with the MSDS sheets (see Figure 2-2).
Cleaning Fluid or
Capping Fluid
Waste Bottle
Figure 2-2 Cleaning Fluid or Capping Fluid Container and Waste Container
2.2
Ink Supply Changes
To reduce the chance of poor image quality, do not shake the ink supply bottles before
installation or during printing. Shaking does not improve ink consistency but may
introduce unwanted air bubbles into the ink system. Follow these steps to correctly replace
the ink supply bottles:
Follow the control panel message and/or go to the Ink Menu to select the color ink to install
or replace.
2-2
Ink Supply Changes
1.
Locate the container on the ink supply tray that requires replacement and remove the
cap and ink pick-up tube from the bottle (see Figure 2-3). Remove the empty bottle.
Figure 2-3 Supply Ink
2.
The barcode on each bottle must be scanned each time a new bottle of ink is added
to the printer (see Figure 2-4). For additional information about scanning the
barcode and ink bottle installation (see "Ink Bottle Installation" on page 4-28).
Figure 2-4 Scanning the Ink Barcode
3.
12/9/04
Remove the ink bottle cap and protective cover on the new ink supply bottle. Place
it on the ink supply tray and insert the ink pick-up tube and cap. It should be placed
loosely back on top of the bottle but not screwed down. If the cap seals too tightly,
the printer may not pump the ink to the reservoirs.
2-3
Océ | Ink System
2.3
Ink Filter Changes
The ink filter (OIN #3012001622) can easily be changed without mess by using the
following procedure.
Note: The ink filter must be changed after four bottles of ink have been filtered.
The use of personal protection consistent with the safety recommendations noted at the
beginning of this chapter is strongly recommended.
1.
Remove the ink bottle from the printer and sit on the floor near the end of the
printer.
Gently pull the filter away from the bulkhead and out of the printer.
Note: Observe the ink flow direction arrow on the filters for proper orientation.
2.
With the new filter in hand next to old filter, remove the tube from the top of the
old filter and place on the top of the new filter (see Figure 2-5 and Figure 2-6).
Figure 2-5 Remove the Top Tube from the Old Filter
2-4
Ink Filter Changes
Figure 2-6 Attach Tube to the New Filter
3.
Hold the old filter up until the ink drains back into the supply bottle (see Figure 2-7).
Figure 2-7 Allow the Ink to Drain from the Filter into the Supply Bottle
12/9/04
2-5
Océ | Ink System
4.
When the ink has drained from the old filter, disconnect the fitting from the bottom
of the old filter and connect it to the new filter (see Figure 2-8).
Figure 2-8 Moving the Supply Tube from the Bottom of the Old
Filter to the New Filter
5.
Reattach the filter to the rear bulkhead and return the supply ink bottle to the supply
bottle tray.
Warning:
Océ Display Graphics Systems accepts no liability when ink other than
Océ Display Graphics Systems recommended ink is used. Customers
voluntarily using ink not supplied by Océ Display Graphics Systems
assume all risk of damage that might result. Customer agrees to waive
any claims or rights they may otherwise have against Océ Display
Graphics Systems or its agents for damage and/or loss of business
resulting from use of ink other than Océ Display Graphics Systems ink.
2-6
3
Media System
Media Specifications
3.1
For detailed media specifications, refer to "Arizona 600 Technical Specifications" on
page 1-7.
Media Handling
3.2
The Arizona 600 printer loads and prints centered on the media. Do not attempt to left
or right justify the media during installation. Take-up cores should always be the same
width as the supply media, and the attached media should be centered on the take-up
core. The supply media is mounted from the rear of the printer, while the take-up is
located at the front just behind the IR heater door. Dancer rollers are positioned between
the vacuum platen and both the supply and take-up media mandrels to aid in correctly
tensioning the media during printing.
To ensure the highest quality printing, protect the media coating and store it at the
recommended temperature and humidity. Media should be stored in a horizontal
position and conditioned to the printer environment. Place media in the same room as
the printer for 2 to 24 hours before use.
12/9/04
3-1
Océ | Media System
3.2.1
Opening the Door
The first step in loading media is to open the IR-heater door on the front of the printer.
Begin by releasing the black clips on both sides of the door (see Figure 3-1) and
(see Figure 3-2).
Handle
Figure 3-1 Left Clip Closed
Handle
Figure 3-2 Left Clip Open
Grasp the door using the two handles and pull the door towards you and down.
3.2.2
Closing the Door
To close the door, grasp the door using the two front handles and pull the door up and away
from you. Secure the black clips on each side of the door.
3.2.3
Media Support System
Océ Display Graphics Systems strongly recommends that two people change supply and
take-up media rolls. The customer’s media support system should be able to support the
weight of a full media roll. Position the media support system as close as possible to the
3-2
Media Handling
printer to limit lifting by the operators when loading/unloading supply and take-up rolls of
media (see Figure 3-3).
Figure 3-3 Media Support System and Installing Media on the Mandrel
12/9/04
3-3
Océ | Media System
3.2.4
Mandrel Assembly
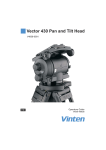
Each supply and take-up mandrel assembly includes two hubs. They must be adjusted
according to the hole placement along the mandrel to center the supply and take-up media
cores. Indexing holes are provided. The user should ensure that the locking pin on the right
hub assembly is properly seated in the correct mandrel index hole.
The Arizona 600 printer accepts media from 0.91-meters to 1.9-meters (36-inches to 75inches) wide. Specifically, the printer can handle 75, 72, 70, 68, 66, 64, 62, 60, 54, 50, 48,
40 and 36-inch wide rolls of supply media (see Figure 3-4).
3/4 View of the complete Mandrel,
Stiffener, Loading Bar/Motor Assembly
Top Bearing Lock Mechanism
(Pivots down with gravity and secures the mandrel
assembly when the loading handle is engaged.)
Right Locking Hub Assembly
Mandrel Assembly
(With locator holes, see increments below.)
Mandrel Gear
Left Slide Hub Assembly
Stiffener
Loading Bar
(Pivots)
Motor Assembly
Loading Bar Lock/Release Handle
(Pull out and turn to release the mandrel.)
Mandrel Bar Assembly
Mandrel Bearing Guide Feature
(Ensure this contact point sits on lower
bearings on drive mechanism.)
Loading Bar Gap
(Ensure this contact point rides
on the Loading Bar during
installation and removal.)
Loading Bar Space
(Ensure this contact point rides on the Loading Bar
during installation and removal.)
Media Width Hub Locator Holes
(Note: All increments in inches.)
36
40
48 50
54
60 62 64 66 68 70 72
75
IMPORTANT! The Arizona 600 is a center load printing machine. Do not attempt to left or right justify
the media during installation. Take-up cores should always be the same width as the supply media and
the loaded media should be centered on the take-up core.
Figure 3-4 Mandrel Assembly
3-4
Roll-to-Roll Media Installation
Roll-to-Roll Media Installation
3.3
Successful media installation is dependent on several factors, including:
•
Centering/alignment of the supply media roll on the supply mandrel
•
Matching lengths of the supply and take-up cores
•
Aligned installation of the supply and take-up cores on the supply and take-up
mandrels
Inexact installation may result in media encoder errors, the misreading of the media width,
media rippling and/or head strikes.
3.3.1
Installing Supply Media
Océ Display Graphics Systems recommends cleaning the media drive roller after each roll
of media (see Figure 3-11 on page 3-9 and "Media Drive Roller" on page 5-3).
Follow the steps below to install a new supply media roll:
1.
Install the supply media on the mandrel (see Figure 3-3 on page 3-3), ensuring that
the media is centered (see Figure 3-4 on page 3-4) and secure the locking hubs.
2.
Lower the mandrel assembly support arms on both sides of the frame and place the
mandrel/media assembly into the machine (see Figure 3-5). Make sure the mandrel is
seated properly on the gear and steel rollers (see Figure 3-6 on page 3-6).
Figure 3-5 Mandrel/Media Assembly on the Support Arms
12/9/04
3-5
Océ | Media System
Figure 3-6 Secure the Mandrel/Media Assembly
3-6
Roll-to-Roll Media Installation
Caution:
Ensure that the loading mechanism lock lever is in its horizontal
position. If the lever flips backward out of position, media feed errors can
result (see Figure 3-7) and (see Figure 3-8).
Figure 3-7 Loading Mechanism Lock Lever in the Correct Position
Figure 3-8 Loading Mechanism Lock Lever Out of Position
12/9/04
3-7
Océ | Media System
3.3.2
3.
Lock the mandrel on both sides of the frame.
4.
Gently close the rear door completely.
Loading New Supply Roll
Follow the steps below for loading a new supply media roll:
1.
Press the Load Media button. You then see:
Load Media
new supply roll?
2.
Press ACCEPT. You then see:
Use +/- keys, attach
takeup, press ACCEPT
3.
Feed the media over the supply dancer and into the vacuum platen area. To keep the
media from falling back, gently feed the media down between the back wall and the
supply dancer assembly (see Figure 3-9).
Turn Bar
Supply Dancer
Back Wall
Figure 3-9 Feeding Media Over the Platen
4.
Install an empty core on the take-up mandrel, and secure the hubs.
Note: Always use a take-up core the same width as the supply media core that is
installed.
3-8
Roll-to-Roll Media Installation
5.
If not already open, gently open the top door completely, and pull the pinch roller
handle to disengage the rollers (see Figure 3-10).
Drip Roller
Rear
Carriage
Rail
Front
Carriage
Rail (Under
Aluminum
Strip)
Pinch
Roller
Handle
Figure 3-10 Pinch Roller Handle
6.
From the front of the printer, push/pull the media towards the drive roll, making sure
it passes between the heat deflector and the drive roll (see Figure 3-11). Use the +/buttons to add more or less media during installation.
Heat Deflector
Drive Roll
Take-up Dancer
Figure 3-11 Feeding Media Over the Drive Roll
7.
12/9/04
Work the media over the front of the take-up dancer and around the back of the takeup core (see Figure 3-12 on page 3-10). Before proceeding to step 8, walk behind the
3-9
Océ | Media System
printer and verify that the left and right edges of the media are straight on the core
and that no coning or sliding has occurred.
Take-up
Dancer
Take-up
Core
Figure 3-12 Wrap Media Around the Take-up Core
8.
Align the media with the right side take-up core edge, then tape along the core in five
places. Tape the leading edge of the media to the core at the right side, the far left side,
and in three more places equally spaced in the middle (see Figure 3-13).
Figure 3-13 Align and Tape the Media
3-10
Roll-to-Roll Media Installation
9.
Turn the take-up core with the taped media one revolution (see Figure 3-14). Engage
the pinch roller handle. Only the left and right pinch rollers should touch both the
media and the drive roll. Raise up all other pinch rollers.
Raised
Pinch
Roller
Raised
Pinch
Roller
Take-up
Core
Figure 3-14 Rotate the Take-up Core
10.
Close the top cover and the front and rear doors, and press the ACCEPT button on
the control panel. You then see:
MEDIA MENU
print side: first side
If you select the first side, go to step 14.
11.
Use the +/- buttons to select the second side. You then see:
MEDIA MENU
print side: second side
You only select this option if you are printing the second side of a double-sided
image.
12.
Press ACCEPT. You then see:
SECOND SIDE
Supply Core OD: (3.10” - 4.0”)
Use the +/- buttons to enter the correct core diameter. The value is increased or
decreased in .01-inch increments. If you do not know the diameter, use a ruler and
measure the outside diameter of the core, and enter the value in this submenu.
13.
12/9/04
Press ACCEPT. You then see:
SECOND SIDE
condition media: OFF
3-11
Océ | Media System
Use the +/- buttons to turn media conditioning OFF/ON. The default value is
OFF.
Condition Media assists in accurate two-sided printing where the printed media
surface tension of the first side affects the printing of the second side. When set
ON, the printer advances the media the length of the print and rewinds to the
starting point.
14.
Press ACCEPT. You then see:
MEDIA MENU
media name
Use the +/- buttons to select the media type you have loaded.
If you select the Other media option, see "Media Types: Other" on page 3-13.
15.
Press ACCEPT. You then see:
MEDIA MENU
Takeup Core OD: (3.10” - 4.0”)
Use the +/- buttons to enter the correct core diameter. The value is increased or
decreased in .01-inch increments. If you do not know the diameter, use a ruler and
measure the outside diameter of the core, and enter the value in this submenu.
16.
Press ACCEPT. You then see:
MEDIA MENU
conserve media: ON
Use the +/- buttons to turn media conservation ON/OFF. The default value is ON.
When set to ON, the printer rewinds the substrate to minimize waste before
printing the next image.
When set to OFF, the printer does not rewind the substrate before printing. This
setting should be used for media that is very thin or adhesive backed, which may
wrinkle during rewinding or become malformed by the heat required to dry the
inks.
17.
Press ACCEPT. You then see:
MEDIA MENU
feed adjustment: +/- 0 - 30
Use the +/- buttons to set the feed adjustment from -30 to +30. The default value
is 0.
This feature enables the adjustment of media stepping to compensate for variation
in media lots and environmental factors. The plus direction lengthens each media
step. The minus direction shortens each media step.
3-12
Roll-to-Roll Media Installation
18.
Press ACCEPT. You then see:
MEDIA MENU
hor. margins: (0.2” - 4.0”)
Use the +/- buttons to adjust the horizontal margins.
19.
Press ACCEPT. You then see:
MEDIA MENU
ver. margins: (0.2” - 4.0”)
Use the +/- buttons to adjust the vertical margins.
Press ACCEPT. You then see:
Sizing media
please wait
The printer sizes the media. If an error occurs, check the alignments along the
media path from the supply to the take-up core.
If no error occurs, you then see:
Stabilizing media
please wait
When stabilizing is complete, printer status information is displayed.
Media Types: Other
Selecting OTHER enables additional menus for manual media setup. When changing
values, holding the +/- buttons continuously increments or decrements the value repeatedly.
Follow the steps below for this media type option:
1.
You then see:
MEDIA MENU
Other
2.
Press the ACCEPT button. You then see:
MEDIA MENU
thickness: (2.00 - 30.00) mil
The range for thickness values is 2.00-30.00 mils. The media thickness is typically
on the media container label, if any. The media thickness changes by .05 mils.
Use the +/- buttons to increment or decrement the thickness setting.
3.
12/9/04
Press ACCEPT. You then see:
MEDIA MENU
takeup core OD: (3.10" - 4.00")
3-13
Océ | Media System
Use the +/- buttons to enter the correct core diameter. The value is increased or
decreased in .01-inch increments. If you do not know the diameter, use a ruler and
measure the outside diameter of the core, and enter the value in this submenu.
4.
Press ACCEPT. You then see:
MEDIA MENU
supply core OD: (3.10" - 4.00")
Use the +/- buttons to enter the correct core diameter. The value is increased or
decreased in .01-inch increments. If you do not know the diameter, use a ruler and
measure the outside diameter of the core, and enter the value in this submenu.
5.
Press ACCEPT. You then see:
MEDIA MENU
4-pass servo target temperature: 150F
The temperature increments or decrements by 1 degree. The maximum
temperature setting is 155ºF. Use the +/- buttons to change the temperature
setting.
6.
Press ACCEPT. You then see:
MEDIA MENU
8-pass servo target temperature: 135F
The temperature increments or decrements by 1 degree. The maximum
temperature setting is 155ºF. Use the +/- buttons to change the temperature
setting.
7.
Press ACCEPT. You then see:
MEDIA MENU
conserve media: ON
Use the +/- buttons to turn media conservation ON/OFF. The default value is ON.
When set to ON, the printer rewinds the substrate to minimize waste before
printing the next image.
When set to OFF, the printer does not rewind the substrate before printing. This
setting should be used for media that is very thin or adhesive backed, which may
wrinkle during rewinding or become malformed by the heat required to dry the
inks.
8.
Press ACCEPT. You then see:
MEDIA MENU
feed adjustment: +/- 0 - 30
Use the +/- buttons to set the feed adjustment from -30 to +30. The default value
is 0.
3-14
Roll-to-Roll Media Installation
The feed adjustment feature enables the adjustment of media stepping to
compensate for variation in media lots and environmental factors. The plus
direction lengthens each media step. The minus direction shortens each media step.
9.
Press ACCEPT. You then see:
MEDIA MENU
hor margins: (0.2" - 4.0")
Use the +/- buttons to select the required horizontal margin value for a job.
10.
Press ACCEPT. You then see:
MEDIA MENU
ver margins: (0.2" - 4.0")
Use the +/- buttons to select the required vertical margin value for a job.
11.
Press ACCEPT. You then see:
MEDIA MENU
Halogen Lamps maximum power: (min, low, medium, max)
Use the +/- buttons to select the required power.
The default value is max.
The high heat from the flying IR unit can cause some media to wrinkle at the
beginning of a print. The halogen lamps maximum power setting enables the
operator to lower the temperature of the flying IR unit to possibly alleviate the
wrinkling.
12.
Press ACCEPT. You then see:
WRITING GAP
“Other” head gap: optimal/wide
This option is only selectable during the Load Media process. Use the +/- buttons
to set optimal or wide. The default is optimal.
The writing gap wide feature sets the print carriage at its maximum height to
accommodate media that may have surface wrinkles. They can lead to carriage
strikes, which may result in a ruined print and/or potential print-head damage. For
more information see Appendix C on page C-1.
Press ACCEPT. You then see:
Sizing media
please wait
The printer sizes the media. If an error occurs, check the alignments along the
media path from the supply to the take-up core.
If no error occurs, you then see:
Stabilizing media
please wait
12/9/04
3-15
Océ | Media System
When stabilizing is complete, printer status information is displayed.
3.3.3
Take-up Roll Reattachment
Follow these steps to remove a partial take-up roll and reattach media to a new empty takeup core:
1.
Press the Load Media button. You then see:
Load Media
new supply roll?
2.
Press the Menu button. You then see:
Load Media
reattach takeup?
3.
Press the ACCEPT button. You then see:
Use +/- keys, attach
takeup, press ACCEPT
The take-up dancer moves automatically up and out of the way.
4.
To unload the partial roll of images, gently open the front door completely.
5.
Cut the media below the take-up dancer and remove the take-up mandrel from the
printer (see Figure 3-15).
Drive Roll
Take-up
Dancer
Take-up
Mandrel
Figure 3-15 Cutting Media Above Take-up Dancer
Note: Avoid cutting into the media drive roller or the Teflon coating on the takeup dancer.
3-16
Print & Go Media Installation
6.
After you remove the printed media from the take-up mandrel, install another empty
core on the mandrel and secure the hubs.
Note: Always use a take-up core the same width as the supply media that is
installed.
7.
Raise the top cover, and pull the pinch roller handle to disengage the rollers (see
Figure 3-10 on page 3-9).
8.
Work the media over the take-up dancer and around the back of the take-up roll (see
Figure 3-12 on page 3-10). Before proceeding to step 9, walk behind the machine
and verify that the left edge of the media is straight on the core and that no coning
or sliding has occurred.
9.
Align the media with the right side take-up core edge, then tape along the core in five
places. Tape the leading edge of the media to the core at the right side first, then the
far left side, and then in three more places equally spaced in the middle (see Figure
3-13 on page 3-10).
10.
Turn the take-up core with the taped media one revolution (see Figure 3-14). Engage
the pinch roller handle. Only the left and right pinch rollers should touch both the
media and the drive roll. Raise up all other pinch rollers.
11.
Close the top cover and the front and rear doors, and press the ACCEPT button on
the control panel. You then see:
Sizing media
please wait
The printer sizes the media. If an error occurs, check the alignments along the
media path from the supply to the take-up core.
If no error occurs, you then see:
Stabilizing media
please wait
When stabilizing is complete, printer status information is displayed.
Print & Go Media Installation
3.4
Successful media installation is dependent on several factors, including:
12/9/04
•
Centering/alignment of the supply media roll on the supply mandrel
•
Matching lengths of the supply and take-up cores
•
Aligned installation of the supply and take-up cores on the supply and take-up
mandrels
3-17
Océ | Media System
•
Positioning of the Print & Go external media take-up unit (EMTU) square to
the front of the Arizona 600 printer
Inexact installation may result in media encoder errors, the misreading of the media width,
media rippling and/or head strikes.
3.4.1
Installing Supply Media
Océ Display Graphics Systems recommends cleaning the media drive roller after each roll
of media (see Figure 3-11 on page 3-9 and "Media Drive Roller" on page 5-3).
Océ Display Graphics Systems recommends cleaning the Print & Go drive roll after each
roll of media (see Figure 3-16 on page 3-19 and "Media Drive Roller" on page 5-3).
Follow the steps below to install a new supply media roll:
3.4.2
1.
Install the supply media on the mandrel (see Figure 3-3 on page 3-3), ensuring that
the media is centered (see Figure 3-4 on page 3-4), and secure the locking hubs.
2.
Lower the mandrel assembly support arms on both sides of the frame and place the
mandrel/media assembly into the machine (see Figure 3-5 on page 3-5). Make sure the
mandrel is seated properly on the gear and steel rollers (see Figure 3-6 on page 3-6).
3.
Lock the mandrel on both sides of the frame.
4.
Gently close the rear door completely.
Loading New Supply Roll
Follow the steps below for loading a new supply media roll:
3-18
1.
Press the Load Media button. You then see:
Load Media
new supply roll?
2.
Press ACCEPT. You then see:
Use +/- keys, attach
takeup, press ACCEPT
3.
Feed the media over the supply dancer and into the vacuum platen area. To keep the
media from falling back, gently feed the media down between the back wall and the
supply dancer assembly (see Figure 3-9 on page 3-8).
4.
Install the Print & Go drive roll and the pinch roller bar into the printer.
5.
If not already open, gently open the top door completely, and pull the pinch roller
handle to disengage the rollers (see Figure 3-10 on page 3-9).
Print & Go Media Installation
6.
From the front of the printer, push/pull the media towards the drive roller, making sure
it passes between the heat deflector and the drive roll (see Figure 3-11 on page 3-9). Use
the +/- buttons to add more or less media during installation.
7.
Route the media over the take-up dancer, behind the Print & Go drive roll, and up
and in-between the pinch roller bar and the Print & Go drive roll (see Figure 3-16
on page 3-19).
Before proceeding to step 8, walk behind the machine and verify that the left edge of
the media is straight on the core and that no coning or sliding has occurred.
Take-up
Dancer
Print & Go
Drive Roller
Pinch
Roller Bar
Figure 3-16 Media Routing
12/9/04
3-19
Océ | Media System
8.
Ensure the media is aligned by lifting the leading edge of the media and align the left
edge exactly to the left edge of the media that goes over the front and under the takeup dancer (see Figure 3-17).
Leading Edge
Take-up
Dancer
Align
Here
Figure 3-17 Media Edges Aligned
9.
Engage the pinch roller handle. Only the left and right pinch rollers should touch both
the media and the drive roll. Raise up all other pinch rollers (see Figure 3-14 on page
3-11).
10.
Close the IR heater door fully and turn the lock and pull the handle to open the small
paper-feed access door below the heater (see Figure 3-18) and (see Figure 3-19).
Handle/
lock
Figure 3-18 Open Paper-Feed Access Door
3-20
Door open
Print & Go Media Installation
Handle/Lock
Figure 3-19 Paper-Feed Access Door Lock and Handle
11.
Pull the media through the paper-feed access door with at least one foot of media
exposed, and close the door (see Figure 3-20).
Handle
Door closed
Figure 3-20 Closed Paper-Feed Access Door
Note: Turn the handle clockwise while closing the paper-feed access door.
12/9/04
3-21
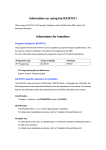
Océ | Media System
12.
Roll the external media take-up unit (EMTU) into position at the side of each IR
door rest and against the front of the printer, ensuring the EMTU is square to the
printer. Lock the front wheels (see Figure 3-21).
Figure 3-21 Correct Position of the Left Side of the EMTU
13.
3-22
Load an empty take-up core the same width as the supply media. Adjust the EMTU
hubs left to right as required to align the edges of the core with the edges of the media
coming out of the printer, and secure the hubs by tightening the knobs.
Print & Go Media Installation
14.
Pull on both sides of the media evenly. A second person can press the + button to
advance the media until you are able to get it over the top of the empty take-up core.
Secure the media firmly with tape along the core in five places. Tape the leading edge
of the media to the core at the right side, the far left side, and in three more places
equally spaced at the middle (see Figure 3-22).
Figure 3-22 Attaching Media to the EMTU Core
15.
Turn the take-up core with the taped media one full revolution.
16.
Close the top cover and the front and rear doors, and press the ACCEPT button on
the control panel. You then see:
PRINT SIDE
print side: first side
If you select the first side, go to step 20.
17.
Use the +/- buttons to select the second side. You then see:
PRINT SIDE
print side: second side
You only select this option if you are printing the second side of a double-sided
image.
18.
Press ACCEPT. You then see:
SECOND SIDE
Supply Core OD: (3.10” - 4.0”)
Use the +/- buttons to enter the correct core diameter. The value is increased or
decreased in .01-inch increments. If you do not know the diameter, use a ruler and
measure the outside diameter of the core, and enter the value in this submenu.
19.
12/9/04
Press ACCEPT. You then see:
SECOND SIDE
condition media: OFF
3-23
Océ | Media System
Use the +/- buttons to turn media conditioning OFF/ON. The default value is
OFF.
CONDITION MEDIA assists in accurate two-sided printing where the printed
media surface tension of the first side affects the printing of the second side. When
set ON, the printer advances the media the length of the print and rewinds to the
starting point.
20.
Press ACCEPT. You then see:
MEDIA MENU
media name
Use the +/- buttons to select the media you have loaded. If you select the Other
media type, see "Media Types: Other" on page 3-25.
21.
Press ACCEPT. You then see:
MEDIA MENU
Takeup Core OD: (3.10” - 4.0”)
Use the +/- buttons to enter the correct core diameter. The value is increased or
decreased in .01-inch increments. If you do not know the diameter, use a ruler and
measure the outside diameter of the core, and enter the value in this submenu.
22.
Press ACCEPT. You then see:
MEDIA MENU
conserve media: ON
Use the +/- buttons to turn media conservation ON/OFF. The default value is ON.
When set to ON, the printer rewinds the substrate to minimize waste before
printing the next image.
When set to OFF, the printer does not rewind the substrate before printing. This
setting should be used for media that is very thin or adhesive backed, which may
wrinkle during rewinding or become malformed by the heat required to dry the
inks.
23.
Press ACCEPT. You then see:
MEDIA MENU
feed adjustment: +/- 0 - 30
Use the +/- buttons to set the feed adjustment from -30 to +30. The default value
is 0.
This feature enables the adjustment of media stepping to compensate for variation
in media lots and environmental factors. The plus direction lengthens each media
step. The minus direction shortens each media step.
3-24
Print & Go Media Installation
24.
Press ACCEPT. You then see:
MEDIA MENU
hor margins: (0.2" - 4.0")
Use the +/- buttons to select the required horizontal margin value for a job.
25.
Press ACCEPT. You then see:
MEDIA MENU
ver margins: (0.2" - 4.0")
Use the +/- buttons to select the required vertical margin value for a job.
26.
Press ACCEPT. You then see:
Sizing media
please wait
The printer sizes the media. If an error occurs, check the alignments along the
media path from the supply to the take-up core.
If no error occurs, you then see:
MEDIA MENU
media delivery mode: roll to roll or Print & Go
Use the +/- buttons to select Print & Go.
27.
Press ACCEPT. You then see:
Stabilizing media
please wait
When stabilizing is complete, printer status information is displayed.
Media Types: Other
Selecting OTHER enables additional menus for manual media setup. When changing
values, holding the +/- buttons continuously increments or decrements the value repeatedly.
Follow the steps below for this media type option:
1.
You then see:
MEDIA MENU
Other
2.
Press the ACCEPT button. You then see:
MEDIA MENU
thickness: (2.00 - 30.00) mil
The range for thickness values is 2.00-30.00 mils. The media thickness is typically
on the media container label, if any. The media thickness changes by .05 mils.
Use the +/- buttons to increment or decrement the thickness setting.
12/9/04
3-25
Océ | Media System
3.
Press ACCEPT. You then see:
MEDIA MENU
takeup core OD: (3.10" - 4.00")
Use the +/- buttons to enter the correct core diameter. The value is increased or
decreased in .01-inch increments. If you do not know the diameter, use a ruler and
measure the outside diameter of the core, and enter the value in this submenu.
4.
Press ACCEPT. You then see:
MEDIA MENU
supply core OD: (3.10" - 4.00")
Use the +/- buttons to enter the correct core diameter. The value is increased or
decreased in .01-inch increments. If you do not know the diameter, use a ruler and
measure the outside diameter of the core, and enter the value in this submenu.
5.
Press ACCEPT. You then see:
MEDIA MENU
4-pass servo target temperature: 150F
The temperature increments or decrements by 1 degree. The maximum
temperature setting is 155ºF. Use the +/- buttons to change the temperature
setting.
6.
Press ACCEPT. You then see:
MEDIA MENU
8-pass servo target temperature: 135F
The temperature increments or decrements by 1 degree. The maximum
temperature setting is 155ºF. Use the +/- buttons to change the temperature
setting.
7.
Press ACCEPT. You then see:
MEDIA MENU
conserve media: ON
Use the +/- buttons to turn media conservation ON/OFF. The default value is ON.
When set to ON, the printer rewinds the substrate to minimize waste before
printing the next image.
When set to OFF, the printer does not rewind the substrate before printing. This
setting should be used for media that is very thin or adhesive backed, which may
wrinkle during rewinding or become malformed by the heat required to dry the
inks.
8.
3-26
Press ACCEPT. You then see:
MEDIA MENU
feed adjustment: +/- 0 - 30
Print & Go Media Installation
Use the +/- buttons to set the feed adjustment from -30 to +30. The default value
is 0.
The feed adjustment feature enables the adjustment of media stepping to
compensate for variation in media lots and environmental factors. The plus
direction lengthens each media step. The minus direction shortens each media step.
9.
Press ACCEPT. You then see:
MEDIA MENU
hor margins: (0.2" - 4.0")
Use the +/- buttons to select the required horizontal margin value for a job.
10.
Press ACCEPT. You then see:
MEDIA MENU
ver margins: (0.2" - 4.0")
Use the +/- buttons to select the required vertical margin value for a job.
11.
Press ACCEPT. You then see:
MEDIA MENU
Halogen Lamps maximum power: (min, low, medium, max)
Use the +/- buttons to select the required power.
The default value is max.
The high heat from the flying IR unit can cause some media to wrinkle at the
beginning of a print. The halogen lamps maximum power setting enables the
operator to lower the temperature of the flying IR unit to possibly alleviate the
wrinkling.
12.
Press ACCEPT. You then see:
WRITING GAP
“Other” head gap: optimal/wide
This option is only selectable during the Load Media process. Use the +/- buttons
to set optimal or wide. The default is optimal.
The WRITING GAP WIDE feature sets the print carriage at its maximum height
to accommodate media that may have surface wrinkles. They can lead to carriage
strikes, which may result in a ruined print and/or potential print-head damage. For
additional information, see Appendix C on page C-1.
13.
Press ACCEPT. You then see:
Sizing media
please wait
The printer sizes the media. If an error occurs, check the alignments along the
media path from the supply to the take-up core.
12/9/04
3-27
Océ | Media System
If no error occurs, you then see:
MEDIA MENU
media delivery mode: roll to roll or Print & Go
Use the +/- buttons to select Print & Go.
14.
Press ACCEPT. You then see:
Stabilizing media
please wait
When stabilizing is complete, printer status information is displayed.
3.4.3
EMTU Take-up Roll Reattachment
Follow these steps to remove a partial take-up roll and reattach media to a new empty takeup core:
3-28
1.
Press the ADVANCE MEDIA button once, and press the + button until at least one
foot of media is exposed through the paper-feed access door after the media is cut.
2.
Press the CANCEL button to ensure the media does not rewind at step 4.
3.
Cut the media so that at least one foot of media is exposed through the paper-feed
access door, and remove the partial take-up roll.
4.
Press the LOAD MEDIA button. You then see:
Load Media
new supply roll?
5.
Press the MENU button. You then see:
Load Media
reattach takeup?
6.
Press the ACCEPT button. You then see:
Use +/- keys, attach
takeup, press ACCEPT
7.
Load an empty take-up core the same width as the supply media. Adjust the EMTU
hubs left to right as required to align the edges of the core with the edges of the media
coming out of the printer, and secure the hubs by tightening the knobs.
8.
Pull on both sides of the media evenly. A second person can press the + button to
advance the media until you are able to get it over the top of the empty take-up core.
Secure the media firmly with tape along the core in five places. Tape the leading edge
of the media to the core at the right side, the far left side, and in three more places
equally spaced at the middle (see Figure 3-22 on page 3-23).
9.
Turn the take-up core with the taped media one revolution.
Print & Go Media Installation
10.
Press ACCEPT. You then see:
Sizing media
please wait
The printer sizes the media. If an error occurs, check the alignments along the
media path from the supply to the take-up core.
If no error occurs, you then see:
MEDIA MENU
media delivery mode: roll to roll or Print & Go
Use the +/- buttons to select Print & Go.
11.
Press ACCEPT. You then see:
Stabilizing media
please wait
When stabilizing is complete, printer status information is displayed.
12/9/04
3-29
Océ | Media System
3-30
4
Control Panel
Overview
0.1
The control panel (see Figure 4-1) sends and returns information to and from the Arizona
600 printer. Through the control panel, you set up the user-controllable options. These
are organized into four major sections: Copies/Reprints, Operator, Ink Menu, and
Configure I/O.
Figure 4-1 Control Panel
0.1.1
Control Panel Buttons
The MENU button (see Figure 4-2) steps through the available submenus in the menu
tree without selecting them. Starred items indicate current settings. When you locate the
required submenu, press the ACCEPT button (see Figure 4-4).
MENU
Figure 4-2 Menu Button
The - and + buttons (see Figure 4-3) enable you to change your menu selection or increase
or decrease numerical values for that menu.
Figure 4-3 Minus and Plus Buttons
12/9/04
4-1
Océ | Control Panel
The ACCEPT button (see Figure 4-4) enables you to confirm or enter your selection for
that menu.
ACCEPT
Figure 4-4 Accept Button
The LOAD MEDIA button (see Figure 4-5) enables you to load new media or reattach
media to the take-up core. This button also enables you to navigate backwards through the
menu tree when in any submenu.
LOAD
MEDIA
Figure 4-5 Load Media Button
The ADVANCE MEDIA button (see Figure 4-6) enables you to move media forward or
backward with the -/+ buttons.
ADVANCE
MEDIA
Figure 4-6 Advance Media Button
The ONLINE button (see Figure 4-7) enables you to enter or exit the submenus and return
to printer online, as indicated by a solid green status LED.
ONLINE
Figure 4-7 Online Button
The CANCEL button (see Figure 4-8) enables you to exit lower menus and return to the
top-level menu. The button is also used to cancel a print.
Figure 4-8 Cancel Button
4-2
Overview
0.1.2
Cancel Printing
In roll-to-roll mode, a print job can be cancelled using the following steps:
1.
Press the Cancel button. You then see:
press ‘-’ to cancel
2.
Press the - button. You then see:
CANCELLING PRINT
In Print & Go mode, a print job can be cancelled using the following steps:
1.
Press the Cancel button. You then see:
press ‘-’ to cancel
2.
Press the - button. You then see:
cancel: image name
3.
Press the Cancel button. You then see:
Dry canceled print first[N/Y]? [-/+]
Pressing the - button cancels the drying process. If another print job is in the queue,
the print process for the queued print job begins.
Pressing the + button continues the drying process. You then see:
drying: image name
Important: If the operator cancels a print before the drying cycle is complete, the media
must not be advanced. Otherwise, ink will be transferred to the lower black
roller.
Caution:
If a cancelled print is followed by a print being processed for a faster print
speed, the initial print must be allowed to dry to prevent smudging and ink
lift-off. For example, if an 8-pass print is cancelled and followed by a 2pass or 4-pass print, the ink from the 8-pass print may remain wet, lift onto
the take-up roller, and transfer to the subsequent print. This condition can
be prevented by allowing the 8-pass print to dry.
0.1.3
Status Lights
Status lights provide information about the current configuration and the state of the
printer.
12/9/04
4-3
Océ | Control Panel
0.2
•
ERROR - Indicates a printer problem has occurred.
•
MEDIA LOW - Indicates that media supply is below 50 feet.
•
ONLINE - Indicates four status conditions:
- Solid, ready to receive a print job or keypad input
- Slow blink, printing
- Fast blink, receiving a print job
- Off, offline
Navigating from the Main Menu
Four main control panel submenus control specific functions on the printer: Copies/
Reprints, Operator, Ink Menu, and Configure I/O.
The entire menu structure can be printed using the Print Menu Tree function (see "Print
Menu Tree" on page 4-13).
0.3
Copies/Reprints
This menu (see "Copies/Reprints Menu" on page A-2) controls the number of copies and
specifies the spacing between copies made during each print job. You can also reprint copies
of a previous printed image. An on-board hard drive enables multiple images to be saved
and accessed through the control panel without reprocessing and resending the print from
the processing workstation.
0.3.1
Reprint Copies of a Previously Printed Image
Copies of a previously printed image can be reprinted using the following steps:
1.
Navigate to:
MAIN MENU
copies/reprints
2.
Press the ACCEPT button. You then see:
REPRINTS: [ 0 ] filename
speed, overlap, dir, res x res, width x length
Use the +/- buttons to select a previously printed image.
3.
Press ACCEPT. You then see:
REPRINTS
position: (right, center, or left)
Use the +/- buttons to select the required position.
4-4
Operator
4.
Press ACCEPT. You then see:
REPRINTS
# reprints: XXX
Use the +/- buttons to select the total number of copies (1-300). If multiple copies
are selected, go to step 5. If one copy is selected, go to step 6.
5.
Press ACCEPT. You then see:
SPACING
vert=(0.00 - 0.20" to 8.98 - 9.18")
Use the +/- buttons to set the vertical spacing amount in inches between images.
6.
Press ACCEPT. The selected image begins printing.
If the media is narrower than the image, the following message is issued:
WARNING: Media too NARROW
CURRENT: xx”, Required: xx
7.
Press CANCEL. You then see:
WARNING: Media too NARROW
Press - to cancel
8.
Press the - button to cancel the print.
Operator
0.4
The Operator menu provides access to the following submenus:
• Print Parameters - Contains the job statistics (On or Off), minimal maintenance
during print (Off or On), and double print (Off or On) submenus (see Figure
A-2 on page A-3).
• Test Prints - Contains the nozzle, configuration, color bars, and menu tree test
prints (see "Test Prints Menu" on page A-4).
• Maintenance - Contains the access carriage, park carriage, high, low, long and
mini purge nozzles submenus. Also includes the spit heads, pump solvent, fill
reservoir, and barcode practice submenus (see "Maintenance Menu (Part 1)" on
page A-5 and "Maintenance Menu (Part 2)" on page A-6).
• Media Menu - Contains menus for supply media selection and setup (see
"Media Menu" on page A-7).
• About Printer - Enables you to view the total media printed in linear feet/meters,
firmware version, firmware build date/time, printer serial number, and boot
ROM version (see "About Printer Menu" on page A-8).
• Units - Selects between English or metric units (see "Units Menu" on page A-9).
• Set Clock - Sets up the printer date and time (see "Set Clock Menu" on page A10).
12/9/04
4-5
Océ | Control Panel
0.4.1
Print Parameters
The Print Parameters menu sets up the basics of the print job, the controls for the image
margins, and the statistics for the job.
Follow these steps to use the Print Parameters menus:
1.
Navigate to:
MAIN MENU
operator
2.
Press the ACCEPT button. You then see:
OPERATOR
print parameter
3.
Press ACCEPT. You then see:
PRINT PARAMETERS
Statistics Menu: (on or off)
When the statistics menu is set to ON, the printer prints a set of job statistics in the
white space below the print area. Use the +/- buttons to turn statistics ON or OFF.
4.
Press ACCEPT. You then see:
PRINT PARAMETERS
minimal maintenance during print: ON
Use the +/- buttons to change the minimal maintenance during print setting to
OFF. The default setting is ON.
The minimal maintenance ON setting is the recommended setting and typically
gives the best results.
The minimal maintenance OFF setting uses different maintenance routines during
printing.
You may want to try minimal maintenance OFF if you are having excessive
overspray or nozzle dropout.
When disabled, the “[Min Maint: OFF]” message is included in the print statistics
line and is displayed on the operator panel.
5.
Press ACCEPT. You then see:
PRINT PARAMETERS
double print: OFF
Use the +/- buttons to change the double print setting to ON. The default setting
is OFF.
When the double print function is enabled (ON), the media is rewound and
reprinted following the initial printing of the image. Prior to the second print, the
4-6
Operator
Arizona 600 printer pauses to enable the operator to accurately align the media for
the second print. This feature is applicable for very dark images where the media is
not able to hold and dry the volume of ink required to produce acceptable output.
When enabled, the “[Double Print: ON]” message is included in the print statistics
line.
Note: Cancellation of the print is not allowed in both roll-to-toll and Print & Go
modes during the drying cycle if the double print function is enabled.
6.
Press ACCEPT. You then see:
OPERATOR
print parameters
Job Statistics List
When the menu is set to ON, the printer prints a set of job statistics in the white space
outside the print area along the width of the print. Depending on the color order in the
printer, the job statistics line is either printed in black or cyan. The statistics line is
approximately 17.75 inches wide and is cut off if the image width is shorter. The line also
appears larger than the Onyx PosterShop job statistics line, if selected by the software. The
following is a sample of the job statistics output:
Example
Name
• Job:
Job Name.ONX
• Media Type:
Media Name
• Overlap:
8-pass (or 4-pass)
• Write Dir.:
bidir
• Resolution:
Stochastic
• Colors:
6 colors
• Print Zone:
89F
• IR Sensor:
155F
• Version:
3.x
• Height:
0.30 ft.
• Width:
64 in.
• Printed:
27-Aug-04 16:58 (Day-Month-Year Time)
• Received:
27-Aug-04 08:34
• Print Time:
05:16
• SN:
801xxx
Additional lines will appear in the statistics output when the following options are activated:
12/9/04
•
Head Gap:
WIDE
•
Min Maint:
OFF
4-7
Océ | Control Panel
0.4.2
•
Double Print:
ON
•
Speed:
Accelerated
Test Prints
The Test Prints menu enables you to print four documents stored in the Arizona 600
printer:
4-8
•
Nozzle print
•
Configuration print
•
Color bars print
•
Menu tree print
Operator
Nozzle Print
The Nozzle Print menu provides you with information on missing nozzles (see Figure 4-9).
The pattern may indicate that maintenance might be required. (No gaps occur between the
color sets on an actual Nozzle Print.)
Misfiring Nozzles
Cyan
Magenta
Yellow
Black
Light
Magenta
Light
Cyan
Figure 4-9 Nozzle Print
12/9/04
4-9
Océ | Control Panel
Follow these steps to print the Nozzle Print (see Figure 4-9):
1.
Navigate to:
MAIN MENU
operator
2.
Press the ACCEPT. You then see:
OPERATOR
print parameters
3.
Press MENU. You then see:
OPERATOR
test prints
4.
Press ACCEPT. You then see:
TEST PRINTS
nozzle print
5.
Press ACCEPT. You then see:
NOZZLE PRINT
(1 - 100) pass
Use the +/- buttons to select the number of passes from 1 to 100.
6.
4-10
Press ACCEPT. The Nozzle Print begins printing.
Operator
Configuration Print
The Configuration Print menu provides the operator and Océ Display Graphics Systems
service technicians with machine-settings data if the unit must be diagnosed or recalibrated. A
configuration print of factory settings should be stored in one of the bays.
Figure 4-10 Configuration Print
Follow these steps to print the configuration print:
1.
Navigate to:
TEST PRINTS
nozzle print
2.
Press the MENU button. You then see:
TEST PRINTS
configuration print
3.
Press the ACCEPT button. You then see:
CONFIGURATION PRINT
position: (right, center, or left)
Use the +/- buttons to select the required position.
4.
12/9/04
Press ACCEPT. The Configuration Print begins printing.
4-11
Océ | Control Panel
Color Bars
The Color Bars menu prints a set of color bars. The eleven color bars start with Light
Magenta and end with Black. Use the color bars to diagnose and calibrate printer inks for
optimal performance. Follow these steps to print the color bars:
1.
Navigate to:
TEST PRINTS
nozzle print
2.
Press the MENU button twice. You then see:
TEST PRINTS
color bars
3.
Press ACCEPT. You then see:
COLOR BARS
overlap: (2, 4, or 8-pass)
Use the +/- buttons to select the number of passes.
4.
Press ACCEPT. You then see:
COLOR BARS
dir: (bidir L<->R, unidir L<-R, unidir L->R)
Use the +/- buttons to set the write direction.
5.
Press ACCEPT. You then see:
COLOR BARS
position: (left, center, or right)
Use the +/- buttons to set the required position.
6.
Press Accept. You then see:
COLOR BARS
print width: (8.0" - 70.0")
Use the +/- buttons to set print width (8.0 in. - 70.0 in.).
7.
Press ACCEPT. You then see:
COLOR BARS
(1 - 10) pass
Use the +/- buttons to select the number of passes.
8.
4-12
Press ACCEPT. The Color Bars begins printing.
Operator
Print Menu Tree
The Print Menu Tree menu prints the entire menu tree structure. Follow these steps to print
the menu tree:
0.4.3
1.
Navigate to:
TEST PRINTS
nozzle print
2.
Press the MENU button three times. You then see:
TEST PRINTS
print menu tree
3.
Press ACCEPT. The Menu Tree begins printing.
Maintenance
The Maintenance menu (see "Maintenance Menu (Part 1)" on page A-5) contains several
maintenance submenus. These maintenance submenus may need to be performed
periodically in addition to the automated maintenance that occurs without direct operator
intervention. Refer to the "Operator Maintenance Schedule" on page 5-2 for additional
information and routine maintenance required on the Arizona 600 printer.
Several maintenance functions can be selected from the front panel menus when the
machine is idle or while printing.
Warning:
Media must be installed prior to performing these functions.
For purge functions, a list of colors to be purged is presented for selection, for example:
INKS TO LOW PURGE
C M Y K LM LC
With this initial setting, all six colors are designated to be purged.
The underscore indicates the color that is the current active item of the list of colors.
Pressing + moves the underscore to the right. Pressing - replaces the letter with a bar. For
example, when C is underscored, pressing - changes the list to:
M Y K LM LC
If you press ACCEPT at this setting, the color cyan is excluded from the purge.
The following setting purges the colors magenta, yellow, black, and light magenta:
M Y K LM
12/9/04
4-13
Océ | Control Panel
Access Carriage
The Access Carriage menu enables the operator to position the carriage over the blotting
station for cleaning the heads. Positioning is important when the operator must conduct
maintenance procedures on the carriage assembly. Do not leave the carriage away from the
home position over the capping station for long periods of time. The ink dries and causes
the nozzles to be blocked.
Warning:
Do not use the Access Carriage function during printing. Doing so
causes the printer to lock, requiring a reboot to continue working.
Follow these steps to access the carriage:
1.
Navigate to:
MAIN MENU
operator
2.
Press the ACCEPT button. You then see:
OPERATOR
print parameters
3.
Press the MENU button twice. You then see:
OPERATOR
maintenance
4.
Press the ACCEPT button. You then see:
MAINTENANCE
access carriage
5.
Press the ACCEPT button. You then see:
ACCESS CARRIAGE
'ACCEPT' to start
6.
Press the ACCEPT button. You then see:
Moving Carriage
please wait
The carriage moves to a position over the blotting station. You then see step 3
below.
4-14
Operator
Park Carriage
The Park Carriage menu enables the operator to move the carriage back to the home
position or over the capping station. Follow these steps to park the carriage:
1.
Navigate to:
MAINTENANCE
access carriage
2.
Press the MENU button. You then see:
MAINTENANCE
park carriage
3.
Press the ACCEPT button. You then see:
PARK CARRIAGE
'ACCEPT' to start
4.
Press ACCEPT. You then see:
Parking Carriage
please wait
The carriage moves to the home position over the capping station.
High Purge Nozzles.
Warning:
Media must be installed prior to performing this function.
The carriage moves slightly to align with the drain holes in the capping station. The purge
pressure is elevated. This process may take as long as 30 seconds. The purge is then
performed. If multiple purges are requested, a pause occurs between purges to allow the ink
to refill. A blot at the maintenance station is performed after the purge to clean the nozzle
plate. If the printer was idle, a nozzle print follows the blot. Follow these steps to perform a
high purge:
12/9/04
1.
Navigate to:
MAINTENANCE
park carriage
2.
Press the MENU button. You then see:
MAINTENANCE
high purge nozzles
4-15
Océ | Control Panel
3.
Press ACCEPT. You then see:
Inks to High Purge
number of purges: (1-10)
Press +/- to select the number of purges to be performed (no more than two are
recommended).
4.
Press ACCEPT. You then see:
Inks to High Purge
C M Y K LM LC
Use the +/- buttons to select the required color or colors to high purge.
5.
Press ACCEPT to begin purging. The Cleaning Nozzles please wait and Printing
Nozzles Test please wait messages are displayed during the purge process.
Low Purge Nozzles.
Warning:
Media must be installed prior to performing this function.
A low purge is the same as a high purge, except a lower pressure is used. No multi-purge
capability is available with the low purge. A blot at the maintenance station is performed
after the purge to clean the nozzle plate. If the printer was idle, a nozzle print follows the
blot. Follow these steps to perform a low purge:
1.
Navigate back to:
MAINTENANCE
high purge nozzles
2.
Press the MENU button. You then see:
MAINTENANCE
low purge nozzles
3.
Press the ACCEPT button. You then see:
INKS TO LOW PURGE
C M Y LM LC
Use the +/- buttons to select the required color or colors to low purge.
4.
4-16
Press ACCEPT to begin purging. The Cleaning Nozzles please wait and Printing
Nozzles Test please wait messages are displayed during the purge process.
Operator
Mini Purge Nozzles.
Warning:
Media must be installed prior to performing this function.
The carriage is moved to the blotting station, and a low-pressure purge is performed while
the nozzle plate is in contact with the blotting cloth. A blot and a spit occur after each mini
purge. Follow these steps to perform a mini purge:
1.
Navigate to:
MAINTENANCE
low purge nozzles
2.
Press the MENU button. You then see:
MAINTENANCE
mini purge nozzles
3.
Press the ACCEPT button. You then see:
INKS TO MINI PURGE
C M Y K LM LC
Use the +/- buttons to select the required color or colors to mini purge.
4.
Press ACCEPT to begin purging. The Cleaning Nozzles please wait message is
displayed during the purge process.
Spit Heads
The carriage is moved to the blotting station and the heads are fired. The nozzle plate is not
in contact with the blotting cloth. Follow these steps to perform a spit:
12/9/04
1.
Navigate to:
MAINTENANCE
mini purge nozzles
2.
Press the MENU button. You then see:
MAINTENANCE
spit heads
3.
Press the ACCEPT button. You then see:
Spitting Heads
please wait
4-17
Océ | Control Panel
Long Purge Nozzles
Warning:
Media must be installed prior to performing this function.
A long purge is the same as a low purge, except a nozzle print never follows the long purge.
Follow these steps to perform a long purge:
1.
Navigate to:
MAINTENANCE
spit heads
2.
Press the MENU button. You then see:
MAINTENANCE
long purge nozzles
3.
Press the ACCEPT button. You then see:
INKS TO LONG PURGE
C M Y K LM LC
Use the +/- buttons to select the color or colors to long purge.
4.
Press ACCEPT to begin purging. You then see:
Cleaning Nozzles
please wait
Pump Cleaning Fluid/Capping Fluid
During normal operation, cleaning fluid (for 5500/6600-series inks) or capping fluid (for
440-series inks) is automatically pumped to the sponges in the capping station. Follow these
steps to perform a manual pumping of cleaning fluid (for 5500/6600-series inks) or capping
fluid (for 440-series inks):
4-18
1.
Navigate to:
MAINTENANCE
long purge nozzles
2.
Press the MENU button. You then see:
MAINTENANCE
pump solvent
3.
Press the ACCEPT button to pump cleaning fluid (for 5500/6600-series inks) or
capping fluid (for 440-series inks). You then see:
Operator
MAINTENANCE
fill reservoir
You will hear the waste pump running longer than the solvent pump.
Fill Reservoir
Follow these steps to manually fill a selected ink reservoir:
1.
Navigate to:
MAINTENANCE
pump solvent
2.
Press the MENU button. You then see:
MAINTENANCE
fill reservoir
3.
Press the ACCEPT button. You then see:
FILL RESERVOIR
[ color ]
Use the +/- buttons to select the required color to fill the ink reservoir.
4.
Press ACCEPT. You then see:
FILLING [ color ]: XXX
press CANCEL to stop
The filling process automatically stops when the ink reservoir is full.
If you cancel before the reservoir is full, you then see:
FILL RESERVOIR
[ color ]
Another color can be selected for filling.
5.
Press the CANCEL button twice. You then see:
MAINTENANCE
bar code practice
Bar Code Practice
The Bar Code Practice menu enables you to practice swiping an ink bottle barcode with the
wand attached to the printer. The wand must be held at a certain angle and moved side-toside over the barcode at a consistent speed. Listen for the audio beep confirmation from the
control panel. One beep is a positive read. Two beeps is a negative read. Bar code swiping
is required when a new or existing ink bottle is installed.
12/9/04
4-19
Océ | Control Panel
To set up the Bar Code Practice menu, refer to the menu tree. Follow these steps to practice
scanning the bar code:
1.
Navigate to:
MAINTENANCE
fill reservoir
2.
Press the MENU button. You then see:
MAINTENANCE
barcode practice
3.
Press the ACCEPT button. You then see:
BARCODE PRACTICE
Press ACCEPT to Continue
4.
Press ACCEPT. You then see:
Scan the barcode
Accept->Manual Entry
5.
Scan the ink barcode found on the side of the bottle. Listen for the sound prompts;
single tone signifies that the barcode scan was successful whereas a double tone
signifies an unsuccessful scan. Check the control panel after a successful scan and
complete the ink bottle installation process. The tip of the barcode should run evenly
across the width of the barcode including some portion of the white space. Go to the
next step to enter it manually when scanning is unsuccessful.
6.
Press ACCEPT. You then see:
BAR CODE
->->->->->->->->->->
For manual entry, use the +/- buttons to select one symbol or letter as shown below
the bar code on the ink bottle and press ACCEPT. Repeat this process until all
symbols and letters are entered.
7.
0.4.4
Press the ACCEPT button, or press the CANCEL button. You then see:
OPERATOR
maintenance
Media Menu
The Media menu enables an operator to change the type of media selected during media
load or specify other media settings.
4-20
Operator
Selecting the Media Type
The label on the end of the supply media box states the media type. If the correct media was
not selected during media load, follow these steps to select the media you loaded:
1.
Navigate to:
MAIN MENU
operator
2.
Press the ACCEPT button. You then see:
OPERATOR
print parameters
3.
Press the MENU button four times. You then see:
OPERATOR
media menu
4.
Press ACCEPT. You then see:
MEDIA MENU
Media table version: XXX
The media table contains the printer set-up values that are implemented when a
media is selected through the Media Type submenu. The version is updated by a
separate file that typically accompanies a new firmware version.
5.
Press ACCEPT. You then see:
MEDIA MENU
print side: first side
If you select the first side, go to step 9.
6.
Use the +/- buttons to select the second side. You then see:
MEDIA MENU
print side: second side
You only select this option if you are printing the second side of a double-sided
image.
7.
Press ACCEPT. You then see:
SECOND SIDE
supply core OD: (3.10” - 4.0”)
Use the +/- buttons to enter the correct core diameter. The value is increased or
decreased in .01-inch increments. If you do not know the diameter, use a ruler and
measure the outside diameter of the core, and enter the value in this submenu.
12/9/04
4-21
Océ | Control Panel
8.
Press ACCEPT. You then see:
SECOND SIDE
condition media: OFF
Use the +/- buttons to turn media conditioning OFF/ON. The default value is
OFF.
Condition Media assists in accurate two-sided printing where the printed media
surface tension of the first side affects the printing of the second side. When set
ON, the printer advances the media the length of the print and rewinds to the
starting point.
9.
Press ACCEPT. You then see:
MEDIA MENU
media name
Use the +/- buttons to select the media you have loaded.
If you select the Other media type, see "Media Type: Other" on page 4-23.
10.
Press ACCEPT. You then see:
MEDIA MENU
takeup core OD: (3.10” - 4.0”)
Use the +/- buttons to enter the correct core diameter. The value is increased or
decreased in .01-inch increments. If you do not know the diameter, use a ruler and
measure the outside diameter of the core, and enter the value in this submenu.
11.
Press ACCEPT. You then see:
MEDIA MENU
conserve media: ON
Use the +/- buttons to turn media conservation ON/OFF. The default value is ON.
When set to ON, the printer rewinds the substrate to minimize waste before
printing the next image.
When set to OFF, the printer does not rewind the substrate before printing. This
setting should be used for media that is very thin or adhesive backed, which may
wrinkle during rewinding or become malformed by the heat required to dry the
inks.
12.
Press ACCEPT. You then see:
MEDIA MENU
feed adjustment: +/- 0 - 30
Use the +/- buttons to set the feed adjustment from -30 to +30. The default value
is 0.
4-22
Operator
This feature enables the adjustment of media stepping to compensate for variation
in media lots and environmental factors. The plus direction lengthens each media
step. The minus direction shortens each media step.
13.
Press ACCEPT. You then see:
MEDIA MENU
hor margins: (0.2" - 4.0")
Use the +/- buttons to select the required horizontal margin value for a job.
14.
Press ACCEPT. You then see:
MEDIA MENU
ver margins: (0.2" - 4.0")
Use the +/- buttons to select the required vertical margin value for a job.
15.
Press ACCEPT. You then see:
MEDIA MENU
[media name]
Media Type: Other
Selecting OTHER enables additional menus for manual setup. When changing values,
holding the +/- buttons continuously increments or decrements the value repeatedly. Follow
the steps below for this media type option:
1.
Navigate to:
MEDIA MENU
Other
2.
Press the ACCEPT button. You then see:
MEDIA MENU
thickness: (2.00 - 30.00) mil
The range for thickness values is 2.00-30.00 mils. The media thickness is typically
on the media container label, if any. The media thickness changes by .05 mils.
Use the +/- buttons to increment or decrement the thickness setting.
3.
Press ACCEPT. You then see:
MEDIA MENU
takeup core OD: (3.10" - 4.00")
Use the +/- buttons to enter the correct core diameter. The value is increased or
decreased in .01-inch increments. If you do not know the diameter, use a ruler and
measure the outside diameter of the core, and enter the value in this submenu.
12/9/04
4-23
Océ | Control Panel
4.
Press ACCEPT. You then see:
MEDIA MENU
supply core OD: (3.10" - 4.00")
Use the +/- buttons to enter the correct core diameter. The value is increased or
decreased in .01-inch increments. If you do not know the diameter, use a ruler and
measure the outside diameter of the core, and enter the value in this submenu.
5.
Press ACCEPT. You then see:
MEDIA MENU
4-pass servo target temperature: 150F
The temperature increments or decrements by 1 degree. The maximum
temperature setting is 155ºF. Use the +/- buttons to change the temperature
setting.
6.
Press ACCEPT. You then see:
MEDIA MENU
8-pass servo target temperature: 135F
The temperature increments or decrements by 1 degree. The maximum
temperature setting is 155ºF. Use the +/- buttons to change the temperature
setting.
7.
Press ACCEPT. You then see:
MEDIA MENU
conserve media: ON
Use the +/- buttons to turn media conservation ON/OFF. The default value is ON.
When set to ON, the printer rewinds the substrate to minimize waste before
printing the next image.
When set to OFF, the printer does not rewind the substrate before printing. This
setting should be used for media that is very thin or adhesive backed, which may
wrinkle during rewinding or become malformed by the heat required to dry the
inks.
8.
Press ACCEPT. You then see:
MEDIA MENU
feed adjustment: +/- 0 - 30
Use the +/- buttons to set the feed adjustment from -30 to +30. The default value
is 0.
This feature enables the adjustment of media stepping to compensate for variation
in media lots and environmental factors. The plus direction lengthens each media
step. The minus direction shortens each media step.
4-24
Operator
9.
Press ACCEPT. You then see:
MEDIA MENU
hor margins: (0.2" - 4.0")
Use the +/- buttons to select the required horizontal margin value for a job.
10.
Press ACCEPT. You then see:
MEDIA MENU
ver margins: (0.2" - 4.0")
Use the +/- buttons to select the required vertical margin value for a job.
11.
Press ACCEPT. You then see:
MEDIA MENU
Halogen Lamps maximum power: (min, low, medium, max)
Use the +/- buttons to select the required power.
The default value is max.
The high heat from the flying IR unit can cause some media to wrinkle at the
beginning of a print. The halogen lamps maximum power setting enables the
operator to lower the temperature of the flying IR unit to possibly alleviate the
wrinkling.
12.
0.4.5
Press ACCEPT. You then see:
MEDIA MENU
[media name]
About Printer
The About Printer menu enables you to view on the printer control panel the current
firmware version and the amount of media printed.
Follow these steps to view the About Printer menu:
12/9/04
1.
Navigate to:
MAIN MENU
operator
2.
Press the ACCEPT button. You then see:
OPERATOR
print parameters
3.
Press the MENU button five times. You then see:
OPERATOR
about printer
4-25
Océ | Control Panel
0.4.6
4.
Press ACCEPT. You then see:
ABOUT PRINTER
Printed: XXXXX
5.
Press ACCEPT or MENU. You then see:
ABOUT PRINTER
FW Rev.: XX.X
6.
Press ACCEPT or MENU. You then see:
ABOUT PRINTER
FW Date: XX / XX / XX
7.
Press ACCEPT or MENU. You then see:
ABOUT PRINTER
FW Time: XX:XX
8.
Press ACCEPT or MENU. You then see:
ABOUT PRINTER
Serial No.: XXXXXX
9.
Press ACCEPT or MENU. You then see:
ABOUT PRINTER
Boot rom: X.XX
10.
Press the ONLINE button. You then see:
MAIN MENU
Units
The Units menu enables you to choose between English and metric units. All control panel
menus will then display the selected unit.
Setting the Units
Follow these steps to select the type of unit to display on the control panel:
4-26
1.
Navigate to:
MAIN MENU
operator
2.
Press the ACCEPT button. You then see:
OPERATOR
print parameters
3.
Press the MENU button six times. You then see:
OPERATOR
units
Operator
4.
Press ACCEPT. You then see:
UNITS
(english or metric)
Use the +/- buttons to select a unit type.
5.
0.4.7
Press ACCEPT. You then see:
OPERATOR
units
Set Clock
The Set Clock menu enables you to set the date and time. When the date and time are set,
they are printed in the statistics output. The printer does not automatically adjust for
daylight savings time.
Set Date and Time
During the setting procedure, the ACCEPT button moves the underscore to the next
parameter to be set. In SET DATE, the underscore specifies:
•
Day
•
Month
•
Year
•
Day of the week
In SET CLOCK, the underscore specifies:
•
Hours
•
Minutes
Follow these steps to set the date and time:
12/9/04
1.
Navigate to:
MAIN MENU
operator
2.
Press the ACCEPT button. You then see:
OPERATOR
print parameters
3.
Press the MENU button seven times. You then see:
OPERATOR
set clock
4-27
Océ | Control Panel
4.
Press ACCEPT. You then see:
SET CLOCK
set date
Press MENU to set the time, and go to step 8.
5.
Press ACCEPT. You then see:
SET DATE
01 JAN 1997 WED
Use the +/- buttons to change each element: the date, the month, the year, and the
day of the week. Press ACCEPT after changing each element.
6.
Press ACCEPT after changing the day of the week. You then see:
SET CLOCK
set date
7.
Press MENU. You then see:
SET CLOCK
set time
8.
Press ACCEPT. You then see:
SET TIME
hh : mm
Use the +/- buttons to enter the correct hour and minute in 24-hour format. Press
ACCEPT after changing each element.
9.
0.5
Press ACCEPT after changing the minute. You then see:
SET CLOCK
set time
Ink Menu
The Ink menu is used to install new ink bottles and check the amount of ink remaining in
each bottle. You are required to either scan or manually enter the barcode code found on
the side of the ink bottle for each new installation.
0.5.1
Ink Bottle Installation
Follow these steps to view the Ink menu:
1.
Navigate to:
MAIN MENU
INK MENU
If you press MENU, go to step 6 (see page 4-29).
4-28
Ink Menu
2.
Press ACCEPT. You then see:
INSTALL INK BOTTLE
color: [color]
Use the +/- button to select a color to install.
3.
Select a color and press ACCEPT. You then see:
Scan barcode (Color)
Accept->Manual Entry
Scan the ink barcode found on the side of the bottle. Listen for the sound prompts;
single tone signifies that the barcode scan was successful whereas a double tone
signifies an unsuccessful scan. Check the control panel after a successful scan and
complete the ink bottle installation process. A barcode practice submenu is located
under the maintenance menu if you need to perfect the scan technique. The tip of
the barcode should run evenly across the width of the barcode including some
portion of the white space. Go to the next step to enter it manually when scanning
is unsuccessful.
4.
Press ACCEPT. You then see:
BAR CODE
->->->->->->->->->->
For manual entry, use the +/- buttons to select one symbol or letter as shown below
the bar code on the ink bottle and press ACCEPT. Repeat this process until all
symbols and letters are entered.
If you enter an ink barcode from an unapproved ink or if no barcode information
is entered and you press ACCEPT or MENU, the following message is displayed:
WRONG INK TYPE
Press ACCEPT to continue
5.
Press the ACCEPT or MENU button. The menu returns to step 3. You then see:
Scan barcode (color)
Accept->Manual Entry
The non-Océ ink barcode is 8 characters, beginning with the hyphen -YKT#J7R
12/9/04
4-29
Océ | Control Panel
This barcode is requested before each print job until a valid Océ ink barcode is
scanned.
Warning:
Océ Display Graphics Systems accepts no liability when non-Océ Display
Graphics Systems ink is used. Customers voluntarily using non-Océ
Display Graphics Systems ink assume all risk of damage that might
result. Customers agree to waive any claims or rights they may otherwise
have against Océ Display Graphics Systems or its agents for damage
and/or loss of business resulting from use of non-Océ Display Graphics
Systems ink.
6.
You then see:
INK LEVELS
color: xx% remain
Use the +/- button to select a color.
7.
Press ACCEPT or MENU. You then see:
INK LOW LEVEL
Ink low warning when: xx% remaining
The default value is 35%.
When the ink level decreases to the warning level, such as 35%, of the bottle
volume, Ink Low warning indicators appear on the operator control panel. If the
ink bottle is allowed to empty, the printed image can be ruined by ink drainage
from the juice boxes. Use the +/- button to adjust the setting. The minimum
recommended setting is 10%.
8.
Press ACCEPT or MENU. You then see:
MAIN MENU
ink menu
Invalid Bar Code
If an invalid bar code is detected, the following message is displayed:
Invalid barcode
press ACCEPT to continue
An invalid bar code can occur from an incorrect reading by the scanning wand.
Press the ACCEPT button. The menu returns to step 3 (see page 4-28). You then see:
Scan barcode (color)
Accept->Manual Entry
4-30
Configure I/0
If the printer determines that a full bottle has been used, the following message is displayed:
Expired barcode
press ACCEPT to continue
An expired bar code can occur from changing ink bottles without scanning a new bar code
or from additional ink being added to an installed bottle. Install a new bottle of ink and scan
its bar code.
Press the ACCEPT button. The menu returns to step 3 (see page 4-28). You then see:
Scan barcode (color)
Accept->Manual Entry
Configure I/0
0.6
The Arizona 600 printer has two types of data ports, Centronics™ parallel and low-voltage
differential (LVD) SCSI-3. The correct configuration is typically selected by the installing
service engineer and should not require adjustment by the customer.
0.6.1
Parallel Port Configuration
Note: This port is only used by service engineers for downloading firmware.
0.6.2
LVD-SCSI-3 Port Configuration
The standard 68-pin LVD-SCSI-3 port connects the printer to the PosterShop RIP
platform via a standard 68-pin SCSI-3 data cable. The maximum length of this cable is 40
feet (12 meters).
Warning:
NEVER connect or disconnect SCSI cables with the printer or the host
PC powered ON.
Follow these steps to configure the SCSI-3 port:
12/9/04
1.
Navigate to:
MAIN MENU
CONFIGURE I/O
2.
Press the ACCEPT button. You then see:
CONFIGURE I/O
active: SCSI
4-31
Océ | Control Panel
If the current setting is parallel, you will see:
CONFIGURE I/O
active: parallel
Use the +/- buttons to select SCSI.
3.
Press ACCEPT. You then see:
SCSI PORT
SCSI address: (0 - 6)
This option specifies a SCSI address that identifies the printer to the host system.
Use the +/- buttons to select an address (0-6), as required.
4.
Press ACCEPT. You then see:
SCSI Port
timeout XXX seconds
This option enables you to specify a time period in seconds (1-600) for the printer
to consider the job transfer complete, if an END OF PRINT command is not
received. The delay may need to be increased if the printer issues an error during
an image transfer. A typical error of this type may cause large blank areas (no data)
within the image. Increase this value by at least 60 seconds and try again. Use the
+ button to increment the timeout period.
The default setting is 60 seconds.
5.
Press ACCEPT. You then see:
SCSI PORT
ultra SCSI: (on or off)
This parameter pertains to the SCSI card being used on the host PC. This
parameter is normally set to On so that the host PC and the printer can negotiate
the highest transfer speed. If the cable is too long, it can cause transfer problems.
This parameter should then be set to Off. Use the +/- buttons to select On or Off.
4-32
6.
Press ACCEPT. You then see:
SCSI PORT
Interface cable detected: LVD or SE
7.
Press ACCEPT. You then see:
CONFIGURE I/O
active: SCSI
5
Printer Maintenance
Maintenance Guidelines
5.1
While Océ Display Graphics Systems furnishes guidelines for periodic maintenance, the
optimum maintenance schedule evolves from your observation of the Arizona 600 printer
over a period of use. For example, some maintenance is required each time you install a
new roll of media. The type of print job and media can determine the maintenance
schedule. Printing a high volume of solid ink fill images may require more tending than
printing low ink coverage images.
Océ Display Graphics Systems requires that the operator follows minimum cleaning
guidelines as described in this manual. A few minutes spent cleaning ensures the highest
quality prints. Use the Operator Maintenance Schedule Guidelines (see Table 5-1,
“Operator Maintenance Schedule Guidelines,” on page 5-2) for requirements about
when to perform regular maintenance to this printer during production runs.
Each customer operation involves different types of print jobs, environmental conditions,
duty cycles, and volume of work. While Océ furnishes guidelines for periodic
maintenance, the optimum maintenance schedule evolves from operator observation of
the printer over a period of use.
5.1.1
Cleaning Fluid/Capping Fluid Usage
The cleaning fluid (for 5500/6600-series inks) or capping fluid (for 440-series inks) is
used for cleaning and flushing print heads, the carriage face plate, and the platen.
The cleaning fluid (for 5500/6600-series inks) or capping fluid (for 440-series inks) is also
used to supply and preserve the capping station foam pads during operation of the printer.
The operator should refill the cleaning fluid (for 5500/6600-series inks) or capping fluid
(for 440-series inks) container located in the right end of the printer when a message
indicates the bottle is nearing empty.
Warning:
Do not wipe the outside painted surfaces or the Plexiglas window of the
printer with cleaning fluid (for 5500/6600-series inks) or capping fluid
(for 440-series inks). It will quickly damage the printer surface.
Print Head Maintenance and Nozzle Recovery
5.2
The Print Head Maintenance document ("Printer Maintenance" on page B-1) is an
essential guide for cleaning and flushing ink buildup from the print head nozzles or plates
and the carriage face plate on the Arizona 600 printer. The procedure is an engineering12/9/04
5-1
Océ | Printer Maintenance
controlled document and is also supplied with the cleaning kit shipped with the printer.
Follow the steps and precautionary messages in the document closely to ensure optimum
performance from your machine.
5.3
Operator Maintenance Schedule
The Arizona 600 printer requires daily maintenance. Periodic cleaning should be scheduled
for some components during the week. A few minutes spent cleaning ensures the highest
quality prints. Several areas require maintenance to ensure the highest print quality, and the
printer design gives you easy access to all these areas. Diligent application of the Arizona 600
printer Operator Maintenance Schedule Guidelines ensures optimum performance from
your printer.
Table 5-1 Operator Maintenance Schedule Guidelines
Description
Procedure
Frequency
Absorbing Pads
Capping Station Pads: Clean the pads biweekly.
Replace pads every 60 days or sooner if
excessively worn, dirty, or ink encrusted. (See
“Replacing Capping Station Pads” on page 510.)
Capping Station Bed: Replace this large pad
located under the capping station if the pad
becomes saturated with ink.
Bi-weekly
Air Pressure Pump
Filter
Replace the filter when the clear crystal material begins to fully discolor. (See “Air Pressure
Pump Line Filter” on page 5-19.)
As required
Blotting Cloth
Replace when empty or as indicated by the
control panel messages. (See “Blotting Cloth
Installation” on page 5-11.)
As required
Capping Station
Follow the Capping Station Maintenance procedure (See “Capping Station Maintenance”
on page 5-8.).
Twice a week
Carriage Cable
Adjust the carriage cable tension.
(See"Adjusting the Carriage Cable" on
page 5-16.)
Clean the carriage cable. (See "Cleaning the
Carriage Cable" on page 5-17.
Weekly or
monthly
5-2
Every 60 days
As required
Monthly
Operator Maintenance Schedule
Description
Procedure
Frequency
Carriage Rails
Wipe clean with a lint-free cloth and 91% or
higher isopropyl alcohol only. Use a lint-free
cloth saturated (but not dripping) with isopropyl alcohol (see Figure 3-12 on page 3-10).
Once a week
Cleaning Fluid (For
5500/6600-Series
Inks) or Capping
Fluid (For 440-Series
Inks)
Refill the bottle when low or as indicated by
control panel messages. (See “Cleaning Fluid
or Capping Fluid Container and Waste Container” on page 2-2.)
As required
Drip Roller
Wipe clean with a lint-free cloth and cleaning
fluid (for 5500/6600-series inks) or capping
fluid (for 440-series inks) (see Figure 3-12 on
page 3-10).
Daily
Encoder Strip
Wipe clean with a lint-free cloth and 91% or
higher isopropyl alcohol only. Take extra care
to not bend the strip when cleaning.
Once a month
Ink Supply Bottles
Replace when empty or as indicated by control panel messages. (See “Ink Supply
Changes” on page 2-2.)
As required
Ink Waste Container
Empty when control panel message indicates
the container is full. Follow ink MSDS requirements for disposal. (See “Cleaning Fluid or
Capping Fluid and Waste Bottles” on page 22.)
As required
Interior and Exterior
Wipe surfaces clean with a lint-free cloth and
91% or higher isopropyl alcohol only.
Once a week
Left and Right End
Caps
All doors must be closed or secured at all
times to capture fumes and heat.
Always
Media Drive Roller
Wipe clean with a lint-free cloth and 91% or
higher isopropyl alcohol only.
Wipe clean with a sponge/scrubber and 91%
or higher isopropyl alcohol only. (See “Cleaning the Media Drive Roller” on page 5-5.)
Every media
change
Wipe the cylindrical-shaped steel bar clean
with a lint-free cloth and 91% or higher isopropyl alcohol (see Figure 3-11 on page 3-9).
Every media
change
Media Encoder Turn
Bar
12/9/04
Weekly
5-3
Océ | Printer Maintenance
Description
Procedure
Frequency
Plexiglas® Windows
Wipe clean with a lint-free cloth and 91% or
higher isopropyl alcohol only.
As required
Print & Go Drive
Roller
Wipe clean with a lint-free cloth and 91% or
higher isopropyl alcohol only (see Figure 3-18
on page 3-20).
Wipe clean with a sponge/scrubber and 91%
or higher isopropyl alcohol only (see Figure 318 on page 3-20).
Every media
change
Weekly
Print Heads
Clean the nozzle plates with a lint-free swab
and cleaning fluid (for 5500/6600-series inks)
or capping fluid (for 440-series inks) according
to the Print Head Maintenance and Nozzle
Recovery Procedures document "Printer
Maintenance" on page B-1.
Use the Operator/Maintenance Menu to purge
print heads. (Note: Media must be installed
when a purge is performed.)
Daily
Wipe clean with a lint-free cloth and 91% or
higher isopropyl alcohol or cleaning fluid (for
5500/6600-series inks) or capping fluid (for
440-series inks).
Cover the open ends with paper to improve
the vacuum when narrow media is in use.
Every media
change
Ensure that the airflow and ducting meet published site survey requirements.
Every 60 days
Vacuum Platen
Ventilation and
Drying
As required
As required
Important: If 91% or higher isopropyl alcohol does not remove ink stains, use only the
approved cleaning fluid (for 5500/6600-series inks) or capping fluid (for
440-series inks) supplied with the printer in very small quantities. Do not
use cleaning fluid (for 5500/6600-series inks) or capping fluid (for 440series inks) on the Plexiglas windows. Always use protective gloves, eye
protectors, and a lint-free cloth when handling solvent-based solutions.
5.4
Automated Maintenance
The Arizona 600 printer firmware performs automated maintenance without direct
operator intervention when the printer is idle and while printing.
5-4
Operator-Performed Maintenance
Operator-Performed Maintenance
5.5
5.5.1
Waste Bottle Full
If the waste bottle is detected to be full, a warning message is displayed before the next print.
This message can be overridden up to five times before it becomes a hard error message. The
waste container must be emptied and disposed of in accordance with state and local laws or
in accordance with the MSDS sheets.
5.5.2
Cleaning Fluid/Capping Fluid Empty
If the cleaning fluid (for 5500/6600-series inks) or capping fluid (for 440-series inks) bottle
is detected to be empty, a warning message is displayed before the next print. This message
can be overridden up to five times before it becomes a hard error message.
5.5.3
Cleaning the Media Drive Roller
General Cleaning
The media drive roller should be wiped clean with a lint-free cloth and 91% or higher
isopropyl alcohol with every media change to maintain high feed accuracy and print quality.
Weekly, the media drive roller should be wiped clean with a sponge/scrubber and 91% or
higher isopropyl alcohol only to remove any accumulated paper dust or residue.
Figure 5-1 Cleaning the Media Drive Roller
Additional Debris Removal
If too much media debris accumulates on the components, it can track back onto the media
and ruin prints. To keep your prints clean and free of debris, routine cleaning should be
done after each media roll change. This is especially important when using medias with
adhesive backing. They have a coated layer that comes off easily and accumulates on various
areas of the printer.
12/9/04
5-5
Océ | Printer Maintenance
Manually clean the following areas:
•
Take-up and supply dancer and nylon support bearing - use a lint-free cloth
with alcohol to clean debris off the entire dancer bar, especially where it
contacts the nylon support bearing. Gently push back on the white support
and insert the alcohol-saturated cloth to clean the white support surface (see
Figure 5-2).
Nylon
Support
Bearing
Figure 5-2 Take-up and Supply Dancer Bar and Nylon Support Bearing
5-6
Operator-Performed Maintenance
•
Encoder wheel - use masking tape (or similar tape) to pick debris off the wheel.
Rotate the wheel and use fresh tape until the entire surface of the wheel is clean
(see Figure 5-3).
Figure 5-3 Press Fresh Tape on the Encoder Wheel
Figure 5-4 Debris on the Tape
12/9/04
5-7
Océ | Printer Maintenance
•
Media drive roller - follow the general cleaning procedure (see "General
Cleaning" on page 5-5) with emphasis on the debris that accumulates on the
center of the roller (see Figure 5-5).
Figure 5-5 Debris on the Media Driver Roller
5.5.4
Capping Station Maintenance
The capping station (see Figure 5-7 on page 5-9) consists of a single plate with 24 small
saturated foam pads (OIN #3012001442). The station is used to cap and preserve the printhead nozzles when the printer is idle between images. The cleaning fluid (for 5500/6600series inks) or capping fluid (for 440-series inks) is pumped up to the plate to provide
continuous saturation of the pads to prevent the solvent ink from drying on the nozzles.
The capping station has funnel-shaped sections with drain holes for each of the print heads
(see "Cleaning the Drain Slots and Drain Holes" on page 5-9). During daily printing
operations, purges ensure nozzle integrity before and during prints. The ink drains through
a manifold and into a single tube down to the waste bottle. Over time, the bottle fills and
must be emptied. Notification is via the control panel.
5-8
Operator-Performed Maintenance
Cleaning the Capping Station
Follow these steps to clean the capping station plate:
1.
Move the carriage using the Access Carriage menu to expose the capping station
surface.
2.
Open the right-side end cap doors.
3.
Using several swabs and cleaning fluid (for 5500/6600-series inks) or capping fluid
(for 440-series inks), clean the drain slots and the drain holes (see Figure 5-6).
Figure 5-6 Cleaning the Drain Slots and Drain Holes
4.
Using a lint-free cloth saturated with cleaning fluid (for 5500/6600-series inks) or
capping fluid (for 440-series inks), clean the capping station plate (see Figure 5-7).
Figure 5-7 Capping Station
12/9/04
5-9
Océ | Printer Maintenance
5.
Monitor and replace any foam pads that are worn (significantly deformed) or
discolored. See Table 5-1, “Operator Maintenance Schedule Guidelines,” on page 52 for more details.
6.
Park the carriage using the Park Carriage menu.
Replacing Capping Station Pads
Follow these steps to replace the capping station pads:
1.
Soak new pads for at least 10 minutes in cleaning fluid (for 5500/6600-series inks)
or capping fluid (for 440-series inks) so they expand to seat correctly.
2.
Move the carriage using the Access Carriage menu to expose the capping station
surface.
3.
Open the right-side end cap doors.
4.
Remove and discard all used pads.
Note: If new pads are unavailable, remove the existing pads. Soak them in a
container with cleaning fluid (for 5500/6600-series inks) or capping
fluid (for 440-series inks) for a few minutes and squeeze out the dirty
fluid. Repeat this process several times until the extracted fluid is
relatively clean.
5.
Use a lint-free cloth saturated with cleaning fluid (for 5500/6600-series inks) or
capping fluid (for 440-series inks), and clean the capping station plate, especially the
indentions where the new pads will set (see Figure 5-7 on page 5-9).
6.
Squeeze most of the fluid from the new pads and install them into the indentations
in the capping station.
Note: Do not squeeze the pads dry. Leave some fluid so the pads remain
moist.
7.
5-10
Park the carriage using the Park Carriage menu.
Maintenance Cloth Station
Maintenance Cloth Station
5.6
The maintenance cloth station (see Figure 5-8) is located in the left-side end cap. Two doors
provide access for replacing the blotting cloth (OIN# 3012000247). The cloth provides a
purge area for the print heads to remove excess ink from the nozzles and head surface. The
cloth rises via an air cylinder to extract ink from the underside of the carriage.
Figure 5-8 Maintenance Cloth Station
5.6.1
Blotting Cloth Installation
Follow these steps to install the blotting cloth:
12/9/04
5-11
Océ | Printer Maintenance
8.
To lower the maintenance station, pull the release handles found on the right side
(see Figure 5-9). The entire maintenance station slides down slowly.
Figure 5-9 Blotting Cloth Release Handle
Note: The blotting cloth can be easily changed without lowering the
maintenance station.
5-12
Maintenance Cloth Station
9.
Swing back both lever arms and remove the used blotting cloth roll (see Figure 5-10).
Figure 5-10 Lever Arms
Warning:
Never reinstall a used blotting cloth roll. It contains dried ink and other
foreign particles that can damage the print heads.
10.
The blotting cloth rides over a Teflon® sheet on top of a foam support pad. Clean
the sheet with recommended cleaning fluid (for 5500/6600-series inks) or capping
fluid (for 440-series inks), and inspect the support foam before replacing the blotting
cloth (see Figure 5-11).
Figure 5-11 Blotting Cloth Sheet and Support Foam
12/9/04
5-13
Océ | Printer Maintenance
11.
While wearing a pair of butyl rubber gloves, wipe down any ink that may have
accumulated along the surface of the Teflon sheet. Use a lint-free cloth saturated with
cleaning fluid (for 5500/6600-series inks) or capping fluid (for 440-series inks).
12.
Install the new blotting cloth roll on the lower hub, and capture the left end with the
lever arm. Install the empty notched take-up core on the upper hub with drive pins,
and capture the left end with the lever arm (see Figure 5-12).
Upper
Hub
Lower
Hub
Figure 5-12 Blotting Cloth Hubs
13.
Feed the leading edge of the cloth from the bottom of the roll up and around the
back side of the Teflon sheet and foam pad (see Figure 5-13).
Figure 5-13 Feeding the Cloth (Step 1)
5-14
Maintenance Cloth Station
14.
Pull the leading edge of the cloth across the Teflon sheet and down until it reaches
the take-up core (see Figure 5-14). Remove the paper backing off the leading edge of
the plastic strip attached to the cloth so it can be taped evenly to the empty take-up
core.
Figure 5-14 Feeding the Cloth (Step 2)
15.
Align the plastic strip with the right ed of the core and attach the sticky strip
horizontally across the empty core (see Figure 5-15).
Figure 5-15 Attach the Cloth to the Take-up Core
16.
12/9/04
Rotate the supply roll to take out the slack in the cloth path. The station will
automatically raise and lock into the correct position at the beginning of the next
print.
5-15
Océ | Printer Maintenance
5.7
Carriage Cable
5.7.1
Adjusting the Carriage Cable
The carriage cable on your new printer will require weekly adjustment during the first two
months after installation. After this initial break-in period, adjustment is recommended
once a month.
In the event the carriage cable is ever replaced in your printer, the new cable will stretch for
several weeks after replacement. The carriage cable may need to be tightened several times
a day for about a week, once a day for a couple of weeks, then weekly for another month to
be certain the cable is fully stretched and tight. After the break-in time, this adjustment will
not be required very often as the cable is fully stretched. After the initial break-in period,
adjustment is recommended once a month.
The carriage cable should be checked for adjustment or cleaning if carriage speed/encoder
errors occur.
To adjust the carriage cable, perform the following tasks:
1.
Turn the handle clockwise (right) smoothly until the handle clicks (see Figure 5-16).
Figure 5-16 Adjusting the Carriage Cable Tension
2.
5-16
Turn the handle an additional full turn until it clicks again. This will verify the cable
is tensioned fully.
Carriage Cable
5.7.2
Cleaning the Carriage Cable
The carriage cable should be cleaned monthly to remove normal build-up of dirt, oils, or
ink on the cable. Additionally, the cable should be checked for cleaning or adjustment if
carriage speed/encoder errors occur.
Note: Always wear gloves when handling the carriage cable. Handling the carriage cable
with bare hands can result in the build-up of oils on the cable, which can lead to
carriage speed/encoder errors.
To clean the carriage cable, perform the following tasks:
12/9/04
1.
Open the top door of the printer.
2.
Clean the exposed cable over the platen using a clean cloth with isopropyl alcohol.
3.
From the operator panel, access the carriage to move it to the left end of the printer.
4.
Clean the exposed cable over the platen using a clean cloth with isopropyl alcohol.
5.
From the operator panel, park the carriage over the capping station.
5-17
Océ | Printer Maintenance
5.8
Printer Filters
Filter type, part number, and dimensions are documented on labels near the filter locations.
Replacement filters are available for purchase from Océ. Contact an Océ supplies
representative if you have any questions or for more information on these filter types and
service life.
5.8.1
Purolator Hi-40 Filters
System Filters
Four air system filters are required on the Arizona 600 printer. Each filter should be
inspected every two months. The filter should be replaced when the filter fabric begins to
discolor from the original condition or once every twelve months, whichever comes first.
They are located at the rear of the printer just below the electronic bay doors. The air system
filter (Dim: 9 1/2 in. x 16 1/2 in. x 1 in.) replacement is OIN #3011570041. These filters
easily slide in/out from underneath the printer (see Figure 5-17).
Figure 5-17 Purolator Hi-40 System Filters
Note: An airflow direction arrow is printed on the side of the filter. The arrow should
be pointing up when installed because the air is being drawn up into the printer.
5-18
Printer Filters
5.8.2
Air Pressure Pump Line Filter
An air pressure pump filter is required on the Arizona 600 printer. The filter is located in
the front of the printer inside the lower right bay doors near the air tanks. The replacement
is OIN #3011695043. The filter is transparent and must be replaced when the clear crystal
material begins to fully discolor (see Figure 5-18). Contact an Océ service representative for
filter type, service life, replacements, questions and/or more information.
Figure 5-18 Air Pressure Pump Line Filter
12/9/04
5-19
Océ | Printer Maintenance
5-20
6
Error Messages and Troubleshooting
Overview
6.1
This section covers general problems that may occur with the printer. In most cases,
malfunctions that trigger system error messages are caused by human error, a system
malfunction, an interface cable malfunction, mechanical printer malfunction and/or printer
firmware failure.
6.1.1
User-Correctable Errors
User-correctable errors are problems that interfere with printing but do not shut down
the printer completely. Typically, these errors are problems that prevent starting a
printing job or that interrupt the current print. You should be able to fix user-correctable
errors without a service call. In most cases, the printer itself informs you what is wrong by
displaying an error message on the control panel. Check these common error messages
and apply the appropriate remedy (see Table 6-1, “Error Message Explanations and
Actions,” on page 6-3).
Insufficient Media
The following message is displayed:
INSUFFICIENT MEDIA
(press ACCEPT to ignore)
The printer may have too little media to print the job. The INSUFFICIENT MEDIA
message may be overridden to continue printing. However, the printer may run out of
media prior to the conclusion of the printing or drying process. If you do not think
enough media is available on the supply media roll, replace it with a new one and restart
your print job.
Door Open
A door is open. Check and close all doors. If the error does not go away, contact your Océ
Display Graphics Systems service representative.
Take-up Roll Full
Too much media is present on the take-up roll. Remove the full roll and replace it with
an empty core.
12/9/04
6-1
Océ | Error Messages and Troubleshooting
Low Ink
Replace the ink color indicated on the control panel and scan the new bottle’s bar code.
Low Solvent
Refill the cleaning fluid (for 5500/6600-series inks) or capping fluid (for 440-series inks)
container.
No Paper
No media is present on the media supply roll. Install a new media roll.
6.1.2
If Problems Persist
If problems persist, perform the following actions as appropriate for the situation:
•
Check for media tears.
•
If the media does not load or has other problems related to installation, try
another roll of media.
•
If you just changed ink in the printer, review the procedures in the user’s
manual and check for successful installation.
•
Try printing the configuration print or menu tree from the Test Prints menu.
•
If the printer is not receiving print jobs, check the SCSI cable/connections.
If you are still having problems, contact your Océ Display Graphics Systems service
representative.
6.1.3
Calling for Service
Trying to eliminate simple problems before calling your service representative is important,
but knowing when to call for service is also important. Without training, servicing the
printer yourself may cause further damage. When you have determined that a service call is
required, call as soon as possible. Have the following information ready:
6-2
1.
Printer model and serial number. They are located on the lower right panel at the
rear of the printer or through the About Printer menu.
2.
The type of computer or computer connection and operating system acting as the
print server.
3.
Error message displayed on the operator control panel, if any.
4.
The exact circumstances when the error occurred, such as during media loading,
printing, or maintenance.
System Errors
5.
Note any unusual phenomena, such as peculiar printing, noises, and smells associated
with the failure.
6.
The media type and lot number. This information may be located on the original box
and inside the tube of the roll.
System Errors
6.2
System errors stop the printer and prevent operation until the error is resolved. Many system
error messages indicate the source of the problem and state that the error can be cleared by
pressing the ACCEPT button on the control panel. If the problem persists, record the error
message and contact your Océ Display Graphics Systems service representative.
Table 6-1 Error Message Explanations and Actions
CONTROL PANEL MESSAGE
EXPLANATION AND ACTION
Print System Warning Messages
WARNING
insufficient media
The printer may have too little media to print
the job. The INSUFFICIENT MEDIA
message may be overridden to continue
printing. However, the printer may run out of
media prior to the conclusion of printing or
the drying process. If you do not think
enough media is available on the supply
media roll, replace it with a new one and
restart your print job.
WARNING
media too narrow
Lower the margin settings in the printer
menu, verify the actual media width and
compare it to the image width set in
PosterShop, and reprocess the image.
WARNING
no media
If no media is loaded, load the media. If
media is loaded, perform the media installation procedure again.
WARNING
take-up roll full
The take-up roll has reached maximum
diameter. Remove the roll, and install an
empty core.
Close All Doors and
press ACCEPT button
Door is open. Close all doors, and press the
ACCEPT button.
12/9/04
6-3
Océ | Error Messages and Troubleshooting
CONTROL PANEL MESSAGE
EXPLANATION AND ACTION
Waste Bottle Almost Full
Press ACCEPT to Continue
Ink waste container is almost full. Monitor
closely, and empty the ink waste container.
Then, press ACCEPT.
Please Replace Waste Bottle
and press ACCEPT button
Ink waste container is full. Empty the ink
waste container, and press ACCEPT.
Media Encoder error
press ACCEPT button
The media is not contacting the media
encoder wheel properly. Perform the following steps before you press ACCEPT:
1. Lower the media-encoder pinch roller.
2. Verify the supply and take-up core
notches are engaged into the mandrel hubs.
3. Verify that the media is not too thick or
stiff.
BLOTTING CLOTH IS ALMOST OUT
press ACCEPT to continue
Check the amount of blotting cloth available
and monitor frequently. Replace the blotting
cloth before the next long print job.
BLOTTING CLOTH IS OUT
press ACCEPT to continue
Replace the blotting cloth, then press
ACCEPT.
Status and Low Ink Messages
XX:XX Media: XXX' Used: YY’ IR/PZ:
Idle
Printer is idle.
XX:XX Media: XXX' Used: YY’ IR/PZ:
DOOR OPEN
Printer is idle, but the door is open. Close
the door to return to idle.
XX:XX Media: XXX' Used: YY’ IR/PZ:
CANCELLING PRINT
Printer is cancelling print.
XX:XX Media: XXX' Used: YY' IR/PZ:
PRN: [job name] dd%
Printer has printed dd percent of [job name].
XX:XX Media: XXX' Used: YY' IR/PZ:
INP: [job name] dd%
Printer has input (parsed) dd percent of [job
name].
XX:XX Media: XXX' Used: YY' IR/PZ:
TST: [job name] dd%
Printer has generated dd percent of [test
print].
ADD BLACK INK
then press ACCEPT
Black ink is out. Replace the ink, and press
ACCEPT.
6-4
System Errors
CONTROL PANEL MESSAGE
EXPLANATION AND ACTION
ADD CYAN INK
then press ACCEPT
Cyan ink is out. Replace the ink, and press
ACCEPT.
ADD MAGENTA INK
then press ACCEPT
Magenta ink is out. Replace ink, and press
ACCEPT.
ADD YELLOW INK
then press ACCEPT
Yellow ink is out. Replace ink, and press
ACCEPT.
ADD LIGHT CYAN INK
then press ACCEPT
Light Cyan ink is out. Replace ink and then
press ACCEPT.
ADD LIGHT MAGENTA INK
then press ACCEPT
Light Magenta ink is out. Replace the ink,
and press ACCEPT.
SOLVENT LOW
Refill the cleaning fluid (for 5500/6600-series
inks) or capping fluid (for 440-series inks)
container.
System Messages
SYSTEM ERROR
[press ACCEPT to restart]
Press ACCEPT for these types of messages. The printer performs a soft reboot.
Allow the printer to reboot and return to idle.
Do not power the printer Off and On to clear
these errors.
If the problem does not clear, call your
authorized service representative with the
details about what the printer was doing and
the exact error messages displayed on the
control panel.
SYSTEM ERROR [press ACCEPT to
restart]
purge air pressure failure
If the error returns after you press ACCEPT
to restart the printer, call your authorized
service representative.
SYSTEM ERROR [press ACCEPT to
restart]
carriage encoder error
Perform the following step before you press
ACCEPT:
1. Clean and/or adjust the carriage cable
tension, as described in Chapter 5.
If the error returns after you press ACCEPT
to restart the printer, call your authorized
service representative.
12/9/04
6-5
Océ | Error Messages and Troubleshooting
CONTROL PANEL MESSAGE
EXPLANATION AND ACTION
SYSTEM ERROR [press ACCEPT to
restart]
TAKEUP MOTOR or ENCODER
Replace the take-up roll, if empty. Check
that the take-up core is correctly installed on
the mandrel hubs. If the error does not clear,
call your authorized service representative.
SYSTEM ERROR [press ACCEPT to
restart]
SUPPLY MOTOR or ENCODER
Replace the supply roll, if empty. Check that
the supply core is correctly installed on the
mandrel hubs. If the error does not clear, call
your authorized service representative.
SYSTEM ERROR [press ACCEPT to
restart]
FEED MOTOR or ENCODER
Check for a possible media jam. Ensure the
pinch rollers are down. Clean the media
drive roller. If the error does not clear, call
your authorized service representative.
SYSTEM ERROR [press ACCEPT to
restart]
TAKEUP DANCER
Verify the media is loaded properly,
especially on the take-up roll. If the error
does not clear, call your authorized service
representative.
SYSTEM ERROR [press ACCEPT to
restart]
SUPPLY DANCER
Verify the media is loaded properly,
especially on the supply roll. If the error does
not clear, call your authorized service
representative.
SYSTEM ERROR [press ACCEPT to
restart]
CARRIAGE STEPPER
If the error returns after you press ACCEPT
to restart the printer, call your authorized
service representative.
SYSTEM ERROR [press ACCEPT to
restart]
INK VACUUM FAILURE
If the error returns after you press ACCEPT
to restart the printer, call your authorized
service representative.
6-6
System Errors
CONTROL PANEL MESSAGE
EXPLANATION AND ACTION
SYSTEM ERROR [press ACCEPT to
restart]
CARRIAGE SPEED ERROR
Perform the following step before you press
ACCEPT:
1. Clean and/or adjust the carriage cable
tension, as described in Chapter 5.
If the error returns after you press ACCEPT
to restart the printer, call your authorized
service representative.
SYSTEM ERROR [press ACCEPT to
restart]
CARRIAGE LCA FAILURE
If the error returns after you press ACCEPT
to restart the printer, call your authorized
service representative.
SYSTEM ERROR [press ACCEPT to
restart]
BLOTTER MOTOR or ENCODER
This error can occur after lowering the
maintenance station to clean the print head
nozzle plates. Check if the blotter cloth
supply roll is loose and take up any slack by
turning the supply roll. Press ACCEPT to
restart the printer. If the error does not clear,
call your authorized service representative.
System Error
Uncorrectable Feed Error
Check for loose media and the correct
attachment of the take-up and supply cores
to the mandrel hubs. Ensure the mediaencoder pinch roller and the media drive
roller pinch rollers are in the correct position.
The media may an unapproved media that
does not work within the printer
specification. Use an approved media. If the
error does not clear, call your authorized
service representative.
12/9/04
6-7
Océ | Error Messages and Troubleshooting
6-8
Appendix A
Menus
The Arizona 600 printer software displays a series of menus to facilitate the operation of
the printer. The entire menu tree structure can be printed using the Print Menu Tree
menu (See “Print Menu Tree” on page 4-13).
Images of the following menus can be found in this appendix:
Menu
Page
Copies/Reprints Menu ...................................................................A-2
Operator Menu ..............................................................................A-3
Print Parameters Menu ............................................................A-3
Test Prints Menu .....................................................................A-4
Maintenance Menu (Part 1) ....................................................A-5
Maintenance Menu (Part 2) ....................................................A-6
Media Menu ............................................................................A-7
About Printer Menu ................................................................A-8
Units Menu .............................................................................A-9
Set Clock Menu ....................................................................A-10
Ink Menu .....................................................................................A-11
Configure I/O Menu ...................................................................A-12
12/9/04
A-1
Océ|Menus
Figure A-1 Copies/Reprints Menu
A-2
Figure A-2 Print Parameters Menu
12/9/04
A-3
Océ|Menus
Figure A-3 Test Prints Menu
A-4
Figure A-4 Maintenance Menu (Part 1)
12/9/04
A-5
Océ|Menus
Figure A-5 Maintenance Menu (Part 2)
A-6
or
MENU
MAIN MENU
copies/reprints
MAIN MENU
operator
ACCEPT
MENU
MAIN MENU
ink menu
MENU
.
.
.
MENU
OPERATOR
media menu
ACCEPT
MENU
MENU
MEDIA MENU
Media table version: XXX
MEDIA MENU
print side
+/-
second side
ACCEPT
ACCEPT
first side
MENU
ACCEPT
+/- ACCEPT
OPERATOR
about printer
SECOND SIDE
supply core OD: (3.10" - 4.00")
SECOND SIDE
condition media: OFF/ON
+/- ACCEPT
MENU
+/- ACCEPT
MENU
MEDIA MENU
[media name or other]
+/-
other
MEDIA MENU
takeup core OD: (3.10" - 4.00")
MEDIA MENU
supply core OD: (3.10" - 4.00")
+/- ACCEPT
MENU
MEDIA MENU
conserve media: ON/OFF
MEDIA MENU
4-pass servo target temperature: 150F/C
+/- ACCEPT
MENU
+/- ACCEPT
MENU
+/- ACCEPT
MENU
MEDIA MENU
+/- ACCEPT
MENU
thickness: (2.00 - 30.00 mil)
+/- ACCEPT
MENU
MEDIA MENU
takeup core OD: (3.10" - 4.00")
+/- ACCEPT
MENU
+/- ACCEPT
MENU
media name
MEDIA MENU
feed adjustment: +/- 0 - 30
+/- ACCEPT
MENU
+/- ACCEPT
MENU
MEDIA MENU
8-pass servo target temperature: 135F/C
MEDIA MENU
hor. margins: (0.2" - 4.0")
+/- ACCEPT
MENU
+/- ACCEPT
MENU
+/- ACCEPT
MENU
+/- ACCEPT
MENU
MEDIA MENU
conserve media:ON/OFF
MEDIA MENU
ver. margins: (0.2" - 4.0")
MEDIA MENU
Halogen Lamps max. power: (min, low, medium, max)
+/- ACCEPT
MENU
MEDIA MENU
ver. margins: (0.2" - 4.0")
+/- ACCEPT
MENU
MEDIA MENU
hor. margins: (0.2" - 4.0")
+/- ACCEPT
MENU
MEDIA MENU
feed adjustment: +/- 0 - 30
Figure A-6 Media Menu
12/9/04
A-7
Océ|Menus
Figure A-7 About Printer Menu
A-8
Figure A-8 Units Menu
12/9/04
A-9
Océ|Menus
Figure A-9 Set Clock Menu
A-10
Figure A-10 Ink Menu
12/9/04
A-11
Océ|Menus
Figure A-11 Configure I/O Menu
A-12
Appendix B
Printer Maintenance
Instructions for properly cleaning and/or flushing ink buildup from the capping station,
carriage face plate and the print head nozzle plates on the Arizona 600 printer.
Materials
Print head maintenance requires the following materials:
•
Isopropyl Alcohol (91% Isopropyl or higher)
•
Shallow 9-Inch x 14-Inch Pan
•
50-ml Syringe Kit (OIN #3010100747)
•
Swabs (OIN #3011620285)
•
Safety Glasses (OIN #3011620274)
•
Lint-Free Cloth (OIN #3011620283)
•
Butyl Gloves (OIN #3011620273)
•
For use with 5500-series and 6600-series inks only,
CGS-50 Cleaning Fluid, 1 Gallon (OIN #3012000798)
•
For use with 440-series inks only,
Capping Fluid (OIN #3012002981)
Flushing Fluid (OIN #3012002982)
Cleaning Fluid/Capping Fluid Usage
The cleaning fluid (for 5500/6600-series inks) or capping fluid (for 440-series
inks) is used for cleaning and flushing print heads, the carriage face plate, and the
platen.
The cleaning fluid (for 5500/6600-series inks) or capping fluid (for 440-series
inks) is also used to supply and preserve the capping station foam pads during
operation of the printer. The operator should refill the cleaning fluid (for 5500/
6600-series inks) or capping fluid (for 440-series inks) container located on the
lower right end of the printer (next to the waste bottle) when the printer indicates
the container is nearing empty.
Warning:
Do not wipe the outside painted surfaces or the Plexiglas window
of the printer with cleaning fluid (for 5500/6600-series inks) or
capping fluid (for 440-series inks). It will quickly damage the printer
surface.
12/9/04
B-1
Océ|Printer Maintenance
Material Usage
A specified quantity of cleaning fluid (for 5500/6600-series inks) or capping fluid
(for 440-series inks), butyl gloves and a lint-free cloth are used to clean the capping
station and the carriage face plate. A specified quantity of cleaning fluid (for 5500/
6600-series inks) or capping fluid (for 440-series inks) is used with swabs to clean
the print head nozzles. A user-supplied respirator should be used during each
cleaning procedure.
General Recommendations for the Operator
•
Always perform a low or high purge using the Operator/Maintenance menu as
a first step to bring nozzles back for printing.
Warning:
Media must be installed prior to performing this function.
•
Prepare materials for each cleaning procedure before accessing the carriage
over the maintenance (blotting cloth) station.
•
Clean all print head nozzle plates at the beginning and end of each work day.
•
Manually flush print heads as a last resort to clear blocked nozzles. Contact
your Customer Service representative for assistance with this procedure.
•
Read guidelines as outlined in the Material Safety Data Sheet (MSDS) before
handling or discarding ink-contaminated items.
Cleaning the Capping Station
B-2
1.
Move the carriage assembly by using the Operator/Maintenance/Access Carriage
menu on the control panel, open the doors on the right end and locate the capping
station.
2.
Put on the protective butyl gloves before handling any ink residue with a lint-free
cloth.
3.
Apply cleaning fluid (for 5500/6600-series inks) or capping fluid (for 440-series
inks) on a lint-free cloth and begin cleaning the capping station as shown in
Photo 1. Wipe away the ink build-up on the face of the capping station and inside
the ink purge drains.
Important: Do not reuse the ink soaked lint-free cloth on any other surfaces of the
printer.
Cleaning the Carriage Face Plate
1.
If you have just cleaned the capping station, then go to the left side of the printer and
open the doors. Otherwise, access the carriage assembly via the control panel using
the Operator/Maintenance/Access Carriage menu before opening the left-end doors.
2.
Retract/lower the maintenance station to expose the print head nozzle plates and
carriage face plate as shown in Photo 2.
3.
Continue using the protective butyl gloves when handling the ink residue.
4.
Apply cleaning fluid (for 5500/6600-series inks) or capping fluid (for 440-series inks)
on a lint-free cloth and gently wipe away any ink buildup on the carriage face plate
shown in Photo 3. Be careful not to touch any of the print head nozzle plates.
Cleaning the Print Head Nozzle Plates
0.1
This procedure should be performed at the beginning of each work day. Always use a new
swab for each color when performing this procedure.
Note: Adhering to this procedure will provide maximum head life and nozzle reliability.
Use an individual, small container of cleaning fluid (for 5500/6600-series inks) or capping
fluid (for 440-series inks) and a new swab for each color. Only use this cleaning fluid (for
5500/6600-series inks) or capping fluid (for 440-series inks) for several cleanings until it
becomes slightly discolored.
Warning:
Never use isopropyl alcohol on the print head nozzle plates.
12/9/04
5.
Access the carriage assembly via the control panel using the Operator/Maintenance/
Access Carriage menu, and open the doors on the left end of the printer.
6.
Lower the maintenance station to access the carriage faceplate.
B-3
Océ|Printer Maintenance
Dip the clean swab into the small container of cleaning fluid (for 5500/6600-series inks) or
capping fluid (for 440-series inks).
Warning:
Each swab has a seam that may scratch the print head nozzle plate. Use
the long semi-curved smooth sides of the swab.
7.
Starting with the light cyan print heads, use a saturated swab to gently apply the
cleaning fluid (for 5500/6600-series inks) or capping fluid (for 440-series inks) onto
the nozzle plates. Gently move the swab across each head nozzle plate one time to
moisten the ink on each head surface, as shown in Photo 4.
Important: Applying too much force with the swab against the nozzle plate may scratch
the surface.
8.
Repeat steps 4 and 5 for each color beginning next with light magenta, working your
way through cyan.
Important: Use one clean swab and container of cleaning fluid (for 5500/6600-series
inks) or capping fluid (for 440-series inks) per color. Never mix an ink
stained swab outside the color you are working with.
9.
10.
Allow the heads to soak a couple of minutes.
Starting again with the light cyan print heads, dip the light cyan swab into its
cleaning fluid (for 5500/6600-series inks) or capping fluid (for 440-series inks) and
gently move the saturated swab across each head nozzle plate several times to remove
the softened ink from each head surface.
Important: Applying too much force with the swab against the nozzle plate may scratch
the surface.
B-4
11.
Repeat step 8 for each color beginning next with light magenta, working your way
through cyan.
12.
Empty or store the cleaning fluid (for 5500/6600-series inks) or capping fluid (for
440-series inks) containers and unused cleaning items (swabs and/or lint-free cloth)
for the next scheduled cleaning. Do not store new swabs in the cleaning fluid (for
5500/6600-series inks) or capping fluid (for 440-series inks).
13.
Park the carriage assembly via the control panel using the Operator/Maintenance/
Park Carriage menu.
14.
Close the printer doors. The maintenance station automatically raises and locks into
place.
15.
Do a low purge of all colors from the Operator Maintenance menu. View the nozzle
print for good quality (few or no nozzles missing). If necessary, run a high purge.
Flushing a Print Head
This procedure is not performed daily. It is performed as a last resort to clear blocked
nozzles. It should only be performed by a trained operator. Contact your Customer Service
representative for assistance with this procedure. See "Materials" on page B-1 for
information about ordering the correct cleaning fluid or flushing fluid.
1.
Access the carriage assembly via the control panel using the Operator/Maintenance/
Access Carriage menu.
2.
Open the doors on the left end of the printer, then lower the maintenance station to
expose the print head nozzle plate, as shown in Photo 2. Place a shallow 9-in. x 14in. (23-cm x 36-cm) pan on top of the maintenance station.
3.
Locate the print head to be flushed. Disconnect and cap the ink line coming from
the ink reservoir to the selected print head to prevent ink spillage.
4.
Depending on the ink type, fill the syringe with cleaning fluid (for 5500/6600 series
ink) or flushing fluid (for 440 series inks), then attach it to the ink line going into the
disconnected print head.
Flush the print head into the pan below (positioned on top of the maintenance station).
Looking from the carriage face plate level, visually check to see the fluid exits the print head
nozzles evenly (straight down versus multidirectional streams of clear fluid) into the pan
from the print head.
Warning:
Do not allow any air to enter the print head.
5.
Disconnect the syringe from the head ink line, then reconnect the head and reservoir
ink lines back together.
Remove the catch pan, return the carriage to the home position and close the leftend doors. Run a long purge of all colors to prime the print heads. Run a low or high
purge for all colors to generate a nozzle test print to verify all nozzles are firing.
12/9/04
B-5
Océ|Printer Maintenance
Contact your Customer Service representative if this procedure fails to correct your
problem.
Photo 1
B-6
Photo 2
Photo 3
12/9/04
B-7
Océ|Printer Maintenance
Photo 4
B-8
Appendix C
Printer Features Description
Blotting Cloth Usage
The Océ Arizona 600 control panel displays the percentage of Blotting Cloth Remaining.
This will provide information for the operator to accurately judge when to change the
cloth without negatively impacting production. When approximately 20% remains on
the blotting cloth roll, the printer issues a warning before the start of each print.
Optimal versus Wide Writing Gap – Default “Optimal”
Note: The Wide Writing Gap option is not intended for smaller, high quality images.
Thin vertical lines and small text could be blurred and slight “misting” may
occur, leading to unwanted image artifacts.
When selecting the Other media option during the Load Media process, the operator now
is given the opportunity to select Wide Writing Gap. This will enable the operator to set
the print head carriage >90 mils above the platen.
Note that the Wide setting does not change the maximum acceptable media/
substrate thickness, which remains at 30 mils.
The actual distance between the media and head carriage will vary depending on the
actual thickness of the target media. The feature is primarily designed to provide an extra
gap to accommodate media that may have surface wrinkles that can lead to carriage
strikes, which may result in a ruined print and potential damage to the print heads.
Important: Carriage strikes increase the potential for permanent print head damage.
If a particular media/substrate results in multiple and/or frequent carriage
strikes, avoid using that media/substrate.
Conserve Media – Default “ON”
When the Océ Arizona 600 printer begins each new print, it will rewind the media to
minimize waste. Certain media may have difficulty rewinding and will wrinkle in the
process. This is primarily evident in very thin media or adhesive-backed substrates that
are malformed by the heat required to dry the inks during the printing process.
To avoid this problem, disable the Conserve Media feature in the Media Menu or
during the Load Media routine. With this selection OFF, each new image will begin
printing without rewinding the substrate.
12/9/04
C-1
Océ|Printer Features Description
The amount of unused media will vary from 203.2 mm (8 inches) when operating in the
roll-to-roll printing and a job is in the print queue to 101.60 mm (40 inches) when using
the Print & Go module.
Feed Adjustment – Default “0”
This feature provides the user with the capability to adjust the media advance length
between print swaths to accommodate for slight media and site-specific variations.
Although the Arizona 600 is programmed with specific media advance parameters based on
the specific substrate being used, environmental factors, such as heat, humidity, and
different media may affect the actual optimal media advance quantity.
A “short” feed may create dark line banding in an image while a “long” feed may exhibit a
white line between print passes. When using this function, pressing the “+” key will increase
the feed number and “-” will decrease it. The range is minus 30 to positive 30. A "+" number
increases the distance of each media feed and a "-" number decreases it.
This selection is available in the Media Menu and is also available during the Load Media
process.
Condition Media – Default “OFF”
This feature is designed to assist in accurate two-sided printing where the printed media
surface tension of the first side can affect the printing of the second side. When set to ON,
the Océ Arizona 600 printer will advance the media the length of the print and rewind back
to the beginning of the image prior to printing.
This selection only appears when the printer is configured to print the Second Side and is
not commonly needed when printing two-sided output. This selection is located in the
Media Menu and it’s also selectable during the Load Media process.
C-2
Appendix D
Two-Sided Printing and Double
Print
Two-Sided Printing
Traditionally, vinyl graphics that are viewable from both sides have been printed on
separate pieces of material and subsequently sewn or stitched together. The obvious
advantage of two-sided printing is the immediate savings resulting from using half the
amount of media. Other advantages include easier finishing, thereby reduced finishing
costs, faster time to market or turnaround time, less weight, more flexibility, and reduced
chance of damage during stitching.
The Print Second Side function enables you to generate extremely accurate two-sided
printing. This can be used for either double-sided banners or for backlit graphics.
The Océ Arizona 600 printer is capable of creating two-sided banner vinyl graphics for
use in many popular applications. Flags, POP banners, trade-show graphics, and two-way
viewable graphics of all kinds can be made easily and accurately using the unique
capabilities of the Océ Arizona 600 printer. This feature requires user input at the control
panel, and direct marking of the media to determine starting points from print to print.
With minimal hardware set-up and a little practice, the two-sided printing feature
provides an effective means to produce two-sided vinyl graphics.
Double Print
The Double Print function of the Arizona 600 is used to generate very high density
images for backlit graphics (constantly on) or other applications where a heavy coverage
of ink is desired. This feature is not recommended than images longer than 6’ (2 meters).
Important: Both of these applications will only work effectively in the roll-to-roll
printing mode. Using the Print & Go external take-up device is not
recommended.
0.0.1
Preparing the Arizona 600 Printer
Before generating a Double Print or a Double Sided Print, the Start of Print Point needs
to be identified. This point is different for both the 8-pass and 4-pass printing.
Marking the Platen
12/9/04
1.
Load 75" vinyl into the machine in then roll-to-roll mode.
2.
Specify "first side" in control panel when loading.
D-1
Océ|Two-Sided Printing and Double Print
3.
Allow machine to load normally.
4.
Using the "maintenance" menu, perform a
head purge.
5.
Allow the machine to complete its purge and
print the accompanying nozzle test - do not
advance the media.
6.
After the nozzle print is complete, open the lid
of the printer.
Figure A
7.
Observe the 4 marks made by the Cyan heads in the BACK right hand corner - see
Fig. A.
8.
Using the second Cyan mark from the
BACK
of the printer as a guide, using the
straight edge create a line continuing to
the right side of the platen - see Fig. A.
9.
Using the masking tape, affix a piece of
tape along this straight line - see Fig. A.
10.
Measure back 5 mm from the front
edge (See the red line in Fig. B) of the
tape for 8-pass printing and draw a
straight line to the edge of the platen.
Mark the edge
of the tape
closest to you
with indelible marker.
Measure and mark 5mm from bottom edge of tape.
This is the starting point of 8-pass print on the 2nd side.
Measure and mark 10mm from bottom edge of
tape. This is the beginning of 4-pass print on the
2nd side.
Figure B
11.
These lines accurately reflect where printing begins in 8 and 4 pass and will be used
to line up the image on the reverse side, when you switch to the second side.
Double Sided Printing: Printing the First Side of the Graphic
D-2
1.
From the control panel, select "Menu", "Operator", "Print Parameters", "Statistics"
and turn "Statistics" off.
2.
In Onyx Rip Queue, highlight the Arizona 600 and select "Change".
3.
From the "Change Media and Placement" window select "Setup.
4.
From the "Placement Strategy" window, set the "Top" and "Left" offsets to 0.00 and
set "Justification" to "Right".
5.
Open the file to be printed in Pre-Flight.
6.
Under "Preview & Size" tab, ensure the X and Y origins are set for "0".
7.
In the "Print" menu, "Print Setup" window, select the "Marks" tab and check to see
that "Print Label" is not enabled.
8.
Print the selected job(s). Be sure it is aligned to the right.
9.
At the end of the print, place a small flag at the edge of the print. Make sure it extends
out from the side of the media and is secure. This will identify the beginning of the
second side of the print.
10.
When all "Side One" jobs are completed, advance approximately 10 feet of media
prior to cutting the substrate. This will allow for an ample leader to leader to load the
media on the second side and area to perform maintenance, if necessary.
Note: Also be cognizant of the "Space Between Print" settings as this will effect
how much leeway you have to line up prints on the second side.
Note: Providing a minimum of 1" bleed on each side will help bleed to ensure
usability of both sides of the output.
Double Sided Printing: Printing the Second Side of the Graphic
11.
Remove the roll of printed media from the front of the printer and use it as the new
supply roll.
12.
Select "Load Media" from the Control Panel.
13.
When prompted, specify "second-side" in the control panel, and complete loading
the substrate.
Note: Determining the proper rotation for the second side image can be
confusing. Creating a mock up may be useful. Cut a strip of paper, draw
your front side images, and roll it like it would be rolled on the printer,
note how the second-side image will need to be rotated to match the firstside.
14.
Send the job to be printed to the Arizona 600 printer.
15.
Prior to beginning the second side of the print job, the printer will prompt you to
adjust the second side media forward or backward into the correct print position.
12/9/04
D-3
Océ|Two-Sided Printing and Double Print
16.
"ACCEPT" and using the +\- keys align the Print Point mark you made on the media
with the mark on the platen from above. When done, press "Accept" and the printer
will begin the printing process for the second side of the print.
8-Pass Line-Up
4-Pass Line-Up
Double Print
1.
Prior to printing the selected image, select "Double Print" from the "Operator/Print
Parameters" menu.
2.
Begin printing. At the end of the job, the printer will complete drying the job and
rewind the media to approximately the beginning of the print.
You will then see:
Adjust Media Position
Accept or Cancel
3.
Press ACCEPT. You then see:
Double Print Media Position
Adjust Media [+/-] --> done
Use the +/- buttons to align the print to the mark you made on the media. When
done, press ACCEPT and the printer begins double printing the selected job.
If you press CANCEL at the Adjust Media Position, Accept or Cancel message,
the printer begins double printing without allowing you to adjust the media
position. The printer rewinds the media slightly before the start of the original print.
The second print is likely to be offset from the first print. Pressing CANCEL is not
recommended.
D-4
Index
Index
A
About printer menu ............................. 4-25
Access carriage .................................. 4-14
B
Bar code practice menu...................... 4-20
Battery back-up option.......................... 1-5
Blotting cloth installation ..................... 5-11
Buttons
Accept ............................................ 4-2
Advance media .............................. 4-2
Cancel ............................................ 4-2
Load media .................................... 4-2
Menu .............................................. 4-1
Minus and plus ............................... 4-1
Online............................................. 4-2
C
Capping station maintenance ............... 5-8
Carriage
Accessing..................................... 4-14
Park.............................................. 4-15
Carriage cable
Adjusting ...................................... 5-16
Cleaning ....................................... 5-17
Circuit breaker switch ........................... 1-5
Cleaning fluid/capping fluid
Pumping ....................................... 4-18
Refilling .......................................... 2-2
Cleaning supplies ................................. 1-4
Cloth station maintenance .................. 5-11
Color bars ........................................... 4-12
Condition media
Print & Go media installation........ 3-24
Roll-to-roll media installation ........ 3-12
Selecting media type.................... 4-22
Configure I/0 menu ............................. 4-31
Conserve media
Print & Go media installation........ 3-24
Print & Go media type other......... 3-26
Roll-to-roll media installation ........ 3-12
12/9/04
Roll-to-roll media type other......... 3-14
Selecting media type ................... 4-22
Selecting media type other .......... 4-24
Consumable supplies ........................... 1-4
Control panel
Buttons........................................... 4-1
Display area ................................... 4-1
Messages ...................................... 6-1
Copies/Reprints menu.......................... 4-4
D
Double print
Description .....................................D-1
Menu .............................................. 4-6
E
Error message explanations and
actions............................................. 6-3
F
Feed adjustment
Print & Go media installation ....... 3-24
Print & Go media type other ........ 3-27
Roll-to-roll media installation........ 3-12
Roll-to-roll media type other......... 3-14
Selecting media type ................... 4-22
Selecting media type other .......... 4-24
Fill reservoir........................................ 4-19
Filters
Air pressure pump ....................... 5-19
System air .................................... 5-18
H
High purge nozzles............................. 4-15
I
Ink
Bottle installation.......................... 4-28
Filling the reservoir ...................... 4-19
Filter changes ................................ 2-4
Index-1
Océ|Index
Ink (Continued)
Handling .........................................2-1
Low ink ...........................................6-2
Menu ............................................4-28
Safety ...........................................1-10
Scanning the barcode ....................2-3
Supply bottle removal .....................2-3
Tray ................................................2-1
Warning and error messages .........6-3
Invalid bar code...................................4-30
IR heater ...............................................1-2
J
Insufficient ...................................... 6-1
Menu ............................................ 4-20
Other type .................................... 4-23
Print & Go loading method ........... 3-17
Selecting media type .................... 4-21
Supply dancer assembly ................ 3-8
Warning and error messages ......... 6-3
Wrapping around the take-up
core.......................................... 3-9
Menu tree structure printing................ 4-13
Mini purge nozzles.............................. 4-17
Minimal maintenance............................ 4-6
MSDS ................................................... 1-9
Job statistics list ....................................4-7
N
L
Long purge nozzles.............................4-18
Low purge nozzles ..............................4-16
M
Main menu navigation...........................4-4
Maintenance
Capping station ..............................5-8
Cloth station .................................5-11
Guidelines ......................................5-1
Menu ............................................4-13
Minimal ...........................................4-6
Operator maintenance schedule
guidelines.................................5-2
Print head maintenance and
nozzle recovery procedures.....5-1
When to place a service call...........6-2
Mandrel
Assembly ........................................3-4
Installing media ..............................3-3
Media
Aligning.........................................3-10
Cutting above take-up ..................3-16
Feeding over the drive roll ..............3-9
Handling .........................................3-1
Installing Print & Go supply
media .....................................3-18
Installing roll-to-roll supply
media .......................................3-5
Index-2
Nozzles
High purge.................................... 4-15
Long purge ................................... 4-18
Low purge .................................... 4-16
Maintenance................................... 5-1
Mini purge .................................... 4-17
Print menu ...................................... 4-9
O
Operator
About printer................................. 4-25
Ink ................................................ 4-28
Maintenance................................. 4-13
Maintenance requirements............. 1-4
Maintenance schedule
guidelines................................. 5-2
Media ........................................... 4-20
Menu .............................................. 4-5
Set clock....................................... 4-27
Units ............................................. 4-26
P
Park carriage ...................................... 4-15
Print & Go
Description ..................................... 1-2
Loading media.............................. 3-17
Procedures
About printer................................. 4-25
Access carriage............................ 4-14
Index
Procedures (Continued)
Bar code practice ......................... 4-20
Blotting cloth installation .............. 5-11
Cancel print .................................... 4-3
Cleaning the capping station.......... 5-9
Color bar test print ....................... 4-12
Fill reservoir ................................. 4-19
High purge nozzles ...................... 4-15
Ink bottle installation .................... 4-28
Ink supply changes ........................ 2-2
Installing Print & Go supply
media..................................... 3-18
Installing roll-to-roll supply
media....................................... 3-5
Loading new supply roll
(Print & Go)............................ 3-18
Loading new supply roll
(roll to roll) ...................................... 3-8
Long purge nozzles...................... 4-18
Low purge nozzles ....................... 4-16
LVD-SCSI-3 port configuration .... 4-31
Media type other .......................... 4-23
Menu structure tree print .............. 4-13
Mini purge nozzles ....................... 4-17
Nozzle print .................................... 4-9
Park carriage................................ 4-15
Pump cleaning fluid/capping
fluid ........................................ 4-18
Replacing capping station pads ... 5-10
Reprint copies of a previously
printed image........................... 4-4
Selecting the media type.............. 4-21
Set date and time ......................... 4-27
Setting the units ........................... 4-26
Spit heads .................................... 4-17
12/9/04
Take-up roll replacement
(Print & Go) ........................... 3-28
Take-up roll replacement
(roll to roll) ............................. 3-16
Pump cleaning fluid/capping fluid....... 4-18
S
Safety
Ink handling ................................... 2-1
Spills ............................................ 1-10
SCSI port configuration ...................... 4-31
Second side print..................................D-1
Set clock menu................................... 4-27
Specifications, technical ....................... 1-7
Spit heads .......................................... 4-17
Status lights.......................................... 4-3
System error messages ....................... 6-5
T
Take-up roll full..................................... 6-1
Test prints menu................................... A-4
Two-sided printing ................................D-1
U
Units menu ......................................... 4-26
User-correctable errors ........................ 6-1
W
Waste bottle ......................................... 2-2
Writing gap
Print & Go media type other ........ 3-27
Roll-to-roll media type other......... 3-15
Index-3
Océ|Index
Index-4