1
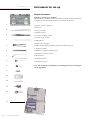
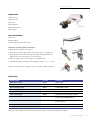
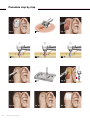
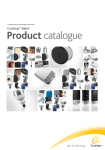
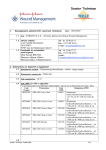
Nurse/Surgical Assistant Quickguide
for Baha® FAST Surgery
sound sense for a better life
Products in this manual are protected by the following patents: US 5 735 790, US 5 935 170, EP 0715839, EP 0715838 and
corresponding patents in other countries and pending patent applications. All products can be subject to change without notice.
No part of this publication may be replaced, stored in a retrieval system, or transmitted, in any form by means, electronic,
mechanical, photocopying, recording or otherwise, without the prior written permission of the publisher.
Caution: Federal law (USA) restricts this device to sale by or on the order of a medical practitioner.
©Entific Medical Systems AB, 2005. All rights reserved.
Contents
Contents
• Instruments for set-up
4
• Procedure step by step
6
• Preparation for surgery
8
• Sterilization guidelines
9
• Implantmed sterilization guidelines
11
• Check list
13
Nurse/Surgical Assistant Quickguide
3
Instruments for set-up
Instruments for set-up
Surgical instruments
Pick’n Place instrument set for Baha®
The instrument set for Baha® includes instruments for fixture/abutment connection.
A complete list of the instruments included is described in detail below.
1.
1. Surgical organizer, titanium
2. Dissector
2.
3. Forceps, titanium
4. Cylinder wrench
3.
5. Screwdriver Unigrip 95 mm
6. Counter torque wrench
4.
7. Drill indicator
8. Connection to handpiece
5.
9. Fixture mount Unigrip (should be placed into titanium organizer)
10. Indicator for Baha
6.
11. Machine screwdriver Unigrip 25 mm
12. Hexagon screwdriver 20 mm
7.
13. Raspatorium
14. Abutment inserter
8.
9.
10.
11.
12.
13.
14.
15.
4
Nurse/Surgical Assistant Quickguide
15. Instrument cassette
Note: The words fixture and implant are interchangeable and are used throughout this Quickguide.
Audiological indications
Instruments for set-up
Implantmed
Unit/power lead
Irrigation stand
Foot pedal
Motor/handpiece
Disposable irrigation
Motor support
Baha® Dermatome
Dermatome
Disposable blade
Vaseline, liquid paraffin or mineral oil
1.
Instrument mounting of Baha® Dermatome:
1. Mount the driver pin into the handpiece.
2. Insert the blade into the Dermatome with the single groove facing upwards.
3. Keep the blade centred when inserting the handpiece into the Dermatome.
Make sure the driver pin mates the groove in the blade.
4. Lift the securing screw over the handpiece and tighten firmly.
2.
3.
4.
5.
5. Check the function by running it with the high speed motor, 2 000–3 000 rpm.
(Caution: Do not turn Dermatome/handpiece until screw is tightened. Blade may fall out.)
Disposables
Denomination
Art. No.
Comments
Guide drill 3+4 mm
90415
With spacer.
Drill countersink 3 mm
90416
If 3 mm drill is used.
Drill countersink 4 mm
90417
If 4 mm drill is used.
Flange fixture ST 3 mm w. Baha abutment
90480
Flange fixture ST 4 mm w. Baha abutment
90434
Most commonly used.
Cover screw Unigrip
90360
Only used for two-stage procedures.
Cover screw space w internal hexagon
90620
For use with two-stage procedures.
For use with sleeping fixtures.
Healing cap
HCB 673-0
Should be sterilized before use (steam
137°C/278.6°F).
Baha blade
90329
For the Dermatome. Sterile packed.
Biopsy punch Ø 4 mm
90055
In surgery, 4 mm components are the most commonly used, but a selection of both should be available.
Nurse/Surgical Assistant Quickguide
5
Procedure step by step
Fig. 1
Fig. 4
Fig. 7
Fig. 10
6
Nurse/Surgical Assistant Quickguide
Fig. 2
Fig. 5
Fig. 8
Fig. 11
Fig. 3
Fig. 6
Fig. 9
Fig. 12
Procedure step by step
Figure
Procedure step by step
–
Shave the hair where the Baha device is to be placed.
–
Create a sterile field around the Baha site.
see Fig. 1
Position of the implant is decided using the indicator for Baha, ruler and pen.
–
The area is infiltrated with local anaesthesia.
–
The periosteum is marked for implant placement, using dye and a needle.
see Fig. 2
The flap is raised using the Dermatome, silvers knife or blade.
see Fig. 3
The subcutaneous tissue is removed.
–
A scalpel is used to make a cruciate incision in the periosteum.
–
The raspatorium is used to raise the corners of the periosteum.
see Fig. 4
The guide drill should initially be used with the spacer in place allowing drilling to an
initial depth of 3 mm (surgeon should use irrigation throughout drilling).
–
The drills have a latch grip connection for the handpiece 20:1 and are used on highspeed (2 000 rpm) with irrigation.
–
The drill indicator should be clipped on and used throughout, to help with the correct angle.
–
Once a depth of 3 mm has been reached the surgeon should check with the dissector if
there is enough bone depth to continue to 4 mm.
see Fig. 5
If so, the spacer is removed from the guide drill to allow drilling to a depth of 4 mm.
see Fig. 6
The relevant drill countersink (3 or 4 mm) is then opened and attached in the same way.
Continue with the same size throughout. All drills are single use and disposable.
–
The undermining around the site is carried out with a scalpel (this can be done prior to
drilling if preferred).
–
The flap is laid back and stretched out with skin hooks.
see Fig. 7
A hole is punched over the implant site with the biopsy punch.
–
Press the button marked with an implant on the Implantmed in order to change to slow
speed and check on drill.
see Fig. 8
Hold the implant ampoule upright, unscrew the cap and stand the ampoule directly into
the ampoule holder in the tray marked implant.
–
see Fig. 9
Connect the abutment inserter to the handpiece.
Pick up the self-tapping fixture with pre-mounted abutment using the abutment
inserter connected to the handpiece. Surgeon should use irrigation once implant is
initially inserted.
–
The implant must not touch anything at all (drapes, gloves or instruments) as this could
negatively affect osseointegration. This is vital to the success of the procedure.
–
Once the self-tapping fixture with pre-mounted abutment is in place the handpiece
with inserter is removed and passed back.
see Fig. 10
The skin flap is now positioned over the site and the hole is pulled over the abutment.
see Fig. 11
The flap is then sutured in position.
see Fig. 12
The healing cap and a dressing are then put in place.
Nurse/Surgical Assistant Quickguide
7
Preparation for surgery
Dressing protocol using foam
Operating theatre dressing:
Cut or biopsy punch a Ø4 mm hole in foam dressing
Apply over abutment directly on to the wound
Healing cap to hold in place
Cover with gauze and mastoid pressure bandage
One day post op:
Remove outer bandage
Leave foam dressing and healing cap in place
Keep dry
5–6 days post op:
Remove healing cap
Carefully remove foam dressing
Gently clean wound with normal saline and gauze
Remove any dried blood
Re-apply foam dressing and healing cap
Patient can wash hair if dressing is protected
10–14 days post op:
Remove foam dressing
Preparation for surgery
Dressings
It is vital that the skin is prepared properly to avoid tissue and hair re-growth that
may cause irritation or wound healing problems around the abutment. The patient
may then be unable to wear their sound processor or prosthesis. Care is taken in
the choice of dressing and aftercare of the wound.
New wound care techniques can reduce complications, increase comfort for
the patient and decrease the time required by the clinician. There are now many
dressings available, but for a graft site it is generally accepted that a non or low
adherent wound contact layer and light pressure dressing will be adequate. You can
use many types of dressings but a few suggestions follow.
Foam dressing
A foam, such as Allevyn* Hydrocellular (Smith & Nephew), which is a hydrophyllic, polyurethane dressing with a trilaminate structure. It has three-dimensional
polyurethane net, which is low adherent to the wound interface. It is made of
hydrophilic foam, which absorbs and retains fluid and has an outside layer of opposite film. It can be used for low to medium exuding wounds and can be cut to shape
to fit around the abutment and under the healing cap. The dressing can be left in
place for up to seven days.
Remove sutures
Gently clean any dried blood or scabs
Patient can wash hair
If healed, no further dressing required
Dressing protocol using silicone or
antiseptic wound contact layer
Operating theatre dressing:
Soft silicone wound contact layer
A soft silicone mesh such as Mepitel® ** (Mölnlycke), which is a non adherent
dressing made of a medical grade silicone gel bound to a soft and pliable polymide
netting that allows the passage of exudate. This is an ideal wound contact layer as
it does not adhere to the wound at all, can be left in place for seven days and cut
to size.
Cut or biopsy punch a Ø4 mm hole in the dressing
Place over abutment directly on to the wound
Apply at least two layers of gauze to exert pressure to graft
Healing cap
Cover with gauze and mastoid bandage
One day post op:
Remove outer bandage
Leave the dressing, gauze dressing and healing cap in place
Keep dry
5–6 days post op:
Antiseptic dressing
An antiseptic such as Inadine® *** ( Johnson & Johnson) is a low adherent knitted
viscose dressing impregnated with 10 % povidone-iodine in a water soluble polyethylene glycol base. It is generally used for the prophylaxis and treatment of a wide
range of bacterial, protozoal and fungal organisms.
Inadine needs to be used in conjunction with gauze, as it does not have any
absorption properties. Can be cut to shape and left in place for 5–7 days or until
colour is lost. Avoid iodine sensitive patients.
Remove healing cap
Carefully remove dressing and gauze dressing
Gently clean wound with normal saline, gauze or tips
Remove any dried blood
Re-apply dressing and gauze dressing and healing cap
Patient can wash hair if dressing is protected
10–14 days post op:
Remove the dressing
Remove sutures
Gently clean any dried blood or scabs
Patient can wash hair
If healed, no further dressing required
Once area is healed, the patient needs to be instructed
on long term cleaning of the area with a soft brush or
non alcohol baby wipes.
8
Nurse/Surgical Assistant Quickguide
*Allevyn is a trademark of Smith & Nephew
**Mepitel® is a registered trademark of Mölnlycke
***Inadine® is a registered trademark of Johnson & Johnson
Sterilization guidelines
Sterilization guidelines
The devices shall be reprocessed in accordance with established local routines
for surgical instruments at the hospital clinic. Entific Medical Systems gives
the following recommendations:
WARNINGS
Limitations on
reprocessing
Do no exceed 137°C (278.6°F)
Repeated processing has minimal effect on these instruments. End of life is normally
determined by wear or damage.
INSTRUCTIONS
Containment and
transportation
Preparations
for cleaning
It is recommended that the instruments are reprocessed as soon as is reasonably
practical following use. If the reprocessing is delayed the instruments should be
submerged into disinfectant solution to prevent drying.
Before cleaning the following instruments should be disassembled. Small parts/screws
can remain in the small box in the cassette during washing and be assembled afterwards.
• Fixture mount standard Unigrip
• Fixture mount short Unigrip
• Dermatome
• Cylinder wrench
Cleaning: Automated
All reusable surgical instruments, including instruments with plastic parts, can be
automatically cleaned combined with thermal disinfection:
Equipment: Automatic standard approved washer-disinfector.
Detergent: Low alkaline detergent recommended from the manufacturer of the washer-disinfector.
Final rinsing phase/disinfection stage: 85–93°C (185–199.4°F) for 1–3 minutes.
Water quality: Processed water or according to the hospitals procedure.
When unloading the washer-disinfector, check the narrow parts on the instruments for
complete removal of visible soil. If necessary repeat cycle or use manual cleaning.
Cleaning: Manual
All other surgical instruments, including instruments with plastic parts, can be manually cleaned:
Equipment: Interdental brush soaked with detergent solution. Items that can be submersed
under water should be cleaned and brushed under water in order to avoid aerolisation spray.
If additional cleaning is necessary, put the instrument in a manual ultrasonic bath.
Detergent: All commonly used low alkaline detergents for surgical instruments.
Initial pre rinsing phase: Rinse in cold water. The temperature should not exceed 35°C
(95°F) in order to prevent the blood to coagulate.
Final rinsing phase: Rinse carefully in hot water until the instruments are free from all
detergent solution.
Water quality: Processed water or according to the hospitals procedure.
Chemical disinfection
Before the manual cleaning if risk for infection, otherwise after the manual cleaning.
Disinfectants: All commonly used disinfectants for surgical instrument or alcohol
(ethanol: 70 v/v, or isopropanol: 45 v/v) with additive of surfactants.
Let the instruments soak in the disinfectant solution for at least 10 minutes.
Nurse/Surgical Assistant Quickguide
9
Sterilization guidelines
INSTRUCTIONS
Drying
Automatic: Let the instruments dry in the washer-disinfector if drying is included as a
part of the washer-disinfector cycle. Do no exceed 137°C (278.6°F).
Manual: Dry each item with a clean lint free towel or let it air dry under controlled conditions.
Place the instruments into the appropriate instrument organizer or the instrument
cassette before sterilization.
Maintenance,
inspection and testing
All instruments: Visually inspect for damage and wear. Cutting edges should be free of
nicks and present a continuous edge.
Where instruments form part of a larger assembly, check assembly with mating components.
Packaging
Packaging materials which are according to EN 868 should be used.
Singly: Individual items can be packaged in heat sealable pouches. The choice of
sterilization temperature should follow the packaging material manufacturers’
recommendation. Ensure that the pack is large enough to contain the instruments
without stressing the seals.
In sets: The instrument cassette, loaded with the instruments, should be packaged in a
double layer of a sterilization wrap using the appropriate method.
Sterilization
Steam sterilization with saturated steam under pressure is recommended for all surgical
instruments, the surgical organizer and the instrument cassette. The sterilization
parameters should be according to EN 554 as below or could be set by a validation study.
Equipment: Validated autoclave process.
Sterilant: Saturated steam. It is very important that the sterilization chamber is
completely filled with saturated steam during the holding time. Do not exceed 137°C
(278.6°F) with restriction to the product materials.
Drying: According to the performance of the autoclave, carefully check that the
instruments are dry before storing.
Storage
Manufacturer
contact
Temperature:
134°C (273.2°F)
121°C (249.8°F)
Holding time, minimum:
3 minutes
15 minutes
Sterilized and packed articles should be stored in a controlled area where they are
protected from dust, moisture and large temperature changes.
See end of this brochure for telephone number and address of local representative or
telephone +46-317333700.
The instructions provided above have been validated by the medical device manufacturer as being capable of preparing a medical device for re-use. It remains the
responsibility of the processor to ensure that the processing, as actually performed
using equipment, materials and personnel in the processing facility, achieves the
desired result. This requires validation and routine monitoring of the process.
Likewise any deviation by the processor from the instructions provided should be
properly evaluated for effectiveness and potential adverse consequences.
10
Nurse/Surgical Assistant Quickguide
Implantmed sterilization guidelines
Implantmed sterilization guidelines
Preparations before cleaning
The handpiece must be removed from the motor and it is recommended that it is
disassembled, cleaned and thereafter assembled and lubricated according to the
W&H Handpiece Manual.
Disinfection, cleaning and sterilization
• Wear protective gloves.
• Disinfect and clean the motor immediately after every surgical treatment.
• Sterilize the motor following manual disinfection and cleaning.
• Motor with cable, pump tubing must be sterilized prior to every use.
• Do not twist or kink the motor cable! Do not coil it too tightly. This instruction
is not necessary when a sterilization cassette is utilized (optional accessory).
Control unit and foot control
Manual disinfection and cleaning
The front panel of the control unit is sealed and may be wiped clean:
• If heavily soiled, clean first with disinfection cloths.
• Disinfect using surface disinfectants; spray disinfection is recommended.
• Use certified disinfectants (e.g. DGHM-tested).
• Note the action times of the disinfectants used.
Motor
Push the sterilization protection cap (04032600) onto the motor attachment.
Manual disinfection
• If heavily soiled, clean first with disinfection cloths.
• Disinfect using surface disinfectants; spray disinfection is recommended.
• Use certified disinfectants (e.g. DGHM-tested).
• Note the action times of the disinfectants used.
Manual cleaning
• Rinse with cold water with the aid of a brush (not applicable for U.K.) or wipe
clean using an alcohol solution.
• Then remove any liquid residues (absorbent cloth, blow dry with compressed air).
Sterilization and storage
W&H recommends sterilization according to prEN 13060, class B:
• Note the instructions of the unit manufacturer.
• Only sterilize clean motors and accessories.
• Wrap motors and accessories in sterile goods packing REF 02802400 from the
pack supplied.
• Make sure that you only remove dry motors and accessories from the sterilizer.
• Store sterile goods dust free and dry.
Nurse/Surgical Assistant Quickguide
11
Implantmed sterilization guidelines
Permitted sterilization methods
Vacuum sterilization – remove the sterilization cap!
• Steam sterilization according to prEN 13060, using a sterilization holding time
of a minimum of four minutes at 134 (+3)°C (273.2 +5.4°F).
Or
Gravity sterilization – push the sterilization protection cap onto the motor attachment.
• Steam gravity sterilization by a sterilization holding time of a minimum of five
minutes at 134 (+3)°C (273.2 +5.4°F).
Sterility of irrigation tubing
Sterile irrigation tubing is included with the equipment supplied. This irrigation
tubing is disposable and must be thrown away after each use!
Please note the expiry date and the relevant regulations for the disposal of
irrigation tubing.
Servicing
The motor bearings are lubricated for life; no oil or other maintenance is necessary.
Technical safety checks should be carried out according to national regulations or
at least once every third year or every 500 sterilization cycles. W&H recommends
the use of their lubrication “Service Oil MD-400” which can be purchased from
W&H. This should be used for the contra angle handpiece.
Note: Please refer to the W&H User’s Manual that is supplied with the Implantmed for further information.
12
Nurse/Surgical Assistant Quickguide
Check list
Implantmed
o Unit
o Power lead
o Irrigation stand
o Foot pedal
o Motor
o Handpiece
Pick’n Place instrument set
o Sterilization cassette
o Surgical organiser
o Dissector
o Forceps titanium
o Cylinder wrench
o Screwdriver Unigrip
o Counter torque wrench
o Drill indicator
o Connection to handpiece
o Fixture mount Unigrip
o Indicator for Baha
o Machine screwdriver Unigrip
o Hexagon screwdriver
o Raspatorium
o Abutment inserter
Baha® Dermatome
o Dermatome
o Vaseline or liquid paraffin
Entific components
o Dermatome blade
o Guide drill 3+4 mm
o Drill countersink 3 mm
o Drill countersink 4 mm
o Flange fixture ST 3 mm w. Baha
abutment
o Flange fixture ST 4 mm w. Baha
abutment
o Cover screw Unigrip
o Cover screw int. hex
o Biopsy punch
o Healing cap
o Disposable irrigation
Theatre extras (non Entific)
o Razor for shaving the hair
o Ruler and pen
o Dye and needle
o Local anaesthetic & syringe
o Antiseptic/betadine solution
o Basic ear drape set
o Basic ear instrument set
o Suction tubing and tip
o Sterile saline bag
o Gauze swabs
o Sutures
o Dressing and bandage
Nurse/Surgical Assistant Quickguide
13
Medical
Systems
P O Box 16024 • SE-412 21 Göteborg • Sweden
Fax: +46-313358860
E-Mail: [email protected]
Visit: www.entific.com
E80404 C 05.04
Phone: +46-317333700
17213 Geson SkandiaTryckeriet. Printed in Sweden.
Entific
s o u n d
s e n s e