1
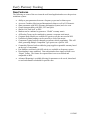
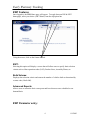
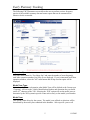
USER MANUAL
8/1/2003
Table of Contents
Introduction..................................................................................................................... 1
New Features................................................................................................................... 2
Logon Procedures ........................................................................................................... 3
EWT Features ................................................................................................................. 4
EWT:........................................................................................................................... 4
Build Volume:............................................................................................................. 4
Advanced Reports:...................................................................................................... 4
EWT Parameter entry: .................................................................................................... 4
Query Rule .................................................................................................................. 7
Explanation of EWT Frequency Report results ............................................................ 10
Printing.......................................................................................................................... 18
Export............................................................................................................................ 19
Advanced Reports......................................................................................................... 20
Jobs: .......................................................................................................................... 21
Queries:..................................................................................................................... 22
Parameters:................................................................................................................ 23
Rules: ........................................................................................................................ 24
Scheduler:.................................................................................................................. 27
Performing Queries on Jobs:..................................................................................... 28
2
8/1/2003
Early Warranty Tracking
Introduction
Early Warranty Tracking (EWT) is an extremely beneficial system in identifying vehicle
launch problems and tracking warranty, transportation and safety repair frequencies over
time periods of as little as one day to the past 6 months (based on the maintenance purge
criteria) of activity. The information recorded in EWT is loaded nightly Tuesday through
Saturday with Sunday and Monday data being combined and updated to EWT the next
business day.
The system can generate summarized frequency reports to the 6th or 10th digit of the labor
operation number and can be sorted at many different levels as well as detailed claim
information on individual vehicles based on the user’s parameters.
The system provides earlier access to warranty information than the WIS system.
However it does not provide the same level of statistical reliability since it does not take
into account units produced, product mix time lags between sold and build dates etc. It
does provide raw causal repair frequencies.
With the technological advancements in PC’s and advent of the extranet/intranet, the
latest version of EWT was developed as a web-based application to work in unison and
interact with WIS (Warranty Information System), GCS (Global Claims System) and
QNA (Quality Narrative Analyzer). EWT is available to corporate employees and
suppliers and is accessible with standard browser software, such as, Internet Explore ™
and Netscape ™.
1
8/1/2003
Early Warranty Tracking
New Features
The following are some of the new items the web-based application has over the previous
mainframe system:
•
•
•
•
•
•
•
•
•
•
•
•
•
•
Ability to pass parameters between a frequency report and a claims report.
Access to Canadian, Mexican and International claims as well as US Domestic.
Share parameters with WIS (Warranty Information System) and vice versa.
Greater interoperability with WIS, GCS and QNA.
Similar ‘feel’ and ‘look’ as WIS.
Markets can be combined to generate a “Global” warranty metric.
All Product Teams can be combined to generate a corporate total metric.
Corporate Body Models are available for queries as are the ones used in WIS.
Underlined column headings can be sorted by a click of the mouse.
Component Typing has been changed to represent vehicle populations. This will
allow generating multiple Component Type queries on a specific LOP.
Commodity Director has been added to group supplier responsible warranty based
on the type of components.
Part Numbers associated with LOP activity are available on frequency reports.
Downloading is more stabilized. Data extraction has been improved with a new
“Export” feature. The forma t for exported data is now user-defined and
comparable to WIS.
Advanced Reporting is available allowing for parameters to be saved, shared and
re-used on demand or scheduled for periodic runs.
2
8/1/2003
Early Warranty Tracking
Logon Procedures
EWT, like WIS, is accessed using either Internet Explorer™ (IE) or Netscape™ through
the following URL:
http://aqip02.appl.chrysler.com/servlet/com.dcx.quality.aqip.qir.WisServlet
Though Netscape™ will work, it is recommended that Internet Explorer™ be used with
web-based corporate applications as it is the corporate standard. Make sure that the IE
software is at least version 5.5 or higher. If not, your DIA can easily update the PC’s IE
version through the LANDS Software Distribution web-site: http://lands.is.chrysler.com/
Upon accessing the WIS URL, users will be prompted to input their mainframe T-ID and
password into the sign-on window and click on the “ACCEPT” button:
.
3
8/1/2003
Early Warranty Tracking
EWT Features
Once logged in, the WIS Home page will appear. To toggle between WIS & EWT
homepages, select your choice (EWT Home) from the top option line
Using the mouse, click on the feature desired.
EWT:
Selecting this option will display a screen that will allow users to specify their selection
criteria such as labor operation codes (LOP), Product Lines, Assembly Plants, etc.
Build Volume:
Displays data selection criteria and returns the number of vehicles built as determined by
a status code (J-built OK).
Advanced Reports:
Allows users to customize their own reports and have them run on a scheduled or ondemand basis.
EWT Parameter entry:
4
8/1/2003
Early Warranty Tracking
The following EWT Parameters screen allows the user to perform various frequency
queries of the available warranty data and create reports that can be summarized to
whatever levels are needed.
Top Labor Ops:
Select the radio button for “Top Labor Ops” and enter the number of most frequently
used labor operation numbers you’d like to see displayed. If you’re interested in all labor
operatio n numbers, select the “All” radio button and all lops used in repairs will be
displayed.
Model Year Type:
Select the radio button to determine what Model Year will be defined as the Current year.
‘Corporate’ will screen the Vehicle Identification Number and determine the year based
on the 10th character of the VIN. Selecting the ‘WIS’ option will use the model years as
determine by the WIS system in special events such as early or late model year launches.
Model Year:
This option is data-driven by the system. The model years offered as selections will be
determined by the model years contained in the database. Select specific years or all.
5
8/1/2003
Early Warranty Tracking
Claim Criteria Definition
Mileage:
Enter a “To” and/or “From” range if required. Otherwise the defaults will automatically
create an all- inclusive range.
Claim Type:
Select the type of claims to be reported: Warranty (W), Transportation (T), Safety (S) or
Policy (P). As with all selection windows in EWT, multiple choices can be selected by
holding the Shift or Ctrl key down while clicking on the various selections.
Repair Date:
If required, enter the desired date ranges in YYYY MM DD format.
Sold Date:
If required, enter the desired date ranges in YYYY MM DD format.
Build Date:
If required, enter the desired date ranges in YYYY MM DD format.
Added Date:
If required, enter the desired date ranges in YYYY MM DD format.
Fleet/Retail:
Determine which type of sold vehicles to include by selecting All, Fleet, or Retail.
Vehicle Population Definition
Fleet/Retail:
Determine which type of sold vehicles to include by selecting All, Fleet, or Retail.
6
8/1/2003
Early Warranty Tracking
Market:
Determine which servicing market by selecting ‘All Markets’ or one of the specific
servicing markets. Multiple markets may be selected by holding the Shift or Ctrl key
down while clicking on the various selections.
Product Team:
Determine which Product Teams to include. Multiple Product Teams may be selected by
holding the Shift or Ctrl key down while clicking on the various selections.
Query Rule
Inputs into the Query Rule fields allow the user to determine how detailed the metrics
should be. All fields currently active and underlined have pop-up windows available to
assist in the selection process. The code and its description are available for all active
Query Rule fields.
The following provides a brief description of each of the Query Rule fields:
PL:
Product Line (PL, RS, DN, WJ, etc.)
FM:
Family is the first two positions of the Corporate Body Model Code (DN represents
Durango, PL represents Neon, etc.)
LN:
Line or Carline is the third position of the Corporate Body Model Code.
PC:
Price Class (High Line, Low Line, etc.) is the fourth position the Corporate Body Model
Code.
BS:
Body Style (2-door, 4-door, Convertible, etc.) is the last two positions of the Corporate
Body Model Code.
AP:
Assembly Plant (SHAP, Toluca, JNAP, etc.)
7
8/1/2003
Early Warranty Tracking
FG:
Functional Group is the 1st and 2nd positions of the labor operation code (LOP). It
defines the major categories (Suspension, Brakes, Engine, etc.).
CG:
Component Group is the 3rd and 4th positions of the LOP and is a sub-category of the
Functional Group. A Component Group cannot be selected without first selecting a
Functional Group.
CC:
Component Code is the 5th and 6th positions of the LOP and is a sub-category of the
Component Group. A Component Code cannot be selected without first selecting a
FG/CG combination.
OP:
Operation Code represents the 7th and 8th positions of the LOP and is a sub-category of
the Component Group. An Operation Code cannot be selected without first selecting a
FG/CG/CC combination.
FC:
Failure Code is the 9th and 10th characters of the LOP. It simply describes the reason the
warranty repair was done.
CTC:
Component Type Class identifies a class of vehicle components (engines, transmission,
wheels, etc.).
CT:
Component Type identifies the number of vehicles equipped with specific components
(2.0L engine, 45RFE transmission, etc.) and the resulting metrics is then based on that
population of vehicles.
CD:
Commodity Director is a grouping of Responsible Plant codes.
RP:
Responsible Plant (Huntsville, McGraw Glass, etc.) and all outside suppliers currently
setup in WIS.
PN:
Part Numbers associated with specific LOP’s. The actual metric value is based on the
LOP not the number of vehicles equipped the Part Number. Therefore, based on paid
Dealer claim activity, a specific LOP may have several Part Numbers associated with it.
This field will be activated as a future system enhancement.
8
8/1/2003
Early Warranty Tracking
IMKT:
International Market may represent a single country such as the USA or a group of
countries such as Europe.
RGN:
Region/Business Center represents a subset of the International Markets defined in the
IMKT field.
BC:
Business Center represents a subset of the IMKT/RGN combination.
Report By List and Selected Items (drilling down) will be illustrated in the
next section
9
8/1/2003
Early Warranty Tracking
Explanation of EWT Frequency Report results
The basic EWT 10-digit Frequency Report contains the fields shown above. However
additional fields may be included by selecting them from the Report By List window.
Additionally, each column heading that’s listed and underlined can be sorted by simply
clicking on the column title. As in WIS, your report parameters will be displayed at the
bottom of the report.
Sel:
Clicking on the Select radio button for one and/or more rows will present detailed
information on your choices when you click on the Claim tab. An additional drill down
feature will be explained next.
Freq:
This metrics represent the number of repair conditions performed based on your
parameter entries.
Average Cost of Repair:
This is the result of simply dividing the total cost by the number of conditions.
Calculated results are rounded.
Total Cost:
Total cost is the total expense incurred by making repairs to the specific conditions
identified by the Labor Op Code.
Labor Op Code:
This 6 or 10 digit entry identifies the repair.
10
8/1/2003
Early Warranty Tracking
FC:
The last two characters of a Labor Operation that describes the reason the repair was
made.
LOP Description:
Nomenclature describing the Labor Operation Number.
Failure Description:
Nomenclature describing the failure code (FC).
Report By List and Selected Items (drilling down)
Assuming we needed a Frequency Report by Functional Group for the PT family code,
our Query Rules and Report By criteria would appear as follows:
Once the results are displayed, drilling down through the various levels is accomplished
by selecting a specific Functional Group code (08) and click on GO immediately to the
left of the Next window which should contain Component Group, the next logical level
(positions 3 and 4) of the LOP.
11
8/1/2003
Early Warranty Tracking
Select “Swt (0880)” from the description list. The next logical set of numbers in a LOP
is the Component Code which appears in the Next window. Click on “Go”.
Select “Switch, malfunction (088087)” from the description list, “Operation Code” from
the “Next” drop-down window and depress “Go”.
Select “Electrical; Switch; Swt; Multifunc; Test & Replace (08808701)” from the
description list , “Failure Code” from the “Next” drop-down window and depress “Go”.
12
8/1/2003
Early Warranty Tracking
Drilling down to the failure code is the lowest level of the LOP. The following screen
lists all of the Failure Codes the dealers selected as the reason why the Multifunction
Switch was replaced (LOP 08808701).Notice that the Standard Report Parameters are
listed at the bottom of this query.
13
8/1/2003
Early Warranty Tracking
Explanation of EWT Claims Report results
Zone/Business Center:
Two character code that identifies the locale the repair is made.
Dlr:
Five character identifier for the dealer within a business center who performed the repair.
Claim:
This is the number of the claim containing information on a repair. For a more in-depth
analysis of the repair and claim, click on the red colored box containing the letters GCS.
This will connect you to the Global Claims System, as seen in the following example
when claim number W07724 was selected.
14
8/1/2003
Early Warranty Tracking
BDY MDL:
This column identifies the body style: 2-door, 4-door, convertible, etc.
LOPS:
Identifies the Labor Operation Number used for this repair.
FC:
Failure code describes the reason for failure.
Part NO:
List of replacing part number.
Repair-Dt:
Date vehicle was repaired.
Vin:
The vehicle’s 17-character vehicle identification number.
Assembly Plant:
Plant at which the vehicle was built.
Mileage:
Odometer miles when the failure occurred.
Built-Dt:
Date the vehicle was built (J-status/Built OK).
Engblt:
Identifies when the engine was built.
MIS:
Months- in-Service. Calculated by subtracting the sold date from the repair date and
converting the result into months.
MOP:
Month of Production. The numeric value of the month of the year the vehicle was built
based on month of launch for a particular vehicle (Generally speaking August = 1).
Bld Mth: The numeric value of the actual month of the year the vehicle was built.
A link providing access to the Quality Narrative Analyzer (QNA) is also available at the
LOP level or for the VINS displayed in a Claims listing. For example, the result set on
the next page was displayed when a search was performed on 2003 PT Cruisers in zone
42 that had an 08080110UC repair.
15
8/1/2003
Early Warranty Tracking
When the QNA link in the LOP column is selected, just those lops for the VINS listed
will be displayed as shown below. This option sho uld be used prudently when dealing
with a large quantity records.
16
8/1/2003
Early Warranty Tracking
When the QNA link in the VIN column is selected, all narratives on record for the VINS
listed will be displayed as shown below. This option should be used only when dealing
with a rather small quantity of VINS. As you can see, the original 5 VINS now produced
17 narratives.
17
8/1/2003
Early Warranty Tracking
Printing
To print data generated from EWT queries, first select the “Print” command in the EWT
title bar. This opens a new browser window with the data in a print preview mode.
Once the new browser is launched with the data in a print preview, use the browser’s
print command to send the data to a user-defined printer or file.
18
8/1/2003
Early Warranty Tracking
Export
EWT data can be downloaded into a Comma Separated Value (*.csv) format file using
the “Export” command on the EWT Title Bar. Once a report is displayed such as the
EWT Claims Report below, clicking on the “Export” command will begin the download
process.
Internet Explorer will open the following window. Selecting “Open this file from its
current location”, will automatically open the text file with an application defined by the
user and append a *.csv file extension.
Selecting “Save this file to disk” initially will simply save the data as a *.html file to the
user defined folder location and make the file contents useless.
Note: Due to an IE bug, you may be prompted up to three times with the above window
when attempting to open the file. Also, if opting to save the data to a file, select “Open
this file from its current location” the first time the above window appears. The second
time the window appears, IE will properly save the data.
19
8/1/2003
Early Warranty Tracking
Advanced Reports
In most cases, a EWT Frequency Report and/or an EWT Claims Report will achieve the
reporting needs of the user. When situations arise where it is not possible to extract data
using these two reporting features, the Advance Reports feature is available.
Examples of some reporting that requires the use of the Advance Reports includes, but
are not limited to:
• Combining multiple Query Rules
• Excluding data
• Reporting on a MIS other than the current system MIS
Advanced Reports are accessed from the EWT Home Page. The “Advanced Reports”
command toggles between Standard Reports and the Advanced Reports.
20
8/1/2003
Early Warranty Tracking
Jobs:
The Jobs tab function currently is not operational.
The Jobs tab contains data extracted from the system. The first time the Advanced
Reports feature is accessed, the Jobs tab will be empty. Each month the system is
updated with new MIS data, all users Jobs are deleted.
All Jobs have unique Job ID’s (Jid). They are created when a Query is submitted against
the database.
Refresh:
Refreshes the screen and updates the Status.
Resubmit:
Resubmits the selected Job against the database. The “Processing Start Date” and
“Processing End Date” will update accordingly.
Abort:
Aborts (cancels) the processing of a selected Job.
Delete:
Deletes the selected Job.
21
8/1/2003
Early Warranty Tracking
Queries:
The Queries tab contains user-defined queries that are submitted against the database to
extract data. Queries are defined using the Parameters and Rules tab. The Scheduler tab
determines the submission frequency (daily, Saturday or On Demand) for the query. The
first time the Advanced Reports feature is accessed, the Queries tab will be empty.
All Queries have unique Query ID’s (Qid). Qid’s are assigned when a new Query is
saved/submitted against the database.
22
8/1/2003
Early Warranty Tracking
Parameters:
Similar to Standard Reports, the Vehicles (All or Sample), Model Years, Coverage,
Fleet/Retail, Market, and Product Team/s are selected during the Query definition
process.
Note: The only coverage available for selection in EWT is: All Coverages (A)
23
8/1/2003
Early Warranty Tracking
Rules:
Vehicle, LOP, and Other are the three active sections available to define the Rules during
the Query definition process. The fields contained in each section are the same as those
used in Standard Reporting. Each field will allow multiple codes separated by commas
and will accommodate up to 255 characters.
Save:
Saves the Query with the current defined Parameters and Rules.
Clear:
Clears all Rules’ field entries.
Reset:
Resets all Rules to the last saved.
24
8/1/2003
Early Warranty Tracking
Inputting Multiple Codes:
As mentioned, each field can have multiple entries separated by a comma as illustrated in
the following example. Fields have a 255-character limit.
Exclude:
Checking the “Exclude” box, excludes all data (expense and sales if toggling between
WIS & EWT or only expense if in the EWT environment ) defined by the rule.
Select Row:
Use the “Select Row” box with the Clear or Delete command.
Zoom:
As each field can contain up to 255 characters, the Zoom command allows viewing of
selected field entries that extend beyond the normal field window.
25
8/1/2003
Early Warranty Tracking
Add:
The Add command in each Rule section can be used to insert additional rows. Clicking
on Add will open the following window. In the box to the right of “New rows”, input the
number of additional rows desired and click on “OK”.
The pop-up window can also be used to insert a “Link from Query Spec ID” or to “Copy
from Query Spec ID” by inputting the Qid of the Query in the box to the right.
26
8/1/2003
Early Warranty Tracking
Scheduler:
The Scheduler tab function currently is not operational.
Once a Query has been defined, it can either be saved and a Query ID will be assigned or
it can be submitted creating a Query ID and a Job ID.
Save:
Saves the Query and assigns a unique Qid.
Submit:
Saves the Query and creates a Job ID with the data extracted from the database.
Query Name:
Allows the Query Name to be modified.
Folder:
To keep Queries organized, Queries can be saved under different user defined folders.
Folder commands include New, Rename, and Delete.
Frequency:
“On Demand” will generate a Job when the Submit command is selected.
“Monthly” will generate a Job only when the system is updated with the next MIS load.
NOTE: Only select “On Demand”, as the “Saturday and Monthly” features are
under consideration and not yet active.
Description:
Allows text input to describe the Query.
27
8/1/2003
Early Warranty Tracking
Performing Queries on Jobs:
Jobs are created from Queries and submitted against the database. Performing queries on
Job data is done from the Jobs tab. When the Job Status states “Completed”, select the
Job by clicking its radio button. Now, the Build Volume, Frequency, or Claims reporting
feature may be used to perform queries against the Job query spec.
Build Volume – Advanced Reports
Selecting Parameters and producing a build volume report is similar to the Build Volume
option available in EWT. Options will be limited based on the Parameters and Rules
defined in the Query used to generate the Job. All expense parameters will be ignored..
28
8/1/2003
Early Warranty Tracking
Frequency and/or Claims Report – Advanced Reports
Selecting Parameters and producing a Frequency Report or a Claims Report is similar to
the Frequency option available in EWT. Options will be limited based on the Parameters
and Rules defined in the Query used to generate the Job.
29
8/1/2003