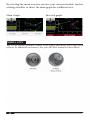
1
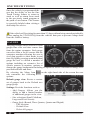
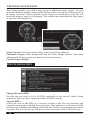
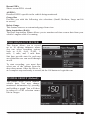
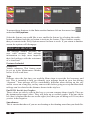
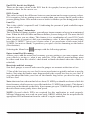
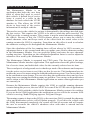
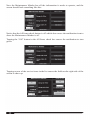
1
TABLE OF CONTENTS
SAFETY WARNING & CAUTION ............................................................................... 4
SAFETY ................................................................................................................... 4
INSTALLATION AND OPERATION WARNINGS ............................................... 5
PRODUCT HANDLING .......................................................................................... 5
LITHIUM-ION BATTERY CAUTION ................................................................... 6
MISUSE .................................................................................................................... 6
WARRANTY INFORMATION ............................................................................... 6
SERVICE CENTER AND COMPATIBILITY CAUTIONS .................................... 7
CARB/EPA COMPLIANCE............................................................................................ 9
USING THIS MANUAL ................................................................................................. 9
WHAT’S IN THE BOX ................................................................................................. 10
SUGGESTED TOOLS NEEDED ................................................................................. 10
UPDATING THE VIVID LINQ .................................................................................... 11
REGISTERING THE VIVID LINQ .............................................................................. 11
LOCATING THE MICRO USB PORT ON THE VIVID LINQ ................................... 12
UPDATING YOUR ARCHOS UNIT ............................................................................ 13
MOUNTING ON WINDSHIELD ................................................................................. 14
LOCATING OBD-II ...................................................................................................... 15
VIVID LINQ LED INFORMATION ............................................................................ 16
POWERING UP THE ARCHOS FOR THE FIRST TIME ........................................... 16
DEVICE PAIRING SOLUTIONS..................................................................................17
USING THE VIVID SOFTWARE ................................................................................ 17
PROGRAMMING YOUR VEHICLE ........................................................................... 18
QUICK TUNING.................................................................................................... 18
ADVANCED TUNING .......................................................................................... 19
TUNING LEVELS ................................................................................................. 19
SWITCHING TUNING LEVELS OR RETURNING TO STOCK ....................... 21
ONE TOUCH TUNING ......................................................................................... 22
GAUGES........................................................................................................................22
ADDITIONAL GAUGE OPTIONS ....................................................................... 23
CHANGE GAUGE FACE ...................................................................................... 24
PID INFORMATION..................................................................................................... 24
2
PERFORMANCE METER ........................................................................................... 25
POWER GROUP ........................................................................................................... 25
ENGINE ONE ........................................................................................................ 26
ENGINE TWO........................................................................................................ 26
CHANGING PID MEASURES IN DAQ...................................................................... 26
DODGE/JEEP ONLY DAQ ADDITIONS.....................................................................27
MILEAGE MENTOR .................................................................................................... 28
MAINTENANCE MINDER ......................................................................................... 30
INCLINOMETER.......................................................................................................... 35
CALIBRATE.................................................................................................................. 35
CHANGE FACE ............................................................................................................ 35
DTC SPY ....................................................................................................................... 36
DOWNLOADABLE FEATURES (Dodge And Jeep Only)..........................................37
TIRE PRESSURE MONITORING SYSTEM (TPMS) ADJUSTABILITY...........37
ADVANCED TRANSMISSION TUNING.............................................................37
ADJUSTABLE SHIFT POINTS.............................................................................37
ADJUSTABLE TORQUE MANAGEMENT..........................................................40
MEDIA APPS ................................................................................................................ 42
TROUBLESHOOTING................................................................................................. 43
Q & A ............................................................................................................................. 43
FACTS ........................................................................................................................... 45
TECH SUPPORT & SERVICE ..................................................................................... 46
3
SAFETY WARNING & CAUTION
Throughout this User Manual, you will see important messages regarding your
safety or the protection of your vehicle. These messages are designated by the words
WARNING and CAUTION.
WARNING indicates a condition that may cause serious injury or death to you, your
passengers or others nearby. Pay careful attention to these Warning messages, and
always comply with them. They could save a life.
CAUTION indicates a condition that could cause damage to your vehicle. It is
important to install and operate your product in conformance with instructions in this
Manual. Caution alerts you to particularly important things that will keep your vehicle
operating properly.
The device you have purchased is a high-performance product. As such, it does present
some risks of which you should be fully aware. Do not use this product until you
carefully read the following safety information and the Owner Agreement.
SAFETY
Always use your best judgment, and operate the vehicle in a safe manner. Do not
become distracted by the device while driving, and always be fully aware of all
driving conditions. Minimize the amount of time spent viewing the device screen
while driving.
Do not operate the device while driving. Perform all adjustments or changes while
stopped. Changing a setting while under way can interfere with your attention to
roadway conditions.
Use of the Speed Limiter removal, Wide Open Throttle restriction removal, and Tire
Pressure Monitor System adjustment features should only be used off the road, on the
track, or in other controlled driving environments. Do not exceed legal speed limits
on public roadways. Use any enhanced speed capabilities of this product only in
closed circuit, legally sanctioned racing environments expressly for this purpose. Loss
of control from speeding on a public road could seriously injure you, your passengers,
or others on the roadway.
Some modifications may affect other parts of your vehicle. For example, if you remove/
adjust the speed limiter in your vehicle, be sure your tires and other components are
rated for the increased speeds they will have to withstand. Not doing so can lead to
loss of vehicle control. Modify the speed limiter only for use in closed-circuit, legallysanctioned racing environments, not for use on public roadways.
Always use and install the Superchips VIVID in compliance with the instructions and
manual provided.
4
INSTALLATION & OPERATION WARNINGS
When installing the VIVID LINQ and AndroidTM tablet units in the vehicle, securely
place the device so it does not obstruct the driver’s view of the road or interfere with
vehicle operating controls, such as the steering wheel, foot pedals, or transmission
levers. Do not place the Android tablet or VIVID LINQ in front of any airbag.
*Avoid cable routing that can interfere with pedal operation.
The windshield mount may not stay attached to the windshield in all circumstances.
Do not place the mount where it will become a distraction if the mount should become
detached. Keep your windshield clean to help ensure that the mount stays on the
windshield.
WARNING Misapplication or misuse of this product could lead to a serious
or fatal accident. Comply with all safety information in this manual, and your
vehicle owner’s manual. Follow safety, installation and operating instructions in
this User Manual to assure proper use.
PRODUCT HANDLING
Please observe all operating conditions relating to the Superchips VIVID.
This product is designed for normal room temperatures or temperatures suitable for
humans.
Please remove the product from the vehicle when not in use.
Do not leave the ARCHOSTM tablet on the dashboard or windshield when not in use.
If exposed to extreme temperature, the unit could become damaged. Remove
the Android tablet from the vehicle if it falls within the following scenarios:
(1) Vehicle interior is subjected to 140˚ F or higher.
(2) Vehicle interior is subjected to 32˚ F or lower.
Do not “stack” Superchips VIVID tuning with other unauthorized tuning products.
“Stacking” performance-enhancing devices or other improper installation can cause
power train failure on the road. Other products may have features incompatible with
your VIVID device. Follow all installation and operating instructions, and do not stack
products.
Unit is sealed and is not to be serviced by user.
Unit can be damaged by violent impact.
If the vehicle will be sitting for long periods of time without being started, disconnect
the VIVID LINQ from the vehicles data port to prevent voltage draw from the battery.
NOTE: Dispose of this product consistent with local city and state codes. Return
to your electronics supplier for proper handling.
5
LITHIUM-ION BATTERY CAUTION
Do not expose the ARCHOS to temperatures over 140˚ F. Failure to follow these
instructions could cause the Lithium-Ion battery to leak acid, become hot, explode or
ignite and cause injury and/or damage. Please refer to the ARCHOS tablet manual
for additional product warnings, suggestions, and FCC compliance details. If the
battery leaks and you come into contact with the leaked fluids, rinse thoroughly with
water and seek medical attention immediately.
Do not leave your battery charging for more than one week. Doing so runs the risk of
overcharging the battery and shortening its total life span.
MISUSE
It is highly recommended you read and comply with all instructions included in the
product manuals provided.
Raising or lowering the center of gravity of the vehicle can affect the overall stability
of the vehicle in certain situations.
Obey all federal and state vehicle rules and regulations.
Do not exceed proper operating conditions.
Please make sure the proper speed rated tires are installed on the vehicle prior to use.
WARRANTY INFORMATION
This warranty gives you specific legal rights, and you may also have other rights which
vary from state to state.
LIMITED 1 YEAR WARRANTY
Powerteq (hereafter “SELLER”) gives Limited Warranty as to description, quality,
merchantability, and fitness for any product’s purpose, productiveness, or any other
matter of SELLER’s normal use* of the product sold herewith. The SELLER shall be
in no way responsible for the product’s open use and service and the BUYER hereby
waives all rights other than those expressly written herein. This Warranty shall not be
extended or varied except by a written instrument signed by SELLER and BUYER.
The Warranty is Limited to one (1) year from the date of sale and limited solely to the
parts contained within the product’s kit. All products that are in question of Warranty
must be returned shipping prepaid to the SELLER and must be accompanied by a
dated proof of purchase receipt. All Warranty claims are subject to approval by the
SELLER.
Under no circumstances shall the SELLER be liable for any labor charged or travel
time incurred in diagnosis for defects, removal, or reinstallation of this product, or
any other contingent expenses. This shall constitute the sole remedy of the purchaser
and the sole liability of the SELLER. To the extent permitted by law, the foregoing is
exclusive and in lieu of all warranty and merchantability or fitness. In no event shall
6
SELLER or its suppliers be liable for special or consequential damages. If the BUYER
sends back a failed unit that is out of warranty and chooses to buy a refurbished unit,
the refurbished unit will only carry a 90 day warranty. If the BUYER purchases a new
unit at a predetermined discounted rate, it will have the standard 1 year warranty.
Under no circumstances will the SELLER be liable for any damage or expenses
incurred by reason of the use or sale of any such equipment.
THE INSTALLATION OF THIS PRODUCT INDICATES THAT THE BUYER HAS
READ AND UNDERSTANDS THIS AGREEMENT AND ACCEPTS ITS TERMS
AND CONDITIONS.
IN THE EVENT THAT THE BUYER DOES NOT AGREE WITH THIS
AGREEMENT, THE BUYER MAY PROMPTLY RETURN THIS PRODUCT, IN
A NEW AND UNUSED CONDITION, WITH A DATED PROOF OF PURCHASE,
TO THE PLACE OF PURCHASE WITHIN THIRTY (30) DAYS FROM DATE OF
PURCHASE FOR A FULL REFUND.
NOTE: This warranty is void for any new products purchased through auction web
sites, classified listings, or publications. Warranty is valid only for new products
purchased through Authorized Dealers (proof of purchase required for all warranty
claims).
*Intended normal use means this item is being used as originally intended and for
the original application as sold by Powerteq. Any modifications to this item, or if
it is used on an application other than as marketed, will VOID the warranty. It is
the sole responsibility of the customer to determine that this item will work on the
application they intend. Powerteq will accept no liability for custom applications.
SERVICE CENTER & COMPATIBILITY CAUTIONS
CAUTION: RETURN YOUR VEHICLE TO STOCK BEFORE TAKING IT TO
A SERVICE CENTER. All programmers are built to operate with OEM power train
software. If you take your vehicle to a service center they may, by your request or
otherwise, update your vehicle’s calibrations. If this happens and your vehicle has
not been returned to stock, your device may no longer be capable of programming
your vehicle. You will need to update the tuner and purchase an unlock. Therefore,
it is important that you return your vehicle to stock before taking it in for service.
Superchips updates its active products (i.e. those currently being manufactured) to
work effectively with updated OEM calibrations. However, this process can take some
time as Superchips is not always made aware of calibration changes made by the
OEM.
CAUTION: If you have used another tuner/programmer on your vehicle, you will
need to program the vehicle back to OEM stock and remove the device before using
the programmer. Failure to return to stock may result in PCM failure or engine
damage. Programming your vehicle may expose existing defects in the vehicle’s PCM
that could disable your vehicle. It is advised that you do not program your vehicle in
remote locations in case of vehicle failure.
7
CAUTION: The programmer was developed on a stock vehicle with no aftermarket
bolt-on parts; as such, the performance changes implemented by the programmer
may not be compatible with certain aftermarket power add-ons. See below for a brief
explanation of how the tuning may be affected by certain aftermarket devices.
COLD AIR INTAKE (CAI) KITS
Most modern-day vehicles use a Mass Air Flow (MAF) sensor. The MAF sensor is
generally located in the intake tube close to the factory air box. MAF sensors play
a key role in determining the amount of fuel an engine needs at any given throttle
position. MAF sensors are precisely calibrated for the factory intake systems; changes
in intake tube diameter, sensor placement, or filter flow Characteristics can adversely
affect the reading from the MAF sensor. Most of the CAI kits on the market change
intake tube diameter, sensor placement, or filter restriction. These changes may cause
the sensor to command leaner fuel conditions. Most of the CAI kits on the market are
developed on stock vehicles, where a leaner fuel curve may be acceptable. Due to the
fact that the programmer already alters the vehicle’s fueling strategies, CAI kits that
create a leaner condition used in conjunction with a programmer may cause the vehicle
to run excessively lean. Excessively lean conditions can cause pre-ignition which can
lead to detonation, a condition that could potentially damage an engine.
There are currently a large number of CAI kits on the market. These kits are designed
to improve air flow and temperature. Some of these kits may be compatible with
the programmer as is; however, others may cause a lean condition when used in
conjunction with the tuning. If you use the programmer in conjunction with a CAI
kit and you think you are experiencing a lean condition you may need to download a
revised tuning map from Superchips, if available. Please contact Superchips Customer
Service if you believe a CAI map is required for your vehicle configuration.
MECHANICAL MODIFICATIONS
Mechanical modifications such as headers, upgraded camshafts, displacement
changes, cylinder head improvements, etc will change the air flow characteristics of
an internal combustion engine. The programmer is not tailored to take advantage of
these modifications; for the best results we recommend vehicle specific custom tuning.
FORCED INDUCTION (TURBOCHARGERS OR SUPERCHARGERS)
Turbochargers and Superchargers drastically change the dynamics/performance of
the engine, and its fueling/timing needs. Additional hard parts and custom tuning are
required to run a forced induction system on an engine that was originally designed as
a Naturally Aspirated (NA) engine. The programmer does not support the addition of
an aftermarket forced induction kit.
8
CARB/EPA COMPLIANCE
Superchips is at the forefront in bringing you up-to-date, street legal parts that comply
with federal and state emissions regulations. Superchips is working vigorously to be
street legal in all 50 states per established CARB (California Air Resources Board) and
EPA (Environmental Protection Agency) regulations.
Superchips applies for and obtains CARB executive orders (E.O.’s) for emissionsrelated products and expects to be fully certified in 2011. CARB requires specialtyparts manufacturers who sell emissions related products in California to obtain
certification for such parts. Failure to do so can result in fines and an inability to pass
routine Inspection and Maintenance (IM) tests conducted by the state.
Nationally, the EPA has similar guidelines, thus resulting in the installation of an
emission related part not supported by a CARB E.O., to be considered a violation of
the tampering provisions in both the California Vehicle Code and Federal Clean Air Act.
Note: Contact Customer Service for your specific information on your vehicle
at 888-227-2447.
USING THIS MANUAL
This manual includes coverage of the best known vehicle tuning applications. You
may be familiar with the some of the features on this product and this manual will help
you navigate through their operation on the device. Most of the menus, features and
operation are similar and common to each other for the various products.
When features or operations are different between OEMs, the various sections or
paragraphs will be identified to the application in most cases. Look for those pages or
sections related to your application and then choose the screen, features or option that
best fit your needs.
NOTE: The display screens, menu items and operating instructions contained in the
following pages are meant to cover a wide variety of vehicles (Ford, Chevy, GMC,
Dodge, Chrysler, Jeep, Nissan, etc.). Every menu and feature is not shown in detail for
each device, but selection and changes are made in a similar manner using the different
devices. Some of the options and/or features covered in the operating instructions may
not apply to your device or vehicle. Your VIVID device will display only the menus,
options and features that are unique to your vehicle’s computer system capabilities. As
such, not every menu and screen is explained in this manual. Most screens are userintuitive and similar in functionality.
For specific information regarding horsepower, torque, and other features available
for this product, visit www.superchips.com for year/make/model/engine performance
parameters.
9
WHAT’S IN THE BOX
- ARCHOS43 Android Tablet
with VIVID APP Preloaded
- VIVID LINQ
- USB Cables
- ARCHOS43 Windshield Mount
-
ARCHOS43 Android Tablet
12V Car Charger
110V Wall Charger
LINQ Zip Tie & Velcro Packet
Instruction Manuals
VIVID LINQ
Windshield Mount
12V Car & 110V Wall Chargers
USB Cables
SUGGESTED TOOLS NEEDED
-
10
Scissors or clippers (to cut zip ties and or velcro to length)
Glass Cleaner (to improve adhesion to windshield)
Vehicle battery charger (ensures adequate voltage for PCM programming)
Shade (improves your comfort during PCM programming)
UPDATING THE VIVID LINQ
Superchips has pre-loaded your new VIVID LINQ with all the applicable programs
for your vehicle from our vast tuning catalog. However, vehicle manufacturer’s
occasionally release new calibrations not detectable to Superchips at the time your
VIVID LINQ is manufactured. In the event your ARCHOS unit displays ‘Vehicle
Calibration not on file. Update programmer online.’ or ‘Needs update.’ message;
Superchips has developed an online process to provide you the up-to-date Superchips
tune for your vehicle.
Gaining access to the internet update site requires the user to first download a free
internet driver to their Windows based PC when you visit www.superchips.com. Use
your mouse to arrow over the “Customer” icon at the top of the page and select the
“Download Internet Update Software” icon. Once on the page, read and follow the
directions. The third line has a link labeled “here” that will start the download.
Proceed to answer the questions that
come up during the process. At the
end of the questions, click on “install
the Superchips Easy Update”. Once
done you will be prompted to click on
Finish. At this point exit the web site
and look for the Superchips internet
update Icon that has been placed on
your desktop. Double click on the
Superchips internet update icon on
your desktop. A user registration box
will be shown.
Click on the word “Register” below user
name and password boxes.
REGISTERING THE VIVID LINQ
A registration box will appear where you will fill out the required information
to gain access to the update server.
You will create a unique user name
and password for your security
giving you sole access to the internet
update site for downloading files and
updates when needed. Registrants
are required to fill out boxes with the
red asterisk next to them. Select the
“Submit” button at the bottom right
of the registration page to complete
the process.
You are now ready to update your
VIVID LINQ with the latest software
and options.
11
If at any point you need to update
your VIVID LINQ in the future,
look on your computers desktop for
the Superchips Internet Update Icon.
The icon is there so you have
a quick access point to the
internet update page.
Simply double click on the icon to
start the connection to the Internet
update server. You will be prompted
to log in with the username and
password you previously created in
the registration form.
**One way to speed up the login
process is by selecting the “Remember me on this computer” tab at the top right hand
side of the screen.
Once you’re logged in the VIVID LINQ will start downloading the latest updates. This
is an automatic process. Once the software update is complete you will be prompted to
“Safely plug the VIVID LINQ into a USB port on your PC.”
LOCATING THE MICRO USB PORT ON THE VIVID LINQ
The Micro USB port can be located at the bottom
edge of the VIVID LINQ as seen
in the image. The LINQ should ONLY be connected
to the PC, and not the vehicle
or wall outlet chargers. First download,
install, register, and then run the Superchips update
software. Then attach the micro USB cable to the
LINQ.
Once the VIVID LINQ is plugged into the USB
port on your PC the server will check to see
what updates are available for the device. If an update is available the software will
automatically be updated. Superchips recommends you update the VIVID LINQ prior
to the first installation into your vehicle so your product has the latest and greatest files.
Some files and options are only presented to the user if the VIVID is vin-locked to your
vehicle. If you want to get the full list of options specific to your vehicle (some vehicles
have different options than others) it is recommended you install the programming
into your vehicle and then log back into Internet Update for a full list of features you
can take advantage of. The VIVID software needs to read the vehicle information in
order to accurately display available options in Internet Update. All software updates
are free. There are additional tuning options available for most applications that the
user can download as well. Some are available at no cost while others require the
user to purchase them to use. Select the appropriate options you want, and follow the
prompts to complete the download to your device.
12
Superchips has a large database of vehicle calibrations in inventory for most
applications but sometimes a few are missed, newer calibrationshave been created
since the product was manufactured requiring an update through Internet Update.
In the event you received the message, ‘Calibration for your vehicle is not currently
supported. Information about your vehicle has been sent to our engineers. On
occasion, the Superchips team is not notified when a file needs an update due to
a specific spam filter or differences in user software. It is recommended that you
call or email Superchips customer service so that there is no additional delayed
in servicing your product. You will be notified via e-mail when the Superchips
tune is available for your vehicle’ on your VIVID even after updating online; you
have a unique engine and /or transmission file we have not seen before. At that point
our engineering staff will take the data that has been uploaded from your VIVID
LINQ through Internet Update and create a new custom file for your vehicle’s specific
calibration.
In most cases, files are created and available online to download through Internet
Update within 10-15 business days. When the file has been completed and is loaded up
on Internet Update for you to download you will automatically receive a confirmation
email stating that your file is available.
Connect your VIVID LINQ to the Internet Update site. Once logged in, the LINQ will
automatically be updated with those files. When you are prompted, disconnect the
LINQ and program the vehicle.
If you require any assistance, call our customer service line at 1-888-227-2447
or email us at [email protected].
UPDATING YOUR ARCHOS UNIT
It is recommended you check for ARCHOS updates at the same time you update your
VIVID LINQ so both units are running at the latest software available.
Connecting ARCHOS to the internet through a Wi-Fi connection:
- Touch the Home icon
- Touch the Menu icon
- Touch the Settings icon
- Touch Wireless & networks
- Touch Wi-Fi to add green checkmark
- Touch Wi-Fi settings to find access point
- View Wi-Fi Access Point under Wi-Fi networks
- Touch Access Point to connect
Update the ARCHOS thru a Wi-Fi connection:
- Touch the Home icon
- Touch the Grid icon
- Touch the AppsLib icon
You will be directed to the ARCHOS site where you can update to the latest files
available.
Apps can only be updated through a Wi-Fi connection.
13
Use the supplied Micro USB cable supplied in the VIVID box to connect your
ARCHOS unit to your PC. The
Micro USB port can be located at
the bottom edge of the ARCHOS
unit.
Attach one end of the micro USB
cable to the ARCHOS unit and
the other end to a USB port on
your PC.
The
enclosed
ARCHOS
handbook offers instructions for updating the device or you can visit the Superchips web
site for a link to the ARCHOS update directory. Before disconnecting your ARCHOS
from your PC, please make sure the battery in the
device is charged to 100%. If not, please charge the
unit by either leaving it connected to your PC or by
using the wall outlet charger included in the product
box.
Charging the ARCHOS battery to 100% will
ensure safe operation of the product when using the
VIVID software to tune your vehicle.
If additional assistance is needed, a helpful customer
service representative can be contacted by calling
the Superchips tech support line at 1-888-227-2447 or by emailing tech@superchips.
com.
MOUNTING ON WINDSHIELD
The windshield mount supplied with your VIVID PAQ is designed to give you
flexibility in mounting your device anywhere you’d like on your windshield.
The windshield mount allows the user a
hands free option for ease of tuning or
while using one of the additional software
features included in the product. The mount
is equipped with a locking suction cup, a
vertically adjustable arm, and a 360˚ pivot
head with spring loaded clips providing a
secure grip on the ARCHOS while allowing
the ability to fine tune the viewing angle to
your preference.
Before using the suction cup mount on your windshield, check the state and local
laws and ordinances where you drive. Some state laws prohibit drivers from using
14
suction mounts on the windshields while operating motor vehicles. Other state laws
allow the suction mount to be located only in specific locations on the windshield.
Many other states have enacted restrictions against placing objects on the windshield
in locations that obstruct the driver’s vision. It is the user’s responsibility to mount
the Superchips VIVID device in compliance with all applicable Laws and
Ordinances. Always mount your Superchips VIVID device in a location that does not
obstruct the driver’s view of the road. Superchips does not assume any responsibility
for any fines, penalties, or damages that may be incurred as a result of any state or local
law or ordinance related to the use of your VIVID device.
LOCATING OBD-II
The VIVID LINQ has a 16 pin OBD-II connector attached that plugs into your
vehicle’s OBD-II port located under the driver’s side dashboard.
The purpose of this connector is to provide a communication link between your vehicle
and your device as well as provide a power and ground source.
OBD-II port located under the driver’s side dashboard
(Locations may vary by make/model)
15
VIVID LINQ LED INFORMATION
Once connected to the vehicles data port the VIVID LINQ will have several LED
lights that become active.
Power LED (status light)
- Device has Power: If the Red LED blinks (this light blinks at its own
interval when powered)
- Device is in ERROR state: If the Red LED is solid and not blinking
or a long blink
- Device has not paired yet with VIVID dongle: If only the Red LED
is blinking
Bluetooth connection LED
- Device is IDLE if the Blue LED blinks every 2 seconds
- Device is communicating: If the Blue LED is flashing very rapidly
(DAQ is on if constant rapid flash)
Your vehicle is already tuned (VIN-Locked) if both Red and Blue LEDs come on at
the same time for 1 second once plugged into vehicle port.
The VIVID LINQ can be attached indefinitely to the vehicles OBD-II port if you plan
to use our Advanced Data Acquisition software included in the VIVID software suite.
If the vehicle will be sitting for long periods of time without being started periodically,
please disconnect the VIVID LINQ from the vehicle’s data port to prevent voltage
draw from the battery.
This cable must remain plugged into the vehicles OBD-II port throughout the
tuning process. Removal of the cable from the OBD-II port while tuning can result in
a vehicle no start.
POWERING UP THE ARCHOS FOR THE FIRST TIME
Make sure your ARCHOS device is 100% charged before tuning. After updating the
VIVID LINQ to the latest files online, plug the VIVID LINQ into the vehicle’s Data
Port and make sure the lights are NOT in one of the error conditions.
If the power light is blinking like it should (as described in the section above), the
ARCHOS can be connected to the LINQ via Bluetooth.
The power button is located on the lower right hand side of the ARCHOS unit. Pressing
the button will initiate the power on sequence.
16
DEVICE PAIRING SOLUTIONS
If connection fails due to a communication error between the ARCHOS and the VIVID
LINQ use the following steps to recover the connection:
*
Select VIVID main app.
*
Select Menu if connection fails.
*
Select Discover in the bottom right hand of the screen to search
for the LINQ device.
*
The VIVID LINQ has a series of serial numbers on the back of the device.
Find the correct SN in the program that matches the LINQ info. Select the
correct device and the software will work to establish a connection.
Menu
Icon
If the devices do not pair after this method, use the following sequences:
>Select the ARCHOS Home Icon
>Select the Settings Icon
>Wireless & Networks
>Bluetooth Settings
>Scan for Device
>Pair & Connect
>Enter Pin: 1234
>Use Keyboard
>Connect.
Your devices should be paired at this time and you may resume using the VIVID
application.
USING THE VIVID SOFTWARE
Identify the VIVID application icon on the Android desktop. Touch the
icon to open the VIVID application. Wait for the connection between the
ARCHOS and VIVID LINQ to be made. When the connection has been
made a small “Q” icon in the upper left hand side of the product will turn
blue. Once the two are paired the LED’s on the VIVID LINQ will be idle. You will
now have access to the VIVID application and all options available for your specific
vehicle application. The VIVID software offers two optional views for users to choose
from:
The Grid View
The Large Icon View**
(Primary View)
(Secondary)
17
**In the Large Icon environment, users can press the center icon and swipe left or
right to view additional icons.
at the upper left portion
Users can switch between views by touching the Grid Icon
of the screen.
PROGRAMMING YOUR VEHICLE
The programming process takes only a few minutes to install the tuning into the
vehicle. Please make sure all other power consuming devices such as the vehicles stero,
blower motor, accessories using the cigarette lighter or power plugs, and dome light are
turned off and any additional items that require vehicle batter power to operate aside from
the engine computer. i.e. GPS, Radar Detextor, Sirrus Radio, ect. Connect the LINQ
to the OBDII port of the vehicle, DO NOT connect the LINQ to the cigarette lighter.
NOTE: If the Linq does not power up when connected to the OBDII port, check
the vehicle’s cigarette lighter fuse. Look in your vehicle’s owner’s manual for the
location of this fuse.
* Warm-up vehicle prior to use in cold weather then switch
ignition OFF to start tuning.
* Do NOT start vehicle during tuning process.
* Do NOT leave device unattended while tuning.
* Stay with the vehicle as you will be prompted to turn the ignition
switch ON/OFF a number of times depending on vehicle.
Once in the tuning feature you will be prompted to select either a Quick Tune or
an Advanced Tune. The Quick tune provides the user with predetermined
Superchips optimized tuning levels. The Advanced Tune provides the user with the
opportunity to not only tune the performance of the vehicle but also a number of
drivetrain features depending upon the specific vehicle. Features such as transmission
shift point and firmness tuning, increases to the speed and rev limiters, Speedometer
corrections for tire and gear swaps, and much more...
Select the VIVID icon located on the
Android desktop to gain access to the
VIVID program. A stock vehicle PCM
memory read will be performed.
Verify the Bluetooth signal to the VIVID
LINQ has been achieved by checking that
the LED lights are powered on the VIVID
LINQ itself.
Next, select the “Tuning” icon to begin tuning your vehicle. You will be prompted
with two tuning options: Quick Tuning using Superchips-preferred vehicle settings or
Advanced Tuning with user adjustable vehicle settings.
QUICK TUNING
This feature provides the user with predetermined Superchips optimized tuning levels.
18
ADVANCED TUNING
Allows the user not only the ability to change the power level of your vehicle it
also allows you the ability to select all of the options available for your application.
**Options may vary by OEM and vehicle type.
TUNING LEVELS
Depending upon your vehicle application
a series of tuning levels will be
provided to you for selection.
Once the engine tuning of your choice
has been selected and you have chosen
to use the Advanced Tuning feature
a list of user adjustable options will
be shown. A wireframe model will be
shown detailing tunable options available to that particular vehicle
on the vehicle body as well as in the icons at the bottom of the
screen.
**The wireframe image shown will be custom to your application – Truck, Car, or SUV.
Select the appropriate options you would like to revise using the touch screen menus.
We will use the Speed Limiter option as an example; however, there are numerous
options available depending on vehicle application. VIVID will only offer options
available for your specific application.
Listing options to Raise the value or leave
it stock.
19
Selecting the Raised value will
increase the Speed Limiter to a
Superchips set increase in the limit.
Select OK to verify your settings and
return to the previous screen. You
can select another option to adjust
other parameters or begin the PCM
programming process.
To begin programming the vehicle with
the setting you selected, click on the
Program icon located in the upper right
hand corner of the screen.
Please do not leave the device unattended while tuning the vehicle. You may be
required to cycle the ignition switch from the off position to the ignition on [engine
off, do not start] position several times during the tuning process.
Do not start the vehicle at any point
in the tuning process or the process will
be interrupted. This causes issues with
communication between the device and
the vehicles computer and prompts the
VIVID to go into recovery mode.
20
Several bars detailing programming percentages as the VIVID installs the files into the
vehicles computers.
At this point the VIVID has completed its engine and transmission programming.
You will now be allowed to explore the additional VIVID options in the app.
When asked to move the key forward do not start the vehicle.
SWITCHING TUNING LEVELS OR RETURNING TO STOCK
The diversity of the Superchips VIVID
programmer allows the user the ability
to change tuning levels and settings as
often as they see fit. For instance, the user
might tow during the week but not on the
weekend. The user simply connects to
the tuning software portion of the VIVID
app. and re-tunes the vehicle to the chosen
tuning level the same way as described
in the, Programming Your Vehicle,
segment of this manual.
Once the vehicle has been tuned by the VIVID, a Stock Tuning Option
becomes available. Simply click on the VIVID tuning icon and search for
the Stock Icon in the list of tuning levels:
Follow the prompts
and your vehicle will
be returned to stock:
Your vehicle is now
returned to its original
stock programming.
21
ONE TOUCH TUNING
Once the vehicle is programmed the
user has the ability to use the One
Touch Tuning feature to return to
stock as well as return from stock
to the previously tuned program at
the push of one button. This feature
is especially helpful when visiting a
dealership for service.
If the vehicle will be sitting for more than 2-3 days without being started periodically,
please unplug the VIVID LINQ from the vehicles data port to prevent voltage draw
from the vehicles battery.
GAUGES
The gauge feature offers users two visual
gauges that offer real time sensor data
from the engine computer. Each gauge
can select from a list of sensors that the
computer monitors allowing the user to
view data specific to their needs in real
time. By lightly pressing on an individual
gauge the user is offered a number of
options including an extensive list of
vehicle sensors to monitor, options to
change the gauge background including an option to select a customized image for a
personalized look and more.
By selecting the Menu Icon
can customize the following
options:
on the right hand side of the screen the user
Default gauge view: Resets a custom
set of gauges back to the Default two
gauge group.
Settings: Provides functions such as:
*
*
*
22
Add Gauges: Allows you the
ability to add a limited number
of additional gauges to the view.
Size selections (Small, Medium,
Large and Fit to Screen)
Gauge Style (Round, Three Quarter, Quarter and Digital)
- PID selection
- Default View
- Delete All gauges
Start Recording: This feature saves the data to a .CSV format on the ARCHOS that
the user can save a copy to their PC for review at a later date. To record the data
the user would go into the gauge application, select the Menu Icon
then start
recording. The user will be prompted to enter the name for the Log.
At this point the user can customize the file name by touching the file name box and
entering the name with the ARCHOS keyboard. Select the Done Icon to move back.
Select ok to start recording.
Once you have completed your driving run select Menu Icon followed by stop
recording.
The recording has been saved to the VIVID.
The recorded file can then be saved to the PC by connecting via USB, selecting
and dragging down the status icon bar from the top of the ARCHOS screen > USB
connected > Mount.
You will now be prompted with a drive pop-up on your PC screen. If you do not see a
pop-up dialog in a timely manner you will need to use Windows Explorer to browse to
the new drive on your computer. (Start > My Computer > Removable Disks)
Open the folder in the pop-up to explore the saved files. Select the Superchips folder
followed by the DAQ folder. These files can be opened in a spread sheet program and
or saved on your PC.
Note: If you are recording a DAQ session in either the Gauges or DAQ and exit the
app it will automatically stop recording the information.
ADDITIONAL GAUGE OPTIONS
You can touch and hold each individual gauge for editing or customizing them to the
your individual tastes. The following instructions details those options.
Move gauge: Allows you to move the highlighted gauge around the screen by holding
the gauge with your finger and dragging it across the screen to the desired position.
23
CHANGE GAUGE FACE
This feature provides you with a large group of additional gauge images. You can
touch and hold the smaller images at the bottom of the screen to scroll through all of
the image selections. When you find a gauge image you would like to add, you will
touch the image to apply it to the gauge. You can then press and hold the large gauge
to enter the following menu:
Select Current: Saves the current image to the gauge being changed.
Customize Gauge: Offers background and text color change options. Once done
editing touch the large gauge to return to the previous screen.
Cancel Gauge Changes
PID INFORMATION
Change Measure (PID)
Provides the user with a list of all PID’s applicable to the specific vehicle being
monitored. There are three options available for PID viewing:
Favorite PID’s
Allows the user to add PID’s to a favorites section so the user can reference and
customize each gauge with that list of favorites. This minimizes scroll time for PID
selection. By touching and holding a PID from the list the user is prompted to add to
Favorites. The user can also go into the Favorites and remove PID’s the same way.
24
Recent PID’s
Shows recent PID’s viewed.
All PID’s
Details all PID’s specific to the vehicle being monitored.
Gauge Size
Provides you with the following size selections (Small, Medium, Large and fit
to screen)
Delete Gauge
This feature removes a customized gauge from view.
Data Acquisition (DAQ)
The Data Acquisition feature allows you to monitor real time sensor data from your
vehicle’s engine while it’s running.
PERFORMANCE METER
This feature allows you to record
up to 10 driving instances where
you can select recording options
such as 0-30, 0-60, 0-100, ¼
mile, ½ mile, and 1 mile data.
Stat bars provide stats for each run
saved that the user can scroll through
at will.
To start recording, you must first
select one of the options from the
drop down menu. Once the Driver is
at a complete stop and ready to record, hit the ON button to begin the run.
POWER GROUP (Default)
This feature allows you to monitor
vehicle data. You may change
monitored information by pressing
and holding a graph. You will then
be taken to a PID selection menu
like in Gauges.
25
ENGINE ONE
This feature provides you with
additional data. Here is a sample of
the different types of information that
can be monitored (display will vary by
application):
*
*
*
*
*
Intake Air Temperature (IAT):
Monitors the temperature of the
incoming air into the engine.
Ambient Air Temperature
(Amb Temp): Monitors outside
These PID’s may be changed
temperatures.
on all engine screens
Mass Air Flow: Airflow rate as measured by a mass
air flow sensor (MAF) if equipped.
Engine Coolant Temperature
Manifold ABS Pressure: Calculated air density from
the ECU determining the engines air mass flow rate.
ENGINE TWO
This feature provides additional PID
information:
-
-
Control Module Voltage (Volt):
Calculated Battery Voltage
Fuel Level
Barometric Pressure:
Shows calculations when
altitude changes occur.
Note: The list of PID’s shown are for
demonstration purposes only and the
actual PID’s show on your vehicle will
vary.
These PID’s may be changed
on all engine screens
CHANGING PID MEASURES IN DAQ
The three main DAQ features–Power Group, Engine One and Engine Two–have the
ability to adjust the diagnostic PID’s to be monitored. By touching and holding an
individual graph a list of additional PID’s are provided to customize the gauge.
PID Recording: This feature saves the data to a .CSV format on the ARCHOS that
you can save a copy to their PC for review at a later date. To record the data the user
would go into the specific application to be recorded, select the menu icon then start
recording. The user will be prompted to enter the name for the Log.
At this point you can customize the file name by touching the file name box and
entering the name with the ARCHOS keyboard. Select the Done Icon to move back.
Select ok to start recording.
26
Once you have completed your
driving run select menu followed by
stop recording.
The recording has been saved to the
VIVID, the file can then be saved
to the PC by selecting and dragging
down the status icon bar from the
top of the ARCHOS screen – USB
connected – Mount.
You will now be prompted with a drive popup on your PC screen. If you do not see a
popup dialog in a timely manner you will need to user Windows Explorer to browse to
the new drive on your computer.
Open the folder in the popup to explore the saved files. Select the Superchips folder
followed by the DAQ folder. Find the file you want to save and drag it to the desktop.
Once saved to a PC the user can view the file by opening the file using a spread sheet
format.
DODGE/JEEP ONLY DAQ ADDITIONS
Engine Idle Up/Down Feature
Engine idle speed adjustment options are available for most Dodge and Jeep vehicle
equipped with electronic throttle control.
Front or Rear Axle Lock Feature
Axle lock options may be available for those Dodge trucks and Jeep vehicles
equipped with electronically controlled differentials. Each differential can be locked
independently which can be useful in off-road situations like rock climbing where
the need for continuous locking and unlocking of the axles is warranted. (Only one
differential can be locked at a time with this feature.)
27
To access these features in the Data monitor feature click on the menu icon
and select DAQ opƟons.
Select the feature you would like to use, enable the feature by selecting the enable
button, and then touch the set button to activate the feature. These features require
that you remain in the DAQ Options menu for them to work. If you return to another
screen the options will disengage.
MILEAGE MENTOR
The Mileage Mentor provides the
user with accurate fuel mileage
information to help users improve
their fuel mileage with the assistance
of a visual tool.
Features Included
Odometer:
Vehicle odometer. This feature must
be set up in the Maintenance Minder
before it will work here.
Trip:
Distance since the last time you used the Menu item to reset the fuel economy and
trip. This is intended to help you identify your mileage based on your last driving
“segment.” Your mileage will be considerably different when driving on the city
streets versus on a long trip, so they can reset this before going on a trip and then their
mileage can be related to the distance shown in the trip box.
Fuel ECO Inst & Ave Graphs:
These values are side by side in this box so you can compare them visually. They are
the instant and average values. They will show up as vertical graphs. If the one on the
left (Inst) is higher than the one on the right (Ave) then you are doing well. If not, then
you are in the negative.
Smoothness:
This is a meter that shows if you are accelerating or decelerating more than you should be.
28
Fuel ECO Inst & Ave Digital:
These are the same values as the ECO Inst & Ave graphs, but are given as the actual
numeric values for the user to see.
ECO Coach:
This value is simply the difference between your instant and average economy values.
If it is negative you are getting worse economy than your average and if positive then
you are getting better. How much worse or better is whether you are doing good or not.
Load %:
This is the vehicle’s reported Load % indicating the percent of peak available torque
in your vehicle.
“Money To Burn” Animation:
The 20 Dollar bill image signifies your mileage improvements or losses in an animated
form. When the bill is all there and has no flames you are doing well. The more the bill
burns the worse you are doing. This feature it is a combination of your ECO Coach
value (positive or negative) and your smoothness value. It takes into account being
less than 35 MPH** (gives you a better value if you accelerate a little more below
35 MPH, but not too much). It penalizes you quite a bit for slamming on the brakes
(Deceleration).
Selecting the Menu Icon
prompts with the following options:
Enter Actual Fuel Economy:
Allows you to add the actual fuel economy you are getting so you can compare what
your vehicle is saving vs. what it was rated for. (Your vehicles actual mileage must
be either read from the vehicle’s dash board or hand calculated when the vehicle is
refueled).
Reset trip and fuel average:
Sets these gauges to zero to make sure the gauges are accurate at the time of use
**One of the best ways to save fuel is to not accelerate too quickly and not to use the
brakes. Not using the brakes more than needed is the overall best way to save fuel. If
you plan ahead and take your foot off the throttle long before you need to stop you
will save fuel.
Note: that tests have shown that below about 35 MPH you should accelerate a little bit
faster because vehicles are not very efficient below 35 MPH (on average). This doesn’t
mean you put the throttle to the floor. It just means get up to 35 MPH fairly quickly and
then accelerate more gently above that speed.
NOTE: Several vehicle PID’s are required for this application to work properly.
Mileage Mentor may not work on some early OBD-II models that do not provide the
appropriate PID information from the vehicle’s engine controller.
29
MAINTENANCE MINDER
The Maintenance Minder is an
application that helps the user keep
track of when they need to service
their vehicle. A default list of service
items is copied to a table in the
database for each vehicle the VIVID
attaches to. This allows the VIVID
device to keep track of the service
information for multiple vehicles.
The need to service the vehicle for an item is determined by the mileage traveled since
the last service. This requires the VIVID to be able to track the miles traveled. The
LINQ provides a running counter. This counter is not the actual odometer reading of
the vehicle. Because of this, the VIVID software allows you to enter the vehicle’s
actual odometer value and keeps track of the offset from the actual value to the
running counter the LINQ is reporting. From then on, this offset is used to calculate
the odometer reading to use throughout the Maintenance Minder.
Since the calculation of the free running timer will not always be 100% accurate, an
adjustment factor is also created each time you update your vehicle odometer reading
in the Maintenance Minder. You can open this dialog and enter the new odometer
reading any time. From then on, the calculated adjustment factor is used to adjust the
odometer value used by the Maintenance Minder.
The Maintenance Minder is separated into TWO parts. The first part is the main
Maintenance Minder interface application. This application shows the global settings,
list of service items, and individual values for the currently selected service item.
The second part is a background service that keeps track of the odometer and compares
it to the active service items to see if they are due for service. This background service
notifies the user of its status using the Android notification system. You can see the icon
in the notification area change. You can also drag the notification down and see how
many items are coming due and how many are past due. You can tap on the notification
and be taken to the Maintenance Minder application no matter what application you
are currently in.
Because the Maintenance Minder requires the LINQ to send the running odometer
counter during this process, the user MUST be in one of the VIVID suite of applications
that actually DAQs with the vehicle for the Maintenance Minder system to be working.
If you are not in a DAQ application, the notification service will not be accurate if the
vehicle is moving. Note: DAQing apps are DAQ and Gauges
The running counter is kept on the LINQ, so the next time DAQ is started the odometer
value and notification service will all update properly. If you drive the vehicle with
the LINQ disconnected completely, the system will not be accurate and will require
the user to reconcile the vehicle’s odometer value with what is entered into the
Maintenance Minder.
30
The first time the application is started on a vehicle the screen should look something
like this: when opened up for the first time, auto prompts for odo.
Notice that the Odometer value on the lower left is 0 and the notification icon on the
status bar indicates the Maintenance Minder is not working.
At this point you must enter the current vehicle odometer value as shown on the
vehicle’s dash.
Selecting the menu item shows this screen:
When you tap on the edit box it brings up the keyboard and text entry field.
You enter the vehicle’s odometer value and hits the DONE button to show the dialog
again:
After verifying the value entered is correct you hit the OK button.
31
Now the Maintenance Minder has all the information it needs to operate, and the
screen should look something like this:
Notice that the All Items check button is off which also causes the notification icon to
show the Maintenance Minder is off.
Tapping the “ON” button in the All Items check box causes the notification to turn
green:
Tapping on one of the service items in the list causes the fields on the right side of the
screen to show up:
32
Notice the item is turned on via the check button and the Service Interval and Next
Service values are both 0. This is because vehicles can be radically different in their
service schedule.
As long as the Service Interval is 0
that item is effectively not active even
though the check button shows it to
be active. To make an item actually
cause a notification when due an
Interval must be entered. This is done
by tapping on the Service Interval edit
box which brings up the keyboard and
text entry box shown here:
Enter the Interval value and hit the DONE button on the lower right side of the display.
The screen should now look like this:
If the Service Interval is such that the current odometer plus the Service Threshold
(lower left) is greater than or equal to the Next Service value then the item is considered
to be getting close to being due. This causes a notification warning. The warning is
indicated by the Service Item being yellow in the list and the notification icon showing
that there are items coming due soon.
You can change the Service Threshold by tapping on the edit box in the lower left
corner. This brings up the keyboard and text entry dialog shown here:
33
After hitting the Done button the main Maintenance Minder screen detail the items
you have selected:
Nothing else changed because the Service Threshold was past the service item already.
If there are any Service Items that the odometer value is greater than the Next Service
value without having to add in the Threshold, the item is considered past due and not
coming due. This causes an Urgent Item condition as shown in this screen:
Notice the notification icon now shows an Urgent Item condition. The Urgent Item
condition takes precedence over the warning condition.
If you drag down the notification from the notification bar, you will see text similar to
the following:
If there are no items due, the icon will
be green and the text will say “No
Items Due.” If there are only warning
items the icon will be yellow and the
text will say Items coming due during
threshold period: x, where x is the
number of items that are coming due.
If there are only urgent items, the icon
will be red and the text will say Items
due now: x, where x is the number of
items that are past due.
If there are both warning and urgent items, the icon will be red and both text will be
shown along with the count of each type of item coming due.
If you tap on the notification area while it is open, you will be taken to the Maintenance
Minder application no matter what application you were in before.
Note: Increasing the threshold will cause items to show a warning sooner.
34
INCLINOMETER
The Inclinometer feature allows users to view negative and positive vehicle pitch and
roll by degrees.
This feature is useful for a number for general off road applications. By selecting the
Menu Icon you will be prompted with the following options:
Menu Icon
CALIBRATE
This feature set’s the gauges current
position to zero to make sure the
gauges are accurate at the time of use.
Use this option once the VIVID
is mounted to the windshield and the
vehicle is on flat land.
CHANGE FACE
This feature provides you with a large
group of additional gauge images. You
can touch and hold the smaller images
at the bottom of the screen to scroll
through all of the image selections.
When you find a gauge image you
would like to add you will touch and
hold down on the large image to move
into the following options:
35
Select Current: Saves the
current image to the gauge
being changed.
* Customize Gauge: Offers
background and text color
change options. Once done
editing touch the large gauge
to return to the previous screen.
* Cancel Gauge Changes
*
DTC SPY
This feature reads and clears
Diagnostic Trouble Codes**. If a
trouble code exists the user will be
provided a definition for the ‘check
engine light’ issue.
By selecting the Menu icon you
will have the choice to re-read
the vehicle, clear the existing codes,
collapse the data, expand the data and
a device list option which is used to pair the ARCHOS device to the VIVID LINQ.
**Some codes are hard codes, i.e. when a part is missing or broken. Even if you clear
the codes, a CEL will still be illuminated and the DTC will remain until the problem
is fixed, or the vehicles PCM is reflashed (if the part is not fixed the DTC will come
back). Other codes like P1000 remain until the vehicle has completed a certain amount
of trip cycles and the adaptive info has been learned.
The P1000 code tells emission testers that the vehicle has recently been cleared
and is ineligible for emissions testing. When preparing for an emissions test, make
sure you have several miles of drive time logged in the vehicle and have not recently
cleared any trouble codes so that the P1000 code clears.
36
DOWNLOADABLE FEATURES
**FOR DODGE AND JEEP ONLY
TIRE PRESSURE MONITORING SYSTEM ADJUSTABILITY
Late model Dodge trucks and Jeeps may be
equipped with a tire pressure monitoring
systems can use the Superchips TPMS
tuning features to adjust the factory set
limit to appropriate thresholds base on tire
specifications mandated by the DOT.
An additional TPMS off road-only feature
is also available for unregistered vehicles
used on public roads or highways. This feature provides the user with the ability to
turn off the TPMS system on off-road or race-only vehicles without TPMS tires and/
or wheels. This feature requires the user to accept an digital waver stating that they
understand this feature is listed for off-road or race-only use only.
To access these features in the Data monitor
feature click on the menu icon and select
DAQ options.
Select the feature you would like to use,
enable the feature by selecting the enable
button, and then touch the set button to
activate the feature.
The TPMS off road feature is a separate function requiring the user to return the
feature back to stock separately from the product’s general return-to-stock tuning.
This feature is for off road use only and a user must agree to the online waver before
the download can begin. Use of this feature on any legal roadways is prohibited.
ADVANCED TRANSMISSION TUNING
Late model Dodge trucks and Jeep applications may have the unique ability to
customize their transmission Shift Points and transmission Torque Management**
with the Superchips Advanced Transmission Tuning feature.
(** Dodge/Jeep Trucks and SUVs with 45RFE Transmissions only.)
Superchips highly recommend that you get the transmission up to its normal
operating temperature before testing any new adjustments made with either of these
Advanced Transmission Tuning features.
ADJUSTABLE SHIFT POINTS
Once you have programmed the vehicle with a Superchips tuning level
scroll down to the 3rd set of icons in the main VIVID menu and select the
Shift points Icon.
37
The Shift Point adjustment application offers the following features:
1) The main graph details each shift point line and how it performs by MPH vs.
throttle position.
2) The two grey buttons in the upper left hand corner of the screen allow you to view
and adjust your up and down Shift Points individually or together.
3) The color coded lines detail each shift table. By touching one of those lines you
highlight that particular shift point on the main graph allowing it to be adjusted.
4) The Points tab allows you to view your adjustments by numeric value.
5) The Shift Groups tab switches you between street/strip (warm) and off-road/crawl
(low) tuning.
Your factory Shift schedules are displayed the first time you enter this feature.
Since each vehicle year, make and model will detail different shift points, Superchips
recommends that you record your stock schedules on paper as a beginning
reference. As you make adjustments it is also recommended that you document your
adjustments as you go along so when you test the changes on the track it will be
easier to reference and fine tune for any driveability issues.
By default, the feature details your current shift point levels by a line graph with each
gear change color coded to make it easier to track.
Shift Point adjustments are made by identifying the color coded schedule that you
would like to adjust from the column to the left. With your finger touch any one of
the intersecting dots in the graph and drag the dot to the desired location.
The user can also adjust each shift point by numerical value in the Points tab.
To access the numeric data touch the Points tab and scroll your finger upward to
expose the folder data. You can now set the MPH by selecting each numerical point
38
in the Points tab or in the graph. Each will react to adjustments made in the other.
(You will need to scroll the tab down in order to select and adjust a different shift
line. Once the new shift line has been selected scroll the Points tab back up to view.)
As you move the intersection dots in each shift point you will see the numbers on the
left change.
The Shift Groups tab lets you tune both the
warm and low transmission settings. Warm
is your street/strip option where higher
MPH would be achieved.
Low covers off-road/rock climbing where
higher torque would be achieved with low
MPH.
By selecting the menu icon
you can save your current schedule, load an
existing schedule, or invert the main graph for a different view.
39
ADJUSTABLE TORQUE MANAGEMENT
Once you have programmed your vehicle with a Superchips tuning level
scroll down to the 3rd set of icons in the main VIVID menu and select the
Torque Management Icon.
Similar to the Shift Point adjustment feature, the Torque management feature for
Dodge gas trucks and SUV applications allows you to adjust how firm gear up and
down shifts are. Here is a definition of the product features:
1) The main graph details torque management lines for each gear change and how it
performs between pedal percentages vs. RPM.
2) The two grey buttons in the upper left hand corner of the screen allow you to view
and adjust your up and down Shift Points individually or together.
3) The color coded lines detail shift torque for each gear change at part throttle.
By touching one of those lines you highlight that particular line on the main graph
allowing it to be adjusted.
4) The Points tab allows you to view your adjustments by numeric value for either
part throttle or wide open throttle torque (Part throttle torque is shown by default).
5) The Shift Groups tab allows you to switch between part throttle torque and wide
open throttle torque allowing you the ability to tune both.
Your factory Torque Management schedules are displayed the first time you
enter this feature. Since each vehicle year, make and model will detail different
transmission Torque Management information, Superchips recommends that
you record your stock schedules on paper as a beginning reference. As you make
adjustments it is also recommended that you document your adjustments as you go
along so when you test the changes on the track it will be easier to reference and fine
tune for any driveability issues.
By default, the feature details your current
torque management levels by a line graph
with each gear change color coded to make
it easier to track. Torque management
adjustments are made by identifying the
color coded schedule that you would like to
adjust from the column to the left.
40
With your finger touch any one of the
intersecting dots in the graph and drag the
dot to the desired location.
The user can also adjust each torque
management point by numerical value in
the Points tab by touching and scrolling the
tab upward.
You can now set the MPH percentage
by selecting each numerical point in the
Points tab or in the graph. Each will react
to adjustments made in the other. (You
will need to scroll the tab down in order to
select and adjust a different shift line. Once
the new shift line has been selected scroll
the Points tab back up to view .)
As you move the intersection dots in each shift point you will see the numbers
change.
The torque management feature offers improvements in part throttle shifting and
wide open throttle shifting (WOT).
Part Throttle:
WOT:
Swapping between these two features is done in the Shift groups tab by touching and
sliding the tab upward exposing the two choices.
41
By selecting the menu icon you can save your current schedule, load an
existing schedule, or invert the main graph for a different view.
Main Graph:
Inverted graph:
MEDIA APPS
The VIVID software provides Camera, Video Player, and Music Player apps in the
software for additional convenience. See your ARCHOS manual for more details.
42
TROUBLESHOOTING
Product Recovery:
When a LINQ is in recovery state the ARCHOS/VIVID will prompt you to enter
Recovery Mode which will follow a step-by-step process to return the vehicle to stock.
This could be caused by stock due to an error during the tuning process (Ignition on
not detected, Disconnection of the LINQ from the data port during tuning, A low
battery, etc…).
Note: When the LINQ is in a recovery state it will not allow the user to complete any
other activities.
In the event the vehicle does not start after tuning, and the LINQ is not prompting the
user to enter recovery mode, you will need to enter the tuning app and explicitly return
the vehicle to stock. You should not use the One Touch Tuning app to do this since it
will save the current settings.
If your ARCHOS experiences a general error or an endless pause at any point, you
need to reset the VIVID application by first returning the ARCHOS unit to the home
screen or VIVID launcher, then removing and reinserting the LINQ from the data port.
Those steps will reboot the system, similar to a PC reboot, and allow you the ability
to reconnect the two devices and return to stock in order to recover the vehicle.
If experiencing a low battery error when returning to stock, turn off all items such as
AC, stereo, etc. and drive around the block to restore the battery, and try again. Battery
levels may vary when car is not running and they need to have enough power to be
able to go through the process of returning a vehicle to stock. This is a preventative
measure when returning to stock.
If assistance is required please call Customer Service for assistance at 888-227-2447.
Q&A
Question: Can I use the VIVID monitor in place of a gauge cluster?
Answer: Yes, the Superchips VIVID’s internet tablet is designed to be used in cabin,
and will provide real time vehicle information on the touch screen, eliminating the
need for gauges. However, do not leave it in the vehicle if the device will encounter
extreme temperatures. Also, do not interact with the VIVID display while the vehicle
is in motion.
Question: Can I remove the Active Fuel Management Feature on my GM (or Multiple
Displacement System on Chrysler products) with the Superchips VIVID?
Answer: Yes. The Superchips Vivid Tuner will allow you to remove the displacementon-demand from any GM or Chrysler vehicle that comes equipped with that feature
from the factory.
Question: How do you mount the Superchips VIVID tablet/monitor?
Answer: The Superchips VIVID comes with a suction cup windshield mount.
43
Question: How big is the Superchips VIVID’S monitor?
Answer: The Superchips VIVID has a 4.3" Color Touch Screen.
Question: Why does it take so long the first time I tune my vehicle?
Answer: When the vehicle is tuned for the first time, the programmer must read the
vehicles stock calibrations to determine what vehicle and files it is tuning to. This
process adds additional time to the tuning process. This is a one-time process and will
only need to be performed if the product is moved to another vehicle.
Question: Does my phone/ARCHOS unit need to be connected to a charger while
tuning?
Answer: We recommend the device to be fully charged. Connecting a charger is not
required but would not hurt.
Question: Can I plug in a charger while in the tuning process?
Answer: Yes, a charger can be connected while tuning.
Question: Does connecting a charger affect the tuning process and decrease voltage
issues?
Answer: This does not affect tuning but will solve many voltage issues.
Question: What do I do if the VIVID doesn’t connect?
Answer: Turn the VIVID off and then back on.
Question: I dropped my VIVID and cracked the screen. Do I have to buy another
or can I send it in for repair?
Answer: Call the ARCHOS tech support number at 1-877-300-8879 for information
on their repair policies.
Question: Why is it that when I press a character it writes a different character?
Answer: Sometimes if your finger is not placed directly over the selected key,
the adjoining key will be displayed.
Question: Why can’t I read the display in the sun?
Answer: The power saving display does not display well in direct sunlight. Reposition
to read.
Question: The auto rotate in the Inclinometer has a delay, is this normal?
Answer: Yes, in an attempt to save power the device updates every few seconds hence
the delay. A faster rate will increase power consumption.
Question: Who do I call if the ARCHOS unit does not work?
Answer: Call the ARCHOS tech support number at 1-877-300-8879 for information
on their repair policies.
44
FACTS
Fact: Programming your vehicle may expose existing defects in your PCM or hard
parts that could disable your vehicle. It is advised that you do not program your vehicle
in remote locations in case of failure. Vehicle manufacturers do not recommend
programming in extreme temperatures. Please see your vehicle service manual to
ensure that programming is being done in accordance with the original equipment
manufacturers specifications.
Fact: The VIVID PAQ is a high performance product. Not all vehicles deliver the
exact same power output when programmed with the VIVID PAQ. It is recommended
that you select a program that will best fit your needs. Whether towing, or traveling
long distances at high speeds, choose your power level wisely and keep in mind the
condition and tolerances of your vehicle when selecting a suitable power level.
Fact: When taking your vehicle to the dealership to get service or work performed
(i.e. oil change, recall, etc), it is recommended that you program the vehicle to stock
before taking it in for service. In many cases, the dealership has new electronic updates
for the vehicle, and consequently will update the vehicles computer. If this happens
and the vehicle is programmed with a Superchips power level, the dealership update
will overwrite the programming and lock the device. The vehicle will still start and
run but the device will no longer tune the vehicle until you unlock the device. You can
purchase an unlock when you update the tuner but if you see additional errors (i.e.
vehicle not stock) please contact our customer service department. Always program
the vehicle to stock, and update the product while it is out of the vehicle to ensure that
the software on the VIVID LINQ is up to date with the software the dealer installs in
the vehicle.
Fact: Transfer media files can be transferred to your PC by connecting the ARCHOS
to your PC via the included Micro USB.
Fact: Some applications require internet connection. Optional features require third
party accessories to be installed and programmed to operate. Additional hardware
may be required. Android and Google are trademarks of Google, Inc. All brands and
product names are registered trademarks of their respective owners. Specifications
are subject to change without notice. Images and illustrations may not always match
contents.
Fact: All Superchips tuning products for gasoline-fueled vehicles are either covered
under CARB Executive Order number or are in a pending state. All Superchips tuning
products for diesel-fueled vehicles are on the CARB products in progress list pending
CARB testing and approval.
Fact: Recovery Mode will automatically prompt customer in recovering vehicle
process.
Fact: You can switch between tuning levels without returning to stock.
45
TECH SUPPORT & SERVICE
If something goes wrong with your product, customer support is available to assist
you. You can contact Customer service by phone at 1-888-227-2447 or by email at
[email protected]. Customer service hours of operation are Monday – Friday
from 8 am to 5 pm Eastern standard time.
Most service issues can be resolved using our internet update software, but in the
event the product needs to be returned to Superchips for service, please follow these
important steps:
1) Contact Superchips customer service at 1-888-227-2447 within the hours
of operation listed above. If the product needs to be returned your customer
service rep will provide you with a Return Authorization number (RA#).
2) If the product is under warranty you will need to provide a copy of the original
sales receipt. The Sales receipt must have the name and address of the business
where you purchased the product from. Invoices, credit card statements, or sales
receipts from an online payment service company will not be accepted.
3) Box up the product along with a copy of the original sales receipt, a description
of the problem and your contact info.
4) Mark the outside of the shipping box in bold print with the RA# provided to you
by the customer service agent.
5) Send the product postage paid to:
POWERTEQ
Attn: Warranty Claims RMA #
1080 South Depot Drive
Ogden, UT 84404
We will inspect the product and either repair it or replace it with a new or rebuilt
product. We reserve the right to use refurbished parts when making repairs.
46
NOTES
47
Follow Us
www.superchips.com
1790 East Airport Blvd. | Sanford, FL 32773 | 888.227.2447
REV01