1
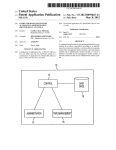
PENNSYLVANIA TURNPIKE COMMISSION
ROADWAY ASSET MANAGEMENT SYSTEM
(RAMS)
SYSTEM USER MANUAL
1
TABLE OF CONTENTS:
CHAPTER ONE……….WELCOME TO THE RAMS SYSTEM!!! ........ 2
What is the RAMS System? ....................................................................... 3
The Application List ................................................................................. 3
CHAPTER TWO……………ABOUT THE RAMS SYSTEM.................... 5
Access to the application........................................................................... 5
Splash Screen ............................................................................................ 6
No Authorization ....................................................................................... 7
The look, The feel ...................................................................................... 8
Standard Functionality ............................................................................. 8
Browsing Records ................................................................................... 10
Running a Query ..................................................................................... 13
Sorting the Records ................................................................................. 15
Editing the Records ................................................................................. 17
Deleting the Records ............................................................................... 19
CHAPTER THREE……….SIGN LOG APPLICATION ......................... 20
Adding a Record...................................................................................... 20
Security.................................................................................................... 24
Reports .................................................................................................... 28
2
WELCOME TO RAMS!!!
CHAPTER ONE
WELCOME TO THE ROADWAY ASSET
MANAGEMENT SYSTEM (RAMS)!
What is the RAMS System?
The RAMS system contains a group of applications that allow users to maintain
information regarding the assets of the Pennsylvania Turnpike Commission. Each of these
applications contains a common look and feel that allows users from one application to easily
enter another application and find there way around.
RAMS is an acronym that stands for Roadway Asset Management System. The purpose
of this system is to replace existing applications currently running in FoxPro and Access with a
Visual Basic system utilizing an Oracle database.
The RAMS system resides on the Network and is accessible from an icon installed on the
user's desktop. For more information on the installation process of the RAMS system please see
the programmers manual.
3
WELCOME TO RAMS!!!
The Applications List?
As mentioned in the previous section, the RAMS system is made up of various PTC
applications. The following is an updated list of the applications that are currently in the system
or will be in the system soon.
•
•
•
•
•
•
•
•
•
•
•
•
•
Bridge Log
Implemented 11/00, Modified 06/02
Sign Log
Implemented 11/00
Survey Control Points
Tunnel PM
Tunnel Structural
Facility Log
Service Plazas
Sign Structures
High Mast Lighting
PTC Utility Log
PTC Access Gates
PTC Communication Towers
PTC Surplus Parcels
4
ABOUT THE RAMS SYSTEM
CHAPTER TWO
Access to the Application:
Access to the various applications is obtained from the main form of the RAMS system.
Choose the application they wish to run from the RUN menu option on the form or by using the
shortcut keystrokes.
5
ABOUT THE RAMS SYSTEM
Splash Screen:
The splash screen for each application will be shown on the screen. The name of the application
being launched will be visible in the middle of this splash screen if the user launching the
application has the proper access.
6
ABOUT THE RAMS SYSTEM
No Authorization:
If the user does not have access to the application being launched the following message will
appear. The user must contact the person listed on this message to gain access to the application.
7
ABOUT THE RAMS SYSTEM
The Look, The Feel!
The main screen to each of the applications has generally the same functionality. The idea is to
give a similar and look and feel to the users of each application in the RAMS system. The general
information for the asset you are looking at can be seen at the top of the screen and the additional
information is displayed on various tabs at the bottom. The information displayed was decided
upon by the key user(s) of each application.
8
ABOUT THE RAMS SYSTEM
Standard Functionality.
The following is a list of the buttons and there functionality. These buttons are standard
to the RAMS system and can be seen on each applications main screen.
The Exit button- will close the current application and return to the main menu.
The Report will contain a drop down menu for each application. This menu will contain
the list of reports available for this application. The menu can be obtained by clicking on
the down arrow on this button.
The Browse button will display the data in a spreadsheet type format. From this form
records can be accessed, sorted or selected quickly.
The Select button allows for the limiting of the current view to only the records meeting
the criteria selected.
The Select All button returns the view back to all records in the database. This button will
only function if a limited selection is place.
The Sort button allows for the changing of the order in which the records are seen in
based upon various fields in the database.
9
ABOUT THE RAMS SYSTEM
The Edit button turns on the edit mode allowing users with the proper access to change
the values in particular fields.
The New button opens the add new screen allowing for the addition of new records.
The Delete button will delete the current record after verifying the record being deleted.
The Security button opens the view security form allowing users with the proper access
the ability to view, edit and add users in the security database.
The Move First button is a record navigation button that will move the record pointer to
the first record in the database.
The Move Previous button is a record navigation button that will move the record pointer
to the previous record in the database.
The Move Next button is a record navigation button that will move the record pointer to
the next record in the database.
The Move Last button is a record navigation button that will move the record pointer to
the last record in the database.
10
ABOUT THE RAMS SYSTEM
Browsing Records:
The browse button will open the following form. The Form displays all selected records and the
fields from the database for the application.
The browse form may be editable or it may be in read only mode. This will vary by application.
Wherever your cursor is in the browse window that is the record that will be shown on the Main
form.
Closes the browse form and returns to the main form.
11
ABOUT THE RAMS SYSTEM
Customize the format of the browse window. See customize form on pages 12-14
Returns the format back to show all fields in the browse window.
Change the viewable recordset by running a query. See the query form on pages 15-16
Reset the recordset to show all records.
Sort the recordset by choosing field(s) that you wish to sort on. See the sort form on pages 17-18
12
ABOUT THE RAMS SYSTEM
Customize the Browse window:
The Customize button will open the following form:
From this form the view of the browse form can be changed to show only those fields the user is
most interested in.
Note: Route and Milepost will not show in the field’s available box in any application. This is
considered to be the unique identifier for all assets at the PTC and will always be displayed.
13
ABOUT THE RAMS SYSTEM
Choose the field to display on the browse screen from the fields available box.
Hit the less than button to move the value to the fields selected box.
14
ABOUT THE RAMS SYSTEM
The value chosen will show in the fields selected box.
The less than button will remove a highlighted item in the fields selected box.
The done button will set up the view of the browse form to show only the route, milepost and the
fields listed in the fields selected box.
15
ABOUT THE RAMS SYSTEM
Running a Query:
The select button will open the following form.
With the Select form a query can be run against the main recordset in the application. This will
set up a limited view of only the records in the recordset that meet the criteria established.
From the fields available box choose the first field wanted for the query on by clicking on it.
16
ABOUT THE RAMS SYSTEM
The field values box will fill in with all valid unique values that were found in the recordset for
the value chosen in the field’s available box
The buttons between the fields available and the field values box are operands for running the
query. The button that fits the criteria being looked for should be clicked. The statement chosen
will be visible in the Current Selection Filter box at the bottom of the form.
Will clear the filter.
Will cancel any query started and close the select form
Will process the selection criteria and return the results.
17
ABOUT THE RAMS SYSTEM
Sorting the Recordset:
The sort button opens the following form.
The sort form allows for the changing of the order the records are seen in based on the list of
fields from the file.
Choose the fields to sort on from the available field’s list on the right.
18
ABOUT THE RAMS SYSTEM
Choose the direction to sort the field(s) chosen.
The results of the selection made will appear in the Selected fields box.
To complete the sort hit the done button.
To remove the sort criteria chosen highlight the criteria in the Selected fields box and hit the
remove button.
19
ABOUT THE RAMS SYSTEM
Editing the Recordset:
Select the edit button from the main screen.
All fields which can be edited in this application will have their background colors turned to a
light blue.
To edit the information in those fields use the tab key to move to the field(s) to be edited or the
mouse can be used to position the cursor on the field(s) to be edited.
While in edit mode most options are turned off. The Exit button and record navigation buttons
function. When editing is completed the edit button is pressed again.
20
ABOUT THE RAMS SYSTEM
If changes have been made to the current recordset then the Record Change Confirmation screen
will show asking if the changes should be saved or not. In order for processing to continue this
question must be responded to.
By hitting the Yes button all changes will be saved. By hitting No all changes will be lost and
original values will be stored.
This message will only appear while in edit mode if the Exit button, the Edit button or the record
navigation buttons are pressed.
21
ABOUT THE RAMS SYSTEM
Deleting a Record:
To delete a record press the delete button.
The following message will appear asking if the record should be deleted. The format of this
message will vary based upon the application you are in.
If the Yes button is pressed the current record will be deleted from the recordset and any
matching linked records in other recordsets will be deleted.
If the No button or the Cancel button is pressed the current record will not be deleted.
22
THE SIGN LOG APPLICATION
CHAPTER THREE
Sign Log Specific Functionality
There is some functionality that is specific to each application such as reports, adding new
records and security. Chapter three discusses the specific functionality of the Sign Log
Application.
Adding a Record:
The Sign Log currently supports two types of additions to the data. The first type is the
addition of new Sign records. To add a new sign you hit the new button. The second type of add
is the addition of an inspection for a given record. This is accomplished by choosing Add
Inspection from the New Drop down menu as seen below.
23
THE SIGN LOG APPLICATION
In both cases a form will open up for the entering of the new information. The new Sign records form
should look like the form listed below.
The user must enter information into all the light blue fields. The fields are all validated and will
only accept certain values. The user has the option of copying the remaining fields in the
databases by checking the Do you want to copy the current record check box.
After all data is entered the New button is pressed to perform the actual add.
If all the fields are validated correctly the following message will appear.
Choosing the Yes button will result in the fields on the Add sign form emptying to allow for the
addition of another record. Hitting the No button will close the message box and the Add Sign
form.
24
THE SIGN LOG APPLICATION
On the Add Sign Form the Close button will close the Add Sign Form.
The Add Inspection form should look like the form listed below:
This form contains only one field that can be edited. The other fields on the form are auto filled
based upon the sign record you are currently on.
The user must enter information into all the light blue fields. The fields are all validated and will
only accept certain values. The user has the option of copying the remaining fields in the database
by checking the Do you want to copy the current record check box.
After all data is entered the New button is pressed to perform the actual add.
25
THE SIGN LOG APPLICATION
If all the fields are validated correctly the following message will appear.
Choosing the Yes button will result in the fields on the Add inspection form emptying to allow
for the addition of another record. Hitting the No button will close the message box and the Add
Inspection form.
On the Add Inspection Form the Close button will close the Add Inspection Form.
26
THE SIGN LOG APPLICATION
Viewing/Editing/Adding Security Information:
To View the Security information you press the key button on the main screen. The following
form will open up.
The fields visible are:
LOGON ID:
USER NAME:
REPORT ADMINISTRATOR:
DATA ADMINISTRATOR:
USER ADMINISTRATOR:
8 character logon- should be the same as the user NT logon id.
The full name of the user typed into the Logon id field.
Grants access to view the reports available in the Sign Log.
Grants access to edit/add and delete Sign Log Information.
Grants access to add and delete users from the Sign Log.
This screen shows all the fields in the Signs Security information table.
Will return the user to the main screen.
Will allow the user to scroll through the records in the database.
27
THE SIGN LOG APPLICATION
Will open the add form to allow the user to enter a new user to the security table.
This form allows for the adding of a new user. Enter the Login Id and the User name and hit the
new button.
The following message will appear.
The yes button will clear the New User information for a new addition. The No button will close
the Add form and return to the Security Information view form.
28
THE SIGN LOG APPLICATION
The Edit Button will allow you to edit the information on the Security Form. All the fields will be
highlighted in light blue and each of these values can be changed.
The Logon id can only be 8 characters. The user name can only be 25 characters.
The valid values that can be entered into the Administrator fields are ‘Y’ and ‘N’.
After the changes have been made you can hit the edit button again to end the edit mode.
If changes are made to a record and you hit the edit button, any one of the record navigation
records or the exit button the message above will be displayed asking if you want to save the
changes made.
The Yes button will save the changes to the database. The No button will revert all the fields back
to their original values.
29
THE SIGN LOG APPLICATION
The delete button will remove the user from the security table. When the button is hit the
following warning message will be displayed:
The user logonid and user name will be displayed in the message box.
30
THE SIGN LOG APPLICATION
Reports:
All reports in the Sign Log application are accessed through the drop down menu on the report
button:
‘
Summary Report: The summary report displays all the information from the main form of the
Sign Log application for each record that is currently selected.
Photo Report: Because of some inability’s in the Report writer being used by the PTC at this
time this Report is not actually a report. When you choose the Photo Report the following form
opens up:
31
THE SIGN LOG APPLICATION
This form shows a view of the report information before printing.
Scroll through the records to find the record to print.
Will display the photo for the current record.
32
THE SIGN LOG APPLICATION
Will allow for the printing of the photo report.
This message will appear to allow the user to print the report for multiple records. The default
value here is 1 record. The printout(s) will go to the default printer for the machine printing the
reports.
Sign List: The Sign List report will show all the selected records and important information
needed when making a trip out in the field to inspect the signs.
33
THE BRIDGE LOG APPLICATION
Chapter Four
Bridge Log Specific Functionality
While RAMS has been designed to utilize many shared functions, each application will have
needs that are unique to it when compared to other RAMS applications. This chapter outlines
those functions that are unique to the Bridge Log.
Adding Records to the Bridge Log
There are seven basic record types in the Bridge Log. As shown to the
left, they are:
• Bridge
• Inspection
• Work Order
• Span
• Station
• Clearance
• Load Rating
To add a bridge record, you can click on the NEW button or click on the down arrow to the right
of the NEW button and select Bridge from the menu. All other record types must be added from
the menu.
When you select a record type to be
added, you will be presented with a form
like the one to the right. On this form,
you will see fields for each piece of
information that is required to add this
record. All fields must be filled in on
this form.
Notice that only three fields are required
to add a new bridge. Once you enter
these three fields, you will be returned to
the normal bridge log screens where you
can enter edit mode to fill in the
remaining information for this bridge.
If you are adding a new bridge that is similar to an existing bridge, you can use the existing
record to automatically fill in all of the other fields. To do this, find the existing bridge in the
Bridge Log. When the existing bridge is being displayed on the main Bridge Log screens, add a
new bridge as noted above. Fill in the Route, Milepost, and Current Bridge Number fields.
Before you click on the NEW button to add the new bridge, turn on the check box labeled “Do
you want to copy the current record?” by clicking on it. Then click on the NEW button and a
new bridge record will be added that has all fields other than the three that you just entered copied
from the existing bridge.
34
THE BRIDGE LOG APPLICATION
When you add a new record for any of
the other Bridge Log record types, you
will see a slightly different form. The
one shown to the left will be displayed
when you select the option to add a new
inspection record. Notice that only one
field has a blue background on this form.
This is because the Route, Milepost, and
Current Bridge Number are filled in for
you. The only piece of information that
you must provide to add an inspection
record for the current bridge is the Last
Inspection Date. The add forms for the
other record types work in much the
same way.
Deleting Records from the Bridge Log
To delete a bridge and all of its supporting information, click on the trashcan icon that is
shown to the right.
35