1
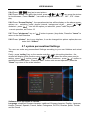
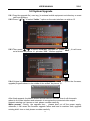
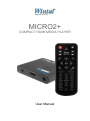
MICRO2+ COMPACT HDMI MEDIA PLAYER User Manual HDTV Media Player 1. Features ................................................................................................... 3 2. Exterior View and Instruction for Remote Control ..................................... 4 3 Technical Standard .................................................................................... 5 4. Host physical connection diagram ............................................................ 6 5. Function Operation ................................................................................... 7 5.1 System Operation .............................................................................. 7 5.2 Select the storage \smart card\CDROM............................................. 7 5.3 Copy function .................................................................................... 8 5.4 Movie playing .................................................................................. 10 5.5 Music playing ..................................................................................... 8 5.6 Picture play...................................................................................... 12 5.7 system personalized Settings .......................................................... 13 5.8 System Upgrade .............................................................................. 15 2 USER MANUAL 1. V1.0 Features Video Decoding:H.263、H.264、VC-1、Mpeg1/2/4、WMV Audio Decoding:DTS、AC3、FLAC、AAC HD Video:SupportVC-1(WMV9-HD)、H.264、Meg2-HD(1920*1080P) Video play: Support RM/RMVB-HD,MKV、AVI、TS-TP、M2TS、MOV、VOB、 RM/RMVB、FLV、WMV etc video format ; Music Play:Support MP3, WMA, Ogg, AAC etc Photo Browse:Support JPEG、GIF、PNG、BMP and other commonly used image format,Can support slide play,Support the rotation 、Scaling 、Moving Pictures; Card Reader Function:SD/MMC Card, Support files play function; Output Interface:AV、HDMI1.3 、DC 5V、USB 、SD/MMC; USB Function:Support external USB storage devices, Such as U disk、Card Reader、 mobile hard dish etc Mobile HDD:Support external removable hard disk storage DVD Play:Playback the DVD disk by means of USB ports , External USB-DVD hard drive Subtitles:Support ass、ssa、sub format No limit hard disk Capacity:Support FAT32/NTFS format; Support Multi-sound track video:MKV、TS、TP、WMV 3 USER MANUAL V1.0 2. Exterior View and Instruction for Remote Control Button Mute Menu VOLVOL+ AV HDMI Movie Music Photo File Zoom Setup ROTATION AUDIO 16:09/4:3 Subtitle GOTO Repeat Display Function Enter standby status Press standby again, starting to enter operating conditions Mute control Return to Main Menu Browse file :Page turning Playing the previous file Browse file,;down forwarder to next page Playing the next file Press this button, the playing files to be draw back Press this button, the playing files to be faster forward Decrease the Volume Increase the Volume Upward Downward Left Right Playing : Stop/Play; Select menu : OK Play movie /music/photo files : Stop/Play Back to previous one eject dialog box, Cancel the current display Setup AV/HDMI mode Setup AV/HDMI mode To enter movie review homepage To enter music review homepage To enter photo review homepage To enter file review homepage Zoom operation for the photo, movie ; System setting Rotate the browse file Switchover TRK Choose the suitable proportion of the screen Display the subtitle or not Time fixing files for the current movie files playing Repeat playing mold for current playing files Display the operation menu; Stop playing , back to the playing list 4 USER MANUAL V1.0 3 Technical Standard Decoding Format Max Stream MPEG1 100Mbps MPEG2 100Mbps MPEG4-XVID Video Max resolution H.264 100Mbps 1920*1080 70Mbps H.263 100Mbps WMV9/VC1 100Mbps RMVB Max Frames 1920*1080 30fps 30Mbps Video Format:MKV、AVI、TS、TP、MP4/M4V、MOV、VOB、PMP、RM/RMVB、 MPG、M2TS、FLV、WMV Bit Rate 32Kb/s ~ 320Kb/s MP3 、WMA、OGG、FLAC、APE、AAC、AC3、DTS Stereo Audio Output:2.0V ± 0.2Vp Audio Frequency Range:20Hz-20KHz ≤2db(1KHz Odb) SNR:More than 80dB(1kHz0dB) Dynamic Range: Greater than 80 dB(1kHz0dB) THD:0.04% Audio Distortion: Lower than test level Crosstalk: More than 80 dB(1kHz0dB) Photo Interface JPG、JPEG、BMP、GIF、PNG (*) AV (*)HDMI Storage USB for USB host to external storages and PC copy SD/MMC Size Naked player:63(L)*75(W)*14(H)mm(MAX) Weight NW:About 0.07KG Power Input: 100-240V,50/60Hz,Output: 5.2V 2A Standard Accessories GW:About 0.38 KG Power Adapter、Remote control 、User manual、AV cable (Subject to the real accessories and any changed without notice) 5 USER MANUAL V1.0 4. Host physical connection diagram 6 USER MANUAL V1.0 5. Function Operation 5.1 System Operation Plug in and show the initialized information. After a second it accesses to the main menu, show as below picture 1 Note: Please attempt the following operation if you can not access the regular interface: Switch over the mold between AV and HDMI by remote control in line with the connecting mold on your TV, until the regular menu turn up. Press“ ” key to access movie/music/photo/explorer/setting; choose the media file from the HDD and SD card. It will stream the video from media file; choose the media file you want to play. Press “ ”, press “EXIT” to step back the last step, Press “MENU” back to the Main interface. 5.2 Select the storage \smart card\CDROM 1 2 USB Device: It shows that it is external HDD and mobile device Smart card: It shows that you insert the memory card CDROM: It show that you plug in DVD drive 7 USER MANUAL V1.0 Press “ ”/“ ” key you can page turning in the file list Press “EXIT” key back to the last catalog When it read the HDD and memory card, access to a file, you will access to a disc, you will see all the files in the disc .Refer to picture 3 3 5.3 Copy function 5.3.1 Access to Movie/MUSIC/picture file, press “ ”/“ ”, choose the file you want to copy. 5.3.2 Press “OSD”, it will display the operation menu on the right screen, press “ ”/“ ” choose copy item; 5.3.3 Press “EXIT”, go to the place where you want to copy. press “OSD” button,it will display the operation menu on the right screen. Press “ ”/“ ” choose the paste item, press “ ” 5.3.4 It will display the progress bar, it means copy completely when the progress bar display 100% Warm reminder: it will display the file after you exit the current file and access to the file again. 5.4 Music playing 5.4.1 Choose the “MUSIC”, it will display the first 9 songs at the first page; go to the next page to find the other songs. Show as below picture 8 8 USER MANUAL V1.0 8 5.4.2 Press“ ”/“ ” to move the cursor, choose the music file you want to play. It will show single, title, name, size information at the left side and show the file address at the bottom. Show as below picture 9 9 5.4.3 Press“ ” to confirm which music you choose. It will show the play bar at the middle of the display. And also display the lyric. The music name, singer information is shown at the left side. There is operation menu at the bottom like picture 10. 5.4.4 Press Volume -/+ button, you can adjust the volume for the music file: 5.4.5 Press OSD button. it will show the operation information status bar on the top screen ,including the EQUALIZER/LRC/color /display mode, press “ ”/“ ”, press“ ” button choose the item ,press exit button quit the current status 9 USER MANUAL V1.0 10 5.4.6 Press “REPEAT” button setup the playing mode, for example, Order of play, random play, single play, single cycle, all cycle 5.4.7 Press “EXIT” button back to the previous step, press “MENU” button System is still running in the background, press “play/pause” button or “ ” button; 5.4.8 Also can press the “explorer” button to enter, also can press “MUSIC” button to Switch directly to music option 5.5 Movie playing 5.5.1choose the “movie” item ,it lists all the movie media files according to the file structure ,press “OK”, It will list all the file .If the media file is up to 9 file, It will be automatically shown next page. Refer to picture 4. 4 10 USER MANUAL V1.0 5.5.2 Press “ ”/“ ” key remove the cursor to choose the video file you want to play, It will show the file attributes on the right side such as title, size of the file. Below the screen it will show that file route. Refer to picture 5 5 5.5.3 Press“ 5.5.4 Press “ 5.5.5 Press “ ” playback the file. You can adjust the volume by volume key -/+ ”/“ ” choose the last file and next file ”/“ ” fast backward and fast forward by 1.5*、2*、4*、8*、16*、32* 5.5.6 Press “16:09/4:3” key adjust the proportion of the screen ,such as 4:3、Video Full Screen、Screen Full Screen、Default Size 5.5.7 Press “Audio” key switch to output of sound track 5.5.8 Press “repeat” key set up the playback mold, such as Random、Repeat One、Repent All 5.5.9 When playback file ,press “GOTO” key ,It will show the dialog box as follows ,input the figure by “ ”/“ key ,press “ ”/“ ” key ,you can move the cursor to the hour, minute, second, press “ ”/“ ”key adjust the time you want ,then press “ ” ,refere to picture 6 ,It will playback the film at 01:12:48 timing. 6 5.5.10 Copy the film file and the subtitle file into the same file or the same directory. It will display the external subtitle file automatically when playback the film file, no need to manual operation, Press “OSD” button, It will show the file information on the top of the screen. It will display the status bar of the operation, including the turn on/OFF/subtitle/color/frame color/size/character encoding, press“ ”/“ ”,then OK ,press exit button quit the current state. Refer to picture 7. 11 USER MANUAL V1.0 7 5.5.11 Press SET UP button .You can set up the system parameter when playback the film, after finish set up, press Exit button, and back to the film interface. 5.5.12 Press “PAUSE/PLAY” key or “ ” key to pause or playback the file, press “EXIT” key back the last step, press “Menu” key back to the main menu. 5.5.13 You can also access to from “explore” item, you can press “MOVIE” key switch to the movie directly. 5.6 Picture play 5.6.1 When select “Picture” , it will list all the Possible be played files and according to the document structure of storage equipment ,press “OK ” ,display all file and foders list , and display the current 9 files and folders , more files and folders will automatic diplay on the next page ,as picture 11 below . 11 5.6.2 Press “ ”/“ ” move the highlight to select the picture file you want to play , and it will display the attribute specification ,such as : title, size; The path of files and folders will be display below the screen . 5.6.3 Press “ ” Full screen play , the system default into slides circulation play state : 12 USER MANUAL V1.0 5.6.4 Press “ ”/“ ” play last or next picture . 5.6.5 Press “Zoom” can aplify the picture, press “ ”/“ ”/“ ”/“ ” can move the picture for local browse ; Press “Rotate” , can make a single picture for 90 °, 180 °, 270 ° rotate play 5.6.6 Press “Screen Display” , the operation statu bar will be display on the above screen , options as : switching mode, played interval, background music , press “ ”/“ ” andselect , press “ ” into into the option you selected , press " exit "key exits current operation ,as Picture 12 5.6.7 Press "play/pause" key or “ return to the main interface ” button to pause / play slides, Press the "menu" to 5.6.8 Press “picture” key in any interface, it can be changed into picture option,also can enter from “folders”. 5.7 system personalized Settings The user can make any personalized Settings according to your own Hobbies and actual using . Firstly , press “setting” key on the remote controller , entry into setting interface , the window will display kinds function menu ,press “ ”/“ ” select the main menu need to setting , press “ ” confirm ,press “ ”/“ ” to select submenu , press “ “ confirm to applicate the setted option ; Press the "exit " button exits current operation, press the "menu" key return to the main interface. Software menu functions as follows : Language: simplified Chinese character, traditional Chinese character, English, Japanese, Korean, German, Spanish, French, Italian, Portuguese, DUTCH, Russian, polish, Turkish and the Czech . 13 USER MANUAL V1.0 Screen protection : 1 minute, 2 minutes and 5 minutes, 10 minutes, 30 minutes, 1 hour, two hours, shut down Video ouput mode : PAL 、 NTSC 、 HDMI-720P-50HZ ,HDMI- 720P-60HZ 、 HDMI-1080P-50HZ、HDMI-1080P-60HZ、HDMI-1080I-50HZ、HDMI-1080I-60HZ Audio output mode:Normal、SPDIF LPCM、SPDIF RAWDATA、Analog Audio Automatic playback: close, video, music, pictures Automatic playback DVD: close, open Warm prompt: automatic playback files need to copy to external hard drive (a division), root directory of U disk and SD card ) Automatic detection HDMI: close, open Recovery factory set System information: software version number 14 USER MANUAL V1.0 5.8 System Upgrade 5.8.1 Copy the upgrade file ( xxxx.img ) to external mobile equipment root directory or smart card root directory. 5.8.2 Press “ ”/“ ” to select “folder ” option on the main interface .as picture 13 13 5.8.3 Then press “ ”/“ ” to select “XXX.img” Upgrade file , press “ out a window as picture 14 , pls selet “Yes ” confirm upgrade . ” , it`s will come 14 5.8.4 Original system files will be delete during upgrade time , To update the firmware, upgrade progress shows in the middle of the screen .as picture 15 . 15 After finish apgrade, the blanck screen will last about 2 minutes ,then it will Automatic reboot to the main interface and automatic to recognize the connected video output. Upgrade existing can`t power on risk, please consider carefully Warm prompt : During the upgrade time , please don't cut off the power supply, otherwise, it will cause the firmware upgrade failure and lead to machine fault; upgrade existing didn't turn on risk, please consider carefully 15