1
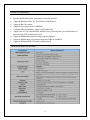
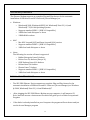
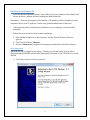
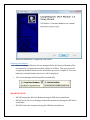
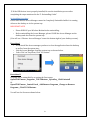
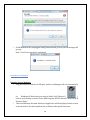
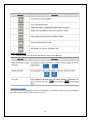
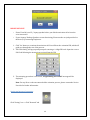
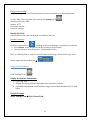
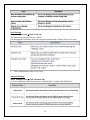
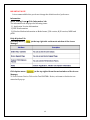
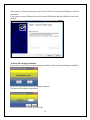
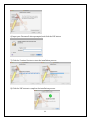
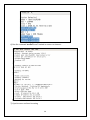
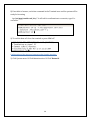
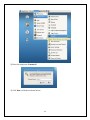
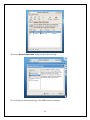
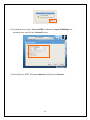
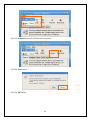
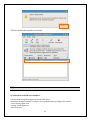
EpiValley 8380 1 Table of Contents Product Features ..................................................................................................................................................................... 3 Technical Specifications........................................................................................................................................................ 3 System Requirements ............................................................................................................................................................ 4 Installation Procedure ........................................................................................................................................................... 4 Installation in Windows XP ........................................................................................................................................ 5 Start Installation ............................................................................................................................................................. 5 USB Driver Installation ................................................................................................................................................ 7 Un-installing Procedure .............................................................................................................................................. 8 Launch Access Manager ............................................................................................................................................ 10 Activation Procedure.................................................................................................................................................. 11 Setting Up Internet Connection.............................................................................................................................. 12 Settings And Information ......................................................................................................................................... 13 Installation in Mac OS .................................................................................................................................................. 18 Installation Procedure ............................................................................................................................................... 18 Un-installing Procedure ............................................................................................................................................ 19 Access Manager Installing Guide ........................................................................................................................... 20 Launch Access Manager ............................................................................................................................................ 23 Setting Up Internet Connection.............................................................................................................................. 24 Network Settings.......................................................................................................................................................... 24 Installation in Linux ..................................................................................................................................................... 26 Installation Procedure ............................................................................................................................................... 26 Configuration Of The Internet Connection on Text Interface .................................................................... 27 Configuration Of The Internet Connection On Graphic Interface ............................................................ 30 FAQ .............................................................................................................................................................................................. 37 2 PRODUCT FEATURES New Sleek Slim and Stylish design with a internal antenna. Supports Windows 2000, XP, Vista32/64 and Windows 7. Supports Mac OS version Supports selected version of LINUX OS Complete PNP functionality support on Windows OS. Support the PC-Voice functionality and Ear-Jack* (Presently the voice functionality is limited to the *228 activation process) Supports SHDR functionality for improved throughputs Supports Hybrid mode of operation between CDMA 1x and HSIA Supports Standard USB 2.0 interface (High Speed) TECHNICAL SPECIFICATIONS 3 SYSTEM REQUIREMENTS The Photon+ Modem supports an complete Plug and Play feature for the automatic installation of USB drivers and PC-Client tool (Access Manager) on Windows o Windows® 2000, Windows® XP32/64, Windows® Vista 32 / 64, and Windows® 7 32/64 bit Operating Systems o Supports standard USB 1.1 ( USB 2.0 Compatible ) o 100Mb free hard disk space or above o 128Mb RAM or above MAC o Mac OS X Leopard(10.5) and Snow Leopard(10.6) version o Supports standard USB 1.1 ( USB 2.0 Compatible ) o 10Mb free hard disk space or above Linux The following the version of Linux is supported. o Redhat Enterprise Linux 3 & above o Fedora Core 5,6 & above (Except 11) o SUSE Desktop Linux 9,10 & above o Debian Linux 5,6 & above o Ubuntu Linux 7 & above o Supports standard USB 1.1 ( USB 2.0 Compatible ) o 10Mb free hard disk space or above INSTALLATION PROCEDURE • The SEC 8380 Photon+ Device supports an complete Plug and Play feature for the automatic installation of USB drivers and PC-Client tool (Access Manager) on Windows ® 2000, Windows® Vista 32 / 64 and Windows® 7 • After plugging the SEC 8380 Photo+ Modem on your computer, it will mount a CD Drive, and will execute a Autorun.exe file which will guide you to a Dialer Setup wizard Program. • If the dialer is already installed on your Computer the program will auto detect and just run the Access Manager program 4 Installation in Windows XP • Insert the Wireless Modem Photon+ into a USB port of your computer. The installer will initiate in about 1 minute and start loading the installation files. Remember : Autorun.exe program of the Photon + CD installer could be disabled on some computers due to local IT policies. Contact your system administrator in this case. • If the Autorun feature on Windows is disabled on your computer, you can install it manually. • Follow the steps below for the first time installation 1. Open Windows Explorer or My Computer, and the Virtual CD Drive ‘Photon+’ appears. 2. Click Virtual CD Drive ‘Photon+’. 3. Execute ‘Autorun.exe’ program for starting the installation by double clicking it. Start Installation When the Device is plugged in the Laptop / Desktop, a welcome Splash Screen will be displayed and the Installer will initialize and display ‘Welcome to the TATA Photon+ Setup Wizard’ 1. Click ‘Next’ button in order to proceed. 5 2. Default Installation directory is ‘C:\Program Files\TATA\Photon+\EpiValley’.You can change it to the desired directory location by Pressing the ‘Browse…’ button. It is recommended to install the program in the default installation directory. Click ‘Install’ button to continue the installation. 3. The Installation process will continue and once completed you will find a dialogue box as shown below which will indicate the completion of the Dialer (Access manager) Installation Process. 6 When the installation is completed, click ‘Finish’. USB Driver Installation • After installing the Photon+ Access manager Dialer, the Wireless Modem will be automatically recognized as a modem, and not a CD Drive. This process will be completely automated and once the installation process is completed “Your new hardware is installed and ready to use” will be displayed. • The Access manager will be launched automatically. IMPORTANT NOTE • • • DO NOT unplug the Wireless Modem during the USB driver installation. DO NOT move the Access Manager launched automatically during the USB driver installation. DO NOT restart the computer during the USB driver installation. 7 ※ If the USB deriver is not properly installed, Re-run the installation process after completing the steps mentioned in the “3. Uninstalling Guide”. Un-installing Procedure Please note that the Access Manager cannot be Completely Uninstalled while it is running either on the desktop or in the system tray. IMPORTANT NOTE • • Please UNPLUG your Wireless Modem before uninstalling. Before uninstalling the Access Manager, please CLOSE the Access Manager on the desktop and also from the system tray. (You will see a ‘Photon+ Access Manager’ icon at the bottom right of your desktop screen.) Procedure I • To Un-install the Access manager you have to close the application from the desktop as well as from the system tray. • Exit the Access Manager from the system tray as shown below: • Select ‘Exit’ on Tray Menu, Click ‘Yes’ button. Procedure II Program can be uninstalled by accessing the Start menu. Open START menu _Programs _ TATA Photon+ _ Epivalley _ Click Uninstall Or Open START menu _ Control Panel _ Add Remove Programs _ Change or Remove Programs _ Click TATA Photon+. You will see the Screen as shown below: 8 Click ‘Yes’ button to continue.. • • Click ‘YES’ if you want to remove the Modem Driver Access manager along with the USB Modem Drivers. Click ‘NO’ to just remove the Photon+ Access Manager application only. Remember Uninstalling the Modem drivers requires restarting the computer. • • Click ‘YES’ to complete, and your computer will restart. Click ‘NO’ to complete, but its recommended that you restart your system . 9 • If USB Modem device unplugged during uninstallation process, Below message will pop up. Note : Your Device should be unplugged Launch Access Manager Running Access Manager • Plug the Wireless Modem in a USB port, and Access Manager will run automatically • on Windows OS. Otherwise you need to double click ‘Photon+’( ) icon on your desktop or select ‘Start All Program TATA Photon+ EpiValley Photon+ dialer’. After initialization, the main window of application will be displayed on the screen as shown below. The main window has six Menus with specific functions. 10 Status Information • The below table lists the status information on the Access Manager. Activation Procedure If you see the following dialogue on the Access Manager, you should activate the wireless modem as per Instructions from Service Provider by PC Voice. 11 IMPORTANT NOTE • • Please Turn ON your PC / Laptop speaker before you dial the activation call to hear the voice instruction. If your Laptop/ Desktop Speakers are not functioning, Please use the ear jack provided on the device, by connecting Earphones. 1. Click ‘Yes’ button, to continue the activation call. You will hear the activation IVR, which will guide you through the rest of the process. 2. ‘PIN Code Dialog’ will pop-up and prompt for entering a 14 digit PIN code. Input the correct PIN Code following the instructions received from the IVR. 3. The activating procedure is successful, ‘Programming Successful..’ message will be displayed. Note: For any Error codes encountered while activation process, please contact the Service Provider for further information. Setting up Internet Connection Click “Setting” icon -> Click “Network” tab 12 Editing Profile Settings While installing the Wireless Modem the Internet connection profile is created automatically. To Add / Edit / Delete a profile, click on the profile settings tab- Default profile name: TATA. Number: #777. User name: internet Password: internet. IMPORTANT NOTE This is default Profile, cannot be deleted or modified by the user. Internet Connection Click the Connect button ( ) flashing on the Access Manager to establish the connection. 1. Click ‘Connect’ icon to display the Internet connection profile details. 2. Select the Internet connection profile “TATA”(Default Profile) There is a default profile to connect to the TATA Indicom web page. Click the below logo at the bottom right of the Access Manager Settings And Information Click “Settings” Icon Display the Statistic information 1. Click ‘Log’ Icon. 2. Display for the log statistics through service operator’s website. 3. It provides information on the Internet usages such as Date, Duration, Rx, Tx total bytes. General Settings Select ‘Setting’ Icon Click ‘General’ tab. 13 Lock Settings Select ‘Settings’ Icon Click ‘Lock’ tab The default lock value is four zero “0000”. For changing the lock value, follow the steps mentioned under ‘Change Lock Code’ setup - This configuration is only for PC Client Network Settings Select ‘Settings’ Icon Click ‘Network’ tab You can change the mode of preference as ‘Hybrid Mode’, ‘1xOnly’ and ‘HSIA Only’. 14 IMPORTANT NOTE It is recommendable that you do not change the default mode of preference. Information Select ‘Setting’ Icon Click ‘Information’ tab The information tab displays the following items: 1) Application Version Information. 2) PRL ID information 3) Wireless Modem information as Model name, F/W version, H/W version, MEID and pESN. Help & Option Tab Click Help menu ( Manager. )at the top right side on the main window of the Access Click Option menu ( ) at the top right side on the main window of the Access Manager. To Test Photon+ Device Click on the Test PHOTON+ Device, welcome to the device test wizard will pop up. 15 Check Create Report if you would like to create a report of the test, And click Next. The PHOTON+ Device Test process will start and will display the progress of the tests. Once the Test process is complete, Click Next on the Test PHOTON+ Device to get the results of the test. 16 If you want to view the device test result, select View Test result and click finish to view the test result. If you want to restart USB modem, select Restart USB modem and click finish to restart the modem. To Reset All Settings to Defaults If you want to reset all the custom settings to default, click on Reset All Settings to Defaults. Click ‘Yes’ if you want to reset all Settings to default. The dialer will prompt for password Enter the password as ‘5298’ and click ‘OK’. 17 Installation in Mac OS The Wireless Modem does not support the automatic installation function on Mac operating system. You need to install it manually following the recommended steps. Installation Procedure Insert the Wireless Modem into a USB port on your Mac computer. You may see the Photon+ CD Driver on the Desktop. Start the Setup 1) Double click the Photon+ CD Driver on the Desktop. 2) You may see the following Installation packages. NOTE: First of all, you have to install the ‘USB Modem Driver’ installer package, and then need to install the ‘Installer_Photon+’ package. USB Driver Installation Double click the ‘USB Modem Driver’ installer package. 18 1) Click the ‘Install’ button in order to proceed. 2) Click the ‘OK’ button. 3) Input your ‘Password’ when prompted, and click the ‘OK’ button. 4) Click the ‘Restart’ button in order to add the system file. Un-installing Procedure 19 Double click the ‘USB Modem Driver’ uninstaller package. 1) Click the ‘Uninstall’ button in order to proceed. 2) Click the ‘OK’ button. 3) Input your ‘Password’ when prompted, and click the ‘OK’ button. 4) Click the ‘OK’ button in order to complete the uninstallation proceeds. Access Manager Installing Guide 1) Double click the ‘Photon+ Access Manager’ installer package. 20 2) Click the ‘Continue’ button in order to proceed. 3) Click the ‘Continue’ button to accept the Software License Agreement. 4) Click the ‘Agree’ button. 5) Click the ‘Install’ button to start installation. 21 6) Input your ‘Password’ when prompted, and click the ‘OK’ button. 7) Click the ‘Continue’ button to start the installation process. 8) Click the ‘OK’ button to complete the installation process. 22 Launch Access Manager Plug the Wireless Modem in a USB port, and click the ‘Photon+ Access Manager’ in the Applications places. Click the ‘Go’ Select the ‘Applications’ in Places Click the ‘Photon+’ Access Manager item. After initialization, the main window of the application will be displayed on the screen as shown below. The Access Manager will try to search for the Wireless Modem device, and then the Access Manager will be displayed on the screen as shown below. 23 Setting Up Internet Connection Internet Connection Click the Connect button ( ) for connecting to the Internet service. After the connection is established, the Total packets and Current Rate will be displayed as shown below. To disconnect, click the disconnect button ( ). Network Settings Add Profile On the menu bar of the management program main interface, click the ‘Network’ menu Click the ‘Setting Profile’ item. There is the default profile to TATA, but if you need to add another profile, you can add as following steps. 1) Click ‘Add’ button. 2) Enter the Profile Name as ‘TATA’. 3) Enter the Dial Number as ‘#777’. 24 4) Enter the user name as ‘internet’ and password as ‘internet’. 5) Click ‘Apply’ button in order to save. Setting Network On the menu bar of the management program main interface, click the ‘Network’ menu Click the ‘Setting Network’ item. You can change the mode mode’, ‘1xOnly’ and ‘Photon+ Only’. of preference as ‘Hybrid Preference Mode Description Hybrid mode The Wireless Modem will operate in dual mode with Photon+ and 1x periodically. 1xOnly The Wireless Modem will operate only in CDMA1x mode without Photon+. You may use the 1xOnly mode in an area without Photon+ coverage. Photon+ Only The Wireless Modem will operate only in Photon+ mode without CDMA1x. If you do not need to use the CDMA1x data service, you can disable it. Modem Information On the menu bar of the management program main interface, click the ‘Network’ menu Click the ‘Modem Information’ item. The information tab displays the following items: 1) PRL ID information. 25 2) Wireless Modem information as Model name, S/W version, H/W version, MEID and pESN. 3) Application Information Version. Installation in Linux Installation Procedure Insert the Wireless Modem into a USB port on your Mac computer. You may see the Photon+ CD Driver on the Desktop. Start the Setup Insert the Wireless Modem into a USB port in your computer. The Photon+ CD Driver will appear on the Desktop. 1. Click the right button of the mouse to displaying the menu. 2. Click the ‘Eject’ item in the Menu, later the modem port of Wireless Modem will loading in “/dev/tty” directory. 26 IMPORTANT NOTE: To use the Internet connection, it should be executed before. Configuration Of The Internet Connection on Text Interface 1) Log in the Graphical Interface and open the ‘Terminal’ from ‘Applications’. Terminal can be found at; * Click ‘Applications’ Click ‘Accessories’ Click ‘Terminal’. Or * Click ‘Applications’ Click ‘System Tools’ Click ‘Terminal’. 2) In Terminal, type the command ‘wvdialconf /etc/wvdial.conf’ to detect and install the modem for Internet connection. * IMPORTANT NOTE: The modem device name is ‘/dev/ttyACM0’. 27 3) In the Terminal window, input the command ‘gedit/etc/wvdial.conf’ to open the configuration file as shown below. 4) Make the following changes in the configuration file. 1. Delete the semi colon(;) before the last three lines phone, username, password. 2. Enter Phone no ‘#777’, Username ‘internet’ and password ‘internet’. 3. In the end, add 2 extra lines in the configuration file. Init3 = AT+CRM=1 Stupid Mode = 1 5) After making these changes, save the configuration file and exit from the gedit application. 28 6) Run the command ‘wvdial’ from Terminal to connect to Internet. 7) Open browser and start browsing. 29 8) If not able to browse, run below command in the Terminal once and the system will be ready for browsing. ‘cp /etc/ppp/resolv.conf /etc/ ’ It will ask for confirmation to overwrite, type Y to overwrite. 9) To end the data call close the terminal or press ‘Ctrl + C’. Configuration of the Internet Connection On Graphic Interface 1) Click System menu Click Administration Click ‘Network’. 30 2) Enter the superuser ‘Password’. 3) Click ‘New’ on Menu as shown below. 31 4) Choose ‘Modem connection’ and proceed to the next step. 5) You will get an Warning message. Click ‘OK’ button to continue. 32 6) For Modem device input ‘/dev/ttyACM0’, for Baud rate input‘460800 bps, the maximum rate, and click the ‘forward’ button. 7) Enter Phone no ‘#777’ Username ‘internet’ and Password ‘internet’. 33 8) Click ‘Forward’ button. 9) Click ‘Apply’ button. 34 10) You can see the configuration registered in the Network Configuration tool. 11) Click ‘Save’ in the ‘File’ menu. 35 12) Click ‘Activate’ button for the Internet connection. 13) Click ‘Yes’ button. 14) Click ‘OK’ button. 36 15) Now the Wireless modem is activated. FAQ Q1. What does each LED color stand for? You can check the signal strength status from LED colors. Normally it changes from Red→ Orange→ Green gradually when you plug in the modem. - Green: Strong signal area - Orange: Weak signal area - Red: No service 37 Q2. What shall I do if I cannot access the Internet? 1. Check the network signal strength. 2. Check whether you have activated the wireless online service. You can ask the local network operator on how to activate it. 3. If the Wireless Modem is activated but still you cannot access the internet happen it, please check the User name / Password in the internet profile on Web. Q3. In spite of “Green” LED, the Access Manager is still not connected! Firstly, Unplug the Wireless Modem. Secondly, follow the step “3. Uninstalling Guide” on page 7, and restart your computer. Lastly, plug the Wireless Modem again, and follow step “2. Installing Guide” Q4. The software is not running automatically and it shows below screen. Please follow the steps mentioned the Q3 step again. If the same message appears contact the Service Provider. Q5. LED color is still “RED”! There’s no LED light! Your Wireless Modem could defect. Please contact the Service Provider. Q6. If you need to re-install the Access Manager with the USB Modem driver! Please follow the steps mentioned in the answers to the Q3. Q7. The Photon+ auto-installation program does not appear automatically. The AutoRun feature of Windows might be disabled under the local IT policies on Windows, In this case, you need to install the PC-Dialer manually, following the steps mentioned at “Starting Setup” Q8. Can not connect the Activation call. Please contact the Service Provider, because your device information might have been improperly registered in the network system. Q9.The Activation call is connected, but the Activation proceed is unsuccessful. Please contact the Service Provider, because your device information might have been improperly registered in the network system. 38 Q10. There are no signal bars on the RSSI indicator of Access Manager and “No service” message is displayed, or the LED of the Wireless Modem is orange or red color. The local network signal might be too weak, Contact the Service Provider for assistance. 39