1
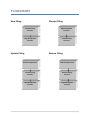
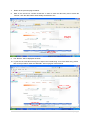
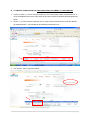
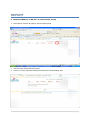
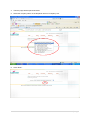
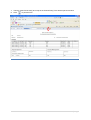
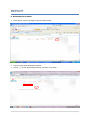
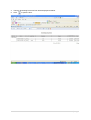
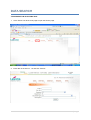
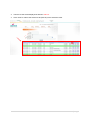
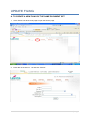
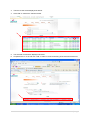
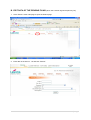
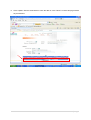
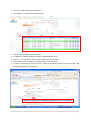
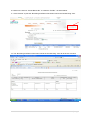
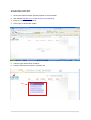
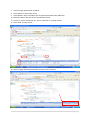
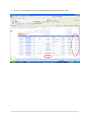
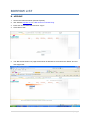
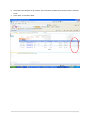
CENTRAL FILING
USER MANUAL
LAGUNA RESORTS & HOTELS PUBLIC COMPANY LIMITED
Table of Contents
FLOWCHART …………………………………………………………………………………………....
1
LOGIN……………………………………………………………………………………………………...
2
ENTRY FORM ……………………………………………………………………………………………
3
A. Create a new filing……………..………………………………………………………….….
3
B. Create a new filing for the additional document of the same set………….…………….
6
REPORT…………………………………………………………………………………………………...
8
A. New document(s) to be kept in the central filing……………………………………….….
8
B. Borrow document(s)………………………………………………………………………….
11
DATA SEARCH (To retrieve the electronic file – PDF File)…..……………………………………..
13
UPDATE FILING…….……………………………………………………………………………………
15
A. Create a new filing of the same set……………………………………………………….
15
B. Edit information of the existing filing………………………………………………………..
18
BORROWING……………………………………………………………………………………………..
21
SIGN RECIPIENT………………………………………………………………………………………...
24
BORROW LIST…………………………………………………………………………………………...
26
A. Pending (CA approve the request of borrowing)…..…………………………………......
26
B. Approved (CA receive the return of documents).……..…………………….…………….
28
C. Return (List of the return document)………………………………………………………..
30
FLOWCHART
New Filing
Receipt Filing
Central Filing
Process
Sign Recipients
Process
Sign Recipients
Process
Central Filing
Process
Update Filing
Borrow Filing
Searching Process
Searching Process
Central Filing
Process
Borrow Filing
Process
Sign Recipients
Process
Sign Recipients
Process
1|Page
LOGIN
1. Launch the internet browser (Internet Explorer is recommended).
2. URL address http://lrh.co.th or LRH Intranet on Central Filing.
3. Enter your User ID and Password.
4. Click “Login” to access the system.
5. The main page will be shown as below.
2|Page
ENTRY FORM
A. CREATE A NEW FILING
1.
Click the “Entry Form” tab at the main page.
2.
Complete item no. 2-10 and click “Add” in order to retrieve the data entry for verification.
1
4
3
2
4
5
6
7
8
9
10
11
12
13
1
Ref No
Running number for the new record
2
Date
Date of entry
3
Company
Company name
4
Department
The related department who submits the document
5
Send By
The associate name of the related department
6
Document Date
The printed date on the document
7
Type of document
Original, copy or certified true copy
8
Counter Party
Counter party
9
Description
Description
10
ExpDate
Expiry date
11
Add
Confirm to create a data entry for verification
12
New Document
Open a new page for a new entry of different document set
13
Confirm Create list
Confirm to save the record and create the “Ref No.”
3|Page
3. Then the data entry will be displayed as below in red box.
(The “Confirm Create List” box should check () to save the entry).
4. Click “Edit” to make the amendment or click “Delete” to remove such data.
1
4
2
3
5
4
6
7
8
9
10
5.
After click “Edit” the page will be displayed as below.
6.
Amend the data (if required) and click “Update” to save the amendment or click “Cancel” to leave
this page without making any amendment.
4|Page
7.
Return to the previous page as below.
8.
Mark on the check box “Confirm Create list” in order to save the data entry and to create the
“Ref No.” then the data will be automatically transferred to CA.
9. The “Ref No.” will be displayed as below.
10. To print out the “New Document(s) to be kept in the Central Filing” form of this data entry, please
refer to the procedure under the “REPORT” item on page 8 of this manual.
5|Page
B. TO CREATE A NEW FILING FOR THE ADDITIONAL DOCUMENT OF THE SAME SET
1. In prior to check () on the “Confirm Create List” box of the previous data, complete item no. 210 for the additional document of the same set and click “Add” then the data will be displayed as
below.
2. Check () on the “Confirm Create list” box in order to save the data and to create the “Ref No.”
as displayed below. The data will be automatically transferred to CA.
4
2
1
3
4
5
6
7
8
9
10
3. The “Ref No.” will be opened as below.
6|Page
Company / Department / Year / File no
Number of the addition document of the same set
4. Click “New Document” for a new entry of a new document set. Please refer to the new filing
procedure under the “Entry Form” item on page 3 of this manual.
5. To print out the “New Document(s) to be kept in the Central Filing” form of this data, please refer
to the procedure under the “REPORT” item on page 8 of this manual.
7|Page
REPORT
A. NEW DOCUMENT(S) TO BE KEPT IN THE CENTRAL FILING
1. Click “Report” at the main page to open the Report page.
2. Then the page will be opened as below.
3. Check () on the “New Document(s) to be kept in the Central Filling” item.
8|Page
4. Then the page will be opened as below.
5. Select the company name on the dropdown items of “Company” box.
6. Click “Show”.
9|Page
7. Then the “New Document(s) to be kept in the Central Filling” form will be opened as below.
8. Click
to print the form.
10 | P a g e
REPORT
B. BORROWING DOCUMENT
1. Click “Report” at the main page to open the Report page.
2. Then the page will be displayed as below.
3. Check () on the “Borrowing Document” box then, click “Show”.
11 | P a g e
4. Then the “Borrowing Document” list will be displayed as below.
5. Click
to print the form.
12 | P a g e
DATA SEARCH
TO RETRIEVE THE ELECTONIC FILE
1. Click “Search” tab at the main page to open the Search page.
2. Enter data in the item no. 1-6 and click “Search”.
13 | P a g e
3. Then the record will be displayed as below in red box.
4. Click “View” to retrieve the electronic file (PDF file) of the selected record.
1
2
3
4
5
6
14 | P a g e
UPDATE FILING
A. TO CREATE A NEW FILING OF THE SAME DOCUMENT SET
1. Click “Search” tab at the main page to open the Search page.
2. Enter data in the item no. 1-6 and click “Search”.
15 | P a g e
3. Then the record will be displayed as below.
4. Click “Edit” to retrieve the selected record.
1
2
3
4
5
6
5. The selected record will be displayed as below.
6. Complete item no. 2-10 and click “Add” in order to create a new filing of the same document set.
1
4
2
3
5
4
6
7
8
9
10
16 | P a g e
7. Then the new data entry will be displayed as below for verification.
8. To print out the “New Document(s) to be kept in the Central Filing” form of this data, please refer
to the procedure under the “REPORT” item on page 8 of this manual.
9. To create a new filing of a new document set please click “New Document” and follow the
procedure under the “Entry Form” item on page 3 of this manual.
17 | P a g e
B. EDIT DATA OF THE PENDING FILING (which has not been signed recipient by CA)
1. Click “Search” at the main page to open the Search page.
2. Enter data in the item no. 1-6 and click “Search”.
18 | P a g e
3. Then the record will be shown as below.
4. Click “Edit” to retrieve the selected record.
1
2
3
4
5
6
5. The data will be shown as below then click “Edit” on the selected data.
19 | P a g e
6. Click “Update” after the amendment to save the data or click “Cancel” to leave this page without
any amendment.
20 | P a g e
BORROWING
1. Click “Search” at the main page to open the Search page.
2. Enter data in the item no. 1-6 and click “Search”.
21 | P a g e
3. Then the record will be opened as below.
4. Click “Borrow” to retrieve the selected record.
1
2
3
4
5
6
5. Then the screen will be opened as below.
6. Complete the “Reason of Borrow” and the “Expected Return” box.
7. Check () on the “None” box if the document will not be returned.
8. Click “Add” to save the data then the data will be shown as below.
9. In case of borrowing more than one item, select the dropdown records from the “Ref No.” and
follow the procedure no. 5-8 above.
22 | P a g e
10. Mark on the tick box “Create Borrow No” to create the “Ref No.” as shown below.
11. Click “Preview” to print the “Borrowing and Return Document from/to the Central Filing” form.
12. The “Borrowing and Return Document from/to the Central Filing” form will be shown as below.
23 | P a g e
SIGN RECIPIENT
1. Launch the internet browser (Internet Explorer is recommended).
2. URL address http://lrh.co.rh or LRH Intranet on Central Filing.
3. Enter your User ID and Password.
4. Click “Login” to access the system.
5. Then the page will be shown as below.
6. Click the selected name from the “Send By” list.
24 | P a g e
7. Then the page will be shown as below.
8. Click “Select” to retrieve the record.
9. Click “Browse” at the “File Name” box to upload the electronic file (PDF File).
10. Enter the name of the person who reviewed the record.
11. Check () on the “Create CF No.” box to create the CF running number.
12. Click “Save” to keep record.
13. Then the page will show the filename and the CF No. as below.
25 | P a g e
BORROW LIST
A. PENDING
1. Launch the internet browser (Internet Explorer).
2. URL address http://lrh.co.th or LRH Intranet on Central Filing.
3. Enter User ID and Password and click “Log in”.
4. Click “Borrow List”.
5. The “Borrow Document List” page will be shown as below then scroll down the “Status” box and
click “Pending”.
26 | P a g e
6. Check () on the “Approve” box to accept the borrowing request then click “Save”.
27 | P a g e
BORROW LIST
B. APPROVE
1. Launch the internet browser (Internet Explorer).
2. URL address http://lrh.co.th or LRH Intranet on Central Filing.
3. Enter User ID and Password and click “Log in”.
4. Click “Borrow List”.
5. The “Borrow Document List” page will be shown as below then scroll down the “Status” box and
click “Approved”.
28 | P a g e
6. Scroll down the calendar on the “Return” item and select the date which the document is returned
to CA.
7. Click “Save” to record the data.
29 | P a g e
BORROW LIST
C. RETURN
1. Launch the internet browser (Internet Explorer).
2. URL address http://lrh.co.th or LRH Intranet on Central Filing.
3. Enter User ID and Password and click “Log in”.
4. Click “Borrow List”.
5. The “Borrow Document List” page will be displayed as below then select the “Status” on the
dropdown box and click “Return”.
30 | P a g e
6. List of the borrowing and return record will displayed as below.
31 | P a g e