1
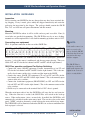
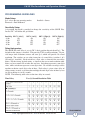
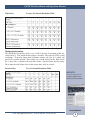
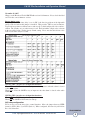
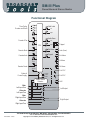
INC
®
Installation and Operation Manual
SM-III Plus
Silence Monitor III Plus
Firmware Version 1.16 (PCB 103201 Rev E/F)
Manual Update: 12/22/11
Please check the label on U4 for the correct firmware version.
Due to the dynamic nature of product design, the information contained in this
document is subject to change without notice. Broadcast Tools, Inc., assumes no
responsibility for errors and/or omissions contained in this document. Revisions
of this information or new editions may be issued to incorporate such changes.
Broadcast Tools® is a registered trademark of Broadcast Tools, Inc.
Copyright, 1989 - 2011 by Broadcast Tools, Inc. All rights reserved.
No part of this document may be reproduced or distributed without permission.
Visit www.broadcasttools.com for important product update information.
SM-III Plus Installation and Operation Manual
Table of Contents
Section Title
Page #
Introduction. . . . . . . . . . . . . . . . . . . . . . . . . . . . . . . . . . . . . . . . . . . . . . . . . . . . . . . 3
Safety Information . . . . . . . . . . . . . . . . . . . . . . . . . . . . . . . . . . . . . . . . . . . . . . . . . 3
Who to Contact for Help . . . . . . . . . . . . . . . . . . . . . . . . . . . . . . . . . . . . . . 3
Product Description . . . . . . . . . . . . . . . . . . . . . . . . . . . . . . . . . . . . . . . . . . 4
Product Features . . . . . . . . . . . . . . . . . . . . . . . . . . . . . . . . . . . . . . . . . . . . . 4
Installation Guidelines . . . . . . . . . . . . . . . . . . . . . . . . . . . . . . . . . . . . . . . . . . . . . . 5
Inspection . . . . . . . . . . . . . . . . . . . . . . . . . . . . . . . . . . . . . . . . . . . . . . . . . . 5
Mounting. . . . . . . . . . . . . . . . . . . . . . . . . . . . . . . . . . . . . . . . . . . . . . . . . . . 5
Connecting user equipment . . . . . . . . . . . . . . . . . . . . . . . . . . . . . . . . . . . . 5
Configured for backup switching . . . . . . . . . . . . . . . . . . . . . . . . . . . . . . . . 5
Remote control . . . . . . . . . . . . . . . . . . . . . . . . . . . . . . . . . . . . . . . . . . . . . . 6
Programming Guidelines . . . . . . . . . . . . . . . . . . . . . . . . . . . . . . . . . . . . . . . . . . . . 7
Mode setup . . . . . . . . . . . . . . . . . . . . . . . . . . . . . . . . . . . . . . . . . . . . . . . . . 7
Sensitivity . . . . . . . . . . . . . . . . . . . . . . . . . . . . . . . . . . . . . . . . . . . . . . . . . . 7
Delay timing . . . . . . . . . . . . . . . . . . . . . . . . . . . . . . . . . . . . . . . . . . . . . . . . 7
Restore delay timing . . . . . . . . . . . . . . . . . . . . . . . . . . . . . . . . . . . . . . . . . . 8
Operation Guidelines . . . . . . . . . . . . . . . . . . . . . . . . . . . . . . . . . . . . . . . . . . . . . . 10
Front panel switch operation . . . . . . . . . . . . . . . . . . . . . . . . . . . . . . . . . . 10
Stereo mode operation . . . . . . . . . . . . . . . . . . . . . . . . . . . . . . . . . . . . . . . 11
Dual monaural mode operation . . . . . . . . . . . . . . . . . . . . . . . . . . . . . . . . 11
WEBSITE:
Visit our web site for
product updates and
additional information.
Specifications . . . . . . . . . . . . . . . . . . . . . . . . . . . . . . . . . . . . . . . . . . . . . . . . . . . . 12
Warranty . . . . . . . . . . . . . . . . . . . . . . . . . . . . . . . . . . . . . . . . . . . . . . . . . . . . . . . 13
Functional/Component Diagram. . . . . . . . . . . . . . . . . . . . . . . . . . . . . . . . Appendix
TABLE OF CONTENTS
e-mail: [email protected] voice: 360.854.9559 fax: 866.783.1742
2
SM-III Plus Installation and Operation Manual
INTRODUCTION
Thank you for your purchase of a Broadcast Tools® Silence Monitor III Plus
(referred to as the SM III Plus throughout this manual). We’re confident that this
product will give you many years of dependable service. This manual is intended
to give you all the information needed to install and operate the Broadcast Tools®
SM III Plus.
SAFETY INFORMATION
Only qualified personnel should install Broadcast Tools® products. Incorrect or
inappropriate use and/or installation could result in a hazardous condition.
Broadcast Tools, Inc., is unable to support NON-Broadcast Tools software, hardware or
NON-Broadcast Tools computer/hardware/software problems. If you experience these
problems, please research your hardware/software instruction manuals or contact the manufacturers technical support department.
WHO TO CONTACT FOR HELP
CAUTION!
Broadcast Tools®
Products, as with any
electronic device, can
fail without warning.
Do not use this product
in applications where a
life threatening condition
could result due to failure.
NOTE:
This manual should be
read thoroughly before
installation and operation.
If you have any questions regarding your product or you need assistance, please contact your distributor from whom you purchased this equipment.
If you would like more information about Broadcast Tools® products, you may
reach us at:
Broadcast Tools, Inc.
131 State Street
Sedro-Woolley, WA 98284-1540 USA
Voice: 360 . 854 . 9559
Fax: 866 . 783 . 1742
Internet Home Page: www.broadcasttools.com
E-mail:
[email protected]
WEBSITE:
Visit our web site for
product updates and
additional information.
THANK YOU FOR CHOOSING
BROADCAST TOOLS® BRAND PRODUCTS!
INTRODUCTION
e-mail: [email protected] voice: 360.854.9559 fax: 866.783.1742
3
SM-III Plus Installation and Operation Manual
PRODUCT DESCRIPTION
The Broadcast Tools® Silence Monitor III Plus improves on the features of the original Broadcast Tools® SSM. The Silence Monitor III Plus is designed to monitor
any stereo or two independent monaural sources, generate alarms and transparently
switch to back-up source equipment when silence is detected. Features include:
front panel, remote control and relay monitoring; Plug-in euroblock screw terminals;
“Plug & Play” (NO POTS) installation; dipswitch selection of silence detection of
–23, –25, –35 and –45db; precise time delay from 2 seconds to 85 minutes; precise
restore timing delay from off to 42 minutes; defeatable sonalert aural alarm; relays
for most remote functions. The SM III Plus may be set on a desktop, mounted on a
wall or optional RA-1 rack shelf for mounting up to three units in 1-RU.
PRODUCT FEATURES
• Transparent stereo or dual monaural program switcher with front panel switcher
transfer switch and indicator LED.
• Dipswitch selection of silence detection of –23, –25, –35 and –45db
• Precise time delay from 2 seconds to 85 minutes
• Precise restore timing delay from off to 42 minutes
• Active balanced inputs
• May be configured for stereo or dual independent monaural operation
• Front panel switcher transfer switch
• Front panel “Mute” switch with built-in sonalert and remote defeat input
• Front panel “Manual/Automatic” switch with front panel LED, remote input and
relay
• Front Panel Alarm “Reset” switch, Tripped LED and relay
• External (“Ext”) alarm input with front panel indicator and relay
• Front Panel Power LED
• Two independent audio alarm relays
• Two pulse open collector alarm outputs
• Auxiliary SPDT relay with user configuration of pulse and
• Plug-in euroblock screw terminals
• The SM III Plus may be set on a desktop, mounted on a wall or optional RA-1 rack
shelf for mounting up to three units in 1-RU
DESCRIPTION
e-mail: [email protected] voice: 360.854.9559 fax: 866.783.1742
4
SM-III Plus Installation and Operation Manual
INSTALLATION GUIDELINES
Inspection:
Please examine your SM III Plus for any damage that may have been sustained during shipping. If any is noted, please notify the shipper immediately and retain the
packaging for inspection by the shipper. The package should contain the SM III
Plus, 16.5 vac@600 ma wall power transformer and this manual.
Mounting:
Mount the SM III Plus where it will be visible and rear panel accessible. Four (4)
screw holes are provided for mounting. The SM III Plus may be set on a desktop,
mounted on a wall or optional RA-1 rack shelf for mounting up to three units in 1-RU.
Connecting user equipment:
TB 1, 18-position connector on the rear of the SM III Plus.
Connect the audio source (air monitor, etc) to the left and right inputs, ground the
negative (-) side if the source is unbalanced and observe proper phasing. These are
labeled LT- and LT+ for the left channel and RT- and RT+ for the right channel.
SM III Plus operation configured For Backup Switching:
• Connect the source (MAIN) equipment (Console, Automation, etc) to LT- and
LT+ for the left channel and RT- and RT+ for the right channel. This is the normally closed contact of the relay switcher and the input to the SM III.
• Connect the source (BACK UP) equipment (CD, etc) to 1LT- and 1LT+ for the
left channel and 1RT- and 1RT+ for the right channel. This is the normally open
contact of the relay switcher.
• Connect the destination equipment (PROCESSING) to 2LT- and 2LT+ for the
left and 2RT- and 2PT+ for the right channel. This is the common contact of the
relay switcher.
• Shields may be connected to the terminal labeled “EG” chassis ground.
NOTE:
If the audio source is a
tuner or receiver, be
sure to feed the SM-III
Plus from the fixed output such as the tape
monitor outputs.
The SM-III Plus is
designed to route the
main audio input to the
output in an event of a
power or unit failure.
When the main input audio is lost, the SM III Plus will sense the loss and start timing. When the time-out is reached, the SM III Plus will switch to the back-up
source. When audio returns, (after a restore delay, if enabled) the SM III Plus will
automatically switch back to the main source input. The user may also use the front
panel “XFER” switch to alternately switch between the main and back up inputs.
The XFER LED will be illuminated when the SM-III is in an alarm condition or the
back-up input is selected.
INSTALLATION
e-mail: [email protected] voice: 360.854.9559 fax: 866.783.1742
5
SM-III Plus Installation and Operation Manual
Remote Control
• Mute input
• Manual/Automatic (Arm) input
• Switcher Transfer Input
• Reset input
• Ext input
• Tripped relay, SPDT contacts.
• Manual/AUTOmatic (Arm) relay, May be configured for either NO or NC
contacts.
• Ext relay, SPDT contacts.
• Left audio (1) alarm relay, SPDT contacts.
• Right audio (2) alarm relay, SPDT contacts.
• Pulse 1, open collector rated at 15Vdc @ 100ma
• Pulse 2, open collector rated at 15Vdc @ 100ma
• Auxiliary relay, SPDT contacts. JP5 is used to select the Aux relays control function.
Move the jumper between XFER (transfer), PUL1 (Pulse 1) or PUL2 (pulse 2).
When configured, the Aux relay will follow the selected function.
Note: ALL inputs are 5 volt TTL/CMOS compatible and active low (pull to
ground to activate).
It is recommended that all cables connected to the SM III Plus be looped through
ferrite cores to suppress RF. Surge protection with RF filtering is also suggested for
the power transformer. The purchase of an inexpensive uninterruptible power supply (UPS) will provide back up in case of power outages.
CAUTION!
Installation of the SM
III Plus in high RF
environments should be
performed with care.
Shielded cable is suggested for all control,
audio inputs and outputs. All shields should
be tied to the “CHASSIS GROUND” terminal. The station
ground should be connected to the chassis
ground screw (CH1)
located behind J1 as
viewed from the rear.
For lightning protection devices, check out
www.polyphaser.com
and www.itwlinx.com.
WEBSITE:
Visit our web site for
product updates and
additional information.
INSTALLATION
e-mail: [email protected] voice: 360.854.9559 fax: 866.783.1742
6
SM-III Plus Installation and Operation Manual
PROGRAMMING GUIDELINES
Mode Setup:
Jp-2 selects the two operating modes:
Removed = Dual Monaural
Installed = Stereo
Sensitivity Setup:
A 4-position dipswitch is provided to change the sensitivity of the SM III Plus.
Locate SW 7 and follow the grid below.
Sensitivity SW 7-1 / Left (1)
- 23 db
ON
- 25 db
OFF
- 35 db
ON
- 45 db
OFF
SW 7-2 / Left (1)
ON
ON
OFF
OFF
SW 7-3 / Right (2)
ON
OFF
ON
OFF
SW 7-4 / Right (2)
ON
ON
OFF
OFF
Delay timing setup:
The SM III Plus time delay is set via SW 1, the 8-position dipswitch and Jp-1. The
default for this jumper is installed. This provides TWO second resolutions. To provide longer time resolution, remove and stow Jp-1, which will provide 20 second
resolution. The switches are set at the factory for a 6 second delay (switches 1 & 2
ON and Jp-1 installed). Each switch has a digit value as shown in the two tables
below. For the factory default setting, as shown in the two-second-resolution table
below, we have turned ON switches one and two. Switch one represents a one-digit
value, while switch two represents a two-digit value. We add these two digit values
together to obtain a total digit value of three. Each value is given a time delay of
two or twenty seconds, so we therefore multiply the total digit value of three by two
(or 20) to obtain six (or 60) seconds.
NOTE: The following table refers to the time delay in seconds.
Time Delay
Two (2) Second Resolution Table
PROGRAMMING
e-mail: [email protected] voice: 360.854.9559 fax: 866.783.1742
7
SM-III Plus Installation and Operation Manual
Time Delay
Twenty (20) Second Resolution Table
Restore timing setup:
The SM III Plus restore time delay is set via SW 2, the first six positions of the dipswitch and Jp-1. The default for this jumper is installed. This provides TWO second
resolutions. To provide longer time resolution, remove and stow Jp-1, which will
provide 20 second resolution. The switches are set at the factory for off. Each switch
has a digit value as shown in the two tables below. For the factory default setting.
Please note the table below refers to the restore time delay in seconds.
Restore Delay
Two (2) Second Resolution Table
WEBSITE:
Visit our web site for
product updates and
additional information.
PROGRAMMING
e-mail: [email protected] voice: 360.854.9559 fax: 866.783.1742
8
SM-III Plus Installation and Operation Manual
November 19, 2007
Changes to the Broadcast Tools® SM-III with version 1.16 firmware. Please check the label
on U4 for the correct firmware version.
Restore timing setup:
The SM III Plus restore time delay is set via SW 2, the first six positions of the dipswitch
and Jp-1 The default for this jumper is installed. This provides TWO second resolutions.
To provide longer time resolution, remove and stow Jp-1, which will provide 20 second resolution. The switches are set at the factory for off. Each switch has a digit value as shown
in the two tables below. For the factory default setting. Please note the table below refers
to the restore time delay in seconds.
NOTE 1, SW2-7 now has two independent functions.
When OFF, the SM-III switches back to input one from input two when the alarm is cleared
or the audio returns.
When ON it allows the SM-III to stay at input two after the alarm is cleared or the audio
returns.
NOTE 2, SW2-8 now has two independent functions.
When OFF, the SM-III is armed at start-up.
When ON, the SM-III is NOT armed at start-up.
AUX relay configuration
JP5 is used to select the Aux relays control function. Move the jumper between XFER
(transfer), PUL1 (Pulse 1) or PUL2 (Pulse 2). When configured, the Aux relay will follow
the selected function.
PROGRAMMING
e-mail: [email protected] voice: 360.854.9559 fax: 866.783.1742
9
SM-III Plus Installation and Operation Manual
OPERATION GUIDELINES
Front panel switches:
“XFER” switch
Forces the SM III Plus between the main and back-up audio switcher input.
“MUTE” switch
Used to silence the sonalert. To permanently disable the sonalert, JP4 must be
removed and stowed.
Manual/”AUTO”matic Switch
Manual or Automatic (Arm) operation. When in the “AUTO” mode, the front panel
“AUTO” led will be illuminated and the Manual/Auto relay will be closed.
NOTE:
“RESET” switch
This switch clears all alarms, sonalert and resets the program switcher. If the alarm
still exists, the SM III Plus will alarm again after the time out delay period. If the
SM III Plus has automatically reset, pressing the reset switch will clear the tripped
and audio alarm led(s) and relays.
Stereo Mode operation
When the SM III Plus is in auto mode (armed), it will trigger in the absence of audio
(see sensitivity setup) on either or both channels after the delay time has expired
(See delay dipswitch SW1) will cause the following action:
1 - The front panel left and right audio LED’s will extinguish.
2 - Unit switches from the main source to the backup source.
3 - Turn on the failed audio alarm LED’(s) (Left and/or Right) and relays.
4 - Turn on the “Tripped” led and relay.
5 - Pulse the pulse 1 open collector for 1 second.
6 - Sound the sonalert.
The sonalert may be
defeated by pressing
the front panel “mute”
switch, remote input
or remove the jumper
on JP4 .
The “EXT” (external)
input will trigger immediately and switch to the
backup source. This
may be used to monitor
STL or satellite squelch
relay, etc.
When both channels return and the restore time delay has expired (if enable), the following action occurs:
1 - Switch from the backup source to the main.
2 - Open the left and right audio alarm relays.
3 - The front panel left and right audio LED’s will illuminate
4 - Pulse the pulse 2 open collector for 1 second.
5 - The left and/or right audio alarm indicators will stay illuminated to provide history of the alarm.
6 - The “tripped” relay stays energized until the SM III Plus is reset.
OPERATION
e-mail: [email protected] voice: 360.854.9559 fax: 866.783.1742
10
SM-III Plus Installation and Operation Manual
Dual Monaural Mode Operation :
When the SM III Plus is armed, it will trigger in the absence of audio (see sensitivity setup) on each of the independent channels after the delay time has expired (See
delay dipswitch SW1).
The SM III Plus when triggered, will cause the following action:
1 - Switch from the main source to the backup source of each independent monaural channel.
2 - Turn on the failed audio alarm LED (1 or 2) and each relay.
3 - Turn on the “Tripped” led and relay.
4 - Pulse the pulse 1 open collector for 1 second for channel (left) 1.
5 - Pulse the pulse 2 open collector for 1 second for channel (right) 2.
6 - Sound the sonalert.
When either channel returns and the restore time delay has expired, the following
action occurs:
1 - Switch from the back up source to the main source of each independent monaural channel.
2 - Open the appropriate audio alarm relay(s).
WEBSITE:
Visit our web site for
product updates and
additional information.
OPERATION
e-mail: [email protected] voice: 360.854.9559 fax: 866.783.1742
11
SM-III Plus Installation and Operation Manual
SPECIFICATIONS
IInput level:
–20 to +27 dbu, balanced bridging (22 K ø),
Program switcher:
(2 x DPDT Relays)
Any input level and impedance can be used. Inputs may be
balanced or unbalanced. Output levels, impedance, distortion,
noise and balancing will match that of the selected input.
Sensitivity:
Dipswitch selectable: –23, –25, –35 or –45 db for each channel.
Operation Control:
Front Panel - Momentary switches.
Remote inputs - Closure to ground or 5 Volt TTL/CMOS Logic
levels.
Relays - All but one SPDT sealed relays utilizing bifurcatedcrossbar silver alloy with gold overlay contacts, 1 amp @ 30
vdc, (2 x DPDT for program switcher).
NOTE: For safety, do NOT connect 120 Vac circuits to these
Relays!
Open collectors - 15 vdc @ 100ma each.
Silence delay:
2 seconds to 85 minutes, in 2 or 20 second increments, via an
8-position dipswitch and Jp-1.
Restore delay:
Off to 42 minutes in 2 or 20 second increments, via an 8-position dipswitch and Jp-1. This feature may be defeated.
Logic:
Microprocessor with nonvolatile memory.
Interfacing:
Audio& Remote Control - Plug-in euroblock screw terminals,
dual-row 18 position. Mate Supplied.
Power - 2.1 mm barrel.
Power Requirements:
16 VAC ONLY, 600 ma. 120 Vac 50-60 hz transformer.
Supplied.(optional CE 240 Vac 50-60 Hz)
Physical Dimensions:
5.65” x 6.50” x 1.55” (WDH)
Weight:
2 pounds.
Options:
RA-1 rack shelf, holds three units (1-RU), filler panels supplied
WEBSITE:
Visit our web site for
product updates and
additional information.
SPECIFICATIONS
e-mail: [email protected] voice: 360.854.9559 fax: 866.783.1742
12
SM-III Plus Installation and Operation Manual
LIMITED WARRANTY
The term “Buyer” as used in this document refers to and includes both (but only) (a) any person or entity who acquires such an item for
the purpose of resale to others (i.e., a dealer or distributor of an item), and (b) the first person or entity who acquires such an item for
such person’s or entity’s own use.
Broadcast Tools warrants to each Buyer of any item manufactured by Broadcast Tools that the item will be free from defects in materials and workmanship at the time it is shipped by Broadcast Tools if the item is properly installed, used and maintained.
EXCLUSIVE REMEDIES
If Broadcast Tools is notified, in writing, of a failure of any item manufactured by Broadcast Tools to conform to the foregoing Limited
Warranty within one (1) year following the date of the Buyer’s acquisition of the item, and if the item is returned to Broadcast Tools in
accordance with Broadcast Tools’ instructions for confirmation by inspection of the defect (which at Broadcast Tools’ election may
include, without limitation, a requirement that the Buyer first obtain a Return Authorization number from Broadcast Tools, that the Buyer
furnish proof of purchase in the form of an invoice and/or receipt, and that the Buyer prepay all freight charges associated with any return
of the item to Broadcast Tools using such freight service as Broadcast Tools reasonably may specify), Broadcast Tools will repair or
replace the defective item, or will refund the purchase price paid by the Buyer for the item. Broadcast Tools shall have the exclusive
right to choose between these alternative remedies.
NO OTHER WARRANTIES OR REMEDIES
TO THE MAXIMUM EXTENT PERMITTED BY APPLICABLE LAW, BROADCAST TOOLS AND ITS SUPPLIERS DISCLAIM ALL OTHER
WARRANTIES, EITHER EXPRESS OR IMPLIED, INCLUDING BUT NOT LIMITED TO IMPLIED WARRANTIES OF MERCHANTABILITY OR FITNESS FOR A PARTICULAR PURPOSE; AND THE FOREGOING ALTERNATIVE REMEDIES SHALL BE EXCLUSIVE OF
ALL OTHER REMEDIES. THIS LIMITED WARRANTY GIVES YOU SPECIFIC LEGAL RIGHTS. YOU MAY HAVE OTHER RIGHTS,
WHICH VARY FROM STATE/JURISDICTION TO STATE/JURISDICTION.
NO LIABILITY FOR CONSEQUENTIAL DAMAGES
TO THE MAXIMUM EXTENT PERMITTED BY APPLICABLE LAW, NEITHER BROADCAST TOOLS NOR ANY OF ITS SUPPLIERS
SHALL HAVE ANY LIABILITY FOR ANY SPECIAL, INCIDENTAL, INDIRECT, CONSEQUENTIAL OR PUNITIVE DAMAGES WHATSOEVER (INCLUDING, WITHOUT LIMITATION, ANY DAMAGES FOR LOST PROFITS, BUSINESS INTERRUPTION, LOSS OF DATA OR
INFORMATION, COST OF CAPITAL, CLAIMS OF CUSTOMERS, OR ANY OTHER PECUNIARY LOSS) ARISING OUT OF THE USE
OF OR THE INABILITY TO USE ANY ITEM SUPPLIED BY BROADCAST TOOLS, EVEN IF BROADCAST TOOLS HAS BEEN
ADVISED OF THE POSSIBILITY OF SUCH DAMAGES HAVE ANY LIABILITY FOR ANY SPECIAL, INCIDENTAL, CONSEQUENTIAL,
EXEMPLARY OR PUNITIVE DAMAGES. THIS LIMITATION OF LIABILITY APPLIES WHETHER A CLAIM IS ONE ALLEGING
BREACH OF A CONTRACT OR WARRANTY, NEGLIGENCE OR OTHER TORT, FOR THE VIOLATION OF ANY STATUTORY DUTY,
THE FAILURE OF ANY LIMITED OR EXCLUSIVE REMEDY TO ACHIEVE ITS ESSENTIAL PURPOSE, OR ANY OTHER CLAIM OF
ANY NATURE. BECAUSE SOME STATES AND JURISDICTIONS DO NOT ALLOW THE EXCLUSION OR LIMITATION OF LIABILITY
FOR INCIDENTAL OR CONSEQUENTIAL DAMAGES, THIS LIMITATION MAY NOT APPLY TO YOU.
Broadcast Tools, Inc.
131 State Street
Sedro-Woolley, WA 98284 • USA
360.854.9559 voice • 866.783.1742 fax
[email protected] e-mail
www.broadcasttools.com website
LIMITED WARRANTY
e-mail: [email protected] voice: 360.854.9559 fax: 866.783.1742
13
SM-III Plus Installation and Operation Manual
ADDENDUM
NOTE 1:
November 19, 2007
Changes to the Broadcast Tools® SM-III with version 1.16 firmware. Please check the label
on U4 for the correct firmware version.
Restore timing setup:
The SM III Plus restore time delay is set via SW 2, the first six positions of the dipswitch
and Jp-1. The default for this jumper is installed. This provides TWO second resolutions.
To provide longer time resolution, remove and stow Jp-1, which will provide 20 second resolution. The switches are set at the factory for off. Each switch has a digit value as shown
in the two tables below. For the factory default setting. Please note the table below refers
to the restore time delay in seconds.
Restore Delay
SW-2 Switch Position and Jp-1 installed.
Digit Value
EXAMPLES:
1 = 2 seconds
1 + 2 = 3 x 2 = 6 seconds
1 + 2 + 4 = 7 x 2 = 14 seconds
32 x 2 = 64 seconds, or
1 minute and 4 seconds
Restore is turned OFF.
Restore Delay
SW-2 Switch Position and Jp-1 removed.
Digit Value
EXAMPLES:
1 = 20 seconds
1 + 2 = 3 x 20 = 60 seconds or
1 minute
1 + 2 + 4 = 7 x 20 = 140 seconds
or 2 minutes and 20 seconds
32 x 20 = 640 seconds or 10
minutes and 40 seconds.
Restore is turned OFF.
Two (2) Second Resolution Table
1
2
3
4
5
6
1
2
4
8
16
32
7
8
Note Note
1
2
ON ⇑ OFF⇓ OFF⇓ OFF⇓ OFF⇓ OFF⇓
ON ⇑ ON ⇑ OFF⇓ OFF⇓ OFF⇓ OFF⇓
ON ⇑ ON ⇑ ON ⇑ OFF⇓ OFF⇓ OFF⇓
SW2-7 now has two independent functions.
When OFF, the SM-III
switches back to input one
from input two when the
alarm is cleared or the
audio returns.
When ON it allows the
SM-III to stay at input two
after the alarm is cleared
or the audio returns.
NOTE 2:
SW2-8 now has two independent functions.
When OFF, the SM-III is
armed at start-up.
When ON, the SM-III is
NOT armed at start-up.
OFF⇓ OFF⇓ OFF⇓ OFF⇓ OFF⇓ ON ⇑
OFF⇓ OFF⇓ OFF⇓ OFF⇓ OFF⇓ OFF⇓
Twenty (20) Second Resolution Table
1
2
3
4
5
6
7
8
1
2
4
8
16
32
Note Note
1
2
WEBSITE:
Visit our web site for
product updates and
additional information.
ON ⇑ OFF⇓ OFF⇓ OFF⇓ OFF⇓ OFF⇓
ON ⇑ ON ⇑ OFF⇓ OFF⇓ OFF⇓ OFF⇓
ON ⇑ ON ⇑ ON ⇑ OFF⇓ OFF⇓ OFF⇓
OFF⇓ OFF⇓ OFF⇓ OFF⇓ OFF⇓ ON ⇑
OFF⇓ OFF⇓ OFF⇓ OFF⇓ OFF⇓ OFF⇓
ADDENDUM
e-mail: [email protected] voice: 360.854.9559 fax: 866.783.1742
14
SM-III Plus Installation and Operation Manual
Broadcast Tools® SM-III Plus Silence Monitor
Switches, Jumpers and Connectors Layout
Timing & Operation
Selection Jumpers
Silence Sensor
Audio Restoration &
Function Selection
Switches
K8 AUX Relay
Option Selection
Jumper
Silence Sensor
Delay Selection
Switches
Left/Right Input
Sensitivity Selection
Switches
16VAC Power
Switcher Output
Input 1
Input 2
Audio & IO Connections
K8 AUX & Transfer Remote
e-mail: [email protected]
voice: 360.854.9559
fax:•866.783.1742
131 State Street, Sedro-Woolley,
WA 98284
360.854.9559 • Fax 866.783.1742
Visit us online at www.broadcasttools.com
Modification Date: 04/08/08
Copyright © 1989-2008 by Broadcast Tools, Inc. All Rights Reserved.
Appendix
SM-III Plus
Stereo/Monaural Silence Monitor
Functional Diagram
Time Delay,
Restore and Mode
Valid Audio
Left
Right
XFER
Audio Alarm
Remote XFer
Left
Mute
Right
CPU
Ext Alarm
Remote Mute
Tripped
Auto (Arm)
Auto
Tripped
Remote Auto
Ext Alarm
Lt-Alarm
Reset
Remote Reset
Rt-Alarm
Sonalert
PuL1 OC
External
Power Supply
PS
+15VDC
-15VDC
+5VDC
Stereo Silence
Detector
PuL2 OC
AUX
Main
–
Left Input One +
Alternate
–
Left Input Two +
–
+ Left Output
Main
–
Right Input One +
Alternate
–
Right Input Two +
–
– Right Output
131 State Street, Sedro-Woolley, WA 98284 • 360.854.9559 • Fax 360.854.9479
Visit us online at www.broadcasttools.com
Date Modified: 11/29/06
Copyright © 1989-2006 by Broadcast Tools, Inc. All Rights Reserved.