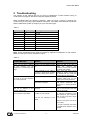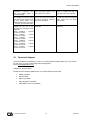
1
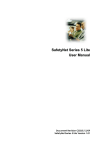
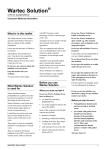
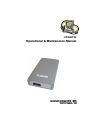
i-Control Operational & Maintenance Manual Document Revision CSSiC 10/03 i-Control Version 1.00 i-Control User Manual Copyright and Trademark © 2003, Computer Support Systems. All rights reserved. No part of the contents of this manual may be transmitted or reproduced in any form or by any means without the written permission of Computer Support Systems. Ethernet is a trademark of XEROX Corporation. UNIX is a registered trademark of The Open Group. Windows 95®, Windows 98®, Windows 2000, Windows NT®, and Windows XP are trademarks of Microsoft Corp. Netscape is a trademark of Netscape Communications Corporation. Java™ is a trademark or a registered trademark of Sun Microsystems, Inc. in the United States and other countries. Computer Support Systems Pty Ltd. Head Office: 373 Johnston Street Abbotsford VICTORIA 3067 Australia Telephone: Facsimile: Web Address: 61 3 9419 3955 61 3 9419 3509 www.csspl.com.au [email protected] [email protected] i-Control User Manual -i- 30/04/2004 i-Control User Manual Disclaimer and Revisions Operation of this equipment in a residential area may cause interference in which case the user, at his or her own expense, will be required to take whatever measures may be required to correct the interference. Date 09/10/2003 Revision CSSiC10/03 i-Control User Manual Comments NK - ii - 30/04/2004 i-Control User Manual Declaration of Conformity Manufacturer’s Name & Address: Computer Support Systems Pty Ltd, 373 Johnston Street, Abbotsford VICTORIA 3067, Australia. Product Name Model: i-Control Version 1.00 i-Control User Manual - iii - 30/04/2004 i-Control User Manual Warranty Computer Support Systems warrants i-Control; if used in accordance with all applicable instructions, to be free from defects in material and workmanship for a period of one year from the date of initial purchase. This warranty is voided if the customer uses i-Control in an unauthorized or improper way, or in an environment for which it was not designed. Warranty does not apply to normal wear or to damage resulting from accident, misuse, abuse or neglect. i-Control User Manual - iv - 30/04/2004 i-Control User Manual Safety Instructions When using this product, basic safety precautions should always be followed to reduce the risk of fire, electric shock, and injury to persons, including the following: 1. Read and understand all instructions in user manual 2. Unplug this product from the wall outlet before cleaning. Do not use liquid cleaners or aerosol cleaners. Use suitable damp cloth for cleaning. 3. Do not use this product in an outdoor environment or near water. 4. Do not place this product on an unstable cart, stand, or table. The product may fall, causing damage to the product. 5. This product should never be placed near or over a radiator or heat register. This product should not be placed in a built-in installation unless proper ventilation is provided. 6. Do not allow anything to rest on the power cord. Do not locate this product where the cord will be abused by persons walking on it. 7. Never push objects of any kind into this product through slots as they may touch dangerous voltage points or short out parts that could result in a risk of fire or electrical shock. Never spill liquid of any kind on the product. 8. To reduce the risk of electrical shock, do not disassemble this product. Opening or removing covers will expose you to dangerous voltages or other risks. 9. Avoid using a telephone (other than a cordless type) during an electrical storm. There may be a remote risk of electric shock from lightning. 10. Do not use the telephone to report a gas leak in the vicinity of the leak. i-Control User Manual -v- 30/04/2004 i-Control User Manual Contents COPYRIGHT AND TRADEMARK.......................................................................................................................................... I DISCLAIMER AND REVISIONS ........................................................................................................................................... II DECLARATION OF CONFORMITY..................................................................................................................................... III WARRANTY ......................................................................................................................................................................... IV 1 INTRODUCTION TO I-CONTROL ......................................................................................... 1 2 GETTING STARTED .............................................................................................................. 2 2.1 REQUIREMENTS ................................................................................................................ 2 2.2 HARDWARE INSTALLATIONS............................................................................................... 2 2.2.1 Ethernet Connections ............................................................................................ 2 2.2.2 A/C Connections.................................................................................................... 3 2.2.3 Telephone Connections......................................................................................... 3 2.2.4 Power Connection Indicator .................................................................................. 3 2.3 I-CONTROL CONFIGURATION ............................................................................................. 4 2.3.1 Assigning of an IP Address ................................................................................... 4 2.3.1.1 Using DHCP ...................................................................................................... 4 2.3.1.2 Using ARP and Telnet....................................................................................... 4 2.3.1.3 Using a Web Browser ....................................................................................... 5 3 I-CONTROL WEB INTERFACE............................................................................................. 6 3.1 I-CONTROL CONTROL INTERFACE ...................................................................................... 6 3.2 I-CONTROL CONFIGURATION INTERFACE ............................................................................ 7 3.3 SECURITY FEATURES ON I-CONTROL ................................................................................. 8 3.3.1 Password ............................................................................................................... 8 3.3.1.1 Forgetting the Password ................................................................................... 8 3.3.2 Single User Control ............................................................................................... 9 3.3.3 Inactivity Timed Logouts........................................................................................ 9 4 HARDWARE SPECIFICATIONS ......................................................................................... 10 5 TROUBLESHOOTING ......................................................................................................... 11 5.1 TECHNICAL SUPPORT ..................................................................................................... 12 i-Control User Manual - vi - 30/04/2004 i-Control User Manual 1 Introduction to i-Control i-Control is a web enabled telephone switch. It is controlled over the network by using a Java enabled web browser. i-Control is password protected and hence secure. Typical applications of i-Control: Power down telephony equipment remotely when not required and power up when required Read the status of the telephone line connected remotely. Network i-Control PC with Browser i-Control ZSP 2021 Front & Back View i-Control User Manual -1- 30/04/2004 i-Control User Manual 2 Getting Started 2.1 Requirements The minimum requirements to run i-Control effectively are as follows: Access to the network Java enabled web browser. (Netscape 4.0 or higher & IE 5.5 or higher recommended) Java™ 2 Runtime Environment, Standard Edition, Version 1.4.2 (You may install this from http://java.sun.com/j2se/1.4.2/download.html) Note: Read install_notes.txt & readme.txt for details on minimum system requirements to install Java™ Runtime Environment Version 1.4.2 Note: On Windows XP The "Internet Connection Firewall" must be disabled, or else UDP Ports 30718 & 30704 must be available. Otherwise, you will not be able to detect or communicate with any of the i-Control devices on the network. To configure, go to the Control Panel, go to Network Settings, select the corresponding network adapter, choose Properties, and go to the Advanced tab. 2.2 Hardware Installations Follow the steps given below: Step 1: Connect the Ethernet connection to the unit Step 2: Connect A/C power cord to the unit with no A/C power Step 3. Connect your telephone lines to the two RJ45 connections at the front of the unit. Step 4: Turn A/C power on. Diagrams below explain each connection. 2.2.1 Ethernet Connections i - Control Network Connect the RJ45 Ethernet connection to the network. i-Control User Manual -2- 30/04/2004 i-Control User Manual 2.2.2 A/C Connections A/C Outlet i - Control Connect A/C power source 2.2.3 Telephone Connections PSTN Connect the RJ45 telephone cables as illustrated above 2.2.4 Power Connection Indicator The red LED Indicator next to the phone line connections shows that i-Control is active. The green LED is lit when telephone lines are linked/enabled. The green LED is not lit when they are disabled/ not linked. i-Control User Manual -3- 30/04/2004 i-Control User Manual 2.3 i-Control Configuration The most important configuration aspect is to assign an appropriate IP address, subnet mask and the gateway to the unit. 2.3.1 Assigning of an IP Address i-Control default IP address is set at 0.0.0.0, which enables DHCP. When you initially connect i-Control to the network and connect power, it will automatically allocate an IP address if your server is DHCP enabled. There are several methods to assign an IP address to i-Control. Consult your network administrator in determining the appropriate IP address. An IP address can be obtained by: 1. DHCP server automatic IP allocation. 2. ARP (Address Resolution Protocol) and Telnet (Recommended) 3. Web browser via the i-Control configuration page. (Also recommended) Note: In typical installations, a fixed IP address is recommended. Your network administrator generally provides the IP address. Obtain the following information before starting to set up your unit: IP Address: Subnet Mask: Gateway: _______ _______ _______ _______ _______ _______ _______ _______ _______ _______ _______ _______ 2.3.1.1 Using DHCP With i-Control’s default IP address of 0.0.0.0, DHCP has been enabled. If your server is DHCP enabled, i-Control will be allocated with an automatic IP address, gateway address and a subnet mask from the DHCP server when powered on. (Ensure that you connect the network connection before power for DHCP allocated IP address) Note: When DHCP is enabled, i-Control configuration applet will not indicate the IP address allocated automatically. However if you know the IP address you can use all features of iControl. Supply the serial number (MAC Address) to your network administrator to retrieve the DHCP allocated IP address. 2.3.1.2 Using ARP and Telnet You can use Address Resolution Protocol (ARP) method from UNIX and Windows® - based systems to assign a temporary IP address on i-Control. The steps to configure i-Control through the network are as follows. 1. Open command prompt and create an entry in the host’s ARP table using the intended IP address and the hardware MAC address, which is found on the devices’ serial number label. Eg: arp -s 192.168.1.220 00-20-4a-xx-xx-xx | ---- new IP ---- | | --- MAC Address --- | Note: For the ARP command to work on Windows® 95, the ARP table on the PC must have at least one IP address defined other than its own. You can verify your ARP table by typing ARP –A at the DOS command prompt. i-Control User Manual -4- 30/04/2004 i-Control User Manual 2. Open a Telnet connection to port 1. The connection will fail quickly, but the unit will temporarily change its IP address to the one designated in this step. Eg: telnet 192.168.1.220 1 3. Finally, open a Telnet connection to port 9999, and press Enter within three seconds to go into setup mode. If you wait longer than three seconds, the unit will reboot. If this happens go back to step 2 and start again. Eg: telnet 192.168.1.220 9999 4. Set all required parameters by following the instructions given by the menu. Most importantly set a static IP address. Once this is completed you may use the web browser configuration to make further changes. Save settings before exiting. Note: The IP address you just set is temporary and will revert to the default value when the iControl's power is reset unless you log into i-Control configuration and store the changes permanently. Refer to the configuration interface on section 3.1 for instructions on permanently configuring the IP address. 2.3.1.3 Using a Web Browser Connect i-Control to the network using the RJ45 Ethernet connections and apply A/C power. You need to have a Java Runtime Environment version 1.4.2 installed on your system. Read install_notes.txt for further details on how to install the Java Runtime Environment. Open your default web browser and direct to the following IP address of i-Control. http://192.168.1.220/config.html (replace the IP address with your IP address) Note: If DHCP was used, you will need to identify the IP address by supplying the serial number of the device (MAC address) to your network administrator. If you used ARP and Telnet (Further details on section 2.3.1.2) you would know the IP address already. We recommend that you use an appropriate static IP address given by your network administrator. You will be directed to a login page. Enter the password to login to i-Control configuration and click OK. The factory default password is “password”. Follow instructions given by section 3.2. Note: Passwords on i-Control are case sensitive. i-Control User Manual -5- 30/04/2004 i-Control User Manual 3 i-Control Web Interface i-Control web interface is controlled by Java applets. You will need the Java™ Runtime Environment version 1.4.2 by installed on your computer to load the applets. See section 2.1 requirements for further details. If your system is not up-to-date with the runtime environment your browser will prompt you to download the latest Java™ 2 Runtime Environment from Sun Microsystems. i-Control has two web interfaces: i-Control Controls i-Control Configuration i-Control web interface gives hyperlinks for easy navigation between the two web interfaces. i-Control is password protected and case sensitive. Factory default password for both web interfaces is set to be “password”. These passwords can be changed only on the i-Control configuration web interface. 3.1 i-Control Control Interface You can enter the i-Control control interface by typing the IP address in the address bar of your browser. Eg: http://192.168.1.220 Alternatively you may configure your WINS (Windows Internet Name Service) to provide a name resolution for the adapter from NetBIOS names to IP addresses for Windows PCs. You will need to enter the appropriate password to gain access to i-Control. This web interface will allow you to connect or disconnect your telephone line as desired. It will also allow you to refresh the most recent telephone line status. Available Controls Enable: Link telephone line Disable: Break telephone line link Cycle Status: Cycle link status for the given period Refresh: Refresh the current link status Logout: Logout from i-Control You can control i-Control by clicking on the appropriate button. During a cycle status other buttons are disabled except for the abort button. If you abort the cycle status, the last known link status will remain active. You can change the cycle period on i-Control at its configuration applet. i-Control User Manual -6- 30/04/2004 i-Control User Manual You can get the latest i-Control status by clicking the refresh button on the applet. Do not use the browser refresh button (i.e. Internet Explorer or Netscape refresh button) as it will automatically load the applet once again and you will need to re-login. If you close the browser you will be automatically logged out from i-Control. If you stay inactive for over 5 minutes you will be automatically logged out from i-Control. Click on logout once you have completed your task. 3.2 i-Control Configuration Interface You can enter the i-Control configuration interface by typing the IP address followed by /config.html in the address bar of your browser. Eg: http://192.168.1.220/config.html i-Control configuration interface will allow you to configure the parameters of the device Device Settings Device Name: Allows you to enter a 32-character name for your i-Control. This name will be displayed on the i-Control Control web interface to easily identify multiple i-Control units. Status Cycle Time: Defines the cycle period in seconds. Maximum of 255 seconds is accepted as a value. IP Settings IP Address: Enter new IP address or 0.0.0.0 to enable DHCP. A static IP address is desired. Subnet Mask: Indicates the number of subnets in the network. Contact your network administrator for further details. DHCP will automatically allocate the subnet mask. Gateway Address: Contact your network administrator for further details. DHCP will automatically allocate the gateway address. Password Settings Section 3.3.1 provides more details on passwords. Control Password: Allows you to change the control password. Configuration Password: Allows you to change the configuration password. i-Control User Manual -7- 30/04/2004 i-Control User Manual By clicking on “Reset” on each section, values you entered are rolled back to its original readings. By clicking on “Apply” the new settings are applied to i-Control. i-Control will reboot when you click “Apply”. Note: You need to click on “Apply” for each subsection to make your changes apply. (i.e. Device Settings, IP Settings or Password Settings). Each time you click on “Apply” i-Control will reboot, thereby logging you out from i-Control. Allow about 10 seconds for i-Control to be active again. After a reboot i-Control will always have its output status loaded with its last known status. You can logout from i-Control by clicking the logout button. If you close the browser you will be automatically logged out from i-Control. If you stay inactive for over 5 minutes you will be automatically logged out from i-Control. 3.3 Security Features on i-Control 3.3.1 Password i-Control is secured by passwords at two levels: i-Control Control Level i-Control Configuration Level The factory default password is set to be “password”. We recommend that you change it to a desired password with at least four characters. Note i-Control passwords are case sensitive. The password is limited to a maximum number of eight characters. 3.3.1.1 Forgetting the Password If you have forgotten any of your passwords there is a method to restore the factory default passwords on i-Control. This method will reset both passwords back to “password”. However in order to minimise the risk of any user taking advantage of this, you will need to have physical access as well as network access to i-Control. Method: 1. Go to http://192.168.1.222/resetsb.html (replace IP address with your IP address) 2. Click on “Reset” and your count down will begin. 3. If you want you passwords to be set back to factory defaults you will need to unplug iControl before this count down is completed. The count down period is set to be one minute. 4. If you do not unplug i-Control before the count down is completed your passwords will remain unchanged. 5. If you are unable to load the default passwords please contact Computer Support Systems technical support. i-Control User Manual -8- 30/04/2004 i-Control User Manual 3.3.2 Single User Control i-Control is implemented as a single user control system due to security. This feature will avoid incidents where two users are simultaneously attempting to control the same device at any given time. It is important that you log out from i-Control once you have completed your task. It is also not possible to control two i-Control devices at the same time using the same PC. If a second user attempt to log into an i-Control device on use, it will indicate that the device is busy by redirecting you to a different web page. If this occurs make sure that no one else is accessing i-Control. Close the browser and try again. 3.3.3 Inactivity Timed Logouts If you log into i-Control and be inactive for more than 5 minutes you will be automatically logged out from the web interface. This feature will protect users from forgetting to logout from i-Control. i-Control User Manual -9- 30/04/2004 i-Control User Manual 4 Hardware Specifications Device Model: i-Control Version 1.00 Physical Dimensions Dimensions: 192 mm L X 100 mm W X 40 mm H Weight: 380g Network Interface RJ45 Ethernet 10Base-T or 100Base-TX (Auto-sensing) LED indication: 10Base-T & 100Base-TX Activity, Full/half duplex. Network Compatibility: Ethernet: Version 2.0/IEEE 802.3 Operating Temperature Operating range: -40°C to +85°C (-40°F to 185°F) Power Requirements Current Usage: 300 mA Operating Voltage: 240V AC 50~60Hz i-Control User Manual - 10 - 30/04/2004 i-Control User Manual 5 Troubleshooting This section of this manual will give you tips to troubleshoot i-Control without having to contact technical support staff from Computer Support Systems. When troubleshooting the following problems, make sure that i-Control is powered up. Confirm that you are using a good network connection. The LED’s at the Ethernet connection and the table below (Table 1) will give you your connection type. Table 1 Left LED Right LED Meaning Off Off No Link Off Off Off Off Solid Amber Blinking Amber Solid Green Solid Amber Blinking Amber Solid Green Blinking Green Off Off Off 100BASE-T Half Duplex Link 100BASE-T Half Duplex; Activity 100BASE-T Full Duplex 100BASE-T Full Duplex; Activity 10BASE-T Half Duplex Link 10BASE-T Half Duplex; Activity 10BASE-T Full Duplex Link Blinking Green Off 10BASE-T Full Duplex; Activity Note: Some unexplained errors might be caused by duplicate IP addresses on the network. Make sure that your unit's IP address is unique. Table 2 Problem/Message Reason Solution When you load the IP address on your browser, you are directed to a i-Control busy web page Another user has already logged in. Make sure that no one else is using the i-Control web interface. i-Control web interface is a single user system. Make sure that ports 30718 (77FEh) & 30704 (77F0h) are not blocked with any router that you are using on the network. i-Control passwords are case sensitive. Make sure you are entering the correct password. Use the i-Control Reset applet to load default passwords. See section 3.3.1.1 of this manual for details. Disconnect power to i-Control, wait for 20 seconds and then apply power again. Turn i-Control off and then issue the following commands at the DOS prompt of your computer: ARP -D X.X.X.X (X.X.X.X is the IP of i-Control) Your computer is not able to connect to ports 30718 (77FEh) & 30704 (77F0h) on the server. Your password is not accepted any more or you have forgotten the correct password Caps lock may be on. Password memory location may have been corrupted. There is no respond when you type the IP address on the browser address bar. You are able to ping i-Control but not Telnet on port 9999. i-Control may not have rebooted properly. There may be an IP address conflict on your network You are not Telneting to port 9999. PING X.X.X.X (X.X.X.X is the IP of i-Control). If you get a response, then there is a duplicate IP address on the network i-Control User Manual - 11 - 30/04/2004 i-Control User Manual When you issue the ARP –S command in Windows, “The ARP entry addition failed: 5" message displays. When you attempted to assign an IP address to i-Control via the ARP method, the “Press Enter to go into Setup Mode” error displayed. Now when you Telnet to i-Control, the connection fails. When you click on Enable or Disable you get one of the following error messages on the status bar Status: Disabled; - Internal Circuitry Error 0001 Status Enabled; - Internal Circuitry Error 0002 Status: Enabled; - Internal Circuitry Error 0003 Status: Disabled; - Internal Circuitry Error 0011 Status: Disabled; - Internal Circuitry Error 0012 Status Enabled; - Internal Circuitry Error 0013 Current logged in user does not have the correct rights to use this command on this PC. A user with sufficient rights needs to complete the task for user rights have to be adjusted. When you Telnet into port 9999 and do not press Enter quickly, the server will reboot, causing it to lose the IP address. Telnet back into Port 1. Wait for it to fail, then Telnet to port 9999 again. Make sure you press Enter quickly. Internal circuitry may have been damaged. Contact CSS technical staff for assistance. 5.1 Technical Support If you are unable to troubleshoot I-Control by using the above table (Table 2) or if you cannot fix your error, you may contact CSS technical support at Email: [email protected] Telephone: 03-9419 3955 Please have the following details when you contact CSS technical staff Model of product Serial number Date of purchase Clear definition of problem Steps taken so far to fix problem i-Control User Manual - 12 - 30/04/2004