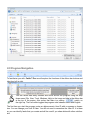
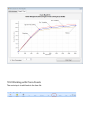
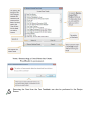
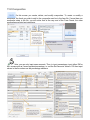
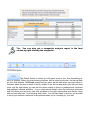
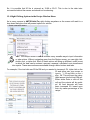
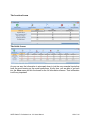
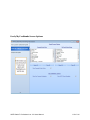
1
AMTS.Cattle™.Pro Users’ Manual For AMTS.Cattle™.Pro November, 2013 1.0 Introduction AMTS.Cattle™.Pro is an implementation of the CNCPS ver. 6.1 for everyday use by nutritionists. The primary audiences for .Pro are: private consultants, technical nutritionists within a company, and advanced nutritionists within a company technical team. It was designed to work with multiple groups of cattle within the same farm file. As a sole implementation, .Pro is the most flexible of the AMTS.Cattle™ product line. In addition to multiple groups within the farm file, recipes can be shared between groups. For example, in a dairy setting where a one-group TMR is utilized, separate cattle groups can be created and identified by group (e.g. early lactation, high cows, low cows, etc.). The recipe can be assigned to each of these groups to evaluate diet adequacy across the herd. Changes made to a recipe affect all groups fed that recipe. In a company setting, where the technical team is leading a team of field nutritionists, .Pro offers a great deal of control. AMTS.Cattle™.Pro is used to create Template Files. Within a company, the technical team can create different templates (by mill, geographical region, dairy or beef, etc.) utilizing local data and pricing for feeds (on- and off-farm feeds). These templates can be time stamped so that users can update recipe and composite pricing when a new template is loaded. Additionally, these template files can contain additional information making them useable only by authorized users. This additional information includes: logos, screen settings (what is shown for results and order of results), company contact information etc. A common file structure is utilized among all AMTS.Cattle™ products with .Pro being the common denominator. AMTS.Cattle™.Pro can read and write AMTS.Cattle™.Dairy files thus enabling the technical team to evaluate diets and make recommendations with no repetitive data input. Additionally, AMTS.Cattle™.Pro can read and write CNCPS v. 6.1 files. AMTS.Cattle™.Pro also introduces a new non-linear optimizer. This optimizer is a genetic algorithm we have licensed. AMTS.Cattle™.Pro is the first program within animal nutrition to introduce this advanced optimization methodology. In addition to formulating for least cost, the user can select to maximize income over feed costs. 1.1 AMTS Tips and Tricks Throughout this manual you will notice our AMTS Logo. This sign will alert you that the information following will be especially helpful as you use the AMTS.Cattle™ program line. We may use this to point out tips or tricks that will help you as you navigate the program, to assist you in inputting information using the right calculations, or to highlight a feature that may be especially helpful. 1.2 System Requirements AMTS.Cattle™.Pro requires Windows 98 SE or later and the Microsoft .net Framework 3.5 or later installed. During setup, your system will be checked to determine if any additional files are required. If .NET framework 3.5 is NOT installed, you will be prompted and be taken to a Microsoft download site for this. Installation of .NET on computers running Microsoft Vista has been problematic. Windows 7 computers using a 64 bit processor has two different versions of the .NET Framework. AMTS programs require that the full .NET Framework be installed. To install the .NET Framework 4 (for both x86 and x64 systems) follow this link: http://go.microsoft.com/fwlink/?LinkId=181013 Contact Microsoft if you encounter errors associated with .NET. 1.3 Install AMTS.Pro You can download .Pro from the AMTS website http://agmodelsystems.com/sw_updates/AMTS.Cattle.Professional%20v.%203.2%20Setup.exe Choose “Run” (or) “Save” the file to your desktop and double click on the AMTS.Cattle™.Pro.exe file. Follow the prompts throughout installation. 1.4 Installing the Non-linear Optimizer When finished downloading the program, download the non-linear optimizer: in the Agmodelsystems.com web page, click on Optimizer Full Version o Choose Run. o Follow prompts. o Enter your name and company. o Contact [email protected] for a serial number and key code for the advanced optimizer. 1.5 Program Registration When you start the program, click on “Continue without Activation”. You have 30 days to use the program prior to activation. If after 30 days, you wish to purchase .Pro (or you fail to register .Cattle™.Pro within 30 days), contact AMTS ([email protected]) and we can get you up and running again. steps: At the time of purchase, select Fill Out Activation Form button, complete the form, copy it to the clipboard and paste the contents into an email to [email protected]. If you do not see a button taking you to the registration screen, follow these Step 1. Choose Help in the pull down screen. Step 2. About AMTS.Cattle. Professional Step 3. Click on button View License Details Step 4. Fill out activation form Step 5. Copy to Clipboard. Step 6. Open your Email program, paste the form Step 7. When the unlock code is sent back, copy and paste the code into the blank box. Step 8. Click button, Process Activation Code 1.6 Saving Your Work As with any AMTS product, there is no reason to worry about saving a file. Once an input is made, it is written to the file, automatically saving the entered data. When you open a file, as with other AMTS products, a copy of the farm file you are opening is placed in the Farms Backup/farm name folder. The file you end up working with is renamed automatically with the time and date stamp when opened as part of the name. You can always go back and open an old file just by browsing to the Farms Backup Folder. It is possible to turn off the Auto- Save Feature. This allows you to open a farm, play around with some “what-if” scenarios, and close the farm without incorporating any of the changes in to the actual farm file. You can save the changes if you want, manually. We will explain how to change from auto save to manual save in the section on Settings. See Manual Page 21. You can then select that Farm and see all the old files annotated by date. Holding the mouse over the farm will reveal a date and time stamp. If you make a major mistake in a farm, you can go back to a previous copy of the farm. 2.0 Program Navigation To familiarize you with .Cattle™.Pro we will explore the functions of the ribbon bar buttons and tabs from left to right. You can select data entry screens and move around the program using the drop down menu (File, View, Tools, Windows, Help) or the icons and tabs in the ribbon bar at the top of the screen. Also notice that there is a sliding switch on the right top. The Units slide toggles the program units between metric and English. The first time you start the program; enter an alpha-numeric User ID with no spaces or characters. You can change your User ID later. You will not need to remember the User ID. It is there so you can identify feeds that you create and will be used if you share diets with other nutritionists. When you start .Pro, you will see the Open Farm Dialog box. If you are selecting a previously created farm, select that file. 3.0 Create a Farm When you open .Pro the Open Farm window will open, by default. If you are creating a new farm, click on Cancel, and then Create New Farm on the Toolbar. OK. Choose a name for your new farm and click The following form box will appear. The name you entered for the farm will be filled in and you will have the opportunity to fill in the rest, including the option to use component pricing. The information box on your screen can be clicked on in the lower right corner and dragged to resize it so that all information can be seen. Input Tip If a Springer sold for $1200 and weighed 1200 lbs the input would be $1. 00. That allows you to look at IOFC (Income Over Feed Cost) for growing animals. ME or MP allowable gain (whichever is lower) x value = income. 4.0 Open Farm In subsequent uses of .Cattle™.Pro, you will be working in farms you have already created. To open a farm, click on Open Farm in the ribbon bar; this will bring up a dialog box with the most recent copy of each farm you have created. Highlight the farm you want to work with and click open. That will bring up the following information box. You can use this box to input farm information, change existing information, or launch reports about that farm. 5.0 Settings The settings you select here will carry over to all farm files that you open, create or import from CPM, CNCPS 6.1 or AMTS programs. You can change these at any time. The information you input in the settings button will dictate the look of reports you generate, establish the unit and refinement of the information you input for feeds, and allows you to control some of the calculations the program makes as you work within it. 5.1 User and Company Information Here you can set or change your User ID and Company ID NOTE: If you previously used .Pro version 2 and you change your User ID, any feeds you have changed in the past may not show up. Look at other feeds you have from v 2 feeds to see your past ID; set your current ID to the same. Contact AMTS with further questions about this. 5.2 Program Settings 5.3 Fonts & Colors Select the font type and colors for the program 5.4 Report Settings This screen allows you to control various ways your reports will appear. 5.5 Feeds Settings The actions you take in this window will affect how information is treated in the Feed section of the program. The settings chosen in this screen provide protection for some actions you may take later in the program. There is no undo button; for this reason, some of these boxes should be checked for a safety net. Until you are familiar with the program, it is a good idea to keep the default settings. 5.6 Feed Passwords Feed Passwords are used as an added level of protection for a user. Password protected feeds can still be used by any user you send them to; however, all they will be able to see is: DM, NDF, CP, Fat, and Ash. Passwords can also be used to protect composites. 5.7 Recipe Screen Settings Choosing the Predicted Dry Matter Intake Equation will set the default equation for animal intake based on either the equation from CNCPS or the equation from NRC. The Snapshot column is a new feature that allows you to make changes to the ration and see how that will affect the outputs in a side-by-side comparison with the unchanged, original ration. With a click, the changes can be incorporated into the recipe. This feature will be explained in more detail in the Recipe section of the manual. 5.8 Ration Outputs Templates This screen allows you to customize ration outputs that are shown and customize optimizer settings; you can create as many output lists as you would like. Using the custom templates allows you to tailor the recipe reports to suit your needs. The templates are a way to tailor reports for your clients. It is a way to create an uncluttered list of the outputs that you most emphasize when working with farms. You can create templates specifically for different farm types. We have sup- plied four templates; Dry Cow Minerals, Dry Cow, Lactating Cow, and Replacement Heifer as a starting point. Each template can be saved as a file that can be shared with others. You can find the saved templates by going to My Documents>AMTS>AMTS.Cattle.Pro>Ration Output Templates 5.9 Optimizer Settings 5.10 Misc. Settings Turning off the Auto-Save feature give you the oportunity to open up back-up versions of the farm and play around with them without messing up the current farm. At anytime, changes can be saved by selecting save in the “Files” menu or hitting <Ctrl-S>. After you have finished working in the back-up farm, you can choose to close it without saving the changes. When you next open a farm by selecting Open Farm it will it will be the last folder you opened a farm from. If you find you are not in your Current Farms folder click up a level to find that folder. 5.11 Reports Signature This setting allows you to add a signature to further customize the reports you print for your clients. To set this feature up, first you must have a .jpg image file of your signature. This is easily accomplished by signing a blank sheet of paper, either scanning or photographing the signature, and saving the image as a .jpg file on you computer. After you have saved the .jpg file bring up the Settings dialog box that allows you to add a signature In this example I have saved a scanned signature in my AMTS > AMTS.Cattle.Pro > Misc folder. 6.0 Farm This is another tab that can be used to bring up the Farm Information input screen; it is the same screen and asks for the same information as the screen generated when a new farm is created within .Cattle™.Pro. That screen will look thus: Reports of Interest within the Farm Window The Farm window includes three tabs that, when clicked, provide some useful yet often overlooked forms. Although we are covering them in manual at this point, they will be of no value until rations have been created on the farm. 6.1 Multi-Group Report The Multi-Group Report aggregates feed use or predicted excretion for multiple groups, locations, and/or the whole farm. This can be very useful for planning for changes in inventory when rations are changed and in considering “what-if” strategies. This very powerful report is able to give you a quick summary of the numbers you need for planning short and long term feed inventory needs and provides the ability to assess excrement outputs for nutrient balancing planning. A Feed Requirements Report looks thus: Using that same Multi- Group Report tab you can also generate an Excretion Report by whole farm, individual location, individual groups, and variations thereof. Conveniently, the Cattle Groups are preceded by their location so that, if you want to look at certain groups in certain locations, you do not have to remember whether, for example, Group one cows are in the Dairy Barn or the Test Barn. 6.2 Group/Ration Comparison Report This report is an easy way to compare diet outputs side-by-side The report generated from these selections looks thus: This report is a nice way to compare groups side by side. 6.3 Multi-Group Custom Report This report allows you to select a custom report you have created in the Reports tab found under Recipes (page 81) and view it with inputs across more than one group, all groups in a given location, or all groups on the farm. 7.0 Locations Locations describe where cattle are housed. For example, for a free-stall dairy operation that raises their own replacements, one could have a location for lactating cows, one for dry cows, one for heifers less than 12 months of age, and one for heifers greater than 12 months of age. For a feedlot, there may only be one location. When thinking of how the program will handle information, remember the hierarchy: “The Recipe is King”, then location, then group. You can specify the same recipe across locations and groups; additionally, many groups can be in one location. You cannot have the reverse. Locations are where the power of .Pro begins. You can have as many locations as you desire; all of the inputs within a given location are then used within each cattle group that is housed in that location. Back to our dairy example: the dry cow location may have two groups in it, close-ups and far-offs. Yet these two groups will share the temperature, humidity, and other inputs. .Pro streamlines data inputs so that information need only be entered once and then copied. 7.1 Create Location When you create a new location, you will be asked to give it a name. Names must begin with a letter and can only be alpha-numeric. Once you click on OK, a new column will appear on the Locations form. Inputs of interest on the Locations form are: As you make inputs, you can move to the next cell by using the arrow keys, mouse, or the tab key. If you have multiple locations, tab will move you left to right across locations. Make special note of the inputs shown in Bold font. Those numbers will have the greatest effect on the Model. Attention to those inputs will translate to greater than 90% accuracy in predictions. For quick evaluations focus on the Bolded inputs. After you create and modify your first location, you can also copy and paste locations (then rename the copy) to quickly populate the location form. This can leave you with just a handful of inputs to change between locations. 7.2 Activity Calculator: At the bottom we’re asking for flat distance walked. No one expects you to know exactly how far the animals are walking and many times they change positions but, this can have a tre- mendous affect on the amount of milk produced so and is commonly grossly underestimated. Activity can make a big difference in the requirements of an animal; an animal on pasture in a grazing system will have a very different energy expenditure than an animal in a freestall system. When you copy and paste a location, all the groups and recipes will come with it. This saves time and avoids repetitive data input. Conversely, the nature of a single physical location can be so large that it may best be handled by breaking it into two or more location designations. Information derived from this differentiation of location will be more precise. 8.0 Water Sources Add water sample nutrient analyses under the water source tab. Water sources can be used as a feed ingredient in a diet. Water added in this screen will appear as a feed ingredient available for use in rations and in balancing mineral inputs in the diet. 9.0 Cattle (Groups) You can have as many groups as you’d like. You can even feed every cow individually, Rename the Group, Cut the Group, or Copy a Group; the buttons on the tool bar make it all very quick and easy! If you only created one location on the Location form, you will see no tabs at the bottom of the Cattle Inputs form. If you have more than one location, at the bottom of the input form you will see tabs for each location. By default, the first tab will be all groups in all the locations on the farm; selecting one of the tab locations will enable you to focus on the groups in a given location. Creating multiple Locations causes the Cattle Inputs form to have multiple tabs (like an Excel spreadsheet) with each tab representing a location. Here you have a choice: you can either work on the All Locations tab or work on the tab relating to a specific location. The inputs required by each cattle type will be customized to that cattle type. Those that cannot be edited are in RED. It is easier to work within a Location (e.g. Lactating Cows), create the first group (e.g. Fresh Cows) and then use the copy and paste function to create new cattle groups within the location (e.g. High Cows, Low Cows). Again, this method allows you to quickly populate the file as you only have a handful of inputs that must be altered between groups. Cattle groups can be cut, copied and pasted between locations. When working in farms where the goal is to increase milk production, the inputs into this form can be manipulated to develop rations to attain those goals i.e., input a lower BC score than target to create a ration that makes more milk. Mature full body weight would be any animal in their 4th lactation or higher. It is important that the Mature FBW is accurate. Almost EVERY animal requirement is derived using this number. TIP: Recipes assigned to a group will be copied when you copy and paste on the cattle page. Make special note of the inputs shown in Bold font. Those numbers will have the greatest effect on the Model. Attention to those inputs will translate to greater than 90% accuracy in predictions. For quick evaluations focus on the Bolded inputs. 9.1 Average Daily Gain Calculator Notice that two tabs: ADG Calculator and Weight Chart; you can print reports from both tabs to generate custom growth charts and tables for your clients. Many producers are visual learners and this chart can be a very powerful tool to help producers see where improvements can be made with growing heifers. Print the now and what-if charts and show the difference. 10.0 Working with Farm Feeds The next step is to add feeds to the farm file. 10.1 Feed Screen Feed Categories are assigned by CNCPS based on the Data Source; the starting digit (s) provides a map to the Data Source following the table below. The AMTS Feeds follows this coding. Category CNCPS ID # Energy Feeds 1xxx Plant Proteins 2xxx Grain Type Forages 3xxx Hay Crop Forages 4xxx Generic Min/Vits 5xxx Fats 6xxx: Animal Proteins 7xxx Commercial Proteins 8xxx Commercial Fats 9xxx Amino Acids 10xxx Commercial Min/Vits 11xxx Additives 12xxx Tropical Energy 13xxx Tropical Proteins 14xxx Tropical Grain Forage 15xxx Tropical Hay Crop Forages 16xxx Composites Cxxxxx Data Source Cornell University and the Miner Institute Cornell University and the Miner Institute Cornell University and the Miner Institute Cornell University and the Miner Institute Cornell University and the Miner Institute Cornell University and the Miner Institute Cornell University and the Miner Institute Manufacturers Manufacturers Manufacturers Manufacturers Manufacturers and AMTS™ Cornell University Cornell University Cornell University Cornell University 10.2 Using the Farm Feed Screen Selecting Print will generate a box from which you can generate a report for printing 10.3 Editing in the Feed Screen Selecting the edit button next to the feed will bring up the work box below You do NOT need to make a separate Feedbank for each farm; each farm has its own farm feeds from which rations are created. If you do have multiple Feedbanks, i.e.,AMTS, CNCPS, RUPDig; limit the number you use farm- pull your feeds from the same source as much as possible. Making too many Feedbanks can cause problems. The last item under Show Common Edits header is something called Mass Check.(there is a next to it in our screen shot) The Mass Check is a simple calculation of CP + Fat + Ash + NDF + VFAs + Sugar + Starch + Soluble Fiber. (Remember, soluble fiber is calculated by difference). VFAs in 6.1 biology are inputs (acetic, propionic, butyric, lactic, and other organic acids). In a perfect world (no errors in sampling or chemical methods), the mass check would always sum to 100. If it sums to 100-105%, this is well within laboratory methodology and sampling errors. Remember also that as long as you are consistent in the lab you use, the vast majority of the error lies with sample collection. So take a good sample! If the mass check is 106% or higher, take a careful look at the results. The error might be the result of a simple input error or it may be a sample that you want to call the lab and ask them to recheck. The prices you put into the feed screen do not have to be the same as the prices you optimize by, these are base prices. 10.4 Special feed attributes: locked feeds and mixes 10.4.1 Locked and Password Protected Feeds Users who use feed libraries created in AMTS.Pro or AMTS.FBM will see one of 3 icons that indicate that a feed has a special status. Feeds in feedbanks created in .Pro or .FBM can be locked, or password protected. The red circle with a white line next to a feed means that the feed originated in someone else’s feedbank or in AMTS.FBM. If you attempt to edit a feed with this attribute, you will see a warning. You can use these feeds; once you access a locked feed, the feed name will be changed to include your User ID. If it’s a feed that you created in .Pro version 2 and you can’t unlock it, check your User ID in the Settings> User and Company Information. 10.4.2 Mixes There may be feeds that cannot be unlocked (e.g. Proprietary mixes). In that case, the symbol shown is a chain. In this case, all you can edit is the feed price. If a Feed Name is in red, then this feed is password protected and all you will see is the DM, NDF, Fat, Ash, and CP. If there is a composite (“Mix”) in the farm file, you will notice that the price is in grey. By default, a composite price is calculated as the weighted average of the prices of its component ingredients. If you input a price here, a warning message appears saying that you are breaking the link. Clicking OK turns the grey color to black and you can now input a price. This allows you to manually input a price for a composite to include margin, discounts, trucking, etc. If you input -1 as the price, you get a new message saying that the composite price will revert to a calculated value making the price cell grey again. Composites will always be kept as the last feeds in the farm feeds list. 10.5 Using the Feed Screen Icons 10.5.1 My Feedbanks Selecting this icon will bring up a screen in which you can create a Feedbank holding feeds available to you for use in rations on the farm. By default AMTS is populated with feeds from the following: AMTS Feeds and AMTS Updates. Additionally, when you select Feedbank Manager you will see Farm as an unpopulated option. Farm will hold the feeds available to you on that specific farm as you formulate rations. Within the My Feedbanks window you can create a feedbank of feeds you commonly use on a group of farms or in a region. This feedbank will be available to you for use on all the farms you work with and is a good place to locate proprietary mixes not found in any of the default feedbanks. Creating a Regional Feedbank rather than a Feedbank for each farm you work with makes good sense. It allows you to readily input common ingredients and minimizes the number of feedbanks contained in the program. 10.5.2 Copy Feed You can make duplicates of any of the feeds in your current feedbank. Clicking on this icon will bring up a list of your current feedbank feeds. Click on the feed you would like to copy. You will be prompted to enter a new name for the duplicate feed. You can now edit the new feed in the feedbank screen Highlighting the desired feed will bring up a dialog box in which the copied feed can be renamed. Make feed names as short as possible. On your recipe screen the feed names dictate how much of the output screen you can see. The longest named feed sets the column width. 10.5.3 Delete Feed Clicking on this icon removes the feed from the selected farm file. You will get a warning message that the feed will be removed. If the feed is being used in a ration, you will also get a message warning you that the feed is used in a ration and which rations. If you choose to delete a feed that is used in a ration, the quantity of all the other feeds in that ration will be proportionally increased so the total amount of dry matter fed is the same as in the original ration. For example, if a ration has 3 feeds: 20 lbs corn silage, 30 lbs of haylage and 5 lbs corn grain (total = 55 lbs) and you delete the corn silage feed, the new ration will be 47.1 lbs haylage and 7.9 lbs corn grain. Be careful deleting feeds that are being used in rations. 10.5.4 Reorder Feeds It is easy to change the order in which you view the feeds in the ration. Traditionally Rations read from forage to concentrates to minerals and additives. In selecting Reorder Feeds in the Feeds toolbar you will bring up the following dialog box in which you have several choices of how you wish to order the feeds. 10.5.5 Feed Comparison Tool This tool will allow you to compare the analysis for multiple feeds side by side. Select the feeds to compare on the right side of the screen. You can select the feeds from the AMTS feed library, any feed bank or the farm file. 10.5.6 Import Feed Analyses You can import feed analysis electronically using the AMTS XML format implemented at several labs. Simply click on Tools, Import Feed Analyses. Find the file you received from the lab (typically with an .amts_fa extension). Select the feed from the lab file, and match it with a feed from the farm file. NOTE: The feed must exist in the farm file to import analysis. If the feed does not exist in the farm file, import a similar feed into the farm file before starting the Import. If no similar feed exists in the library, MinVit is a blank analysis and can be used. The screen shows the feed analysis value from the lab and the current farm file feed values and the difference between them. A difference greater than 10% will show in red. 10.5.6.1 Import CPM files The CPM Import Function is intended to allow AMTS.Cattle (all versions) users to quickly convert CPM files into AMTS files. The CPM user should be aware that their predicted results will be different in AMTS.Cattle. CPM ver. 3 is based on the CNCPS ver. 5.5 biological model. There are differences in several inputs, namely the additional carbohydrate pools utilized by ver. 6 biology and changes in protein A and B1 pool sizes and kd values. To make the conversion seamless, AMTS automatically selects a feed of the correct feed type and assigns the updated pool sizes and kd values to the imported CPM feeds. Additionally, changes in the core biological model calculations, as well as how mixes (composites) are handled internally result in prediction differences. Model users must remember that a good model is evolutionary and as updated/new biology is modeled, prediction differences do (and will continue) to change. The goal of updated biological models is to more accurately predict field responses. Using the CPM Import Function Step 1. If you have any mixes within mixes in CPM. Go into CPM and un-mix them. Also if you have water as an ingredient in your ssn file take it out for now then you can add it back into the diet after it’s in AMTS (CPM uses 0 dry matter and AMTS can’t handle a feed like that) TAKE THE DASH OUT: To ensure data integrity, if a CPM feed has a dash (-) in the name, we recommend changing the CPM name to either remove the dash or replace it with an underscore (_). Dashes are used with AMTS software as part of the feed naming done automatically internally. Step 2. If this is the first CPM file from a farm being imported, create a new farm in AMTS.Cattle (all versions). If you are importing a CPM file into an existing farm, open that farm file. Step 3. Once the farm is created/opened, click on Tools, Import CPM Session File. This dialog box will appear Step 4. The Import CPM Session dialog box opens. Browse to find the CPM Session file you wish to import. When found, click on it. Click on Open, you will see: If a feed does NOT exist in the AMTS.Cattle farm file, the Overwrite cell is NOT selectable and is checked. This allows AMTS.Cattle to import the feed. If a feed does exist (has the exact same Feed Name, the Overwrite checkbox is NOT checked by default. o If not checked, a second copy of the feed will be added to the farm file o If you click on the Overwrite checkbox (set it to checked), the imported feed will overwrite the existing data in AMTS.Dairy. This is useful if you are importing several CPM sessions representing one farm. For example, you may have 5 CPM session files for a farm (different groups) that all use the same corn silage. By overwriting, you can be sure you are using the most recent analysis for that corn silage. Step 6. Click on the Add CPM Group to Farm button. A message box will appear stating that import is complete. At this point, you can either import another session file by clicking on Open CPM File to Import button or Exit this screen and evaluate the ration using AMTS.Dairy Tip: It is important that you double check your values in the new feedbank in .Cattle.Professional as changes in the biology may require some adjustments to rates, intestinal digestibility, and pools to recalibrate your data with 6.1 biology. Questions regarding this should be directed to: [email protected]. 10.5.7 Feed Notes Feed Notes can be added to each feed in the Farm Feedbank from either the Feed Notes window, in the Edit Feed Dialog box, or in the Composite Screen. The notes can be added Feed or Composite Analysis Reports. In the Edit Feed dialog box 10.5.8 Remove Unused Feeds This option can be used to clear the Farm Feedbank of feeds no longer used in any recipes. Farm Feed lists can get long if many ingredients are used or .Pro has been used for a number of years. This option allows for Farm Feed removal both in the Feeds window or the Recipe window. Removing the Feed from the Farm Feedbank can also be performed in the Recipe Screen. 10.4.9 Reconcile Feeds Clicking on the Reconcile Feeds icon will update the farm feed prices and composition from available feedbanks that have identical names. This was developed especially for use with AMTS Feed Bank Manager but is also very useful if a feed company regularly sends out updated analysis and pricing information. After selecting the Feed Bank and Date Range, ticking the Begin Scan tab to generate a list of Feeds available to reconcile. This allows you to evaluate the analysis or price as they are currently, then reconcile and see the changes. When you run Reconcile Farm Feeds, especially if it is done infrequently, open up the date range to ensure to catch all the changes. 11.0 Composites On this screen you create, delete, and modify composites. To create or modify a composite, the feeds you wish to add to the composite must be in the farm file. If more than one composite exists in the file, you will notice that at the very end of the Farm Feeds, the other composites are listed as ingredients. Note: you can only input mass amounts. Thus, to input percentages, input either DM or As-Fed amounts as if mass equaled percentage. i.e. set the Set Amounts value to 100 then input values in the lbs column as the percentage numbers The Composite Analysis Report button prints a report to send to a mill. This report can be printed or saved as a file (c1dx, pdf, xlsx, xls, docx, htm, emf). When the “Constituent Feeds” box is check, the list of feeds in the composite appears on the report. When the “Show Nutrient Weighted Averages” box is checked, the weighted average nutrient analysis of the composite is shown on the report. Tip: You can also get a composite analysis report in the feed screen by right clicking the composite. 12.0 Recipes The Recipe Screen is where you will spend most of your time formulating rations (or recipes). Before you start entering numbers, take a look at the screen. On the top there are four slide buttons. The Recipe screen has two parts: the left side where you input basic information about the diet in terms of lbs Dry matter or lbs As Fed and where you add your feed costs; and the right where you can see the ration outputs in terms of predicted milk produced and predicted nutrients available. If your output screen doesn’t show the safe mins and maxs and only shows min and max, right click anywhere in the right side window and choose “show safe min and safe max.” from the drop down menu. You will want these to show so you are able to set up your nutrient constraints in the optimizer when you’re “touching up” your diet. 12.1 Show Nutrient Contributions 12.2 Snapshot Column The values in (Snapshot) icon column are those for the existing diet. You can edit diets in the lbs/day (DM) column while keeping the original diet numbers in the Snapshot column. The outputs from both diets can be observed on the right side of the Recipe screen. The changes can be easily observed side-by-side and in conjunction with Safe min and Safe max. values. Click the IMPORT Bar and the following screen will show. TIP: The recipe is at the top of the hierarchy when it comes to recipes and cattle. A single recipe can be fed to many groups of cattle at different rates but, only one recipe can be fed to one cattle group. 12.3 Creating a Recipe As shown below, clicking on the dropdown arrow beside the Recipe button will bring up a menu list of actions, then locations, then groups for which you will formulate rations. The name you choose for the recipe can be anything so long as the name does not include a dash. TIP: The order that you select the feeds, is the order the feed will appear in the diet. Don’t worry if you don’t put them in the correct order; you can always reorder them by clicking on the reorder button on the tool bar. You can input DM amounts on the fly. The simplest way to input amounts is to use the arrow keys to move around. After leaving each cell, the outputs (right side of the screen) are updated. You can also change the total amount of a recipe fed just by double clicking on the DM total and inputting a new value. The cattle drinking water is set to on when you add a drinking source to the Cattle screen. You can add the water source, or other water sources, you created in the recipe as an ingredient. This would be used if water is added to the feeds in a TMR or composite. At the bottom of the screen the water intake prediction is also shown in pounds along with the name of the water source used for that cattle group. The drinking water intake is calculated in the row “Drinking Water Intake”. Total water intake includes the water content of feeds and water added as a feed ingredient. TIP: all data is stored as a percentage dry matter coupled with total kilograms dry matter fed to the group. Thus, if working in As Fed, pounds, when you return to the file, it is possible that 20 lbs is returned as 19.99 or 20.01. This is due to the data interconversions behind the scenes and should not be alarming. 12.4 Right Clicking Options in the Recipe Window Menu As in many screens in AMTS.Cattle.Pro right clicking anywhere on the screen will result in a drop down dialog box that will present options for actions. TIP: The Recipe screen in AMTS includes many versatile ways to input information or take actions. Without navigating away from the Recipe screen, you can right click, double click, or triple click. Each of these actions will bring up different, useful boxes in which the data can be entered, removed, renamed, calculated, even transformed into reports. These same actions are available through ribbon buttons and tabs. For example, if the total diet was 50 lbs DM and you wanted to increase it 5%, triple click on the 50 and either use your mouse or type in * 1.05 and click on the = sign, OK. This will input the calculated amount into the total DM cell. Either strike Enter or click off the cell and the outputs will be updated. All feed amounts will have been increased 5% based upon their dry matter percentage of the recipe. If you RIGHT click on an empty row in the Recipe Feeds side of the Recipe screen, this “pop up” menu appears: Auto-Evaluate: when checked, the ration computations in the window on the right side of the screen will be updated each time a value is entered. The program will run faster when the auto-recalculate is set to “off”. To recalculate the computations when the auto-recalculate is off, click on the at the top of the screen. Or, you can simply press the F9 key to recalc. Add/Remove Feeds: to add or remove feeds from the current ration feed list. Create Composite From This Recipe: see page 55 for more information on creating a composite. Feed This Recipe To… Selects which cattle group to feed the created recipe to by first showing you locations, then groups. Changes you make to this recipe will affect all the groups it is fed to Go To Recipe For…Selects for location, then group; changes your screen to a previously created recipe Copy This Recipe And Feed To…Selects for location, then group; effectively copies recipe to another group in the same farm. Changes made to the recipe will only affect the group you are working in. Reordering Recipe Feeds: Clicking on this brings up a screen with a list of the recipe feeds and column for their new order. Simply click on the feeds in the order you want them to appear on the recipe screen (and in reports). You do not need to click on every feed. Click on the feeds through the ones you want to reorder and leave any remaining alone. When you click on the Set Feeds Order button, the feeds are reordered and feeds you did not click on are in the same order as they were. You can also sort alphabetically or by dry matter or asfed amount. Take Ration Shot: see page 68 Reset Ration Shots: erases all of the current ration shots. View Ration Results Report: Generates a Ration Results Report as illustrated on page 90 View Simple Recipe Report: Generates a report as illustrated on page 90 View Summary Results report: Generates a report as illustrated on page 90 Delete This Recipe: Deletes all the data the Information you have inputted from the Ration Screen. This action will result in a blank Ration Sheet. Right clicking in a numerically populated cell will generate a box that provides the option to move, remove, or edit the particular feed represented by that cell. 12.5 Ration Output Window Gaining More Screen Space for Viewing Outputs The Ration Output window presents a lot of information about predicted results from the diet you have constructed in the Recipe (Left) side of the screen. You can maximize the amount of the information you can view by sliding the Optimizer Feed Constraints buttons into the HIDE position. Also, in any screen of AMTS, double clicking on the gray area of the screen will expand that particular screen to the full size available. TIP: If you have the recalculate button in the off mode you must turn it on or hit the F9 key to recalculate values. Nutrients on the Ration Output Window can be placed in user defined order by “dragging and dropping”. There are also a variety of tabs along the top right of the screen that will allow you to look at different reports. 12.5.1 Options in the Ration Output Window Menu As in the Recipe section of this screen, Right click on any cell in the window on the Ration Outputs Screen to see this popup menu: Show All Outputs: Click on this option to see all outputs. To limit the outputs displayed, click on the check box in the Show column to show or hide an output. Show Safe Min/Max Values: set the screen to display safe min/max values. Safe Min/Max values provide an additional color option on this screen. If a value is within the Min/Max, the result is in Green. If it is within Safe Min/Min or Max/Safe Max, it will be in Yellow. If outside Safe Min/Max, it is in Red. In .Pro, the Safe Min/Max values are also used in the advanced optimizer. Reorder Ration Outputs: You can change the order by clicking in the position column of the output value you want to see first, second, etc. Set Current Outputs as Default: Click on this option to set the current outputs as the default. Otherwise, the recipe screen reverts to its original layout for all new recipes. The “default” saved is the setup information, i.e. which output items are shown and their order on the screen. Apply Default Outputs to Current Group: resets the current group output options to the default. Reset Outputs to AMTS defaults: If you want the original AMTS selections to be the default, click on Set Current Outputs to Default. Reset Output Order to AMTS default: If you want the original AMTS order to be the default, click on Set Current Outputs to Default. TIP: Occasionally AMTS will add a new nutrient to the program. In order for you to use the new nutrient in the optimizer, you will have to “Reset Outputs to AMTS defaults. 12.6 Recipe Screen Tabs Notice the row of tabs over the left hand window of the Recipe Screen. The Ration tab has been discussed above. Other tabs of interest are: Ration Shots, Opt. Feed Constraints, Optimizer, Adv. Optimizer, Batch Report, Feeding Sheet, Reports, and Notes. 12.6.1 Ration Shots™ When working within a group on the Ration screen or the Optimizer screen, you can capture the ration as it currently exists coupled with the outputs as listed on the Ration Outputs tab. The Ration Shot™ tab allows you to make changes in the existing ration while maintaining the original numbers. When you open the Ration Screen by clicking Ration you will hear the noise you designated in the Settings tab on the ribbon. This action preserves the existing ration numbers. You can then make changes in the ration and temporarily save those as a Ration Shot™. The configuration of the Ration Shot™ screen allows for side-by-side comparisons as you “work” the numbers. Take a Ration Shot™ of the original, make some changes, take another Ration Shot™, and on and on. The number of Ration Shots™ is unlimited! Ration Shots™ are not stored. If you close a group, their Shots are discarded. However, if you keep the group open, you can work with other groups and move back and forth between groups. 12.6.2 Opt. Feed Constraints To set feed constraints for optimization, click on the tab titled Opt. Feed Constraints. Selecting that tab will produce a screen which looks thusly: You can also work from the Ration tab itself. When either of the two slides are set to On (both can be On), the ration screen adds the checkbox, amount constraints, and price to the left side of the screen. You can then make changes to those quantities for consideration when running the optimizer. 12.6.3 Optimization AMTS.Cattle.Pro has two optimizers: a linear optimizer and a non-linear optimizer. The linear optimizer results in a least cost formulation and is started by clicking on the “Optimizer” tab. The non-linear optimizer will optimize for least cost ration or maximum income over feed costs. To do this, click on the “Adv. Optimizer” tab. The first steps for using either optimizer are the same. Tip: When working in the Recipe screen, you can “free up” screen space by turning off the Snapshot feature. To do this: Go to Settings>Recipe Screen Settings>Un-tick the Show Snapshot Column(s). You can also slide the Opt. FCs(DM)and(AF) to Hide position to give yourself more screen space devoted to outputs. These are actions that you can easily reverse when you want to work in the input side of the Recipe screen. 12.6.3.1 Setting up for Optimization Step 1. Set Nutrient Constraints—this is performed in the Outputs (right) side of Recipe Screen. Step 2. Set Feed Constraints—performed in the Inputs (left) side of the Recipe Screen Step 3. Start the Optimizer 12.6.3.2 Linear Optimizer Click on the Optimizer tab on the Recipe Screen. You must have prices in all the feeds for this optimizer to work. In your nutrient constraints you can only optimize off of values that do not depend on model predictive values; for instance MP%req not MP Allowable milk. 12.6.3.2.1 Optimizer Assistance for Constraint Conflict notices The first time putting a diet through the linear optimizer it is typical to receive a dialog outlining possible conflicts to feed constraints. The notice will list the areas in which the ration needs to be tweaked for best optimization. For assistance in this area there are guides that AMTS has developed to guide you in optimizing. 12.6.3.2.2 Optimizer Flowchart Clicking the Optimizer Flowchart button will generate the following pdf. 12.6.3.2.3 Optimizer Guide The Following pdf file will come up as a result of Clicking Optimizer Guide Optimization in AMTS a.k.a. How do I make this crazy thing work? November 11, 2010 T.P. Tylutki Optimization, especially non-linear optimization, is one of those areas that can drive a software company and its clients crazy! You may ask how this can be since optimization has been used in the feed industry for 30+ years. Well, that was in a linear world! This document is meant to explain some of the differences between optimizers and some hints/suggestions to making the AMTS optimizer perform. In a linear world, optimization is easy. For example, let’s use something like crude protein as a constraint. And, every feed has a crude protein content. The issue is that the crude protein content of a feed does NOT change with different diets or combinations of ingredients. Thus, the linear optimizer knows that for every increment it adds of this feed, so much protein will be added. Linear optimization is a relatively mature science and offers repeatable, predictable results for the right problem types. Our world is not linear though. Feed ME and MP values are not constants. They vary based on diet, level of intake, and other feeds that may impact their digestibility. Think of driving up a hill. A linear hill means that the slope is constant. A non-linear hill though would mean we drive so far at one slope and then the hill gets steeper and steeper. A pure linear optimizer fails with these problems. That doesn’t mean linear won’t work though. Curve peeling can be used to look at small portions of the curve and through iterative processes, find a good solution. Another option is to use non-linear optimization. There are multiple types of non-linear optimization. One method is called evolutionary and uses genetic algorithms to search for solutions. GAs (genetic algorithms) are very powerful and allow for different objective functions (e.g. Maximize income over feed costs or Least Cost or Maximize Nitrogen Efficiency). Other non-linear optimizers, such as the one in CPMv3, exist and can work very well. All optimization methods have their limitations though. And software developers are left with a difficult balancing act, trying to balance speed with power and accuracy. The linear optimizer uses a curve peeling approach. This method can, and does, work very well. Making the AMTS Linear Optimizer Perform It is important you understand how nutrient constraints are handled. For this example, we will use the following: Min Value Max DMI, lbs/d 50.5 51 51.5 NFC, %DM 0 37 41 Internally, the linear optimizer does all calculations in metric, dry matter. Within the optimizer, constraints such as NFC are converted from a percentage to a mass. Thus, the above changes to: Item Min Value Max DMI, kg/d 22.9 23.2 23.4 NFC, g/d 0 8,567 9,545 Thus, since each constraint is evaluated independently in the optimizer, it is possible to have a result that meets the constraints when: DMI = 22.9 kg (DMI Min) NFC = 9,545 g (NFC Max) This gives an NFC of 41.68% DM, which some may consider different from a 41%. We could re-evaluate the result and say that it fails to meet constraints because the percentage is not 41. We decided not to do this though as it provides some additional flexibility and range for the optimization. Take home message: set your DMI constraints tight. WARNING: when working with a new ration, the default DMI min is 0 and the max is 220 (100 kg). There are a handful of nutrients that non-linear in nature: 1. ME 2. MP 3. Rumen Ammonia 4. LYS 5. MET These nutrients are estimated for each feed. These estimates are then used in the optimization. The resulting solution is then used to generate new feed values and optimization occurs again. This iterative process represents the curve peeling. By default, the linear optimizer does three (3) iterations; however, the user can change this in View, Settings, Advanced Settings. Our simulations show that the feed nutrient values stabilize typically between 2 and 3 iterations. Increasing the number of iterations may improve the solutions in the 2nd and 3rd decimal point. The most difficult nutrients to optimize are: ME %rqd, LYS %MP and MET %MP. We are working to improve the ME issue and have discovered work-arounds for LYS and AMTS.Cattle™.Professional ver. 3.3 Users Manual 79 of 114 MET. Future program patches will include improvements to the optimizer as they are developed and implemented. For now, the following guidelines will assist you. Optimization Tricks (shown are lactating cow tricks but should apply to heifers and dry cows as well) Constraint How to Set Why DMI Start with +/- 0.5 lbs or with previously optimized diets, +/- 0.2 lbs. The tighter DMI is set, the smaller the mass/% deviation. For the first run, ensure that your MIN MAX enclose the actual (ie if actual is 51, make min 50.5 and max 51.5). ME %rqd Desire 100%, you may want to input 103% but start with 100. Max: no trick. If you want 110%, input 110. The result will typically be within 1-2 units of what you initially desired. Since we are curve peeling, ME feed values are an estimate so a little playing may be needed. MP %rqd Min: no trick Max: no trick MP %rqd tends to be stable and seldom causes problems with a min value. You may want to make the MAX 120 to 125% just to give room for the optimizer to ‘look’ Ammonia, %rqd Set min to 100%. Perhaps not include in optimization if troublesome. May need to adjust lower if infeasible solutions. We are exploring other nutrients to use as a proxy for ammonia. The requirement for ammonia is deep within the model and relies heavily on other model components. LYS %rqd If formulating for amino acids, MIN = 125% If not, MIN = 100% If you use %rqd vs %MP, amino acids seldom cause infeasible solutions. If formulating for amino acids, the LYS 125% rqd min typically returns a diet that is at least 6.4% MP. MET %rqd The 135% minimum will return a LYS:MET If formulating for milk protein production, MIN ratio near 2.9:1 = 135% If not, MIN = 100% All others No tricks Just make sure feeds are available that contain the nutrients you constrain upon. E.g. If you constrain monensin, ensure that a monensin containing feed exists in the ration. I got infeasible even with these tricks. Now what? AMTS.Cattle™.Professional ver. 3.3 Users Manual 80 of 114 Check these: 1. Did you start with a decent (maybe not ideal) diet? You must start with a diet in order for the feed values to be generated. 2. When I get the infeasible screen, I always tell it to optimize again. Sometimes it works. The Program is just starting from a little different spot and that may be all it takes. 3. Double check all your nutrient constraints as well as feed constraints. You cannot push Se to 0.35 ppm without a Se source available in the optimizer! 4. On ME, MP, LYS, MET, Ammonia: open up the constraints so that they enclose the current values. Try optimizing again. If it solves, start working with one constraint to see where it starts causing infeasible solutions again. Now do the next constraint. 5. Did you set a maximum on the feed amount too low? 6. Check your animal inputs. Do you have an input that is making this an impossible problem? 7. Do you have constraints set that make this an impossible solution? We have not built in checks yet (we are in the process of developing this) so check things like: a. Max DMI = 50 lbs b. Min forage = 50% (25 lbs) c. Forage 1 max inclusion 14 lbs d. Forage 2 max inclusion 10 lbs This is an infeasible problem as Forage 1 + 2 = 24 lbs max when the min diet is supposed to be 25 lbs! What are those other values that are shown? When a solution is found, you will see Shadow Prices next to each feed. A shadow price is the RANGE in price where the amount of the ingredient will not change (Given nothing else changes). For example, let’s say that Corn Silage was used at 15 lbs dry matter and shows a Shadow range of 0 to $55. This means that, if nothing else changes price wise or constraint wise, the optimizer will use 15 lbs DM corn silage if the corn silage is priced between 0 and $55. You will find some ingredients that when used will show a range of xxx to INF meaning that, regardless of price, they will be used because nothing else can provide it. For example: MET %Rqd as a constraint and Smartamine (or name your favorite by-pass MET source) may show 4,500 and INF as shadows. Since the MET constraint must be met, and there is only one source, it really doesn’t matter what the max price is. At this time if a feed is not used in the solution, then you will see shadows of 0 and INF. At this time we are not able to report the shadow prices of ingredients as they relate to when they would be used. We will be implementing this in the near future. AMTS.Cattle™.Professional ver. 3.3 Users Manual 81 of 114 Below the ingredient amounts is a second table. This table lists the nutrient constraints, the original results and the optimized solution results. Then there are the two other shadow columns. It looks something like this: DMI ME %rqd Original Optimized 50 97.4 50.2 98.5 Shadow Low Shadow High x x The symbol itself is meaningless as in we could have used a D or a # or any symbol. So don’t get hung up on the symbol itself. What is important is the column it is in. Using the example above, you see that there is a X (Shadow High) for DMI. This means that, if no other constraints change, by relaxing (raising the max) the DMI constraint, the optimizer would probably find a less expensive diet. If the X symbol is shown (Shadow Low), it means that be relaxing that constraint (reducing the min), a less expensive solution may be found. How much less expensive solution, we cannot say but it gives you directionality as to price sensitivity and nutrient constraint. Finally: At any time, feel free to email a farm file to Tom with an explanation of what you were trying to do. I will go through it, make it solve, and then go through with you what I did. Do not be afraid to take a file and play with it. Just as you had to get a ‘feel’ for how the CPM optimizer behaved, you have to get the ‘feel’ for this one. Hint: as you would expect, the model (and thus the optimizer) prefers to grow microbes as a protein and amino acid source. Given the chance, it will let NFC run high (45-47% DM) with 22% peNDF. While mathematically correct, you must use your nutritional expertise and evaluate the solutions! Just as a reminder, read the following…. So, how do we reset ourselves to thinking in CNCPS6.1 biology? Here is a big thing to consider. In everything up till now, because of limitations in our knowledge, safety factors were ‘built in’. In 6.1 biology, there are NO safety factors. If the model says most limiting milk will be 77 lbs, there is a very high probability actual milk will be between 76.5 and 77.5 lbs. Most of the time even closer! So, if you formulate for 77 lbs, will you be limiting the higher producing cow? Maybe. The whole issue of safety factors and lead feeding must be considered! Safety factors are now in your hands as the nutritionist. So, here are our current recommendations: 1. Actual DMI should be between the CNCPS and NRC predicted intakes. 2. Ensure adequate peNDF (>22% but can vary based on herd management) AMTS.Cattle™.Professional ver. 3.3 Users Manual 82 of 114 3. Ensure adequate rumen ammonia (>120%). A maximum on rumen ammonia is difficult as it partially depends on which feeds are available. I tend to watch what MUNs are doing and am targeting 8-12 mg/dl. 4. NFC: the model likes fermentable carbohydrates and NFCs are a great source. While we now say 40% is the maximum, depending on the sources and the cows, 42-43% may be acceptable. a. Makeup of NFC is debatable. Some people get all worked up that sugar + starch must be x, so much soluble fiber must be fed, etc. For me, I look at what is the most economical source of fermentable NFC and that varies by geographical region. In the Northeast US, it is starch so I will be at 2832% starch. But I will be low sugar (less than 3%) and low soluble fiber. b. With no safety factors, availability of the NFC is a bigger concern. Corn that is not degradable does not produce microbial protein! More will be coming from this whole starch degradation area in the future! 5. MP supply: remember, we are first microbial nutritionists and then supplement the cow. Select high quality proteins and amino acids. 6. Fat: same recommendations as CPM. Total unsaturates >500 g/d are a risk factor for reducing milk fat. Watch quantity and quality of NDF. I tend to watch unsaturates % diet DM and target <3%. 7. Amino Acids: If you are going to formulate for amino acids, 6.1 biology tells us: a. Make sure MP balance is positive b. Make sure all (or majority) of amino acids are >=100% required by factorial calculations c. LYS %MP >6.4 d. Now, if I am formulating for maximum milk protein, I will meet LYS and then bring in MET until the LYS:MET ratio is between 2.8 and 2.9:1 i. This is different from the old 3:1 from CPM and represents running the same data through 6.1 biology to get the new ratios! 8. Minerals to requirements 9. Additives to recommended levels. Now, how to set those safety factors? An easy way to set the safety factors is to add at least 0.25 lbs ADG for lactating cows 3rd or greater lactation. For younger cows, add 0.25 lbs to whatever the target ADG is. This equates to about 2 lbs of milk safety factor. Beyond that, setting the formulation safety factor is dependent upon herd management, feed quality, objectives of the farm, and milk and feed pricing. Millions of cattle are being fed off 6.1 biology around the world and as your experience with the newest biological model grows, so will your comfort! (End of Guide) AMTS.Cattle™.Professional ver. 3.3 Users Manual 83 of 114 12.6.3.2.4 Shadow Prices in the Linear Optimizer The Linear Optimizer will report shadow prices for feeds considered in the recipe. When a solution is found, you will see Shadow Prices next to each feed. A shadow price is the RANGE in price where the amount of the ingredient will not change (given nothing else changes). For example, let’s say that Corn Silage was used at 15 lbs dry matter and shows a Shadow range of 0 to $55. This means that, if nothing else changes price wise or constraint wise, the optimizer will use 15 lbs DM corn silage if the corn silage is priced between 0 and $55. You will find some ingredients that when used will show a range of xxx to INF meaning that, regardless of price, they will be used because nothing else can provide it. For example: MET %Rqd as a constraint and Smartamine (or name your favorite by-pass MET source) may show 4,500 and INF as shadows. Since the MET constraint must be met, and there is only one source, it really doesn’t matter what the max price is. At this time if a feed is not used in the solution, then you will see shadows of 0 and INF. Presently, we are not able to report the shadow prices of ingredients as they relate to when they would be used. Below the ingredient amounts is a second table. This table lists the nutrient constraints, the original results and the optimized solution results. Then there are the two other shadow columns. It looks like this: AMTS.Cattle™.Professional ver. 3.3 Users Manual 84 of 114 The symbol itself is meaningless as in we could have used a D or a # or any symbol. So don’t get hung up on the symbol itself. What is important is the column it is in. Using the example above, you see that there is a X (Shadow High) for DMI. This means that, if no other constraints change, by relaxing (raising the max) the DMI constraint, the optimizer would probably find a less expensive diet. If the X symbol is shown (Shadow Low), it means that be relaxing that constraint (reducing the min), a less expensive solution may be found. How much less expensive solution, we cannot say, but it gives you directionality as to price sensitivity and nutrient constraint. 12.6.4 Non-linear (Advanced Optimizer) Click on the Adv. Optimizer tab on the Recipe Screen. AMTS.Cattle™.Professional ver. 3.3 Users Manual 85 of 114 Due to the non-linear nature of the algorithm, you could get a different result each time you optimize. Be sure to take a ration shot of the diets that you like because they might not show up again. You can choose to replace your entered recipe with the optimized diet. Evaluate the Results AMTS.Cattle™.Professional ver. 3.3 Users Manual 86 of 114 Does the Optimizer reach a solution? If not, what constraints are not met? If the solution meets all of the min/max constraints, the window at the bottom of the screen will read “This solution meets all the specified constraints.” If the problem is solvable within the “safe” limits, you will see in the lower left corner constraints that failed to meet nutrient constraints but are very close. Some of this is because an ingredient (let’s say sodium selenite) may be used at the fifth or sixth decimal in the optimizer but on screen, you may only be using three or four decimals. Thus, when the solution is ‘dropped back in’ the model, the fifth decimal disappears. Does it look like a reasonable diet? To re-run the optimizer, either change a constraint, take a ration shot, or accept the solution. Once this is done, you can run it again. The solution may be different but do NOT WORRY about this. You must remember, there is no one perfect solution in a non-linear problem. Rather, there are multiple solutions that may give the same cost or meet the same constraints with slightly different values. Manually iterating three or four times maybe a good option to try and converge as closely as possible. Just take your original diet, do a Ration Shot™, Optimize, do a Ration Shot™, etc. And then you can select the one you believe to be most desirable from the Ration Shots™ screen. We have heard from users that in certain types of diets, as many as 8 iterations are required. Thus, we encourage to spend some time playing with a few diets to determine how many iterations you feel comfortable with. 12.6.4.1 Advanced Optimization Strategies This section is meant to explain how the optimizer works and some hints/suggestions to making the optimizer(s) perform. Optimization tends to be a subject of great debate. The optimization AMTS as implemented reflects a nutritionist’s thinking instead of a pure mathematician/programmer’s thinking. A mathematician will say that if a nutrient is constrained to be between 100 and 110% of required, anything outside that range fails to meet the constraint. A nutritionist will say, ‘well, if it can find a solution at 99%, that’s close AMTS.Cattle™.Professional ver. 3.3 Users Manual 87 of 114 enough’. That is the approach taken in AMTS products. This is done with a proprietary method and as you work with the optimizer, you may find you want to change your constraints to add an additional “safety factor”. The optimization routine is a tool. The final diet decisions are at the discretion of the nutritionist. Two resources are available to you with in the program. The Optimizer Flow Chart and the Optimizer Guide . The documents are found on pages 74 and 75 of this guide as well as through the Optimizer screen. 12.6.4.2 Mathematical Approach AMTS optimization equations minimize ration feed cost subject to user defined nutrient and feed ingredient quantity constraints. These equations are linear. For example, let’s use something like crude protein as a constraint. Crude protein content of a feed does not change with different diets or combinations of ingredients. Thus, the linear optimizer knows that for every increment it adds of this feed, so much protein will be added to meet the crude protein constraint. The CNCPS model equations, that AMTS products are based on, are not linear. Feed ME and MP values are not constants. They vary based on diet, level of intake, and other feeds that may impact their digestibility. Think of driving up a hill. A linear hill means that the slope is constant. A non-linear hill though would mean we drive so far at one slope and then the hill gets steeper and steeper. A pure linear optimizer fails with these problems. That doesn’t mean linear won’t work though. Curve peeling can be used to look at small portions of the curve and through iterative processes, find a good solution. AMTS utilizes a linear optimizer with a curve peeling approach. 12.6.4.3 Safety Factors Here is a big thing to consider. In everything up till now, because of limitations in our knowledge, safety factors were ‘built in’. In 6.1 biology, there are NO safety factors. If the model says most limiting milk will be 77 lbs, there is a very high probability actual milk will be between 76.5 and 77.5 lbs. Most of the time even closer! So, if you formulate for 77 lbs, will you be limiting the higher producing cow? Maybe. The whole issue of safety factors and lead feeding must be considered! Safety factors are now in your hands as the nutritionist. So, here are our current recommendations: Actual DMI should be between the CNCPS and NRC predicted intakes. Ensure adequate peNDF (>22% but can vary based on herd management) Ensure adequate rumen ammonia (>120%). A maximum on rumen ammonia is difficult as it partially depends on which feeds are available. I tend to watch what MUNs are doing and am targeting 8-12 mg/dl. AMTS.Cattle™.Professional ver. 3.3 Users Manual 88 of 114 NFC: the model likes fermentable carbohydrates and NFCs are a great source. While we now say 40% is the maximum, depending on the sources and the cows, 42-43% may be acceptable. Makeup of NFC is debatable. Some people get all worked up that sugar + starch must be x, so much soluble fiber must be fed, etc. For me, I look at what is the most economical source of fermentable NFC and that varies by geographical region. In the Northeast US, it is starch so I will be 28-32% starch. But I will be low sugar (less then 3%) and low soluble fiber. with no safety factors, availability of the NFC is a bigger concern. Corn that is not degradable doesn’t produce microbial protein! More will be coming from this whole starch degradation area in the future! MP supply: remember, we are first microbial nutritionists and then supplement the cow. Select high quality proteins and amino acids. Fat: same recommendations as CPM. Total unsaturates >500 g/d are a risk factor for reducing milk fat. Watch quantity and quality of NDF. I tend to watch unsaturates %diet DM and target <3%. Amino Acids: If you are going to formulate for amino acids, 6.1 biology tells us: Make sure MP balance is positive Make sure all (or majority) of amino acids are >=100% required by factorial calculations LYS %MP >6.4 now, if I am formulating for maximizing milk protein, I will meet LYS and then bring in MET until the LYS:MET ratio is between 2.8 and 2.9:1. This is different then the old 3:1 from CPM and represents running the same data through 6.1 biology to get the new ratios! Minerals to requirements Additives to recommended levels. 12.6.4.4 How do I set the safety factors? An easy way to set the safety factors is to add at least 0.25 lbs ADG for lactating cows 3rd or greater lactation. For younger cows, add 0.25 lbs to whatever the target ADG is. This equates to about 2 lbs of milk safety factor. Beyond that, setting the formulation safety factor is dependent upon herd management, feed quality, objectives of the farm, and milk and feed pricing. AMTS.Cattle™.Professional ver. 3.3 Users Manual 89 of 114 12.6.5 Batch Report This tab allows you to set up your inputs so that you can then generate a Batch Report that you can print for the person responsible for feeding on your farm. In this window you establish how you want the information displayed on the Batch Report Sheet The Batch Report Sheet can be created in terms on number of animals or size of Batch. First the screen in terms of number of animals: The entries in the batch report screen (above) results in the batch report (below): In terms of Batch size: AMTS.Cattle™.Professional ver. 3.3 Users Manual 90 of 114 Which results in this Batch Report AMTS.Cattle™.Professional ver. 3.3 Users Manual 91 of 114 12.6.6 Feeding Sheet The feeding sheet has the same function as the batch report but allows more flexibility in customizing its format. The Feeding Sheet can also be printed in Spanish. Quantities fed can be set by the number of animals or by the amount fed. Feed amounts can be rounded based on the type of feed. For example, you might set forage amounts to be rounded to the closest 5 lbs and minerals to be fed to the closest .01 lbs using the drop down menu next to Forages / Minerals / Concentrates / Composites. The Reorder feeds button displays a screen that allows you to select the order that the feeds in the report are shown on the feeding sheet. AMTS.Cattle™.Professional ver. 3.3 Users Manual 92 of 114 12.6.7 Reports AMTS.Pro contains a comprehensive list of reports. You can set up the default reports to show or print and select the information presented. Report Selection Window: in the window on the left side of the screen check the reports that you routinely want to see or print. These setting will stay the same even when you open other farm files. The “Select All” “Clear All” buttons at the bottom of the window will select or clear all the checks in the window. Print, Save, View Options: Windows Save, Page Setup, Print and View options are displayed as icons on the top of the report window. With any report, you have the option of either printing or saving the report as a file (pdf, Excel, html). AMTS.Cattle™.Professional ver. 3.3 Users Manual 93 of 114 Add/Edit/Delete Custom Report AMTS.Cattle™.Professional ver. 3.3 Users Manual 94 of 114 12.6.8 Notes This section supplies a handy location for your personal notes about the program If you add notes and save them. A Recipe Notes Report will appear in the Reports section. You can choose to print, email, save these notes. They will pertain to that specific Recipe and Group. 13.0 Other Recipe Screen Icons The following tabs help navigate the ration formulation and optimization process: Takes a Ration Shot of the current recipe (see page 68). Brings up a list of feeds available for this group. Add or remove feeds to be included in the ration. Reorders the list of feeds in the ration. This is also the order that the feeds will be listed in the batch report. Composites are feed mixes. See page 54 for details about creating and working with a composite. Also note that the carrot next to the Composite icon can be clicked to bring up a quick menu in which you can separate the composite into its component parts. This is useful when the composite is something like a TMR or Forage. Also, see the section below on page 93 for more information about composites. Clicking the carrot beside the Optimizer icon will drop down a menu that provides the opportunity to run the linear Optimizer from the recipe screen. You may also select the Optimize with Parametrics (explanation on pg 85 ) AMTS.Cattle™.Professional ver. 3.3 Users Manual 95 of 114 Clicking the carrot beside this icon will provide a menu of the templates you developed in the Settings tab / Ration Output Templates as explained on page 18. Selecting from the drop down selection will refine your outputs for the specific group you are working with. When set to “ON”, the optimizer feed constraints (in Dry Matter units fed per day) and feed prices are displayed and can be edited on the ration screen. When set to “ON”, the optimizer feed constraints (in As Fed units fed per day) and feed prices are displayed and can be edited on the ration screen (left window). Brings a report corresponding to the Recipe Output Window tab displayed up in Preview Mode. You can then view, print or save the report(s). Reports can be saved as a pdf, Microsoft Word document or Excel spreadsheet. Slide this button if you want to turn off the Snapshot feature on the recipe inputs side of the screen. Doing this will free up more screen space for the ration outputs. When set to “ON”, the ration computations in the window on the right side of the screen will be updated each time a value is entered. The program will run faster when the auto-recalculate is set to “off”. To recalculate the computations when the auto-recalculate is off, click on the “Recalc” icon at the top of the screen. 14.0 Composites AMTS has adopted Composites as a term for mixes. Composites in AMTS.Cattle™ are a complex programming issue. On the screen, composites simply combine feeds; however, in the background, AMTS.Cattle™ is treating every ingredient in a composite as an individual ingredient. This is done to ensure predictions remain the same regardless of working with the individual feeds or with composites. Composites can be multiple layers deep (that is, a composite within a composite, or for example: a micro-mix within a pre-mix within a TMR) and the predicted results are consistent throughout. This represents a very big difference from CPM Dairy. CPM Dairy utilizes a simple weighted average for most nutrients and attempts to calculate other mix inputs. This is why CPM calculates different results when individual feeds are used versus those same feeds in a mix. Recipes are named using an inputted composite name (e.g. Protein Mix) and then a feed ID is assigned using Cxxxxx where xxxxxx represents the current date/time. You can create a composite from the Recipe Screen or from the Composite Screen: AMTS.Cattle™.Professional ver. 3.3 Users Manual 96 of 114 14.1 Creating Composites from the Recipe Screen Once a ration is formulated to a desired level, you can create a composite from any of the feeds fed in that ration or if you need you can pull more feeds in from the main library by clicking on the plus. Right-click on the left pane of the Ration form (as if creating a new ration) and select Create Composite from This Recipe. A new dialog box appears listing the feeds in the recipe. By default, feeds with an amount greater than zero are automatically selected. This was done as the default because most of the time, the number of feeds to deselect from a recipe is less than the number of feeds in a composite. Remove the check mark from the feeds you do not want in the composite (using your mouse), enter a Composite Name and then click on the Create Composite button. You will be returned to the ration screen. On the ration screen the new composite name is in the ration feed list and the feeds in the ration that are part of the composite are removed from the feed list. Any composite can be easily recognized on the ration screen as the text of the composite name is in a different color than the other feeds. If you left click on the composite, you will see this drop down menu: Decompose ‘Feed’ means that the composite reverts to its component ingredients in the ration feed file. Edit ‘Feed’ brings up the Composite Screen, allowing you to change the amounts and feed ingredients in the composite. When you add an ingredient using this method, the composite structure is updated and, by default, the new ingredient is added with zero inclusion rate. Enter the feeding rate for this new ingredient and you will notice that the total amount of the composite fed is updated. For example, if ground corn is fed as an ingredient outside a composite and the producer now wants to add the ground corn to the composite: Step 1. Add ground corn to the composite using the above method. Step 2. Enter the amount of ground corn in the composite (DM or AF). AMTS.Cattle™.Professional ver. 3.3 Users Manual 97 of 114 Step 3. Change the ground corn recipe inclusion rate (ie the ground corn outside the composite) to zero. 15.0 Optimize with Parametrics This is an optimization method that allows you to vary nutrient or feed constraints giving an opportunity to evaluate the ration sensitivity to nutrient constraints and ingredient availability. To begin select Optimize with Parametrics from the Optimizer button in the Recipe screen. This dialog box will appear: The number of Ration Shots will be determined by the step size of the variables. If you were to have two variables the shots would be a product of the two; you can get a lot of Ration Shots very quickly, so be aware! AMTS.Cattle™.Professional ver. 3.3 Users Manual 98 of 114 In the Analyze screen AMTS.Cattle™.Professional ver. 3.3 Users Manual 99 of 114 This can be a powerful tool for presenting if/then scenarios on the farm. 16.0 Inventory and Multi-Group Optimization This feature of AMTS.Pro provides a tool with which users can easily track, forecast, and manage inventories for each feed. This is especially helpful in times when inventories are constrained and margins are tight. It allows for optimization across multiple groups and can use inventory as an optimizing constraint. Step 1. To begin Inventory and Multi-Group Optimization, first open the Cattle screen and make sure the number of animals in each group is reflective of the actual numbers in each group. AMTS.Cattle™.Professional ver. 3.3 Users Manual 100 of 114 Step 2. In the Recipe screen, for each Recipe, set the nutrient and feed constraints you wish to use. You may want to include feeds you are not normally offering to that group (for example, low quality hay to high producing cows) and let the optimizer decide how it could be used. Step 3. Open the Inventory and Multi-Group Optimization screen. It can be found at the top line of the program, click on Tools to drop down a menu and click on the proper selection. Step 4. Select the Rations you will be using for the Multi-Group Optimization. For recipes that are fed to multiple groups (for example, High Cow recipe fed to both High Cows and Weaned Heifers) AMTS calculates the equivalent number of animals to get the inventory utilization correct. In this example : • 100 high cowws comsuming 60 lbs DMI • 100 heifers consuming 15 lbs DMI o Equals 25 high cows (100 animals x 15 lbs = 1,500 lbs/ 60 lbs DMI = 25 cows) • The number of “High Cow” equivalents: 125 AMTS.Cattle™.Professional ver. 3.3 Users Manual 101 of 114 Step 5. Click on the Inventory Inputs tab AMTS.Cattle™.Professional ver. 3.3 Users Manual 102 of 114 Step 6. If you are just using this for Inventory Tracking, click on the Inventory Outputs tab AMTS.Cattle™.Professional ver. 3.3 Users Manual 103 of 114 Step 7. Click on the Optimization Tab You can also use multi –group optimization without inventory constraints. This is especially useful to re-optimize the entire herd after a feed analysis, or after a new feed becomes available. This can easily be done by inputting one animal for each group and creating an inventory like 100 tons available for 1 day. With these inputs inventory constraints will not enter into the optimizer. AMTS.Cattle™.Professional ver. 3.3 Users Manual 104 of 114 Results Screen AMTS.Cattle™.Professional ver. 3.3 Users Manual 105 of 114 17.0 Screen Viewing Options In response to the increasing number of users who run AMTS.Cattle.Pro on portable, usually smaller devises like tablets and smart phones, we have incorporated an option that allows users to control how much information is viewable on their screen. This option is accessed through the View tab on the menu bar. You have a number of places where you can simplify the screen for easier viewing. AMTS.Cattle™.Professional ver. 3.3 Users Manual 106 of 114 AMTS.Cattle™.Professional ver. 3.3 Users Manual 107 of 114 The Farm Screen AMTS.Cattle™.Professional ver. 3.3 Users Manual 108 of 114 The Location Screen The Cattle Screen As you can see, the information is winnowed down to just the very essential inputs that have the most bearing on the model predictions. At any time, you are able to go back into the View menu and tick the boxes for the full information screens. That information is still very important! AMTS.Cattle™.Professional ver. 3.3 Users Manual 109 of 114 Feeds/My Feedbanks Screen Options AMTS.Cattle™.Professional ver. 3.3 Users Manual 110 of 114 Recipe Screen Options Having this option allows you to focus on just a few parameters. You can bring the full display back easily by going back into each tab and selecting all for the displayed information. It is very quickly done! If you have any questions about using AMTS.Cattle™.Pro.Cattle, please contact us at: [email protected] or call us at +1.607.423.3327. THANK-YOU from the AMTS LLC team. AMTS.Cattle™.Professional ver. 3.3 Users Manual 111 of 114 Copyright 2013. AMTS LLC AMTS.Cattle™, is a registered trademark held by AMTS LLC 1.0 1 Introduction 1 1.1 AMTS Tips and Tricks 1 1.2 System Requirements 2 1.3 Install AMTS.Pro 2 1.4 Installing the Non-linear Optimizer 2 1.5 Program Registration 2 1.6 Saving Your Work 3 2.0 Program Navigation 5 3.0 Create a Farm 6 4.0 Open Farm 9 5.0 Settings 11 5.1 User and Company Information 11 5.2 Program Settings 12 5.3 Fonts & Colors 13 5.4 Report Settings 14 5.5 Feeds Settings 14 5.6 Feed Passwords 16 5.7 Recipe Screen Settings 17 5.8 Ration Outputs Templates 17 5.9 Optimizer Settings 20 5.10 Misc. Settings 21 5.11 Reports Signature 21 6.0 Farm 24 6.1 Multi-Group Report 25 6.2 Group/Ration Comparison Report 28 6.3 Multi-Group Custom Report 29 7.0 Locations 7.1 Create Location Inputs of interest on the Locations form are: 7.2 Activity Calculator: 8.0 Water Sources AMTS.Cattle™.Professional ver. 3.3 Users Manual 30 31 33 33 35 112 of 114 9.0 Cattle (Groups) 37 9.1 39 Average Daily Gain Calculator 39 10.0 Working with Farm Feeds 40 10.1 Feed Screen 41 10.2 Using the Farm Feed Screen 42 10.3 Editing in the Feed Screen 43 10.4 Special feed attributes: locked feeds and mixes 45 10.4.1 Locked and Password Protected Feeds 45 10.4.2 Mixes 46 10.5 Using the Feed Screen Icons 46 10.5.1 My Feedbanks 46 10.5.2 48 Copy Feed 48 10.5.3 48 Delete Feed 48 10.5.4 Reorder Feeds 49 10.5.5 Feed Comparison Tool 50 10.5.6 Import Feed Analyses 51 10.5.6.1 Import CPM files 51 10.5.7 Feed Notes 54 10.5.8 Remove Unused Feeds 55 10.4.9 Reconcile Feeds 57 11.0 Composites 58 12.0 Recipes 60 12.1 Show Nutrient Contributions 61 12.2 Snapshot Column 63 12.3 Creating a Recipe 64 12.4 Right Clicking Options in the Recipe Window Menu 66 12.5 Ration Output Window 68 12.5.1 Options in the Ration Output Window Menu 69 12.6 Recipe Screen Tabs 71 12.6.1 Ration Shots™ 71 12.6.2 Opt. Feed Constraints AMTS.Cattle™.Professional ver. 3.3 Users Manual 73 113 of 114 12.6.3 Optimization 74 12.6.3.1 Setting up for Optimization 74 12.6.3.2 Linear Optimizer 75 12.6.3.2.1 Optimizer Assistance for Constraint Conflict notices 75 12.6.3.2.2 Optimizer Flowchart 76 12.6.3.2.3 Optimizer Guide 77 12.6.3.2.4 Shadow Prices in the Linear Optimizer 84 12.6.4 Non-linear (Advanced Optimizer) 85 12.6.4.1 Advanced 87 Optimization Strategies 87 12.6.4.2 Mathematical Approach 88 12.6.4.3 88 Safety Factors 88 12.6.4.4 How do I set the safety factors? 89 12.6.5 Batch Report 90 12.6.6 Feeding Sheet 92 12.6.7 Reports 93 12.6.8 Notes 95 13.0 Other Recipe Screen Icons 95 14.0 Composites 96 14.1 Creating Composites from the Recipe Screen 15.0 Optimize with Parametrics 97 98 16.0 Inventory and Multi-Group Optimization 100 17.0 Screen Viewing Options 106 The Farm Screen 108 The Location Screen 109 The Cattle Screen 109 Feeds/My Feedbanks Screen Options 110 Recipe Screen Options 111 AMTS.Cattle™.Professional ver. 3.3 Users Manual 114 of 114