1
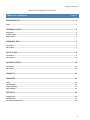
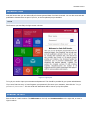
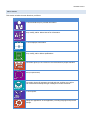
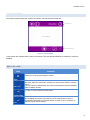
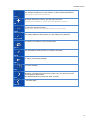
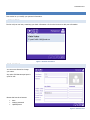
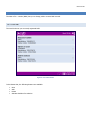
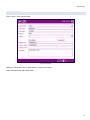
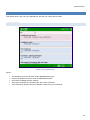
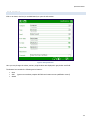
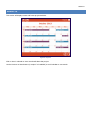
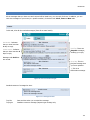
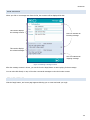
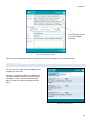
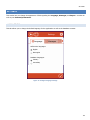
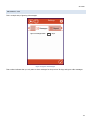
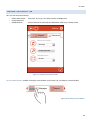
INTRODUCTION Onix Self Service User Manual Employee Self Service Employee Self Service Onix AS Onix AS 10/4/2013 TABLE OF CONTENTS Welcome to Employee Self Service TABLE OF CONTENTS Page # INTRODUCTION ...................................................................................................................................... 3 Login ...................................................................................................................................................................... 3 GENERAL LAYOUT.................................................................................................................................. 3 Main menu ............................................................................................................................................................ 4 Content section...................................................................................................................................................... 5 Basic buttons ......................................................................................................................................................... 5 PERSONAL INFO ...................................................................................................................................... 7 List content ............................................................................................................................................................ 7 Edit content ........................................................................................................................................................... 7 NEXT OF KIN ............................................................................................................................................ 8 List content ............................................................................................................................................................ 8 Edit content ........................................................................................................................................................... 9 QUALIFICATIONS................................................................................................................................. 10 List content .......................................................................................................................................................... 10 Edit content ......................................................................................................................................................... 11 PROJECTS ............................................................................................................................................... 12 MESSAGES .............................................................................................................................................. 13 Inbox.................................................................................................................................................................... 13 View Message ...................................................................................................................................................... 14 Reply to Message ................................................................................................................................................. 14 Sent messages ..................................................................................................................................................... 15 SETTINGS ............................................................................................................................................... 16 Language tab ....................................................................................................................................................... 16 Messages tab ....................................................................................................................................................... 17 Personal preferences tab ..................................................................................................................................... 18 2 GENERAL LAYOUT INTRODUCTION Onix Self Service lets you see and modify all relevant personal data from Onix Personnel. You can also view and edit qualification elements that are part of your CV, as well as planned project activities LOGIN The first time you start ESS, the login screen is shown: Figure 1. Login layout To log in you need to input your username and password. This should be provided by you system administrator. If you are a first time user, or have forgotten your password: First enter your username, then click the "Forgot password / New user?"- link. An email with instructions will be sent to you by the system. GENERAL LAYOUT ESS consists of 2 main sections: The Main menu on the left, and Content section on the right side, as seen in Figure 1 above. GENERAL LAYOUT MAIN MENU This section includes the main functions, as follows: Icon Function To view and edit all your personal information. Personnel View, modify, add or delete Next of kin-information. Next Of Kin To view employee information. Employee View, modify, add or delete qualifications. Qualifications This section gives you an overview of current and future project-activities. Projects (Not yet implemented) Hour This section shows all messages received and sent, and lets you reply to both Information and Request-type messages from Onix Personnel. Messages 3 To view reports. Reports Change the appearance of the application, including language and personal settings. Settings GENERAL LAYOUT CONTENT SECTION The Content section always has 3 parts: the top bar, the body and the bottom bar. The top bar. < the body > The bottom bar. Figure 2. Content section. In the bottom bar example above, there are 4 buttons. The first and third buttons are enabled, 2 others are disabled. BASIC BUTTONS Icon Function Returns you to the previous page or section Back Max mode Max-mode hides the main menu, and fills your entire screen with the Content Section. It is very useful on small devices when the Content Section needs all available space to display its data. To return to normal mode from Max-mode. Normal mode Save After changing any values in any section, use the Save button to store it permanently. Otherwise use the back-button or Menu to go to a previous or different section without saving. 5 GENERAL LAYOUT This activates checkboxes in a list of items, to allow selection/deselection. (Click again to deactivate checkboxes) Select Whenever this button is active, you may add a new item (currently only available in next of kin and qualification sections) Add To delete the selected list item(s). (Please select at least one item before clicking on this button) Delete This button displays a dialog where you may change your password. Change Pwd To upload a new photo to your personal profile Upload This will display a dialog that lets you attach a document. Attach To reply to an incoming message Reply To send a message Send Next Whenever a Content section has more to show you, you can scroll / move forward with the Next-button. (On handheld devices you may also swipe to scroll) … and back again Previous 6 PERSONAL INFO PERSONAL INFO This section let you modify your personal information. LIST CONTENT The list only has one item, containing your basic information. Click on the list-item to edit your information. Figure 3. Personal information EDIT CONTENT You are never allowed to change your name. Any other field that accepts input is open for edit. Bottom-bar has three buttons: Save Change password Upload picture Figure 4. Edit Personnel NEXT OF KIN NEXT OF KIN The Next of kin – section (NOK) lets you to change, add or remove NOK-records. LIST CONTENT The item-list shows your currently registered NOK. Figure 5. List of Next Of Kin In the Bottom-bar, the following buttons are available: Save Add Delete Activate checkbox for selection NEXT OF KIN EDIT CONTENT Click on item in list to edit that NOK. Figure 6. Edit NOK Make your change then click on Save button to archive your change. Click on Add button to add another NOK. 9 QUALIFICATIONS QUALIFICATIONS This section show a list of all your qualifications, and lets you modify, add or delete. LIST CONTENT Figure 7. List of Qualifications Where: The dropdown menu can be used to filter Qualifications by type Click on the attachment icon to view the attached document. Items with red background are expired. Items with red border are deleted in ESS, but are not confirmed. Items with yellow border have been changed in ESS, but are not confirmed. 10 QUALIFICATIONS EDIT CONTENT Click on an item in the list (or use Add-button) to open the edit section. Figure 8. Edit Qualification Here you may change the values, and any original values are displayed in gray below each field. The Bottom-bar contains the following active buttons: Save Add (ignores current data, empties all fields and creates a new qualification record) Attach 11 PROJECTS PROJECTS This section will display current and future project-activities. Figure 9. Projects Click on item in calendar to view more detail about that project. Use the Previous or Next buttons (or swipe if on handheld) to scroll calendar to next month. MESSAGES MESSAGES All the messages that you have sent and received will be listed here, you can reply for those. In addition, you can send new messages to your team (or a specific member). Includes 3 tab: Inbox, Sent and New tabs. INBOX In this tab, it list all the received messages (from HR or team leader). Red border: Indicates that you have less than 2 days to reply. Idar an n Red flag: These are Request-messages, awaiting your reply. Yellow border: Indicates that you have less than 5 days to reply. Messages with bold text are unread. da an n The subject of the letter. This is the message content. da an n Gray flag: This is a Request-message that you have replied to. i : This is an Information message. Figure 10. List of received messages. Detailed contents of message list-item: Sender name. This is the message title. This is the message content.. Figure 11. A message list-item. Top left: Top right: Date and time when you received the message. Deadline to answer message (Request type message only 13 MESSAGES VIEW MESSAGE When you click on a message-item from the list, the contents will be displayed like this: This section displays the message content. This icon indicates an incoming message. This section displays the related messages. This icon indicates an outgoing message. Figure 12. Viewing a message content. After the message content is shown, you can click on the Reply button to start replying for that message. You can also click directly on any of the other connected messages to view their entire content. REPLY TO MESSAGE Click the Reply-button, and a new page appears allowing you to create and send your reply. 14 MESSAGES You must always choose one of the available responses! Figure 13. Replying a message. After choosing an appropriate response, and typing the necessary message-text, click the Send-button. SENT MESSAGES The Sent tab in the main section will display all the messages you have sent. Clicking on a message will display it, together with any linked message. Clicking on a linked message, will display it on top – and its related messages below, just like when viewing messages from the inbox. Figure 14. Sent messages. 15 SETTINGS SETTINGS This section lets you change the appearance of ESS regarding the Language, Messages, and Report – sections as well as your Personal preferences. LANGUAGE TAB This tab allows you to change the default language for the application as well as the database contents. Settings Language Messages Self Service languages: English Norwegian Database languages: Primary Secondary Figure 15. Configure language settings. 16 SETTINGS MESSAGES TAB This is a simple way of ignoring old messages. Settings Report Messages Ignore messages after: 35 days. Figure 16. Ignore old messages. That number indicates that you only want to show messages for the previous 35 days, and ignore older messages. 17 SETTINGS PERSONAL PREFERENCES TAB Here you can setup the following: o o o Default start section: Change password. Standard layout: Every time you log on, the chosen section will display first. Choose between Normal mode and Maximized mode as your startup mode. Settings Report Personnel Default start section: Messages Change passowd Standard layout: Normal Figure 17. Configure your default modes. TIP FOR TOUCH DEVICES: Instead of using the arrow-buttons on the Menu Tab, just swipe it (touch and slide). Messages Report Figure 18. Use swipe on touch devices. 18