1
Settings - Menu Create
Settings - Menu Create
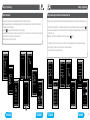
Using the information in the completed installation form, programme the individual location/circuit names in to the RF Touch menu.
Menu (create menu)
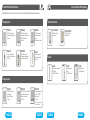
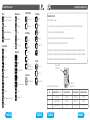
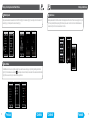
Menu (create menu) is used to add, edit or remove the location and circuit names of the individual devices on to the system. In
this menu (Fig. 1) you need to first create your own device location labels for the sections you want to control.
Creating names is important for successful programming of the RF Touch. Quick Control names should describe the mood / scene to
be created e.g. 'TV' or 'Reading'.
Each actuator must have its own location /circuit identification, e.g. if there is more than one blind actuator in one location (room), then
you must ensure you can easily identify each one, e.g. Kitchen Blind 1 / Kitchen Blind 2 etc.
Menu (create name) - Edit
Menu (create name) - Remove
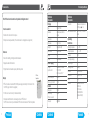
The Edit button is used to modify an existing name in the menu listing.
The Remove button can be used to delete an existing created
name in the menu listing.
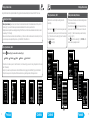
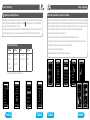
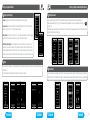
Press the Remove icon
(Fig. 10) the device function menu
appears, select the function in which you want to remove the
name (Fig. 11). Select the device label you want to delete by
touching it. (Fig. 12).
to confirm the selection (Fig. 13). WARNING - This
Press
will also delete any assigned actuator!
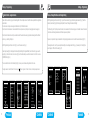
Press the Edit icon
(Fig. 6), the section menu appears, select
the device function in which you want to edit the created name
(Fig. 7). Select the name to be edited (Fig. 8) and then edit with
the displayed keyboard.
Press OK to save (Fig. 9).
Menu (create menu) - Add
Fig. 6
Press the
Fig. 10
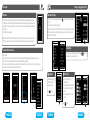
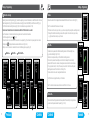
Add icon (Fig. 2) to show a list of sections (Fig. 3):
Switching Dimming Blinds Detectors Quick Control
Fig. 7
Choose the section where you want to add the location / circuit name and type your own text using the keyboard on the screen
(max. 20 characters).
Example 1: If you want to setup blind actuators - Select the 'Blinds' section by tapping on the text 'Blinds' (Fig. 3) and the 'Add next'.
Complete for every actuator on the system within the relevant sections e.g. switching actuators, dimming actuators etc.
Fig. 1
14
Fig. 2
Previous
Fig. 3
Fig. 4
Fig. 8
Fig. 12
Fig. 9
Fig. 5
Contents
Fig. 11
Contents
Fig. 13
Forward
15