1
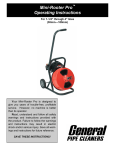
Operating Instructions for
General Gen-Ear LE
™
Water Leak Location System
Your Gen-Ear LE is designed to
give you years of trouble-free
service. However, no tool is
better than its operator. We
therefore suggest you read these
instructions carefully before using
your tool on the job. This will
enable you to operate the
Gen-Ear LE more safely and
effectively.
SAVE THESE INSTRUCTIONS!
Gen-Ear LE™
Although the Gen-Ear LE is the most advanced
leak location system you can buy, it takes
patience and practice to master the art of
finding hidden water leaks.
Read the
instructions carefully to save time in becoming a
leak location professional. Failure to follow
these instructions may cause personal injury to
the operator or damage to the equipment.
2. High Performance Headphones—
Designed to give the clearest sound with the
least interference from ambient noise. Note:
Amplifier will not work unless headphones
are plugged in.
3. Ground Sensor—3-point ground plate
locates leaks through hard surfaces,
concrete, tile, etc. Threaded nipple
accommodates sectional probe rods for
locating leaks under soft surfaces such as
grass or carpet. Magnet threads on to
Sensor to listen to above ground pipes,
faucets, and hydrants. Wind proof, shock
resistant housing protects against handling
noise interfering with locating process.
SAFETY INSTRUCTIONS
Avoid possible damage to your hearing by
always starting out with the volume control
at the lowest setting (counter-clockwise).
Use the Mute button to protect your hearing.
Release the Mute button when you
experience sudden loud noises.
7
Do not press the Mute button while sensor is
in motion. Wait to press the Mute button
until sensor is in place.
2
SAVE THESE INSTRUCTIONS!
!
CAUTION
5
!
1
4
The Gen-Ear LE sensor is a ceramic piezoelectric element. It can be broken if it is
dropped onto concrete or other hard surfaces
from only 18 to 24 inches, or if it is physically
shocked in some other way. If the element is
broken due to harsh treatment, it must be
replaced at the owner’s expense, and it will
not be covered under warranty. The sensor
is covered under the Gen-Ear LE’s warranty
against manufacturing defects and against
failures during ordinary use and handling.
3
6
4. Probe Rods— For water leak searches in
areas covered by loose soil, grass, or
carpeted floors over the water line. Three
one-foot probe rods thread into bottom of the
ground sensor to allow easy sound sampling
while operator is in a comfortable position.
To use, attach the probe rod to the brass
thread on the base of the ground sensor. If
only a short rod is needed, attach only the
pointed section of the probe rod to the
bottom of the ground sensor. For deep
brass valves at curb stops, use all three
sections of the probe rod. Push the point of
the contact rod firmly against the brass
valve.
COMPONENTS
1. Amplifier—Has built-in preset audio filters,
low battery indicator light, and volume
control housed in a heavy-duty case. Safety
mute button protects the operator from
sudden loud noises. Unit automatically
shuts down when the headphones are
removed to extend battery life. Power light
blinks when batteries are low. Operates on
two “AA” batteries.
2
Gen-Ear LE™
5. Magnet Base for Hydrants and Valves –
The magnet base threads onto the ground
sensor to more easily survey leaks
at cast iron fire hydrants, water
mains, iron valves, or steel water
pipes and fittings. The magnet
base can be used with or without
the 3-pronged base. The magnet
should be hand-tightened only
onto the brass screw thread of
the ground sensor.
knob counter-clockwise to deactivate the unit or
to decrease the sound level. Always adjust the
volume control to a low level (10% to 25%)
when first putting on the headphones and
before depressing the mute button. Increase
the volume gradually until the water leak sounds
can be heard easily but without distortion.
Reduce the volume if there is distortion of the
sound. To turn on the built-in flashlight, depress
the control knob.
High and Low Frequency Filters
The Gen-Ear LE has a preset low frequency
filter set at 100 Hz and a high frequency filter
set at 1000 Hz. This enables the unit to filter
out all noises and sounds at 100 Hz frequency
and lower, and at 1000 Hz frequency and
higher. The filters eliminate most extraneous
noises, such as traffic and wind, which would
interfere with hearing a leak clearly.
6. Sound Amplification Manifold (SAM)—
Module helps to amplify hard to hear leaks
by pressurizing the water line with air.
7. Carrying Case—Made of high-density
polyethylene. Designed to withstand heavy
use. Foam cutouts to hold all components
listed above.
AMPLIFIER FEATURES
INTRODUCTION TO LEAK
LOCATION
Battery Power and Battery Check Light
The low battery indicator is integral with the
amplifier’s power light. The light will remain lit
as long as the unit is turned on and the batteries
are in good condition. If the battery power is
low, the light will flash on and off. Replace the
batteries immediately.
Leak sounds are created by three different
situations:
1. The vibration of the pipe caused by water
forced through a crack in the pipe. Pipe
vibration is the loudest and easiest to detect.
It sounds like a “whoosh” or a “hiss.”
Mute Button
The mute button on the amplifier should be
depressed only when the ground sensor and
cables are completely stationary and you are
ready to hear the leak. Sound will not be heard
until the mute button is depressed. The mute
button must be released before moving the
ground sensor in order to protect your hearing.
The mute button is specifically designed for this
purpose.
2. Water forced through the crack and hitting
the surrounding soil, sounds quieter and is
affected by the type of material around the
pipe. If it’s rock or gravel, a “hammering” or
“knocking” sound may be heard. If loose soil
surrounds the pipe, it may be difficult to hear
anything at all.
3. Water flowing through the soil cavity will
create a “gurgling” sound like a small stream
or brook.
Volume Control,
On/Off switch
and Built-In
Flashlight
Turn the volume
control knob
clockwise to
activate the unit
and increase the
sound level. Turn
the volume control
The loudness and frequency of leak noise is
affected by water pressure, pipe material, soil
density and type, depth of the pipe, and type of
surface (i.e. concrete, grass, etc.) The higher
the water pressure, the louder the leak sounds
will be. If you are having difficulty finding a leak,
use the Sound Amplification Manifold (SAM)
that injects air into the water line in order to
increase the water pressure at the site of the
leak. (See below).
3
Gen-Ear LE™
Knowing the type of pipe is helpful. Metal pipes
transmit sounds at a higher frequency. In cast
iron, copper and steel pipes, you are most likely
to hear leak sounds in the range of 400 Hz to
1200 Hz. In PVC pipe, leak sounds resonate in
the range of 200 Hz to 600 Hz.
Main Line Sound Transmission Chart
Pipe
Pipe
Maximum
Material
Diameter
Distance
Cast Iron
6”
500 to 1000 ft.
PVC
6”
200 to 300 ft.
Pipe size, no matter what material, affects
frequency and sound levels as well. Water
leaks from larger pipes transmit less sound and
at lower frequencies than smaller pipes.
Frequency Chart
Pipe
Material
Cast Iron
PVC Pipe
Low
Frequency
400 Hz
200 Hz
High
Frequency
1200 Hz
600 Hz
Loose or sandy soil, swampy or water-saturated
areas, as well as newly buried pipe produce
muffled leak sounds that can be harder to find.
Thus, a pipe that’s been leaking for some time
will absorb the leak vibrations making it much
more difficult to find. Pipe in hard or rocky
ground transmits leak sounds best.
The combination of high-end and low-end
filtering will remove the extraneous noises of
equipment, wind, traffic, etc. The Amplifier has
built-in audio filters preset to 100 Hz low and
1000 Hz high.
The deeper the pipe, the harder it will be to find
the leak because soil absorbs leak sounds
quickly. It’s difficult to find leaks in lines buried
deeper than 8 feet. To find leaks in deeper
lines, the water pressure must be increased to
amplify the sound.
The surface material also will affect the
amplification of leak noises. A hard surface like
concrete will resonate with the sound of a leak
for 5 to 10 feet around the water pipe, while
grass and earth do not assist in the
amplification of leak noise. Select the proper
sensor for the surface on which you are
locating.
The leak vibration travels down the length of the
pipe as well. In 6” cast iron main lines leaks
can be detected as far as 500 to 1000 feet
away, while a 6” PVC pipe may only transmit
the vibration 200 to 300 feet down the line. The
probe must be placed directly on the pipe wall
to detect the leak at these distances.
4
Gen-Ear LE™
such as grass or carpet. Use the magnet
on above ground pipes or hydrants.
OPERATION
1. Plug the headphones
into Amplifier. Note:
The unit will not work
unless headphones
are plugged in.
6. Start the pinpoint process by moving the
sensor directly over the water line in onefoot increments. As you get closer to the
actual leak, the sound will increase in the
headphones.
2. Turn Amplifier volume
on/off switch on. The
light in the switch will
blink when the
batteries are low.
Replace with two “AA”
Alkaline batteries.
!
CAUTION
7. Once the leak has been pinpointed, mark
its location. You should be within one foot
of the leak.
8. If the leak sound isn’t loud enough for
positive location or outside noise is
interfering, use the Sound Amplification
Manifold (SAM).
PINPOINTING A LEAK—WATER
LEAK SURVEY
!
The Gen-Ear LE has a high level of output.
Always start with the volume control at the
lowest setting (counter-clockwise), then
proceed slowly, adjusting upward for the
maximum sound.
The most common indicators of a domestic
water leak are a dramatic increase in a water
bill or hearing water running all the time.
If you don’t see any obvious evidence of a
major water leak, like “ponding” or loud leak
sounds, then start a water leak survey. Use
the Sensor and Probe Rods or magnet to
survey the hydrants and main valves. If you
hear the sound of a leak at one location,
check lines running in all directions from that
point. The leak location is usually found
between the loudest and second loudest
survey locations. Then you can begin to
narrow down your search.
3. Depress and hold the mute button to listen
to sound from sensor.
!
CAUTION
!
Do not press the mute button while sensor is in
motion. Wait to press the mute button until
sensor is in place.
4. Make direct contact with
Sensor and Probe Rods or
magnet to all sink lines, hot
water heater lines, and
hose bibs. This gives you
a general location of the
leak. The leak location is
usually found between the
loudest and second
loudest survey locations.
Then you can begin to
narrow down your search.
5. Use either the Ground Sensor or the Probe
Rods, depending upon the surface on
which you are locating. The Ground
Sensor is used when locating water leaks
through hard surfaces, concrete, asphalt,
tile, etc. Select the Probe Rods when
locating water leaks under soft surfaces
5
Gen-Ear LE™
Start by locating the route of the water line by
using General’s Gen-Eye pipe Locator and
Transmitter.
SOUND AMPLIFICATION MANIFOLD
(SAM)
The Gen-Ear LE Sound Amplification
Manifold adds air to the water line, which
increases the leak pressure and thus
increases the leak sound making it much
1. Attach the Transmitter leads
to each end of the pipe to
be located, then turn the
Transmitter on.
2. Turn on the
Locator and
set the
frequency to
Pipe
Location
Mode (65
KHz).
easier to pinpoint even the most difficult leak.
1. Attach the end of the SAM to a nearby
hose bib.
3. Make sure the blade of the Locator is
perpendicular to the ground and across
the pipe (rather than in-line).
2. Then, attach the air compressor to the
inlet of the SAM.
4. Mark the surface as you locate the path of
the water line.
3. Turn the pump on and open the valve on
the SAM.
After you’ve traced the water line, walk the
marked path with the Gen-Ear LE senor,
taking a reading every 3 or 4 feet. Follow the
flow of the water line, from upstream to
downstream, and note each reading. Do not
adjust the volume control. The volume
must remain constant in order to make
accurate comparisons. When you are very
close to the leak, you will be able to discern
the location of the leak with your hearing
alone.
4. Then open the hose bib valve. You
should hear an instant amplification of the
leak noise.
Once you’ve pinpointed the leak and marked
its location, it’s a good idea to double-check
your mark by turning off the air while listening
to the marked area. If you’ve got the right
location, the leak sound should dissipate.
This assures that you’ve found the leak, not
some other outside noise.
!
WARNING!
!
When using the Sound Amplification
Manifold (SAM), do not let air pressure
exceed water pressure by more than 10-15
psi, or toilet float valves, water tanks and
faucet valves could be damaged. To be
safe, shut off all fixture and water heater
valves.
Dealing With Extraneous Noises
Often there are extraneous noises at a water
leak job site, such as traffic, wind, AC hum,
etc., that can make leak location difficult,
particularly water leak pinpointing on the
street.
6
Gen-Ear LE™
Walk 15 feet away from the water line to an
area of the pavement identical in surface to
that over the water line, but without any water
lines or other utilities anywhere beneath it. If
it is windy, block the wind’s flow around the
sensor and cable with your body. Familiarize
yourself with any extraneous noises that are
present with the ground sensor on the street
at this location away from the water line.
Return to the water line and ignore all the
extraneous noises and concentrate on the
unique sounds that are present only over the
water line.
TIPS FOR BEGINNERS
If you are new to leak location, you must learn
the sound of a leak before you start your
search. Set up the Gen-Ear LE with one
Probe Rod. Touch the tip of the Probe Rod to
the cold water line under a sink. Then turn on
the valve just a little bit so the water is
dribbling out of the faucet. This simulates the
sound of a leak. Turn the valve on and off as
you listen until you hear the difference.
The rest of leak location is a process of
elimination. Assume that you’ve got a leak if
the water meter is registering water flow, yet
all the valves in the house are closed. The
rest of your job is to isolate the leak. Use the
Probe Rod or magnet on all sink lines, hot
water heater lines, and hose bibs to get a
general location of the leak. Suspect older
parts of the system or areas with a history of
leaks, and of course, any recent excavations.
This method is also very effective when the
leak is very small, or very quiet, and you are
not even certain that what you hear is the
leak. In this situation, move 15 feet away
from the water line and listen. If you hear the
same sounds as before, then you were not
hearing the sounds of a water leak.
TROUBLE SHOOTING GUIDE
Fault
Amplifier will not turn on
Remedy
Check that the headphones are plugged in.
Check the battery strength.
Check all connections.
Check that the Ground Sensor plate, Probe
Rods, or magnet is tight.
Press and hold mute button when locating.
The Sensor can be damaged by dropping it
from as little as 12” to 24” onto a hard surface.
Use caution when handling the senor. If it is
damaged due to a fall, it must be replaced.
No sound from sensor
Ground Sensor failure
QUESTIONS?
If you have any problems or questions, call the Drain Brains®
at 800-245-6200 or 412-771-6300.
7
Gen-Ear LE™
GENERAL'S LIMITED WARRANTY
General Gen-Ear LE water leak locator carries a one-year warranty against defect
in materials except as noted below. Should any part break or fail to work properly
in the one year following purchase, it will be repaired or replaced at our discretion
at no charge.
Damage due to negligence, improper usage, failure to follow instructions,
accidents, or alteration from original design is not covered by this warranty.
In order to handle any adjustment with a minimum of delay, please follow this
procedure:
1. Return the part to your wholesaler, and have them notify us immediately, with
complete information on the problem.
2. We must have the serial number, the date of purchase, and the name of the
wholesaler from whom you tool was purchased. To activate your Gen-Ear
LE warranty, your warranty card, which has this information, must be filled
out and sent to us immediately after your machine is purchased.
3. We will then advise your wholesaler if the part should be returned to us and
assign a return goods authorization (RGA) number. Ship freight prepaid,
and you will be compensated for these charges if it is determined that the
part is defective.
If repairs are necessary due to conditions beyond our control, or if the item is out
of warranty, we will do the work at the lowest possible cost, but a charge will be
made.
This warranty is made in place of all other warranties, express, statutory or
implied, including those of merchantability and of fitness for purpose.
General shall not be responsible for any incidental or consequential
damages.
This warranty gives you specific legal rights, and you may also have other rights
which vary from state to state. Some states do not allow the exclusion of limitation
of incidental or consequential damages, so these limitations may not apply to you.
General Wire Spring Co.
1101 Thompson Avenue
McKees Rocks, PA 15136 USA
© 2007 General Wire Spring
GRLE-OI-0307
8