1
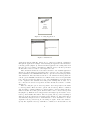
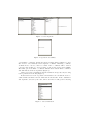
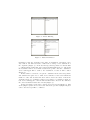
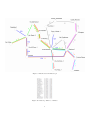
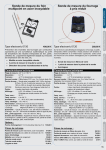
Mobile Services Report
Gytis Tumas
Free University of Bozen - Bolzano
E-mail [email protected]
Raivis Kalnins
Free University of Bozen - Bolzano
E-mail [email protected]
June 7, 2007
Abstract
In this article we will give information about our created mobile application, called easyBus. Applications goal is to help tourists to travel
around the city using busses, giving to a user the possibility tochoose the
departure and destination as bus stop name or using GPS coordinates.
Article will consist of three main parts - detailed information about easyBus application, the guide how to use application, class list with main
methods and sourse code.
1
About easyBus
Mobile application easyBus is developed under Eclipse using Java 2 Micro Edition. This application could be very useful for tourists end guests, who are
new to city life and don’t know how to travel around. Application will give the
time table for particular connection between two bus stops. User will be able to
choose how he wants to set the departure and the destination. There are three
options how to do it: to choose the bus stop from the list, toenter the GPS
coordinates of the departure point or let the intergrated GPS devide to read the
actual location data. After user has indicated the departure and destination,
device will give information whitch bus number the user should take and when
the next bus will arrive. The time of the mobile device is used to compute the
next departure time. If the user is not satisfied with the suggested departure
time, there will be displayed next three departure times.
2
User Manual
In this section we will show how to use our mobile application easyBus, from
deploying till choosing destination. To be sure that user will be able to use
application valuably first he should check if his mobile device support JAVA.
See the developer kit for your device for details. To deploy easyBus application
on mobile device user should copy these two files: easyBus.jar and easyBus.jad
to device (using infrared, Bluetooth, or a USB connection). To install the
1
Figure 1: Loading Application
Figure 2: Main Form
application run the JAR file. There are no others preconditions. Navigation
through the application is simple. After starting the application user should see
following picture (Figure 1), that means that application is reading data from
files, the speed of reading could differ for different devices. At that point user
should wait for few seconds, no other input is needed.
After all data from files are loaded user can start to use easyBus application
(Figure 2). At the main screen user have three options to use: Select departure,
Select destination and ADVISE. The first two options is for selecting departure
and destination. After user has chosen the booth destination and departure he
can use option ADVISE, and then device will show data on screen for particular
bus connection. If the user will try to use option ADVISE before he has chosen
both - departure and destination he will get the warning that at least one of
two connection nodes are not specified, and user should chose them to continue
(Figure 2).
After choosing the option ”Select departure” user can specify how he wants
to enter departure. There are three options: Chose bus stop, Enter coordinates
and Use GPS coordinates (Figure 3). If user wants to enter departure bus stop
name he should chose first option, then he will be able to chose bus stop from
list (Figure 3). With the devices keypad user can navigate up and down to chose
bus stop that satisfies his wishes. After accepting bus stop and everything is
without errors user should see following picture (Figure 4). After that user is
automatically navigated back to main window to chose destination or if the
departure bus stop was wrong he can change it again. If the user wants to
specify his departure bus stop with GPS coordinates, he should take second
2
Figure 3: Select Departure
Figure 4: Operation Successfully
option Enter coordinates, then he should see following window (Figure 3). Now
user needs to enter Latitude and Longitude coordinates. Entering coordinate
decimals need to use dot, and not comma. If the coordinates will be entered
correctly, user should see on screen that operation was executed successfully.
The third option Use GPS coordinates will take users current GPS coordinates
and will indicate them as departure (Figure 3).
Using option Select destination user his destination can specify only choosing
bus stop name from the list (Figure 5).
If user has chosen both - departure and destination, he can ask the device to
advise which bus number and at what time he should take. If the destination
and departure, selected by the user, will be the same, he will get the following
Figure 5: Select Destination
3
Figure 6: Advise Warning
Figure 7: Advise Information
information, that the departure is the same as destination, and will not give
any solution, but will lead back to main form to change or the destination or
the departure (Figure 6). If the user has specified departure as current GPS
coordinates and he wants that device suggested him which bus stop to take and if
the destination will be closer than closest bus stop that connects to destination
device will suggest him to walk to the destination, because it will be faster
(Figure 6).
If there will no be these two exceptions - destination is the some as departure
and destination is quite close to walk, device will show on the screen which bus
number to take and at what time there will be next four busses. If from the
departure bus stop to destination bus stop is possible to get with more than one
bus, device will suggest to take the first bus that arrive, however also will show
the other bus numbers that user can take (Figure 7).
At the next image we show the connection between screens (Figure 8). And
at the (Figure 9) user can see bus routes and bus stops, and at (Figure 10) user
can see the bus stops GPS coordinates.
4
Figure 8: Connection Between Screens
5
Figure 9: Bus Routes and Bus Stops
Figure 10: Bus Stop GPS Coordinates
6
3
Structure of the code
Our project code consists of two packages that include sixteen classes. In this
section we will briefly explain the role of each class and its main methods.
it.unibz.easybus.gui package classes
• EasyBusMIDlet.java
• AdviseScreen.java
• Busstops1Screen.java
• Busstops2Screen.java
• CoordinatesScreen.java
• Departure.java
• ImageScreen.java
• MainScreen.java
it.unibz.easybus.storage package classes
• Advisor.java
• BusDeparture.java
• BusRoute.java
• BusStop.java
• CoordinatesManager.java
• CoordinatesRetriever.java
• FileManager.java
• TransportManager.java
EasyBusMIDlet.java this is the starting midlet class, which set display to
the main screen.
• method startApp() reads data from flat files by calling FileManager
method.
CoordinatesScreen.java, DepartureScreen.java, *Screen.java all these classes
are displayables that we pass to the display.setCurrent method. accordingly to invoked command.
Advisor.java that class is responsible for the reading bus stop coordinates
data from the file and composing the response to the query made by user.
• method public String advise(String busStopname1, String busStopname2, TransportManager tm, CoordinatesManager cm) returns the
advise message (including information whitch bus number user should
take, when is the next bus comming etc.).
• method public void readCoordinatesFromFile(TransportManager tm)
reads data from coordinates.cor file and just adds that data to the
appropriate BusStop instance.
7
BusDeparture.java the instance of that class describe the specific event including one bus route, one bus stop and the time when this bus leaves
from this bus stop.
BusRoute.java this class is used for keeping the information about bus routes(1,
3, 7, 10A, etc) and the bus stops where they stop.
BusStop.java each buss top represents physical location in the city by GPS
coordinates.
CoordinatesManager.java is responsible for actions connected with coordinates.
• method public BusStop getClosestBusStop(Vector busstops, Coordinates ourCoord) out of the given list of bus stops this method returns
the physically closest bus stop to the given coordinates.
CoordinatesRetriever.java this thread retrieves current coordinates from location provider passing them to the CoordinatesManager.
FileManager.java this class is responsible for dealing with bus route files.
• method public void readDataFromFile() reads data from .pfs files
and acordingly to the information inside new objects of BusStop,
BusRoute and BusDeparture are created and saved in the TransportManager instance.
TransportManager.java is responsible for storing all information about busses,
routes and departures, it also provides infrastructure for queering the data
about busses.
• method public Vector getBusDepartures(BusRoute br, BusStop bs)
filters the departures by bus route and bus stop.
• method public String getNextBusTime(Vector departures, String currentTime) using that method we can found out when is the next bus
coming to particular bus stop.
• method public Vector getBusRoutes(BusStop bs1, BusStop bs2) returns one or several bus routes that stops at both given bus stops.
4
Conclusions
After finishing our project we gain more new ideas how to improve our mobile
application, new features, like map support, navigation support that helps to
lead our user to the bus stop, showing the direction, how far is the bus stop and
showing the time, that after how many minutes user will be there considering
on his avarage movement speed. Also showing to user will he be on time for
searched bus and how many minutes he will need to wait in the bus stop next
bus. The main improvement would be changing advising algorithm, user can use
more than one bus route to get to destination, advise would say which busses to
take where to change the bus number, to get at destination faster or using less
bus changes. Sharing time tables with other users using Bluetooth or Infrared
would be great.
8
References
[1] Quasay H. Mahmoud. Learning Wireless Java. O’Reilly and Associates,
pp.245, 2002.
[2] Sing Li and Jonathan Knudsen. Beginning J2ME: from novice to professional. Berkeley, CA. : Apress, pp.456, 2005.
9