1
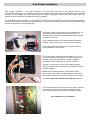
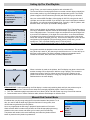
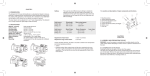
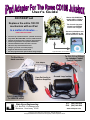
User's Guide
Works with ROWE/Ami
models CD51, CD100 &
CD100A thru CD100H
CD100iPod
Replaces the entire 100 CD
mechanism with an iPod
The Control Computer
should have EPROM
version 3.9 or higher
In a matter of minutes …
Visit www.cdadapter.com
Click on FAQ then to the
CD100 section for details
IPOD IS NOT INCLUDED !
♦
♦
♦
♦
♦
♦
♦
♦
♦
Can have up to 9,900 selections (100 CD / 99 Tracks)
Plays AAC, MP3, MP3 VBR, Lossless, WAV and AIFF
Change the iPod equalizer setting for desired effect
Faster song selections and quicker initialization
100 CD initialization takes less than 1 minute
Will never skip and maintenance free
Charges your iPod, even while playing
Supports manual iPod control mode
See last page about the optional iPod charge adapter
CD Mechanism
Apple iPod Nano 3rd Generation
To P10, P11 or P12 on
the Jukebox Central
Control Computer
To iPod 30-pin
dock connector
iPod Adapter
Line-Out Audio to
Jukebox Amplifier
Ground Loop Isolator
9VDC Power Supply
To SERVICE outlet
Data Sync Engineering
P.O. Box 539, 2 Footbridge Lane
Blairstown, New Jersey 07825
Copyright © 2012 Data Sync Engineering. All Rights Reserved.
Designated trademarks and brands are the property of their respective owners.
TEL: (908) 362-6299
FAX: (908) 362-5889
www.cdadapter.com
iPod Adapter Installation
Easy jukebox installation ! Only three connectors, two RCA audio connectors to your amplifier and the 3-pin
communication connector to your jukebox Central Control Computer. Any jukebox that uses the 408322xx Central Control
Computer can be adapted to an iPod player except for models CD100I and CD100J. These two models require an
external mute control which is not supported by the iPod adapter.
The iPod adapter connects directly to your jukebox CCC and mimics the mechanism control and CD decoder operations.
This tricks the jukebox into thinking it is still hooked up to a CD player and allows the jukebox to select individual songs
from the iPod, same as if it were playing CD's.
Connection to the iPod is through the 30-pin Docking Port. The
iPod cable has locking tabs to secure the connection. To
unplug the cable, press the release buttons at each side of the
connector then pull out.
The AC adapter powers the unit and keeps the iPod battery
charged. The DC connector is a 2.1mm, center pin positive.
The orange & white wires with the 3-pin connector is for the
jukebox Rowelink communication.
The communication connectors are at positions P10, P11 or
P12 on the central control computer. Commonly, two of these
positions are used, and sometimes, all three if additional
accessories such as wallboxes and remotes are added.
Typically, one connector is for the CD mechanism and the
other for the Bill Acceptor. Unplug the CD mechanism and plug
in the iPod adapter.
NOTE: On later model jukeboxes, if the CANCEL button
doesn’t work or the volume level starts high then drops down
after a jukebox selection, you may need to add or move a wire.
Visit website http://www.cdadapter.com/faq.htm for details.
The iPod Adapter kit includes a Ground Loop Isolator. One end
is connected to the line-out from the iPod adapter unit, the
other end to the right and left inputs of the jukebox amplifier.
Your installation is now complete !
Setting Up The iPod Playlists
00
01
02
03
04
05
06
Playlists
Avril Lavigne
Eric Clapton
Mariah Carey
John Michael Montgomery
Reba McEntire
Tim McGraw
Acker Bilk
Using iTunes, you would create a playlist for each selectable CD.
>
>
>
>
>
>
>
Playlists
95 Aerosmith
96 ZZ Top
97 The Moody Blues
98 Rick Springfield
99 The Eagles
T19
>
>
>
>
>
>
On-The-Go
>
00 Avril Lavigne
Losing Grip
Complicated
Sk8er Boi
I’m With You
Mobile
Unwanted
Tomorrow
iPod
The first two letters of each playlist name must contain numeric digits to identify the
disc number position. Any text following these two digits are ignored. The CD100
jukebox supports 100 CD selections (00 to 99) with each having up to 99 tracks.
Here, we used an 8GB iPod Nano. After ripping all 100 CD's, using the bit rate of
192 kbps, we used about 6.3GB. If you decide to have more tracks than a standard
CD capacity, you will need a larger capacity iPod. Typically, a 100 CD jukebox, with
99 tracks each, can require up to 50GB of storage space.
Notice, near the bottom of the playlists, a playlist named "T19". This playlist name is
used as an initialization identifier. When the iPod Adapter is powered-up, it searches
for the T## playlist name. The numeric digits are compared to the stored digits from
a previous iPod initialization. If the digits are not the same, a new iPod Initialization
is performed. Any time the iPod will be re-sync'd, the numeric digits of the playlist
name T## should be changed (00 to 99). This forces the adapter to "learn" the new
configuration of iPod playlists (CD's) and songs (tracks). In this case, you can
rename it to "T20" or for date tracking, name it "T20 July 2012".
For iTunes to transfer this playlist name, it needs to contain at least one song
Song positions within the playlists are the same for track selections. The very first
song at the top is track 01, the next song is track 02 and so on. You can have up to
99 songs in each playlist. The iPod is capable of playing most standard audio
formats such as AAC, MP3, MP3 VBR, Lossless, WAV and AIFF.
When a selection is made on the jukebox, the iPod display may show a check mark
and the message "OK to disconnect" while the song is playing. This means the
jukebox has control of the iPod. When the end of the song is reached, or the
jukebox cancel button is pressed, the song play is stopped and the iPod screen
switches back to the menu display.
ERROR NOTICE: If, when powered up, the iPod display is continuously switching back and forth, the problem may be ...
♦ No playlists were found. Need to have at least one numerically identified playlist. Check iPod contents.
♦ The "Tnn" initialization playlist name was not found. Need T00 to T99 with at least one song. Check iPod contents.
♦ Communication error or failure. Defective cable, defective iPod Adapter or defective iPod.
Manual iPod Control Mode
iPod Mode lets you play songs using the iPod controls instead of the jukebox. To do
this, you need to add the dollar sign ($) as the first letter of a song name, then
choose that song selection from the jukebox.
Here, we programmed the fifth song in playlist 00 as the switch to iPod mode.
When selection 0005 is made on the jukebox, the iPod will start playing that song,
switches to the menu screen and allows you to control your iPod manually.
The jukebox will remain in this mode indefinitely until either the jukebox Cancel
button is pressed or the jukebox is powered off.
00 Avril Lavigne
Losing Grip
Complicated
Sk8er Boi
I’m With You
$Mobile
Unwanted
Tomorrow
Rowe/Ami CD100 Jukebox Initialization
If this is a new installation or tracks have been added or deleted on the iPod, you need to initialize the jukebox so it can
determine what CD numbers are available and how many tracks are in each playlist. This takes less than a minute.
Here are the steps to start the jukebox initialization …
1)
2)
3)
4)
5)
6)
Unlock and open the door
Move the SERVICE switch to the SERVICE position
Make sure "SERVICE MODE" appears on the display
Type 3 to select the INITIALIZE sub menu then type 0. FULL INITIALIZE will appear on the display
Press POPULAR to start the initialization and close the door or move the SERVICE switch to the NORMAL position
During the initialization process (about 1 minute), the iPod screen will show an up and down scroll toggle
Useful Jukebox Service Codes
Free Play On/Off
Clear Errors
CD’s Initialized
View # of CD Tracks
SERVICE | 55 | hold RESET & press 9
SERVICE | 81 | POPULAR
SERVICE | 34 (shows # of CD’s initialized)
SERVICE | 32 (enter CD # to see tracks)
iPod Compatibility Chart
iPod Mini
iPod Photo
2GB
4GB
20GB
30GB
40GB
60GB
1GB
2GB
4GB
Hard Disk
Hard Disk
Hard Disk
Flash
iPod nano
2nd Gen
iPod 5G
with Video
iPod nano
3rd Gen
2GB
4GB
8GB
30GB
60GB
80GB
4GB
8GB
Flash
Hard Disk
Flash
iPod 4G with
Clickwheel
20GB
40GB
iPod nano
1st Gen
Newer iPod Models
will require the
12V to 5V
Charge Adapter
See details below ...
iPod 12v to 5v Charge Converter
Beginning about 2009, Apple introduced a range of new devices which
only charge from a 5V supply.
Some of these devices include the iPhone 3G & 3GS, iPhone 4 & 4S,
iPad, iPad 2, iPod Touch 2nd, 3rd, 4th, or newer generation and the
iPod Nano 4th, 5th, 6th, or newer generation.
These iPod models will generally display the message "Charging is
not supported with this accessory"
To fix this problem, you will need to insert a 12V to 5V charge
converter between the cable and iPod as shown here. These are
widely available on-line, at eBay, or you can purchase directly from us.
DISCLAIMER - PLEASE READ
The CD100iPod Adapter was developed for jukebox owners for non public performance use.
We do not supply jukebox licenses.