1
Table of Contents
Introduction
...........................................................................
About the software .......................................................................
Hardware Requirements ................................................................
Installation of the Program ............................................................
A.
A-2
A-2
A-2
A-2
TIME CLOCK MODULE
Part A: Getting Started.........................................................
A.1 Transferring of Employee File from Payroll Module.. ........
A.2 Setting Password ...................................................... ..
A.3 Opening Time Clock Entry .. .......................................
Part B: Transferring of Data to Timekeeping Module.
B.1 Create a folder for EasyPay Daily Time Record ............... ..
B.2 Setting the Path ....................................................... ..
A-3
A-4
A-4
A-5
B.3 Transferring of Daily Time Record .................................................
A-5
A-5
A-5
Part C: Other Functions
View / Print Entries........................................................... ..
Deleting Records............................................................. ..
Repair & Compact Database ............................................. ..
A-6
A-6
A-7
A- 1
EasyPay Payroll System
Introduction
Doing our periodic payroll manually consumes most of our work time.
Software, it gives us more time to do other activities in a day.
With a Payroll
However, using a payroll software is different from using a word processor. It takes time and
practice to learn how to use the program properly. It is adviced that before starting our
payroll entry, correct understanding of each function and proper sequence of entry as
recommended be followed to minimize redundancy and error in our final result.
Please follow the correct procedure in using the software. Let’s get started!
About the Software
The software is developed using Visual Basic 5 as front-end for user interface and Microsoft
Access 97 as the back-end database. The program is network ready and can run under
Windows 95/98/NT/2000/XP.
Recommended Hardware Specifications
•
•
•
•
•
•
A PC based computer with a Pentium II processor or higher.
64 MB of RAM or higher.
CD-ROM drive for Program Installation
800 x 600 B/W or Color Monitor
Back-up Device (CD-RW / Zip drive)
The system would require a minimum of 50 megabytes of disk space and would increase
as the database increases.
Installation of the Program
1.
2.
3.
4.
5.
6.
Insert (CD) Installation
Disk into the CD drive.
The CD will
automatically initialize
setup. Otherwise run
Setup.exe of the CD.
Place a check mark on
the program to be
installed then click the
“install” button.
You will be guided by
the Setup wizard, just
use
the
defaults
provided.
After the installation, For
Windows 98, a folder
“Lee
Systems”
containing all the icons
of the programs will
automatically appear in the desktop.
For other versions of Windows operating system, click the “Start” button on the taskbar;
go to Programs; Lee Systems, then select the module.
A- 2
Time Clock System
The main purpose of the Time Clock module is to record the Time In / Time Out of each
employee per day. It basically serves as an electronic bundy clock.
The program is usually stored in a separate computer, place near the security guard.
hardware specification is the same as required above but with a less storage capacity.
The
The data/employee No. may be entered manually into the program or the computer may be
connected with other peripherals for automation:
•
Barcode reader /swipe
•
Proximity reader
•
Magnetic Strip reader
•
Biometric device
These may be connected to the program provided that the device have already a text file
output. You can call us to linked your device to the program.
All the employee’s data should be encoded first in the EasyPay Payroll module. The Time
Clock module will not accept any new employee which have no record in the EasyPay
Payroll Employee File. Please check the procedure in updating new employees to the Time
Clock System.
Part A : Getting Started - Time Clock System
For Windows 98:
Double click “Lee Systems” folder then double click the icon ”Clock”
For Windows NT/2000/XP
Click “Start” button at the task bar. Select >Programs > Lee Systems > Clock
The Copyright
appear.
&
Warranty
screen
will
Should you find the conditions acceptable,
click the “I accept..” button
If not, click “Quit” button to exit.
A- 3
Step
A.1
:
Transferring
Payroll to Time Clock module
of
Employee
File
from
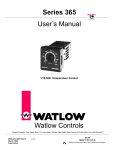
Refer to Payroll manual for extracting the employee from payroll
Click the “Employee File” button.
1. Insert Diskette extracted from Payroll
(PayTransferFile.mdb)
2. Click the “Browse”
button in the
Download Employee Master File
3. Select 3½ Floppy{A:} then Select the
filename “PayTransferFile.mdb”.
[e.g. A:\PayTransferFile.mdb]
4. Click “Download” button
The updated employees should appear in
the Employee File list.
Employee
Master
Step A.2: Setting Password
The objective for setting the password is
to prevent unauthorized tampering of the Time Clock entry screen.
1.
2.
3.
4.
Click “System Parameters” button
Enter the password to be change, the system
password is set at lst / admin. Either one
depending on the version.
The Validate Employee Name should also be
“checked”.
Click “Save” button.
A- 4
File.
Filename:
Step A.3:
1.
2.
3.
Opening Time Clock Entry
Click “Time Clock” button.
For keyboard entry, type in the employee no. in the space provided for the barcode entry.
For other peripherals such as barcode/magnetic strip reader, the employee no. will
automatically appear once the barcode /magnetic strip is read.
Part B : Transferring of Data to Timekeeping module
Step B.1 :
Create a folder for EasyPay - Daily Time Record
•
Go to Windows Explorer and create a folder name “EasyPay-DTR”
The folder to be created intends to store data
to be transferred to the Timekeeping Module.
Step B.2 :
Setting the Path
From the Main Menu, click System
Parameters button.
1.
2.
3.
Click “System Parameters” button
Type C:\EasyPay-DTR\
Click “Save” button
Step B.3 :
Transferring of Daily Time Record
From Main Menu, click Create Transfer File button.
1.
2.
3.
4.
5.
Click “Create Transfer File”
Enter the Date Range to be transferred.
Type in the filename to be saved. It is
recommended that the following coding of
filename be followed.
e.g. EP-2003-02-25
EP – stands for EasyPay Payroll
2003 – payroll year
02 - payroll month
25- cut-off date / payroll counter
Click “Create File” button
The filename entered will be saved under the
folder EasyPay-DTR
Copy the filename to the diskette to be downloaded in the Timekeeping module.
A- 5
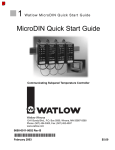
C. Other Functions
View Entries
You may view and print the Transactions recorded in the Time Clock System.
•
•
•
Enter the Period Covered to be
viewed.
To view specific employee, fill
in employee name space. To
view all employee, leave the
space blank.
Click the “Refresh” button
To Print,
•
Go to Printer Set-up. Select
the Printer Name that you are
about to use, the Print Range
and the Number of Copies that
you are going to make.
•
Click Ok.
•
Go to Preview Report.
•
From the lower left of your
screen, you would see the number of pages you are about to print.
•
In line with that, click the Printer icon.
Deleting Records
If your free/available disk space in your hard disk is low, you may need to delete some of your
data.
It is advised that you should keep at least 2 year’s data in your system and delete data that is
more than 2 years.
However, if your system has a 10 or 20-gig hard disk and the computer is solely used for
purposes, you may not need to delete data.
Deleting data may improve the speed of the program.
After Deleting Data you should compact the file. Refer to section on Compact Repair Compact.
You may also check the file size your data. Open Windows Explorer and look for the filename
“ClockFile.mdb”. If the file size is about 100mb and the computer is starting to slow down,
you may want to delete previous data.
1.
2.
3.
Click “Delete Records by Date” button
Enter Cut-Off Date to be deleted.
Click “Delete” button
This procedure deletes the Time In/Out entries from
start to the Cut-Off Date.
A- 6
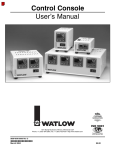
Repair/Compact Database
From the Main Menu, click Repair/Compact button. The following screen will appear:
Repair Database
Database may be damaged due to hard disk failures, abnormal power
interruptions/failure, and poor network connections and network collisions. This is why backup
is very important. “Repair Database” repairs the database to restore database integrity. Before
repairing the database, backup the file without overwriting your existing backup, by backing it
up in another name or folder.
Compact Database
When records are deleted, the system does not physically delete the records from the
file. This means that the disk space used by the data file continually increases, and a large file
slows down the system. “Compact Database” actually removes the deleted records from the
file thus reducing the actual file size. This process should be done regularly (Quarterly or
Yearly) if a lot of transactions are usually deleted. Make sure to backup before proceeding with
this process.
Click the Repair button to start the repair process.
Click the Compact button to start the compact process.
Checking the Refresh Auxiliary Files in Compact Procedure optimize (reduces) the size of the
temporary files and auxiliary files that the system also uses. These are files other than the
Data File.
Click Close to return to main menu.
A- 7
Backup
From the Main Menu, click Back Up button and the following screen will appear:
1. Specify the Backup Directory and File. Click the Browse button to search for available
folders or to create a folder.
2. Click the Start Backup.
Important: Make sure that no one else is using the program (networked programs) and that
all other parts of the system are closed before proceeding.
It is of utmost importance that you should have a backup for your system and data. Data may
be damaged due to voltage fluctuations, hardware/computer malfunction, closing the program
or computer without shutting it down properly and computer viruses. Backup should be done
regularly depending on the volume of your data. For a system wherein data are entered daily,
backup should be done daily. However, if data is entered only one or twice a month, backup
may be done monthly or semi-monthly. Start backing up once you have entered actual
or valuable data into your system.
There should at least be two sets of backup, one on site and the other off site. This is
to ensure that should anything happen to the site, there is an off-site backup to retrieve data
from.
A simple backup system is provided, it copies the Data Files from the working
directory to another folder/drive/zip drive. There are efficient backup programs commercially
available in the market. There are programs that compress the data before storing it to your
backup device such as Winzip Program, you may also use these programs to backup. You may
use Zip Drives or Tape Drives or CD-rewrite as your external backup. DO NOT USE
DISKETTES. They are easily damaged and are an unreliable media for backup.
The files to backup are the following:
Look for these files in the folder/subdirectory where the program/data is installed.
Description
1.Application or
Executable files
2.Report files
3.Data files
(files whose extension name is rpt, exe and mdb)
*.exe (Available in Installation Disk)
*.rpt (Available in Installation Disk)
*.mdb
A- 8
Restore
From the Main Menu, Click Restore button. The following screen will appear:
1. Specify the Backup Directory and File that will be restored as the current file. Click the
Browse button to search for available backup files.
2. Click the Start Restore.
Important: Make sure that no one else is using the program (networked programs) and that
all other parts of the system are closed before proceeding.
Restoring Data Files would overwrite your current data with a backed up data. This would be
necessary on the following cases:
1. When the current file is damaged beyond repair. If Repair Utility is unable to successfully
repair the file. (Refer to the section on the Repair Utility)
2. When the data file is virus infected and cannot be cured.
3. When the integrity of the current data is questionable and the Backed Up data is more
reliable.
A- 9