1
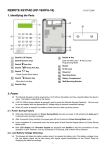
Thetha
Thetha
prepaid airtime
& electricity
Congratulations on choosing Thetha Thetha as your prepaid airtime and electricity vending business
partner. We wish you many years of success.
Here are a few helpful tips that will ensure the successful running of your business:
Please look after your Timpa Prepaid Machine and keep it away from heat and water. Only use the
power supply unit supplied with your Timpa and do not charge while in a box or bag.
Do not wait until your credit is finished before you deposit. If you see that your credit balance is going
below R 100.00, you should deposit immediately. You are only able to sell if you have a credit
balance.
Please ensure that you always use the correct account number and reference number when making
deposits. This account number can be found on the sticker underneath your Timpa and by selecting
“PRINT BANK INFO” in the ADMIN menu.
Mistakes can only be rectified at the bank. Incorrect reference numbers can cause delays in your
credit being allocated to your account and leaving you unable to sell airtime and electricity. If credit is
not allocated call 0860 103 456 or 082 241 4977.
Should you be running low on thermal paper, please call 0860 103 456, email:
[email protected] or fax us on (021) 434-8651. Postage of paper will be for your cost. Please
ensure that the correct size thermal paper is purchased (57mm wide x 40 mm and 50mm thick (in
diameter).Thermal paper rolls are also available at stationery stores like Waltons.
Please follow the instructions below when inserting thermal paper. If the paper is inserted incorrectly,
the voucher will print but nothing will appear on the paper and money will be taken off your machine.
You should reprint the voucher immediately after replacing the paper. Please replace paper once
pink marking starts to appear.
1. Lift compartment cover flap and open lid
2. Place paper roll in the printer and make sure that it rolls from underneath the roll
3. Close the lid and make sure that it clips firmly into place
4. Leave a small section of paper sticking out. Switch machine on & press
to feed paper.
Thetha Thetha cannot be held liable for any loss resulting from the paper being inserted incorrectly.
THE PAPER COVER MUST CLOSE EASILY. IF THERE IS TOO MUCH PAPER ON THE
ROLL PLEASE PULL EXCESS PAPER OFF UNTIL IT FITS. DO NOT FORCE CLOSED.
Below is your reference number as well as the bank account number for the airtime and electricity
credit deposits:
Reference Number: 3S__________________________
Bank Account Number:
Account Name:
Branch Code:
406 700 6647 (ABSA BANK)
THETHA THETHA
632756
If you have any questions, please do not hesitate to call our help line on: 0860 103 456 / 082 241 4977.
All the best
Thetha Thetha
INSTRUCTIONS – DO NOT operate before reading these instructions
Getting Started
Your Thetha Thetha Timpa Prepaid machine already has an active pre paid sim card installed. This
sim card has been through RICA registration and is loaded with sufficient credit to start you selling.
You will need to regularly check that you have sufficient balance on your sim card. (See USSD View
under Device menu.)
Before you can start selling you need to charge your prepaid machine. The unit’s first charge needs to
be for at least 4 hours. When you see
on the screen the machine is fully charged.
Selling
Press and hold
and wait until the machine switches on and beeps. You will see
followed by
and then “Connecting to MC,”
followed by “Connected to MC.” When you see the Thetha Thetha screen, you are ready to sell.
The Thetha Thetha Timpa Prepaid machine has 2 menus:
A
Trading Menu (Push button under
B
Device, Business and Security Menu (Select
requested (default is 1234)
Use
A
to start selling)
or
to access). Enter code if
if you make a typing error and correct. Press
Trading Menu
How to sell an airtime voucher:
. If key pad lock is active you will be prompted to enter your
1. Press button under
keypad key. Default is 1234. Press
2. Select 1 for Airtime. Press
and then press the button under
again.
3. In the Airtime menu select e.g. 1 for Vodacom, 2 for MTN, or scroll down using
to select
the Network you would like to sell. Press
4. Press the number corresponding to the voucher you wish to sell. E.g. 1 for R2, 2 for R5, or
scroll down using
5. Press
to select the voucher you would like to sell. Press
to confirm voucher sale.
6. Voucher will now print.
7. Instructions on how to load the airtime will be printed on the voucher. Press
until you see Thetha Thetha screen
8. If you do not want to confirm the voucher sale, press
and you will return to the Thetha
Thetha screen.
9. To reprint a voucher, press button under
. If key pad lock is active you will be
prompted to enter your keypad key. Default is 1234. Press
and then press the button
under
again.
10. Use
and select 3 Admin and press
11. Select 4 or use
to select Reprint Voucher and press
12. Enter your keypad key. Default is 1234. Press
13. Confirm the voucher reprint by pressing
and voucher will reprint with REPRINT as the
voucher header. Press
until you see Thetha Thetha screen.
12. If you do not want to confirm the voucher reprint, press
and you will return to the
Thetha Thetha screen.
IMPORTANT: Only the last airtime voucher sold can be reprinted.
ALWAYS PRESS
TO RETURN TO MAIN MENU
HOT KEYS
With the Thetha Thetha Timpa you can program keys 1-0 to sell popular airtime vouchers without
having to process a sale step by step in the Airtime menu:
To sell an Airtime voucher using a HOT KEY:
1. Go to Thetha Thetha screen. The following HOT KEYS have been pre programmed:
2. Press 1 for Vodacom R 2.00
Press 2 for Vodacom R 5.00
Press 3 for Vodacom R 12.00
Press 4 for Vodacom R 29.00
Press 5 for MTN R 5.00
Press 6 for MTN R 10.00
Press 7 for MTN R 15.00
Press 8 for MTN R 30.00
Press 9 for Cell C R 5.00
Press 0 for Cell C R 10.00
3. You will land on the Airtime screen with the voucher you want to sell highlighted
4. Process the sale as from point 5 in the How to sell an airtime voucher section.
How to sell an electricity voucher:
1. Press button under
1234.Press
. If you are prompted to enter your keypad key, default is
2.
3
4
Press 2 or
to select Electricity. Press
Press e.g.1. for EasyPay and Press
Press 1 if a customer wants to buy electricity and
5.
Depending on format of meter number push button under
for numerals,
for lower case letters, or
for upper case letters and enter the meter
number. Use
if you make a typing error and correct. Press
6. Enter Rand amount and Press
7. Confirm transaction by pressing
and voucher will print. Press
and you will return to the Thetha
8. If you do not want to confirm the voucher sale, press
Thetha screen.
9. To reprint a voucher, follow steps 1-2 and then select 2 or
to select reprint a voucher and
press
10. Enter the electricity meter number. Press
12. Confirm transaction by pressing
and voucher will reprint with REPRINT as the voucher
header.
13. If you do not want to confirm the voucher reprint, press
Thetha Thetha screen.
and you will return to the
IMPORTANT: Only the last transaction linked to a specific meter number can be reprinted.
Should you need the pin number but do not want to reprint an airtime or electricity voucher, the pin
number from the voucher sold can be viewed by scrolling down with the bottom arrow
feature is not available once you have pressed
.
. This
IT IS THE RESPONSIBILTY OF THE CUSTOMER TO ENSURE THAT THE CORRECT METER
NUMBER IS PROVIDED AS THERE ARE NO REFUNDS FOR ELECTRICITY SALES. DO NOT
REFUND CUSTOMERS FOR ELECTRICITY THAT YOU HAVE SOLD THEM.
How to check your balance:
Press button under
and select 3 or
to select Admin
Press 2 or
to select Balance Enquiry. Press
Enter code. Default password is 1234.Press
The balance will now print and display on the screen.
Press
until the Thetha Thetha screen appears
REPORTS
How to print a sales report:
Press button under
Press 3 or
and select 3 or
to select Reports. Press
to select Admin. Press
.
.
Press 1 for today’s report, 2 or
to select yesterday’s report or 3 or
to select a month to
date report. Month to date will give you all sales from the first of the current month to the current
date. Enter code. Default password is 1234. Press
Press
and the report will print.
until the Thetha Thetha screen appears
Press
Print Bank Info.
Bank deposit details are printed for easy reference.
Press button under
and select 3 or
to select. Admin Press
.
Press 5 or
to select Print Bank Info.
Press
Bank deposit details now print
Press
and the Thetha Thetha screen will appear
ACCESS CODES:
Balance Code:
The balance code is a password that will be required when checking the balance available on your
prepaid machine. You can decide if you want to give the operator this function by giving him access
to the password.
Report Code:
The report code is a password that will be required when you wish to print a sales report. You can
decide if you want to give the operator this function by giving him access to the password.
How to change access codes:
Press button under
and select 3 or
to select Admin
Press 1 to select Change Codes. Press
.
Enter code. Default password is 1234. Press
.
Push 1 to change the Balance Code and push 2 to change the Report Code, or use
to select
Enter new code and press
.
Confirm new code by pressing
Wait
until code is changed
or
--------------------------------------------------------------------------------------------------------------------------------------
B
Device, Business and Security Menu
Device Menu
Push
Push
or
. Default password is 1234. Press
or
again and press 1 for Device Menu. Press
Keypad Lock
Push 1 to select Keypad Lock and press
.
To lock the key pad push 1. You will now need to put in the key pad key whenever you need to do a
transaction. Default password is 1234. You will see a
on the top of the screen.
To enter key pad lock mode push 2 or
off .
Press
Press press
. Press button under
to select auto lock on or
. When key pad lock is off the key will be removed from the screen.
and you will return to the Thetha Thetha screen.
To change keypad key from 1234 push 3 or
Enter your new keypad key and press
twice. Press
and you will return to the Thetha Thetha screen.
Press
SMS Messages (when you see an envelope on the screen, you have a sms message)
To read a sms message, push 2 or
Select 1 to read all messages. Press
Press
to select SMS Messages. Press
.
.
and you will return to the Thetha Thetha screen.
USSD View (Sim Card maintenance)
twice. Press
For USSD View push 3 or
Enter your new keypad key. Press
Press the button under
and you will see the balance remaining on your sim card
To recharge your SIM card
Press the button under *123# and enter the recharge pin on your airtime voucher.
Use
if you make a typing error and correct.
Press
and you will return to the Thetha Thetha screen.
Backlight
For Backlight push 4 or
. Press
to indicate whether you would like the backlight to be always off, always on or on
Press
when in use and press
Version Info
This is for IT support only
Print Test Page
To print a test page push 6 or
A test page will print. Press
to select and and press
to feed the paper
.
Security Menu
Push
or
Default password is 1234. Press
Push
or
again and press 3 for Security Menu and press
Press 1 for Security Level 4 and press
.
Security Level 4 is the Owners Security Level. All other security levels are for IT support use.
Enter your security key. Default is 1234.Press
To change the default key, push the button under
Now enter your new key and press
Press
to exit the menu
and enter your old key. Press
Business Menu
Push
or
Default password is 1234. Press
Push
or
again and press 2 for Business Menu. Press
Transaction Record is only for IT back end reporting
The following menu items are available to users with Level 4 Security Code (only available once Level
4 Security Code has been registered in the Security Menu):
Multi Users
Up to 4 users can be set up so that a record of their sales is available.
YOU NEED TO HAVE THE SECURITY LEVEL 4 CODE INPUTED TO ACCESS MULTI USER
MODE
For Multi-user mode push 3 or
and press
Push
or
to select Disabled or Enabled and then push the button under
or disable multi user mode and press
.
to enable
For Multi-user Admin push 3 or
and press
Add a user
Select 1 and press
Select an
field
Enter user name. Push button under
Use
and press
or
to choose upper or lower case.
if you make a typing error and correct. Press
Enter user pin number (The user will need to put in this pin number before a transaction can be done).
Press
Confirm pin number and Press
Delete a user
Select 2 or
to Delete a user and press
Select the user to delete
and press
Confirm user delete by pressing
Edit user name
Select 3 or
to edit a user name a user and press
Select user name to edit
and press
Use
to delete and push button under
edit user name
Confirm user name edit by pressing
or
Change user pin
Select 4 or
to change user pin and press
Select user name to change pin
and press
Enter new user pin (Use
to correct a typing error) and press
Confirm new pin number and press
to choose upper or lower case and