1
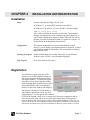
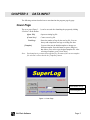
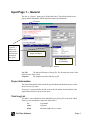
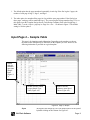
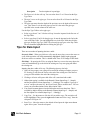
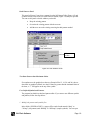
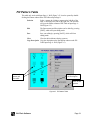
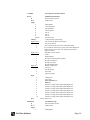
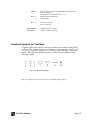
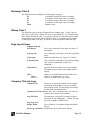
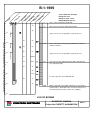
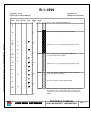
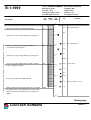
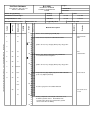
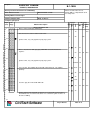
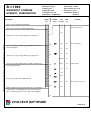
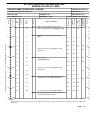
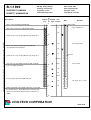
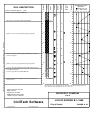
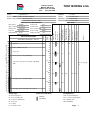
CHAPTER 2
INSTALLATION AND REGISTRATION
Installation
Setup
Insert the setup disk into floppy drive A: or B.
In Windows 3.1, go to the [FILE] menu and select [RUN].
In Windows 95, 98, 2000, or NT press <START> and select [RUN].
Type: A: setup or B: setup
Press <OK> and follow the directions on the screen. The installation
program will automatically create a shortcut icon called “SuperLog” on
your Windows desktop and a SuperLog folder. When you first start the
program you will be in unregistered mode. To register the software, see
the instructions in the Registration Section below.
Configuration
The software configuration uses your existing Windows settings.
However, you can change your configuration later in Windows. (Consult
your Windows manual for instructions.) The recommended resolution is
higher than 800 x 600.
Starting the Program
Double click the shortcut icon called “SuperLog” on your Windows
desktop or from <START> select [Programs/Superlog].
Quit Program
Press [Exit] from the [File] menu.
Registration
You will need to register your copy of this
software to use its full capabilities. When you
first start the program, the Registration Panel
will appear (Figure 2-1.) If you do not register
at this time you can always open this window
which is located under the [HELP] menu as the
option [REGISTER]. After your registration
has been accepted, this window will disappear.
The program will find the CPU ID number of
Figure 2-1 Registration Panel
your computer and indicate it at the top of the
registration panel. You may provide this number to
CivilTech by telephone, email, or fax. In return, you will be given a registration code to
enter into the panel, along with your user name and company name. Click Register to
close the program. Re-open it and you will have full program capabilities. You will need
to have one license for each computer running the program. Additional licenses may be
obtained at discounted rates. If further information is desired, please contact CivilTech.
CivilTech Software
Page 2