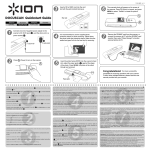
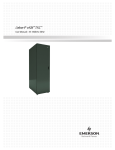
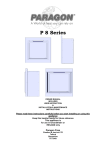
1
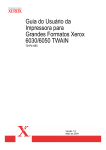
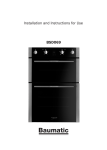
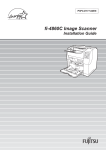
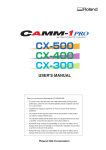
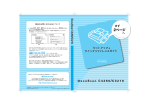
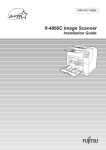
Xerox 6030/6050 Wide Format TWAIN User Guide 701P41580 Version 1.5 May 2004 Xerox Corporation Global Knowledge & Language Services 800 Phillips Road Bldg. 845-17S Webster, NY 14580 Copyright © 2004 Xerox Corporation. All rights reserved. Printed in the United States of America. Copyright protection claimed includes all forms and matters of copyrighted material and information now allowed by statutory or judicial law or hereinafter granted, including without limitation, material generated from the software programs that are displayed on the screen such as styles, templates, icons, screen displays, looks, etc. Adobe® and the Adobe logo, InDesign®, Illustrator®, PageMaker®, Photoshop®, Acrobat®, Distiller®, and the Acrobat logo are either registered trademarks or trademarks of Adobe Systems Incorporated in the United States and/or other countries. The Creo wordmark, Creo logo, and the names of Creo products and services referred to this document are trademarks of Creo, Inc. Macintosh, Power Macintosh, and Mac are registered trademarks of Apple Computer, Inc. Microsoft® Windows NT® and Microsoft® Windows are trademarks of Microsoft Corporation. PANTONE® is a registered trademark of Pantone, Inc. Sun Microsystems and Solaris are a trademarks, registered trademarks, or service marks of Sun Microsystems, Inc. in the U.S. and other countries. SWOP® is a registered trademark of SWOP, Inc. Quark and QuarkXPress are trademarks of Quark, Inc. and all applicable affiliated companies, Reg. U.S. Pat. & Tm. Off. and in many other countries. Macromedia FreeHand® is a trademark of Macromedia, Inc. This product includes software developed by the Apache Software Foundation (http://www.apache.org). This product includes software developed by the JDOM Project (http://www.jdom.org). This product includes software developed by the Jaxen Project (http://www.jaxen.org). XEROX®, The Document Company®, the digital X®, Xerox 6030/6050 Wide Format TWAIN are the trademarks of or licensed to XEROX CORPORATION. Preface Welcome to 6030/6050 Wide Format TWAIN. 6030/6050 Wide Format TWAIN is TWAIN data source for 6030/6050 Wide Format Copier/Printer. This User Guide describes 6030/6050 Wide Format TWAIN operation and usage cautions. Read this guide prior to using 6030/6050 Wide Format TWAIN for most effective use and maximum performance. Manual Organization This guide has been prepared on the assumption that the user has understood the general idea and operation of Scanner, Printer, and Microsoft Windows. For operation guide for Scanner and Printer, refer to the following manuals. Types of Manuals Contents X e r o x 6 0 3 0 / 6 0 5 0 W i d e Describes the operation methods and precautions regarding usage related to Format Printer with Scan the Xerox 6030/6050 Wide Format Printer with Scan System. System User Guide X e r o x 6 0 3 0 / 6 0 5 0 W i d e Describes the various setup procedures and precautions regarding usage Format Copier/Printer User related to the copier. Guide X e r o x 6 0 3 0 / 6 0 5 0 W i d e Describes the various setup procedures and precautions regarding usage Format Printer User Guide related to the printer. D o c u S c a n 1 2 0 0 w U s e r Describes the operation methods and precautions regarding usage related to Guide the DocuScan 1200w. Manual Organization Using This Guide This guide describes how to scan a monochrome image by using DocuScan 1200w and 6030/6050 Wide Format Copier/Printer, and how to edit, save, and print the scanned data. About This Guide This book has been prepared on the assumption that the user has used 6030/6050 Wide Format Copier/Printer prior to reading this manual. The detail specifications and functions of Scanner and Printer, refer to respective manuals. 6030/6050 Wide Format TWAIN is compatible with Microsoft Windows 2000, Microsoft Windows XP and Microsoft Windows 98 operating systems. For basic operation of each Windows operating system, refer to Microsoft Windows manual. Table of Contents This guide consists of the following chapters: Chapter 1 Overview of 6030/6050 Wide Format TWAIN Chapter 2. Preparation Chapter 3. Functions Chapter 4. Error messages Using This Guide Conventions This guide uses the following symbols depending on the contents: [XXXX] Indicates the topics, button names, and menu on operation window. 1234 Bold letters indicates the messages displayed on Wide Format TWAIN operation window. <XXXX> Indicates the messages. Indicates important information and must be read in detail. Gives what to follow for the correct use of Wide Format TWAIN. =>p.10 <xxxx> Using This Guide Indicates page number and topic. Table of Contents Preface Manual Organization Using This Guide Table of Contents Chapter 1 Overview of 6030/6050 Wide Format TWAIN 1.1 About TWAIN Source .............................................................................................................. 2 1.2 Terms ............................................................................................................................................. 3 1.3 Precautions ................................................................................................................................... 4 Chapter 2 Preparation 2.1 System Configuration ................................................................................................................ 8 2.2 Installation .................................................................................................................................... 9 2.3 Uninstallation ............................................................................................................................ 17 Chapter 3 Functions 3.1 Available scanning function ................................................................................................... 20 Chapter 4 Error and Warning messages 4.1 Error and Warning messages .................................................................................................. 30 Index ....................................................................................................................................... 34 Table Of Contents Table Of Contents Chapter 1 Overview of 6030/6050 Wide Format TWAIN This chapter overviews and describes the functions of 6030/6050 Wide Format TWAIN. Chapter 1 1.1 About TWAIN Source 6030/6050 Wide Format TWAIN (hereafter referred to as Wide Format TWAIN) provides image document scanning function by using 6030/6050 Wide Format Copier/ Printer and DocuScan 1200w with a host computer. The supported operating systems are Microsoft Windows 2000, Microsoft Windows XP and Microsoft Windows 98. Basic functions required for wide size image scanning are available by Windows user interface operation. Feature of Wide Format TWAIN • Easy operation using TWAIN protocol, which is used as standard protocol for image scanner • Including automatic document size judgement, and automatic background suppression 2 Chapter 1 Overview of 6030/6050 Wide Format TWAIN 1.2 Terms This section explains the terms used in this guide Explanation of terms Scan protocol: Indicates the communication between image scanning application software and image scanner. TWAIN Source software: Indicates standard image scanning protocol for image scanning application and image scanner, developed by TWAIN Working Group. Wide Format TWAIN uses this protocol for the communication with image scanning application such as DocuWorks. For detail explanation of DocuWorks, refer to DocuWorks user guide. 1.2 Terms 3 1.3 Precautions This chapter explains the precautions for using Wide Format TWAIN. Precautions and Restrictions for Scanner To use Wide Format TWAIN, Scanner firmware version must be 1.0.0 or later version. The firmware version can be confirmed by Wide Format TWAIN version information. If the version is before 1.0.0, call for your Service Representative. Precautions and Restrictions for Document Scanning Available scanning size for Wide Format TWAIN is as follows. Read error or unexpected results may occur if oversized document is scanned. [1] Scan size At 600 dpi: Size series ISO A SpecialA-1 (880mm) 4 Size Paper size (Width x Length) [mm] dot [dot] A0 Portrait 841.0 x 1189.0 19866 x 28087 A1 Portrait 594.0 x 841.0 14031 x 19866 A2 Portrait 420.0 x 594.0 9921 x 14031 A3 Portrait 297.0 x 420.0 7016 x 9921 A4 Portrait 210.0 x 297.0 4961 x 7016 A1 Landscape 841.0 x 594.0 19866 x 14031 A2 Landscape 594.0 x 420.0 14031 x 9921 A3 Landscape 420.0 x 297.0 9921 x 7016 A4 Landscape 297.0x 210.0 7016 x 4961 Special A0 Portrait 841.0 x 1189.0 19866 x 28087 Special A1 Portrait 594.0 x 841.0 14031 x 19866 Special A2 Portrait 420.0 x 594.0 9921 x 14031 Special A3 Portrait 297.0 x 420.0 7016 x 9921 Special A4 Portrait 210.0 x 297.0 4961 x 7016 Special A1 Landscape 841.0 x 594.0 19866 x 14031 Special A2 Landscape 594.0 x 420.0 14031 x 9921 Special A3 Landscape 420.0 x 297.0 9921 x 7016 A4 Landscape 297.0x 210.0 7016 x 4961 Chapter 1 Overview of 6030/6050 Wide Format TWAIN Size series Special A-2 (870mm) ANSI ARCH ARCH Size Paper size (Width x Length) [mm] dot [dot] B1 Portrait 728.0 x 1030.0 17197 x 24331 B2 Portrait 515.0 x 728.0 12165 x 17197 B3 Portrait 364.0 x 515.0 8598 x 12165 B4 Portrait 257.0 x 364.0 6071 x 8598 B5 Portrait 182.0 x 257.0 4299 x 6071 B2 Landscape 728.0 x 515.0 17197 x 12165 B3 Landscape 515.0 x 364.0 12165 x 8598 B4 Landscape 364.0 x 257.0 8598 x 6071 B5 Landscape 257.0 x 182.0 6071 x 4299 ANSI/E Portrait 863.6 x 1117.6 20400 x 26400 ANSI/D Portrait 558.8 x 863.6 13200 x 20400 ANSI/C Portrait 431.8 x 558.8 10200 x 13200 ANSI/B Portrait 279.4 x 431.8 6600 x 10200 ANSI/A Portrait 215.9 x 279.4 5100 x 6600 ANSI/E Landscape 863.6 x 558.8 20400 x 13200 ANSI/D Landscape 558.8 x 431.8 13200 x 10200 ANSI/C Landscape 431.8 x 279.4 10200 x 6600 ANSI/B Landscape 279.4 x 215.9 6600 x 5100 ARCH/E Portrait 914.4 x 1219.2 21600 x 28800 ARCH/D Portrait 609.6 x 914.4 14400 x 21600 ARCH/C Portrait 457.2 x 609.6 10800 x 14400 ARCH/B Portrait 304.8 x 457.2 7200 x 10800 ARCH/A Portrait 228.6 x 304.8 5400 x 7200 ARCH/E Landscape 914.4 x 609.6 21600 x 14400 ARCH/D Landscape 609.6 x 457.2 14400 x 10800 ARCH/C Landscape 457.2 x 304.8 10800 x 7200 ARCH/B Landscape 304.8 x 228.6 7200 x 5400 1.3 Precautions 5 Automatic document size judgement Judged value ISO A Special A (880mm) Special A (870mm) 841mm (A0 Portrait/A1 Landscape) 880mm (Sp.A0 Port./ Sp.A1 Land.) 880/870mm (Sp. A0 Port. / Sp.A1 Land.) 863.6mm (34"x44"/ 34"x22") 914.4mm (36"x48"/ 36"x24") 718 - 502mm 594mm (A1 Portrait/ A2 Landscape) 625mm (Sp.A1 Port./ Sp. A2 Land.) 620mm (Sp. A1 Port. / Sp.A2 Land.) 558.8mm (22"x34"/ 22"x17") 609.6mm (24"x36"/ 24"x18") 502 - 332mm 420mm (2 PortraitA3 Landscape) 440mm (Sp.A2 Port./ Sp. A3 Land.) 435mm (Sp. A2 Port. / Sp.A3 Land.) 431.8mm (17"x22"/ 17"x11") 457.2mm (18"x24"/ 18"x12") 332 - 242mm 297mm (A3 Portrait/A4 Landscape) 312/297mm (Sp. A3 Port. / Sp.A4 Land.) 310/297mm (Sp.A3 Port./ A4 Landscape) 279.4mm (11"x17"/ 11"x8.5") 304.8mm (12"x18"/ 12"x9") 242 - 137mm 210m (A4 Portrait) 210mm (A4 Portrait) 210mm (A4 Portrait) 215.9mm (8.5"x11") 28.6mm (9"x12") 718mm over or ANSI ARCH Document size is judged by the detected document width and specified size series. Maximum document size Maximum document size is determined by the memory size installed in scanner. Installed memory Maximum scan length 256MB 3,000mm 512MB 7,500mm 1GB 15,000mm Depending on the scanning application software, document less than the above maximum size may not be scanned. Refer to the corresponding scanning application software manual for the maximum size. 6 Chapter 1 Overview of 6030/6050 Wide Format TWAIN Chapter 2 Preparation This chapter describes the host computer and system configuration required for scanning and printing using Wide Format TWAIN. Chapter 2 2.1 System Configuration Host Configuration Wide Format TWAIN uses a computer with Windows 2000, Windows XP, or Windows 98 operating system installed. The following are the requirements for the host computer: Requirements for a host computer <Hardware> CPU Pentium III 450MHz or over Memory Mainly A0 size binary image256MB or over Mainly Gray multi tone image:1GB or over Hard disk Mainly A0 size binary image: 500MB or over free space Mainly Gray multi tone image: 1GB or over free space SCSI board Adaptec AHA-2940 Ultra (For Windows XP) Adaptec ASC29160(For Windows 98, 2000) <Software> (OS) Windows 2000, Windows XP, Windows 98 operating system (English version only) Connections To scan image document, it is required to confirm if SCSI card is installed to a host computer, and DocuScan 1200w and 6030/6050 Wide Format Copier/Printer are connected correctly. For the information about SCSI card and how to install SCSI card driver, follow the instructions described on each SCSI card manual. 8 Chapter 2 Preparation 2.2 Installation This chapter describes how to install Wide Format TWAIN software to a host computer. Before installation Please follow the instructions below for installation. • For software upgrade, prior to installing the latest version software uninstall any previous version of the software. Wide Format TWAIN new version setup program creates new a file and does not overwrite the previous version file. Because of this, the new version software may be installed incorrectly if the previous version has not been uninstalled. • Wide Scanner TWAIN Source is a different product, and not the previous version software. TWAIN Source and Wide Format TWAIN can be installed in the same PC. Product information Wide Format TWAIN is an optional software for 6030/6050 Wide Format Copier/ Printer. Please confirm that the following items are contained when you open Wide Format TWAIN package. <License Agreeement(1)> Read carefully before installation of software. It describes about the license of Wide Format TWAIN software. <CD for Setup> The setup program for installing the program required to execute scanning application and Wide Format TWAIN software for processing data between 6030/6050 Wide Format Copier/Printer and host computer is located on a CD. The program will be saved on the hard disk of the host computer, following the setup program. Therefore, you do not need to confirm the contents of the floppy disk. How to install Use Setup program from the CD to install Wide Format TWAIN software to a host computer. It is required to login as an administrator to install Wide Format TWAIN on Windows 2000. For Windows XP, it is required to login as an administrative user of a computer. 2.2 Installation 9 Start Setup program on the host computer (Windows 98, Windows 2000, Windows XP) from the CD in either of the following methods. 1. Use [Add/Delete program] wizard of control panel. 2. Use [Run...] from Start menu. 3. Open Setup program file from CD by using Explorer. If you install the program in the method other than 1., select setup.exe and execute it. If you are not accustomed to Windows file operation, it is recommended to use the method 1. Installation Procedure The followings is the installation procedure using [Add/Remove Programs] wizard. This section explains the procedures using Windows 2000. For the case of Windows 98, Windows XP, operations are the same as Windows 2000. Start the host computer (Windows 98, Windows 2000, Windows XP). 1 Open the Control panel and double-click (Windows XP single-click) on [Add/ Remove Programs]. [Add/Remove programs Property] will be displayed. 10 Chapter 2 Preparation 2 Click on [Add New Programs] button. [Install Program from Floppy Disk or CD-ROM] will be displayed. 3 Insert Setup disk into the CD drive, and click on [Next]. The screen will be switched into [Run Installation Program] Select the [Browse] button and select the CD drive and directory that contains the Setup.exe. This explanation is based on the assumption that the CD drive is D. 2.2 Installation 11 4 Click [Finish] button. Setup wizard will be displayed. 5 Click [Next] button. Setup program will be started, and [Choose Destination Location] screen will be displayed. Installation procedure will be different if the procedure other than 1. has been selected. Default installation folder will be automatically prepared by Setup program. To change the folder, click [Browse] button and specify the location. 12 Chapter 2 Preparation 6 Click on [Next] button. Installation will be started. • If ASPI driver file has been installed already, a message stating ASPI related file already exists. [Do you want to replace it?] will appear. If you want to replace, click on [Yes] and continue installation. If you do not want to replace, click on [No]. In this case, a message stating [Do you want to continue installation?] will be displayed. To stop installation, click on [No]. To continue, click on [Yes]. • If [No] is selected, Wide Format TWAIN operation cannot be assured. 7 Check on [Yes, I want to restart my computer now]. 8 Take out Setup disk from the CD drive. 9 Click on [Finish] button. Host computer will be restarted. The setup will be valid after restarting the computer. 2.2 Installation 13 • If installing on Windows XP and [New Hardware Found] appears complete the following procedure to install the 6030 driver. 10 Select [Install from list or specific location (Advanced)]. 11 Select [Search for the best driver in these locations] and check both options. 14 Chapter 2 Preparation 12 The PC will search for the driver. 13 When the driver is located click [Continue Anyway] 14 The driver will be installed and the installation widow will be displayed 2.2 Installation 15 15 When the installation is compete click [Finish] After installation Wide Format TWAIN folder will be created after completing the installation of Wide Format TWAIN. This example shows that Wide Format TWAIN program folder has been created by the name of [Wide Format TWAIN], in [Xerox] folder in [Program Files]. 16 Chapter 2 Preparation 2.3 Uninstallation This chapter how to uninstall It is required to uninstall the currently used software before upgrading to the current version. Wide Format TWAIN new version setup program will not overwrite on the previous version file, but create a new file. Because of this, if the previous version file exists, installation may not be completed correctly. 1 Open Control Panel and double-click on [Add/Remove programs] icon. [Add/Remove programs] property will be open. 2 Select [Wide Format TWAIN] from program list. [Add/Remove] button will become active. 3 Click on [Change/Remove] button. 2.3 Uninstallation 17 A message to confirm the deletion of the program will be displayed. 4 Click on [Yes] button. Click on [Yes] to start uninstalling the program. To stop uninstallation, click [No]. 5 Following this, a dialog box to confirm the deletion of shared files may be displayed depending on the situation. Delete the shared files if required. To delete the file, click on [Yes]. To delete the all shared files, click on [Yes to all] button. Select [No] to save the file. Select [No to all] to save the all the other shared files. The following screen will be displayed when uninstallation is completed. 6 Click [OK] button to finish deletion of the program. [Add/Remove programs] property will be displayed. Uninstallation is completed. 18 Chapter 2 Preparation Chapter 3 Functions This section describes the functions available with Wide Format TWAIN. Chapter 3 3.1 Available scanning function The scanning software requires an imaging applications (Photoshop, Corel, Windows Paint). Start the imaging application and select Scanner or TWAIN (usually located under the File pull down menu). Image scan After setting required scanning options by using dialog box and press [Scan Start], Wide Format TWAIN will scan the image, and the image data will be stored in the memory. [Wide Format TWAIN dialog box] Functions and the meanings set by [Wide Format TWAIN] dialog box are described in the next section. Operation mode Scanning modes for DocuScan 1200w and 6030/6050 Wide Format Copier/Printer can be defined in Operation mode. DocuScan 1200w operates in [Scan mode] only, and 6030/6050 Wide Format Copier/Printer operates in either of [Scan mode] or [Scan & Copy mode]. Scan mode Scan mode performs scanning of a document only. Document size is judged by the following four ways. It is required to select the judgement method according to the requirements for scanning, because available functions are different in each method. 20 Chapter 3 Functions – Standard size auto judgement – Synchronized – Standard size custom specification – Custom size The following two functions are available when [Standard size custom specification] or [Custom size] is selected. – Offset – Scan start position The followings are the descriptions of each function. Standard size auto judgement Scan document by detecting document size automatically. Media series and document orientation (Portrait/Landscape) needs to be specified. If the free space in Scanner memory is insufficient, it starts prefeeding the next document, but will not start scanning instantly. It starts scanning automatically when sufficient memory is secured. Please wait for a while in this case. [Scan Start Position] can be specified when [Standard size auto judgement] has been selected. Synchronized If the long edge of the long document is nonstandard size, the image is scanned according to the document length. It is required to specify media size series. The maximum document size for scanning is different according to the installed page memory of DocuScan 1200w and 6030/6050 Wide Format Copier/Printer. [Scan Start Position] can be specified when [Synchronized] selected. Standard size custom specification Specify document size from the drop-down list. • If you select [Standard size custom specification], [Scan start position] and [Offset] can be specified. • Mirror image (refer to [3]Contrast Reversal/Mirror Image) cannot be selected when [Standard size custom specification] has been selected. 3.1 Available scanning function 21 22 Chapter 3 Functions Custom size Document width and length can be specified by 1mm increment. By clicking right mouse button on either of [Width] or [Length], standard size width and length can be specified from the list provided. • If you select [Custom size], [Scan start position] and [Offset] can be specified. • Mirror image (refer to [3]Contrast Reversal/Mirror Image) cannot be selected when [Standard size custom specification] has been selected. Offset If you select [Standard size custom specification] or [Custom size] in standard mode, [Offset] button becomes active. Click [Offset] button to open [Offset] dialog, and enter the offset value. Offset value ranges from 0 to 310mm. Up/Down Left/Right Original • If offset value is set beyond the size of the document, it becomes blank data or error. • The initial point of offset is the point specified by scan start position adjustment. Scan start position [Scan start position] dialog box will be displayed when you click [Scan start position] button. You can set the scan start position by specifying the distance from lead and left edge of the document. Available value range from the initial point is from -500 to 500mm for fast scan direction, and -999 to 999mm for slow scan direction. Left/Right Up/Down -(minus) +(plus) Document +(plus) -(minus) Document (From the front side of the document) *Auto size recognition in Scan Start Position adjusted mode 3.1 Available scanning function 23 The length of the scanned image becomes standard size length, even if the image has been shifted to upper or lower by using Scan Start Position adjustment feature. The image moved out of the standard size will be cut, and the blank area will become white. Document Moves to +(plus) direction Moves to -(minus) direction Scan & Copy mode Scanning and copying can be carried out at the same time with a system machine such as 6030/6050 Wide Format. This function is called Scan & Copy. There are two methods in Scan & Copy: – Scan in different setting from copy – Scan in same setting as copy Media size cannot be specified in [Scan & copy mode]. Copy setting is enabled. This mode is enabled only when using the system machine such as 6030/6050 Wide Format Copier/Printer. At scanning, the data will be transferred to the host computer in the same size as copy output. • Scan in different setting from copy (Alternate output) After reading the document, transfer the data to the host computer. The following functions can be set from Wide Format TWAIN UI screen. – Resolution, Contrast Reversal, Mirror Image, Document Type, Background suppression, Scan Density, Sharpness, Image Type, Timer Check The maximum resolution is 600dpi. • Scan in same setting as copy (Simultaneous output) Transfer the data to the host computer at the same time as scanning the document. The following function can be set from Wide Format TWAIN UI screen. The resolution is fixed to be 600dpi. 24 Chapter 3 Functions Resolution Set resolution according to the document image. It is selectable from 150 to 2400dpi (dots/inch), by 1dpi (dots/inch) increment. The default setting is 400dpi (dots/inch). Contrast reversal/Mirror image The following image processing can be specified when Scanner is reading the document. – Contrast reversal – Mirror image • Contrast Reversal Prints black images on a document to be white and white areas to be black. Positive Original Negative • In Scan & Copy mode, specify contrast reversal from Copier. • In Scan mode, white areas are to be scanned black. In Scan & Copy mode, (Contrast Reversal specified by Copier), white areas are to be scanned white. • Mirror Image Creates the reflection of the original document. Original Mirror image This function is not available when [Standard size custom specification] or [Custom size] has been specified in Scan mode, or [Same as copy setting] has been specified in Scan & copy mode. Scan in accordance with the document image type (Document image type) There are the following nine image type options. To ensure excellent scan quality, it is 3.1 Available scanning function 25 good practice to select the best document image type that matches the document. – Line (Default) – Line/Picture – Photo – Picture – DIAZO – Cut & Paste – Transparent – Dark background – Special original 1-3 • Line Select when the original contains lines and text images. • Line/Picture Select when the original contains text/lines and dot matrix images or halftone images. • Photo Select when the original contains pure glossy image. • Picture Select when the original contains dot matrix images (like newspaper, posters, or copy of photographs). • DIAZO Select when the original is diazo document. • Cut & Paste Select when the original contains cut and paste images, so that the density between cut and pasted images and the background is sharply changed. Cut and paste document width can be specified in 10 levels. • Transparent Select when the original is transparent document. Blur around the texts can be suppressed. • Dark background Select when the original contains a dark background. • 26 Special original 1-3 Chapter 3 Functions Not currently supported. If this mode is selected, line mode will be assigned. • If [Same as copy setting] is specified in Scan & Copy mode, document will be scanned by copier setting. • [Black/White binary] cannot be specified when [Picture] or [Photo] is selected. Scan in accordance with the document quality Even if the same scan mode is selected for the same type of image, the result may be different when the document is irregular, the paper has color, or has been damaged. In order to make fine adjustment, the following 4 functions are available. – Background adjustment – Scan density – Sharpness – Image type If [Same as copy setting] is specified in Scan & Copy mode, document will be scanned by copier setting. • Background adjustment Sets the method to suppress unwanted background of documents. There are two background suppression options. If [Auto] is selected, the level of suppression can be selected in 7 levels. If [Manual] is selected, the level of suppression can be selected in 39 levels. Background adjustment feature adjusts only background scan result. Depending on the image of the document, other adjustment function may need to be used simultaneously to achieve the best image quality. • Scan density Sets the density of the entire image in 9 levels. • Sharpness Sets the sharpness of outline of the scanned data in 5 levels. It is effective when moire pattern is found in scanned data. • Image type [Black/White binary] converts image into black and white with reference to the binary threshold. The threshold can be set between 1(White) to 255(Black). 3.1 Available scanning function 27 [Pseudo Black/White binary] or [Gray multi level] converts the level automatically. • [Black/White binary] cannot be specified when [Photo] or [Picture] is selected. • Document type and Edge erase become invalid when [Gray scale] or [Gray multi level is specified. • The maximum scanning length is 48 inches when [Gray multi level] is specified. Additional functions Other functions are available when scanning document. – Edge erase – Timer check – Save – Save position – Scan setting • Edge Erase This function erases the images on the outer edge of the document (top edge, bottom edge, left and right edges). The amount of edge erasure can be set within 50mm, by 1mm increment. This function cannot be specified in Scan & Copy mode. • Edge erase is not available when [Synchronized] mode is selected. • If the length is specified over 8000mm in [Custom Size], Edge Erase will be invalid. • Timer Check Check the time from the point of completion of image data transfer to host computer to the point of completion of scanning next document. When the time-out occurs, scanner control will be invalid Time-out time can be set between 1 to 120 minutes by 1 minute increment. When timeout occurs, [Wide Format TWAIN] dialog box will be displayed. To start scanning a document again, click on [Start] button of [Wide Format TWAIN] dialog box. • Save You can save the custom scanning parameter by clicking [Save] button. If you want to set it to default, press [Reset] button. • Save position Save the position of main screen. The main screen will be opened at the same position from the next time. 28 Chapter 3 Functions • Scan setting Set scan start method and scanning speed. When you click [Scan setting] button, [Scan setting] dialog box will be displayed. • [Same as scanner setting] cannot be selected when using DocuScan 1200w. • In scan & copy mode, [Same as scanner setting] will be selected automatically. 3.1 Available scanning function 29 30 Chapter 3 Functions Chapter 4 Error and Warning messages Chapter 4 4.1 Error and Warning messages This chapter describes the causes and solutions for error and warning messages displayed during Wide Format TWAIN operation. Wide Format TWAIN Error Messages If an error occurs with host computer or scanner while scanning, Wide Format TWAIN software displays an error message in a dialog box to inform the user. The messages and their meanings are as follows. <Scanner is being initialized or abnormal.> Cause Scanner is being initialized or abnormal. Solution Re-start the operation after modifying scanner. <Check printer section.> Cause Media jam occurred or printer is warming up. Solution Re-start the operation when printer is ready. <Failed to scan document.> Cause In standard size auto detect/synchronized mode, document exceeding the specified maximum resolution has been inserted. Solution Set the resolution within the maximum value and re-start operation. <Document being jammed or scanner cover is open. Continue scanning?> Cause Scanner cover is open, or document has been jammed. Solution Close scanner cover, or remove jammed document and restart operation. <Document is too long. Failed to scan completely.> 30 Cause Document is too long. Solution Use shorter document. Chapter 4 Error and Warning messages <Hardware error has occurred.> Cause Fatal hardware error has occurred for unknown reasons. Solution <Cannot change operation mode. Pull out original and click [OK]. > Cause User tried to change operation mode while it is unavailable. Solution Change operation mode after 30 seconds. <Cannot change operation mode. Pull out original and click [OK]. > Cause User tried to change operation mode while document is jammed and operation mode cannot be changed. Solution Remove jammed document and press [OK]. <Cannot use scanner. Check SCSI connection and Scanner control panel display.> Cause No device available. Solution Connect available device. <Power-off or reset has occurred.> Cause Power-off or reset has occurred. Solution <Document size including specified offset is beyond allowable setting range. Change offset, document size, or resolution.> Cause The combination of offset, document size, resolution value is inappropriate. Solution Change specified value. <Cannot read document with specified resolution.> Cause Resolution specified in standard size custom specification mode cannot be used for scanning the specified document. Solution Change resolution value or document size. 4.1 Error and Warning messages 31 <Read size is too large. Failed to scan completely. Add memory or hard disk to device.> Cause Device memory is insufficient to read the document. Solution Add memory to device. <Failed to save settings.> Cause User has entered out-of-range value in any of parameters. Solution Confirm parameter value and set them within the range. <Cannot set specified resolution.> Cause User has specified out-of-range value for resolution. Solution Specify the value within the range. <Cannot set specified frame erase range. Set value in the range of 0 to 50mm.> Cause Specified value is out or range. Solution Specify value within the range. <Cannot set specified Custom Size. Specify width up to 914mm, length up to 15,000mm.> Cause User has specified out-of-range value in Custom Size. Solution Specify value within the range. <Cannot set specified timer value. Specify value in the range of 1 to 120.> Cause User has specified out-of-range value in Timer check. Solution Specify value within the range. <Cannot set specified Threshold value. Specify value from 1 to 255. > 32 Cause User has specified out-of-range value in Threshold. Solution Specify value within the range. Chapter 4 Error and Warning messages <Insufficient free disk space. Cannot create temporary file for saving image data.> Cause Cannot use sufficient space in disk to save temporary image data. Solution Increase free space in disk. <Failed to control device.> Cause Error has occurred while operating SCSI command. Solution Check device if it is correctly operated. <Cannot create temporary file for saving image data.> Cause Cannot create TIFF file. Solution Check free space in disk. If insufficient, increase free space. <Failed to acquire image data.> Cause Image file cannot be created because of insufficient memory. Solution If operating other application, exit the application. 4.1 Error and Warning messages 33 Index A G A0 size binary image ............................................ 8 Gray multi tone image ...........................................8 About TWAIN Source .......................................... 2 Additional functions ........................................... 27 After installation ................................................ 16 Alternate output ................................................. 23 Auto size recognition in Scan Start Position adjusted mode ............................................................... 22 Automatic document size judgement ........................ 6 H host computer ..................................................2, 8 Host environment .................................................8 How to install ......................................................9 How to uninstall .................................................17 Available scanning function ................................. 20 I B Image scan ........................................................20 Background adjustment ....................................... 26 Image type ........................................................26 Before installation ................................................ 9 Installation ....................................................9, Before Use.......................................................... 1 17 Installation Procedure..........................................10 C L Connections ........................................................ 8 License Agreeement .............................................9 Contrast reversal ................................................ 24 Line .................................................................25 Contrast reversal/Mirror image ............................. 24 Line/Picture ......................................................25 Custom size ................................................ 21, 22 Cut&Paste ........................................................ 25 M Maximum document size .......................................6 D Mirror image .....................................................24 Dark background ............................................... 25 DIAZO ............................................................ 25 Document image type ......................................... 24 DocuScan 1200w ................................................. 2 DocuWorks......................................................... 3 E Edge Erase........................................................ 27 Error/Warning message ....................................... 30 O Offset.........................................................21, 22 Operation mode .................................................20 Overview of 6030/6050 Wide Format TWAIN .......1 P Photo ...............................................................25 Explanation of terms ............................................. 3 Picture .............................................................25 F Precautions and Restrictions for Document Scanning ..4 Feature of 6030/6050 Wide Format TWAIN .......... 2 Product information ..............................................9 Precautions and Restrictions for Scanner ...................4 firmware version .................................................. 4 34 Precautions .........................................................4 Index R T Requirements for a host computer ........................... 8 Terms ................................................................3 Resolution ........................................................ 24 Timeout tim ......................................................27 S Save position..................................................... 27 Save setting ...................................................... 27 Scan & Copy mode ............................................ 23 Scan density ...................................................... 26 Scan in different setting from copy ........................ 23 Scan in same setting as copy ................................ 23 Timer Check .....................................................27 Transparent .......................................................25 TWAIN protocol ..................................................2 TWAIN Source software .......................................3 TWAIN Error Message .......................................30 W Wide Scanner TWAIN User Manual ........................9 Scan mode ........................................................ 20 Scan protocol ...................................................... 3 Scan setting ...................................................... 28 Scan size ............................................................ 4 Scan start position ........................................ 21, 22 SCSI board ......................................................... 8 Sharpness ......................................................... 26 Simultaneous output ........................................... 23 Special original .................................................. 25 Standard size auto judgement ......................... 20, 21 Standard size custom specification .................. 20, 21 Synchronized .............................................. 20, 21 System Environment............................................. 8 Index 35 36 Index Index 37 38 Index