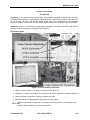
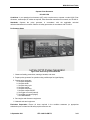
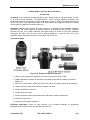
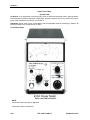
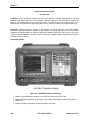
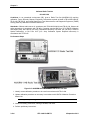
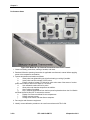
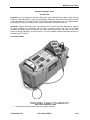
1
STP 9-94H13-SM-TG
SOLDIER'S MANUAL AND TRAINER'S GUIDE
MOS 94H
__________________________________________
TEST, MEASUREMENT, AND DIAGNOSTIC
EQUIPMENT (TMDE)
MAINTENANCE SUPPORT SPECIALIST
SKILL LEVELS 1, 2, and 3
______________________________________________
SEPTEMBER 2011
______________________________________________
HEADQUARTERS, DEPARTMENT OF THE ARMY
______________________________________________
DISTRIBUTION RESTRICTION: Approved for public release; distribution is unlimited.
This publication is available at
Army Knowledge Online (www.us.army.mil) and
General Dennis J. Reimer Training and Doctrine
Digital Library at (www.train.army.mil).
STP 9-94H13-SM-TG
HEADQUARTERS,
DEPARTMENT OF THE ARMY
Washington, DC, 9 September 2011
SOLDIER TRAINING
PUBLICATION
No. 9-94H13-SM-TG
SOLDIER'S MANUAL and TRAINER'S GUIDE
MOS 94H
SOLDIER'S MANUAL, SKILL LEVEL 1, 2, 3 and TRAINER'S
GUIDE , MOS 94H, Test, Measurement, and Diagnostic
Equipment (TMDE) Maintenance Support Specialist
TABLE OF CONTENTS
PAGE
PREFACE ...................................................................................................................................................... i
Chapter 1. Introduction........................................................................................................................... 1-1
Chapter 2. Trainer's Guide ..................................................................................................................... 2-1
2-1. General ........................................................................................................................... 2-1
2-2. Subject Area Codes ....................................................................................................... 2-2
2-3. Duty Position Training Requirements ............................................................................. 2-2
2-4. Critical Tasks List ........................................................................................................... 2-3
Chapter 3. MOS/Skill Level Tasks ......................................................................................................... 3-1
Skill Level 1
081-831-1042
093-94H-1000
093-94H-1001
093-94H-1010
093-94H-1020
093-94H-1030
Subject Area 1: Shop Operations and Production Control
Perform Mouth-to-Mouth Resuscitation.................................................................... 3-1
Perform Grounding Checks ..................................................................................... 3-5
Perform Conductivity Checks .................................................................................. 3-8
Perform TMDE Technical Supply Operations (Software) ...................................... 3-10
Perform Automated Production Control Procedures ............................................. 3-14
Perform Classification Inspection of TMDE ........................................................... 3-19
093-94H-1100
093-94H-1101
093-94H-1102
093-94H-1120
093-94H-1125
093-94H-1130
093-94H-1131
093-94H-1140
093-94H-1141
093-94H-1150
093-94H-1170
Subject Area 2: Direct Current (DC) and Low Frequency
Operate Work Station Controller ............................................................................ 3-21
Operate Core Work Station ................................................................................... 3-23
Operate Impedance Measuring System ................................................................ 3-25
Perform Cross Checks ........................................................................................... 3-27
Operate Time/Frequency Workstation ................................................................... 3-29
Repair Frequency Counter .................................................................................... 3-32
Calibrate Frequency Counter ................................................................................. 3-34
Repair Multimeter................................................................................................... 3-36
Calibrate Multimeter ............................................................................................... 3-38
Calibrate Resistance Decade ................................................................................ 3-40
Repair Simplified Test Equipment (STE) ............................................................... 3-42
i
Contents
093-94H-1200
093-94H-1210
093-94H-1211
093-94H-1212
093-94H-1221
Subject Area 3: Oscilloscopes and Fiber Optic Equipment
Operate Oscilloscope Work Station ....................................................................... 3-49
Operate Oscilloscope............................................................................................. 3-54
Repair Oscilloscope ............................................................................................... 3-59
Calibrate Oscilloscope ........................................................................................... 3-61
Calibrate Fiber Optic Equipment............................................................................ 3-65
093-94H-1300
093-94H-1310
093-94H-1311
093-94H-1312
093-94H-1320
093-94H-1330
093-94H-1340
093-94H-1350
093-94H-1351
Subject Area 4: Signal Generator
Operate Signal Generator Work Station ................................................................ 3-71
Operate Signal Generator ...................................................................................... 3-73
Repair Signal Generator ........................................................................................ 3-76
Calibrate Signal Generator .................................................................................... 3-78
Operate Pulse Generator ....................................................................................... 3-81
Calibrate Radio Frequency (RF) Power Sensor .................................................... 3-83
Calibrate Attenuator ............................................................................................... 3-85
Repair Power Meter ............................................................................................... 3-88
Calibrate Power Meter ........................................................................................... 3-91
093-94H-1400
093-94H-1401
093-94H-1402
093-94H-1409
093-94H-1410
093-94H-1420
093-94H-1431
Subject Area 5: Microwave and Radio Frequency (RF)
Operate Spectrum Analyzer .................................................................................. 3-93
Repair Spectrum Analyzer ..................................................................................... 3-96
Calibrate Spectrum Analyzer ................................................................................. 3-98
Repair Radio Test Set (Basic) ............................................................................. 3-101
Calibrate Radio Test Set ...................................................................................... 3-104
Operate High Radio Frequency (RF) Power Measurement System ................... 3-108
Calibrate Radar Test Set ..................................................................................... 3-110
093-94H-1103
093-94H-1501
093-94H-1510
093-94H-1511
093-94H-1512
093-94H-1513
093-94H-1521
093-94H-1530
093-94H-1550
093-94H-1569
093-94H-1570
Subject Area 6: Physical-Dimensional and Aviation
Calibrate Linear Measurement Devices............................................................... 3-115
Calibrate Thermometer ........................................................................................ 3-118
Operate Force Torque Standard.......................................................................... 3-123
Calibrate Torque Wrench ..................................................................................... 3-126
Calibrate Tensiometer.......................................................................................... 3-128
Calibrate Weighing Scale .................................................................................... 3-131
Calibrate Pressure/Vacuum Gauges ................................................................... 3-133
Calibrate Fuel Quantity Test Set.......................................................................... 3-141
Calibrate Jet Cal .................................................................................................. 3-143
Repair Pitot Static Tester ..................................................................................... 3-148
Calibrate Pitot Static Tester ................................................................................. 3-151
Subject Area 7: RADIAC
093-94H-1600 Operate RADIAC Calibrator Sets ........................................................................ 3-153
Subject Area 8: Calibration Set 2000 (CALSET 2000)
091-91D-1111 Perform Preventive Maintenance Checks and Services on a Generator Set...... 3-156
551-88M-1364 Operate Vehicle With Standard or Automatic/Semiautomatic Transmission ...... 3-158
Skill Level 3
Subject Area 9: Maintenance Operations
093-94H-3000 Prepare Secondary Transfer Set for Mobile Operations ..................................... 3-160
093-94H-3010 Repair Radio Test Set (Advanced) ...................................................................... 3-162
093-94H-3020 Perform Duties as RADIAC Custodian ................................................................ 3-166
ii
STP 9-94H13-SM-TG
9 September 2011
Contents
093-94H-3030 Maintain Automated Network System.................................................................. 3-168
093-94H-3050 Conduct Quality Assurance Inspection ................................................................ 3-169
093-SSG-3004 Submit a Quality Deficiency Report (QDR)......................................................... 3-172
093-SSG-3005 Submit Equipment Improvement Recommendation (EIR).................................. 3-176
093-SSG-3006 Plan Work Flow ................................................................................................... 3-178
093-SSG-3007 Direct Performance of Preventive Maintenance ................................................. 3-179
093-SSG-3008 Provide Technical Assistance to Repairers ........................................................ 3-181
093-SSG-3009 Perform Initial Inspections................................................................................... 3-183
093-SSG-3010 Perform Final Inspections ................................................................................... 3-185
093-SSG-3012 Perform In-Process Inspections .......................................................................... 3-185
Subject Area 10: Maintenance Management
093-94H-3040 Manage Cross Checks......................................................................................... 3-186
093-94H-3060 Manage Shop Operations Using Automated Procedures.................................... 3-188
093-SSG-3001 Inspect Section/Shop Safety ............................................................................... 3-190
093-SSG-3002 Manage Section/Shop Security .......................................................................... 3-193
093-SSG-3003 Maintain Section/Shop Calibration Program ....................................................... 3-195
093-SSG-3011 Write a Standing Operating Procedure (SOP) .................................................... 3-197
093-SSG-3013 Maintain Property Accountability ........................................................................ 3-199
093-SSG-3014 Assess Battlefield Damage ................................................................................. 3-201
093-SSG-3015 Manage Demand Supported Repair Parts Listed on the Prescribed Load
List (PLL) ............................................................................................................. 3-203
093-SSG-3016 Monitor Bench Stock Operations ........................................................................ 3-205
093-SSG-3017 Monitor Shop Stock Operations .......................................................................... 3-206
093-SSG-3019 Inspect Maintenance Support Team Operations ................................................ 3-208
093-SSG-3020 Inspect Maintenance Reporting and Management Data .................................... 3-209
093-SSG-3021 Review SAMS Reports ....................................................................................... 3-211
Glossary ...................................................................................................................................... Glossary-1
References .............................................................................................................................. References-1
9 September 2011
STP 9-94H13-SM-TG
iii
PREFACE
This Soldier Training Publication (STP) is intended for Soldiers holding MOS 94H, Skill Levels 1, 2, 3,
and 4, their supervisors, trainers, and commanders. It contains a MOS Training Plan providing
information needed to plan, conduct, and evaluate unit training, one of the most important jobs of military
leaders. It includes standardized training objectives in the form of task summaries that can be used to
train and evaluate Soldiers on critical tasks supporting unit missions during wartime.
Soldiers holding MOS 94H should have access to this publication. Trainers and first-line supervisors
should actively plan for Soldiers’ access, making it available in work areas, unit learning centers, and
unit libraries. However, it is not intended for an individual copy to be provided to each MOS holder. The
STP is obtainable on line from the Reimer Digital Library (RDL) at
https://rdl.train.army.mil/soldierPortal/soldier.portal.
This publication applies to the Active Army, the Army National Guard (ARNG)/Army National Guard of
the United States (ARNGUS), and the United States Army Reserve (USAR) unless otherwise stated.
The proponent of this publication is United States Army Training and Doctrine Command (TRADOC).
Submit comments and recommendations on DA Form 2028 (Recommended Changes to Publications
and Blank Forms) directly to: Department of the Army, Training Directorate, Ordnance Training Division,
ATTN: ATCL-TDF, 2221 Adams Ave, Fort Lee, VA 23801-2012.
iv
STP 9-94H13-SM-TG
9 September 2011
CHAPTER 1
Introduction
1-1. General. This Soldier training publication (STP) identifies individual military occupational specialty
(MOS) training requirements for Soldiers holding MOS 94H. Commanders, trainers, and Soldiers should
use it to plan, conduct, and evaluate individual training in units. The STP is the primary MOS reference
for supporting self-development, evaluating MOS proficiency, and training of 94H Soldiers.
Commanders employ two primary methods to evaluate Soldiers' proficiency:
•
Commander's evaluation. Commander’s evaluations are local tests or assessments of Soldiers'
performance of MOS-specific and common tasks critical to the unit mission. They may be
conducted year-round.
•
Common task test (CTT). CTTs are hands-on tests used to evaluate proficiency on common
tasks. Alternate written tests are provided if equipment is not available for hands-on testing.
This publication is the Soldier's primary reference to prepare for a commander's evaluation of MOSspecific tasks. It contains task summaries for all critical tasks specific to the MOS and skill level (SL).
Commanders and trainers will use this Soldier's manual/trainer's guide (SM/TG) to plan and conduct
training and commander's evaluations.
Chapter 2, Trainer’s Guide, contains information needed to plan training requirements for this MOS.
The trainer's guide:
•
Identifies subject areas in which Soldiers must be trained.
•
Identifies critical tasks for each subject area.
•
Specifies where Soldiers are initially trained on each task.
•
Recommends how often each task should be trained to sustain proficiency.
•
Recommends a strategy for cross-training Soldiers.
•
Recommends a strategy for training Soldiers to perform higher-level tasks.
Use this STP along with STP 21-1-SMCT (Soldier’s Manual of Common Tasks, Skill Level 1), STP 2124-SMCT (Soldier’s Manual of Common Tasks, Skill Levels 2-4), Army training and evaluation programs
(ARTEPs), FM 25-5 (Training for Mobilization and War), and FM 7-0 (Training the Force) to establish
effective training plans and programs that integrate Soldier, leader, and collective tasks.
1-2. Task Summaries. Task summaries outline wartime performance requirements for each critical task
in the STP. They provide both Soldier and trainer with the information necessary to prepare, conduct,
and evaluate critical task training. As a minimum, task summaries include information Soldiers must
know and skills they must perform to standard for each task. Following is the task summary format:
•
Task number. The task number is comprised of 10 alpha-numeric characters that identify the
task and skill level. Include the task number and title in any correspondence relating to the task.
•
Task title. The task title identifies the action to be performed.
•
Conditions. The task conditions statement describes the field or garrison conditions under
which the task will be performed and identifies the equipment, tools, references, job aids, and
supporting personnel that the Soldier needs to perform the task in wartime.
9 September 2011
STP 9-94H13-SM-TG
1-1
Chapter 1
•
Standards. The task standards describe how well and to what level of proficiency the Soldier
must perform the task under wartime conditions. Standards are typically expressed in terms of
accuracy, completeness, duration, sequence, speed, and tolerance.
•
Performance measures. This section identifies specific actions that the Soldier must accomplish
to complete the task successfully. Performance measures appear in a GO/NO-GO rating format
for easy evaluation. Some tasks may also include detailed training information in a Training
Information Outline and an Evaluation Preparation Section. The Evaluation Preparation Section
indicates necessary modifications to task performance in order to train and evaluate a task that
cannot be trained to the wartime standard under wartime conditions. It may also include special
training and evaluation preparation instructions to accommodate these modifications and any
instructions that should be given to the Soldier before evaluation.
•
References. This section identifies references that provide more detailed explanations of task
performance requirements than are given in the task summary.
•
Warnings. Warnings alert users to the possibility of immediate personal injury or equipment
damage.
•
Notes. Notes provide additional supportive explanations or tips relating to task performance.
1-3. Soldier’s Responsibilities. Each Soldier is responsible for performing individual tasks identified by
the first-line supervisor based on the unit’s mission-essential task list (METL). Soldiers must perform
tasks to the standards included in the task summary. If Soldiers have questions about tasks or which
tasks in this manual they must perform, they are responsible for asking their first-line supervisor for
clarification. First-line supervisors know how to perform each task or can direct Soldiers to appropriate
training materials, including current field manuals, technical manuals, and Army regulations. Soldiers
are responsible for using these materials to maintain performance. They are also responsible for
maintaining performance of all common tasks listed in the SMCTs at their current skill level and below.
Periodically, Soldiers should ask their supervisor or another solder to check their performance to ensure
that they can perform the tasks.
Self-development is a key component of leader
1-4. NCO Self-Development and the STP.
development. Leaders follow planned, progressive, sequential self-development programs developed
by the individual NCO and his or her first-line supervisor to enhance and sustain military competencies.
Self-development consists of individual study, research, professional reading, practice, and selfassessment.
The self-development concept requires NCOs, as Army professionals, to take
responsibility for remaining current in all phases of their MOS. The STP is the NCO’s primary source for
maintaining MOS proficiency.
Another important resource for self-development is the Army Correspondence Course Program (ACCP).
Information is available at local education centers or on line through the Army Institute for Professional
Development (AIPD) web site, http://www.train.army.mil/. The web site offers on-line enrollment.
1-5. Commander’s Responsibilities. Commanders must ensure that their unit training plans prepare the
unit for war by enabling Soldiers to develop and sustain proficiency in their MOS and skill level tasks.
Commanders should design unit training programs to provide individual training for all Soldiers assigned
to the unit and to evaluate Soldier proficiency routinely as part of the commander’s evaluation program.
The unit training program should also integrate individual training with crew drills and other collective
training. The MOS training plan provides information on which to base integration, cross-train, train-up,
and sustainment training programs. Commanders should use the MOS training plan when developing
unit training plans.
1-2
STP 9-94H13-SM-TG
9 September 2011
Introduction
1-6. Trainer’s Responsibilities. Training is the business of all unit leaders. First-line leaders are the
principal trainers in the unit because they directly supervise Soldiers and lead crews, squads, sections,
and teams.
Trainers can use the MOS training plan to determine the critical tasks each Soldier is responsible for
performing. They should tell each Soldier which tasks he or she must be able to perform. Trainers
should evaluate task performance to determine which tasks each Soldier can or cannot perform to
standard. Soldiers who cannot perform a task to standard need further training. This STP helps the
trainer do what trainers get paid to do Train. Developing effective training is explained in detail in FM 70.
Every task summary in this STP includes performance measures, which trainers may use year-round to
determine if Soldiers can perform critical tasks to the specified standards. The performance measures
identify what the trainer needs to observe to score a Soldier’s performance. A blank space is provided
for the trainer to check either the GO or NO-GO column for each performance measure. Some tasks
require the trainer to watch the Soldier perform them (evaluate the process). Other tasks call for the
trainer to focus on the results of the Soldier’s performance (evaluate the product). Comments should
not be written on the task summary.
Trainers can monitor the progress of their Soldiers by recording task GO/NO-GO results. Trainers may
use DA Form 5164-R (Hands-On Evaluation) to record the performance measures a Soldier passed or
failed. The form, which may be locally reproduced, applies to all tasks in this STP. Trainers may have
DA Form 5164-R over printed with information unique to their training requirements before reproducing
it.
Trainers may use DA Form 5165-R (Field Expedient Squad Book) to record hands-on go/no-go results
for a group of Soldiers (for example, a crew, section, or squad) having the same MOS and skill level.
This form supports conduct of commander’s evaluations, and can be used to record training results
gathered in the field during slack time for all MOSs and skill levels. Use of this form is optional. Trainers
should work with each Soldier until tasks can be performed to specific task summary standards.
1-7. Training Support. References have been identified for each task to assist in planning and
conducting training. A consolidated list of references identified by type, publication number, and title and
a comprehensive glossary of acronyms, abbreviations, and definitions are included in this STP.
9 September 2011
STP 9-94H13-SM-TG
1-3
This page intentionally left blank.
CHAPTER 2
Trainer's Guide
2-1. General. The MOS Training Plan (MTP) identifies the essential components of a unit training plan
for individual training. Units have different training needs and requirements based on differences in
environment, location, equipment, dispersion, and similar factors. Therefore, the MTP should be used
as a guide for conducting unit training and not a rigid standard. The MTP consists of two parts. Each
part is designed to assist the commander in preparing a unit training plan which satisfies integration,
cross training, training up, and sustainment training requirements for Soldiers in this MOS.
Part One of the MTP shows the relationship of an MOS skill level between duty position and critical
tasks. These critical tasks are grouped by task commonality into subject areas.
Section I lists subject area numbers and titles used throughout the MTP. These subject areas are used
to define the training requirements for each duty position within an MOS.
Section II identifies the total training requirement for each duty position within an MOS and provides a
recommendation for cross training and train-up/merger training.
•
Duty Position Column. This column lists the duty positions of the MOS, by skill level, which
have different training requirements.
•
Subject Area Column. This column lists, by numerical key (see Section I), the subject areas a
Soldier must be proficient in to perform in that duty position.
•
Cross-Train Column. This column lists the recommended duty position for which Soldiers
should be cross-trained.
•
Train-Up/Merger Column. This column lists the corresponding duty position for the next higher
skill level or MOSC the Soldier will merge into on promotion.
Part Two lists, by general subject areas, the critical tasks to be trained in an MOS and the type of
training required (resident, integration, or sustainment).
•
Subject Area Column. This column lists the subject area number and title in the same order as
Section I, Part One of the MTP.
•
Task Number Column. This column lists the task numbers for all tasks included in the subject
area.
•
Title Column. This column lists the task title for each task in the subject area.
•
Training Location Column. This column identifies the training location where the task is first
trained to Soldier training publications standards. If the task is first trained to standard in the unit, the
word “Unit” will be in this column. If the task is first trained to standard in the training base, it will
identify, by brevity code (ANCOC, BNCOC, etc.), the resident course where the task was taught.
Figure 2-1 contains a list of training locations and their corresponding brevity codes.
AIT
UNIT
ALC
SLC
SNCOC
Advanced Individual Training
Trained in the Unit
Advanced Leader Course
Senior Leader's Course
Senior NCO Course
Figure 2-1. Training Locations
9 September 2011
STP 9-94H13-SM-TG
2 -1
Chapter 2
•
Sustainment Training Frequency Column.
This column indicates the recommended
frequency at which the tasks should be trained to ensure Soldiers maintain task proficiency. Figure
2-2 identifies the frequency codes used in this column.
BA
AN
SA
QT
MO
BW
WK
-
Biannually
Annually
Semiannually
Quarterly
Monthly
Biweekly
Weekly
Figure 2-2. Sustainment Training Frequency Codes
•
Sustainment Training Skill Level Column. This column lists the skill levels of the MOS for
which Soldiers must receive sustainment training to ensure they maintain proficiency to Soldier’s
manual standards.
2-2. Subject Area Codes.
Skill Level 1
1
Shop Operations and Production Control
2
Direct Current (DC) and Low Frequency
3
Oscilloscopes and Fiber Optic Equipment
4
Signal Generator
5
Microwave and Radio Frequency (RF)
6
Physical-Dimensional and Aviation
7
RADIAC
8
Calibration Set 2000 (CALSET 2000)
Skill Level 3
9
Maintenance Operations
10
Maintenance Management
2-3. Duty Position Training Requirements.
Table 2-1. 94H CAREER FIELD DUTY POSITIONS
94H CAREER FIELD DUTY POSITIONS
Subject Cross Train-up/Merger
Area
Train
Skill Level 1
TMDE Maintenance Support
1-8
N/A
94H2 TMDE Sergeant
Specialist
Skill Level 2
TMDE Sergeant
1-8
N/A
94H3 Team Chief
Skill Level 3
Team Chief
9-10
N/A
94W4 Electronics Maintenance Chief
Skill Level 4
Electronics Maintenance Chief
11-12
N/A
94Z5 Senior Electronics Maintenance Chief
Duty Position
2-2
STP 9-94H13-SM-TG
9 September 2011
Trainer’s Guide
2-4. Critical Tasks List.
MOS TRAINING PLAN
94H14
CRITICAL TASKS
Task Number
Title
Training
Location
Sust
Tng
Freq
Sust
Tng SL
Skill Level 1
Subject Area 1. Shop Operations and Production Control
081-831-1042
Perform Mouth-to-Mouth Resuscitation
UNIT
QT
1-4
093-94H-1000
Perform Grounding Checks
AIT
QT
1-4
093-94H-1001
Perform Conductivity Checks
AIT
QT
1-4
093-94H-1010
Perform TMDE Technical Supply Operations (Software)
AIT
QT
1-4
093-94H-1020
Perform Automated Production Control Procedures
AIT
QT
1-4
093-94H-1030
Perform Classification Inspection of TMDE
UNIT
QT
1-4
Subject Area 2. Direct Current (DC) and Low Frequency
093-94H-1100
Operate Work station Controller
AIT
QT
1-4
093-94H-1101
Operate Core Work station
AIT
QT
1-4
093-94H-1102
Operate Impedance Measuring System
AIT
QT
1-4
093-94H-1120
Perform Cross Checks
AIT
QT
1-4
093-94H-1125
Operate Time/Frequency Workstation
AIT
QT
1-4
093-94H-1130
Repair Frequency Counter
AIT
QT
1-4
093-94H-1131
Calibrate Frequency Counter
AIT
QT
1-4
093-94H-1140
Repair Multimeter
AIT
QT
1-4
093-94H-1141
Calibrate Multimeter
AIT
QT
1-4
093-94H-1170
Repair Simplified Test Equipment (STE)
UNIT
QT
1-4
Subject Area 3. Oscilloscopes and Fiber Optic Equipment
093-94H-1200
Operate Oscilloscope Work station
AIT
QT
1-4
093-94H-1210
Operate Oscilloscope
AIT
QT
1-4
093-94H-1211
Repair Oscilloscope
AIT
QT
1-4
093-94H-1212
Calibrate Oscilloscope
AIT
QT
1-4
093-94H-1221
Calibrate Fiber Optic Equipment
AIT
QT
1-4
Subject Area 4. Signal Generator
093-94H-1300
Operate Signal Generator Work station
AIT
QT
1-4
093-94H-1310
Operate Signal Generator
AIT
QT
1-4
093-94H-1311
Repair Signal Generator
AIT
QT
1-4
093-94H-1312
Calibrate Signal Generator
AIT
QT
1-4
093-94H-1320
Operate Pulse Generator
AIT
QT
1-4
093-94H-1330
Calibrate Radio Frequency (RF) Power Sensor
AIT
QT
1-4
093-94H-1340
Calibrate Attenuator
AIT
QT
1-4
093-94H-1350
Repair Power Meter
AIT
QT
1-4
093-94H-1351
Calibrate Power Meter
AIT
QT
1-4
Subject Area 5. Microwave and Radio Frequency (RF)
9 September 2011
STP 9-94H13-SM-TG
2-3
Chapter 2
CRITICAL TASKS
Task Number
Title
Training
Location
093-94H-1400
Operate Spectrum Analyzer
AIT
Sust
Tng
Freq
QT
093-94H-1401
Repair Spectrum Analyzer
AIT
QT
1-4
093-94H-1402
Calibrate Spectrum Analyzer
AIT
QT
1-4
093-94H-1409
Repair Radio Test Set (Basic)
AIT
QT
1-4
093-94H-1410
Calibrate Radio Test Set
AIT
QT
1-4
093-94H-1420
Operate High Radio Frequency (RF) Power Measurement
System
AIT
QT
1-4
093-94H-1431
Calibrate Radar Test Set
AIT
QT
1-4
Sust
Tng SL
1-4
Subject Area 6. Physical-Dimensional and Aviation
093-94H-1103
Calibrate Linear Measurement Devices
AIT
QT
1-4
093-94H-1501
Calibrate Thermometer
AIT
QT
1-4
093-94H-1510
Operate Force Torque Standard
AIT
QT
1-4
093-94H-1511
Calibrate Torque Wrench
AIT
QT
1-4
093-94H-1512
Calibrate Tensiometer
AIT
QT
1-4
093-94H-1513
Calibrate Weighing Scale
AIT
QT
1-4
093-94H-1521
Calibrate Pressure/Vacuum Gauges
AIT
QT
1-4
093-94H-1530
Calibrate Fuel Quantity Test Set
AIT
QT
1-4
093-94H-1550
Calibrate Jet Cal
UNIT
QT
1-4
093-94H-1569
Repair Pitot Static Tester
AIT
QT
1-4
093-94H-1570
Calibrate Pitot Static Tester
AIT
QT
1-4
AIT
QT
1-4
UNIT
QT
1-4
Subject Area 7. RADIAC
093-94H-1600
Operate RADIAC Calibrator Sets
Subject Area 8. Calibration Set 2000 (CALSET 2000)
551-88M-1364
Operate Vehicle With Standard or
Automatic/Semiautomatic Transmission
Skill Level 3
Subject Area 9. Maintenance Operations
093-94H-3000
Prepare Secondary Transfer Set for Mobile Operations
UNIT
SA
3-4
093-94H-3010
Repair Radio Test Set (Advanced)
ALC
QT
3-4
093-94H-3020
Perform Duties as RADIAC Custodian
ALC
QT
3-4
093-94H-3030
Maintain Automated Network System
ALC
QT
3-4
093-94H-3050
Conduct Quality Assurance Inspection
ALC
QT
3-4
093-SSG-3004
Submit a Quality Deficiency Report (QDR)
ALC
QT
3
093-SSG-3005
Submit Equipment Improvement Recommendation (EIR)
ALC
QT
3
093-SSG-3006
Plan Work Flow
ALC
QT
3
093-SSG-3007
Direct Performance of Preventive Maintenance
ALC
QT
3
093-SSG-3008
Provide Technical Assistance to Repairers
ALC
QT
3
093-SSG-3009
Perform Initial Inspections
ALC
QT
3
093-SSG-3010
Perform Final Inspections
ALC
QT
3
093-SSG-3012
Perform In-Process Inspections
ALC
QT
3
2-4
STP 9-94H13-SM-TG
9 September 2011
Trainer’s Guide
CRITICAL TASKS
Task Number
Title
Training
Location
Sust
Tng
Freq
Sust
Tng SL
Subject Area 10. Maintenance Management
093-94H-3040
Manage Cross Checks
ALC
QT
3-4
093-94H-3060
Manage Shop Operations Using Automated Procedures
UNIT
QT
3-4
093-SSG-3001
Inspect Section/Shop Safety
ALC
QT
3
093-SSG-3002
Manage Section/Shop Security
ALC
QT
3
093-SSG-3003
Maintain Section/Shop Calibration Program
ALC
QT
3
093-SSG-3011
Write a Standing Operating Procedure (SOP)
UNIT
QT
3
093-SSG-3013
Maintain Property Accountability
ALC
QT
3
093-SSG-3014
Assess Battlefield Damage
ALC
QT
3
093-SSG-3015
Manage Demand Supported Repair Parts Listed on the
Prescribed Load List (PLL)
ALC
QT
3
093-SSG-3016
Monitor Bench Stock Operations
ALC
QT
3
093-SSG-3017
Monitor Shop Stock Operations
ALC
QT
3
093-SSG-3019
Inspect Maintenance Support Team Operations
ALC
QT
3
093-SSG-3020
Inspect Maintenance Reporting and Management Data
ALC
QT
3
093-SSG-3021
Review SAMS Reports
ALC
QT
3
9 September 2011
STP 9-94H13-SM-TG
2-5
This page intentionally left blank.
CHAPTER 3
MOS/Skill Level Tasks
Skill Level 1
Subject Area 1: Shop Operations and Production Control
Perform Mouth-to-Mouth Resuscitation
081-831-1042
Conditions: Given an adult casualty who is unconscious and does not appear to be breathing. You are
not in a chemical environment.
Standards: Perform mouth-to-mouth resuscitation correctly, in the correct sequence. Continue mouthto-mouth resuscitation at the rate of about 10 to 12 breaths per minute until the casualty start to breathe
on his own, the Soldier is relieved by a qualified person, or the Soldier is too tired to go on.
Note: The standard is based on American Heart Association information.
Performance Steps
Note: Conditions, standards, performance steps, and performance measures match task as it appears in
STP 21-1-SMCT.
1. Roll the casualty onto his back if necessary.
WARNING: The casualty should be carefully rolled as a whole, so the body does not twist.
2. Open the airway.
Note: If foreign material or vomit is in the mouth, it should be removed as quickly as possible (see
step 7).
a. Head-tilt/chin-lift method.
(1) Kneel at the level of the casualty's shoulders.
(2) Place one hand on the casualty's forehead and apply firm, backward pressure with the
palm to tilt the head back.
(3) Place the fingertips of the other hand under the bony part of the lower jaw and lift, bringing
the chin forward.
Note: Do not use the thumb to lift.
Note: Do not press deeply into the soft tissue under the chin with the fingers.
b. Jaw-thrust method.
Note: This method is usually used for casualties with a neck or severe head injury.
(1) Kneel above the casualty's head (looking toward the casualty's feet).
9 September 2011
STP 9-94H13-SM-TG
3-1
Chapter 3
(2) Rest your elbows on the ground or floor.
(3) Place one hand on each side of the casualty's head and place the tips of the index and
middle fingers under the angles of the casualty's lower jaw. Place your thumbs on the jaw
just below the level of the teeth.
(4) Raise your fingertips to lift the jaw forward (upward). This action will also cause the
casualty's head to tilt backward somewhat.
Note: If the casualty's lips are still closed after the jaw has been moved forward, use your thumbs
to retract the lower lip and allow air to enter the casualty's mouth.
3. Check for breathing.
a. Check for breathing within 3 to 5 seconds by placing an ear over the casualty's mouth and
looking toward his chest.
b. Look for the chest to rise and fall.
c. Listen for sounds of breathing.
d. Feel for breath on your cheek.
Note: If the casualty resumes breathing at any time during this procedure, the airway should be
kept open and the casualty should be monitored. If the casualty continues to breathe, he should be
transported to medical aid. Otherwise, the procedure should be continued.
4. Give breaths to ensure an open airway.
Note: When mouth-to-mouth resuscitation breathing cannot be performed because the casualty
has jaw injuries or spasms, the mouth-to-nose method may be more effective.
Note: Perform the mouth-to-nose method by blowing into the nose while holding the lips closed.
Let air escape by removing your mouth and, in some cases, removing your mouth and separating
the casualty's lips.
a. Maintain the airway and gently pinch the nose closed, using the hand on the casualty's
forehead.
b. Take a deep breath and place your mouth, in an airtight seal, around the casualty's mouth.
c. Give two full breaths (1 1/2 to 2 seconds each), taking a breath between them, while watching
for the chest to rise and fall and listening and/or feeling for air to escape during exhalation.
Note: If chest rises, go to step 8.
Note: If chest does not rise, continue with step 5.
5. Reposition the casualty's head slightly farther backward and repeat the breaths.
Note: If chest rises, go to step 8.
Note: If chest does not rise, continue with step 6.
6. Perform abdominal or chest thrusts.
Note: Abdominal thrusts should be used unless the casualty is in the advanced stages of
pregnancy, is very obese, or has a significant abdominal wound.
3-2
STP 9-94H13-SM-TG
9 September 2011
MOS/Skill Level Tasks
a. Abdominal thrusts.
(1) Kneel astride the casualty's thighs.
(2) Place the heel of one hand against the casualty's abdomen, slightly above the navel but
well below the tip of the breastbone, with the fingers pointing toward the casualty's head.
(3) Place the other hand on top of the first.
(4) Press into the abdomen with a quick forward and upward thrust.
Note: Each thrust should be a separate, distinct movement.
(5) Give several thrusts (up to five).
b. Chest thrusts.
(1) Kneel close to the side of the casualty's body.
(2) Locate the lower edge of the casualty's ribs and run the fingers up along the rib cage to
the notch where the ribs meet the breastbone.
(3) Place the middle finger on the notch with the index finger just above it on the lower end of
the breastbone.
(4) Place the heel of the other hand on the lower half of the breastbone next to the two
fingers.
(5) Remove the fingers from the notch and place that hand on top of the other hand,
extending or interlacing the fingers.
(6) Straighten and lock the elbows with the shoulders directly above the hands.
(7) Without bending the elbows, rocking, or allowing the shoulders to sag, apply enough
pressure to depress the breastbone 1 to 2 inches.
Note: Each thrust should be given slowly, distinctly, and with the intent of relieving the
obstruction.
(8) Give several thrusts (up to five).
7. Perform a finger sweep and repeat breaths.
a. Open the mouth by grasping the tongue and lower jaw to lift the jaw open or crossing the
fingers and thumb to push the teeth apart.
b. Insert the index finger of the other hand down along the cheek to the base of the tongue.
c. Use a hooking motion from the side of the mouth toward the center to dislodge the object.
WARNING: Take care not to force the object deeper into the airway.
d. Reopen the airway and repeat the breaths.
Note: If chest rises, go to step 8.
Note: If chest does not rise, repeat steps 6 and 7 until the airway is clear.
8. Check for a pulse for 5 to 10 seconds.
Note: Use the first two fingers in the groove in the casualty's throat beside the Adam's apple. Do
not use the thumb.
a. If a pulse is found but the casualty is not breathing, continue with step 9.
b. If no pulse is found, cardiopulmonary resuscitation (CPR) must be performed by qualified
personnel. Send for qualified medical personnel.
9. Continue mouth-to-mouth resuscitation, at the rate of about 10 to 12 breaths per minute.
9 September 2011
STP 9-94H13-SM-TG
3-3
Chapter 3
10. Recheck for pulse and breathing for 3 to 5 seconds after every 12 breaths.
Note: Once breathing is restored, watch the casualty closely, maintain an open airway, and check
for other injuries.
Evaluation Preparation: Setup: For training and testing, you must use a resuscitation training
mannequin (DVC 08-15). Have a bottle of alcohol and swabs or cotton available. Place the mannequin
on the floor and alcohol and cotton balls on the table. Clean the mannequin's nose and mouth before
each Soldier is evaluated.
Brief Soldier: Tell the Soldier to do, in order, all necessary steps to restore breathing. After step 3, tell
the Soldier that the casualty is not breathing. When testing steps 4 and 5, you can vary the test by
indicating whether the chest rises or not. If step 7 is tested, tell the Soldier that the airway is open. You
can stop the evaluation when the Soldier rechecks for the pulse in step 10.
Note: Reference made to the mouth-to-nose method within the task presents information on an
alternate procedure that must be used under some circumstances. This method will not be
evaluated.
GO
NO-GO
1. Rolled the casualty onto his/her back if necessary.
——
——
2. Opened the airway.
——
——
3. Checked for breathing.
——
——
4. Gave breaths to ensure an open airway.
——
——
5. Repositioned the casualty's head slightly farther backward and repeated the
breaths.
——
——
6. Performed abdominal or chest thrusts.
——
——
7. Performed a finger sweep and repeated breaths.
——
——
8. Checked for a pulse for 5 to 10 seconds.
——
——
9. Continued mouth-to-mouth resuscitation, at the rate of about 10 to 12 breaths per
minute.
——
——
——
——
Performance Measures
10. Rechecked for pulse and breathing for 3 to 5 seconds after every 12 breaths.
Evaluation Guidance: Score the Soldier GO if all performance measures are passed. Score the
Soldier NO GO if any performance measure is failed. If the Soldier scores NO GO, show what was
done wrong and how to do it correctly.
References
Required
DVC 08-15
STP 21-1-SMCT
3-4
Related
FM 4-25.11
STP 9-94H13-SM-TG
9 September 2011
MOS/Skill Level Tasks
Perform Grounding Checks
093-94H-1000
Conditions: In an operational environment (OE), with a requirement to perform earth ground checks; a
R1L-CR Digital Ohmmeter with accessories, grounding kit, ground area of sufficient size to conduct test
(20 to 25 meters [m]), TM 11-5820-1118-12&P, R1L-CR manufacturer's manual TB 385-4.
Standards: Perform grounding checks using the R1L-CR Digital Ohmmeter in accordance with
applicable manufacturer's manual. Observe all safety requirements in accordance with TB 385-4.
Achieve a measured earth ground resistance of less than 25 ohms, and remote facility grounding point
of less than 2 ohms.
Performance Steps
Figure 3-1. R1L-CR Earth Tester w/ Accessory Kit
1. Observe all safety precautions, warnings, and hazards.
WARNING: Testing of earth grounds can involve a possible hazard to the operator such as from a
difference of potential caused by a return current to the ground under test, and induced voltages in the
long wire test leads. The operator should wear electrician's safety gloves consisting of an insulating
rubber inner glove and a leather outer glove. Testing should also not be done when there is lightning in
the vicinity. Do not disconnect the ground of an energized circuit.
2. Setup equipment to perform grounding checks using normal method of test for earth electrodes
employing the 62 percent method.
a. Ensure instrument battery is charged prior to any connection to instrument terminals.
9 September 2011
STP 9-94H13-SM-TG
3-5
Chapter 3
b. Hammer a test spike (the remote current electrode) into the ground 50 feet (15 m) away from
ground electrode under test.
c. Hammer another test spike (the remote potential electrode) into the ground 31 feet (10 m)
away from ground under test, in line with the remote current electrode just hammered in.
d. Disconnect the supplied shorting bar and any other wires between terminals of the R1L-CR.
e. Connect one of the supplied lead wires (short length suggested) between the -I terminal of
the R1L-CR and the ground to be measured.
f. Connect one of the supplied lead wires (short length suggested) between the -V terminal of
the R1L-CR and the ground to be measured.
g. Connect one of the supplied lead wires between the +I terminal of the R1L-CR and the
farther current supplying auxiliary electrode.
h. Connect one of the supplied lead wires between the +V terminal of the R1L-CR and the
closer potential measurement auxiliary electrode.
Note: The lead wire test clip can be placed around the auxiliary electrode rod directly behind the
screw, washer, and wing nut assembly, so that the clip jaws grab between the rod and washer.
Avoid having the large clip on the screw threads. The large test clips on the two supplied longer
leads with take up reels are removable, if desired, for a spade lug connection to the auxiliary
electrode rods via the threaded screw, washer, and wing nut assembly.
3. Operate equipment to perform grounding checks using normal method of test for earth
electrodes employing the 62 percent method.
a. Depress the R1L-CR "TEST" switch and read the LCD display for a ground resistance
reading. Refer to the manual section concerning any outside of range or error conditions.
b. Improve spike resistance as necessary.
c. Read instrument display and take reading when stable (less than 25 ohms).
d. Take corrective action in order to obtain required reading if reading of less than 25 ohms is
not obtained.
e. Release the "TEST" switch when measurements were not being made.
4. Document the measurements.
5. Setup equipment to perform facility grounding checks from the most electrically remote grounding
point to the ground electrode.
a. Connect leads from Ohmmeter to the most remote grounding point in the facility and the
ground electrode.
b. Select highest range.
c. Switch instrument on.
d. Decrease range in order to obtain highest resolution reading (less than 2 ohms).
e. Take corrective action in order to obtain required reading If reading of less than 2 ohms is not
obtained.
6. Document the measurements.
7. Maintain tools and equipment.
Evaluation Preparation: Ensure all items required in the condition statement (or appropriate
substitutions) are on hand and all safety requirements are met.
Performance Measures
1. Observed all safety precautions, warnings, and hazards.
3-6
STP 9-94H13-SM-TG
GO
NO-GO
——
——
9 September 2011
MOS/Skill Level Tasks
2. Setup equipment to perform grounding checks using normal method of test for
earth electrodes employing the 62 percent method.
——
——
3. Operated equipment to perform grounding checks using normal method of test for
earth electrodes employing the 62 percent method.
——
——
4. Documented the measurements.
——
——
5. Setup equipment to perform facility grounding checks from the most electrically
remote grounding point to the ground electrode.
——
——
6. Documented the measurements.
——
——
7. Maintained tools and equipment.
——
——
Evaluation Guidance: Score the Soldier GO if all performance measures are passed. Score the Soldier
NO-GO if any performance measure is failed. If the Soldier fails any performance measure, explain what
was done wrong and how to do it correctly.
References
Required
CECOM TR 98-6
PPM INSTRUMENTS R1L-CR
TB 385-4
TM 11-5820-1118-12&P
9 September 2011
Related
TM 9-6695-239-14
STP 9-94H13-SM-TG
3-7
Chapter 3
Perform Conductivity Checks
093-94H-1001
Conditions: In an operational environment (OE), given a requirement for surface conductivity testing; a
R1M-A Megohmmeter, five-pound block of metal with a contact surface of five square inches of good
conducting material, a floor or work surface to be tested for conductivity, TB 385-4, and manufacturer's
manual.
Standards: Perform conductivity (surface resistance) checks using the R1M-A Megohmmeter in
accordance with manufacturer's manual and TB 385-4.
Performance Steps
Figure 3-2. R1M-A Megohmmeter
1. Observe all safety precautions, warnings, and hazards.
WARNING: High voltage is used or exposed during the performance of this check. Death on contact
may result if personnel fail to observe safety precautions. Reduce output(s) to minimum after each
setup within the procedure where applicable.
2. Prepare R1M-AR Megohmmeter for use in accordance with manufacturer's manual.
a. Check that test leads supplied with the Megohmmeter were available and were in good
condition with spring clips and no cracks in the insulation.
3-8
STP 9-94H13-SM-TG
9 September 2011
MOS/Skill Level Tasks
Performance Steps
b. Set the TEST VOLTAGE rotary switch to the desired value, from 50 to 500 volts (V) and set
the OHMS RANGE switch to the anticipated range.
Note: Although the OHMS RANGE switch is marked from 1 M to 100 G, a 100 percent over
range capability is built into this instrument. Note, also, that for resistance values less than one
megohm, the only test voltage that should be used is 50 V. No damage will occur if a higher
voltage is selected, but the readings may not be accurate.
c. Plug the power cord into a source of AC power (103.5 to 129 V at 50 or 60 Hz) and
turn on the POWER toggle switch. Check that the other end is plugged securely into
the power input receptacle on the front panel.
3. Perform conductivity (surface resistance) test on floor or work surface in accordance with TB 3854.
a. Connect the "SIG" binding post of the Megohmmeter to the facility's certified ground.
b. Connect the recessed "TEST" connector of the Megohmmeter to a five-pound block of metal
with a contact surface of five square inches of good conducting material.
c. Attach a nonconductive strap or handle to the block (refer to Figure 3-3 of TB 385-4).
d. Apply voltage by pressing the "TEST" push button while pulling the block along all points of
the floor or work surface to be tested.
e. Observe instrument display and verify that a minimum of 1 (one) megohms of measured
surface resistance existed for every kilovolt present in work area.
f. Adjust range as necessary to correct under range or over range conditions.
4. Document results.
5. Maintain tools and equipment.
Evaluation Preparation: Ensure all items required in the condition statement (or appropriate
substitutions) are on hand and all safety requirements are met.
GO
NO-GO
1. Observed all safety precautions, warnings, and hazards.
——
——
2. Prepared R1M-AR Megohmmeter for use in accordance with manufacturer's
manual.
——
——
3. Performed conductivity (surface resistance) test on floor or work surface in
accordance with TB 385-4.
——
——
4. Documented results.
——
——
5. Maintained tools and equipment.
——
——
Performance Measures
Evaluation Guidance: Score the Soldier GO if all performance measures are passed. Score the Soldier
NO-GO if any performance measure is failed. If the Soldier fails any performance measure, explain what
was done wrong and how to do it correctly.
References
Required
PPM INSTRUMENTS R1M-AR
TB 385-4
9 September 2011
Related
TM 9-6695-239-14
STP 9-94H13-SM-TG
3-9
Chapter 3
Perform TMDE Technical Supply Operations (Software)
093-94H-1010
Conditions: In an operational environment (OE), with a requirement for technical supply operations; an
International Business Machine (IBM) compatible computer loaded with TMDE Integrated Material
Management System (TIMMS) software and supply files, and TIMMS User's Guide.
Standards: Perform TMDE technical supply operations using TIMMS in accordance with the TIMMS
User's Guide.
Performance Steps
1. Refer to TIMMS User's Guide for detailed procedures.
2. Start TIMMS.
3. Perform Supply Actions.
a. Perform Issue Item.
b. Perform Maintain Item.
c. Perform Receive Item.
d. Perform Requisition Item.
e. Perform Turn-in Item.
4. Generate Supply Reports.
a. Generate Balance Report by NIIN/PN.
b.
c.
d.
e.
f.
3-10
Figure 3-3. Balance Items by NIIN/PN Report
Generate Balance Report by Location.
Generate Balance Report by Demands.
Generate Balance Report by SLC Changes.
Generate Balance Report by Statistics.
Generate Balance Report by Bench Stock.
STP 9-94H13-SM-TG
9 September 2011
MOS/Skill Level Tasks
Performance Steps
Figure 3-4. Balance Items by Bench Stock Report
g.
h.
i.
j.
k.
l.
m.
n.
o.
p.
q.
r.
s.
t.
u.
v.
w.
x.
y.
Generate Balance Report by Shop Stock.
Generate Balance Report by Authorized Stock Level (ASL).
Generate Balance Report by Diagnostic Stock Items.
Generate Balance Report by Non-demand.
Generate Balance Report by Excess Stock.
Generate Balance Report by Balance Issues.
Generate Balance Report by Total Lines.
Generate Canceled Requisitions Reports.
Generate Demands Reports by DODAAC.
Generate Demands Reports by NIIN/PN.
Generate Document Register.
Generate List Issues Report.
Generate On Order (Bal/Sup) Report.
Generate Confirm Receipts Report.
Generate Receipt Daily Transactions Report.
Generate Requisition Exception Data Report.
Generate Unserviceable Items by NIIN Report.
Generate Unserviceable Items by PN Report.
Generate Unserviceable Items by Location Report.
5. Perform Supply Utilities.
9 September 2011
STP 9-94H13-SM-TG
3-11
Chapter 3
Performance Steps
Figure 3-5. Supply Utilities Menu
a.
b.
c.
d.
e.
f.
g.
h.
i.
j.
k.
l.
m.
n.
o.
p.
q.
Perform FEDLOG Programs.
Perform FEDLOG Army Master Data File (AMDF) CDs.
Perform Build AMDF Files.
Perform Local AMDF.
Perform Document Register Cleanup.
Perform Inventory Process.
Perform Purge Balance File.
Perform Purge Demands File.
Perform Purge Requisitions.
Perform Update Demands Count.
Perform Undo Issues.
Perform Rollup Balance.
Perform RO/ROP Computation.
Perform SLC Update.
Perform SLC Update.
Perform Fund Code Update.
Perform Match G Set K.
Evaluation Preparation: Ensure all items required in the condition statement (or appropriate
substitutions) are on hand and all safety requirements are met.
GO
NO-GO
1. Referred to TIMMS User's Guide for detailed procedures.
——
——
2. Started TIMMS.
——
——
3. Performed Supply Actions.
——
——
4. Generated Supply Reports.
——
——
5. Performed Supply Utilities.
——
——
Performance Measures
Evaluation Guidance: Use the TIMMS User's Guide as an additional reference for evaluating
performance of this task.
3-12
STP 9-94H13-SM-TG
9 September 2011
MOS/Skill Level Tasks
Score the Soldier GO if all performance measures are passed. Score the Soldier NO-GO if any
performance measure is failed. If the Soldier fails any performance measure, explain what was done
wrong and how to do it correctly.
References
Required
AR 710-2
DA PAM 710-2-1
DA PAM 710-2-2
EM 0007
TIMMS USERS GUIDE
9 September 2011
Related
DA PAM 750-8
STP 9-94H13-SM-TG
3-13
Chapter 3
Perform Automated Production Control Procedures
093-94H-1020
Conditions: In an operational environment (OE), given test, measurement, and diagnostic equipment
(TMDE) requiring support; TMDE Information Maintenance Management System (TIMMS) loaded on an
IBM compatible computer, TIMMS User's Guide, DA Pamphlet 750-8, AR 750-43, TB 750-25, TB 43180, DA Form 7372 (TMDE Calibration and Repair Data), DA Form 1687 (Notice of Delegation of
Authority-Receipt for Supplies), and shop standing operating procedures (SOPs).
Standards: Process customer equipment for maintenance, assign a job sequence, appropriate status,
and enter the equipment into the TIMMS database to reflect the current status of all open jobs. Prepare
TIMMS reports in accordance with the TIMMS User's Guide and shop SOP.
Performance Steps
1. Refer to TIMMS User's Guide for detailed procedures.
2. Start TIMMS.
3. Process incoming TMDE.
a. Verify that item includes all necessary components.
b. Verify that all operator and unit level maintenance is performed on item.
c. Select Calibration from the TIMMS menu bar.
d. Select method for Production Control.
(1) Select Production Control-ID/Serial.
3-14
STP 9-94H13-SM-TG
9 September 2011
MOS/Skill Level Tasks
Performance Steps
Figure 3-6. TIMMS Production Control by ID Code / Serial Number Screen
(2) Select Instrument Master Record File (IMRF) Browser.
(3) Select Production Control by Scanner.
e. Type, browse, or scan the ID Code or serial number of the item.
(1) Use the 'Insert' button to add the item.
(2) Complete data fields in the 'Update the IMRF File' screen with the 'Changing IMRF Key
Fields' screen overlay.
(3) Enter correct Unit Identification Code (UIC) information.
(4) Enter correct ID Code information.
(5) Enter correct Serial Number information.
(6) Enter correct Model Number information by using the 'TB43-180' button.
Note: Using the 'TB43-180' button to search and select the correct model automatically
populates the National Stock Number (NSN), nomenclature, interval, and system code of the
item to the new IMRF record.
9 September 2011
STP 9-94H13-SM-TG
3-15
Chapter 3
Performance Steps
(7) Complete the information in 'TMDE Catalog Change Submission' screen if item is not
found in TB 43-180.
f. Open a job for the item.
(1) Select Calibration from the menu bar.
(2) Select Production Control-ID/Serial.
(3) Type, browse, or scan the ID Code or serial number of the item.
(4) Click the 'Status' button once the correct ID/Serial is highlighted.
(5) Enter initial status code.
(6) Change/update the Priority, Status PUIC, Interval, and/or Tech code if necessary.
(7) Select 'OK' button.
4. Change Status of a Job.
a. Select Calibration from the menu bar.
b. Select Production Control-ID/Serial.
c. Type, browse, or scan the ID Code or serial number of the item.
d. Click the 'Status' button once the correct ID/Serial is highlighted.
e. Select 'Change Status' button on the 'Browse the Status File' screen.
f. Use the 'Insert' or 'Change' buttons on the 'Status Trail' screen to insert a new or change an
existing status.
g. Complete the data fields on the 'Adding (New)' or 'Changing…'screen.
(1) Verify PUIC.
(2) Enter correct Status Date.
(3) Enter correct Status.
(4) Enter technician's initials.
(5) Enter Calibration Hours and/or Repair Hours if status is 'M'.
(6) Enter evacuation information in the appropriate fields if status is set to 'S' or 'T'.
( a) Enter the EVAC TO and FROM PUICs in the appropriate fields.
( b) Select the correct evacuation code for the item.
( c) Click the 'Done' button.
(7) Click 'OK'.
h. Select the 'DA Form 7372' button to preview/print DA Form 7372 or generate .pdf file of the
DA Form 7372.
5. Perform Report Action on a Job.
a. Select 'Report Action' button from the 'Browse the Status File' screen.
b. Verify interval.
c. Verify calibration condition code.
d. Verify repair code, if necessary.
e. Verify performance code.
f. Verify the report code if applicable.
g. Enter information in the 'Adjusted', 'Replaced', and 'Remarks' fields if applicable.
h. Click the 'OK' button.
6. Prepare Master List.
3-16
STP 9-94H13-SM-TG
9 September 2011
MOS/Skill Level Tasks
Performance Steps
Figure 3-7. TIMMS Production Control Reports Screen
7. Prepare Projected List.
8. Prepare Delinquent Report.
9. Prepare Management Report.
a. Execute Weekly Collection.
b. Execute Management Report Print.
c. Execute Management Report Rollup.
10. Prepare In-Shop Reports.
a. Prepare In Shop List.
b. Prepare Awaiting Pickup List.
11. Prepare Job Log.
12. Prepare TMDE Delinquency Report.
13. Prepare UIC Reports.
a. Prepare UIC Report by Scheduler.
b. Prepare UIC Report by Dist. Code.
14. Prepare Total IMRF Reports.
a. Prepare Total IMRF by Model.
b. Prepare Total IMRF by Serial.
9 September 2011
STP 9-94H13-SM-TG
3-17
Chapter 3
Performance Steps
c. Prepare Total IMRF by Owner.
d. Prepare Total IMRF by Scheduler.
e. Prepare Total IMRF by Performer.
Evaluation Preparation: Ensure all items required in the condition statement (or appropriate
substitutions) are on hand and all safety requirements are met.
Performance Measures
GO
NO-GO
1. Referred to TIMMS User's Guide for detailed procedures.
——
——
2. Started TIMMS.
——
——
3. Processed incoming TMDE.
——
——
4. Changed Status of a Job.
——
——
5. Performed Report Action on a Job.
——
——
6. Prepared Master List.
——
——
7. Prepared Projected List.
——
——
8. Prepared Delinquent Report.
——
——
9. Prepared Management Report.
——
——
10. Prepared In-Shop Reports.
——
——
11. Prepared Job Log.
——
——
12. Prepared TMDE Delinquency Report.
——
——
13. Prepared UIC Reports.
——
——
14. Prepared Total IMRF Reports.
——
——
Evaluation Guidance: Use the TIMMS User's Guide as an additional reference for evaluating
performance of this task.
Score the Soldier GO if all performance measures are passed. Score the Soldier NO-GO if any
performance measure is failed. If the Soldier fails any performance measure, explain what was done
wrong and how to do it correctly.
References
Required
AR 750-1
AR 750-43
DA FORM 1687
DA FORM 7372
DA PAM 750-8
TB 43-180
TB 750-25
TIMMS USERS GUIDE
3-18
Related
STP 9-94H13-SM-TG
9 September 2011
MOS/Skill Level Tasks
Perform Classification Inspection of TMDE
093-94H-1030
Conditions: In an operational environment (OE), given an item of TMDE requiring condition coding; and
the following forms and publications: AR 710-2, AR 725-50, AR 750-1, DA Form 7372 (TMDE
Calibration and Repair Data), DA Form 2404 (Equipment Inspection and Maintenance Worksheet), DD
Form 1574 (Serviceable Tag-Materiel), DD Form 1577 (Unserviceable (Condemned) Tag - Materiel), DD
Form 1577-2 (Unserviceable (Reparable) Tag - Materiel, SF 368 (Product Quality Deficiency Report),
DA Pamphlet 708-2, DA Pamphlet 710-2-1, DA Pamphlet 710-2-2, DA Pamphlet 750-8, DA Pamphlet
738-751, FEDLOG, applicable TB 43-0002-series publication, TB 11-6625-3263-25, and applicable
technical manuals.
Standards: Accomplish the technical inspection (TI) of the TMDE item in accordance with appropriate
manufacturer/service manual and note all discrepancies. Assign proper condition code based on the
results of the TI in accordance with AR 725-50. Complete all forms correctly in accordance with DA
Pamphlet 750-8 and DA Pamphlet 738-751.
Performance Steps
1. Research item using FEDLOG for all applicable codes and determine proper disposition for
unserviceable and excess items.
2. Perform technical inspections (TI) on item.
3. Determine if an unserviceable item is economically or uneconomically repairable by considering the
following factors:
a. The cost of replacing the item as opposed to the cost of repair.
b. The value (in terms of service life) that will be restored to the item if it is repaired.
c. The value restored to the item through repair in comparison to the probable maintenance cost
of a new item.
4. Determine the maintenance required to restore unserviceable, economically repairable equipment to
serviceable condition.
5. Determine the availability of replacement parts and analyze the shop workload to determine the
unit's capability to perform the required repairs.
6. Process item for repair if item meets repair criteria.
7. Evacuate the item to a higher echelon for repair, if the repair requirement exceeds the established
repair time limits.
8. Evacuate the item to designated facilities of the same or higher category of maintenance for repair, if
the repair is beyond authorized capability and capacity.
9. Assign proper condition code to item for return to customer.
10. Complete all necessary forms and paperwork.
a. Complete DA Form 7372 with condition code stamp.
b. Complete DA Form 2404 with condition code stamp.
c. Complete DA Form 5990-E (Maintenance Request) with condition code stamp.
d. Complete appropriate materiel condition code tag with condition code stamp.
e. Provide customer with sufficient copies of all forms.
Evaluation Preparation: Ensure all items required in the condition statement (or appropriate
substitutions) are on hand and all safety requirements are met.
9 September 2011
STP 9-94H13-SM-TG
3-19
Chapter 3
Performance Measures
GO
NO-GO
1. Researched item using FEDLOG for all applicable codes and determined proper
disposition for unserviceable and excess items.
——
——
2. Performed technical inspections (TI) on item.
——
——
3. Determined if an unserviceable item was economically or uneconomically
repairable.
——
——
4. Determined the maintenance required to restore unserviceable, economically
repairable equipment to serviceable condition.
——
——
5. Determined the availability of replacement parts and analyzed the shop workload
to determine the unit's capability to perform the required repairs.
——
——
6. Processed item for repair if item met repair criteria.
——
——
7. Evacuated the item to a higher echelon for repair, if the repair requirement
exceeded the established repair time limits.
——
——
8. Evacuated the item to designated facilities of the same or higher category of
maintenance for repair, if the repair was beyond authorized capability and
capacity.
——
——
9. Assigned proper condition code to item for return to customer.
——
——
——
——
10. Completed all necessary forms and paperwork.
Evaluation Guidance: Score the Soldier GO if all performance measures are passed. Score the Soldier
NO-GO if any performance measure is failed. If the Soldier fails any performance measure, explain what
was done wrong and how to do it correctly.
References
Required
AR 710-2
AR 725-50
AR 750-1
DA FORM 2404
DA FORM 5990-E
DA FORM 7372
DA PAM 708-2
DA PAM 710-2-1
DA PAM 710-2-2
DA PAM 738-751
DA PAM 750-8
DD FORM 1574
DD FORM 1577
DD FORM 1577-2
EM 0007
SF 368
TB 11-6625-3263-25
TB 43-0002-SERIES
3-20
Related
STP 9-94H13-SM-TG
9 September 2011
MOS/Skill Level Tasks
Subject Area 2: Direct Current (DC) and Low Frequency
Operate Work station Controller
093-94H-1100
Conditions: In an operational environment (OE), with a requirement to perform a calibration procedure
on an item of TMDE using the Integrated Calibration Environment (ICE); a work station controller,
access to United States Army Test, Measurement, and Diagnostic Equipment (TMDE) Activity (USATA)
website, media storage device, TB 43-180, TB 385-4, TB 750-25, and USATA Master List.
Standards: Operate Work station Controller in accordance with ICE calibration procedure to calibrate
the equipment.
Performance Steps
Figure 3-8. Workstation Controller
1. Determine correct Integrated Calibration Environment (ICE) procedure for use in accordance with
TB 43-180.
2. Update ICE procedure as necessary in accordance with USATA Calibration Procedure Master
List.
a. Download update from USATA website onto media storage device or system hard drive.
b. Extract file into temporary directory if necessary.
c. Execute program to install automatically.
9 September 2011
STP 9-94H13-SM-TG
3-21
Chapter 3
Performance Steps
3. Enter ICE menu from work station controller desktop or start menu.
4. Navigate through ICE menu to select appropriate calibration procedure.
5. Setup hardware manager for prime instrument (if necessary).
6. Observe all safety precautions, warnings, and hazards.
7. Follow onscreen instructions for equipment required.
a. Connect GP-IB cables from unit under test and calibration standards to appropriate port(s) on
workstation controller.
b. Set addresses on equipment as appropriate for calibration procedure and ICE procedure
being used.
8. De-energize and disconnect equipment.
Evaluation Preparation: Ensure all items required in the condition statement (or appropriate
substitutions) are on hand and all safety requirements are met.
Performance Measures
GO
NO-GO
1. Determined correct Integrated Calibration Environment (ICE) procedure for use in
accordance with TB 43-180.
——
——
2. Updated ICE procedure as necessary in accordance with USATA Calibration
Procedure Master List.
——
——
3. Entered ICE menu from work station controller desktop or start menu.
——
——
4. Navigated through ICE menu to select appropriate calibration procedure.
——
——
5. Setup hardware manager for prime instrument (if necessary).
——
——
6. Observed all safety precautions, warnings, and hazards.
——
——
7. Followed onscreen instructions for equipment required.
a. Connected GP-IB cables from unit under test and calibration standards to
appropriate port(s) on workstation controller.
b. Set addresses on equipment as appropriate for calibration procedure and
ICE procedure being used.
——
——
8. De-energized and disconnected equipment.
——
——
Evaluation Guidance: Score the Soldier GO if all performance measures are passed. Score the Soldier
NO-GO if any performance measure is failed. If the Soldier fails any performance measure, explain what
was done wrong and how to do it correctly.
References
Required
AR 750-1
TB 385-4
TB 43-180
TB 750-25
USATA MASTER LIST
3-22
Related
DA PAM 750-8
TM 9-6695-239-14
STP 9-94H13-SM-TG
9 September 2011
MOS/Skill Level Tasks
Operate Core Work station
093-94H-1101
Conditions: In an operational environment (OE), with a requirement to operate the Core Workstation; a
5720A/CT Calibrator, 5725A/CT Amplifier, and 3458A Multimeter; cables, connectors, TB 385-4, and
Manufacturer's Operator Manuals for 5720A/CT, 5725A/CT, and 3458A.
Standards: Operate the Core Workstation in accordance with Manufacturer's Operator Manuals.
Observe all safety requirements in accordance with TB 385-4.
Performance Steps
Figure 3-9. Core Workstation Components
1. Observe all safety precautions, warnings, hazards, and notes.
2. Operate the Core workstation as follows using the 3458A multimeter as the unit under test (UUT).
a. Set up equipment to produce and measure DC Voltage.
b. Use Error Mode of Calibrator and output adjustment controls to achieve a reading on UUT
equal to original entry on calibrator.
c. Set up equipment to produce and measure AC Voltage.
d. Use Error Mode of Calibrator and output adjustment controls to achieve a reading on UUT
equal to original entry on calibrator.
e. Set up equipment to produce and measure DC Current.
f. Use Error Mode of Calibrator and output adjustment controls to achieve a reading on UUT
equal to original entry on calibrator.
g. Set up equipment to produce and measure AC Current.
h. Use Error Mode of Calibrator and output adjustment controls to achieve a reading on UUT
equal to original entry on calibrator.
i. Set up equipment to produce and measure Resistance.
j. Use Error Mode of Calibrator and output adjustment controls to achieve a reading on the
Control Display equal to the reading on the UUT.
k. Set up equipment to produce and measure Wideband AC Voltage.
3. De-energize and disconnect equipment.
Evaluation Preparation: Ensure all items required in the condition statement (or appropriate
substitutions) are on hand and all safety requirements are met.
Performance Measures
1. Observed all safety precautions, warnings, hazards, and notes.
9 September 2011
STP 9-94H13-SM-TG
GO
NO-GO
——
——
3-23
Chapter 3
Performance Measures
GO
NO-GO
2. Operated the Core workstation using the 3458A as the unit under test (UUT).
——
——
3. De-energized and disconnected equipment.
——
——
Evaluation Guidance: Score the Soldier GO if all performance measures are passed. Score the Soldier
NO-GO if any performance measure is failed. If the Soldier fails any performance measure, explain what
was done wrong and how to do it correctly.
References
Required
AGILENT 3458A
FLUKE 5700A/5720A
FLUKE 5725A
TB 385-4
3-24
Related
TM 9-6695-239-14
STP 9-94H13-SM-TG
9 September 2011
MOS/Skill Level Tasks
Operate Impedance Measuring System
093-94H-1102
Conditions: In an operational environment (OE), with a requirement to operate an impedance
measuring system; a 6425B Precision Component Analyzer, a standard capacitor, Instruction Manual for
6425B Precision Component Analyzer, and TB 385-4.
Standards: Operate impedance measuring system in accordance with Manufacturer's Instruction
Manual. Observe all safety requirements in accordance with TB 385-4.
Performance Steps
Figure 3-10. Wayne-Kerr 6425B
Note: Perform all steps in accordance with manufacturer's manual (Wayne-Kerr model 6425B
Precision Component Analyzer).
1. Observe all safety precautions, warnings, hazards, and notes.
2. Operate the Impedance Measuring System as follows using a standard capacitor as the unit under
test:
a. Set up equipment and perform trimming operation.
b. Set up equipment to perform capacitance measurement on standard capacitor.
c. Perform capacitance measurement on standard capacitor.
3. De-energize and disconnect all equipment.
Evaluation Preparation: Ensure all items required in the condition statement (or appropriate
substitutions) are on hand and all safety requirements are met.
GO
NO-GO
1. Observed all safety precautions, warnings, hazards, and notes.
——
——
2. Operated the Impedance Measuring System as follows using a standard
capacitor as the unit under test:
——
——
Performance Measures
9 September 2011
STP 9-94H13-SM-TG
3-25
Chapter 3
Performance Measures
3. De-energized and disconnected all equipment.
GO
NO-GO
——
——
Evaluation Guidance: Score the Soldier GO if all performance measures are passed. Score the Soldier
NO-GO if any performance measure is failed. If the Soldier fails any performance measure, explain what
was done wrong and how to do it correctly.
References
Required
TB 385-4
WAYNE KERR ELECTRONICS
3-26
Related
DA PAM 750-8
TM 9-6695-239-14
STP 9-94H13-SM-TG
9 September 2011
MOS/Skill Level Tasks
Perform Cross Checks
093-94H-1120
Conditions: In an operational environment (OE), with calibration standards requiring Cross Checks; a
5720A Electrical Calibrator, 5725A Amplifier, 3458A Multimeter; cables and connectors, TB 9-4931-53724, TB 43-180, TB 385-4; TB 750-25; United States Army Test, Measurement, and Diagnostic
Equipment (TMDE) Activity (USATA) Calibration Procedure Master List and facility Cross Checks SOP.
Standards: Perform Cross Checks of measurement standards in accordance with TB 9-4931-537-24.
Observe all safety precautions in accordance with TB 385-4.
Performance Steps
Figure 3-11. Cross Checks Components
1. Identify correct procedure to be used in accordance with TB 43-180.
2. Update the procedure as necessary in accordance with USATA Calibration Procedure Master List.
3. Observe all safety precautions, warnings, hazards, and notes.
4. Review the facility standing operating procedures for cross checks.
5.
Perform cross checks of equipment in accordance with TB 9-4931-537-24 and facility cross
checks SOP.
a. Identify when standards are to be cross checked.
9 September 2011
STP 9-94H13-SM-TG
3-27
Chapter 3
Performance Steps
b.
c.
d.
e.
f.
Identify correct standards to be cross checked.
Cross check appropriate ranges and parameters of equipment.
Complete the cross checks data tables and forms and ensure all information is accurate.
Follow proper procedures if a standard is inoperable or fails cross checks.
File and distribute copies of cross checks records as required.
6. De-energize and disconnect equipment as appropriate.
Evaluation Preparation: Ensure all items required in the condition statement (or appropriate
substitutions) are on hand and all safety requirements are met.
Performance Measures
GO
NO-GO
1. Identified correct procedure to be used in accordance with TB 43-180.
——
——
2. Updated procedure as necessary in accordance with USATA Calibration
Procedure Master List.
——
——
3. Observed all safety precautions, warnings, hazards, and notes.
——
——
4. Reviewed the facility standing operating procedures for cross checks.
——
——
5. Performed cross checks of equipment in accordance with TB 9-4931-537-24 and
facility cross checks SOP.
a. Identified when standards are to be cross checked.
b. Identified correct standards to be cross checked.
c. Cross checked appropriate ranges and parameters of equipment.
d. Completed the cross checks data tables and forms ensuring all information
was accurate.
e. Followed proper procedures when a standard was inoperable or failed cross
checks.
f. Filed and distributed copies of cross checks records as required.
——
——
6. De-energized and disconnected equipment as appropriate.
——
——
Evaluation Guidance: Use TB 9-4931-537-24 as a guide to verify that all steps in the cross-check
process are performed in accordance with the proper procedure.
Score the Soldier GO if all performance measures are passed. Score the Soldier NO-GO if any
performance measure is failed. If the Soldier fails any performance measure, explain what was done
wrong and how to do it correctly.
References
Required
TB 385-4
TB 43-180
TB 750-25
TB 9-4931-537-24
3-28
Related
AR 750-1
TM 9-6695-239-14
STP 9-94H13-SM-TG
9 September 2011
MOS/Skill Level Tasks
Operate Time/Frequency Workstation
093-94H-1125
Conditions: In an operational environment (OE), with a requirement to operate a Time/Frequency
Workstation; an ET6000-75 GPS station, external 10 MHz signal source, oscilloscope, all necessary
cables, adaptors, and connectors, manufacturer's and technical manuals, and TB 385-4.
Standards: Operate Time/Frequency Workstation in accordance with manufacturer's and technical
manuals. Observe all safety precautions in accordance with TB 385-4.
Performance Steps
Figure 3-12. Time/Frequency Workstation
1. Observe all safety precautions, warnings, hazards, and notes.
2. Connect the power cable, the antenna, and antenna cable.
3. Apply power to the unit.
4. Set the SET MODE to "AUTO" if it is not already in the "AUTO" mode.
Note: When satellites are acquired, the TRACKING LED will illuminate. Once the unit has
accomplished its position averaging, the LOCKED LED will illuminate.
9 September 2011
STP 9-94H13-SM-TG
3-29
Chapter 3
Performance Steps
5. Press the MENU keyboard switch until the External Frequency Measurement Menu Screen is
displayed and contains the following choices:
-------------------------------------------------------------------------EXT FRQ:+0000E-14 /
+0000E+00 SEC *
1>ENTER FRQ
<2>ENABLE<3>DISABLE
-------------------------------------------------------------------------6. Connect a 10 MHz signal from signal source to connector J10 using RF cable.
7. Press keyboard button "1" followed by 10000000 to input the frequency to measure (10 MHz).
8. Press keyboard button "2" to ENABLE the external frequency measurement option.
Note: If the unit is locked, the measurement count (once per second) will start to increment.
It will display measurements in parts to E-09, E-12, or E-14. If the input offset/measurement is
greater than 1x10⁻⁵ or if the input signal contains noise, "TOO HIGH" will be displayed.
9. Observe external frequency offset measurement on display screen.
10. Press keyboard button "3" to disable external frequency measurement.
11. Connect rear panel connector J7 to an oscilloscope using RF cable to acquire and observe the 10
MHz signal.
12. De-energize and disconnect equipment.
Evaluation Preparation: Ensure all items required in the condition statement (or appropriate
substitutions) are on hand and all safety requirements are met. Antenna, antenna cable, and power
cable may be connected and power applied to the workstation prior to evaluation in order to eliminate
the time necessary to track and lock satellites.
Performance Measures
GO
NO-GO
1. Observed all safety precautions, warnings, hazards, and notes.
——
——
2. Connected the power cable, the antenna, and antenna cable.
——
——
3. Applied power to the unit.
——
——
4. Set the SET MODE to "AUTO" if it was not already in the "AUTO" mode.
——
——
5. Pressed the MENU keyboard switch until the External Frequency Measurement
Menu Screen is displayed.
——
——
6. Connected a 10 MHz signal from signal source to connector J10 using RF cable.
——
——
7. Pressed keyboard button "1" followed by 10000000 to input the frequency to
measure (10 MHz).
——
——
8. Pressed keyboard button "2" to ENABLE the external frequency measurement
option.
——
——
9. Observed external frequency measurement offset measurement on display
screen.
——
——
10. Pressed keyboard button "3" to disable external frequency measurement.
——
——
11. Connected rear panel connector J7 to an oscilloscope using RF cable to acquire
and observe the 10 MHz signal.
——
——
3-30
STP 9-94H13-SM-TG
9 September 2011
MOS/Skill Level Tasks
Performance Measures
12. De-energized and disconnected equipment.
GO
NO-GO
——
——
Evaluation Guidance: Score the Soldier GO if all performance measures are passed. Score the Soldier
NO-GO if any performance measure is failed. If the Soldier fails any performance measure, explain what
was done wrong and how to do it correctly.
References
Required
ET6000-SERIES
TB 385-4
TM 11-6625-3165-14
TM 43-6625-915-12
9 September 2011
Related
TM 9-6695-239-14
STP 9-94H13-SM-TG
3-31
Chapter 3
Repair Frequency Counter
093-94H-1130
Conditions: In an operational environment (OE), given a faulty frequency counter, a signal generator,
test equipment as needed (multimeter, oscilloscope, spectrum analyzer, and so on), electrician's tool kit,
frequency counter manufacturer's manual, and TB 385-4.
Standards: Repair frequency counter in accordance with manufacturer's manual. Observe all safety
requirements in accordance with TB 385-4.
Performance Steps
NOTE:
-Determine if warranty repair is applicable.
-Determine if repair is authorized.
-Before beginning repair process, check work order and talk to unit maintenance, if possible, for
description of symptoms and steps taken to correct them.
-Check all forms and tags attached to or accompanying equipment to determine reason for removal from
service.
1. Observe all safety precautions, warnings, hazards, and notes.
2. Visually inspect the frequency counter for any physical defects.
3. Read and follow the operator, maintenance, and repair instructions given in technical reference.
4. Set up necessary support equipment to repair the frequency counter.
5. Perform operational circuit checks to sectionalize the malfunction.
6. Perform a schematic analysis and functional tests to localize the malfunction.
7. Perform resistance, continuity, and power distribution tests to isolate the malfunction.
8. Repair/replace faulty component.
9. Verify repair.
10. De-energize and disconnect equipment.
11. Complete proper maintenance forms.
Evaluation Preparation: Ensure all items required in the condition statement (or appropriate
substitutions) are on hand and all safety requirements are met. Evaluator will induce a fault by
disconnecting a circuit card or cable connector or other non-destructive method prior to the start of
performance evaluation.
GO
NO-GO
1. Observed all safety precautions, warnings, hazards, and notes.
——
——
2. Visually inspected the frequency counter for any physical defects.
——
——
3. Read and followed the operator, maintenance, and repair instructions given in
technical reference.
——
——
4. Set up necessary support equipment to repair the frequency counter.
——
——
Performance Measures
3-32
STP 9-94H13-SM-TG
9 September 2011
MOS/Skill Level Tasks
Performance Measures
GO
NO-GO
5. Performed operational circuit checks to sectionalize the malfunction.
——
——
6. Performed a schematic analysis and functional tests to localize the malfunction.
——
——
7. Performed resistance, continuity, and power distribution tests to isolate the
malfunction.
——
——
8. Repaired/replaced faulty component.
——
——
9. Verified repair.
——
——
10. De-energized and disconnected equipment.
——
——
11. Completed proper maintenance forms.
——
——
Evaluation Guidance: Score the Soldier GO if all performance measures are passed. Score the Soldier
NO-GO if any performance measure is failed. If the Soldier fails any performance measure, explain what
was done wrong and how to do it correctly.
References
Required
HEWLETT-PACKARD 5345A
TB 385-4
TM 9-4931-509-34P
9 September 2011
Related
AR 750-1
DA PAM 750-8
MANUFACTURER'S MANUAL
TB 750-25
TM 9-6695-239-14
STP 9-94H13-SM-TG
3-33
Chapter 3
Calibrate Frequency Counter
093-94H-1131
Conditions: In an operational environment (OE), given model PM6681/656 frequency counter requiring
calibration; Forms, Records, Reports, Equipment, and Accessories required as listed in TB 9-66252331-24; TB 43-180; TB 385-4, TB 750-25; and United States Army Test, Measurement, and Diagnostic
Equipment (TMDE) Activity (USATA) Calibration Procedure Master List.
Standards: Calibrate frequency counter in accordance with TB 43-180 and calibration procedure.
Observe all safety precautions in accordance with TB 385-4. Complete required DA Form 7372 (TMDE
Calibration and Repair Data), DA Label 80 (US Army Calibrated Instrument), DA Label 163 (US Army
Limited or Special Calibration), or DA Form 2417 (U.S. Army Calibration System Rejected Instrument) in
accordance with TB 750-25.
Performance Steps
Figure 3-13. Fluke PM 6681
1. Identify correct calibration procedure to be used in accordance with TB 43-180.
2. Update calibration procedure as necessary in accordance with USATA Calibration Procedure
Master List.
3. Observe all safety precautions, warnings, hazards, and notes.
Note: All paragraphs referred to in steps 4 through 11 are found in TB 9-6625-2331-24.
4. Perform preliminary Instructions in accordance with paragraph 6.
5. Perform equipment setup in accordance with paragraph 7.
6. Perform time base stability performance check and make necessary adjustments in accordance
with paragraph 8.
7. Perform sensitivity performance checks in accordance with paragraph 9.
8. Perform volts maximum/minimum performance check in accordance with paragraph 10.
9. Perform Trig Level A&B Outputs performance check in accordance with paragraph 11.
3-34
STP 9-94H13-SM-TG
9 September 2011
MOS/Skill Level Tasks
Performance Steps
Note: Do not perform power supply check if all other parameters are within tolerance. If any of
the power supply checks are out of tolerance perform the entire calibration adjustment
procedures in the manufacturer’s service manual for this instrument.
10. Perform power supply check if necessary and make necessary adjustments in accordance with
paragraph 12.
11. Perform final procedure in accordance with paragraph 13.
Evaluation Preparation: Ensure all items required in the condition statement (or appropriate
substitutions) are on hand and all safety requirements are met.
Performance Measures
GO
NO-GO
1. Identified correct calibration procedure to be used in accordance with TB 43-180.
——
——
2. Updated calibration procedure as necessary in accordance with USATA
Calibration Procedure Master List.
——
——
3. Observed all safety precautions, warnings, hazards, and notes.
——
——
4. Performed preliminary instructions.
——
——
5. Performed equipment setup.
——
——
6. Performed time base stability performance check and made necessary
adjustments.
——
——
7. Performed sensitivity performance checks.
——
——
8. Performed volts maximum/minimum performance check.
——
——
9. Performed Trig Level A&B Outputs performance check.
——
——
10. Performed power supply check if necessary and made necessary adjustments.
——
——
11. Performed final procedure.
——
——
Evaluation Guidance: Refer to the applicable technical bulletin as a guide to verify that all steps in the
calibration process are performed in accordance with the proper calibration procedure.
Score the Soldier GO if all performance measures are passed. Score the Soldier NO-GO if any
performance measure is failed. If the Soldier fails any performance measure, explain what was done
wrong and how to do it correctly.
References
Required
DA FORM 2417
DA FORM 7372
DA LABEL 163
DA LABEL 80
ET6000-SERIES
TB 385-4
TB 43-180
TB 750-25
TB 9-6625-2331-24
USATA MASTER LIST
9 September 2011
Related
AR 750-1
AR 750-43
DA PAM 750-8
TM 9-6695-239-14
STP 9-94H13-SM-TG
3-35
Chapter 3
Repair Multimeter
093-94H-1140
Conditions: In an operational environment (OE), given a faulty multimeter, core workstation, test
equipment as needed (multimeter, oscilloscope, and so on), electrician's tool kit, technical manuals,
manufacturer's manual, and TB 385-4.
Standards: Repair the multimeter in accordance with multimeter manufacturer's and/or technical
manual. Observe safety requirements in accordance with TB 385-4.
Performance Steps
NOTES:
-Determine if warranty repair is applicable.
-Determine if repair is authorized.
-Before beginning repair process, check work order and talk to unit maintenance, if possible, for
description of symptoms and steps taken to correct them.
-Check all forms and tags attached to or accompanying equipment to determine reason for removal from
service.
1. Observe all safety precautions, warnings, hazards, and notes.
2. Visually inspect the multimeter for any physical defects.
Note: Determine the appropriate maintenance publication (either technical manual or
manufacturer's manual) for the particular model requiring repair. Follow the detailed repair
procedures provided in the maintenance publication. Steps 3 thru 10 are general repair
procedures for use if no detailed procedures are available.
3. Read and follow the operator, maintenance, and repair instructions given in the applicable technical
reference.
4. Set up support equipment necessary to repair the multimeter.
5. Perform operational circuit checks to sectionalize the malfunction.
6. Perform schematic analysis and functional tests to localize the malfunction.
7. Perform resistance, continuity, and power distribution tests to isolate the malfunction.
8. Repair/replace faulty component(s).
9. Verify repair.
10. De-energize and disconnect equipment.
11. Complete proper maintenance forms.
Evaluation Preparation: Ensure all items required in the condition statement (or appropriate
substitutions) are on hand and all safety requirements are met. Evaluator will induce a fault by
disconnecting a circuit card or cable connector or other non-destructive method prior to the start of
performance evaluation.
Performance Measures
1. Observed all safety precautions, warnings, hazards, and notes.
3-36
STP 9-94H13-SM-TG
GO
NO-GO
——
——
9 September 2011
MOS/Skill Level Tasks
Performance Measures
GO
NO-GO
2. Visually inspected the faulty multimeter for any physical defects.
——
——
3. Read and followed the operator, maintenance, and repair instructions given in
technical reference.
——
——
4. Set up necessary support equipment to repair the multimeter.
——
——
5. Performed operational circuit checks to sectionalize the malfunction.
——
——
6. Performed a schematic analysis and functional tests to localize the malfunction.
——
——
7. Performed resistance, continuity, and power distribution tests to isolate the
malfunction.
——
——
8. Repaired/replaced faulty component(s).
——
——
9. Verified repair.
——
——
10. De-energized and disconnected all the equipment.
——
——
11. Completed proper maintenance forms.
——
——
Evaluation Guidance: Score the Soldier GO if all performance measures are passed. Score the Soldier
NO-GO if any performance measure is failed. If the Soldier fails any performance measure, explain what
was done wrong and how to do it correctly.
References
Required
MANUFACTURER'S MANUAL
TB 385-4
9 September 2011
Related
AR 750-1
AR 750-43
DA PAM 750-8
EM 0007
TB 43-180
TB 750-25
TM 9-6695-239-14
STP 9-94H13-SM-TG
3-37
Chapter 3
Calibrate Multimeter
093-94H-1141
Conditions: In an operational environment (OE), given a multimeter requiring calibration; TB 9-66252190-24; Forms, Records, Reports, Equipment, and Accessories required as listed in TB 9-6625-219024; TB 43-180; TB 385-4, TB 750-25; and United States Army Test, Measurement, and Diagnostic
Equipment (TMDE) Activity (USATA) Calibration Procedure Master List.
Standards: Calibrate the multimeter in accordance with TB 43-180 and TB 9-6625-2190-24. Observe all
safety requirements in accordance with TB 385-4. Complete required DA Form 7372 (TMDE Calibration
and Repair Data), DA Label 80 (US Army Calibrated Instrument), DA Label 163 (US Army Limited or
Special Calibration), or DA Form 2417 (U.S. Army Calibration System Rejected Instrument) in
accordance with TB 750-25.
Performance Steps
Figure 3-14. Multimeter Examples
1. Identify correct calibration procedure to be used in accordance with TB 43-180.
2. Update calibration procedure as necessary in accordance with USATA Calibration Procedure
Master List.
3. Observe all safety precautions, warnings, hazards, and notes.
Note: Paragraphs referred to in steps 4 through 10 are found in TB 9-6625-2190-24.
3-38
STP 9-94H13-SM-TG
9 September 2011
MOS/Skill Level Tasks
Performance Steps
4. Perform preliminary instructions in accordance with paragraph 6.
5. Perform equipment setup in accordance with paragraph 7.
6. Perform DC voltage performance check, and make necessary adjustments in accordance with
paragraph 8.
7. Perform DC current performance check in accordance with paragraph 9.
8. Performed AC voltage performance check, and make necessary adjustments in accordance with
paragraph 10.
9. Perform resistance performance check in accordance with paragraph 11.
10. Perform final procedure in accordance with paragraph 12.
Evaluation Preparation: Ensure all items required in the condition statement (or appropriate
substitutions) are on hand and all safety requirements are met.
Performance Measures
GO
NO-GO
1. Identified correct calibration procedure to be used in accordance with TB 43-180.
——
——
2. Updated calibration procedure as necessary in accordance with USATA
Calibration Procedure Master List.
——
——
3. Observed all safety precautions, warnings, hazards, and notes.
——
——
4. Performed preliminary instructions.
——
——
5. Performed equipment setup.
——
——
6. Performed DC voltage performance check, and made adjustments if necessary.
——
——
7. Performed DC current performance check.
——
——
8. Performed AC voltage performance check, and made adjustments if necessary.
——
——
9. Performed resistance performance check.
——
——
——
——
10. Performed final procedure.
Evaluation Guidance: Refer to the applicable technical bulletin as a guide to verify that all steps in the
calibration process are performed in accordance with the proper calibration procedure.
Score the Soldier GO if all performance measures are passed. Score the Soldier NO-GO if any
performance measure is failed. If the Soldier fails any performance measure, explain what was done
wrong and how to do it correctly.
References
Required
DA FORM 2417
DA FORM 7372
DA LABEL 163
DA LABEL 80
TB 385-4
TB 43-180
TB 750-25
TB 9-6625-2190-24
USATA MASTER LIST
9 September 2011
Related
AR 750-1
AR 750-43
DA PAM 750-8
TM 9-6695-239-14
STP 9-94H13-SM-TG
3-39
Chapter 3
Calibrate Resistance Decade
093-94H-1150
Conditions: In an operational environment, given a resistance decade requiring calibration; TB 9-66252153-24; Forms, Records, Reports, Equipment, and Accessories required as listed in TB 9-6625-215324; TB 385-4; TB 43-180; TB 750-25; and U.S. Army TMDE Activity (USATA) Calibration Procedure
Master List.
Standards: Calibrate resistance decade in accordance with TB 43-180 and TB 9-6625-2153-24.
Observe all safety precautions IAW TB 385-4. Complete the required DA Label 80 (US Army Calibrated
Instrument), DA Label 163 (US Army Limited or Special Calibration) or DA Form 2417 (U.S. Army
Calibration System Rejected Instrument) IAW TB 750-25.
Performance Steps
Figure 3-15. Resistance Decade
1. Identify correct calibration procedure to be used in accordance with TB 43-180.
2. Update calibration procedure as necessary in accordance with USATA Calibration Procedure
Master List.
3. Observe all safety precautions, warnings, hazards, and notes.
Note: All paragraphs referenced in steps 4 thru 8 are found in TB 9-6625-2153-24.
4. Perform Preliminary instructions IAW paragraph 6.
5. Perform Equipment setup IAW paragraph 7.
6. Perform Resistance Accuracy check IAW paragraph 8.
3-40
STP 9-94H13-SM-TG
9 September 2011
MOS/Skill Level Tasks
Performance Steps
7. Complete and file a Calibration Test Report if appropriate, IAW TB 9-6625-2153-24.
8. Perform Final procedure IAW paragraph 9.
9. Disconnect and maintain equipment.
Evaluation Preparation: Ensure all items required in the condition statement (or appropriate
substitutions) are on hand and all safety requirements are met.
Performance Measures
GO
NO-GO
1. Identified correct calibration procedure to be used in accordance with TB 43-180.
——
——
2. Updated calibration procedure as necessary in accordance with USATA
Calibration Procedure Master List.
——
——
3. Observed all safety precautions, warnings, hazards, and notes.
——
——
4. Performed calibration procedure IAW TB 9-6625-2153-24.
——
——
5. Disconnected and maintained equipment.
——
——
Evaluation Guidance: Refer to the applicable technical bulletin as a guide to verify that all steps in the
calibration process are performed IAW the proper calibration procedure.
Score the Soldier GO if all performance measures are passed. Score the Soldier NO-GO if any
performance measure is failed. If the Soldier fails any performance measure, explain what was done
wrong and how to do it correctly.
References
Required
DA FORM 2417
DA LABEL 163
DA LABEL 80
TB 385-4
TB 43-180
TB 750-25
TB 9-6625-2153-24
USATA MASTER LIST
9 September 2011
Related
AR 750-1
DA PAM 750-8
TM 9-6695-239-14
STP 9-94H13-SM-TG
3-41
Chapter 3
Repair Simplified Test Equipment (STE)
093-94H-1170
Conditions: In an operational environment (OE), given a faulty item of simplified test equipment
(Simplified Test Equipment for Internal Combustion Engines, Reprogrammable (STE/ICE-R), Test Set
STE-M1/FVS, Contact Test Set (CTS) AN/PSM-80 version 2 or 3, Soldier's Portable On-System Repair
Tool (SPORT) AN/PSM-95 with ICE kit, or SPORT/Maintenance Support Device (SPORT/MSD) with
ICE kit), an electrician's tool kit, diagnostic circuit boards, and appropriate technical references.
Note: You may be required to pick-up or lift bulky or heavy equipment.
Standards: Repair faulty item of Simplified Test Equipment according to the appropriate technical
reference(s). Observe all safety precautions in accordance with TB 385-4.
Performance Steps
Figure 3-16. Maintenance Support
Device
3-42
STP 9-94H13-SM-TG
9 September 2011
MOS/Skill Level Tasks
Performance Steps
Figure 3-17. STE/ICE-R Set
9 September 2011
STP 9-94H13-SM-TG
3-43
Chapter 3
Performance Steps
Figure 3-18. VTM/Transducer Kit/Set Communicator Assembly
3-44
STP 9-94H13-SM-TG
9 September 2011
MOS/Skill Level Tasks
Performance Steps
Figure 3-19. Controllable Interface
Assembly
9 September 2011
STP 9-94H13-SM-TG
3-45
Chapter 3
Performance Steps
Figure 3-20. Components of the SPORT
NOTE:
-Determine if warranty repair is applicable.
-Determine if repair is authorized.
-Before beginning repair process, check work order and talk to unit maintenance, if possible, for
description of symptoms and steps taken to correct them.
-Check all forms and tags attached to or accompanying equipment to determine reason for removal
from service.
1. Visually inspect the simplified test equipment (STE) for any physical defects.
2. Read and follow the preliminary instructions given in technical reference.
3. Set up the equipment needed to perform troubleshooting.
4. Perform self-test/operations check of STE.
3-46
STP 9-94H13-SM-TG
9 September 2011
MOS/Skill Level Tasks
Performance Steps
5. Perform troubleshooting steps/fault isolation as identified on readout or troubleshooting flowchart
in applicable technical reference if self-test fails.
6. Perform the performance check for each parameter.
7. Perform troubleshooting steps/fault isolation as identified on readout or troubleshooting flowchart
in applicable technical reference for any parameter that is out of tolerance.
8. Verify the authority to perform repairs through Maintenance Allocation Chart (MAC), Warranty
Card, FEDLOG, existing service contracts, Operations, or any other current regulatory guidance.
9. Perform repairs as required if authorized or make other appropriate arrangements to have item
repaired/replaced.
10. Verify equipment passes self-test.
11. De-energize and disconnect all the equipment.
12. Complete proper maintenance forms.
Evaluation Preparation: Ensure all items required in the condition statement (or appropriate
substitutions) are on hand and all safety requirements are met. Evaluator will induce a fault by
disconnecting a circuit card or cable connector or other non-destructive method prior to the start of
performance evaluation.
Performance Measures
GO
NO-GO
1. Visually inspected the simplified test equipment for any physical defects.
——
——
2. Read and followed the preliminary instructions given in technical reference.
——
——
3. Set up the equipment needed to perform troubleshooting.
——
——
4. Performed self-test/operations check of Test Instrument (TI).
——
——
5. Performed troubleshooting steps/fault isolation as identified on readout or
troubleshooting flowchart in applicable technical reference if self-test fails.
——
——
6. Performed the performance check for each parameter.
——
——
7. Performed troubleshooting steps/fault isolation as identified on readout or
troubleshooting flowchart in applicable technical reference for any parameter that
is out of tolerance.
——
——
8. Verified the authority to perform repairs through Maintenance Allocation Chart
(MAC), Warranty Card, FEDLOG, existing service contracts, Operations, or any
other current regulatory guidance.
——
——
9. Performed repairs as required if authorized or made other appropriate
arrangements to have item repaired/replaced.
——
——
10. Verified repair.
——
——
11. De-energized and disconnected equipment.
——
——
12. Completed proper maintenance forms.
——
——
9 September 2011
STP 9-94H13-SM-TG
3-47
Chapter 3
Evaluation Guidance: Score the Soldier GO if all performance measures are passed. Score the Soldier
NO-GO if any performance measure is failed. If the Soldier fails any performance measure, explain what
was done wrong and how to do it correctly.
References
Required
DA PAM 750-8
TB 385-4
TB 43-180
TB 750-25
TM 9-4910-571-12&P
TM 9-4910-571-34&P
TM 9-4910-751-14&P
3-48
Related
AR 750-1
EM 0103
TB 9-6625-2321-24
TM 9-6695-239-14
STP 9-94H13-SM-TG
9 September 2011
MOS/Skill Level Tasks
Subject Area 3: Oscilloscopes and Fiber Optic Equipment
Operate Oscilloscope Work station
093-94H-1200
Conditions: In an operational environment (OE), with a requirement to operate a 5820A oscilloscope
calibrator workstation; an oscilloscope to be used as unit under test (UUT), required cables and
connectors, oscilloscope workstation manufacturer's manual, oscilloscope technical manual, and TB
385-4.
Standards: Operate the oscilloscope workstation according to applicable technical references. Observe
all safety precautions in accordance with TB 385-4.
Performance Steps
Figure 3-21. Oscilloscope Workstation
1. Observe all safety precautions, warnings, hazards, and notes.
2. Read and follow the preliminary instructions given in technical references to include:
a. Check cal dates.
b. Adjust display.
c. Perform remote setup.
d. Perform front panel tests.
e. Exercise relays.
(1) Press SETUP.
(2) Press blue softkey UTILITY FUNCTIONS.
9 September 2011
STP 9-94H13-SM-TG
3-49
Chapter 3
Performance Steps
(3) Press blue softkey SELF TESTS.
(4) Press blue softkey WORK RF RELAYS.
3. Set up support equipment necessary to operate the oscilloscope workstation and oscilloscope unit
under test (UUT) according to applicable technical references.
4. Allow 30 minutes for warm up and stabilization.
5. Connect the oscilloscope workstation CHAN 1 and the UUT channel 1 using the cable(s) provided
with the workstation.
6. Operate the oscilloscope workstation using the oscilloscope as the UUT.
Note: Adjust UUT controls as necessary to obtain an easily viewed signal trace.
a. Operate oscilloscope workstation in Voltage Mode by setting the following:
(1) Press the VOLTAGE key or press blue softkey under MODE until "volt" appears.
(2) Press blue softkey under CHANGE until "to DC" appears.
(3) Press blue softkey under SCOPE Z until proper UUT input impedance (1M ohm or 50
ohm) appears.
(4) Press blue softkey under TRIG until "off" appears.
(5) Select the V/DIV MENU:
(a) Select 10 mV/DIV using softkey.
(b) Select #DIV = 8 using softkey.
(6) Reconnect the signal by pressing OPR/STBY key on the Calibrator.
(7) Obtain an 80 mV peak-to-peak signal on UUT.
(8) Remove the signal by pressing OPR/STBY key.
b. Operate oscilloscope workstation in Edge Mode by setting the following:
(1) Press the EDGE key or press blue softkey under MODE until "edge" appears.
(2) Press blue softkey under TRIG until "off" appears.
(3) Press blue softkey under TDPULSE until "off" appears.
(4) Select 50 ohm impedance on UUT or use a 50 ohm termination directly at the UUT
input.
(5) Adjust voltage level for a 1 volt p-p, 1 MHz signal.
(6) Reconnect the signal by pressing OPR/STBY key on the Calibrator.
(7) Adjust the scale on the UUT to achieve a good picture of the edge.
(8) Adjust the time base on the UUT to the fastest position available (1 ns/div or faster).
(9) Verify that the UUT exhibits the proper rise time and pulse aberration characteristics.
(10) Remove the input signal by pressing OPR/STBY key.
c. Operate oscilloscope workstation in Leveled Sine Mode.
Note: Steps 1 through 8 are a quick check of the UUT's frequency response.
(1) Press LEVEL SINE key or press MODE softkey until "levsine" appears.
(2) Select 50 ohm impedance on UUT or used a 50 ohm external termination directly at the
UUT input.
(3) Select output amplitude of 600 mV by pressing "6", "0", "0", "m", "V", and "ENTER"
keys.
(4) Reconnect the signal by pressing OPR/STBY key on the Calibrator.
(5) Adjust UUT to obtain a sine wave trace of exactly 6 divisions peak-to-peak.
(6) Make small adjustments (If necessary) to the voltage amplitude until the wave reaches
exactly six divisions.
(a) Fine-tune the voltage by pressing the EDIT FIELD key to bring a cursor into the
Output Display.
(b) Move the cursor with the left arrow key.
(c) Turn the rotary knob to adjust the value.
3-50
STP 9-94H13-SM-TG
9 September 2011
MOS/Skill Level Tasks
Performance Steps
(7) Increase the frequency to 400 MHz (for 500-MHz instruments), or 500 MHz (for
600-MHz instruments).
(8) Increase the frequency slowly until the waveform decreases to 4.2 divisions.
(a) Fine-tune frequency by using the rotary knob.
(b) Press EDIT FIELD key to place a cursor in the Output Display.
(c) Press EDIT FIELD key again to place cursor in the frequency field, and use the left
and right arrow keys to move cursor to the digit to change.
(d) Change the value by turning the rotary knob.
(e) Continue making small increments in the frequency until the signal drops to 4.2
divisions.
(At 4.2 divisions, the signal is at the frequency that corresponds to the -3 dB point.)
(9) Remove the input signal by pressing OPR/STBY key.
d. Operate oscilloscope workstation in Marker Mode.
(1) Press MARKER key or pressed MODE softkey until "marker" appeared.
(2) Select 50 ohm impedance or use an external 50 ohm termination. Make sure the UUT is
dc-coupled.
(3) Apply a 200 nanosecond time marker value by pressing "2", "0", "0", "n", "s", and
ENTER keys.
(4) Reconnect the signal by pressing OPR/STBY key on the Calibrator.
(5) Set UUT time base to show 10 time markers.
(a) Align the time markers with the UUT display panel graticule divisions.
(b) Align the signal’s peaks with the horizontal center axis.
(6) Remove the input signal by pressing OPR/STBY key.
e. Operate oscilloscope workstation using Wave Generator.
(1) Press MORE MODES key and then select "WAVEGEN" or press the blue softkey under
MODE until "wavegen" appears.
(2) Press blue softkey under SCOPE Z until proper UUT input impedance (1M or 50 ohm)
appears.
(3) Press blue softkey under WAVE until "square" appears.
Note: Allow OFFSET default value to remain.
(4) Reconnect the signal by pressing OPR/STBY key on the calibrator.
(5) View signal trace on UUT.
(6) Press blue softkey under WAVE until "sine" appears.
(7) View signal trace on UUT.
(8) Press blue softkey under WAVE until "tri" appears.
(9) View signal trace on UUT.
(10) Remove the input signal by pressing OPR/STBY key.
f. Operate oscilloscope workstation in Pulse Mode.
(1) Press MORE MODES key and then select "PULSE" or press the blue softkey under
MODE until "pulse" appears.
(2) Press blue softkey under AMPL until "600 mV" appears.
(3) Press blue softkey under TRIG until "off" appears.
(4) Reconnect the signal by pressing OPR/STBY key on the calibrator.
(5) Set pulse width of 50 nanoseconds:
(a) Press "5", "0", "n", "sec", and ENTER keys, or:
(b) Press EDIT FIELD key and use cursor and rotary knob to change digits in order to
obtain a 50 nanosecond pulse width.
(6) Set pulse period for 1 microsecond:
(a) Press EDIT FIELD key until the cursor is on the second line of the output display
(unlabeled line).
(b) Change the value using the cursor and rotary knob.
9 September 2011
STP 9-94H13-SM-TG
3-51
Chapter 3
Performance Steps
Note: Pulse periods are not always compatible with the pulse width selected. A beep sounds if the
pulse period is reduced to too low a value..
Note: Pulse width and period may be entered simultaneously by using data keys.
(7) Use the keyboard to enter in the pulse width and period value by pressing "5", "0", "n",
"sec", "1", "u", "sec", and ENTER keys.
(8) Remove the input signal by pressing OPR/STBY key.
g. Operate oscilloscope workstation in Meas Z Mode.
(1) Press MORE MODES key and then select MEAS Z or press the blue softkey under
MODE until “meas Z” appears.
(2) Measure input impedance:
(a) Press the blue softkey under MEASURE to select “res 50 ohm“ or “res 1M ohm“
termination.
(b) Connect the calibrator to Channel 1 on the UUT.
(c) Press OPR/STBY key to initiate the measurement.
(d) Press OPR/STBY key to terminate the measurement.
(3) Measure input capacitance:
Note: Input capacitance testing cannot be done with 50 ohm input impedance.
(a) Set the UUT for 1 M ohm input impedance.
(b) Press the blue softkey under MEASURE until "cap" appears.
(c) Press blue softkey to SET OFFSET with the output cable connected to the
calibrator but NOT connected to the UUT in order to cancel stray capacitances.
(d) Connect the output cable to Channel 1 on the UUT.
(e) Press OPR/STBY key to initiate the measurement.
(f) Press OPR/STBY key to terminate the measurement.
(g) Operate oscilloscope workstation in Meas V Mode.
CAUTION
Input voltages exceeding 30 VDC may cause damage to the instrument. Do not apply voltages except
in voltage measurement mode.
(1) Press MORE MODES key followed by the OTHER blue softkey.
(2) Press MEAS V CAL blue softkey when the display changes.
(3) Connect the UUT dc output to CHAN 1 of the workstation to display the UUT voltage
output.
(4) Remove the UUT connection when the DC measurement is complete.
h. Operate oscilloscope workstation in Current Mode.
(1) Press the MORE MODES key followed by the OTHER and CURRENT blue softkeys.
(2) Verify the Control Display showed a label on the right that identifies the mode as “amp.”
(3) Attach a current probe to the current loop bar located above the calibrator power button.
(4) Press OPR/STBY key to initiate current.
(5) Press OPR/STBY key to terminate current.
i. Operate oscilloscope workstation in Overload Mode.
CAUTION
To avoid damage to the UUT, use this test to check the power handling capability of the 50 ohm input
of the UUT. Before proceeding, ensure that the power rating of the UUT can handle the voltages and
currents that this test can produce.
(1) Press MORE MODES key and then select OVERLD or press the blue softkey under
MODE until “overld” appears.
(2) Press blue softkey under OUT VAL to select DC or AC and a value ranging from 5 V to
9 V (shown in Output Display). Key in or edit this value. Default value is 5 V DC.
3-52
STP 9-94H13-SM-TG
9 September 2011
MOS/Skill Level Tasks
Performance Steps
(3) Press blue softkey under T LIMIT to select a duration (in seconds). Default value is 10
seconds.
(4) Reconnect the signal by pressing OPR/STBY key on the Calibrator.
(5) Check for test results displayed with the UUTTRIP blue softkey.
(6) Remove the input signal by pressing OPR/STBY key.
7. De-energize and disconnect the equipment.
Evaluation Preparation: Ensure all items required in the condition statement (or appropriate
substitutions) are on hand and all safety requirements are met.
GO
NO-GO
1. Observed all safety precautions, warnings, hazards, and notes.
——
——
2. Read and followed the preliminary instructions given in technical references to
include:
a. Checked cal dates.
b. Adjusted display.
c. Performed remote setup.
d. Performed front panel tests.
e. Exercised relays.
——
——
3. Set up support equipment necessary to operate the oscilloscope workstation and
oscilloscope unit under test (UUT) according to applicable technical references.
——
——
4. Allowed 30 minutes for warm up and stabilization.
——
——
5. Connected the oscilloscope workstation CHAN 1and the UUT channel 1 using the
cable(s) provided with the workstation.
——
——
6. Operated the oscilloscope workstation using the oscilloscope as the UUT.
——
——
7. De-energized and disconnected the equipment.
——
——
Performance Measures
Evaluation Guidance: Score the Soldier GO if all performance measures are passed. Score the Soldier
NO-GO if any performance measure is failed. If the Soldier fails any performance measure, explain what
was done wrong and how to do it correctly.
All measurement values listed in Performance Steps/Performance Measures are nominal. Evaluators
may direct the Soldier to input different values in order to demonstrate the various capabilities of the
oscilloscope workstation.
References
Required
FLUKE 5820A
TB 385-4
TM 43-6625-915-12
9 September 2011
Related
DA PAM 750-8
TB 750-25
TM 9-6695-239-14
STP 9-94H13-SM-TG
3-53
Chapter 3
Operate Oscilloscope
093-94H-1210
Conditions: In an operational environment (OE), with a requirement to operate a model OS-303/G
oscilloscope ; model 33250A function generator, time/frequency workstation, required cables, and TM
43-6625-915-12 or manufacturer's manual, and TB 385-4.
Standards: Operate oscilloscope in accordance with TM 43-6625-915-12 or manufacturer's manual.
Observe all safety requirements in accordance with TB 385-4.
3-54
STP 9-94H13-SM-TG
9 September 2011
MOS/Skill Level Tasks
Performance Steps
Figure 3-22. OS/303-G with Components
1. Observe all safety precautions, warnings, hazards, and notes.
2. Connect mouse and keyboard to oscilloscope.
3. Connect oscilloscope to A/C power source.
4. Turn on oscilloscope by pressing power button, and allow oscilloscope to run through start up
procedure.
9 September 2011
STP 9-94H13-SM-TG
3-55
Chapter 3
Performance Steps
5. Click on mouse icon in the upper right portion of screen to enable the graphical user interface.
6. Connect output of function generator to Channel 1 of the oscilloscope using radio frequency (RF)
cable.
7. Adjust function generator to produce a 10 kHz, 500 mV RMS square wave signal.
8. Select Channel 1 by clicking on the corresponding checkbox on the display.
9. Adjust Channel 1 vertical scale:
a. Click on oval icon representing Channel 1.
b. Adjust scale to 200 mV/ by either clicking on the sine wave icons or directly on the vertical
scaling value and using numeric buttons.
10. Adjust Channel 1 horizontal scale:
a. Click on the "H" icon at the bottom portion of the screen to open the Horizontal Setup dialog
box.
b. Adjust scale to 100 µs by either clicking the controls in the Horizontal Setup dialog box,
clicking the sweep speed value and using the numeric buttons, or clicking on the 2 sine wave
icons to the right of the sweep speed value.
11. Press RUN button or click on the blue-green octagon shaped icon in the bottom left portion of the
screen.
12. Perform Zoom function using the mouse:
a. Click and drag a rectangle enclosing the area of the waveform to be viewed.
b. Click inside the outlined rectangle to magnify the image.
c. Click on "Close" button in the Zoom dialog box.
13. Perform waveform measurements using the icons in the Measurement Toolbar:
a. Click, drag, and drop the Rise time icon onto a leading edge of the square wave.
b. Click, drag, and drop the Fall time icon onto a trailing edge of the square wave.
c. Click on Frequency icon and select "Entire Display" for the Measurement Area of the "Enter
Measurement Info" dialog box.
d. Click on Period icon and select "Single Cycle" for the Measurement Area of the "Enter
Measurement Info" dialog box.
e. Repeat the previous measurement techniques for the remaining icons in the Measurement
Toolbar.
f. Perform multiple simultaneous Rise time measurements by clicking, dragging, and dropping
the Rise time icon to three separate leading edges of displayed waveform.
14. Press STOP button or click on the red octagon shaped icon in the bottom left portion of the
screen.
Note: Performing steps 15 through 28 will result in a displayed image (Lissajou pattern) used
for comparing frequency and phase relationships between two waveforms.
15. Adjust function generator to produce a 10 MHz, 1 V RMS sine wave signal.
16. Connect RF cable from rear panel connector J7 of the Time/Frequency workstation to oscilloscope
Channel 2.
17. Select oscilloscope Channel 2 by clicking on the corresponding checkbox on the display.
18. Click on "Control" drop down menu on the upper toolbar.
19. Select "Autoscale" from the "Control" drop down menu.
3-56
STP 9-94H13-SM-TG
9 September 2011
MOS/Skill Level Tasks
Performance Steps
20. Click on "Analyze" drop down menu on the upper toolbar.
21. Select "Math/FFT" from the "Analyze" drop down menu.
22. Check the "Display On" and "Scaling" checkboxes.
23. Select "Versus" from the "Operator" drop down list box.
24. Select "Channel 1" from the "Source 1" drop down list box.
25. Select "Channel 2" from the "Source 2" drop down list box.
26. Click the "Close" button on the Math / FFT dialog box.
27. Turn off the active channels by unchecking the corresponding boxes for Channels 1 & 2.
28. Vary the frequency of the function generator in 1 Hz increments (above and below 10 MHz), and
observe resulting changes in the displayed image.
29. Disable output of function generator.
30. Remove all RF cable connections.
31. De-energize oscilloscope and disconnect mouse and keyboard.
32. Stow and maintain all equipment.
Evaluation Preparation: Ensure all items required in the condition statement (or appropriate
substitutions) are on hand and all safety requirements are met.
Performance Measures
GO
NO-GO
1. Observed all safety precautions, warnings, hazards, and notes.
——
——
2. Connected mouse and keyboard to oscilloscope.
——
——
3. Connected oscilloscope to A/C power source.
——
——
4. Turned on oscilloscope by pressing power button, and allowed oscilloscope to run
through start up procedure.
——
——
5. Clicked on mouse icon in the upper right portion of screen to enable the graphical
user interface.
——
——
6. Connected output of function generator to Channel 1 of the oscilloscope using
radio frequency (RF) cable.
——
——
7. Adjusted function generator to produce a 10 kHz, 500 mV RMS square wave
signal.
——
——
8. Selected Channel 1 by clicking on the corresponding checkbox on the display.
——
——
9. Adjusted Channel 1 vertical scale.
——
——
10. Adjusted Channel 1 horizontal scale.
——
——
11. Pressed RUN button or clicked on the blue-green octagon shaped icon in the
bottom left portion of the screen.
——
——
12. Performed Zoom function using the mouse.
——
——
13. Performed waveform measurements using the icons in the Measurement Toolbar.
——
——
9 September 2011
STP 9-94H13-SM-TG
3-57
Chapter 3
Performance Measures
GO
NO-GO
14. Pressed STOP button or clicked on the red octagon shaped icon in the bottom left
portion of the screen.
——
——
15. Adjusted function generator to produce a 10 MHz, 1 V RMS sine wave signal.
——
——
16. Connected rear panel connector J7 of the Time/Frequency workstation to
oscilloscope Channel 2 using RF cable.
——
——
17. Selected oscilloscope Channel 2 by clicking on the corresponding checkbox on
the display.
——
——
18. Clicked on "Control" drop down menu on the upper toolbar.
——
——
19. Selected "Autoscale" from the "Control" drop down menu.
——
——
20. Clicked on "Analyze" drop down menu on the upper toolbar.
——
——
21. Selected "Math/FFT" from the "Analyze" drop down menu.
——
——
22. Checked the "Display On" and "Scaling" checkboxes.
——
——
23. Selected "Versus" from the "Operator" drop down list box.
——
——
24. Selected "Channel 1" from the "Source 1" drop down list box.
——
——
25. Selected "Channel 2" from the "Source 2" drop down list box.
——
——
26. Clicked the "Close" button on the Math / FFT dialog box.
——
——
27. Turned off the active channels by unchecking the corresponding boxes for
Channels 1 & 2.
——
——
28. Varied the frequency of the function generator in 1 Hz increments (above and
below 10 MHz), and observed resulting changes in the displayed image.
——
——
29. Disabled output of function generator.
——
——
30. Removed all RF cable connections.
——
——
31. De-energized oscilloscope and disconnected mouse and keyboard.
——
——
32. Stowed and maintained all equipment.
——
——
Evaluation Guidance: Score the Soldier GO if all performance measures are passed. Score the Soldier
NO-GO if any performance measure is failed. If the Soldier fails any performance measure, explain what
was done wrong and how to do it correctly.
References
Required
AGILENT 33250A
TB 385-4
TM 43-6625-915-12
3-58
Related
DA PAM 750-8
ET6000-SERIES
TM 9-6695-239-14
STP 9-94H13-SM-TG
9 September 2011
MOS/Skill Level Tasks
Repair Oscilloscope
093-94H-1211
Conditions: In an operational environment (OE), given a faulty oscilloscope; oscilloscope workstation,
test equipment as needed (multimeter, oscilloscope, and so on), electrician's tool kit, oscilloscope
manufacturer's manual, and TB 385-4.
Standards: Repair oscilloscope in accordance with applicable technical reference(s). Observe all safety
precautions in accordance with TB 385-4.
Performance Steps
NOTE:
-Determine if warranty repair is applicable.
-Determine if repair is authorized.
-Before beginning repair process, check work order and talk to unit maintenance, if possible, for
description of symptoms and steps taken to correct them.
-Check all forms and tags attached to or accompanying equipment to determine reason for removal from
service.
1. Observe all safety precautions, warnings, hazards, and notes.
2. Visually inspect the oscilloscope for any physical defects.
3. Read and follow the operator, maintenance, and repair instructions given in the applicable technical
reference.
4. Set up support equipment necessary to repair the oscilloscope.
5. Perform operational circuit checks to sectionalize the malfunction.
6. Perform schematic analysis and functional tests to localize the malfunction.
7. Perform resistance, continuity, and power distribution tests to isolate the malfunction.
8. Repair/replace faulty component(s).
9. Verify repair.
10. De-energize and disconnect equipment.
11. Complete proper maintenance forms.
Evaluation Preparation: Ensure all items required in the condition statement (or appropriate
substitutions) are on hand and all safety requirements are met. Evaluator will induce a fault by
disconnecting a circuit card or cable connector or other non-destructive method prior to the start of
performance evaluation.
GO
NO-GO
1. Observed all safety precautions, warnings, hazards, and notes.
——
——
2. Visually inspected the oscilloscope for any physical defects.
——
——
3. Read and followed the operator, maintenance, and repair instructions given in the
applicable technical reference.
——
——
4. Set up support equipment necessary to repair the oscilloscope.
——
——
Performance Measures
9 September 2011
STP 9-94H13-SM-TG
3-59
Chapter 3
Performance Measures
GO
NO-GO
5. Performed operational circuit checks to sectionalize the malfunction.
——
——
6. Performed a schematic analysis and functional tests to localize the malfunction.
——
——
7. Performed resistance, continuity, and power distribution tests to isolate the
malfunction.
——
——
8. Repaired/replaced faulty component(s).
——
——
9. Verified repair.
——
——
10. De-energized and disconnected equipment.
——
——
11. Completed proper maintenance forms.
——
——
Evaluation Guidance: Score the Soldier GO if all performance measures are passed. Score the Soldier
NO-GO if any performance measure is failed. If the Soldier fails any performance measure, explain what
was done wrong and how to do it correctly.
References
Required
AGILENT 54830
TB 385-4
TM 11-6625-3135-40
TM 43-6625-915-12
3-60
Related
AR 750-1
DA PAM 750-8
EM 0007
TB 43-180
TB 750-25
TM 9-6695-239-14
STP 9-94H13-SM-TG
9 September 2011
MOS/Skill Level Tasks
Calibrate Oscilloscope
093-94H-1212
Conditions: In an operational environment (OE), given a model OS-303/G oscilloscope requiring
calibration; Forms, Records, Reports, Equipment, and Accessories required as listed in TB 9-66252344-24; TB 43-180; TB 385-4, TB 750-25; and United States Army Test, Measurement, and Diagnostic
Equipment (TMDE) Activity (USATA) Calibration Procedure Master List.
Standards: Calibrate oscilloscope in accordance with TB 43-180 and TB 9-6625-2344-24. Observe all
safety precautions in accordance with TB 385-4. Complete required DA Form 7372 (TMDE Calibration
and Repair Data), DA Label 80 (US Army Calibrated Instrument), DA Label 163 (US Army Limited or
Special Calibration), or DA Form 2417 (U.S. Army Calibration System Rejected Instrument) in
accordance with TB 750-25.
9 September 2011
STP 9-94H13-SM-TG
3-61
Chapter 3
Performance Steps
Figure 3-23. Fluke 5820A Oscilloscope Workstation
1. Identify correct calibration procedure to be used in accordance with TB 43-180.
3-62
STP 9-94H13-SM-TG
9 September 2011
MOS/Skill Level Tasks
Performance Steps
2. Update calibration procedure as necessary in accordance with USATA Calibration Procedure
Master List.
3. Observe all safety precautions, warnings, hazards, and notes.
Note: Oscilloscope being calibrated is referred to as the test instrument (TI). All paragraphs
referenced in steps 4 through 8 are found in TB 9-6625-2344-24.
4. Perform preliminary operations.
5. Perform Equipment Setup.
a. Connect mouse and keyboard to TI.
b. Apply power and allow 30 minute warm-up.
Note: Warm up must be preceded by a 2 hour non-operating temperature stabilization period (if
applicable).
c. Access UTILITIES menu using TI mouse.
d. Open SELF TEST WINDOW and run SCOPE SELF TESTS.
Note: If one or more self-tests fail, refer to TM 43-6625-915-12, Chapter 2, Troubleshooting
Procedures.
e. Close SELF TEST WINDOW after TI passes self tests.
Note: Self-calibration should be performed if the TI fails any parameter.
6. Perform Calibration Process as follows:
a. Perform Vertical Gain Accuracy check in accordance with paragraph 8.
b. Perform Vertical Offset check in accordance with paragraph 9.
c. Perform Bandwidth Accuracy check in accordance with paragraph 10.
d. Perform Equivalent Time Measurement check in accordance with paragraph 11.
e. Perform Real Time Measurement check in accordance with paragraph 12.
f. Perform Trigger Sensitivity check in accordance with paragraph 13.
g. Perform DC Calibrator check in accordance with paragraph 14.
Note: DO NOT perform Power Supply checks if all other parameters are in tolerance.
h. Perform Power Supply check in accordance with paragraph 15.
7. Perform the Alignment Process described in Section IV ONLY IF the TI fails any parameter:
a. Perform Self-calibration in accordance with paragraph 17.
b. Perform procedures in accordance with paragraph 18.
8. Perform Final procedure in accordance with paragraph 16.
Evaluation Preparation: Ensure all items required in the condition statement (or appropriate
substitutions) are on hand and all safety requirements are met.
Performance Measures
GO
NO-GO
1. Identified correct calibration procedure to be used in accordance with TB 43-180.
——
——
2. Updated calibration procedure as necessary in accordance with USATA
Calibration Procedure Master List.
——
——
9 September 2011
STP 9-94H13-SM-TG
3-63
Chapter 3
Performance Measures
GO
NO-GO
3. Observed all safety precautions, warnings, hazards, and notes.
——
——
4. Performed preliminary operations.
——
——
5. Performed equipment setup.
——
——
6. Performed Calibration Process.
——
——
7. Performed the Alignment Process described in Section IV ONLY IF the TI fails
any parameter.
——
——
8. Performed Final procedure in accordance with paragraph 16.
——
——
Evaluation Guidance: Refer to the applicable technical bulletin as a guide to verify that all steps in the
calibration process are performed in accordance with the proper calibration procedure.
Score the Soldier GO if all performance measures are passed. Score the Soldier NO-GO if any
performance measure is failed. If the Soldier fails any performance measure, explain what was done
wrong and how to do it correctly.
References
Required
DA FORM 2417
DA FORM 7372
DA LABEL 163
DA LABEL 80
TB 385-4
TB 43-180
TB 750-25
TB 9-6625-2344-24
TM 43-6625-915-12
USATA MASTER LIST
3-64
Related
AR 750-1
AR 750-43
DA PAM 750-8
STP 9-94H13-SM-TG
9 September 2011
MOS/Skill Level Tasks
Calibrate Fiber Optic Equipment
093-94H-1221
Conditions: In an operational environment (OE), given fiber optic equipment requiring calibration; an
Optical Fiber Test Set (TS-4320(P)/G), TB 9-6625-2309-24; forms, records, reports, equipment, and
accessories required as listed in TB 9-6625-2309-24, TB 43-180; TB 750-25; TB 385-4; TB MED 524;
TM 11-6625-3271-12, TM 11-6625-3271-40 and United States Army Test, Measurement, and
Diagnostic Equipment (TMDE) Activity (USATA) Calibration Procedure Master List.
Standards: Calibrate fiber optic equipment in accordance with TB 43-180 and TB 9-6625-2309-24.
Observe all safety precautions in accordance with TB 385-4 and TB MED 524. Complete required DA
Form 7372 (TMDE Calibration and Repair Data), DA Label 80 (US Army Calibrated Instrument), DA
Label 163 (US Army Limited or Special Calibration), or DA Form 2417 (U.S. Army Calibration System
Rejected Instrument) in accordance with TB 750-25.
Performance Steps
Figure 3-24. FOCUS
9 September 2011
STP 9-94H13-SM-TG
3-65
Chapter 3
Performance Steps
LWCM
Figure 3-25. FOCUS
SWCM
Figure 3-26. 8153A Lightwave
3-66
STP 9-94H13-SM-TG
9 September 2011
MOS/Skill Level Tasks
Performance Steps
Multimeter
Figure 3-27. DG535 Digital
Generator
Figure 3-28. Optical Fiber Test
9 September 2011
STP 9-94H13-SM-TG
3-67
Chapter 3
Performance Steps
Set
Figure 3-29. Fiber Optic Calibration Standards
1. Observe all safety precautions, warnings, hazards, and notes in accordance with TB 385-4, TB
MED 524, and manufacturer's operator manuals.
2. Operate the fiber optic equipment.
a.
Zero lightwave multimeter.
b.
Set up lightwave multimeter to measure 850 nM in dBm units.
c.
Set FOCUS-SWCM LD Bias Current switch to LD Pulsed.
d.
Set FOCUS-SWCM VAR ATTN 1 and VAR ATTN 2 controls for maximum attenuation
(CW).
e.
Set FOCUS-SWCM VAR ATTN 2 SWITCHED ATTN 2 IN OUT Switch to OUT.
f.
Connect appropriate fiber optic jumper cable (FC to STC-2-METER) from ST connector
adapter on lightwave multimeter optical input to FOCUS-SWCM OPTICAL I-O.
g.
Set FOCUS-SWCM POWER OFF ON key control to ON.
3-68
STP 9-94H13-SM-TG
9 September 2011
MOS/Skill Level Tasks
Performance Steps
h.
Monitor lightwave multimeter and adjust FOCUS-SWCM VAR ATTN 1 control for a -27
dBm display on lightwave multimeter.
i.
Set FOCUS-SWCM ATTN 2 SWITCHED ATTN IN OUT switch to IN.
j.
Monitor lightwave multimeter display and adjust FOCUS-SWCM VAR ATTN 2 control
for lightwave multimeter indication of -33 dBm.
k.
Reset FOCUS-SWCM VAR ATTN 1 and VAR ATTN 2 controls for maximum
attenuation (CW).
l.
Set FOCUS-SWCM POWER OFF ON key control to OFF.
m.
Disconnect fiber optic jumper cable from ST connector adapter on lightwave multimeter
optical input.
n.
Set up lightwave multimeter to measure 1310 nM in dBm units.
o.
Set FOCUS-LWCM LD Bias Current switch to LD Pulsed.
p.
Set FOCUS-LWCM VAR ATTN 1 and VAR ATTN 2 controls for maximum attenuation
(CW).
q.
Set FOCUS-LWCM VAR ATTN 2 SWITCHED ATTN 2 IN OUT Switch to OUT.
r.
Set FOCUS-LWCM WAVELENGTH switch to 1310 nM.
s.
Connect appropriate fiber optic jumper cable (FC to STC-2-METER) from ST connector
adapter on lightwave multimeter optical input to FOCUS-LWCM OPTICAL I-O.
t.
Set FOCUS-LWCM POWER OFF ON key control to ON.
u.
Monitor lightwave multimeter and adjust FOCUS-LWCM VAR ATTN 1 control for a -27
dBm display on lightwave multimeter.
v.
Reset FOCUS-LWCM VAR ATTN 1 and VAR ATTN 2 controls for maximum
attenuation (CW).
w.
Set FOCUS-LWCM POWER OFF ON key control to OFF.
3. De-energize and disconnect equipment.
4. Identify correct calibration procedure to be used in accordance with TB 43-180.
5. Update calibration procedure as necessary in accordance with USATA Calibration Procedure
Master List.
6. Observe all safety precautions, warnings, hazards, and notes.
Note: Paragraphs referenced in steps 4 through 9 are found in TB 9-6625-2309-24.
7. Perform preliminary instructions in accordance with paragraph 6.
8. Perform Equipment setup in accordance with paragraph 7.
a. Perform time insertion delay characterization in accordance with Section IV, paragraph 12 if
FOCUS-SWCM optical subassembly, FOCUS-LWCM optical subassembly, or DG535 digital
delay/pulse generator have been repaired or replaced.
b. Perform steps in accordance with paragraph 11 to change ZERO-KM SETTING if software
level 1.08a is installed in TI.
9. Perform horizontal scale error performance check in accordance with paragraph 8a and make
necessary adjustments in accordance with paragraph 8b.
10. Perform attenuation scale non-linearity performance check in accordance with paragraph 9a, and
make necessary adjustments in accordance with paragraph 9b.
11. Perform circuit alignment only if TI is found to be out of tolerance during Horizontal scale error
performance check or Attenuation scale non-linearity performance; or if FOCUS-SWCM optical
subassembly, FOCUS-LWCM optical subassembly, or DG535 digital delay/pulse generator are
repaired or replaced.
a. Perform A/D adjustments in accordance with paragraph 10.
b. Perform Time insertion delay characterization in accordance with paragraph 12.
9 September 2011
STP 9-94H13-SM-TG
3-69
Chapter 3
Performance Steps
12. Perform final procedure in accordance with paragraph 13.
13. Disconnect and maintain equipment.
Evaluation Preparation: Ensure all items required in the condition statement (or appropriate
substitutions) are on hand and all safety requirements are met.
Performance Measures
GO
NO-GO
1. Observed all safety precautions, warnings, hazards, and notes in accordance with
TB 385-4, TB Med 524, and manufacturer's operator manuals.
——
——
2. Operated the fiber optic equipment.
——
——
3. De-energized and disconnected equipment.
——
——
4. Identified correct calibration procedure to be used in accordance with TB 43-180.
——
——
5. Updated calibration procedure as necessary in accordance with USATA
Calibration Procedure Master List.
——
——
6. Observed all safety precautions, warnings, hazards, and notes.
——
——
7. Performed preliminary instructions in accordance with paragraph 6.
——
——
8. Performed equipment setup in accordance with paragraph 7.
——
——
9. Performed horizontal scale error performance check in accordance with
paragraph 8a and made necessary adjustments in accordance with paragraph 8b.
——
——
10. Performed attenuation scale non-linearity performance check in accordance with
paragraph 9a and made necessary adjustments in accordance with paragraph 9b.
——
——
11. Performed circuit alignment.
——
——
12. Performed final procedure in accordance with paragraph 13.
——
——
13. Disconnected and maintained equipment.
——
——
Evaluation Guidance: Refer to the applicable technical bulletin as a guide to verify that all steps in the
calibration process are performed in accordance with the proper calibration procedure.
Score the Soldier GO if all performance measures are passed. Score the Soldier NO-GO if any
performance measure is failed. If the Soldier fails any performance measure, explain what was done
wrong and how to do it correctly.
References
Required
DA FORM 2417
DA FORM 7372
DA LABEL 163
DA LABEL 80
HP 8153A
TB 385-4
TB 43-180
TB 750-25
TB 9-6625-2309-24
TB MED 524
TM 11-6625-3271-12
TM 11-6625-3271-40
USATA MASTER LIST
3-70
Related
AR 750-1
AR 750-43
DA PAM 750-8
TM 9-6695-239-14
STP 9-94H13-SM-TG
9 September 2011
MOS/Skill Level Tasks
Subject Area 4: Signal Generator
Operate Signal Generator Work station
093-94H-1300
Conditions: In an operational environment (OE), with a requirement to operate a signal generator
workstation; model 8902A signal generator tester, model 11793A waveform converter, model 1121
audio analyzer, model 11722A and 11792A sensors, a signal generator to be used as the unit under
test, cables and connectors, signal generator workstation manufacturer's manuals, signal generator
manufacturer's manual or TM, and TB 385-4.
Standards: Operate the signal generator workstation in accordance with applicable technical references
(manufacturer's manuals). Observe all safety precautions in accordance with TB 385-4.
Performance Steps
Figure 3-30. Key Components of the Signal Generator Workstation
1. Observe all safety precautions, warnings, hazards, and notes.
2. Read and follow the preliminary instructions given in technical references for signal generator
workstation.
3. Set up the equipment needed to operate the signal generator workstation using the signal
generator as unit under test (UUT) according to technical references.
4. Operate the signal generator workstation controls to establish the appropriate measurement
configuration to measure the signal output by UUT.
a. Measure RF output frequency.
b. Measure RF output power.
c. Measure tuned RF level.
d. Measure amplitude modulation.
9 September 2011
STP 9-94H13-SM-TG
3-71
Chapter 3
Performance Steps
e. Measure frequency modulation.
f. Measure phase modulation.
g. Measure modulation frequency.
h. Measure audio level.
i. Measure audio distortion.
5. De-energize and disconnect equipment.
Evaluation Preparation: Ensure all items required in the condition statement (or appropriate
substitutions) are on hand and all safety requirements are met.
GO
NO-GO
1. Observed all safety precautions, warnings, hazards, and notes.
——
——
2. Read and followed the preliminary instructions given in technical references for
signal generator workstation.
——
——
3. Set up the equipment needed to operate the signal generator workstation using
the signal generator as unit under test (UUT) according to technical references.
——
——
4. Operated the signal generator workstation controls to establish the appropriate
measurement configuration to measure the signal output by UUT.
——
——
5. De-energized and disconnected the equipment.
——
——
Performance Measures
Evaluation Guidance: Score the Soldier GO if all performance measures are passed. Score the Soldier
NO-GO if any performance measure is failed. If the Soldier fails any performance measure, explain what
was done wrong and how to do it correctly.
References
Required
HP 8902A
TB 385-4
3-72
Related
683XXC
ANRITSU 682XXB/683XXB
DA PAM 750-8
HP 8902A CAL MANUAL
TM 11-6625-3165-14
TM 9-6695-239-14
STP 9-94H13-SM-TG
9 September 2011
MOS/Skill Level Tasks
Operate Signal Generator
093-94H-1310
Conditions: In an operational environment (OE), with a requirement to operate a signal generator;
model SG-1207 /U, 68369NV, or 68347M signal generator, spectrum analyzer, signal generator
workstation, RF cables as required, TM 11-6625-3165-14 or manufacturer's manual, and TB 385-4.
Standards: Operate the signal generator in accordance with appropriate technical or manufacturer's
manual. Observe all safety precautions in accordance with TB 385-4.
Performance Steps
Figure 3-31. 68369NV Signal
Generator
9 September 2011
STP 9-94H13-SM-TG
3-73
Chapter 3
Performance Steps
Figure 3-32. 68347M Signal Generator
1. Observe all safety precautions, warnings, hazards, and notes.
2. Prepare signal generator for use.
3. Operate signal generator.
a. Set frequency.
b. Set amplitude.
c. Set output ON/OFF.
d. Set amplitude modulation.
e. Set frequency modulation.
f. Set phase modulation.
g. Set pulse modulation.
h. Set internal modulation source.
i. Set external modulation source.
j. Set modulation output.
k. Set HP-IB address.
4. De-energize and disconnect equipment.
Evaluation Preparation: Ensure all items required in the condition statement (or appropriate
substitutions) are on hand and all safety requirements are met.
GO
NO-GO
1. Observed all safety precautions, warnings, hazards, and notes.
——
——
2. Prepared signal generator for use.
——
——
3. Operated signal generator.
a. Set frequency.
——
——
Performance Measures
3-74
STP 9-94H13-SM-TG
9 September 2011
MOS/Skill Level Tasks
Performance Measures
b. Set amplitude.
c. Set output ON/OFF.
d. Set amplitude modulation.
e. Set frequency modulation.
f. Set phase modulation.
g. Set pulse modulation.
h. Set internal modulation source.
i. Set external modulation source.
j. Set modulation output.
k. Set HP-IB address.
4. De-energized and disconnected equipment.
GO
NO-GO
——
——
Evaluation Guidance: Score the Soldier GO if all performance measures are passed. Score the Soldier
NO-GO if any performance measure is failed. If the Soldier fails any performance measure, explain what
was done wrong and how to do it correctly.
References
Required
683XXC
ANRITSU 682XXB/683XXB
TB 385-4
TM 11-6625-3165-14
9 September 2011
Related
DA PAM 750-8
TM 9-6695-239-14
STP 9-94H13-SM-TG
3-75
Chapter 3
Repair Signal Generator
093-94H-1311
Conditions: In an operational environment (OE), given a malfunctioning signal generator, signal
generator workstation, test equipment as needed (multimeter, oscilloscope, spectrum analyzer, and so
on), electrician's tool kit, signal generator manufacturer's manual, maintenance forms, and TB 385-4.
Standards: Repair signal generator in accordance with applicable signal generator technical references.
Observe all safety precautions in accordance with TB 385-4.
Performance Steps
NOTE:
-Determine if warranty repair is applicable.
-Determine if repair is authorized.
-Before beginning repair process, check work order and talk to unit maintenance, if possible, for
description of symptoms and steps taken to correct them.
-Check all forms and tags attached to or accompanying equipment to determine reason for removal from
service.
1. Observe all safety precautions, warnings, hazards, and notes.
2. Visually inspect the signal generator for any physical defects.
3. Read and follow the operator, maintenance, and repair instructions given in technical reference.
4. Set up equipment necessary for troubleshooting the signal generator.
5. Perform operational circuit checks to sectionalize the malfunction.
6. Perform schematic analysis and functional tests to localize the malfunction.
7. Perform resistance, continuity, and power distribution tests to isolate the malfunction.
8. Repair/replace faulty component(s).
9. Verify repair.
10. De-energize and disconnect equipment.
11. Complete proper maintenance forms.
Evaluation Preparation: Ensure all items required in the condition statement (or appropriate
substitutions) are on hand and all safety requirements are met. Evaluator will induce a fault by
disconnecting a circuit card or cable connector or other non-destructive method prior to the start of
performance evaluation.
GO
NO-GO
1. Observed all safety precautions, warnings, hazards, and notes.
——
——
2. Visually inspected the signal generator for any physical defects.
——
——
3. Read and followed the operator, maintenance, and repair instructions given in
technical reference.
——
——
4. Set up equipment needed for troubleshooting the signal generator.
——
——
Performance Measures
3-76
STP 9-94H13-SM-TG
9 September 2011
MOS/Skill Level Tasks
Performance Measures
GO
NO-GO
5. Performed operational circuit checks to sectionalize the malfunction.
——
——
6. Performed a schematic analysis and functional tests to localize the malfunction.
——
——
7. Performed resistance, continuity, and power distribution tests to isolate the
malfunction.
——
——
8. Repaired/replaced faulty component(s).
——
——
9. Verified repair.
——
——
10. De-energized and disconnected all the equipment.
——
——
11. Completed proper maintenance forms.
——
——
Evaluation Guidance: Score the Soldier GO if all performance measures are passed. Score the Soldier
NO-GO if any performance measure is failed. If the Soldier fails any performance measure, explain what
was done wrong and how to do it correctly.
References
Required
683XXC
HP 8902A
TB 385-4
TB 750-25
TM 11-6625-3165-14
9 September 2011
Related
AR 750-1
DA PAM 750-8
TB 43-180
TM 9-6695-239-14
STP 9-94H13-SM-TG
3-77
Chapter 3
Calibrate Signal Generator
093-94H-1312
Conditions: In an operational environment (OE), given signal generator requiring calibration, applicable
calibration procedure, Forms, Records, Reports, Equipment, and Accessories required as listed in
procedure; TB 43-180, TB 385-4, TB 750-25, and United States Army Test, Measurement, and
Diagnostic Equipment (TMDE) Activity (USATA) Calibration Procedure Master List.
Standards: Calibrate the signal generator in accordance with TB 43-180 and calibration procedure.
Observe all safety precautions in accordance with TB 385-4. Complete required DA Form 7372 (TMDE
Calibration and Repair Data), DA Label 80 (US Army Calibrated Instrument), DA Label 163 (US Army
Limited or Special Calibration), or DA Form 2417 (U.S. Army Calibration System Rejected Instrument) in
accordance with TB 750-25.
Performance Steps
Figure 3-33. Signal Generator Workstation in Operation
1. Identify correct calibration procedure to be used in accordance with TB 43-180.
2. Update calibration procedure as necessary in accordance with USATA Calibration Procedure
Master List.
3. Observe all safety precautions, warnings, hazards, and notes.
4. Perform preliminary operations.
a. Perform setup instructions.
b. Perform equipment connections.
5. Perform line stability performance check and make necessary adjustments.
3-78
STP 9-94H13-SM-TG
9 September 2011
MOS/Skill Level Tasks
Performance Steps
6. Perform frequency accuracy performance check and make necessary adjustments.
7. Perform RF output performance check and make necessary adjustments.
8. Perform output level flatness performance check and make necessary adjustments.
9. Perform attenuation performance check and make necessary adjustments.
10. Perform spectral purity performance check and make necessary adjustments.
11. Perform pulse modulation performance check and make necessary adjustments.
12. Perform amplitude modulation performance check and make necessary adjustments.
13. Perform frequency modulation performance check and make necessary adjustments.
14. Perform phase modulation performance check and make necessary adjustments.
15. Perform internal oscillator performance check and make necessary adjustments.
16. Perform power supply performance check if necessary and make required adjustments.
17. Perform final procedure.
18. Disconnect and maintain equipment.
Evaluation Preparation: Ensure all items required in the condition statement (or appropriate
substitutions) are on hand and all safety requirements are met.
Performance Measures
GO
NO-GO
1. Identified correct calibration procedure to be used in accordance with TB 43-180.
——
——
2. Updated calibration procedure as necessary in accordance with USATA
Calibration Procedure Master List.
——
——
3. Observed all safety precautions, warnings, hazards, and notes.
——
——
4. Performed preliminary operations.
——
——
5. Performed line stability performance checks and made necessary adjustments.
——
——
6. Performed frequency accuracy performance checks and made necessary
adjustments.
——
——
7. Performed RF output performance checks and made necessary adjustments.
——
——
8. Performed output level flatness performance checks and made necessary
adjustments.
——
——
9. Performed attenuation performance checks and made necessary adjustments.
——
——
10. Performed spectral purity performance checks and made necessary adjustments.
——
——
11. Performed pulse modulation performance checks and made necessary
adjustments.
——
——
12. Performed amplitude modulation performance checks and made necessary
adjustments.
——
——
13. Performed frequency modulation performance checks and made necessary
adjustments.
——
——
9 September 2011
STP 9-94H13-SM-TG
3-79
Chapter 3
Performance Measures
GO
NO-GO
14. Performed phase modulation performance checks and made necessary
adjustments.
——
——
15. Performed internal oscillator performance checks and made necessary
adjustments.
——
——
16. Performed power supply performance checks (if necessary) and made required
adjustments.
——
——
17. Performed final procedure.
——
——
18. Disconnected and maintained equipment.
——
——
Evaluation Guidance: Refer to the applicable technical bulletin as a guide to verify that all steps in the
calibration process are performed in accordance with the proper calibration procedure.
Score the Soldier GO if all performance measures are passed. Score the Soldier NO-GO if any
performance measure is failed. If the Soldier fails any performance measure, explain what was done
wrong and how to do it correctly.
References
Required
DA FORM 7372
DA LABEL 80
TB 385-4
TB 43-180
TB 750-25
TB 9-6625-2182-24
TB 9-6625-2322-24
TB 9-6625-2323-24
USATA MASTER LIST
3-80
Related
AR 750-1
AR 750-43
DA FORM 2417
DA LABEL 163
DA PAM 750-8
TM 11-6625-3165-14
TM 9-6695-239-14
STP 9-94H13-SM-TG
9 September 2011
MOS/Skill Level Tasks
Operate Pulse Generator
093-94H-1320
Conditions: In an operational environment (OE), with a requirement to operate a model 9210 Pulse
Generator, oscilloscope, RF cables as required, Pulse Generator manufacturer's manual, and TB 385-4.
Standards: Operate the pulse generator in accordance with the applicable technical
reference/manufacturer's manual. Observe all safety precautions in accordance with TB 385-4.
Performance Steps
Figure 3-34. 9210 LeCroy Pulse Generator
1. Observe all safety precautions, warnings, hazards, and notes.
2. Prepare pulse generator for operation using oscilloscope for signal display.
3. Operate pulse generator.
a. Set pulse amplitude.
b. Set pulse width.
c. Set pulse duty cycle.
d. Set pulse period.
e. Set pulse frequency.
f. Set pulse output ON/OFF.
g. Set trigger to normal (internal).
h. Set trigger to external (single).
i. Set GPIB address.
4. De-energize and disconnect equipment.
5. Maintain tools and equipment.
Evaluation Preparation: Ensure all items required in the condition statement (or appropriate
substitutions) are on hand and all safety requirements are met.
9 September 2011
STP 9-94H13-SM-TG
3-81
Chapter 3
Performance Measures
GO
NO-GO
1. Observed all safety precautions, warnings, hazards, and notes.
——
——
2. Prepared pulse generator for use using oscilloscope for display.
——
——
3. Operated pulse generator.
——
——
4. De-energized and disconnected equipment.
——
——
5. Maintained tools and equipment.
——
——
Evaluation Guidance: Score the Soldier GO if all performance measures are passed. Score the Soldier
NO-GO if any performance measure is failed. If the Soldier fails any performance measure, explain what
was done wrong and how to do it correctly.
References
Required
MODEL 9210
TB 385-4
3-82
Related
DA PAM 750-8
TM 43-6625-915-12
TM 9-6695-239-14
STP 9-94H13-SM-TG
9 September 2011
MOS/Skill Level Tasks
Calibrate Radio Frequency (RF) Power Sensor
093-94H-1330
Conditions: In an operational environment (OE), given a Power Sensor or Thermistor Mount (10 MHz
to 18 GHz) requiring calibration, TB 9-6625-1932-24, Forms, Records, Reports, Equipment, and
Accessories required for Secondary Transfer Calibration Process as listed in TB 9-6625-1932-24, TB
43-180, TB 750-25, and United States Army Test, Measurement, and Diagnostic Equipment (TMDE)
Activity (USATA) Calibration Procedure Master List.
Standards: Calibrate radio frequency (RF) power sensor in accordance with the applicable calibration
procedure and TB 43-180. Observe all safety precautions in accordance with TB 385-4. Complete
required DA Form 7372 (TMDE Calibration and Repair Data), DA Label 80 (US Army Calibrated
Instrument), DA Label 163 (US Army Limited or Special Calibration), or DA Form 2417 (U.S. Army
Calibration System Rejected Instrument) in accordance with TB 750-25.
Performance Steps
Figure 3-35. Examples of RF Power Sensors
1. Identify correct calibration procedure to be used in accordance with TB 43-180.
2. Update calibration procedure as necessary in accordance with USATA Calibration Procedure
Master List.
3. Determine correct section of TB 9-6625-1932-24 to use for Secondary Transfer level calibration.
4. Observe all safety precautions, warnings, hazards, and notes.
5. Perform preliminary instructions.
6. Perform equipment setup.
7. Perform calibration factors performance check and make necessary adjustments.
8. Perform final procedure.
9. Disconnect and maintain equipment.
Evaluation Preparation: Ensure all items required in the condition statement (or appropriate
substitutions) are on hand and all safety requirements are met.
9 September 2011
STP 9-94H13-SM-TG
3-83
Chapter 3
Performance Measures
GO
NO-GO
1. Identified correct calibration procedure to be used in accordance with TB 43-180.
——
——
2. Updated calibration procedure as necessary in accordance with USATA
Calibration Procedure Master List.
——
——
3. Determined correct section of TB 9-6625-1932-24 to use for Secondary Transfer
level calibration.
——
——
4. Observed all safety precautions, warnings, hazards, and notes.
——
——
5. Performed preliminary instructions.
——
——
6. Performed equipment setup.
——
——
7. Performed calibration factors performance checks and made necessary
adjustments.
——
——
8. Performed final procedure.
——
——
9. Disconnected and maintained equipment.
——
——
Evaluation Guidance: Refer to the applicable technical bulletin as a guide to verify that all steps in the
calibration process are performed in accordance with the proper calibration procedure.
Score the Soldier GO if all performance measures are passed. Score the Soldier NO-GO if any
performance measure is failed. If the Soldier fails any performance measure, explain what was done
wrong and how to do it correctly.
References
Required
DA FORM 7372
DA LABEL 80
TB 385-4
TB 43-180
TB 750-25
TB 9-6625-1932-24
USATA MASTER LIST
3-84
Related
683XXC
AR 750-1
AR 750-43
DA FORM 2417
DA LABEL 163
DA PAM 750-8
TM 9-6695-239-14
STP 9-94H13-SM-TG
9 September 2011
MOS/Skill Level Tasks
Calibrate Attenuator
093-94H-1340
Conditions: In an operational environment (OE), given attenuators (fixed and variable, 10 MHz to 18
GHz) requiring calibration; TB 9-4931-523-24; Forms, Records, Reports, Equipment, and Accessories
required as listed in TB 9-4931-523-24; Software package USATA 001-PDMAT (V) (if available for use
in alternate performance checks), TB 43-180, TB 385-4, TB 750-25, and United States Army Test,
Measurement, and Diagnostic Equipment (TMDE) Activity (USATA) Calibration Procedure Master List.
Standards: Calibrate attenuator in accordance withthe applicable calibration procedure and TB 43-180.
Observe all safety precautions in accordance with TB 385-4. Complete required DA Form 7372 (TMDE
Calibration and Repair Data), DA Label 80 (US Army Calibrated Instrument), DA Label 163 (US Army
Limited or Special Calibration), or DA Form 2417 (U.S. Army Calibration System Rejected Instrument) in
accordance with TB 750-25.
Performance Steps
Figure 3-36. RF Attenuators
(Variable)
9 September 2011
STP 9-94H13-SM-TG
3-85
Chapter 3
Performance Steps
Figure 3-37. RF Attenuators (Fixed)
1. Identify correct calibration procedure to be used in accordance with TB 43-180.
2. Update calibration procedure as necessary in accordance with USATA Calibration Procedure
Master List.
3. Observe all safety precautions, warnings, hazards, and notes.
4. Calibrate attenuator (fixed and variable, 10 MHz to 18 GHz) in accordance with applicable
calibration procedure.
a. Perform preliminary instructions.
b. Perform equipment setup.
c. Perform fixed attenuation measurement (10 MHz to 18 GHz) performance check or alternate
fixed attenuation measurement (10 MHz to 18 GHz) performance check, and prepare a
correction chart if necessary.
d. Perform variable attenuation measurement (10 MHz to 18 GHz) performance check or
alternate fixed attenuation measurement (10 MHz to 18 GHz) performance check, and
prepare a correction chart if necessary.
e. Perform final procedure.
5. De-energize and disconnect equipment.
Evaluation Preparation: Ensure all items required in the condition statement (or appropriate
substitutions) are on hand and all safety requirements are met. If applicable, ensure USATA PD-MAT
software is loaded on signal generator workstation controller.
GO
NO-GO
1. Identified correct calibration procedure to be used in accordance with TB 43-180.
——
——
2. Updated calibration procedure as necessary in accordance with USATA
Calibration Procedure Master List.
——
——
3. Observed all safety precautions, warnings, hazards, and notes.
——
——
4. Calibrated attenuator (fixed and variable, 10 MHz to 18 GHz) in accordance with
applicable calibration procedure.
——
——
5. De-energized and disconnected equipment.
——
——
Performance Measures
Evaluation Guidance: Refer to the applicable technical bulletin as a guide to verify that all steps in the
calibration process are performed in accordance with the proper calibration procedure.
3-86
STP 9-94H13-SM-TG
9 September 2011
MOS/Skill Level Tasks
Score the Soldier GO if all performance measures are passed. Score the Soldier NO-GO if any
performance measure is failed. If the Soldier fails any performance measure, explain what was done
wrong and how to do it correctly.
References
Required
DA FORM 2417
DA FORM 7372
DA LABEL 163
DA LABEL 80
TB 385-4
TB 43-180
TB 750-25
TB 9-4931-523-24
USATA MASTER LIST
9 September 2011
Related
AR 750-1
AR 750-43
DA PAM 750-8
TM 9-6695-239-14
STP 9-94H13-SM-TG
3-87
Chapter 3
Repair Power Meter
093-94H-1350
Conditions: In an operational environment (OE), given a malfunctioning power meter; signal generator,
test equipment as needed (multimeter, oscilloscope, spectrum analyzer, and so on), electrician's tool kit,
power meter manufacturer's manual, and TB 385-4.
Standards: Repair power meter in accordance with the applicable technical reference(s). Observe all
safety precautions in accordance with TB 385-4.
Performance Steps
Figure 3-38. 432A Power Meter
NOTE:
-Determine if warranty repair is applicable.
-Determine if repair is authorized.
3-88
STP 9-94H13-SM-TG
9 September 2011
MOS/Skill Level Tasks
Performance Steps
-Before beginning repair process, check work order and talk to unit maintenance, if possible, for
description of symptoms and steps taken to correct them.
-Check all forms and tags attached to or accompanying equipment to determine reason for removal
from service.
1. Observe all safety precautions, warnings, hazards, and notes.
2. Visually inspect the power meter for any physical defects.
3. Read and follow the operator, maintenance, and repair instructions given in the applicable
technical reference.
4. Set up equipment needed for troubleshooting the power meter.
5. Perform operational circuit checks to sectionalize the malfunction.
6. Perform a schematic analysis and functional tests to localize the malfunction.
7. Perform resistance, continuity, and power distribution tests to isolate the malfunction.
8. Repair/replace faulty component(s).
9. Verify repair.
10. De-energize and disconnect equipment.
11. Complete proper maintenance forms.
Evaluation Preparation: Ensure all required equipment or appropriate substitutions are on hand and all
safety requirements are met. Evaluator will induce a fault by disconnecting a circuit card or cable
connector or other non-destructive method prior to the start of performance evaluation.
GO
NO-GO
1. Observed all safety precautions, warnings, hazards, and notes.
——
——
2. Visually inspected the power meter for any physical defects.
——
——
3. Read and followed the operator, maintenance, and repair instructions given in the
applicable technical reference.
——
——
4. Set up equipment needed for troubleshooting the power meter.
——
——
5. Performed operational circuit checks to sectionalize the malfunction.
——
——
6. Performed a schematic analysis and functional tests to localize the malfunction.
——
——
7. Performed resistance, continuity, and power distribution tests to isolate the
malfunction.
——
——
8. Repaired/replaced faulty component(s).
——
——
9. Verified repair.
——
——
10. De-energized and disconnected equipment.
——
——
11. Completed proper maintenance forms.
——
——
Performance Measures
9 September 2011
STP 9-94H13-SM-TG
3-89
Chapter 3
Evaluation Guidance: Score the Soldier GO if all performance measures are passed. Score the Soldier
NO-GO if any performance measure is failed. If the Soldier fails any performance measure, explain what
was done wrong and how to do it correctly.
References
Required
HP437B
TB 385-4
TM 9-6625-2469-15
3-90
Related
437B
AR 750-1
TB 750-25
TM 9-6695-239-14
STP 9-94H13-SM-TG
9 September 2011
MOS/Skill Level Tasks
Calibrate Power Meter
093-94H-1351
Conditions: In an operational environment (OE), given Power Meter (437B) requiring calibration, TB 96625-2297-24, Forms, Records, Reports, Equipment, and Accessories required as listed in TB 9-66252297-24; TB 43-180, TB 385-4, TB 750-25, and United States Army Test, Measurement, and Diagnostic
Equipment (TMDE) Activity (USATA) Calibration Procedure Master List.
Standards: Calibrate power meter in accordance with TB 43-180 and TB 9-6625-2297-24. Observe all
safety precautions in accordance with TB 385-4. Complete required DA Form 7372 (TMDE Calibration
and Repair Data), DA Label 80 (US Army Calibrated Instrument), DA Label 163 (US Army Limited or
Special Calibration), or DA Form 2417 (U.S. Army Calibration System Rejected Instrument) in
accordance with TB 750-25.
Performance Steps
Figure 3-39. 437B Power Meter
1. Identify correct calibration procedure to be used in accordance with TB 43-180.
2. Update calibration procedure as necessary in accordance with USATA Calibration Procedure
Master List.
3. Observe all safety precautions, warnings, hazards, and notes.
Note: Perform steps 4 through 10 in accordance with TB 9-6625-2297-24.
4. Perform preliminary instructions.
5. Perform equipment setup.
6. Perform zero carryover performance check and make adjustments if necessary.
7. Perform Instrument accuracy performance check and make adjustments if necessary.
9 September 2011
STP 9-94H13-SM-TG
3-91
Chapter 3
Performance Steps
8. Perform reference frequency oscillator performance check and make adjustments if necessary.
9. Perform power reference level performance check and make adjustments if necessary.
10. Perform final procedure.
11. Disconnect and maintain equipment.
Evaluation Preparation: Ensure all items required in the condition statement (or appropriate
substitutions) are on hand and all safety requirements are met.
Performance Measures
GO
NO-GO
1. Identified correct calibration procedure to be used in accordance with TB 43-180.
——
——
2. Updated calibration procedure as necessary in accordance with USATA
Calibration Procedure Master List.
——
——
3. Observed all safety precautions, warnings, hazards, and notes.
——
——
4. Performed preliminary instructions.
——
——
5. Performed equipment setup.
——
——
6. Performed zero carryover performance checks and made adjustments if
necessary.
——
——
7. Performed Instrument accuracy performance checks and made adjustments if
necessary.
——
——
8. Performed reference frequency oscillator performance checks and made
adjustments if necessary.
——
——
9. Performed power reference level performance checks and made adjustments if
necessary.
——
——
10. Performed final procedure.
——
——
11. Disconnected and maintained equipment.
——
——
Evaluation Guidance: Refer to the applicable technical bulletin as a guide to verify that all steps in the
calibration process are performed in accordance with the proper calibration procedure.
Score the Soldier GO if all performance measures are passed. Score the Soldier NO-GO if any
performance measure is failed. If the Soldier fails any performance measure, explain what was done
wrong and how to do it correctly.
References
Required
DA FORM 2417
DA FORM 7372
DA LABEL 163
DA LABEL 80
TB 385-4
TB 43-180
TB 750-25
TB 9-6625-2297-24
USATA MASTER LIST
3-92
Related
437B
AR 750-1
AR 750-43
DA PAM 750-8
TM 9-6625-2469-15
TM 9-6695-239-14
STP 9-94H13-SM-TG
9 September 2011
MOS/Skill Level Tasks
Subject Area 5: Microwave and Radio Frequency (RF)
Operate Spectrum Analyzer
093-94H-1400
Conditions: In an operational environment (OE), with a requirement to operate a spectrum analyzer
(AN/USM-677); signal generator, RF cables as required, TM 43-6625-914-12 or manufacturer's manual,
and TB 385-4.
Standards: Operate the spectrum analyzer in accordance with the applicable technical reference.
Observe all safety precautions in accordance with TB 385-4.
Performance Steps
Figure 3-40. AN/USM-677 Spectrum Analyzer
1. Observe all safety precautions, warnings, hazards, and notes.
CAUTION: Ensure that the total power of all signals at the analyzer input does not exceed +30 dBm (1
watt).
Note: Spectrum analyzer controls are indicated by "<" and ">" symbols.
2. Press < | > On key.
3. Allow 5 minutes for warm-up.
4. Press <Preset> (if the softkeys <Factory Preset> and <User Preset> appear, select <Factory
Preset>).
9 September 2011
STP 9-94H13-SM-TG
3-93
Chapter 3
Performance Steps
5. Connect signal generator output to spectrum analyzer front panel input using radio frequency (RF)
cable.
6. Set signal generator for a 10 MHz, 0 dBm output.
7. Press <AMPLITUDE>, <1>, <0>, and <dBm>.
8. Press <FREQUENCY>, <Center Freq>, <3>, <0>, and <MHz>.
9. Observe the 10 MHz signal on the spectrum analyzer display.
10. Press <SPAN>, <5>, <0>, and <MHz>.
11. Read frequency and amplitude.
a. Press <Peak Search>.
b. Observe frequency and amplitude of the marker appear both in the active function block, and
in the upper-right corner of the screen.
c. Move marker by using the knob, the arrow keys, or the softkeys in the Peak Search menu.
d. Press <Peak Search>.
12. Change Reference Level.
a. Press <AMPLITUDE>, and note that reference level (Ref Level) is now the active function.
b. Press <Marker->>, <Mkr-> Ref Lvl>, and note that changing the reference level changes the
amplitude value of the top graticule line.
13. Press <Marker->>, <Mkr->CF> to move the 10 MHz peak to the center of the display.
14. Compare two signals on the same screen using Marker Delta.
a. Press <Marker>, <Delta> (the label on the first marker now reads 1R, indicating that it is the
reference point).
b. Press <Peak Search>, <Next Peak> (The amplitude and frequency difference between the
markers is displayed in the active function block).
15. Improve Frequency Accuracy.
a. Press <Marker>, <Mkr Fctn>.
b. Press <Marker Count>.
c. Press <Freq Count> (The marker annotation changes from Mkr1 to Cntr1, and displayed
frequency resolution improves).
16. Press BW/Avg, Res BW, then use knob to change resolution bandwidth value.
17. Use signal tracking and span zoom.
a. Press <Preset> (if the softkeys <Factory Preset> and <User Preset appear>, select <Factory
Preset>).
b. Adjust signal generator output signal to 50 MHz.
c. Press <FREQUENCY>, Start Freq, 20, MHz.
d. Press <FREQUENCY>, Stop Freq, 1, GHz.
e. Press <Peak Search>.
f. Press <FREQUENCY>, <Signal Track> (On).
g. Press <SPAN>, <2>, <0>, <0>, and <kHz>.
18. Disable signal generator output.
19. De-energize and disconnect equipment.
Evaluation Preparation: Ensure all items required in the condition statement (or appropriate
substitutions) are on hand and all safety requirements are met.
3-94
STP 9-94H13-SM-TG
9 September 2011
MOS/Skill Level Tasks
Performance Measures
GO
NO-GO
1. Observed all safety precautions, warnings, hazards, and notes.
——
——
2. Pressed < | > On key.
——
——
3. Allowed 5 minutes for warm-up.
——
——
4. Pressed <Preset> (if the softkeys <Factory Preset> and <User Preset> appeared,
selected <Factory Preset>).
——
——
5. Connected signal generator output to spectrum analyzer front panel input using
radio frequency (RF) cable.
——
——
6. Set signal generator for a 10 MHz, 0 dBm output.
——
——
7. Pressed <AMPLITUDE>, <1>, <0>, and <dBm>.
——
——
8. Pressed <FREQUENCY>, <Center Freq>, <3>, <0>, and <MHz>.
——
——
9. Observed the 10 MHz signal on the spectrum analyzer display.
——
——
10. Pressed <SPAN>, <5>, <0>, and <MHz>.
——
——
11. Read frequency and amplitude.
——
——
12. Changed Reference Level.
——
——
13. Pressed <Marker->>, <Mkr->CF> to move the 10 MHz peak to the center of the
display.
——
——
14. Compared two signals on the same screen using Marker Delta.
——
——
15. Improved Frequency Accuracy.
——
——
16. Pressed BW/Avg, Res BW, then used knob to change resolution bandwidth value.
——
——
17. Used signal tracking and span zoom.
——
——
18. Disabled signal generator output.
——
——
19. De-energized and disconnected equipment.
——
——
Evaluation Guidance: Score the Soldier GO if all performance measures are passed. Score the Soldier
NO-GO if any performance measure is failed. If the Soldier fails any performance measure, explain what
was done wrong and how to do it correctly.
References
Required
TB 385-4
TM 43-6625-914-12
9 September 2011
Related
683XXC
ANRITSU 682XXB/683XXB
DA PAM 750-8
TM 9-6695-239-14
STP 9-94H13-SM-TG
3-95
Chapter 3
Repair Spectrum Analyzer
093-94H-1401
Conditions: In an operational environment (OE), given a faulty spectrum analyzer, signal generator,
test equipment as needed (multimeter, oscilloscope, spectrum analyzer, etc.), electrician's tool kit,
spectrum analyzer manufacturer's manual, and TB 385-4.
Standards: Repair spectrum analyzer in accordance with the applicable spectrum analyzer technical
reference. Observe all safety precautions in accordance with TB 385-4.
Performance Steps
NOTE:
-Determine if warranty repair is applicable.
-Determine if repair is authorized.
-Before beginning repair process, check work order and talk to unit maintenance, if possible, for
description of symptoms and steps taken to correct them.
-Check all forms and tags attached to or accompanying equipment to determine reason for removal from
service.
1. Observe all safety precautions, warnings, hazards, and notes.
2. Visually inspect the spectrum analyzer for any physical defects.
3. Read and follow the operator, maintenance, and repair instructions given in the applicable technical
reference.
4. Set up equipment necessary for troubleshooting the spectrum analyzer.
5. Perform operational circuit checks to sectionalize the malfunction.
6. Perform schematic analysis and functional tests to localize the malfunction.
7. Perform resistance, continuity, and power distribution tests to isolate the malfunction.
8. Repair/replace faulty component.
9. Verify repair.
10. De-energize and disconnect equipment.
11. Complete proper maintenance forms.
Evaluation Preparation: Ensure all items required in the condition statement (or appropriate
substitutions) are on hand and all safety requirements are met. Evaluator will induce a fault by
disconnecting a circuit card or cable connector or other non-destructive method prior to the start of
performance evaluation.
GO
NO-GO
1. Observed all safety precautions, warnings, hazards, and notes.
——
——
2. Visually inspected the spectrum analyzer for any physical defects.
——
——
3. Read and followed the operator, maintenance, and repair instructions given in the
applicable technical reference.
——
——
Performance Measures
3-96
STP 9-94H13-SM-TG
9 September 2011
MOS/Skill Level Tasks
Performance Measures
GO
NO-GO
4. Set up equipment needed for troubleshooting the spectrum analyzer.
——
——
5. Performed operational circuit checks to sectionalize the malfunction.
——
——
6. Performed a schematic analysis and functional tests to localize the malfunction.
——
——
7. Performed resistance, continuity, and power distribution tests to isolate the
malfunction.
——
——
8. Repaired/replaced faulty component.
——
——
9. Verified repair.
——
——
10. De-energized and disconnected all the equipment.
——
——
11. Completed proper maintenance forms.
——
——
Evaluation Guidance: Score the Soldier GO if all performance measures are passed. Score the Soldier
NO-GO if any performance measure is failed. If the Soldier fails any performance measure, explain what
was done wrong and how to do it correctly.
References
Required
TB 385-4
TM 11-6625-3250-12
TM 43-6625-914-12
9 September 2011
Related
AR 750-1
DA PAM 750-8
TB 43-180
TB 750-25
TM 9-6695-239-14
STP 9-94H13-SM-TG
3-97
Chapter 3
Calibrate Spectrum Analyzer
093-94H-1402
Conditions: In an operational environment (OE), given Spectrum analyzer (AN/USM-677) requiring
calibration; TB 9-6625-2339-24; Forms, Records, Reports, Equipment, and Accessories required as
listed in TB 9-6625-2339-24; TB 43-180; TB 385-4, TB 750-25; and United States Army Test,
Measurement, and Diagnostic Equipment (TMDE) Activity (USATA) Calibration Procedure Master List.
Standards: Calibrate spectrum analyzer in accordance with TB 43-180 and TB 9-6625-2339-24.
Observe all safety precautions in accordance with TB 385-4. Complete required DA Form 7372 (TMDE
Calibration and Repair Data), DA Label 80 (US Army Calibrated Instrument), DA Label 163 (US Army
Limited or Special Calibration), or DA Form 2417 (U.S. Army Calibration System Rejected Instrument) in
accordance with TB 750-25.
Performance Steps
Figure 3-41. AN/USM-677 Spectrum Analyzer
1. Identify correct calibration procedure to be used in accordance with TB 43-180.
2. Update calibration procedure as necessary in accordance with USATA Calibration Procedure
Master List.
3. Observe all safety precautions, warnings, hazards, and notes.
3-98
STP 9-94H13-SM-TG
9 September 2011
MOS/Skill Level Tasks
Performance Steps
Note: Performance steps 4 through 19 are to be performed in accordance with TB 9-6625-233924.
4. Perform Preliminary instructions.
Note: Spectrum analyzer must sit with the power off for at least 60 minutes before performing
task step 5.
5. Perform Equipment setup.
6. Perform Frequency Readout and Marker Frequency Count Accuracy check.
7. Perform Frequency Span Readout Accuracy check.
8. Perform Noise Sidebands check.
9. Perform Residual FM check.
10. Perform Input Attenuator Accuracy check.
11. Perform Reference Level Accuracy check.
12. Perform Resolution Bandwidth Switching Uncertainty check.
13. Perform Absolute Amplitude Accuracy check.
14. Perform Resolution Bandwidth Accuracy check.
15. Perform Frequency Response check.
16. Perform Displayed Average Noise check.
17. Perform Residual Responses check.
18. Perform Power supply performance check:
a. Perform only if a parameter is out of tolerance.
b. Repeat task steps 5 through 17.
19. Perform Final procedure.
20. Disconnect and maintain equipment.
Evaluation Preparation: Ensure all items required in the condition statement (or appropriate
substitutions) are on hand and all safety requirements are met.
Performance Measures
GO
NO-GO
1. Identified correct calibration procedure to be used in accordance with TB 43-180.
——
——
2. Updated calibration procedure as necessary in accordance with USATA
Calibration Procedure Master List.
——
——
3. Observed all safety precautions, warnings, hazards, and notes.
——
——
4. Performed Preliminary instructions.
——
——
5. Performed Equipment setup.
——
——
6. Performed Frequency Readout and Marker Frequency Count Accuracy check.
——
——
7. Performed Frequency Span Readout Accuracy check.
——
——
9 September 2011
STP 9-94H13-SM-TG
3-99
Chapter 3
Performance Measures
GO
NO-GO
8. Performed Noise Sidebands check.
——
——
9. Performed Residual FM check.
——
——
10. Performed Input Attenuator Accuracy check.
——
——
11. Performed Reference Level Accuracy check.
——
——
12. Performed Resolution Bandwidth Switching Uncertainty check.
——
——
13. Performed Absolute Amplitude Accuracy check.
——
——
14. Performed Resolution Bandwidth Accuracy check.
——
——
15. Performed Frequency Response check.
——
——
16. Performed Displayed Average Noise check.
——
——
17. Performed Residual Responses check.
——
——
18. Performed Power supply performance check.
——
——
19. Performed Final procedure.
——
——
20. Disconnected and maintained equipment.
——
——
Evaluation Guidance: Refer to the applicable technical bulletin as a guide to verify that all steps in the
calibration process are performed in accordance with the proper calibration procedure.
Score the Soldier GO if all performance measures are passed. Score the Soldier NO-GO if any
performance measure is failed. If the Soldier fails any performance measure, explain what was done
wrong and how to do it correctly.
References
Required
DA FORM 2417
DA FORM 7372
DA LABEL 163
DA LABEL 80
TB 385-4
TB 43-180
TB 750-25
TB 9-6625-2339-24
TM 43-6625-914-12
USATA MASTER LIST
3-100
Related
AR 750-1
AR 750-43
DA PAM 750-8
TM 9-6695-239-14
STP 9-94H13-SM-TG
9 September 2011
MOS/Skill Level Tasks
Repair Radio Test Set (Basic)
093-94H-1409
Conditions: In an operational environment (OE), given a malfunctioning Radio Test Set (AN/GRM-114B
or AN/GRM-122); electrician's tool kit, test equipment as needed (multimeter, oscilloscope, spectrum
analyzer, and etc), TM 11-6625-3244-40, TM 11-6625-3245-40, TB 385-4, Radio Test Set
manufacturer's service manual, TB 750-25, DA Form 2404 (Equipment Inspection and Maintenance
Worksheet), and DA Form 7372 (TMDE Calibration and Repair Data).
Standards: Repair Radio Test Set in accordance with the applicable manufacturer's and technical
manuals. Observe all safety precautions in accordance with TB 385-4.
Performance Steps
Figure 3-42. AN/GRM-122 and AN/GRM-114B Radio Test Sets
NOTE:
-Determine if warranty repair is applicable.
-Determine if repair is authorized.
-Before beginning repair process, check work order and talk to unit maintenance, if possible, for
description of symptoms and steps taken to correct them.
-Check all forms and tags attached to or accompanying equipment to determine reason for removal
from service.
9 September 2011
STP 9-94H13-SM-TG
3-101
Chapter 3
Performance Steps
1. Observe all safety precautions, warnings, hazards, and notes.
2. Visually inspect the radio test set for any physical defects.
3. Read and follow the operator, maintenance, and repair instructions given in TM 11-6625-3244-40,
and Aeroflex TS-4317 and J-1601A / RPM-001 maintenance manuals.
4. Set up support equipment necessary to repair the radio test set.
5. Turn on Small Computer System Interface (SCSI).
a. Press MTRS MODE key.
b. Press "AUX" F6.
c. Press 5 on DATA ENTRY keypad to select "5. External I/O".
d. Press 3 on DATA ENTRY keypad to display the Configure SCSI sub-menu.
e. Verify SCSI operation mode is ON. If OFF, press ENTER to toggle on.
f. Press "ESC" F6 twice to return to Auxiliary Functions Menu.
6. Restore factory defaults.
Note: Resetting Factory Defaults returns frequencies for most operation screens to 10.000 MHz,
resets most meter ranges to Autorange and turns upper and lower limits off.
a. Press RCL key while in Auxiliary Functions Menu.
b. Press FIELD SELECT directional keys to move highlight to "10. Factory Defaults", and press
ENTER.
c. Verify Yes/No selection is Yes, and press ENTER.
7. Perform Self-test.
Note: All external input connections must be removed from Test Set prior to performing Self
Test
If no Auxiliary Box is attached to SCSI port, disable SCSI port prior to performing Self Test.
a.
b.
c.
d.
e.
f.
Press MTRS key.
Press "AUX" F6.
Press 4 on DATA ENTRY keypad.
Press 1 on DATA ENTRY keypad.
Use FIELD SELECT direction keys to find failed test.
Press "Extend" F1 when submenu highlight is over failed test.
(1) Record displayed values of failed tests (if any).
(2) Perform tests on each submenu item (if any) by pressing list number on DATA ENTRY
Keypad, and record results.
g. Use FIELD SELECT directional keys to move through remainder of Self Test Menu.
h. Repeat step 7e for each item that failed and record results of each Extended test.
8. Perform troubleshooting procedures in accordance with TM 11-6625-3244-40, Chapter 2, Section
III.
a. Follow the General Troubleshooting Guidelines of paragraph 2-7.
b. Select symptom from Symptom Index.
c. Refer to Table 2-1 for appropriate troubleshooting procedures.
9. Perform functional block diagram and schematic analysis to localize the malfunction.
10. Perform various checks and tests as outlined in "Troubleshooting" sections of the technical
manual and manufacturer's manual to isolate the malfunction.
11. Take corrective action as prescribed in maintenance procedure.
3-102
STP 9-94H13-SM-TG
9 September 2011
MOS/Skill Level Tasks
Performance Steps
12. Verify operation of the radio test set.
13. De-energize and disconnect all equipment.
14. Complete proper maintenance forms.
Evaluation Preparation: Ensure all required equipment or appropriate substitutions are on hand and all
safety requirements are met. Evaluator will induce a fault by disconnecting a circuit card or cable
connector or other non-destructive method prior to the start of performance evaluation.
Performance Measures
GO
NO-GO
1. Observed all safety precautions, warnings, hazards, and notes.
——
——
2. Visually inspected the radio test set for any physical defects.
——
——
3. Read and followed the operator, maintenance, and repair instructions given in TM
11-6625-3244-40, and Aeroflex TS-4317 and J-1601A / RPM-001 maintenance
manuals.
——
——
4. Set up support equipment necessary to repair the radio test set.
——
——
5. Turned on Small Computer System Interface (SCSI).
——
——
6. Restored factory defaults.
——
——
7. Performed Self-test.
——
——
8. Performed troubleshooting procedures in accordance with TM 11-6625-3244-40,
Chapter 2, Section III.
——
——
9. Performed functional block diagram and schematic analysis to localize the
malfunction.
——
——
10. Performed various checks and tests as outlined in "Troubleshooting" sections of
the technical manual and manufacturer's manual to isolate the malfunction.
——
——
11. Took corrective action as prescribed in maintenance procedure.
——
——
12. Verified operation of radio test set.
——
——
13. De-energized and disconnected all the equipment.
——
——
14. Completed proper maintenance forms.
——
——
Evaluation Guidance: Score the Soldier GO if all performance measures are passed. Score the Soldier
NO-GO if any performance measure is failed. If the Soldier fails any performance measure, explain what
was done wrong and how to do it correctly.
References
Required
AEROFLEX J-1601A
AEROFLEX TS-4317 MM
AEROFLEX TS-4317 OM
DA FORM 2404
DA FORM 7372
TB 385-4
TB 750-25
TM 11-6625-3244-40
TM 11-6625-3245-40
9 September 2011
Related
AR 750-1
DA PAM 750-8
TM 9-6695-239-14
STP 9-94H13-SM-TG
3-103
Chapter 3
Calibrate Radio Test Set
093-94H-1410
Conditions: In an operational environment (OE), given a Radio Test Set (AN/GRM-122) requiring
calibration, Forms, Records, Reports, Equipment, Accessories required as listed in TB 9-6625-2296-24,
TB 43-180, TB 750-25, and United States Army Test, Measurement, and Diagnostic Equipment (TMDE)
Activity (USATA) Calibration Procedure Master List.
Standards: Calibrate radio test set in accordance with TB 9-6625-2296-24 and TB 43-180. Observe all
safety precautions in accordance with TB 385-4. Complete required DA Form 7372 (TMDE Calibration
and Repair Data), DA Label 80 (US Army Calibrated Instrument), DA Label 163 (US Army Limited or
Special Calibration), or DA Form 2417 (U.S. Army Calibration System Rejected Instrument) in
accordance with TB 750-25.
Performance Steps
Figure 3-43. AN/GRM-122 and AN/GRM-114B Radio Test Sets
1. Identify correct calibration procedure to be used in accordance with TB 43-180.
2. Update calibration procedure as necessary in accordance with USATA Calibration Procedure
Master List.
Note: Perform steps 3 through 25 in accordance with TB 9-6625-2296-24.
3. Observe all safety precautions, warnings, hazards, and notes.
4. Perform preliminary instructions.
3-104
STP 9-94H13-SM-TG
9 September 2011
MOS/Skill Level Tasks
Performance Steps
5. Perform equipment setup.
6. Perform AF generator frequency performance check and make adjustments if necessary.
7. Perform AF generator output level performance check and make adjustments if necessary.
8. Perform distortion meter performance check and make adjustments if necessary.
9. Perform SINAD meter performance check and make adjustments if necessary.
10. Perform digital multimeter performance check and make adjustments if necessary.
11. Perform generator output level performance check and make adjustments if necessary.
12. Perform generator spectral purity performance check and make adjustments if necessary.
13. Perform generator residuals performance check and make adjustments if necessary.
14. Perform generator frequency performance check and make adjustments if necessary.
15. Perform oscilloscope performance check and make adjustments if necessary.
16. Perform spectrum analyzer performance check and make adjustments if necessary.
17. Perform power meter calibration performance check and make adjustments if necessary.
18. Perform generator amplitude modulation performance check and make adjustments if necessary.
19. Perform generator frequency modulation performance check and make adjustments if necessary.
20. Perform FM deviation meter (peak) performance check and make adjustments if necessary.
21. Perform amplitude modulation meter performance check and make adjustments if necessary.
22. Perform frequency error meter and RF counter performance check and make adjustments if
necessary.
23. Perform AF counter performance check and make adjustments if necessary.
24. Perform power supply check if necessary, and make adjustments if necessary.
25. Perform final procedure.
26. Disconnect and maintain equipment.
Evaluation Preparation: Ensure all items required in the condition statement (or appropriate
substitutions) are on hand and all safety requirements are met.
Performance Measures
GO
NO-GO
1. Identified correct calibration procedure to be used in accordance with TB 43-180.
——
——
2. Updated calibration procedure as necessary in accordance with USATA
Calibration Procedure Master List.
——
——
3. Observed all safety precautions, warnings, hazards, and notes.
——
——
4. Performed preliminary instructions.
——
——
5. Performed equipment setup.
——
——
9 September 2011
STP 9-94H13-SM-TG
3-105
Chapter 3
6. Performed AF generator frequency performance check and made adjustments if
necessary.
——
——
7. Performed AF generator output level performance check and made adjustments if
necessary.
——
——
8. Performed distortion meter performance check and made adjustments if
necessary.
——
——
9. Performed distortion meter performance check and made adjustments if
necessary.
——
——
10. Performed digital multimeter performance check and made adjustments if
necessary.
——
——
11. Performed generator output level performance check and made adjustments if
necessary.
——
——
12. Performed generator spectral purity performance check and made adjustments if
necessary.
——
——
13. Performed generator residuals performance check and made adjustments if
necessary.
——
——
14. Performed generator frequency performance check and made adjustments if
necessary.
——
——
15. Performed oscilloscope performance check and made adjustments if necessary.
——
——
16. Performed spectrum analyzer performance check and made adjustments if
necessary.
——
——
17. Performed power meter calibration performance check and made adjustments if
necessary.
——
——
18. Performed generator amplitude modulation performance check and made
adjustments if necessary.
——
——
19. Performed generator frequency modulation performance check and made
adjustments if necessary.
——
——
20. Performed FM deviation meter (peak) performance check and made adjustments
if necessary.
——
——
21. Performed amplitude modulation meter performance check and made
adjustments if necessary.
——
——
22. Performed frequency error meter and RF counter performance check and made
adjustments if necessary.
——
——
23. Performed AF counter performance check and made adjustments if necessary.
——
——
24. Performed power supply check if necessary, and made adjustments if necessary.
——
——
25. Performed final procedure.
——
——
26. Disconnected and maintained equipment.
——
——
Evaluation Guidance: Refer to the applicable technical bulletin as a guide to verify that all steps in the
calibration process are performed in accordance with the proper calibration procedure.
3-106
STP 9-94H13-SM-TG
9 September 2011
MOS/Skill Level Tasks
Score the Soldier GO if all performance measures are passed. Score the Soldier NO-GO if any
performance measure is failed. If the Soldier fails any performance measure, explain what was done
wrong and how to do it correctly.
References
Required
DA FORM 7372
DA LABEL 80
TB 385-4
TB 43-180
TB 750-25
TB 9-6625-2296-24
TM 11-6625-3244-40
TM 11-6625-3245-40
USATA MASTER LIST
9 September 2011
Related
AEROFLEX J-1601A
AEROFLEX TS-4317 MM
AEROFLEX TS-4317 OM
AR 750-1
AR 750-43
DA FORM 2417
DA LABEL 163
DA PAM 750-8
TM 9-6695-239-14
STP 9-94H13-SM-TG
3-107
Chapter 3
Operate High Radio Frequency (RF) Power Measurement System
093-94H-1420
Conditions: In an operational environment, with a requirement to operate a High RF Power
Measurement System, wideband RF power amplifier (ARA757LC-CE) and RF power wattmeter (4421),
signal generator, high power RF termination, RF cables as required, manufacturer's manuals, and TB
385-4.
Standards: Operate High Radio Frequency (RF) Power Measurement System in accordance with the
manufacturer's manuals. Observe all safety precautions in accordance with TB 385-4.
Performance Steps
Figure 3-44. Measuring High RF power
CAUTION: Potential for severe equipment damage exists. Exercise caution when applying RF power.
Terminate all RF connections with appropriate loads.
1. Observe all safety precautions, warnings, hazards, and notes.
2. Prepare RF power measurement system for use.
a. Prepare RF power wattmeter 4421 for use to measure forward power in watts.
b. Prepare wideband RF power amplifier ARA757LC-CE for operation using signal generator as
a signal source and high power RF cables at power amplifier output connector.
c. Connect power amplifier output to RF power wattmeter directional coupler assembly (sensor)
and terminate with a suitable high power RF termination.
3-108
STP 9-94H13-SM-TG
9 September 2011
MOS/Skill Level Tasks
3. Operate RF power measurement system.
a. Ensure wideband RF power amplifier Input Blanking pushbutton was pressed in and the red
LED is lit.
b. Ensure wideband RF power amplifier RF Gain Control rotary switch is set to minimum (fully
CCW).
c. Set frequency of signal source.
d. Set amplitude of signal source.
e. Set signal source RF output switch to ON.
f. Set wideband RF power amplifier Input Blanking pushbutton to off (out) ensuring red LED is
not lit.
g. Monitor RF power indication on RF power wattmeter (do not trust RF power indication on
wideband RF power amplifier) while slowly rotating wideband RF power amplifier RF Gain
Control rotary switch clockwise until RF power wattmeter indicates approximately 10W of
forward RF power.
h. Monitor RF power indication on RF power wattmeter and slowly increase or decrease signal
generator amplitude in small magnitude steps until RF power wattmeter indicates 10.0W of
forward RF power.
i. Set RF power wattmeter 4421 to measure reflected power while observing the indication.
j. Decrease RF power output to minimum by rotating RF Gain Control rotary switch fully CCW.
k. Press RF power amplifier Input Blanking pushbutton in and ensure red LED is lit.
4. De-energize and disconnect equipment.
Evaluation Preparation: Ensure all items required in the condition statement (or appropriate
substitutions) are on hand and all safety requirements are met.
Potential for severe equipment damage exists due to the high level of RF energy available at the output
of the amplifier. Evaluator must supervise operations closely.
GO
NO-GO
1. Observed all safety precautions, warnings, hazards, and notes.
——
——
2. Prepared radio frequency (RF) power measurement system for use.
——
——
3. Operated RF power measurement system.
——
——
4. De-energized and disconnected equipment.
——
——
Performance Measures
Evaluation Guidance: Score the Soldier GO if all performance measures are passed. Score the Soldier
NO-GO if any performance measure is failed. If the Soldier fails any performance measure, explain what
was done wrong and how to do it correctly.
References
Required
BIRD MODEL 4421
MANUFACTURER'S MANUAL
TB 385-4
9 September 2011
Related
DA PAM 750-8
TM 9-6695-239-14
STP 9-94H13-SM-TG
3-109
Chapter 3
Calibrate Radar Test Set
093-94H-1431
Conditions: In an operational environment (OE), given Radar Test set requiring calibration, applicable
calibration procedure, Forms, Records, and Reports and Equipment and Accessories required as listed
in calibration procedure; TB 43-180, TB 385-4, TB 750-25, and United States Army Test, Measurement,
and Diagnostic Equipment (TMDE) Activity (USATA) Calibration Procedure Master List.
Standards: Calibrate radar test set in accordance with TB 43-180 and applicable calibration procedure.
Observe all safety precautions in accordance with TB 385-4. Complete required DA Form 7372 (TMDE
Calibration and Repair Data), DA Label 80 (US Army Calibrated Instrument), DA Label 163 (US Army
Limited or Special Calibration), or DA Form 2417 (U.S. Army Calibration System Rejected Instrument) in
accordance with TB 750-25.
Performance Steps
Figure 3-45. Radar Test
Sets
3-110
STP 9-94H13-SM-TG
9 September 2011
MOS/Skill Level Tasks
Performance Steps
Figure 3-46. AN/UPM-155 Radar Test Set
1. Observe all safety precautions, warnings, hazards, and notes.
2. Prepare AN/UPM-155 for use and enter TRANSPONDER MENUS from the TOP LEVEL MENU.
3. Measure various outputs from AN/UPM-155 using 54602A oscilloscope.
a.
Measure SUPPR OUT signal for pulse amplitude and pulse width.
b.
Measure ACP OUT for risetime and falltime.
c.
Setup external trigger using pulse generator and set 0 TRIGGER to EXTERNAL+
using MENU 14.
d.
Measure pulse delay from the external trigger at EXT IN to 0 TRIGGER.
e.
Reset 0 TRIGGER to INTERNAL.
f.
Setup and measure M4 PRE OUT signal for pulse amplitude, width, and pulse delay
from 0 TRIGGER.
g.
Vary delay of M4 PRE OUT pulse from 0 TRIGGER using MENU 5.
9 September 2011
STP 9-94H13-SM-TG
3-111
Chapter 3
Performance Steps
h.
Setup and measure VAR PULSE OUT signal for pulse amplitude, width, and delay
from 0 TRIGGER.
i.
Vary delay of VAR PULSE output from 0 TRIGGER using MENU 6.
j.
Setup and measure pulses at CHAL/TAG output to determine challenge mode.
k.
Set M2 reply to ON using MENU 6.
l.
Setup and measure pulses at FIRST REPLY output and determine reply.
m.
Connect a 10W continuous wave input to MAIN RF IN/OUT using High Radio
Frequency (RF) Power Measurement System.
n.
Measure input to MAIN RF IN/OUT using MENU 16.
4. Measure various outputs from AN/UPM-155 using spectrum analyzer.
a.
Setup MAIN RF IN/OUT output signal frequency to 1050 MHz and amplitude to -30
dBm using MENU 10 and MENU 11.
b.
Display MAIN RF IN/OUT output signal using spectrum analyzer.
c.
Setup 1030 MHz OUT signal using MENU 10 and display output on spectrum analyzer.
d.
Setup 60 MHz OUT signal using MENU 10 and MENU 11 and display output on
spectrum analyzer.
5. De-energize and disconnect equipment.
6. Identify correct calibration procedure to be used in accordance with TB 43-180.
7. Update calibration procedure as necessary in accordance with USATA Calibration Procedure
Master List.
8. Observe all safety precautions, warnings, and hazards.
9. Perform Equipment Setup.
10. Perform PRF/PRI and Delays performance check.
11. Perform VAR Pulses 1 and 2 performance check.
12. Perform CHAL and TAG Gen performance check.
13. Perform Mode Repeat performance check.
14. Perform 1st SIF Reply Video performance check.
15. Perform Second Reply performance check.
16. Perform Suppression Gate performance check.
17. Perform Mode 4 Pretrig Out performance check.
18. Perform Mode 4 GTC Trig Out performance check.
19. Perform Video Reset Output performance check.
20. Perform Reply Signal Gating performance check.
21. Perform Mixed Video performance check.
22. Perform M4 KIR Simulator performance check.
23. Perform M4 KIT Simulator performance check.
24. Perform Measurement performance check.
25. Perform RF Section performance check.
26. Perform Modulation performance check.
3-112
STP 9-94H13-SM-TG
9 September 2011
MOS/Skill Level Tasks
Performance Steps
27. Perform Out Main/Aux performance check.
28. Perform High Power In performance check.
29. Perform Final Procedure.
Evaluation Preparation: Ensure all items required in the condition statement (or appropriate
substitutions) are on hand and all safety requirements are met.
Performance Measures
GO
NO-GO
1. Prepared AN/UPM-155 for use and entered TRANSPONDER MENUS from the
TOP LEVEL MENU.
——
——
2. Measured various outputs from AN/UPM-155 using 54602A oscilloscope.
——
——
3. Measured various outputs from AN/UPM-155 using spectrum analyzer.
——
——
4. De-energized and disconnected equipment.
——
——
5. Identified correct calibration procedure to be used in accordance with TB 43-180.
——
——
6. Updated calibration procedure as necessary in accordance with USATA
Calibration Procedure Master List.
——
——
7. Observed all safety precautions, warnings, and hazards.
——
——
8. Performed Equipment Setup.
——
——
9. Performed PRF/PRI and Delays performance check.
——
——
10. Performed VAR Pulses 1 and 2 performance check.
——
——
11. Performed CHAL and TAG Gen performance check.
——
——
12. Performed Mode Repeat performance check.
——
——
13. Performed 1st SIF Reply Video performance check.
——
——
14. Performed Second Reply performance check.
——
——
15. Performed Suppression Gate performance check.
——
——
16. Performed Mode 4 Pretrig Out performance check.
——
——
17. Performed Mode 4 GTC Trig Out performance check.
——
——
18. Performed Video Reset Output performance check.
——
——
19. Performed Reply Signal Gating performance check.
——
——
20. Performed Mixed Video performance check.
——
——
21. Performed M4 KIR Simulator performance check.
——
——
22. Performed M4 KIT Simulator performance check.
——
——
23. Performed Measurement performance check.
——
——
24. Performed RF Section performance check.
——
——
25. Performed Modulation performance check.
——
——
26. Performed Out Main/Aux performance check.
——
——
9 September 2011
STP 9-94H13-SM-TG
3-113
Chapter 3
Performance Measures
GO
NO-GO
27. Performed High Power In performance check.
——
——
28. Performed Final Procedure.
——
——
Evaluation Guidance: Use the applicable technical bulletin as a guide to verify that all steps in the
calibration process are performed in accordance with the proper calibration procedure.
Score the Soldier GO if all performance measures are passed. Score the Soldier NO-GO if any
performance measure is failed. If the Soldier fails any performance measure, explain what was done
wrong and how to do it correctly.
References
Required
DA FORM 7372
DA LABEL 80
TB 385-4
TB 43-180
TB 750-25
TB 9-6625-2337-24
TB 9-6625-2355-24
USATA MASTER LIST
3-114
Related
AR 750-1
AR 750-43
DA FORM 2417
DA LABEL 163
DA PAM 750-8
TM 43-6625-912-12
TM 9-6695-239-14
STP 9-94H13-SM-TG
9 September 2011
MOS/Skill Level Tasks
Subject Area 6: Physical-Dimensional and Aviation
Calibrate Linear Measurement Devices
093-94H-1103
Conditions: In an operational environment (OE), given Linear Measurement Devices requiring
calibration: inside micrometers, vernier calipers, micrometer calipers; TB 9-5210-204-24, TB 9-5210207-24, TB 9-5210-208-24; Forms, Records, Reports, Equipment, and Accessories required as listed in
TB 9-5210-207-24, TB 9-5210-208-24, TB 9-5210-209-24, and TB 9-5210-204-24; manufacturer's
manuals, TB 43-180, TB 385-4, and TB 750-25.
Standards: Calibrate Linear Measurement Devices in accordance with TB 43-180 and the applicable
calibration procedures. Observe all safety precautions in accordance with TB 385-4. Complete required
DA Form 7372 (TMDE Calibration and Repair Data), DA Label 80 (US Army Calibrated Instrument), DA
Label 163 (US Army Limited or Special Calibration), or DA Form 2417 (U.S. Army Calibration System
Rejected Instrument) in accordance with TB 750-25.
9 September 2011
STP 9-94H13-SM-TG
3-115
Chapter 3
Performance Steps
Figure 3-47. Caliper, Inside Micrometer, and Depth Gauge
1. Visually inspect the linear measurement devices for any physical defects.
2. Identify the correct calibration procedures to be used in accordance with TB 43-180.
3. Update calibration procedures as necessary in accordance with USATA Calibration Procedure
Master List.
4. Observe all safety precautions, warnings, hazards, and notes.
5. Calibrate inside micrometer as follows:
a. Perform Preliminary Instructions.
b. Perform Equipment Setup.
c. Perform Micrometer Head Calibration performance check, and adjust if necessary.
d. Perform Length Calibration performance check, and adjust if necessary.
e. Perform Final Procedure.
6. Calibrate vernier caliper as follows:
a. Perform Preliminary Instructions.
b. Perform Equipment Setup.
3-116
STP 9-94H13-SM-TG
9 September 2011
MOS/Skill Level Tasks
Performance Steps
c. Perform Outside Scale performance check, and adjust if necessary.
d. Perform Inside Scale performance check, and adjust if necessary.
e. Perform Final Procedure.
7. Calibrate micrometer caliper as follows:
a. Perform Preliminary instructions.
b. Perform Equipment Setup.
c. Perform Parallelism performance check (if necessary).
d. Perform Zero Check performance check, and adjust if necessary.
e. Perform Length measurement for micrometers without adjustable mandrels and checking
standards performance check if appropriate.
f. Perform Length measurement for micrometers with adjustable mandrels and checking
standards performance check if appropriate.
g. Perform Final Procedure.
8. Maintain tools and equipment.
Evaluation Preparation: Ensure all items required in the condition statement (or appropriate
substitutions) are on hand and all safety requirements are met.
GO
NO-GO
1. Visually inspected the linear measurement devices for any physical defects.
——
——
2. Identified correct calibration procedures to be used in accordance with TB 43-180.
——
——
3. Updated calibration procedures as necessary in accordance with USATA
Calibration Procedure Master List.
——
——
4. Observed all safety precautions, warnings, and hazards.
——
——
5. Calibrated inside micrometer.
——
——
6. Calibrated vernier caliper.
——
——
7. Calibrated micrometer caliper.
——
——
8. Maintained tools and equipment.
——
——
Performance Measures
Evaluation Guidance: Refer to the applicable technical bulletin as a guide to verify that all steps in the
calibration process are performed in accordance with the proper calibration procedure.
Score the Soldier GO if all performance measures are passed. Score the Soldier NO-GO if any
performance measure is failed. If the Soldier fails any performance measure, explain what was done
wrong and how to do it correctly.
References
Required
DA FORM 2417
DA FORM 7372
DA LABEL 163
DA LABEL 80
TB 385-4
TB 43-180
TB 750-25
TB 9-5210-204-24
TB 9-5210-207-24
TB 9-5210-208-24
TB 9-5210-209-24
USATA MASTER LIST
9 September 2011
Related
AR 750-1
AR 750-43
DA PAM 750-8
TM 9-6695-239-14
STP 9-94H13-SM-TG
3-117
Chapter 3
Calibrate Thermometer
093-94H-1501
Conditions: In an operational environment (OE), given a thermometer requiring calibration, TB 9-6685314-24, Forms, Records, Reports, Equipment, and Accessories required as listed in TB 9-6685-314-24;
TB 43-180, TB 750-25, and United States Army Test, Measurement, and Diagnostic Equipment (TMDE)
Activity (USATA) Calibration Procedure Master List.
Standards: Calibrate thermometer in accordance with TB 9-6685-314-24 and TB 43-180. Observe all
safety precautions in accordance with TB 385-4. Complete required DA Form 7372 (TMDE Calibration
and Repair Data), DA Label 80 (US Army Calibrated Instrument), DA Label 163 (US Army Limited or
Special Calibration), or DA Form 2417 (U.S. Army Calibration System Rejected Instrument) in
accordance with TB 750-25. Prepare correction chart, if applicable.
Performance Steps
Figure 3-48. Model 28 Cool/Heat
Source
3-118
STP 9-94H13-SM-TG
9 September 2011
MOS/Skill Level Tasks
Performance Steps
Figure 3-49. Typical Temperature Calibration Set-Up
9 September 2011
STP 9-94H13-SM-TG
3-119
Chapter 3
Performance Steps
Figure 3-50. Model 28 Top View and Thermometer that can be inserted
1. Observe all safety precautions, warnings, hazards, and notes.
2. Read and follow the operating instructions in applicable manufacturer's manual before applying
power to the temperature workstation.
3. Operate temperature workstation as follows:
a.
Insert probe into tightest fitting cavity before heating or cooling if possible.
b.
Insert probe into hole to depth of 5.25 inches.
c.
Ensure a depth of at least 0.75 inches for entire active area of the sensor of a short
probe when unable to achieve the depth of 5.25 inches.
d.
Use calibrated readout device for probe.
e.
Allow probe and chamber temperature to stabilize.
f.
Use insulation if available.
g.
Key in setpoint temperatures from the front panel keyboard and turn the Cool Switch
and Heat Switch ON and OFF to activate the sources.
h.
Display Cool Source and Heat Source temperatures.
i.
Display summary screen.
j.
Change Cool Source and Heat Source setpoints.
4. De-energize and disconnect equipment.
5. Identify correct calibration procedure to be used in accordance with TB 43-180.
3-120
STP 9-94H13-SM-TG
9 September 2011
MOS/Skill Level Tasks
Performance Steps
6. Update calibration procedure as necessary in accordance with USATA Calibration Procedure
Master List.
7. Observe all safety precautions, warnings, and hazards.
8. Perform preliminary instructions.
9. Perform equipment setup.
10. Perform ambient temperature performance check, and prepare correction chart if necessary.
11. Perform boiling point performance check, and prepare correction chart if necessary.
12. Perform final procedure.
Evaluation Preparation: Ensure all items required in the condition statement (or appropriate
substitutions) are on hand and all safety requirements are met.
GO
NO-GO
1. Observed all safety precautions, warnings, hazards, and notes.
——
——
2. Read and followed the operating instructions in applicable manufacturer's manual
before applying power to the temperature workstation.
——
——
3. Operated temperature workstation.
——
——
4. De-energized and disconnected equipment.
——
——
5. Identified correct calibration procedure to be used in accordance with TB 43-180.
——
——
6. Updated calibration procedure as necessary in accordance with USATA
Calibration Procedure Master List.
——
——
7. Observed all safety precautions, warnings, and hazards.
——
——
8. Performed preliminary instructions.
——
——
9. Performed equipment setup.
——
——
10. Performed ambient temperature performance check, and prepared correction
chart if necessary.
——
——
11. Performed boiling point performance check, and prepared correction chart if
necessary.
——
——
12. Performed final procedure.
——
——
Performance Measures
Evaluation Guidance: Use the applicable technical bulletin as a guide to verify that all steps in the
calibration process are performed in accordance with the proper calibration procedure.
Score the Soldier GO if all performance measures are passed. Score the Soldier NO-GO if any
performance measure is failed. If the Soldier fails any performance measure, explain what was done
wrong and how to do it correctly.
References
Required
DA FORM 2417
DA FORM 7372
DA LABEL 163
DA LABEL 80
TB 385-4
9 September 2011
Related
AR 750-1
AR 750-43
DA PAM 750-8
TM 9-6695-239-14
STP 9-94H13-SM-TG
3-121
Chapter 3
References
Required
TB 43-180
TB 750-25
TB 9-6685-314-24
THERMACAL INC MODEL 28
USATA MASTER LIST
3-122
Related
STP 9-94H13-SM-TG
9 September 2011
MOS/Skill Level Tasks
Operate Force Torque Standard
093-94H-1510
Conditions: In an operational environment (OE), with a requirement to operate an MGCPlus Force
Torque Standard, torque cells, various type torque wrenches, Manufacturer's Manuals, and TB 385-4.
Standards: Operate the force torque standard in accordance with applicable technical reference.
Observe all safety precautions in accordance with TB 385-4.
Performance Steps
Figure 3-51. MGCPlus Torque Indicator
1. Observe all safety precautions, warnings, hazards, and notes.
2. Visually inspect the force/torque standard and torque wrenches for any physical defects.
3. Read and follow the operator's instructions given in manufacturer's manual.
4. Select appropriate torque cell (or cells) for checking the full range of the torque wrench used as
the test instrument (TI).
5. Mount the torque cell on the calibration fixture. Orient the cell so the cable hangs somewhere
between the 6 o'clock and 7 o'clock position, or at a position designated on the cell itself.
Note: On 20 ft/lb and smaller cells, support the bulk of the cable in a way that does not add any
clockwise or counter-clockwise torque load to the cell.
6. Connect the torque cell cable to the ML10B amplifier plug-in input connector on the rear of the
force/torque standard.
7. Connect the force/torque standard to 115 V A/C power source.
8. Turn on the force/torque by pressing the POWER button.
Note: If the torque standard was powered off for more than 30 minutes, allow 30 minutes of
warm up time before proceeding.
9. Press the CHANNEL + button to switch to Channel 3.
10. Press the up or down SIGNAL button to indicate "Gross" on the display.
9 September 2011
STP 9-94H13-SM-TG
3-123
Chapter 3
Performance Steps
11. Press the F4 button to show the Transducer selection soft keys above the F2 and F3 buttons.
12. Press either the F2 or F3 button to select the indication that matches the attached torque cell.
13. Press the F4 button to show the Units selection soft keys above the F2 and F3 buttons.
14. Press either the F2 or F3 button to select the units of torque reading to match the TI.
15. Exercise torque cell using socket wrench:
a. Attach socket wrench to torque cell.
b. Slowly apply torque in a clockwise direction until full scale of the torque cell is indicated on
the display.
c. Slowly release torque back to an approximate zero indication.
d. Repeat exercise two more times.
16. Exercise TI (full scale).
WARNING: DO NOT OVERTORQUE THE TORQUE CELL: CHANGE TORQUE CELLS AS
NECESSARY.
a. Attach TI to torque cell.
b. Apply torque slowly in a clockwise direction until full scale of TI is reached.
WARNING: DO NOT OVERTORQUE THE TORQUE CELL: CHANGE TORQUE CELLS AS
NECESSARY.
c. Released torque slowly back to an approximate zero indication.
d. Repeat exercise two more times.
17. Pressed F4 to display the ->0<- (Zero), -||- (Clear Store), and ACAL softkeys.
Note: Ensure the ACAL indicator is on by pressing the F3 button if necessary.
18. Ensure the force/torque standard is in "Gross" mode for zeroing. Press SIGNAL button to place
standard into "Gross" mode if necessary.
19. Press F1 to zero the indication on the force/torque standard.
20. Use appropriate signal mode for particular type of torque wrench:
a. Use the "Store 1" signal mode for non-snap type torque wrenches.
b. Use "1st Peak Hold" signal mode for snap type torque wrenches.
21. Apply torque in clockwise direction and obtain readings on torque/force standard display of 20, 60,
and 100 percent of the range of the TI. Change torque cells as necessary to accommodate range
of TI.
22. Disconnect, maintain, and store equipment.
Evaluation Preparation: Ensure all items required in the condition statement (or appropriate
substitutions) are on hand and all safety requirements are met.
Performance Measures
GO
NO-GO
1. Observed all safety precautions, warnings, hazards, and notes.
——
——
2. Visually inspected the force/torque standard and torque wrenches for any
physical defects.
——
——
3. Read and followed the operator's instructions given in manufacturer's manual.
——
——
4. Selected appropriate torque cell (or cells) for checking the full range of the torque
wrench used as the test instrument (TI).
——
——
3-124
STP 9-94H13-SM-TG
9 September 2011
MOS/Skill Level Tasks
Performance Measures
GO
NO-GO
5. Mounted the torque cell on the calibration fixture. Oriented the cell so the cable
hung down somewhere between the 6 o'clock and 7 o'clock position, or at a
position designated on the cell itself.
——
——
6. Connected the torque cell cable to the ML10B amplifier plug-in input connector on
the rear of the force/torque standard.
——
——
7. Connected the force/torque standard to 115 V A/C power source.
——
——
8. Turned on the force/torque by pressing the POWER button.
——
——
Note: If the torque standard was powered off for more than 30 minutes, allowed 30 minutes of
warm up time before proceeding.
9. Pressed the CHANNEL + button to switch to Channel 3.
——
——
10. Pressed the up or down SIGNAL button to indicate "Gross" on the display.
——
——
11. Pressed the F4 button to show the Transducer selection soft keys above the F2
and F3 buttons.
——
——
12. Pressed either the F2 or F3 button to select the indication that matches the
attached torque cell.
——
——
13. Pressed the F4 button to show the Units selection soft keys above the F2 and F3
buttons.
——
——
14. Pressed either the F2 or F3 button to select the units of torque reading to match
the TI.
——
——
15. Exercised torque cell (full scale) using socket wrench.
——
——
16. Exercised TI three times (full scale).
——
——
17. Pressed F4 to display the ->0<- (Zero), -||- (Clear Store), and ACAL softkeys.
——
——
18. Ensured the force/torque standard was in "Gross" mode for zeroing. Pressed
SIGNAL button to place standard into "Gross" mode if necessary.
——
——
19. Pressed F1 to zero the indication on the force/torque standard.
——
——
20. Used appropriate signal mode for particular type of torque wrench.
——
——
21. Applied torque in clockwise direction and obtained readings on torque/force
standard display of 20, 60, and 100 percent of the range of the TI. Changed
torque cells as necessary.
——
——
22. Disconnected, maintained, and stored equipment.
——
——
Evaluation Guidance: Score the Soldier GO if all performance measures are passed. Score the Soldier
NO-GO if any performance measure is failed. If the Soldier fails any performance measure, explain what
was done wrong and how to do it correctly.
References
Required
MANUFACTURER'S MANUAL
TB 385-4
9 September 2011
Related
DA PAM 750-8
TB 750-25
TM 9-6695-239-14
STP 9-94H13-SM-TG
3-125
Chapter 3
Calibrate Torque Wrench
093-94H-1511
Conditions: In an operational environment (OE), given torque wrench requiring calibration, TB 9-5120202-24, Forms, Records, Reports, Equipment, and Accessories required as listed in TB 9-5120-202-24;
TB 43-180, TB 385-4, TB 750-25, Manufacturer's manual, and United States Army Test, Measurement,
and Diagnostic Equipment (TMDE) Activity (USATA) Calibration Procedure Master List.
Standards: Calibrate torque wrench in accordance with TB 43-180 and TB 9-5120-202-24. Observe all
safety precautions in accordance with TB 385-4. Complete required DA Form 7372 (TMDE Calibration
and Repair Data), DA Label 80 (US Army Calibrated Instrument), DA Label 163 (US Army Limited or
Special Calibration), or DA Form 2417 (U.S. Army Calibration System Rejected Instrument) in
accordance with TB 750-25.
Performance Steps
Figure 3-52. Typical Torque Measurement Set-Up
1. Visually inspect the torque wrench for any physical defects.
2. Identify the correct calibration procedure to be used in accordance with TB 43-180.
3. Update calibration procedure as necessary in accordance with USATA Calibration Procedure
Master List.
4. Observe all safety precautions, warnings, and hazards.
5. Calibrate torque wrench as follows using force torque standard:
3-126
STP 9-94H13-SM-TG
9 September 2011
MOS/Skill Level Tasks
Performance Steps
a. Perform preliminary instructions.
b. Perform appropriate performance check dependent on torque wrench type and make
adjustments if necessary.
6. Perform final procedure.
Evaluation Preparation: Ensure all items required in the condition statement (or appropriate
substitutions) are on hand and all safety requirements are met.
Performance Measures
GO
NO-GO
1. Visually inspected the torque wrench for any physical defects.
——
——
2. Identified correct calibration procedure to be used in accordance with TB 43-180.
——
——
3. Updated calibration procedure as necessary in accordance with USATA
Calibration Procedure Master List.
——
——
4. Observed all safety precautions, warnings, and hazards.
——
——
5. Calibrated torque wrench as follows using force torque standard:
a. Performed preliminary instructions.
b. Performed appropriate performance check dependent on torque wrench
type, and made adjustments if necessary.
——
——
6. Performed final procedure.
——
——
Evaluation Guidance: Use the applicable technical bulletin as a guide to verify that all steps in the
calibration process are performed in accordance with the proper calibration procedure.
Score the Soldier GO if all performance measures are passed. Score the Soldier NO-GO if any
performance measure is failed. If the Soldier fails any performance measure, explain what was done
wrong and how to do it correctly.
References
Required
DA FORM 2417
DA FORM 7372
DA LABEL 163
DA LABEL 80
MANUFACTURER'S MANUAL
TB 385-4
TB 43-180
TB 750-25
TB 9-5120-202-24
9 September 2011
Related
AR 750-1
DA PAM 750-8
TM 9-6695-239-14
STP 9-94H13-SM-TG
3-127
Chapter 3
Calibrate Tensiometer
093-94H-1512
Conditions: In an operational environment (OE), given Tensiometer (dial indicating MIL-T-7638 or MILT-38760) requiring calibration, TB 9-6635-203-24, forms, records, reports, equipment, and accessories
required as listed in TB 9-6635-203-24; TB 43-180, TB 385-4, TB 750-25, and United States Army Test,
Measurement, and Diagnostic Equipment (TMDE) Activity (USATA) Calibration Procedure Master List.
Standards: Calibrate Tensiometer in accordance with TB 43-180 and TB 9-6635-203-24. Observe all
safety precautions in accordance with TB 385-4. Complete required DA Form 7372 (TMDE Calibration
and Repair Data), DA Label 80 (US Army Calibrated Instrument), DA Label 163 (US Army Limited or
Special Calibration), or DA Form 2417 (U.S. Army Calibration System Rejected Instrument) in
accordance with TB 750-25.
Performance Steps
Figure 3-53. Tensiometer
3-128
STP 9-94H13-SM-TG
9 September 2011
MOS/Skill Level Tasks
Performance Steps
(typical)
Figure 3-54. Analog and Digital Cable Tensiometers
1. Visually inspect the Tensiometer for any physical defects.
2. Identify the correct calibration procedure to be used in accordance with TB 43-180.
3. Update calibration procedure as necessary in accordance with USATA Calibration Procedure
Master List.
4. Observe all safety precautions, warnings, and hazards.
5. Perform preliminary instructions.
6. Perform equipment setup.
7. Perform Tensiometer accuracy (Dial Indicating Tensiometer) performance check.
8. Perform final procedure.
Evaluation Preparation: Ensure all items required in the condition statement (or appropriate
substitutions) are on hand and all safety requirements are met.
Performance Measures
GO
NO-GO
1. Visually inspected the Tensiometer for any physical defects.
——
——
2. Identified correct calibration procedure to be used in accordance with TB 43-180.
——
——
3. Updated calibration procedure as necessary in accordance with USATA
Calibration Procedure Master List.
——
——
4. Observed all safety precautions, warnings, and hazards.
——
——
5. Performed preliminary instructions.
——
——
9 September 2011
STP 9-94H13-SM-TG
3-129
Chapter 3
Performance Measures
GO
NO-GO
6. Performed equipment setup.
——
——
7. Performed Tensiometer accuracy (Dial Indicating Tensiometer) performance
check.
——
——
8. Performed final procedure.
——
——
Evaluation Guidance: Use the applicable technical bulletin as a guide to verify that all steps in the
calibration process are performed in accordance with the proper calibration procedure.
Score the Soldier GO if all performance measures are passed. Score the Soldier NO-GO if any
performance measure is failed. If the Soldier fails any performance measure, explain what was done
wrong and how to do it correctly.
References
Required
DA FORM 2417
DA FORM 7372
DA LABEL 163
DA LABEL 80
TB 385-4
TB 43-180
TB 750-25
TB 9-6635-203-24
USATA MASTER LIST
3-130
Related
AR 750-1
AR 750-43
DA PAM 750-8
TM 9-6695-239-14
STP 9-94H13-SM-TG
9 September 2011
MOS/Skill Level Tasks
Calibrate Weighing Scale
093-94H-1513
Conditions: In an operational environment (OE), given weighing scale (Resiliency Tester) requiring
calibration, TB 9-6670-251-24, Forms, Records, Reports, Equipment, and Accessories required as listed
in TB 9-6670-251-24; TB 43-180, TB 385-4, TB 750-25, and United States Army Test, Measurement,
and Diagnostic Equipment (TMDE) Activity (USATA) Calibration Procedure Master List.
Standards: Calibrate weighing scale in accordance with TB 43-180 and TB 9-6670-251-24. Observe all
safety precautions in accordance with TB 385-4. Complete required DA Form 7372 (TMDE Calibration
and Repair Data), DA Label 80 (US Army Calibrated Instrument), DA Label 163 (US Army Limited or
Special Calibration), or DA Form 2417 (U.S. Army Calibration System Rejected Instrument) in
accordance with TB 750-25.
Performance Steps
Figure 3-55. Typical Weighing Scales
1. Visually inspect the weighing scale for any physical defects.
2. Identify correct calibration procedure to be used in accordance with TB 43-180.
3. Update calibration procedure as necessary in accordance with USATA Calibration Procedure
Master List.
4. Observe all safety precautions, warnings, hazards, and notes.
9 September 2011
STP 9-94H13-SM-TG
3-131
Chapter 3
Performance Steps
5. Perform preliminary instructions.
6. Perform equipment setup.
7. Perform appropriate performance check dependent on Resiliency Tester type.
8. Perform final procedure.
Evaluation Preparation: Ensured all required equipment or appropriate substitutions were on hand and
all safety requirements were being met.
Performance Measures
GO
NO-GO
1. Visually inspected the weighing scale for any physical defects.
——
——
2. Identified TB 9-6670-251-24 as correct calibration procedure to be used in
accordance with TB 43-180.
——
——
3. Updated calibration procedure as necessary in accordance with USATA
Calibration Procedure Master List.
——
——
4. Observed all safety precautions, warnings, hazards, and notes.
——
——
5. Performed preliminary instructions.
——
——
6. Performed equipment setup.
——
——
7. Performed appropriate performance check dependent on Resiliency Tester type.
——
——
8. Performed final procedure.
——
——
Evaluation Guidance: Use the applicable technical bulletin as a guide to verify that all steps in the
calibration process are performed in accordance with the proper calibration procedure.
Score the Soldier GO if all performance measures are passed. Score the Soldier NO-GO if any
performance measure is failed. If the Soldier fails any performance measure, explain what was done
wrong and how to do it correctly.
References
Required
DA FORM 2417
DA FORM 7372
DA LABEL 163
DA LABEL 80
TB 385-4
TB 43-180
TB 750-25
TB 9-6670-251-24
USATA MASTER LIST
3-132
Related
AR 750-1
AR 750-43
DA PAM 750-8
TM 9-6695-239-14
STP 9-94H13-SM-TG
9 September 2011
MOS/Skill Level Tasks
Calibrate Pressure/Vacuum Gauges
093-94H-1521
Conditions: In an operational environment (OE), given pressure and vacuum gauges requiring
calibration, TB 9-6685-319-24 or TB 9-6685-327-35; forms, records, reports, equipment, and
accessories required as listed in TB 9-6685-319-24 or TB 9-6685-327-35; TB 43-180; TB 385-4; TB 75025; and United States Army Test, Measurement, and Diagnostic Equipment (TMDE) Activity (USATA)
Calibration Procedure Master List.
Standards: Calibrate pressure and vacuum gauges in accordance with TB 43-180 and TB 9-6685-31924 or TB 9-6685-327-35. Observe all safety precautions in accordance with AR 700-68 and TB 385-4.
Complete required DA Form 7372 (TMDE Calibration and Repair Data), DA Label 80 (US Army
Calibrated Instrument), DA Label 163 (US Army Limited or Special Calibration), or DA Form 2417 (U.S.
Army Calibration System Rejected Instrument) in accordance with TB 750-25.
Performance Steps
1. Read TB 385-4, Paragraph 6-2.c. and review AR 700-68 at least annually before working with or
handling pressurized gas cylinders.
2. Ensure no more than two cylinders of the same gas are at a workstation at any one time.
3. Ensure empty cylinders were removed from the workstation.
4. Check the identity of the gas by reading the label or other markings on the cylinder before using.
5. Check gas cylinder for the correct cylinder color, the correct band size and color, the correct DOT
colored tag, and the correct title.
6. Do not rely solely upon cylinder color for content identification.
7. Inspect the gas cylinder for scratches, dents, bulges, corrosion pits, scorch or burn marks, or any
other physical indications that exceed the acceptable specifications for pressurized cylinders.
8. Keep the removable valve protection and valve outlet caps and plugs in place until connecting the
cylinder for use.
9. Place the gas cylinder in an upright position and secure it to prevent an accidental upset or fall and
to prevent it from striking another object.
10. Remove valve protector cap(s).
11. Examine the outlet of the valve for any dirt or other contamination before attaching a regulator.
12. Clear outlet of the valve of any dust and dirt by pointing the valve outlet away from personnel and
slightly opening the valve (1/4 turn) and immediately closing it for an instantaneous burst of
pressure.
13. Mount a thread-matched regulator onto the gas cylinder.
14. Open the regulator control fully.
15. Close the regulator control.
16. Open the cylinder valve slowly, using proper tools or by hand if fitted with a hand wheel, to prevent a
sudden discharge of gas.
17. Ensure no hammering or use of improper wrenches is used to attempt to open or close a stuck
valve. Tag the cylinder If necessary and take to an authorized facility to have the valve replaced.
9 September 2011
STP 9-94H13-SM-TG
3-133
Chapter 3
Performance Steps
18. Open the cylinder valve fully and then close it to 1/2 turn from full open to free the valve for rapid
operation if necessary.
19. Perform a pressure test using the regulator control.
20. Ensure at least 15 psig remain in the cylinder, or ensure the cylinder is empty and purged if less
than 15 psig remained in the cylinder.
21. Close the cylinder valve tightly when finished with the pressure test.
22. Release all gas from the regulator.
23. Close the regulator control.
24. Remove the regulator from the gas cylinder.
25. Replace the valve protector cap(s).
26. Return and secure the gas cylinder to its storage area.
27. Read and follow the operating instructions in given reference(s).
Note: Performance steps 32 through 34 are to be used in conjunction with the Pressure
Distribution System (PDS) included in the AN/GSM-705() Calibration.
28. Visually inspect the pressure standards and test instrument(s) (TI) for any physical defects.
29. Observe all safety precautions, warnings, hazards, and notes.
WARNING: The oxygen monitoring system alarm sounds when oxygen levels are dangerously low.
Failure to observe this warning may result in death by asphyxiation.
WARNING: Ensure both nitrogen tank valves (TV 1 and TV 2) are closed before beginning any
procedure. Failure to observe this warning may cause severe injury or death.
CAUTION: Equipment damage hazard. Quick connectors supplied with pressure distribution system are
color-coded. Flex line connectors with a specific color band will only connect to pressure distribution
system connectors of the same color. Attempting to mate connectors with different color bands may
cause damage to tube fittings and quick connectors.
30. Turn on DPI 145/R pneumatic pressure standard (PPS) using front panel power switch.
31. Ensure that appropriate unit of measure is displayed (F1 Key).
32. Operate PDS and PPS to perform high pressure operation (300 - 2200 psi):
a.
Remove the protective cover from the high-pressure outlet port (orange band) and
connect the flex line tubing with orange band by pushing the flex line in until a click is heard.
b.
Remove the white band protective covers from the flex line tubing and the pressure
connector assembly.
c.
Connect the flex line tubing white band connector to the pressure connector (white band)
assembly by pushing the flex line in until a click is heard.
d.
Connect the flex line tubing white band connector to the pressure connector (white band)
assembly by pushing the flex line in until a click is heard.
e.
Remove the protective cover from the high pressure elbow port on panel below the DPI
145/R PPS.
f.
Connect the opposite end of pressure interface test assembly to the high pressure elbow
port.
3-134
STP 9-94H13-SM-TG
9 September 2011
MOS/Skill Level Tasks
Performance Steps
Note: Use Gap Inspection Go/No Go Gage to ensure connectors are sufficiently tightened.
g.
h.
i.
j.
Mate TI to interface test adapter using appropriate adapter(s) and Teflon tape.
Remove protective cover from the pressure interface test assembly, and retain cover.
Mate TI and adapter (if necessary) to the pressure interface test assembly.
Ensure manifold valves V1, V2, and V3 are closed (clockwise).
WARNING: HIGH PRESSURE AIR HAZARD-Do not exceed 250 psi when no connections have
been made to high pressure ports. Do not exceed 3000 psi at any time during high pressure
operation.
Note: Ensure the pressure distribution system has been configured for high pressure operation
before beginning this procedure.
k.
Ensure V4 is in the closed (finger tight) position before opening nitrogen tanks.
l.
Close the high-pressure and low-pressure regulators by turning the handles fully
counterclockwise until no resistance is felt.
m.
Open both nitrogen tank valves (TV 1 and TV 2) at least one full turn counterclockwise.
n.
Open manifold valves V1 and V2 two full turns counterclockwise.
o.
Open manifold valve V3 momentarily, then close V2 and V3.
p.
Adjust the high-pressure regulator valve as required to obtain pressure required (up to
2200 psi or tank pressure).
q.
Rotate the MPC1-3000 OUTLET SELECTION valve to the vent position, and then close
the TEST OUTLET valve.
CAUTION: Never tighten the needle valves on the TEST INLET and OUTLET beyond light pressure.
Over tightening will result in equipment damage.
CAUTION: Open the EQUALIZE valve (pull out) prior to opening the TEST INLET and OUTLET valves.
Failure to observe this caution will result in equipment damage.
r.
Rotate the Variable Volume piston (TEST ADJUST knob) to the appropriate position
(normally mid-stroke).
s.
Adjust (slowly) the TEST INLET valve as close to the desired indication on the TI as
possible.
t.
Close the TEST INLET valve.
CAUTION: Do not over range the TI.
u.
v.
Close the EQUALIZE valve (push in).
Rotate the Variable Volume (TEST ADJUST) knob until the desired pressure is obtained.
Note: EQUALIZE valve may open if Variable Volume is adjusted in excess of 150 psi, and a
slight loss of pressure may result..
w.
Close valves V1, V2, and V3 (fully clockwise).
x.
Rotate both high and low pressure regulators to mid-range position.
y.
Open valve V4 to bleed pressure from the system.
z.
Ensure the OUTLET SELECTION valve is in VENT position, then open the EQUALIZE,
TEST INLET, and TEST OUTLET valves in order to vent the MPC1-3000.
aa.
Remove the TI from the pressure interface test assembly.
ab.
Close both tank valves (TV 1 and TV 2) by turning fully clockwise.
ac.
Open valves V1, V2, V3, and V4 to bleed the system.
ad.
Remove all connections.
9 September 2011
STP 9-94H13-SM-TG
3-135
Chapter 3
Performance Steps
33. Operate PDS and PPS to perform low pressure operation (0 - 299 psi):
a.
Remove the protective cover from the high-pressure outlet port (yellow band) and
connect the flex line tubing with orange band by pushing the flex line in until a click is heard.
b.
Remove the white band protective covers from the flex line tubing and the pressure
connector assembly.
c.
Connect the flex line tubing white band connector to the pressure connector (white band)
assembly by pushing the flex line in until a click is heard.
d.
Connect the green band connector from the pressure interface test assembly to the
green band connector (top connector) of the pressure connector assembly.
e.
Remove the protective cover from the low pressure elbow port on panel below DPI 145/R
PPS.
f.
Connect the opposite end of pressure interface test assembly to the low pressure elbow
port (300 psig connector).
Note: Use Gap Inspection Go/No Go Gage to ensure connectors are sufficiently tightened.
g.
Mate test instrument (TI) to interface test adapter using appropriate adapter(s) and
Teflon tape.
h.
Remove protective cover from the pressure interface test assembly, and retain cover.
i.
Mate TI and adapter (if necessary) to the pressure interface test assembly.
j.
Ensure manifold valves V1, V2, and V3 are closed (clockwise).
CAUTION: Never tighten the needle valves on the TEST INLET and OUTLET beyond light pressure.
Over tightening will result in equipment damage.
CAUTION: Open the EQUALIZE valve (pull out) prior to opening the TEST INLET and OUTLET valves.
Failure to observe this caution will result in equipment damage.
k.
Rotate the Variable Volume piston (TEST ADJUST knob) to the appropriate position
(normally mid-stroke).
l.
Adjust (slowly) the TEST INLET valve as close to the desired indication on the TI as
possible.
m.
Close the TEST INLET valve.
CAUTION: Do not over range the TI.
n.
Close the EQUALIZE valve (push in).
o.
Rotate the Variable Volume (TEST ADJUST) knob until the desired pressure is obtained.
p.
Close both tank valves (TV 1 and TV 2) by turning fully clockwise.
q.
Open valves V4 and V6 to bleed the system.
r.
Open manifold valves V1, V2, and V3 two turns counterclockwise.
s.
Open the high and low pressure regulators by turning handles fully clockwise.
t.
Ensure the OUTLET SELECTION valve is in VENT position, then open the EQUALIZE,
TEST INLET, and TEST OUTLET valves in order to vent the MPC1-3000.
u.
Remove the TI from the pressure interface test assembly.
v.
Remove all connections.
34. Replace all protective covers.
35. Operate Reference Pressure Monitor RPM-3 to perform hydraulic pressure operation.
a.
Turn on RPM-3 using front panel ON/OFF soft key.
b.
Ensure RPM-3 range setting is appropriate for TI test pressure (Key 7).
c.
Ensure RPM-3 displays appropriate unit of measure (Key 8).
d.
Connect hydraulic pressure comparator to RPM-3 rear panel transducer connection
using quick disconnect pressure hoses.
3-136
STP 9-94H13-SM-TG
9 September 2011
MOS/Skill Level Tasks
Performance Steps
CAUTION: Ensure pressure hoses are rated to withstand test pressure.
e.
f.
g.
h.
Attach gauge serving as TI to hydraulic comparator using Teflon tape.
Use fluid separator if calibrating high pressure pneumatic gauge.
Apply hydraulic pressure using pump handle.
Observe pressure displayed on RPM-3 front panel and TI.
CAUTION: Apply pressure slowly as desired TI pressure approaches. Do not over range TI.
i.
j.
Release pressure in a controlled manner.
Remove all connections.
36. Clean all equipment.
37. Replace all protective covers.
38. Stow all equipment.
39. Visually inspect the pressure and vacuum gauges for any physical defects.
40. Identify the correct calibration procedure(s) to be used in accordance with TB 43-180.
41. Update calibration procedure(s) as necessary in accordance with USATA Calibration Procedure
Master List.
42. Observe all safety precautions, warnings, hazards, and notes.
43. Calibrate hydraulic gauges in accordance with TB 9-6685-319-24, Section III.
a. Perform preliminary instructions.
b. Perform equipment setup.
c. Perform 0 to 10,000 psi hydraulic gages (0 to 20 percent accuracy) performance check, and
make adjustments if necessary.
d. Perform 0 to 5000 psi panel mounted hydraulic gages (1.0 to 20 percent accuracy)
performance check, and make adjustments if necessary.
e. Perform 0 to 10,000 psi panel mounted hydraulic gages (0.1 to 1.0 percent accuracy)
performance check, and make adjustments if necessary.
f. Perform final procedure.
44. Calibrate pneumatic gauges in accordance with TB 9-6685-319-24, Section IV.
a. Perform preliminary instructions.
b. Perform equipment setup.
c. Perform 0 to 235 psi pneumatic gages (0.1 to 1.0 percent accuracy) performance check, and
make adjustments if necessary.
d. Perform 235 to 1000 psi pneumatic gages (0.1 to 1.0 percent accuracy) performance check,
and make adjustments if necessary.
e. Perform 1000 to 5000 psi pneumatic gages (0.1 to 1.0 percent accuracy) performance check,
and make adjustments if necessary.
f. Perform Final procedure.
45. Calibrate vacuum gauges in accordance with TB 9-6685-327-35, Section III.
a. Perform preliminary instructions.
b. Perform equipment setup.
c. Perform vacuum performance check.
d. Perform final procedure.
46. Replace the protective covers on gauges if necessary.
47. Disconnect and properly maintain equipment.
9 September 2011
STP 9-94H13-SM-TG
3-137
Chapter 3
Evaluation Preparation: Ensure all items required in the condition statement (or appropriate
substitutions) are on hand and all safety requirements are met.
Performance Measures
GO
NO-GO
1. Read TB 385-4, Paragraph 6-2.c. and reviewed AR 700-68 at least annually
before working with or handling pressurized gas cylinders.
——
——
2. Ensured no more than two cylinders of the same gas were at a workstation at any
one time.
——
——
3. Ensured empty cylinders were removed from the workstation.
——
——
4. Checked the identity of the gas by reading the label or other markings on the
cylinder before using.
——
——
5. Checked gas cylinder for the correct cylinder color, the correct band size and
color, the correct DOT colored tag, and the correct title.
——
——
6. Did not rely solely upon cylinder color for content identification.
——
——
7. Inspected the gas cylinder for scratches, dents, bulges, corrosion pits, scorch or
burn marks, or any other physical indications that exceed the acceptable
specifications for pressurized cylinders.
——
——
8. Kept the removable valve protection and valve outlet caps and plugs in place until
connecting the cylinder for use.
——
——
9. Placed the gas cylinder in an upright position and secured it to prevent an
accidental upset or fall and to prevent it from striking another object.
——
——
10. Removed valve protector cap(s).
——
——
11. Examined the outlet of the valve for any dirt or other contamination before
attaching a regulator.
——
——
12. Cleared outlet of the valve of any dust and dirt by pointing the valve outlet away
from personnel and slightly opening the valve (1/4 turn) and immediately closing it
for an instantaneous burst of pressure.
——
——
13. Mounted a thread-matched regulator onto the gas cylinder.
——
——
14. Opened the regulator control fully.
——
——
15. Closed the regulator control.
——
——
16. Opened the cylinder valve slowly, using proper tools or by hand if fitted with a
hand wheel, to prevent a sudden discharge of gas.
——
——
17. Ensured no hammering or use of improper wrenches was used to attempt to open
or close a stuck valve. If necessary the cylinder was tagged and taken to an
authorized facility to have the valve replaced.
——
——
18. Opened the cylinder valve fully and then closed it to 1/2 turn from full open to free
the valve for rapid operation if necessary.
——
——
19. Performed a pressure test using the regulator control.
——
——
20. Ensured at least 15 psig remained in the cylinder, or ensured the cylinder was
emptied and purged if less than 15 psig remained in the cylinder.
——
——
21. Closed the cylinder valve tightly when finished with the pressure test.
——
——
3-138
STP 9-94H13-SM-TG
9 September 2011
MOS/Skill Level Tasks
Performance Measures
GO
NO-GO
22. Released all gas from the regulator.
——
——
23. Closed the regulator control.
——
——
24. Removed the regulator from the gas cylinder.
——
——
25. Replaced the valve protector cap(s).
——
——
26. Returned and secured the gas cylinder to its storage area.
——
——
27. Read and followed the operating instructions in given reference(s).
——
——
28. Visually inspected the pressure standards and test instrument(s) (TI) for any
physical defects.
——
——
29. Observed all safety precautions, warnings, hazards, and notes.
——
——
30. Turned on DPI 145/R pneumatic pressure standard (PPS) using front panel
power switch.
——
——
31. Ensured that appropriate unit of measure is displayed (F1 Key).
——
——
32. Operated PDS and PPS to perform high pressure operation (300 - 2200 psi).
——
——
33. Operated PDS and PPS to perform low pressure operation (0 - 299 psi).
——
——
34. Replaced all protective covers.
——
——
35. Operated Reference Pressure Monitor RPM-3 to perform hydraulic pressure
operation.
——
——
36. Cleaned all equipment.
——
——
37. Replaced all protective covers.
——
——
38. Stowed all equipment.
——
——
39. Visually inspected the pressure and vacuum gauges for any physical defects.
——
——
40. Identified correct calibration procedure(s) to be used in accordance with TB 43180.
——
——
41. Updated calibration procedure(s) as necessary in accordance with USATA
Calibration Procedure Master List.
——
——
42. Observed all safety precautions, warnings, hazards, and notes.
——
——
43. Calibrated hydraulic gauges in accordance with TB 9-6685-319-24, Section III.
——
——
44. Calibrated pneumatic gauges in accordance with TB 9-6685-319-24, Section IV.
——
——
45. Calibrated vacuum gauges in accordance with TB 9-6685-327-35, Section III.
——
——
46. Replaced protective covers on gauges if necessary.
——
——
47. Disconnected and properly maintained equipment.
——
——
Evaluation Guidance: Use the applicable technical bulletin as a guide to verify that all steps in the
calibration process are performed in accordance with the proper calibration procedure.
9 September 2011
STP 9-94H13-SM-TG
3-139
Chapter 3
Score the Soldier GO if all performance measures are passed. Score the Soldier NO-GO if any
performance measure is failed. If the Soldier fails any performance measure, explain what was done
wrong and how to do it correctly.
References
Required
DA FORM 2417
DA FORM 7372
DA LABEL 163
DA LABEL 80
DHI RPM3
DRUCK DPI-145
TB 385-4
TB 43-180
TB 750-25
TB 9-6685-327-35
USATA MASTER LIST
TB 9-6685-319-24
3-140
Related
AR 750-1
AR 750-43
DA PAM 750-8
TM 9-6695-239-14
STP 9-94H13-SM-TG
9 September 2011
MOS/Skill Level Tasks
Calibrate Fuel Quantity Test Set
093-94H-1530
Conditions: In an operational environment (OE), given a Fuel Quantity Test Set (PSD 60-lAF) requiring
calibration, TB 9-6625-2285-24; Forms, Records, Reports, Equipment, and Accessories required as
listed in TB 9-6625-2285-24, TB 43-180, TB 750-25, Manufacturer's Manual, and United States Army
Test, Measurement, and Diagnostic Equipment (TMDE) Activity (USATA) Calibration Procedure Master
List.
Standards: Calibrate Fuel Quantity Test Set in accordance with TB 9-6625-2285-24 and TB 43-180.
Observe all safety precautions in accordance with TB 385-4. Complete required DA Form 7372 (TMDE
Calibration and Repair Data), DA Label 80 (US Army Calibrated Instrument), DA Label 163 (US Army
Limited or Special Calibration), or DA Form 2417 (U.S. Army Calibration System Rejected Instrument) in
accordance with TB 750-25.
Performance Steps
Figure 3-56. PSD60-1AF Fuel Quantity Test Set
1. Identify correct calibration procedure to be used in accordance with TB 43-180.
9 September 2011
STP 9-94H13-SM-TG
3-141
Chapter 3
Performance Steps
2. Update calibration procedure as necessary in accordance with USATA Calibration Procedure
Master List.
Note: Perform steps 3 through 9 in accordance with TB 9-6625-2285-24.
3. Observe all safety precautions, warnings, hazards, and notes.
4. Perform preliminary instructions.
5. Perform equipment setup.
6. Perform capacitance measuring section accuracy performance check and make adjustments if
necessary.
7. Perform capacitance simulation accuracy performance check and make adjustments if necessary.
8. Perform Megohmeter accuracy performance check and make adjustments if necessary.
9. Perform final procedure.
10. De-energize and disconnect equipment.
Evaluation Preparation: Ensure all items required in the condition statement (or appropriate
substitutions) are on hand and all safety requirements are met.
Performance Measures
GO
NO-GO
1. Identified correct calibration procedure to be used in accordance with TB 43-180.
——
——
2. Updated calibration procedure as necessary in accordance with USATA
Calibration Procedure Master List.
——
——
3. Observed all safety precautions, warnings, hazards, and notes.
——
——
4. Performed calibration procedure in accordance with TB 9-6625-2285-24.
——
——
5. De-energized and disconnect equipment.
——
——
Evaluation Guidance: Use the applicable technical bulletin as a guide to verify that all steps in the
calibration process are performed in accordance with the proper calibration procedure.
Score the Soldier GO if all performance measures are passed. Score the Soldier NO-GO if any
performance measure is failed. If the Soldier fails any performance measure, explain what was done
wrong and how to do it correctly.
References
Required
DA FORM 2417
DA FORM 7372
DA LABEL 163
DA LABEL 80
TB 385-4
TB 43-180
TB 750-25
TB 9-6625-2285-24
USATA MASTER LIST
WAYNE KERR ELECTRONICS
3-142
Related
AR 750-1
AR 750-43
DA PAM 738-751
DA PAM 750-8
TM 9-6695-239-14
STP 9-94H13-SM-TG
9 September 2011
MOS/Skill Level Tasks
Calibrate Jet Cal
093-94H-1550
Conditions: In an operational environment (OE), given a Jet Cal (Tester Exhaust Gas Temperature
BH112JB-( )) requiring calibration, TB 9-4920-454-24, Forms, Records, Reports, Equipment, and
Accessories required as listed in TB 9-4920-454-24; TB 43-180, TB 750-25, TB 385-4, TM 55-4920-40113&P, and United States Army Test, Measurement, and Diagnostic Equipment (TMDE) Activity (USATA)
Calibration Procedure Master List.
Standards: Calibrate Jet Cal in accordance with TB 9-4920-454-24 and TB 43-180. Observe all safety
precautions in accordance with TB 385-4. Complete required DA Form 7372 (TMDE Calibration and
Repair Data), DA Label 80 (US Army Calibrated Instrument), DA Label 163 (US Army Limited or Special
Calibration), or DA Form 2417 (U.S. Army Calibration System Rejected Instrument) in accordance with
TB 750-25.
9 September 2011
STP 9-94H13-SM-TG
3-143
Chapter 3
Figure 3-57. Operator's
Control
3-144
STP 9-94H13-SM-TG
9 September 2011
MOS/Skill Level Tasks
Figure 3-58. Exhaust Gas Temperature Tester
1. Identify correct calibration procedure to be used in accordance with TB 43-180.
2. Update calibration procedure as necessary in accordance with USATA Calibration Procedure
Master List.
3. Observe all safety precautions, warnings, hazards, and notes.
Note: Perform steps 4 through 14 in accordance with TB 9-4920-454-24.
4. Perform preliminary instructions.
5. Perform equipment setup.
6. Perform Temperature Indicator Performance check and make adjustments if necessary.
9 September 2011
STP 9-94H13-SM-TG
3-145
Chapter 3
7. Perform Calibrator Board Performance check and make adjustments if necessary.
8. Perform % RPM Indicator Performance check and make adjustments if necessary.
9. Perform Standard Day Performance check and make adjustments if necessary.
10. Perform Heater Probe Control Performance check and make adjustments if necessary.
WARNING: Do not touch heater probes as severe burns could result.
11. Perform Insulation Resistance Performance check and make adjustments if necessary.
12. Perform Resistance Performance check and make adjustments if necessary.
13. Perform Aircraft Indicator Performance check.
14. Perform final procedure.
Evaluation Preparation: Ensure all items required in the condition statement (or appropriate
substitutions) are on hand and all safety requirements are met.
Performance Measures
GO
NO-GO
1. Identified correct calibration procedure to be used in accordance with TB 43-180.
——
——
2. Updated calibration procedure as necessary in accordance with USATA
Calibration Procedure Master List.
——
——
3. Observed all safety precautions, warnings, hazards, and notes.
——
——
4. Performed preliminary instructions.
——
——
5. Performed equipment setup.
——
——
6. Performed Temperature Indicator Performance check and made adjustments if
necessary.
——
——
7. Performed Calibrator Board Performance check and made adjustments if
necessary.
——
——
8. Performed % RPM Indicator Performance check and made adjustments if
necessary.
——
——
9. Performed Standard Day Performance check and made adjustments if necessary.
——
——
10. Performed Heater Probe Control Performance check and made adjustments if
necessary.
——
——
11. Performed Insulation Resistance Performance check and made adjustments if
necessary.
——
——
12. Performed Resistance Performance check and made adjustments if necessary.
——
——
13. Performed Aircraft Indicator Performance check.
——
——
14. Performed final procedure.
——
——
3-146
STP 9-94H13-SM-TG
9 September 2011
MOS/Skill Level Tasks
Evaluation Guidance: Use the applicable technical bulletin as a guide to verify that all steps in the
calibration process are performed in accordance with the proper calibration procedure. Score the
Soldier GO if all performance measures are passed. Score the Soldier NO-GO if any performance
measure is failed. If the Soldier fails any performance measure, explain what was done wrong and how
to do it correctly.
References
Required
DA FORM 2417
DA FORM 7372
DA LABEL 163
DA LABEL 80
TB 385-4
TB 43-180
TB 750-25
TB 9-4920-454-24
TM 55-4920-401-13&P
USATA MASTER LIST
9 September 2011
Related
AR 750-1
AR 750-43
DA PAM 738-751
DA PAM 750-8
TM 9-6695-239-14
STP 9-94H13-SM-TG
3-147
Chapter 3
Repair Pitot Static Tester
093-94H-1569
Conditions: In an operational environment (OE), given a malfunctioning Pitot Static Tester (TS4463()/P); pneumatic pressure standard, an electrician's tool kit, multimeter, TM 43-4920-910-12, TM
43-4920-910-40, DA Form 2404 (Equipment Inspection and Maintenance Worksheet), DA Form 7372
(TMDE Calibration and Repair Data), TB 385-4, and TB 750-25.
Standards: Repair Pitot Static Tester in accordance with TM 43-4920-910-12 and TM 43-4920-910-40.
Observe all safety procedures in accordance with TB 385-4.
Performance Steps
Figure 3-59. Pitot Static Tester
3-148
STP 9-94H13-SM-TG
9 September 2011
MOS/Skill Level Tasks
Performance Steps
NOTE:
-Determine if warranty repair is applicable.
-Determine if repair is authorized.
-Before beginning repair process, check work order and talk to unit maintenance, if possible, for
description of symptoms and steps taken to correct them.
-Check all forms and tags attached to or accompanying equipment to determine reason for removal
from service.
1. Observe all safety precautions, warnings, hazards, and notes.
2. Read and follow the operator, maintenance, and repair instructions given in TM 43-4920-910-12
and TM 43-4920-910-40.
3. Visually inspect the pitot static tester for any physical defects.
4. Set up necessary support equipment to perform repair procedures on the pitot static tester.
5. Perform power-up procedures (including Leak rate and Stability Test) in accordance with TM 434920-910-12, Chapter 2-5.4.
6. Observe and record error messages displayed during power-up self-tests.
Note: Some errors display extra information using a four digit hexadecimal code. This should
always be recorded with the error number to provide information for the repair depot.
7. Take corrective action to restore pitot static tester to serviceable condition.
a. Refer to TM 43-4920-910-40, Appendix C ERROR MESSAGES to determine if depot-level
maintenance repair is necessary (based upon error codes).
b. Refer to TM 43-4920-910-40, Appendix C WARNING MESSAGES to determine proper repair
procedure.
c. Follow procedures outlined in TM 43-4920-910-40, Chapter 3-9.1 MAIN FAULT FINDING
CHART, based on symptoms, error messages, and flow chart.
d. Refer to TM 43-4920-910-24P for information on repair parts and special tools (if necessary).
e. Verify repair by performing Troubleshooting Flow Chart Tests in accordance with TM 434920-910-40, paragraph 3-10.2, Table 3-1 "Tests and Checks".
8. De-energize and disconnect all equipment.
9. Complete proper maintenance forms.
Evaluation Preparation: Ensure all required equipment or appropriate substitutions are on hand and all
safety requirements are met. Evaluator will induce a fault by disconnecting a circuit card or cable
connector or other non-destructive method prior to the start of performance evaluation.
GO
NO-GO
1. Observed all safety precautions, warnings, hazards, and notes.
——
——
2. Read and followed the operator, maintenance, and repair instructions given in TM
43-4920-910-12 and TM 43-4920-910-40.
——
——
3. Visually inspected the pitot static tester for any physical defects.
——
——
4. Set up necessary support equipment to perform repair procedures on the pitot
static tester.
——
——
5. Performed power-up procedures.
——
——
Performance Measures
9 September 2011
STP 9-94H13-SM-TG
3-149
Chapter 3
Performance Measures
GO
NO-GO
6. Observed and recorded error messages displayed during power-up self-tests.
——
——
7. Took corrective action to restore pitot static tester to serviceable condition.
——
——
8. De-energized and disconnected all equipment.
——
——
9. Completed proper maintenance forms.
——
——
Evaluation Guidance: Score the Soldier GO if all performance measures are passed. Score the Soldier
NO-GO if any performance measure is failed. If the Soldier fails any performance measure, explain what
was done wrong and how to do it correctly.
References
Required
DA FORM 2404
DA FORM 7372
TB 385-4
TB 750-25
TM 43-4920-910-12
TM 43-4920-910-24P
TM 43-4920-910-40
3-150
Related
AR 750-1
DA PAM 738-751
DA PAM 750-8
DRUCK DPI-145
TM 9-6695-239-14
STP 9-94H13-SM-TG
9 September 2011
MOS/Skill Level Tasks
Calibrate Pitot Static Tester
093-94H-1570
Conditions: In an operational environment (OE), given model TS-4463()/P Pitot Static Tester requiring
calibration, TB 9-4920-459-24; Forms, Records, Reports, Equipment, and Accessories required as listed
in TB 9-4920-459-24; TB 43-180; TB 385-4, TB 750-25; and United States Army Test, Measurement,
and Diagnostic Equipment (TMDE) Activity (USATA) Calibration Procedure Master List.
Standards: Calibrate Pitot static tester in accordance with TB 43-180 and TB 9-4920-459-24. Observe
all safety precautions in accordance with TB 385-4. Complete required DA Form 7372 (TMDE
Calibration and Repair Data), DA Label 80 (US Army Calibrated Instrument), DA Label 163 (US Army
Limited or Special Calibration), or DA Form 2417 (U.S. Army Calibration System Rejected Instrument) in
accordance with TB 750-25.
Performance Steps
Figure 3-60. Pitot Static Tester
1. Visually inspect the pitot static tester for any physical defects.
9 September 2011
STP 9-94H13-SM-TG
3-151
Chapter 3
Performance Steps
2. Identify correct calibration procedure to be used in accordance with TB 43-180.
3. Update calibration procedure as necessary in accordance with USATA Calibration Procedure
Master List.
4. Observe all safety precautions, warnings, and hazards.
5. Perform preliminary instructions.
6. Perform equipment setup.
7. Perform altitude performance check and make necessary adjustments.
8. Perform airspeed performance check and make necessary adjustments.
9. Perform final procedure.
Evaluation Preparation: Ensure all items required in the condition statement (or appropriate
substitutions) are on hand and all safety requirements are met.
Performance Measures
GO
NO-GO
1. Visually inspected the pitot static tester for any physical defects.
——
——
2. Identified correct calibration procedure to be used in accordance with TB 43-180.
——
——
3. Updated calibration procedure as necessary in accordance with USATA
Calibration Procedure Master List.
——
——
4. Observed all safety precautions, warnings, and hazards.
——
——
5. Performed preliminary instructions.
——
——
6. Performed equipment setup.
——
——
7. Performed altitude performance check and made adjustments if necessary.
——
——
8. Performed airspeed performance check and made adjustments if necessary.
——
——
9. Performed final procedure.
——
——
Evaluation Guidance: Use the applicable technical bulletin as a guide to verify that all steps in the
calibration process are performed in accordance with the proper calibration procedure.
Score the Soldier GO if all performance measures are passed. Score the Soldier NO-GO if any
performance measure is failed. If the Soldier fails any performance measure, explain what was done
wrong and how to do it correctly.
References
Required
DA FORM 2417
DA FORM 7372
DA LABEL 163
DA LABEL 80
DRUCK DPI-145
TB 385-4
TB 43-180
TB 750-25
TB 9-4920-459-24
TM 43-4920-910-12
USATA MASTER LIST
3-152
Related
AR 750-1
AR 750-43
DA PAM 738-751
DA PAM 750-8
TM 43-4920-910-40
TM 9-6695-239-14
STP 9-94H13-SM-TG
9 September 2011
MOS/Skill Level Tasks
Subject Area 7: RADIAC
Operate RADIAC Calibrator Sets
093-94H-1600
Conditions: In an operational environment (OE), with a requirement to operate a RADIAC calibrator set,
model AN/UDM-2 RADIAC calibrator, various RADIAC items to act as Units Under Test (UUT),
Radiation Room or working area, safety glasses, whole body and wrist thermo luminescent dosimeters,
"Active" RADIAC survey meter, proper certification of safety indoctrination and training; proper
supervision, TB 11-6665-227-12, TM 11-6665-227-12, 10 CFR 19, 10 CFR 20, 10 CFR 21, NRC 8.13,
NRC 8.29, NRC Form 3 (U.S. Nuclear Regulatory Commission), AR 385-10, local RADIAC SOP, TB 43180, TB 385-4, calibration procedures for test instruments, and TB 750-25.
Standards: Operate RADIAC calibrator set in accordance with applicable technical reference(s).
Observe all safety precautions in accordance with Federal Regulations, AR 385-10, TB 385-4.
Performance Steps
Figure 3-61. AN/UDM-2 RADIAC Calibrator
1. Read and follow the operating and safety instructions in TM 11-6665-227-12 and TB 11-6665-22712.
2. Visually inspect the RADIAC calibrator set and RADIAC test instruments for any physical defects.
9 September 2011
STP 9-94H13-SM-TG
3-153
Chapter 3
Performance Steps
a. Read and follow the operating and safety instructions in TM 11-6665-227-12 and TB 116665-227-12.
b. Visually inspect the RADIAC calibrator set and RADIAC test instruments for any physical
defects.
c. Observe all safety precautions, warnings, hazards, and notes.
d. Perform survey of radiation room or work area.
e. Perform PMCS of RADIAC calibrator set in accordance with TM 11-6662-227-12.
f. Perform operation of RADIAC calibrator set in accordance with calibration procedure for
RADIAC instruments.
g. Secure AN/UDM-2 RADIAC calibrator set.
h. Perform survey of radiation room or work area.
3. Observe all safety precautions, warnings, hazards, and notes.
4. Perform survey of radiation room or work area.
5. Perform PMCS of RADIAC calibrator set in accordance with TM 11-6662-227-12.
6. Perform operation of RADIAC calibrator set in accordance with calibration procedure for RADIAC
instruments.
7. Secure AN/UDM-2 RADIAC calibrator set.
8. Perform survey of radiation room or work area.
Evaluation Preparation: Ensure all items required in the condition statement (or appropriate
substitutions) are on hand and all safety requirements are met.
GO
NO-GO
1. Read and followed the operating and safety instructions in given reference(s).
——
——
2. Visually inspected the RADIAC calibrator set and RADIAC test instruments for
any physical defects.
——
——
3. Observed all safety precautions, warnings, hazards, and notes.
——
——
4. Performed survey of radiation room or work area.
——
——
5. Performed PMCS of RADIAC calibrator set in accordance with TM 11-6662-22712.
——
——
6. Performed operation of RADIAC calibrator set in accordance with calibration
procedure for RADIAC acting as test instruments.
——
——
7. Secured RADIAC calibrator set.
——
——
8. Performed survey of radiation room or work area.
——
——
Performance Measures
Evaluation Guidance: Score the Soldier GO if all performance measures are passed. Score the Soldier
NO-GO if any performance measure is failed. If the Soldier fails any performance measure, explain what
was done wrong and how to do it correctly.
References
Required
10 CFR 19
10 CFR 20
10 CFR 21
AR 385-10
NRC FORM 3
NRC REGULATORY GUIDE 8.13
3-154
Related
DA PAM 750-8
TM 9-6695-239-14
STP 9-94H13-SM-TG
9 September 2011
MOS/Skill Level Tasks
References
Required
NRC REGULATORY GUIDE 8.29
TB 11-6665-227-12
TB 385-4
TB 43-180
TB 750-25
TM 11-6665-227-12
9 September 2011
Related
STP 9-94H13-SM-TG
3-155
Chapter 3
Subject Area 8: Calibration Set 2000 (CALSET 2000)
Perform Preventive Maintenance Checks and Services on a Generator Set
091-91D-1111
Conditions: In a contemporary operational environment, given a generator set, optical anti freeze
tester, battery, goggles, apron, general mechanic's tool kit, rags, DA Form 5988-E (Equipment
Inspection Maintenance Worksheet [EGA]), applicable technical publications and forms, hearing
protection, and with supervision/assistance.
Standards: Perform preventive maintenance checks and services (PMCS) on a generator in
accordance with the applicable technical publications and performance measures.
Performance Steps
1. Select and use applicable publications.
2. Select and used applicable tools to perform PMCS on a generator set.
3. Practice shop safety and maintenance discipline.
4. Perform before-operation PMCS on a generator set.
5. Operate the generator set.
6. Perform during-operation PMCS.
7. Shut down the generator set.
8. Perform after-operation PMCS.
9. Ensure required maintenance forms have been completed.
10. Maintain tools and equipment.
Evaluation Preparation: None
GO
NO-GO
1. Selected and used applicable publications.
——
——
2. Selected and used applicable tools to perform PMCS on a generator set.
——
——
3. Practiced shop safety and maintenance discipline.
——
——
4. Performed before-operation PMCS on a generator set.
——
——
5. Operated the generator set.
——
——
6. Performed during-operation PMCS.
——
——
7. Shut down the generator set.
——
——
8. Performed after-operation PMCS.
——
——
9. Ensured required maintenance forms had been completed.
——
——
——
——
Performance Measures
10. Maintained tools and equipment.
Evaluation Guidance: The Soldier scores a GO if all performance measures were passed. The Soldier
scores a NO-GO if any performance measure was failed. If any performance measure was failed show
the Soldier what was done wrong and how it should have been done to score a GO.
3-156
STP 9-94H13-SM-TG
9 September 2011
MOS/Skill Level Tasks
References
Required
DA FORM 5988-E
DA PAM 750-8
FM 5-424
TM 5-6115-271-14
TM 5-6115-423-15
TM 5-6115-440-10
TM 5-6115-440-20
TM 5-6115-465-12
TM 5-6115-465-34
TM 5-6115-545-12
TM 5-6115-545-34
TM 5-6115-584-12
TM 5-6115-584-34
TM 5-6115-585-12
TM 5-6115-585-34
TM 5-6115-586-12
TM 5-6115-590-12
TM 5-6115-590-34
TM 5-6115-593-12
TM 5-6115-596-14
TM 5-6115-600-12
TM 5-6115-600-34
TM 5-6115-612-12
TM 5-6115-612-34
TM 5-6115-614-12
TM 5-6115-615-12
TM 5-6115-615-34
TM 5-6115-629-14&P
TM 9-2815-252-24
TM 9-2815-254-24
TM 9-2815-256-24
TM 9-6115-464-12
TM 9-6115-542-24&P
TM 9-6115-545-24P
TM 9-6115-624-BD
TM 9-6115-641-10
TM 9-6115-641-24
TM 9-6115-642-10
TM 9-6115-642-24
TM 9-6115-643-10
TM 9-6115-643-24
TM 9-6115-644-10
TM 9-6115-644-24
TM 9-6115-645-10
TM 9-6115-645-24
TM 9-6115-663-13&P
9 September 2011
Related
STP 9-94H13-SM-TG
3-157
Chapter 3
Operate Vehicle with Standard or Automatic/Semiautomatic Transmission
551-88M-1364
Conditions: Provided a tactical wheeled vehicle with a standard or automatic/semiautomatic
transmission, with before-operation maintenance performed, basic issue items (BII), dispatch, -10 series
technical manual (TM), accident forms, and guidance on route to operate.
Standards: You are to safely operate your vehicle by following all starting and operating procedures in
the referenced TM. You are to have shift gears (manual transmission), use the proper gear mode or
gear range for road conditions, and maintain control of the vehicle during all movement (forward and
backward). All driving maneuvers are to be completed without injury to personnel or damage to vehicle.
Performance Steps
1. Prepare for vehicle operation.
a. Adjust the seats (as needed).
b. Adjust driving mirrors (as needed).
c. Fasten seat belt.
d. Ensure the parking brake is applied.
e. On vehicles with winch, ensure that power takeoff is disengaged.
f. Insert hearing protection prior to starting vehicle.
g. Start vehicle engine (refer to applicable vehicle TM for proper starting procedures).
h. Observe all instruments and warning lights and buzzers for proper operation.
i. Allow engine to warm up and brake system air tank warning buzzer to go off (as applicable).
2. Set the vehicle in motion.
a. Turn on lights as required.
b. Refer to TM for proper procedures for placing your vehicle into motion.
c. Check for approaching traffic.
d. Signal to indicate your direction of movement (if tactically permitted).
e. Release parking brake.
3. Shift the gears (as applicable). Bring vehicle to desired speed by shifting, as necessary, through the
gear pattern (manual transmission) or selecting different gear ranges (automatic transmission).
4. Turn the vehicle.
a. Prepare to turn (full turn).
(1) Signal a right or left turn (when permitted).
(2) Observe responses of other vehicle to your signals.
(3) Reduce speed to make the turn safely. Keep in mind terrain and load (if applicable) when
determining your speed through the turn.
b. Start the turn. Rotate the top of the steering wheel in the direction of turn and adjust as
desired.
5. Stop the vehicle (nonemergency).
a. Remove foot from accelerator.
b. Apply engine retarder if equipped and as needed.
c. Apply service brakes as needed to bring vehicle to complete and safe stop.
6. Back the vehicle.
a. With vehicle at a complete stop, set the parking brake.
b. Place transmission in Neutral (N).
c. Post ground guides if available.
d. Check behind vehicle to ensure there are no obstructions or personnel.
e. Sound horn (if tactically permitted).
f. Place transmission in Reverse (R).
3-158
STP 9-94H13-SM-TG
9 September 2011
MOS/Skill Level Tasks
Performance Steps
g. Release parking brake.
h. If ground guide is posted, observe and adhere to signals to move vehicle into position.
i. If no ground guide is present, check all views through rear view mirrors and slowly steer the
vehicle backward into position. If necessary, repeat steps 6 a through g above to complete the
rearward movement.
j. Stop the vehicle.
7. Park the vehicle.
a. Place the transmission selector lever in Neutral (N).
b. Set the parking brake.
c. Shutdown the engine (refer to TM).
d. Drain air reservoir if vehicle is no longer needed.
e. Emplace chocks blocks as needed.
Evaluation Preparation: Setup: Provide the Soldier with a vehicle and a route to follow.
Brief Soldier: Tell the Soldier to drive the vehicle safely using the proper shifting techniques (gear to
gear - standard, gear range - automatic/semiautomatic). The Soldier is to operate vehicle from a
standing start for level ground, uphill starting, and downhill starting, use proper braking techniques on
level ground as well as up or down hill. If vehicle has a standard transmission, Soldier must use the
engine compression (clutch out) to assist in slowing vehicle. There must NOT be any free clutching
(coasting with the clutch engaged) to slow vehicle. If operating vehicle with automatic/semiautomatic
transmissions, the proper gear range must be selected appropriate with the terrain conditions and load
on the vehicle.
GO
NO-GO
1. Prepared for vehicle operation.
——
——
2. Set the vehicle in motion.
——
——
3. Shifted the gears.
——
——
4. Turned the vehicle.
——
——
5. Stopped the vehicle (nonemergency).
——
——
6. Backed the vehicle.
——
——
7. Parked the vehicle.
——
——
Performance Measures
Evaluation Guidance: Score the Soldier GO if all performance measures are passed. Score the Soldier
NO-GO if any performance measure is failed. If any performance measure is failed, tell the Soldier what
was done wrong and how to do it correctly.
References
Required
TC 21-305-20
TM 9-2320-260-10
TM 9-2320-280-10
TM 9-2320-303-10
TM 9-2320-364-10
TM 9-2320-365-10
TM 9-2320-366-10-1
TM 9-2320-366-10-2
9 September 2011
Related
STP 9-94H13-SM-TG
3-159
Chapter 3
Skill Level 3
Subject Area 9: Maintenance Operations
Prepare Secondary Transfer Set for Mobile Operations
093-94H-3000
Conditions: In an operational environment (OE), given a movement order, an Area TMDE Support
Team including all personnel and organic equipment; unit standing operating procedure (SOP), and
equipment technical references.
Standards: Prepare all equipment and personnel organic to the Area TMDE Support Team including
secondary transfer calibration set, vehicles, and repair parts for mobile operations. Supervise preventive
maintenance checks and services (PMCS), load plan preparation, and equipment load up in accordance
with unit standing operating procedures and associated technical references. Observe all safety
precautions in accordance with TB 385-4 and apply composite risk management.
Performance Steps
1. Read and follow the unit standing operating procedures and Operation Order for the mobile
operations.
2. Brief personnel assigned to the mobile operations.
3. Assign operators to perform preventive maintenance checks and services (PMCS) on equipment.
4. Supervise PMCS of all equipment.
5. Assign areas of responsibility to team personnel.
6. Ensure traceability of all calibration standards is maintained.
7. Assemble equipment needed to perform the mobile operations.
8. Verify load plans.
9. Supervise equipment load up.
10. Perform pre-movement inspection for both personnel and equipment.
11. Incorporate Composite Risk Management measures into all operations.
Evaluation Preparation: Ensure all items required in the condition statement (or appropriate
substitutions) are on hand and all safety requirements are met.
GO
NO-GO
1. Read and followed the unit standing operating procedures and Operation Order
for the mobile operations.
——
——
2. Briefed personnel assigned to the mobile operations.
——
——
3. Assigned operators to perform preventive maintenance checks and services
(PMCS) on equipment.
——
——
4. Supervised PMCS of all equipment.
——
——
5. Assigned areas of responsibility to team personnel.
——
——
6. Ensured traceability of all calibration standards is maintained.
——
——
7. Assembled equipment needed to perform the mobile operations.
——
——
Performance Measures
3-160
STP 9-94H13-SM-TG
9 September 2011
MOS/Skill Level Tasks
Performance Measures
GO
NO-GO
8. Verified load plans.
——
——
9. Supervised equipment load up.
——
——
10. Performed pre-movement inspection for both personnel and equipment.
——
——
11. Incorporated Composite Risk Management measures into all operations.
——
——
Evaluation Guidance: Score the Soldier GO if all performance measures are passed. Score the Soldier
NO-GO if any performance measure is failed. If the Soldier fails any performance measure, explain what
was done wrong and how to do it correctly.
References
Required
FM 5-19
TB 385-4
UNIT SOP
9 September 2011
Related
DA PAM 385-1
DA PAM 750-8
TB 43-180
TB 750-25
TM 9-6695-239-14
STP 9-94H13-SM-TG
3-161
Chapter 3
Repair Radio Test Set (Advanced)
093-94H-3010
Conditions: In an operational environment (OE), given a malfunctioning radio test set, electrician's tool
kit, necessary support equipment (oscilloscope, multimeter, spectrum analyzer, and so on),
manufacturer's or technical manual, equipment listed in the manual, TB 385-4, and TB 750-25.
Standards: Repair the radio test set in accordance with applicable technical manual(s). Observe all
safety precautions in accordance with TB 385-4.
Performance Steps
Figure 3-62. AN/GRM-122 and AN/GRM-114B Radio Test Sets
NOTE:
-Determine if warranty repair is applicable.
-Determine if repair is authorized.
-Before beginning repair process, check work order and talk to unit maintenance, if possible, for
description of symptoms and steps taken to correct them.
-Check all forms and tags attached to or accompanying equipment to determine reason for removal
from service.
1. Observe all safety precautions, warnings, hazards, and notes.
2. Read and follow the preliminary instructions given in TM 11-6625-3244-40, and Aeroflex TS-4317
and J-1601A / RPM-001 maintenance manuals.
3. Visually inspect the radio test set for any physical defects.
3-162
STP 9-94H13-SM-TG
9 September 2011
MOS/Skill Level Tasks
Performance Steps
4. Set up the necessary support equipment to perform repair procedures on the radio test set.
5. Turn on Small Computer System Interface (SCSI).
a. Press MTRS MODE key.
b. Press "AUX" F6.
c. Press 5 on DATA ENTRY keypad to select "5. External I/O".
d. Press 3 on DATA ENTRY keypad to display the Configure SCSI sub-menu.
e. Verify SCSI operation mode is ON. If OFF, press ENTER to toggle on.
f. Press "ESC" F6 twice to return to Auxiliary Functions Menu.
6. Restore factory defaults.
a. Press RCL key while in Auxiliary Functions Menu.
b. Press FIELD SELECT directional keys to move highlight to "10. Factory Defaults", and press
ENTER.
c. Verify Yes/No selection is Yes, and press ENTER.
7. Perform Self Test.
Note: All external input connections must be removed from Test Set prior to performing Self
Test.
a.
b.
c.
d.
e.
f.
Press MTRS key.
Press "AUX" F6.
Press 4 on DATA ENTRY keypad.
Press 1 on DATA ENTRY keypad.
Use FIELD SELECT direction keys to find failed test.
Press "Extend" F1 when submenu highlight is over failed test.
(1) Record displayed values of failed test (if any).
(2) Perform tests on each submenu item (if any) by pressing list number on DATA ENTRY
keypad, and record results.
g. Use FIELD SELECT directional keys to move through remainder of Self Test Menu.
h. Repeat step 7e for each item that failed and record results of each extended test.
8. Perform BIT1 Test.
a. Press the DPLX Mode key.
b. Press "Sp Tst" F5 key.
c. Press "More" F6 key until "BIT1" and "BIT2" are displayed over the F2 and F3 keys,
respectively.
d. Press "BIT1" F2 key.
e. Press GO.
f. Follow the on-screen directions to press appropriate buttons, and make necessary cable
connections.
9. Perform BIT2 Test.
a. Press the DPLX Mode key.
b. Press "Sp Tst" F5 key.
c. Press "More" F6 key until "BIT1" and "BIT2" are displayed over the F2 and F3 keys,
respectively.
d. Press "BIT2" F3 key.
e. Press GO.
f. Follow the on-screen directions to press appropriate buttons and connect/disconnect test
cables.
10. Perform troubleshooting procedures in accordance with TM 11-6625-3244-40, Chapter 2, Section
III, and Aeroflex TS-4317 and J-1601A / RPM-001 maintenance manuals.
9 September 2011
STP 9-94H13-SM-TG
3-163
Chapter 3
Performance Steps
a. Follow the General Troubleshooting Guidelines of paragraph 2-7.
b. Select symptom from Symptom Index.
c. Refer to Troubleshooting Table 2-1 for appropriate repair procedures.
11. Perform a functional block diagram and schematic analysis to localize the malfunction.
12. Perform Performance Test in accordance with procedures in TM 11-6625-3244-40, Chapter 2,
Section IV.
13. Perform various checks and tests as outlined in applicable technical manuals and manufacturer's
manuals to isolate the malfunction.
14. Take corrective action as prescribed in maintenance procedure.
15. Verify operation of radio test set.
16. De-energize and disconnect all equipment.
17. Complete proper maintenance forms.
Evaluation Preparation: Ensure all required equipment or appropriate substitutions are on hand and all
safety requirements are met. Evaluator will induce a fault by disconnecting a circuit card or cable
connector or other non-destructive method prior to the start of performance evaluation.
GO
NO-GO
1. Observed all safety precautions, warnings, hazards, and notes.
——
——
2. Read and followed the preliminary instructions given in TM 11-6625-3244-40, and
Aeroflex TS-4317 and J-1601A / RPM-001 maintenance manuals.
——
——
3. Visually inspected the radio test set for any physical defects.
——
——
4. Set up the necessary support equipment to perform repair procedures on the
radio test set.
——
——
5. Turned on Small Computer System Interface (SCSI).
——
——
6. Restored factory defaults.
——
——
7. Performed Self Test.
——
——
8. Performed BIT1 Test.
——
——
9. Performed BIT2 Test.
——
——
10. Performed troubleshooting procedures in accordance with TM 11-6625-3244-40,
Chapter 2, Section III, and Aeroflex TS-4317 and J-1601A / RPM-001
maintenance manuals.
——
——
11. Performed functional block diagram and schematic analysis to localize the
malfunction.
——
——
12. Performed Performance Test in accordance with procedures in TM 11-66253244-40, Chapter 2, Section IV.
——
——
13. Performed various checks and tests as outlined in applicable technical manuals
and manufacturer's maintenance manuals to isolate the malfunction.
——
——
14. Took corrective action as prescribed in maintenance procedure.
——
——
15. Verified operation of radio test set.
——
——
Performance Measures
3-164
STP 9-94H13-SM-TG
9 September 2011
MOS/Skill Level Tasks
Performance Measures
GO
NO-GO
16. De-energized and disconnected all equipment.
——
——
17. Completed proper maintenance forms.
——
——
Evaluation Guidance: Score the Soldier GO if all performance measures are passed. Score the Soldier
NO-GO if any performance measure is failed. If the Soldier fails any performance measure, explain what
was done wrong and how to do it correctly.
References
Required
AEROFLEX J-1601A
AEROFLEX TS-4317 MM
AEROFLEX TS-4317 OM
TB 385-4
TB 750-25
TM 11-6625-3244-12
TM 11-6625-3245-40
9 September 2011
Related
AR 750-1
DA PAM 750-8
TM 9-6695-239-14
STP 9-94H13-SM-TG
3-165
Chapter 3
Perform Duties as RADIAC Custodian
093-94H-3020
Conditions: In an operational environment (OE), given RADIAC custodian duties, a TMDE maintenance
facility containing radioactive commodities, local post and unit standing operating procedures, AR 25400-2, AR 40-5, AR 385-10, and technical bulletins for handling, monitoring, wipe test, transporting,
reporting, storage, and disposal of radioactive materials.
Standards: Perform RADIAC custodian duties in accordance with local post and unit standing operating
procedures, AR 25-400-2, AR 40-5, AR 385-10, and technical bulletins for handling, monitoring, wipe
test, transporting, reporting, storage, and disposal of radioactive materials.
Performance Steps
Figure 3-63. AN/UDM-2 RADIAC Calibrator
1. Develop an inspection schedule.
2. Locate copies of local standing operating procedures.
3. Locate copies of prior inspection reports.
4. Perform wipe test on RADIAC equipment properly.
5. Perform inspection of the RADIAC equipment, radioactive materials and areas according to the
following inspection areas:
a. Verify personnel handle radioactive materials and RADIAC equipment properly.
3-166
STP 9-94H13-SM-TG
9 September 2011
MOS/Skill Level Tasks
Performance Steps
b. Verify radioactive materials and RADIAC equipment are stored properly.
c. Verify RADIAC equipment and radioactive materials have proper paper work prior to
transportation.
d. Verify personnel dispose of RADIAC equipment and radioactive materials properly.
6. Correct deficiencies or list remedial action to correct deficiencies noted on the report.
7. Prepare final report.
8. File copy of final report.
Evaluation Preparation: Ensure all items required in the condition statement (or appropriate
substitutions) are on hand and all safety requirements are met.
Performance Measures
GO
NO-GO
1. Developed an inspection schedule.
——
——
2. Located copies of local standing operating procedures.
——
——
3. Located copies of prior inspection reports.
——
——
4. Performed wipe test on RADIAC equipment properly.
——
——
5. Performed inspection of the RADIAC equipment, radioactive materials and areas.
——
——
6. Corrected or listed remedial action to correct deficiencies noted on the report.
——
——
7. Prepared final report.
——
——
8. Filed copy of final report.
——
——
Evaluation Guidance: Score the Soldier GO if all performance measures are passed. Score the Soldier
NO-GO if any performance measure is failed. If the Soldier fails any performance measure, explain what
was done wrong and how to do it correctly.
References
Required
AR 25-400-2
AR 385-10
AR 40-5
NRC FORM 3
NRC REGULATORY GUIDE 8.13
NRC REGULATORY GUIDE 8.29
TB 11-6665-227-12
TB 385-4
TM 3-6665-312-30&P
TM 3-6665-331-23&P
TM 3-6665-343-23&P
9 September 2011
Related
10 CFR 19
10 CFR 20
10 CFR 21
AR 710-3
DA PAM 750-8
TM 11-6665-227-12
TM 9-6695-239-14
STP 9-94H13-SM-TG
3-167
Chapter 3
Maintain Automated Network System
093-94H-3030
Conditions: In an operational environment (OE), given automated system within AN/GSM-705( )
Calibration Set requiring routine maintenance, cables and connectors, TM 9-6695-239-14 and/or
Manufacturer's Manuals, and TB 385-4.
Standards: Maintain the automated system within the AN/GSM-705( ) Calibration Set in accordance
with TM 9-6695-239-14 and Manufacturer's Manuals, and observe all safety precautions in accordance
with TB 385-4.
Performance Steps
1. Observe all safety precautions, warnings, hazards, and notes.
2. Maintain the following equipment as an Automated system within AN/GSM-705( ) in accordance with
TM 9-6695-239-14 and manufacturer's manuals:
a. 10Base-T hub
b. Fiber optic hub
c. Flat panel display
d. ICE workstations
e. Keyboard and mouse receiver
f. Media converters
g. Network router
h. Network server
i. Power conditioners
j. Printer
k. RAID cabinet with storage drives
l. Redundant power supply
m. SEP (signal entry panel)
n. Server
o. UPS (uninterruptible power supply)
p. Video and optic network cables
Evaluation Preparation: Ensure all items required in the condition statement (or appropriate
substitutions) are on hand and all safety requirements are met.
GO
NO-GO
1. Observed all safety precautions, warnings, hazards, and notes.
——
——
2. Maintained the equipment in performance step 2 above as an Automated system
within AN/GSM-705( ) in accordance with TM 9-6695-239-14 and manufacturer's
manuals.
——
——
Performance Measures
Evaluation Guidance: Score the Soldier GO if all performance measures are passed. Score the Soldier
NO-GO if any performance measure is failed. If the Soldier fails any performance measure, explain what
was done wrong and how to do it correctly.
References
Required
MANUFACTURER'S MANUAL
TB 385-4
TM 9-6695-239-14
3-168
Related
DA PAM 750-8
STP 9-94H13-SM-TG
9 September 2011
MOS/Skill Level Tasks
Conduct Quality Assurance Inspection
093-94H-3050
Conditions: In an operational environment (OE), given an Area TMDE Support Team, local standing
operating procedures, local safety records, all required reports, documentation, applicable technical
publications, prior inspection reports, AR 190-51, AR 700-68, AR 750-43, DA Form 1687 (Notice of
Delegation of Authority-Receipt for Supplies), DA Pamphlet 750-8, TB 385-4, TB 750-25, TB 43-180,
and United States Army Test, Measurement, and Diagnostic Equipment (TMDE) Activity (USATA) SOP
702-1.
Standards: Conduct the Quality Assurance inspection of the Army TMDE Support Team in accordance
with reference publications listed in the task condition.
Performance Steps
1. Develop an inspection schedule.
2. Conduct an inspection in briefing.
3. Select the equipment for end item verification inspection.
4. Conduct an inspection and assign a rating in all functional areas.
a. Inspect Safety:
(1) Inspect CPR training for assigned personnel.
(2) Inspect Compressed gas cylinder safety.
(3) Inspect Laser/Mercury SOP (if applicable).
(4) Inspect Grounding/non-conductivity.
(5) Inspect Safety warning signs.
(6) Inspect Emergency shut-off circuit breaker(s).
(7) Inspect Emergency lights.
b. Inspect Management operations, to include administrative, procedural, publications, and
technical operations.
(1) Inspect Required reading for assigned personnel.
(2) Inspect Calibrator DC Zero documentation.
(3) Inspect Cross checks.
(4) Inspect Visual inspections.
(5) Inspect Test reports.
(6) Inspect Administrative storage procedures.
(7) Inspect Technical library.
(8) Inspect Instrument Master Record File (IMRF) accuracy.
(9) Inspect Calibration labels.
(10) Conduct End-item verifications.
c. Inspect Facilities.
(1) Inspect Physical security program.
(2) Inspect Key control.
(3) Inspect Vehicle maintenance program.
(4) Inspect Equipment PMCS.
(5) Inspect Materiel Safety Data Sheets.
d. Inspect Production Control.
(1) Inspect Customer account files.
(a) Inspect DA Form 1687.
(b) Inspect Assumption of Command memoranda.
(c) Inspect TMDE Support Coordinator appointment orders.
(d) Inspect TMDE Support Coordinator training certificates.
(2) Inspect Customer equipment accountability (inventories).
(3) Inspect Management Report.
9 September 2011
STP 9-94H13-SM-TG
3-169
Chapter 3
Performance Steps
(a) Inspect Readiness rate.
(b) Inspect Delinquency rate.
(c) Inspect Backlog.
(d) Inspect Turn around time.
(4) Inspect In- Shop Status List.
(5) Inspect TMDE Support Coordinator training.
e. Inspect Supply.
(1) Inspect Bench Stock.
(2) Inspect Document register.
f. Inspect RADIAC Operations.
(1) Inspect Local Radiation Safety Officer files.
(2) Inspect Training files.
(3) Inspect Dosimetry files.
(4) Inspect Survey files.
5. Compile the inspection report.
6. Conduct an inspection out-briefing.
7. Submit the formal inspection report.
8. Review the inspection report reply for corrective action, if applicable.
Evaluation Preparation: Ensure all items required in the condition statement (or appropriate
substitutions) are on hand and all safety requirements are met.
GO
NO-GO
1. Developed an inspection schedule.
——
——
2. Conducted an inspection in briefing.
——
——
3. Selected the equipment for end item verification inspection.
——
——
4. Conducted an inspection and assigned a rating in the functional areas.
——
——
5. Compiled the inspection report.
——
——
6. Conducted an inspection out-briefing.
——
——
7. Submitted the formal inspection report.
——
——
8. Reviewed the inspection report reply for corrective action, if applicable.
——
——
Performance Measures
Evaluation Guidance: Score the Soldier GO if all performance measures are passed. Score the Soldier
NO-GO if any performance measure is failed. If the Soldier fails any performance measure, explain what
was done wrong and how to do it correctly.
References
Required
AR 190-51
AR 385-10
AR 700-68
AR 750-1
AR 750-43
DA FORM 1687
DA PAM 750-8
NRC FORM 3
NRC REGULATORY GUIDE 8.13
NRC REGULATORY GUIDE 8.29
3-170
Related
10 CFR 19
10 CFR 20
10 CFR 21
DA PAM 738-751
TM 9-6695-239-14
STP 9-94H13-SM-TG
9 September 2011
MOS/Skill Level Tasks
References
Required
TB 11-6665-227-12
TB 385-4
TB 43-180
TB 750-25
TM 11-6665-227-12
USATA SOP 702-1
9 September 2011
Related
STP 9-94H13-SM-TG
3-171
Chapter 3
Submit a Quality Deficiency Report (QDR)
093-SSG-3004
Conditions: In an operational environment (OE), given the requirement to submit a QDR for a serious
or recurring maintenance problem and given Army regulation (AR) 95-1, AR 725-50, Department of the
Army (DA) Form 2404 (Equipment Inspection and Maintenance Worksheet), Department of Defense
(DD) Form 1575 (Suspended Tag - Materiel), DD Form 2332 (Product Quality Deficiency Report
Exhibit), DA Pamphlet 750-8, DA Pamphlet 738-751, Standard Form (SF) 368 (Product Quality
Deficiency Report), and Technical Bulletin (TB) 43-0001-62-01-3. This task can be performed in a field
or garrison environment.
Standards: Identify conditions that indicate a quality deficiency exists, prepare the appropriate report
form, and identify and retain QDR exhibits that had been disposed of.
Performance Steps
Note: Follow steps 1 through 9 for all equipment except aviation equipment. For aviation
equipment, follow steps 10 through 17.
1. Identify one or more conditions that indicate a quality deficiency existed.
a. A condition in or with the equipment dangerous to people, other equipment, or the mission.
b. An item or equipment that does not work right or lasts as long as it should have because of bad
design or materials.
c. Items that are not within the approved equipment specifications.
d. Low-quality workmanship.
e. Dangerous situations due to incorrect or missing data.
f. Maintenance problems.
g. Conditions that prevents use of the equipment.
h. Repeat problems that take a lot of time with no solutions in sight.
i. Problems requested to be reported by the national maintenance point (NMP).
j. Corrosion problems in or on parts, components, assemblies, weapon systems, and/or
equipment.
2. Identify defect as a Category I or Category II deficiency.
a. Identify as a Category 1 deficiency any defect that-(1) May have caused death, injury, or severe job illness.
(2) Would have caused loss or major damage to a weapon system.
(3) Would have critically restricted the combat readiness capabilities of the unit.
b. Identify any defect as Category II deficiency that does not meet the criteria for a Category I
deficiency.
3. Prepare appropriate QDR for Category I or Category II.
a. Prepare Category I report in message format copy of SF 368 in accordance with DA Pamphlet
750-8.
b. Prepare Category II report on SF 368 in accordance with DA Pamphlet 750-8.
4. Forward SF 368 to the major subordinate command (MSC) within 48 hours (Category I deficiencies)
or 5 working days (Category II deficiencies) after the defect or problem was found.
Note: Category I reports may be phoned in or brought in for immediate assistance, with message
following within the 48-hour time frame.
Note: MSC acknowledges receipt and begins screening stocks within 24 hours of the report.
5. Files one copy of the SF 368 until the Army screening point closes the case.
3-172
STP 9-94H13-SM-TG
9 September 2011
MOS/Skill Level Tasks
Performance Steps
6. Sends one copy of the SF 368 to the support maintenance activity.
Note: Sent SF 368 even if-a. Correspondence indicates the problem is known to exist.
b. Other units send in a QDR on the same problem.
7. Identify defective equipment as exhibits.
8. Retain QDR exhibits in accordance with DA Pamphlet 750-8.
9. Follow disposition instructions received from the MSC action office responsible for the exhibits.
Note: Follow steps 10 through 17 for preparation of QDRs on aviation equipment.
10. Identify any of the following conditions that indicate an aviation quality deficiency exists in
accordance with DA Pamphlet 738-751, Chapter 3.
a. A condition involving personnel safety or safety of flight (SOF) as defined in AR 95-1.
b. Suspected or confirmed materiel failure that causes a Class A, B, C, D, or E aircraft mishap.
c. Materiel failure or fault that would cause a hazard to personnel or equipment or hinder safe
completion of the mission.
d. Equipment did not work properly because of bad design and/or materiel or low-quality
workmanship during manufacture, modification, conversion, repair, overhaul, or rebuild.
e. Environmental conditions that cause the failure of aircraft or aviation associated equipment, to
include mission related equipment, components and modules, repair parts, systems, and/or
subsystems.
f. During initial test or use, found a defective stock funding of depot level repairables (SFDLR)
item, and such defect was not caused by user accident, misuse, improper installation, and/or
operation, unauthorized repair, or alteration.
11. Identify deficiencies as Category I or Category II.
a. Identify any of the following as a Category I deficiency.
(1) An unsafe condition, operation, or maintenance procedure for aircraft, mission related
equipment, component and module, or repair part whose use was critical to airworthiness.
(2) Any failure that could be expected to cause loss of the aircraft and/or serious injuries to
the aircrew or ground personnel.
(3) The reason for failure, identified or suspected, did not provide enough warning for the
aircrew to complete a safe landing, and it was reasonable to assume that the problem
could be present in other aircraft of the mission, design, and series (MDS).
(4) Incorrect or missing data in technical publications that may have caused a hazardous
operational or maintenance problem.
b. Identify as a Category II deficiency any defect that did not meet the criteria for a Category I
deficiency.
12. Prepare SF 368 for Category I or Category II deficiency in accordance with DA Pamphlet 738-751,
Chapter 3.
13. Submit a Category I or Category II report in accordance with DA Pamphlet 738-751.
14. Distribute file copies of the SF 368 in accordance with DA Pamphlet 738-751.
Note: Sent SF 368 even if -a. Manufacturer representatives have shown that they are aware of the problem.
b. Another unit within your command has already sent a deficiency report on the same problem.
15. Identify defective equipment as exhibits.
9 September 2011
STP 9-94H13-SM-TG
3-173
Chapter 3
Performance Steps
16. Receive acknowledgment of receipt of Category I report within 48 hours or Category II report within
7 days from Aviation and Missile Command (AMCOM). The acknowledgement included the
disposition instructions for exhibits.
17. Follow disposition instructions received from the AMCOM action office for the exhibits.
Evaluation Preparation: Ensure all items required in the condition statement (or appropriate
substitutions) are on hand and all safety requirements are met.
Performance Measures
GO
NO-GO
Note: Follow steps 1 through 9 for all equipment except aviation equipment. For aviation
equipment, follow steps 10 through 17.
1. Identified one or more conditions that indicated a quality deficiency existed.
——
——
2. Identified defect as a Category I or Category II deficiency.
——
——
3. Prepared appropriate QDR for Category I or Category II.
——
——
4. Forwarded SF 368 to the major subordinate command (MSC) within 48 hours
(Category I deficiencies) or 5 working days (Category II deficiencies) after the
defect or problem was found.
——
——
5. Kept one copy of the SF 368 until the Army screening point closed the case.
——
——
6. Sent one copy of the SF 368 to the support maintenance activity.
——
——
7. Identified defective equipment as exhibits.
——
——
8. Retained QDR exhibits in accordance with DA Pamphlet 750-8.
——
——
9. Followed disposition instructions received from the MSC action office responsible
for the exhibits.
——
——
10. Identified any of the following conditions that indicated an aviation quality
deficiency existed in accordance with DA Pamphlet 738-751, Chapter 3.
——
——
11. Identified deficiencies as Category I or Category II.
——
——
12. Prepared SF 368 for Category I or Category II deficiency in accordance with DA
Pamphlet 738-751, Chapter 3.
——
——
13. Submitted a Category I or Category II report in accordance with DA Pamphlet
738-751.
——
——
14. Distributed file copies of the SF 368 in accordance with DA Pamphlet 738-751.
——
——
15. Identified defective equipment as exhibits.
——
——
16. Received acknowledgment of receipt of Category I report within 48 hours or
Category II report within 7 days from Aviation and Missile Command (AMCOM).
The acknowledgement included the disposition instructions for exhibits.
——
——
17. Followed disposition instructions received from the AMCOM action office for the
exhibits.
——
——
Note: Follow steps 10 through 17 for preparation of QDRs on aviation equipment.
3-174
STP 9-94H13-SM-TG
9 September 2011
MOS/Skill Level Tasks
Evaluation Guidance: Score the Soldier GO if all performance measures are passed (P). Score the
Soldier NO-GO if any performance measure is failed (F). If the Soldier fails any performance measure,
show what was done wrong and how to do it correctly.
References
Required
AR 725-50
AR 95-1
DA FORM 2404
DA PAM 738-751
DA PAM 750-8
DD FORM 1575
DD FORM 2332
SF 368
TB 43-0001-62-08-3
9 September 2011
Related
AR 702-7
AR 702-7-1
STP 9-94H13-SM-TG
3-175
Chapter 3
Submit Equipment Improvement Recommendation (EIR)
093-SSG-3005
Conditions: You have found a better way to repair a piece of electronic equipment. In an operational
environment (OE), submit an EIR given the following: Army regulation (AR) 672-20, Department of the
Army (DA) Pamphlet 750-8, and Standard Form (SF) 368 (Product Quality Deficiency Report). This task
can be performed in a field or garrison environment.
Standards: Prepare the appropriate report forms for a recommended equipment improvement and
check AR 672-20 to see if the EIR qualified as a suggestion.
Performance Steps
1. Identify conditions that indicate a need to improve the performance and/or maintenance of
equipment.
a. A condition in or with the equipment that was dangerous to people, other equipment, or the
mission.
b. An item or piece of equipment that did not work right or last as long as it should because of bad
design or materials.
c. Items that were not within the approved equipment specifications.
d. Low quality workmanship.
e. Dangerous situations due to incorrect or missing data.
f. Maintenance problems.
g. Conditions that prevented using the equipment.
h. Repeated problems that took a lot of time with no solutions in sight.
i. Problems requested to be reported by the national maintenance point (NMP).
2. Report Category I or Category II recommendations for improvements.
a. Reports Category I recommendations for any of the following improvements.
(1) Improvements that prevent death, injury, or severe job illness.
(2) Improvements that prevent loss or major damage to equipment.
(3) Improvements that will affect the combat readiness capabilities of the unit.
b. Reports as a Category II recommendation any recommendation that does not meet the criteria
of a Category I equipment improvement recommendation.
3. Send in a Category I or Category II equipment improvement recommendation.
a. Prepares SF 368 in accordance with DA Pamphlet 750-8, Chapter 10.
b. Sends a message within 48 hours (Category I recommendation) or 5 days (Category II
recommendation) after defect or problem was found.
c. Keeps one copy of the SF 368 until the Army screening point closed the case.
d. Sends one copy of the SF 368 to the support maintenance activity.
4. Check AR 672-20 to see if the EIR qualified as a suggestion.
Evaluation Preparation: Ensure all items required in the condition statement (or appropriate
substitutions) are on hand and all safety requirements are met.
GO
NO-GO
1. Identified conditions that indicated a need to improve the performance and/or
maintenance of equipment.
——
——
2. Reported Category I or Category II recommendations for improvements.
——
——
3. Sent in a Category I or Category II equipment improvement recommendation.
——
——
4. Checked AR 672-20 to see if the EIR qualified as a suggestion.
——
——
Performance Measures
3-176
STP 9-94H13-SM-TG
9 September 2011
MOS/Skill Level Tasks
Evaluation Guidance: Score the Soldier GO if all performance measures are passed (P). Score the
Soldier NO-GO if any performance measure is failed (F). If the Soldier fails any performance measure,
show what was done wrong and how to do it correctly.
References
Required
AR 672-20
DA PAM 750-8
SF 368
9 September 2011
Related
DA PAM 738-751
STP 9-94H13-SM-TG
3-177
Chapter 3
Plan Work Flow
093-SSG-3006
Conditions: In an operational environment (OE), given DA Form 5990-Es (Maintenance Request
[EGA])/job packets with various issue priority designators, a visible index file showing the shop workload
summary. This task can be performed in a field or garrison environment.
Standards: Distribute all DA Form 5990-Es/job packets by issue priority designators, highest priorities
first. Ensure the visible index file was up to date, legible, and complete.
Performance Steps
1. Arrange the DA Form 5990-Es/job packets by issue priority designators, highest priorities first.
2. Use the DA Form 5990-Es/job packets in the same order to assign jobs to repairers.
3. Monitor work as the jobs went through the repair process.
4. Assign new jobs to the repairers as they completed those assigned.
5. Review all paperwork within the job packets for completeness.
6. Update the visible index file.
Evaluation Preparation: Ensure all items required in the condition statement (or appropriate
substitutions) are on hand and all safety requirements are met.
GO
NO-GO
1. Arranged the DA Form 5990-Es/job packets by issue priority designators, highest
priorities first.
——
——
2. Used the DA Form 5990-Es/job packets in the same order to assign jobs to
repairers.
——
——
3. Monitored work as the jobs went through the repair process.
——
——
4. Assigned new jobs to the repairers as they completed those assigned.
——
——
5. Reviewed all paperwork within the job packets for completeness.
——
——
6. Updated the visible index file.
——
——
Performance Measures
Evaluation Guidance: Score the Soldier GO if all performance measures are passed (P). Score the
Soldier NO-GO if any performance measure is failed (F). If the Soldier fails any performance measure,
show what was done wrong and how to do it correctly.
References
Required
DA FORM 5990-E
3-178
Related
DA PAM 738-751
DA PAM 750-8
FM 4-30.3
STP 9-94H13-SM-TG
9 September 2011
MOS/Skill Level Tasks
Direct Performance of Preventive Maintenance
093-SSG-3007
Conditions: In an operational environment (OE), given personnel to perform preventive maintenance
checks and services (PMCS), Department of the Army (DA) Form 2408-14 (Uncorrected Fault Record),
DA Form 2404 (Equipment Inspection and Maintenance Worksheet) or DA Form 5988-E (Equipment
Inspection Maintenance Worksheet [EGA]), Department of Defense (DD) Form 314 (Preventive
Maintenance Schedule and Record), DA Pamphlet 750-8, DA Pamphlet 738-751, equipment, and
vehicle -10 series technical manuals (TMs). This task can be performed in a field or garrison under
normal, extreme heat, and extreme cold environment conditions.
Note: All the information from DA Form 2408-14 is now included in DA Form 5988-E.
Standards: Perform all PMCS according to the applicable -10 series TMs. Complete DA Form 2404 or
DA Form 5988-E and DA Form 2408-14 and DD Form 314 according to DA Pamphlet 750-8 or DA
Pamphlet 738-751.
Performance Steps
1. Coordinate with the motor pool section prior to performing section/shop vehicle PMCS.
2. Review the DD Form 314 and the applicable -10 series TMs to conduct weekly vehicle PMCS.
a. Identify which PMCS service operation must be performed.
b. Identify each piece of equipment for which operation under conditions inspection must be
performed.
(1) Operation under usual conditions.
(2) Operation under unusual conditions.
(a) Operation in extreme cold weather.
(b) Operation in extreme heat weather.
(c) Operation in dusty or sandy areas.
(d) Operation under rainy or humid conditions.
3. Identify hazards to the environment before starting PMCS.
4. Assign jobs and ensure that repairers know what PMCS must be performed.
5. Spot-check the work being performed and ensure that the repairers are using the applicable TMs.
6. Assess the probability of environmental damage/violations using environmental risk assessment
matrices during PMCS.
7. Spot-check corrective actions taken for all defects listed on DA Form 2404.
8. Coordinate with the maintenance sergeant to repair vehicles requiring services beyond the driver's
responsibility.
a. Ensure the repairer placed a drip pan under any equipment leaking fluids onto the ground.
b. Make sure parts needed for repair that are not available are entered on DA Form 5988-E or DA
Form 2408-14.
9. Check the DD Form 314 for correctness.
10. Report vehicle status to section/shop supervisor.
11. Brief the chain of command on any observed environmental potentially high-risk areas during
PMCS.
9 September 2011
STP 9-94H13-SM-TG
3-179
Chapter 3
Evaluation Preparation: Ensure all items required in the condition statement (or appropriate
substitutions) are on hand and all safety requirements are met.
Performance Measures
GO
NO-GO
1. Coordinated with the motor pool section prior to performing section/shop vehicle
PMCS.
——
——
2. Reviewed the DD Form 314 and the applicable -10 series TMs to conduct weekly
vehicle PMCS.
——
——
3. Identified hazards to the environment before starting PMCS.
——
——
4. Assigned jobs and ensured that repairers knew what PMCS must be performed.
——
——
5. Spot-checked the work being performed and ensured that the repairers were
using the applicable TMs.
——
——
6. Assessed the probability of environmental damage/violations using environmental
risk assessment matrices during PMCS.
——
——
7. Spot-checked corrective actions taken for all defects listed on DA Form 2404.
——
——
8. Coordinated with the maintenance sergeant to repair vehicles requiring services
beyond the driver's responsibility.
——
——
9. Checked the DD Form 314 for correctness.
——
——
10. Reported vehicle status to section/shop supervisor.
——
——
11. Briefed the chain of command on any observed environmental potentially highrisk areas during PMCS.
——
——
Evaluation Guidance: Score the Soldier GO if all performance measures are passed (P). Score the
Soldier NO-GO if any performance measure is failed (F). If the Soldier fails any performance measure,
show what was done wrong and how to do it correctly.
References
Required
DA FORM 2404
DA FORM 2408-14
DA FORM 5988-E
DA PAM 738-751
DA PAM 750-8
DD FORM 314
3-180
Related
AR 200-1
FM 4-30.3
TC 3-34.489
STP 9-94H13-SM-TG
9 September 2011
MOS/Skill Level Tasks
Provide Technical Assistance to Repairers
093-SSG-3008
Conditions: A repairer in the electronics/avionics maintenance shop requires technical assistance. In
an operational environment (OE), given Department of the Army (DA) Form 2404 (Equipment Inspection
and Maintenance Worksheet) or DA Form 5988-E (Equipment Inspection Maintenance Worksheet
[EGA]), DA Form 5990-E (Maintenance Request [EGA]), DA Pamphlet 750-8, DA Pamphlet 738-751,
and Technical Bulletin (TB) 385-4, provide needed assistance to the repairer. This task can be
performed in a field or garrison environment.
Standards: Provide technical assistance that will enable the repairer to perform repair procedures
correctly.
Performance Steps
1. Determine the type of assistance needed by the repairer, such as isolating the malfunction, repairing
the malfunction, or making proper entries on the paperwork.
2. Review DA Form 2404 or DA Form 5988-E and DA Form 5990-E to determine reason for
maintenance or repair.
3. Verify repairer observes WARNING, CAUTION, and NOTE statements in applicable references and
observed all safety precautions.
4. Review the repair procedures performed by the repairer.
5. Provide technical assistance to the repairer.
6. Counsel repairer on areas of technical weakness.
7. Recommend technical material and training to increase repairer's expertise.
Evaluation Preparation: Setup: A repairer in the electronics/avionics maintenance shop requires
technical assistance working on a job order.
Brief Soldier: Tell the Soldiers they are going to be evaluated on how well they provide technical
assistance to a subordinate while working on a work order. They will be evaluated on well they
determine what type of assistance the Soldier requires to isolating the malfunction, repair job order piece
of equipment or complete paperwork, while still being compliance with the current Army safety
regulations, shop safety policies and unit SOP.
GO
NO-GO
1. Determined the type of assistance needed by the repairer, such as isolating the
malfunction, repairing the malfunction, or making proper entries on the
paperwork.
——
——
2. Reviewed DA Form 2404 or DA Form 5988-E and DA Form 5990-E to determine
reason for maintenance or repair.
——
——
3. Verified repairer observed WARNING, CAUTION, and NOTE statements in
applicable references and observed all safety precautions.
——
——
4. Reviewed the repair procedures performed by the repairer.
——
——
5. Provided technical assistance to the repairer.
——
——
6. Counseled repairer on areas of technical weakness.
——
——
7. Recommended technical material and training to increase repairer's expertise.
——
——
Performance Measures
9 September 2011
STP 9-94H13-SM-TG
3-181
Chapter 3
Evaluation Guidance: Score the Soldier GO if all performance measures are passed (P). Score the
Soldier NO-GO if any performance measure is failed (F). If the Soldier fails any performance measure,
show what was done wrong and how to do it correctly.
References
Required
DA FORM 2404
DA FORM 5988-E
DA FORM 5990-E
DA PAM 738-751
DA PAM 750-8
TB 385-4
3-182
Related
STP 9-94H13-SM-TG
9 September 2011
MOS/Skill Level Tasks
Perform Initial Inspections
093-SSG-3009
Conditions: In an operational environment (OE), given applicable technical manuals (TMs), the
equipment to be inspected, Department of the Army (DA) Form 2404 (Equipment Inspection and
Maintenance Worksheet) or DA Form 5988-E (Equipment Inspection Maintenance Worksheet [EGA]),
DA Form 5990-E (Maintenance Request [EGA]), DA Pamphlet 750-8, and DA Pamphlet 738-751. This
task can be performed in a field or garrison environment.
Standards: Perform the initial inspection, ensuring that the equipment was repairable according to the
applicable TMs; identify all defects, and complete all maintenance forms according to DA Pamphlet 7508 or DA Pamphlet 738-751.
Performance Steps
1. Check submitted paperwork for completeness and accuracy.
2. Inspect the equipment for physical damage and determined if it is feasible to repair the equipment.
3. Ensure that operator maintenance have been performed on the equipment.
4. Inventory the equipment to ensure that it is complete.
5. Ensure that all modification work orders (MWOs) are complete.
6. Perform self-tests or checks on the equipment, if necessary.
7. Record all defects or reasons for rejection the equipment on DA Form 2404 or DA Form 5988-E.
Evaluation Preparation: Ensure all items required in the condition statement (or appropriate
substitutions) are on hand and all safety requirements are met.
Performance Measures
GO
NO-GO
1. Checked submitted paperwork for completeness and accuracy.
——
——
2. Inspected the equipment for physical damage and determined if it was feasible to
repair the equipment.
——
——
3. Ensured that operator maintenance had been performed on the equipment.
——
——
4. Inventoried the equipment to ensure that it was complete.
——
——
5. Ensured that all modification work orders (MWOs) had been completed.
——
——
6. Performed self-tests or checks on the equipment, if necessary.
——
——
7. Recorded all defects or reasons for rejecting the equipment on DA Form 2404 or
DA Form 5988-E.
——
——
Evaluation Guidance: Score the Soldier GO if all performance measures are passed (P). Score the
Soldier NO-GO if any performance measure is failed (F). If the Soldier fails any performance measure,
show what was done wrong and how to do it correctly.
References
Required
DA FORM 2404
DA FORM 5988-E
DA FORM 5990-E
DA PAM 738-751
DA PAM 750-8
9 September 2011
Related
DA PAM 750-1
FM 4-30.3
TM 750-245-4
STP 9-94H13-SM-TG
3-183
Chapter 3
Perform Final Inspections
093-SSG-3010
Conditions: In an operational environment (OE), given applicable technical manuals (TMs), equipment
to be inspected, Department of the Army (DA) Form 2404 (Equipment Inspection and Maintenance
Worksheet) or DA Form 5988-E (Equipment Inspection Maintenance Worksheet [EGA]), DA Form 5990E (Maintenance Request [EGA]), DA Pamphlet 750-8, and DA Pamphlet 738-751. This task can be
performed in a field or garrison environment.
Standards: Perform final inspection. Ensure that equipment was complete according to applicable
TMs, all defects identified in previous inspections had been corrected, any additional defects had been
recorded on DA Form 2404 or DA Form 5988-E, and all forms had been completed according to DA
Pamphlet 750-8 or DA Pamphlet 738-751.
Performance Steps
1. Check the equipment to determine if it is complete and that all defects found on the initial and inprocess inspections are complete.
2. Ensure that all forms and records are complete and correct.
3. Record any additional defects on DA Form 2404 or DA Form 5988-E and return the equipment to
production control.
4. Sign and date the DA Form 5990-E when the equipment passes its final inspection.
Evaluation Preparation: Ensure all items required in the condition statement (or appropriate
substitutions) are on hand and all safety requirements are met.
GO
NO-GO
1. Checked the equipment to determine if it was complete and that all defects found
on the initial and in-process inspections had been corrected.
——
——
2. Ensured that all forms and records were complete and correct.
——
——
3. Recorded any additional defects on DA Form 2404 or DA Form 5988-E and
returned the equipment to production control.
——
——
4. Signed and dated the DA Form 5990-E when the equipment passed its final
inspection.
——
——
Performance Measures
Evaluation Guidance: Score the Soldier GO if all performance measures are passed (P). Score the
Soldier NO-GO if any performance measure is failed (F). If the Soldier fails any performance measure,
show what was done wrong and how to do it correctly.
References
Required
DA FORM 2404
DA FORM 5988-E
DA FORM 5990-E
DA PAM 738-751
DA PAM 750-8
3-184
Related
DA PAM 750-1
FM 4-30.3
TM 750-245-4
STP 9-94H13-SM-TG
9 September 2011
MOS/Skill Level Tasks
Perform In-Process Inspections
093-SSG-3012
Conditions: In an operational environment (OE), given applicable inspection forms and technical
manuals (TMs), DA Pamphlet 750-8, and DA Pamphlet 738-751, conducts in-process inspection of a
repairer performing repairs on equipment. This task can be performed in a field or garrison
environment.
Standards: Perform in-process inspection. Ensure that the proper tools and equipment were being
used and all safety rules and warnings were being followed according to applicable TMs. Complete all
forms according to DA Pamphlet 750-8 or DA Pamphlet 738-751 and report inspection results.
Performance Steps
1. Use the proper tools and equipment during in-process inspection.
2. Use the proper technical manual repair procedures during in-process inspection.
3. Ensure that authorized repair parts and supplies are available.
4. Ensure that only authorize repairs are performed on the equipment.
5. Ensure that only authorize personnel make the repairs.
6. Ensure that all safety rules and warnings are used.
7. Ensure that all forms are filled out correctly.
8. Make an oral or written report of the inspection to the repair section chief and the quality control
section supervisor.
Evaluation Preparation: Ensure all items required in the condition statement (or appropriate
substitutions) are on hand and all safety requirements are met.
Performance Measures
GO
NO-GO
1. Ensured that the proper tools and equipment were used.
——
——
2. Ensured that the proper repair procedures were followed.
——
——
3. Ensured that only authorized repair parts and supplies were used.
——
——
4. Ensured that only authorized repairs were performed on the equipment.
——
——
5. Ensured that only authorized personnel made the repairs.
——
——
6. Ensured that all safety rules and warnings were followed.
——
——
7. Ensured that all forms were filled out correctly.
——
——
8. Made an oral or written report of the inspection to the repair section chief and the
quality control section supervisor.
——
——
Evaluation Guidance: Score the Soldier GO if all performance measures are passed (P). Score the
Soldier NO-GO if any performance measure is failed (F). If the Soldier fails any performance measure,
show what was done wrong and how to do it correctly.
References
Required
DA PAM 738-751
DA PAM 750-8
9 September 2011
Related
FM 4-30.3
TM 750-245-4
STP 9-94H13-SM-TG
3-185
Chapter 3
Subject Area 10: Maintenance Management
Manage Cross Checks
093-94H-3040
Conditions: In an operational environment (OE), given selected TMDE standards from the Area TMDE
Support Team requiring cross checks, 94H personnel to perform cross checks, TB 9-4931-537-24, TB
385-4, TB 43-180, and TIMMS User's Guide.
Standards: Supervise the performance of cross check procedures in accordance with TB 9-4931-53724, and enforce safety precautions in accordance with TB 385-4. Take corrective action in accordance
with TB 9-4931-537-24 if calibration standard fails cross check. Supervise the completion and
maintenance of cross check records in accordance with TB 9-7931-537-24.
Performance Steps
1. Ensure that the correct standards are identified for cross checks.
a. Fluke 5720A Calibrator.
b. Fluke 5725A Amplifier.
c. HP 3458A Multimeter.
2. Ensure that cross checks are performed as follows:
a. Prior to placing the standards into service.
b. Prior to submitting the standards for recertification.
c. When there is doubt about the accuracy of a standard.
d. When arriving at a site to perform calibration support and again before departing the site.
3. Ensure the cross checks are performed in accordance with TB 9-4931-537-24.
4. Ensure that cross check data tables and forms are complete and all information is accurate.
5. Ensure that proper procedures are followed when a standard is inoperable or fails to cross check.
6. Ensure that cross check records are maintained and copies distributed as required.
a. Maintain cross check records for 2 years.
b. Furnish copies to U.S. Army TMDE Activity Region Quality Assurance Office or appropriate
activity.
7. Ensure that the cross checks are recorded in TIMMS/ICAPS.
Evaluation Preparation: Ensure all items required in the condition statement (or appropriate
substitutions) are on hand and all safety requirements are met.
GO
NO-GO
1. Ensured that the correct standards were identified for cross checks.
——
——
2. Ensured that cross checks were being performed as follows.
——
——
3. Ensured the cross checks were performed in accordance with TB 9-4931-537-24.
——
——
4. Ensured that cross check data tables and forms were complete and all
information was accurate.
——
——
5. Ensured that proper procedures were followed when a standard was inoperable
or failed to cross check.
——
——
6. Ensured that cross check records were maintained and copies distributed as
required.
——
——
Performance Measures
3-186
STP 9-94H13-SM-TG
9 September 2011
MOS/Skill Level Tasks
Performance Measures
7. Ensured that the cross checks were recorded in TIMMS/ICAPS.
GO
NO-GO
——
——
Evaluation Guidance: Score the Soldier GO if all performance measures are passed. Score the Soldier
NO-GO if any performance measure is failed. If the Soldier fails any performance measure, explain what
was done wrong and how to do it correctly.
References
Required
TB 385-4
TB 43-180
TB 9-4931-537-24
TIMMS USERS GUIDE
9 September 2011
Related
AR 750-43
TM 9-6695-239-14
STP 9-94H13-SM-TG
3-187
Chapter 3
Manage Shop Operations Using Automated Procedures
093-94H-3060
Conditions: In an operational environment (OE), given customer equipment requiring calibration and
repair support with open job orders and priority designators, TMDE facility standing operating
procedures, a computer loaded with TMDE Integrated Materiel Management System (TIMMS), TIMMS
User's Guide, AR 750-43, and automated shop reports.
Standards: Manage shop operations by using the current shop automated reports. Direct job flow and
priority of work in accordance with open job order priority designators starting with the highest priorities.
Ensure oldest jobs are completed first (First In/First Out). Meet TMDE readiness goals of AR 750-43.
Performance Steps
1. Review the current shop automated reports.
Figure 3-64. TIMMS In-Shop Report by OUIC
2. Establish priority of job orders according to their priority designators.
3. Direct work flow according to job date (First In First Out).
a. Address jobs awaiting calibration over five days.
b. Address jobs awaiting repair over 15 days.
c. Address jobs awaiting parts over 20 days.
d. Address jobs awaiting customer pickup over 10 days.
4. Monitor the work as the jobs go through the calibration and/or repair process.
5. Review all paper work within the job packets for completeness.
6. Update the job status.
7. Verify automated reports reflect current job status.
Evaluation Preparation: Ensure all items required in the condition statement (or appropriate
substitutions) are on hand and all safety requirements are met.
Performance Measures
GO
NO-GO
1. Reviewed the current shop automated reports.
——
——
2. Established priority of job orders according to their priority designators.
——
——
3. Directed work flow according to job date (First In First Out).
——
——
3-188
STP 9-94H13-SM-TG
9 September 2011
MOS/Skill Level Tasks
Performance Measures
GO
NO-GO
4. Monitored the work as the jobs went through the calibration and/or repair process.
——
——
5. Reviewed all paper work within the job packets for completeness.
——
——
6. Updated the job status.
——
——
7. Verified automated reports reflect current job status.
——
——
Evaluation Guidance: Score the Soldier GO if all performance measures are passed. Score the Soldier
NO-GO if any performance measure is failed. If the Soldier fails any performance measure, explain what
was done wrong and how to do it correctly.
References
Required
AR 750-1
AR 750-43
DA PAM 750-3
TB 750-25
TIMMS USERS GUIDE
9 September 2011
Related
DA PAM 750-8
TB 385-4
TB 43-180
TM 9-6695-239-14
STP 9-94H13-SM-TG
3-189
Chapter 3
Inspect Section/Shop Safety
093-SSG-3001
Conditions: In an operational environment (OE), given a requirement to inspect an electronics or
avionics maintenance shop area and given Army regulation (AR) 40-5, AR 385-10, Department of the
Army (DA) Pamphlet 40-501, DA Pamphlet 385-1, TB 385-4, TB Medical (MED) 523, unit and local
standing operating procedures (SOPs), and unit safety checklist. This task can be performed in a field
or garrison environment.
Standards: Conduct inspection to ensure that all Army, company, and maintenance shop safety
policies, regulations, and local SOPs were followed; all safety hazards were identified; environmental
risk assessment to determine high risks areas was performed; and all deficiencies were corrected.
Establish an inspection schedule covering what to inspect and how frequently. Record deficiencies and
recommended corrective actions and retained these reports to check progress. Follow up to ensure
deficiencies had been corrected.
Performance Steps
1. Review the Army, company, and maintenance shop safety policies, regulations, and local SOPs.
2. Ensure that all of the Army safety references and company and maintenance shop SOPs are being
followed.
3. Plan periodic safety inspections for all section/shop work areas.
a. Identify hazards to the environment prior to the inspection process.
b. Assess the probability of environmental damage/violations using environmental risk
assessment matrices before the inspection process.
4. Schedule the inspection so that disruptions to normal operations are as little as possible.
5. Inspect areas with the greatest potential for accident severity and those having the highest accident
frequency more frequently.
6. Develop a suitable checklist of items to be inspected in accordance with AR 385-10, AR 40-5, DA
Pamphlet 40-501, DA Pamphlet 385-1, TB 385-4, TB MED 523, and maintenance section/shop
SOPs.
7. Inspect the maintenance section/shop to ensure that all test equipment calibration dates are current.
8. Inspect all of the equipment and benches for proper grounding within the maintenance section/shop
areas.
9. Inspect the maintenance section/shop to ensure that a mounted safety board is present.
10. Inspect the maintenance section/shop to ensure that rubber floor mats or similar insulating materials
are available for each repair position.
11. Inspect the maintenance section/shop to ensure that all power attachments, plugs, and connectors
are serviceable with no exposed parts carrying electric current except the prongs.
12. Inspect and identify all of the physical and high-voltage hazards within the maintenance
section/shop areas.
13. Inspect the maintenance section/shop to ensure it complies with host nation, local, state, and federal
environmental laws and regulations.
14. Brief the chain of command on the results, potential high-risk areas, and recommendations from the
safety inspection.
15. Identify all safety hazards and took corrective action.
3-190
STP 9-94H13-SM-TG
9 September 2011
MOS/Skill Level Tasks
Performance Steps
16. Ensure all deficiencies found during inspection have proper corrective action scheduled.
Evaluation Preparation: Setup: Select one of the maintenance section/shop within the company to
perform a safety inspection.
Brief Soldier: Tell the Soldiers they are going to be evaluated on how well they are in compliances with
the current Army safety regulations, shop safety policies and unit SOP. Request a copy of the last safety
inspection and a copy of the current unit maintenance section/shop safety checklist, unit SOP and
review the checklist prior to walk through. Look for areas with the greatest potential for accident severity
and areas having the highest accident frequency, mounted safety board, rubber floor mats or similar
insulating materials as requires and etc.
GO
NO-GO
1. Reviewed the Army, company, and maintenance shop safety policies, regulations,
and local SOPs.
——
——
2. Ensured that all of the Army safety references and company and maintenance
shop SOPs were being followed.
——
——
3. Planned periodic safety inspections for all section/shop work areas.
——
——
4. Scheduled the inspection so that normal operations were disrupted as little as
possible.
——
——
5. Inspected areas with the greatest potential for accident severity and those having
the highest accident frequency more frequently.
——
——
6. Developed a suitable checklist of items to be inspected in accordance with
AR 385-10, AR 40-5, DA Pamphlet 40-501, DA Pamphlet 385-1, TB 385-4, TB
MED 523, and maintenance section/shop SOPs.
——
——
7. Inspected the maintenance section/shop to ensure that all test equipment
calibration dates were current.
——
——
8. Inspected all of the equipment and benches for proper grounding within the
maintenance section/shop areas.
——
——
9. Inspected the maintenance section/shop to ensure that a mounted safety board
was present.
——
——
10. Inspected the maintenance section/shop to ensure that rubber floor mats or
similar insulating materials were provided for each repair position.
——
——
11. Inspected the maintenance section/shop to ensure that all power attachments,
plugs, and connectors were serviceable with no exposed parts carrying electric
current except the prongs.
——
——
12. Inspected and identified all of the physical and high-voltage hazards within the
maintenance section/shop areas.
——
——
13. Inspected the maintenance section/shop to ensure it was complying with host
nation, local, state, and federal environmental laws and regulations.
——
——
14. Briefed the chain of command on the results, potential high-risk areas, and
recommendations from the safety inspection.
——
——
15. Identified all safety hazards and took corrective action.
——
——
16. Ensured that any deficiencies found were corrected.
——
——
Performance Measures
9 September 2011
STP 9-94H13-SM-TG
3-191
Chapter 3
Evaluation Guidance: Score the Soldier GO if all performance measures are passed (P). Score the
Soldier NO-GO if any performance measure is failed (F). If the Soldier fails any performance measure,
show what was done wrong and how to do it correctly.
References
Required
AR 385-10
AR 40-5
DA PAM 385-1
DA PAM 40-501
TB 385-4
TB MED 523
3-192
Related
AR 200-1
FM 4-30.3
TB 43-0129
TC 3-34.489
STP 9-94H13-SM-TG
9 September 2011
MOS/Skill Level Tasks
Manage Section/Shop Security
093-SSG-3002
Conditions: In an operational environment (OE), given AR 25-2, AR 190-13, AR 380-5, AR 380-40, DA
Pamphlet 190-51, and local and unit standing operating procedures (SOPs). This task can be
performed in a field or garrison environment.
Standards: Ensure that all Army security policies and regulations and the maintenance shop and local
SOPs were followed. Identify and report all security deficiencies and ensured that all deficiencies were
corrected.
Performance Steps
1. Review all of the Army security policies and regulations and the maintenance shop and local SOPs.
2. Ensure a work place risk analysis is performed.
3. Ensure that physical security policies, regulations, and SOPs are followed.
4. Ensure that classification and marking policies are followed.
5. Ensure that all security control policies and regulations are followed.
6. Ensure that personnel security and signal training policies are followed.
a. Initial security training and briefing for newly assigned personnel.
b. Refresher security training for assigned personnel.
c. Procedures for identifying and reporting insecurities.
7. Ensure that signal security (SIGSEC) policies and regulations are followed.
a. Ensure subordinates follow all Army and unit policies and regulations covering communications
security (COMSEC) procedures.
b. Ensure subordinates follow all Army and unit policies and regulations covering electronics
security (ELSEC) procedures.
8. Identify and report all security deficiencies and ensure that all deficiencies are corrected.
Evaluation Preparation: Setup: Select one of the maintenance section/shop within the company and
inspect their security management.
Brief Soldier: Tell the Soldiers they are going to be evaluated on how well they are in compliances with
the current Army security regulations, shop security policies and unit SOP. Request a copy of the last
security inspection and a copy of the current unit maintenance section/shop security checklist, unit SOP
and review the checklist prior to walk through. Look over the unit last six months gain roster for newly
assigned personnel to see if they received their Initial security training and to see if refresher security
training for assigned personnel is being conducted.
GO
NO-GO
1. Reviewed all of the Army security policies and regulations and the maintenance
shop and local SOPs.
——
——
2. Ensured a work place risk analysis was performed.
——
——
3. Ensured that physical security policies, regulations, and SOPs were followed.
——
——
4. Ensured that classification and marking policies were followed.
——
——
5. Ensured that all security control policies and regulations were followed.
——
——
6. Ensured that personnel security and signal training policies were followed.
——
——
Performance Measures
9 September 2011
STP 9-94H13-SM-TG
3-193
Chapter 3
Performance Measures
GO
NO-GO
7. Ensured that signal security (SIGSEC) policies and regulations were followed.
——
——
8. Identified and reported all security deficiencies and ensured that all deficiencies
were corrected.
——
——
Evaluation Guidance: Score the Soldier GO if all performance measures are passed (P). Score the
Soldier NO-GO if any performance measure is failed (F). If the Soldier fails any performance measure,
show what was done wrong and how to do it correctly.
References
Required
AR 190-13
AR 25-2
AR 380-40
AR 380-5
DA PAM 190-51
3-194
Related
AR 5-12
DA PAM 25-380-2
FM 4-30.3
STP 9-94H13-SM-TG
9 September 2011
MOS/Skill Level Tasks
Maintain Section/Shop Calibration Program
093-SSG-3003
Conditions: In an operational environment (OE), given the maintenance section/shop calibration
program, to include test, measurement, and diagnostic equipment (TMDE) master listing for the
program; DA Form 3758-R (Calibration and Repair Requirements Worksheet); DA Label 80 (US Army
Calibrated Instrument); TB 43-180; TB 750-25; and company standing operating procedures (SOPs).
This task can be performed in a field or garrison environment.
Standards: Maintain a master listing for all calibrated equipment assigned to the maintenance
section/shop in accordance with TB 43-180, TB 750-25, and company SOPs. Review the section/shop
calibration listing for equipment due calibration on a monthly basis and update status of all calibration
equipment still turned in to the calibration support unit.
Performance Steps
1. Identify all equipment listed on section/shop hand receipts that might require a calibration label.
a. Test equipment.
b. Equipment modules.
c. Dummy loads.
d. Voltage test probes.
e. Radiation detection, indication, and computation (RADIAC) equipment.
f. Motor pool equipment.
g. Power supplies.
2. Determine which equipment identified was listed in TB 43-180.
a. Equipment that requires calibration.
b. Calibration not required (CNR) equipment.
3. Prepare DA Form 3758-R if any new equipment not listed in TB 43-180 required calibration.
4. Maintain a master listing for all calibrated items in the maintenance section/shop.
5. Schedule equipment for calibration
a. Stagger like equipment, when possible, so that equipment is always available on site.
b. Assign a higher priority for critical TMDE, when necessary.
c. Schedule plug-in modules and accessories for calibration with the major piece of equipment.
d. Review signature cards and orders, as required locally, to update customer files and for the first
appointment.
6. Prepare CNR labels for remaining equipment, as required.
7. Turn in/pick up equipment from the calibration facility.
a. Turn in equipment with a minimum of accessories and covers.
b. Obtain signed and dated receipt for equipment.
c. Inspect equipment for damage and accessories before signing.
d. Obtain calibration listings when available.
8. Update calibration listing.
a. Verify calibration due dates.
b. Delete entries.
c. Add entries.
d. correct serial number, calibration date, and due date errors.
9. Maintain a temporary storage area for calibrate before use (CBU) equipment.
a. Identify CBU equipment as appropriate.
b. Identify a limited access storage area.
c. Prepare DA Label 80 for CBU.
9 September 2011
STP 9-94H13-SM-TG
3-195
Chapter 3
Performance Steps
d. Update calibration listing for CBU items.
e. Store equipment until required.
f. Submit equipment for calibration prior to use.
Evaluation Preparation: Setup: Select one of the maintenance shop/section within the company hand
receipt that contents test, measurement, and diagnostic equipment (TMDE).
Brief Soldier: Tell the Soldiers they are going to be evaluated on how they review the company's master
listing of all calibration items and selected maintenance section/shop hand receipt for calibration
equipment listed. They must verify entries, equipment for correct serial numbers, calibration due dates
and update company calibration list with new and turned-in equipment on the selected shop/section
hand receipt due calibration.
GO
NO-GO
1. Identified all equipment listed on section/shop hand receipts that might require a
calibration label.
——
——
2. Determined which equipment identified was listed in TB 43-180.
——
——
3. Prepared DA Form 3758-R if any new equipment not listed in TB 43-180 required
calibration.
——
——
4. Maintained a master listing for all calibrated items in the maintenance
section/shop.
——
——
5. Scheduled equipment for calibration.
——
——
6. Prepared CNR labels for remaining equipment, as required.
——
——
7. Turned in/picked up equipment from the calibration facility.
——
——
8. Updated calibration listing.
——
——
9. Maintained a temporary storage area for calibrate before use (CBU) equipment.
——
——
Performance Measures
Evaluation Guidance: Score the Soldier GO if all performance measures are passed (P). Score the
Soldier NO-GO if any performance measure is failed (F). If the Soldier fails any performance measure,
show what was done wrong and how to do it correctly.
References
Required
DA FORM 3758-R
DA LABEL 80
TB 43-180
TB 750-25
3-196
Related
DA PAM 750-3
STP 9-94H13-SM-TG
9 September 2011
MOS/Skill Level Tasks
Write a Standing Operating Procedure (SOP)
093-SSG-3011
Conditions: In an operational environment (OE), given the unit's old SOP, Army regulation (AR) 750-1,
Department of the Army (DA) Pamphlet 600-67, DA Pamphlet 750-3, Field Manual (FM) 4-30.3, FM 5-0,
and Training Circular (TC) 43-4. This task can be performed in a field or garrison environment.
Standards: Write a new SOP that is reviewed and approved by the supervisor/commander. Implement
all recommended changes.
Performance Steps
1. Develop a basic SOP format to ensure it meets organization/element specific needs and/or
requirements for the maintenance facility.
a. Purpose statement.
b. Scope statement.
c. Organization statement.
d. Conformity statement.
e. References.
f. Annexes.
2. Include guidance in the SOP on the following as they pertain only to the maintenance facility.
a. Personnel administration.
b. Security.
c. Security and intelligence.
d. Area security.
e. Physical security of weapons and property.
f. Safety program.
g. Maintenance operations.
h. Management of hand receipts.
i. Standard warnings.
j. Alert procedures.
k. Chemical, biological, radiological, nuclear (CBRN) warfare.
l. Defense against nuclear attack.
m. Logistics.
n. Motor pool operations.
o. Motor movement and traffic control.
p. Tactical operations.
3. Ensure that all references used are current.
4. Staff the draft through the supervisor/commander.
5. Implement any approved SOP changes.
6. Obtain supervisor/commander signature on final version of SOP.
Evaluation Preparation: Ensure all items required in the condition statement (or appropriate
substitutions) are on hand and all safety requirements are met.
GO
NO-GO
1. Developed a basic SOP format to ensure it met organization/element specific
needs and/or requirements for the maintenance facility.
——
——
2. Included guidance in the SOP on the following as they pertained only to the
maintenance facility.
——
——
3. Ensured that all references used were current.
——
——
Performance Measures
9 September 2011
STP 9-94H13-SM-TG
3-197
Chapter 3
Performance Measures
GO
NO-GO
4. Staffed the draft through the supervisor/commander.
——
——
5. Implemented any approved SOP changes.
——
——
6. Obtained supervisor/commander signature on final version of SOP.
——
——
Evaluation Guidance: Score the Soldier GO if all performance measures are passed (P). Score the
Soldier NO-GO if any performance measure is failed (F). If the Soldier fails any performance measure,
show what was done wrong and how to do it correctly.
References
Required
AR 750-1
DA PAM 600-67
DA PAM 750-3
FM 4-30.3
FM 5-0
TC 43-4
3-198
Related
STP 9-94H13-SM-TG
9 September 2011
MOS/Skill Level Tasks
Maintain Property Accountability
093-SSG-3013
Conditions: In an operational environment (OE), perform this task given a quarterly review of all hand
receipts with hand receipt holders in the maintenance section/shop, issued new equipment, and tagged
unserviceable equipment for turn-in, Army regulation (AR) 25-400-2, AR 710-2, Department of the Army
(DA) Form 2062 (Hand Receipt/Annex Number), DA Pamphlet 710-2-1, hand receipts, applicable
equipment, and applicable technical manuals (TMs). This task can be performed in a field or garrison
environment.
Standards: Issue supplies and equipment to hand receipt holders while maintaining property and supply
accountability.
Performance Steps
1. Notify hand receipt holders of quarterly inventory.
2. Review file copies of all hand receipts and signature cards for each maintenance section/shop.
3. Assembly all new equipment to be issued out into separate groups for issuing to hand receipt
holders during the quarterly inventory.
4. Issue new equipment to hand receipt holders before inventorying.
5. Inventory hand receipts.
6. Update each hand receipt holder's equipment shortage list, as required.
7. Ensure that only authorized personnel on the hand receipt holder signature card signs the hand
receipt.
8. Ensure that all forms were filled out correctly.
9. File hand receipts in appropriate hand receipt holder files.
Evaluation Preparation: Setup:
quarterly hand receipt inventory.
One of your electronics/avionics maintenance shops is due its
Brief Soldier: Tell the Soldier they are going to be evaluated on how well they been maintaining their
shop hand receipt, to see if they have current signature cards, issued-out new equipment to sub-hand
receipt holders, and equipment shortage list is current.
GO
NO-GO
1. Notified hand receipt holders of quarterly inventory.
——
——
2. Reviewed file copies of all hand receipts and signature cards for each
maintenance section/shop.
——
——
3. Assembled all new equipment to be issued into separate groups for issuing to
hand receipt holders during the quarterly inventory.
——
——
4. Issued new equipment to hand receipt holders before inventorying.
——
——
5. Inventoried hand receipts.
——
——
6. Updated each hand receipt holder's equipment shortage list, as needed.
——
——
7. Ensured that only authorized personnel on the hand receipt holder signature card
signed the hand receipt.
——
——
Performance Measures
9 September 2011
STP 9-94H13-SM-TG
3-199
Chapter 3
Performance Measures
GO
NO-GO
8. Ensured that all forms were filled out correctly.
——
——
9. Filed hand receipts in appropriate hand receipt holder files.
——
——
Evaluation Guidance: Score the Soldier GO if all performance measures are passed (P). Score the
Soldier NO-GO if any performance measure is failed (F). If the Soldier fails any performance measure,
show what was done wrong and how to do it correctly.
References
Required
AR 25-400-2
AR 710-2
DA FORM 2062
DA PAM 710-2-1
3-200
Related
STP 9-94H13-SM-TG
9 September 2011
MOS/Skill Level Tasks
Assess Battlefield Damage
093-SSG-3014
Conditions: In an operational environment (OE), supervise the performance of an organizational
maintenance team or a field maintenance support team (MST) performing battlefield assessment. Given
a disabled vehicle or equipment; repairers to assess the equipment; applicable -10, -20, and -30-series
technical manuals (TMs), repair parts manuals, and tool kits; Department of the Army (DA) Form 2404
(Equipment Inspection and Maintenance Worksheet) or DA Form 5988-E (Equipment Inspection
Maintenance Worksheet [EGA]), DA Form 5990-E (Maintenance Request [EGA]), DA Pamphlet 750-8,
DA Pamphlet 738-751, Department of Defense (DD) Form 1577 (Unserviceable (Condemned) Tag Materiel), DD Form 1577-1 (Unserviceable (Condemned) Label - Materiel), DD Form 1577-2
(Unserviceable (Repairable) Tag - Materiel), DD Form 1577-3 (Unserviceable (Reparable) Label Materiel), Field Manual (FM) 4-30.3, and FM 4-30.31. This task can be performed in a field or garrison
environment.
Standards: Supervise the organizational maintenance team or direct support (DS) MST that identified
and performed repairs needed to restore a disabled piece of equipment to the minimum essential
combat capabilities necessary to support a specific combat mission or to enable the equipment to selfrecover. Complete all required paperwork according to DA Pamphlet 750-8, DA Pamphlet 738-751, FM
4-30.3, and FM 4-30.31.
Performance Steps
1. Brief the organizational maintenance team or DS MST on the upcoming mission to assess battlefield
damage (see FM 4-30.3).
a. Identify point of contact at unit/site.
b. Identify the equipment to be assessed for battlefield damage.
c. Identify the equipment needed for the upcoming mission.
d. Explain logistics support.
e. Plan primary and secondary routes to unit.
f. Ensure team receives a copy of supported units' radio frequencies and call signs.
2. Monitor assigned personnel to the team according to their qualifications and availability to meet the
mission needs.
3. Arrange for transportation to the site.
4. Ensure that the proper battlefield assessment procedures are followed.
a. Review the operator/crew assessment and the safety checks made.
b. Interview the operator/crew, if available.
c. Conduct visual inspection.
d. Perform self-test.
e. Test equipment with the organizational/DS maintenance equipment.
5. Ensure the MST provides technical assistance to the organizational maintenance team as required.
6. Ensure the MST prioritizes repairs according to battlefield damage time guidelines.
7. Ensure that all required maintenance forms are completed in accordance with DA Pamphlet 750-8
and DA Pamphlet 738-751.
a. DA Form 2404 or DA Form 5988-E.
b. DA Form 5990-E.
c. DD Form 1577.
d. DD Form 1577-1.
e. DD Form 1577-2.
f. DD Form 1577-3.
8. Ensure a system assessment summary is completed and submitted properly.
9 September 2011
STP 9-94H13-SM-TG
3-201
Chapter 3
Evaluation Preparation: Ensure all items required in the condition statement (or appropriate
substitutions) are on hand and all safety requirements are met.
Performance Measures
GO
NO-GO
1. Briefed the organizational maintenance team or DS MST on the upcoming
mission to assess battlefield damage.
——
——
2. Monitored assigned personnel to the team according to their qualifications and
availability to meet the mission needs.
——
——
3. Arranged for transportation to the site.
——
——
4. Ensured that the proper battlefield assessment procedures were followed.
——
——
5. Ensured the MST provided technical assistance to the organizational
maintenance team, as required.
——
——
6. Ensured the MST prioritized repairs according to battlefield damage time
guidelines.
——
——
7. Ensured that all required maintenance forms were filled out correctly in
accordance with DA Pamphlet 750-8 and DA Pamphlet 738-751.
——
——
8. Ensured a system assessment summary was completed correctly and submitted.
——
——
Evaluation Guidance: Score the Soldier GO if all performance measures are passed (P). Score the
Soldier NO-GO if any performance measure is failed (F). If the Soldier fails any performance measure,
show what was done wrong and how to do it correctly.
References
Required
DA FORM 2404
DA FORM 5988-E
DA FORM 5990-E
DA PAM 738-751
DA PAM 750-8
DD FORM 1577
DD FORM 1577-1
DD FORM 1577-2
DD FORM 1577-3
FM 4-30.3
FM 4-30.31
3-202
Related
TM 750-245-4
STP 9-94H13-SM-TG
9 September 2011
MOS/Skill Level Tasks
Manage Demand Supported Repair Parts Listed on the Prescribed Load List (PLL)
093-SSG-3015
Conditions: In an operational environment (OE), conduct this task during the normal performance of
your daily duties within an electronics/avionics maintenance shop. Manage demand supported repair
parts for an electronics/avionics maintenance shop given Army regulation (AR) 710-2, Department of the
Army (DA) Pamphlet 710-2-1, DA Form 2063-R (Prescribed Load List), DA Form 2064 (Document
Register for Supply Actions), DA Form 3318 (Records of Demands-Title Insert), copy of Federal
Logistics (FEDLOG) discs, unit's initial mandatory parts list (IMPL), unit's prescribed load list (PLL), and
technical parts manuals. This task can be performed in a field or garrison environment.
Standards: Complete review and correct the PLL in accordance with the equipment technical parts
manual, AR 710-2, and DA Pamphlet 710-2-1 for the electronics/avionics repair parts listed on the PLL.
Performance Steps
1. Review the unit's PLL for electronics/avionics maintenance shop's repair parts.
2. Verify that the electronics/avionics shop's repair parts qualify to be on the PLL list.
3. Review demand supported unit maintenance repair parts documents and ensure they meet the
following:
a. Three demands made within the control period of 180 days for Active Army.
b. Parts were essential and had a maintenance use code of "O" (except for non-tactical
telecommunications systems, air traffic control, or lifesaving systems).
4. Review non-demand supported unit maintenance repair parts documents and ensure they meet the
following:
a. Approval by the first general officer staff level in the chain of command required in order to
stock.
b. Parts essential, with a maintenance use code of "O" (except for non-tactical
telecommunications systems, air traffic control, or lifesaving systems).
5. Review the initial stockage of repair parts for newly introduced end items as identified by the
Support List Allowance Card (SLAC) deck.
a. The stockage level will not be reduced the first year.
b. If the end item is under warranty, the first year (as stipulated above) will begin upon expiration
of warranty.
6. Review the mandatory stockage of repair parts as identified in the IMPL.
Evaluation Preparation: Brief Soldier: Tell the Soldier they are going to be evaluated on how well they
been maintaining the unit's prescribed load list according with current Army regulations.
GO
NO-GO
1. Reviewed the unit's PLL for electronics/avionics maintenance shop's repair parts.
——
——
2. Verified that the electronics/avionics shop's repair parts qualify to be on the PLL
list.
——
——
3. Reviewed demand supported unit maintenance repair parts documents and
ensured they met the following.
——
——
4. Reviewed non-demand supported unit maintenance repair parts documents and
ensured they met the following.
——
——
5. Reviewed the initial stockage of repair parts for newly introduced end items as
identified by the SLAC deck.
——
——
Performance Measures
9 September 2011
STP 9-94H13-SM-TG
3-203
Chapter 3
Performance Measures
6. Reviewed the mandatory stockage of repair parts as identified in the IMPL.
GO
NO-GO
——
——
Evaluation Guidance: Score the Soldier GO if all performance measures are passed (P). Score the
Soldier NO-GO if any performance measure is failed (F). If the Soldier fails any performance measure,
show what was done wrong and how to do it correctly.
References
Required
AR 710-2
DA FORM 2063-R
DA FORM 2064
DA FORM 3318
DA PAM 710-2-1
3-204
Related
FM 4-30.3
STP 9-94H13-SM-TG
9 September 2011
MOS/Skill Level Tasks
Monitor Bench Stock Operations
093-SSG-3016
Conditions: In an operational environment (OE), perform this task given Army regulation (AR) 710-2,
Department of the Army (DA) Pamphlet 710-2-2, and a copy of Federal Logistics (FEDLOG) discs. This
task can be performed in a field or garrison environment.
Standards: Maintain bench stock in accordance with AR 710-2 and DA Pamphlet 710-2-2.
Performance Steps
1. Ensure that the bench stock items are made up of low-cost expendable items.
2. Ensure the bench stock is stored near the work area.
3. Ensure that bench stock replenishment tags and lists are maintain with the bench stock.
4. Ensure that bench stock orders are on a prescribed schedule or as needed.
5. Ensure that the bench stock items are ordered under the correct urgency of need designator (UND).
6. Review the bench stock items list semiannually.
Evaluation Preparation: Brief Soldier: Tell the Soldier they are going to be evaluated on how well they
been maintaining the bench stock according with current Army regulations.
GO
NO-GO
1. Ensured that the bench stock was made up of low-cost expendable items.
——
——
2. Ensured that the bench stock was stored near the work area.
——
——
3. Ensured that bench stock replenishment tags and lists were maintained with the
bench stock.
——
——
4. Ensured that bench stock was ordered on a prescribed schedule or as needed.
——
——
5. Ensured that the bench stock was ordered under the correct urgency of need
designator (UND).
——
——
6. Ensured that the bench stock was reviewed semiannually.
——
——
Performance Measures
Evaluation Guidance: Score the Soldier GO if all performance measures are passed (P). Score the
Soldier NO-GO if any performance measure is failed (F). If the Soldier fails any performance measure,
show what was done wrong and how to do it correctly.
References
Required
AR 710-2
DA PAM 710-2-2
9 September 2011
Related
STP 9-94H13-SM-TG
3-205
Chapter 3
Monitor Shop Stock Operations
093-SSG-3017
Conditions: In an operational environment (OE), perform this task given a current copy of the shop
stock list, Army regulation AR 710-2, Department of the Army (DA) Pamphlet 710-2-2, and a copy of
Federal Logistics (FEDLOG) discs. This task can be performed in a field or garrison environment.
Standards: Maintain the shop stock according to AR 710-2 and DA Pamphlet 710-2-2.
Performance Steps
1. Ensure all repair parts and consumables listed on the shop stock meet the criteria listed in AR 710-2
and DA Pamphlet 710-2-2.
2. Ensure each item is demand supported.
3. Ensure each item's stockage level is developed in accordance with DA Pamphlet 710-2-2.
4. Ensure that excess stocks are turned in within 10 days of review.
5. Ensure that replenishment of stocks' is based on the reorder point (ROP).
6. Ensure a temporary hand-receipted is issued for the controlled cryptographic item (CCI) repair parts
required by the communications security (COMSEC) maintenance activities for diagnostic purpose.
7. Ensure an inventory of the shop stock items are scheduled for the review during the correct
reviewing period.
8. Review the Supply Support Activity (SSA) shop stock list to see if it was signed by the unit
commander.
Evaluation Preparation: Brief Soldier: Tell the Soldier they are going to be evaluated on how well they
been maintaining the shop stock according with current Army regulations.
GO
NO-GO
1. Ensured repair parts and consumables listed on the shop stock met the criteria
listed in AR 710-2 and DA Pamphlet 710-2-2.
——
——
2. Ensured each item was demand supported.
——
——
3. Ensured each item's stockage levels were developed in accordance with DA
Pamphlet 710-2-2.
——
——
4. Ensured excess stocks were turned in within 10 days of review.
——
——
5. Ensured replenishment of stock was based on the reorder point (ROP).
——
——
6. Ensured a temporary hand-receipted was issued for the controlled cryptographic
item (CCI) repair parts required by the communications security (COMSEC)
maintenance activities for diagnostic purpose.
——
——
7. Ensured an inventory of the shop stock items were scheduled for the review
during the correct reviewing period.
——
——
8. Reviewed the Supply Support Activity (SSA) shop stock list to see if it was signed
by the unit commander.
——
——
Performance Measures
Evaluation Guidance: Score the Soldier GO if all performance measures are passed (P). Score the
Soldier NO-GO if any performance measure is failed (F). If the Soldier fails any performance measure,
show what was done wrong and how to do it correctly.
3-206
STP 9-94H13-SM-TG
9 September 2011
MOS/Skill Level Tasks
References
Required
AR 710-2
DA PAM 710-2-2
9 September 2011
Related
STP 9-94H13-SM-TG
3-207
Chapter 3
Inspect Maintenance Support Team Operations
093-SSG-3019
Conditions: In an operational environment (OE), perform this task given the necessary personnel to
perform an electronics/avionics maintenance support team (MST) operation, Department of the Army
(DA) Pamphlet 611-21, DA Pamphlet 750-8, DA Pamphlet 738-751, Field Manual (FM) 3-25.26, and FM
4-30.3. This task can be performed in a field or garrison environment.
Standards: Ensure the correct military occupational specialty holders were assigned to a support team,
briefed, and provided with transportation.
Performance Steps
1. Monitor assigned personnel according to their qualifications and availability.
2. Arrange for transportation to the site.
3. Brief the support team on mission requirements.
a. Identify point of contact at unit.
b. Identify equipment needed for the support mission.
c. Explain logistics support.
d. Plan primary and secondary routes to unit.
e. Ensure team received a copy of supported units' radio frequencies and call signs.
4. Provide technical assistance to the support team as required.
5. Ensure that all maintenance forms are filled out correctly.
Evaluation Preparation: Setup:
Maintenance Support Team.
One of your electronics/avionics maintenance shops will deploy
Brief Soldier: Tell the Soldier they will be evaluated on how well they select personnel, identify test
equipment and bench stock requirements, and make other pre-deploying arrangements as need before
going on mission.
Performance Measures
GO
NO-GO
1. Monitored assigned personnel according to their qualifications and availability.
——
——
2. Arranged for transportation to the site.
——
——
3. Briefed the support team on mission requirements.
——
——
4. Provided technical assistance to the support team as required.
——
——
5. Ensured that all maintenance forms were filled out correctly.
——
——
Evaluation Guidance: Score the Soldier GO if all performance measures are passed (P). Score the
Soldier NO-GO if any performance measure is failed (F). If the Soldier fails any performance measure,
show what was done wrong and how to do it correctly.
References
Required
DA PAM 611-21
DA PAM 738-751
DA PAM 750-8
FM 3-25.26
FM 4-30.3
3-208
Related
STP 9-94H13-SM-TG
9 September 2011
MOS/Skill Level Tasks
Inspect Maintenance Reporting and Management Data
093-SSG-3020
Conditions: As a senior repairer, one of your responsibilities is to inspect the paperwork used in an
electronics/avionics maintenance facility. In an operational environment (OE), you must inspect and
manage all of the maintenance forms and records used in reporting the maintenance status of
equipment repaired in the maintenance facility. If needed, the following forms, records, and publications
will be available for each piece of equipment job-ordered: DA Form 2404 (Equipment Inspection and
Maintenance Worksheet), DA Form 2405 (Maintenance Request Register), DA Form 2408-12 (Army
Aviator's Flight Record), DA Form 2408-13 (Aircraft Status Information Record), DA Form 2408-13-1
(Aircraft Maintenance and Inspection Record), DA Form 2410 (Component Removal and
Repair/Overhaul Record), Department of Defense (DD) Form 1574 (Serviceable Tag - Materiel), DD
Form 1574-1 (Serviceable Label - Materiel), DD Form 1575 (Suspended Tag - Materiel), DD Form 15751 (Suspended Label - Materiel), DD Form 1576 (Test/Modification Tag - Materiel), DD Form 1576-1
(Test/Modification Label - Materiel), DD Form 1577 (Unserviceable (Condemned) Tag - Materiel), DD
Form 1577-1 (Unserviceable (Condemned) Label - Materiel), DD Form 1577-2 (Unserviceable
(Reparable) Tag - Materiel), DD Form 1577-3 (Unserviceable (Reparable) Label - Materiel), DA
Pamphlet 750-8, and DA Pamphlet 738-751.
Standards: Inspect the electronics/avionics maintenance forms and records for errors and forms
missing from the job packets.
Performance Steps
1. Locate closed-out and active job order packets within the electronics/avionics maintenance facility.
2. Match all job-ordered equipment serial numbers with closed-out and active job packets within the
electronics/avionics maintenance facility.
3. Ensure that all required forms and records are inside the job order packets.
4. Verify that all forms and records within the job packets are properly completed.
5. Ensure that all listed discrepancies been corrected.
6. Ensure that all forms and reports are distributed or filed in accordance with DA pamphlets and Army
regulations.
Evaluation Preparation: Ensure all items required in the condition statement (or appropriate
substitutions) are on hand and all safety requirements are met.
GO
NO-GO
1. Located closed-out and active job order packets within the electronics/avionics
maintenance facility.
——
——
2. Matched all job-ordered equipment serial numbers with closed-out and active job
packets within the electronics/avionics maintenance facility.
——
——
3. Ensured that all required forms and records were in the job order packets.
——
——
4. Verified that all forms and records within the job packets were properly
completed.
——
——
5. Ensured that all discrepancies had been corrected.
——
——
6. Ensured that all forms and reports were distributed or filed in accordance with DA
pamphlets and Army regulations.
——
——
Performance Measures
9 September 2011
STP 9-94H13-SM-TG
3-209
Chapter 3
Evaluation Guidance: Score the Soldier GO if all performance measures are passed (P). Score the
Soldier NO-GO if any performance measure is failed (F). If the Soldier fails any performance measure,
show what was done wrong and how to do it correctly.
References
Required
DA FORM 2404
DA FORM 2405
DA FORM 2408-12
DA FORM 2408-13
DA FORM 2408-13-1
DA FORM 2410
DA PAM 738-751
DA PAM 750-8
DD FORM 1574
DD FORM 1574-1
DD FORM 1575
DD FORM 1575-1
DD FORM 1576
DD FORM 1576-1
DD FORM 1577
DD FORM 1577-1
DD FORM 1577-2
DD FORM 1577-3
3-210
Related
FM 4-30.3
STP 9-94H13-SM-TG
9 September 2011
MOS/Skill Level Tasks
Review SAMS Reports
093-SSG-3021
Conditions: In an operational environment (OE), perform this task given Standard Army Maintenance
System (SAMS) installed, completed set of required SAMS reports and forms, Automated Information
System Manual (AISM) 25-L21-AHN-ZZZ-EM, AISM 25-L26-AHO-ZZZ-EM, Department of the Army
(DA) Pamphlet 750-8, DA Pamphlet 738-751, and Field Manual (FM) 4-30.3.
Note: This task may be performed in a chemical, biological, radiological, and nuclear (CBRN)
environment.
Standards: Review all required SAMS-1E reports and forms and correct discrepancies according to
AISM 25-L21-AHN-ZZZ-EM and DA Pamphlet 750-8 or DA Pamphlet 738-751. File all reports properly
and forward copies, as required.
Performance Steps
1. Ensure that the electronics/avionics maintenance operations are using all of the required SAMS-1
reports and forms.
2. Review all of the new copies of all SAMS-1 reports and forms needed to run the electronics/avionics
maintenance operations.
3. Compare previous and newly printed SAMS-1 reports and forms for discrepancies.
4. Review the new SAMS-1 reports and forms for discrepancies.
5. Correct all identified discrepancies.
6. Ensure that all SAMS-1 reports and forms are distributed or filed in accordance with Army
regulations.
Evaluation Preparation: Ensure all items required in the condition statement (or appropriate
substitutions) are on hand and all safety requirements are met.
Performance Measures
GO
NO-GO
1. Ensured that all required SAMS-1 reports and forms required for
electronics/avionics maintenance operations were being used.
——
——
2. Reviewed new copies of all SAMS-1 reports and forms needed to run the
electronics/avionics maintenance operations.
——
——
3. Compared the previous SAMS-1 reports and forms with the newly printed reports
and forms for discrepancies.
——
——
4. Reviewed the new SAMS-1 reports and forms for discrepancies.
——
——
5. Corrected all identified discrepancies.
——
——
6. Ensured that all SAMS-1 reports and forms were distributed or filed in accordance
with Army regulations.
——
——
Evaluation Guidance: Score the Soldier GO if all performance measures are passed (P). Score the
Soldier NO-GO if any performance measure is failed (F). If the Soldier fails any performance measure,
show what was done wrong and how to do it correctly.
References
Required
Related
AISM 25-L21-AHO-ZZZ-EM
AISM 25-L26-AHO-ZZZ-EM
DA PAM 738-751
DA PAM 750-8
FM 4-30.3
9 September 2011
STP 9-94H13-SM-TG
3-211
This page intentionally left blank.
GLOSSARY
Section I - Acronyms & Abbreviations
AAR
After Action Review; After Action Report
AC (3)
alternating current
ACCP
Army Correspondence Course Program
AIPD
Army Institute for Professional Development
AISM
Automated Information Systems Manual
AIT
Advanced Individual Training
ALC(1)
Advanced Leaders Course
AM
amplitude modulation
AMCOM
Aviation and Missile Command
AMDF
Army Master Data File
AN
annually
AR
Army regulation
ARTEP
Army Training and Evaluation Program
ASL
authorized stockage list
BA
biannually
BCT
basic combat training; brigade combat team; battle coordination team
BDAR
battlefield damage assessment repair
BII
basic issue items
BW
biweekly
CALSET
Calibration Set
CBRN (1)
chemical, biological, radiological, and nuclear
CBU (1)
calibrate before use
CCI
controlled cryptographic item
CCW
counterclockwise
CLT (1)
common logistic task
9 September 2011
STP 9-94H13-SM-TG
Glossary-1
Glossary
CNR
calibration not required
COMSEC
communications security
CTS
Contact Test Set
CTT
common task test
DA
Department of the Army
DA Form
Department of the Army Form
DA Label
Department of the Army Label
DA PAM
Department of the Army Pamphlet
DC (1)
direct current
DD Form
Department of Defense Form
DOD
Department of Defense
DODAAC
Department of Defense Activity Address Code
DS
direct support
DVC
device
EIR
equipment improvement recommendation
ELSEC
electronic security
F
fail; failed
FEDLOG
Federal Logistics
FM
field manual; flare multiunit; force module; frequency-modulated;
frequency modulation
FM (1)
field manual
Freq
frequency
HQ
Headquarters
IAW
In Accordance With
IBM
International Business Machines
ICE
Integrated Calibration Environment
ID
identification
IMPL
initial mandatory parts list
IMRF
Instrument Master Record File
Glossary-2
STP 9-94H13-SM-TG
9 September 2011
Glossary
LED
light emitting diode
MAC
Maintenance Allocation Chart
MCP
maintenance collection point
MDS (1)
mission, design, and series
METL
mission essential task list
MO
monthly
MOS
military occupational specialty
MSC (2)
major subordinate command
MSD
maintenance support device
MST
maintenance support team
MTP
mission training plan
MWO
modification work order
N (2)
Neutral
NCO
noncommissioned officer
NCOER
Noncommissioned Officer Evaluation Report
NIIN
national item identification number
NMP
national maintenance point
NSN
national stock number
OPORD
operations order
OE
operational environment
P
pass; passed
PDS
Pressure Distribution System
PLL
Prescribed Load List
PMCS
preventive maintenance checks and services
PN
part number
PPS
pneumatic pressure standard
QDR
Quality Deficiency Report
QMP
Qualitative Management Program
9 September 2011
STP 9-94H13-SM-TG
Glossary-3
Glossary
QT
quarterly
R
Reverse
RADIAC
Radiation detection, indication, and computation
RDL
Reimer Digital Library
RF
radio frequency
RO/ROP
reorder/reorder point
ROP
reorder point
SA (2)
semiannually
SAMS-1
Standard Army Maintenance System-Level 1
SAMS-2
Standard Army Maintenance System-Level 2
SARSS-O
Standard Army Retail Supply System-Objective
SASO
stability and support operations
SF
standard form
SFDLR
stock funding of depot level repairables
SIGSEC
signal security
SL
skill level
SLAC (1)
Support List Allowance Card
SLC(1)
Senior Leaders Course
SM
Soldier's Manual
SMCT
Soldier's Manual of Common Tasks
SOF (1)
safety of flight
SOP
standing operating procedure
SPORT
Soldier's Portable On-System Repair Tool
SSA
Supply Support Activity
SSG (1)
staff sergeant
STE/ICE-R
Simplified Test Equipment for Internal Combustion Engine,
Reprogrammable
STP
Soldier Training Publication
Glossary-4
STP 9-94H13-SM-TG
9 September 2011
Glossary
TAMMS
The Army Maintenance Management System
TB
technical bulletin
TB MED
technical bulletin (medical)
TC (1)
training circular
TG
Trainer's Guide
TI
technical inspection
TIMMS
TMDE Integrated Material Management System
TM
technical manual
TMDE
test, measurement, and diagnostic equipment
TNG
training
TRADOC
Training and Doctrine Command
UIC
unit identification code
ULLS-G
Unit Level Logistics System-Ground
UMCP
unit maintenance collection point
UND
urgency of need designator
UNIT
Trained in the Unit
U.S.
United States
USACASCOM
United States Army Combined Arms Support Command
USAOMEMS
US Army Ordnance Munitions and Electronics Maintenance School
USATA
United States Army Test, Measurement, and Diagnostic Equipment
Activity
UUT
unit under test
WK
weekly
Section II - Terms
Army Training and Evaluation Program (1)
The ARTEP is the cornerstone of unit training. It is the umbrella program used by the trainer and
training manager in the training evaluation of units. The ARTEP is a complete program that enables
commanders to evaluate and develop collective training based on unit weaknesses, then train the unit to
overcome those weaknesses and reevaluate. Success on the battlefield depends on the coordinated
performance of collective and individual skills that are taught through the ARTEP mission training plan
(MTP).
9 September 2011
STP 9-94H13-SM-TG
Glossary-5
Glossary
cross training
The systematic training of Soldiers on tasks related to another duty position.
DD Form
Department of the Defense Form.
duty position
Duty positions are determined by military occupational specialties (MOSs), which are subdivided into
five major skill levels (SLs). These SLs are further subdivided into related individual tasks which identify
a Soldier's SL or job.
Evaluation guide
The section of the task summary in a Soldier's manual that lists pass/fail performance measures for
evaluating the Soldier's performance on the task.
FED LOG
The logistics information system published by the Defense Logistics Information Service (DLIS). FED
LOG contains information on more than 7 million stock numbers and 12 million part numbers. Updated
monthly, FED LOG is available in CD-ROM or DVD format.
GO/NO-GO
This is a pass-fail criterion of evaluation whereby the Soldier cannot be "partially correct." The Soldier
either meets the standard or does not meet the standard.
Individual training
Training that prepares the Soldier to perform specified duties or tasks related to assigned duty position
or subsequent duty positions and skill level.
merger training
Training that prepares an NCO to supervise one or more different MOSs at lower skill levels when the
Soldier advances in skill level in his career management field.
military occupational specialty
A group of similar duty positions.
mission essential task list (METL)
A compilation of collective mission essential tasks that must be successfully performed if an organization
is to accomplish its wartime missions.
MOS technical task
A task related to your duty position and skill level.
performance measure
Action or resulting product that determines if the Soldier has performed a task correctly.
R (1)
Reverse
SAMS1 (1)
Software package designed to manage maintenance operations, including work order registration, repair
parts, stockage and requisition, manpower utilization, and readiness reporting.
Glossary-6
STP 9-94H13-SM-TG
9 September 2011
Glossary
skill level
Identifies task proficiency, or ability typically required for successful performance at the grade with which
the skill level is associated. The skill levels by grade are shown as follows: Skill levels => 1 2 3 4 5;
Enlisted - E 1/2, 3/4, 5, 6, 7, 8/9; Warrant - W 1/2, 3, 4, 5; Officers - O 1/2, 3, 4, 5, 6.
skill qualification test
A test of the Soldier's ability to perform the tasks in a Soldier's manual. This test has been replaced by
the self-development test.
Soldier's Manual
An STP listing of critical tasks for each SL in a particular MOS.
task
A clearly defined and measurable activity accomplished by individuals and organizations. It is the lowest
behavioral level in a job or unit that is performed for its own sake. It must be specific; usually has a
definite beginning and ending; may support or be supported by other tasks; has only one action and,
therefore, is described using only one verb; generally is performed in a relatively short time (however,
there may be no time limit or there may be a specific time limit); and it must be observable and
measurable. The task title must contain an action verb and object and may contain a qualifier.
trainer's guide
A publication that covers the information needed by your commander, training manager, and trainer to
plan, conduct, and evaluate training in your MOS. There is a trainer's guide for each MOS.
train-up
The opportunity for an individual to train to a higher skill level in his or her MOS or CMF; certification
may be involved.
9 September 2011
STP 9-94H13-SM-TG
Glossary-7
This page intentionally left blank.
REFERENCES
Required Publications
Required publications are sources that users must read in order to understand or to comply with this
publication.
Army Regulations
AR 25-2
AR 25-400-2
AR 40-5
AR 95-1
AR 190-13
AR 190-51
AR 380-5
AR 380-40
AR 385-10
AR 600-8-2
AR 614-200
AR 623-3
AR 635-200
AR 672-20
AR 700-68
AR 710-2
AR 725-50
AR 750-1
AR 750-43
Information Assurance, 24 October 2007.
The Army Records Information Management System (ARIMS), 2
October 2007.
Preventive Medicine, 25 May 2007.
Flight Regulations, 12 November 2008.
The Army Physical Security Program, 25 February 2011.
Security of Unclassified Army Property (Sensitive and Nonsensitive), 30
September 1993.
Department of the Army Information Security Program, 29 September
2000.
Policy for Safeguarding and Controlling Communications Security
(COMSEC) Material, 30 June 2000.
The Army Safety Program, 27 August 2007.
Suspension of Favorable Personnel Actions (Flags), 23 December
2004.
Enlisted Assignments and Utilization Management, 26 February 2009.
Evaluation Reporting System, 10 August 2007.
Active Duty Enlisted Administrative Separations, 6 June 2005.
Incentive Awards, 29 January 1999.
Storage and Handling of Liquefied and Gaseous Compressed Gasses
and their full and empty Cylinders, 16 June 2000.
Supply Policy Below the National Level, 28 March 2008.
Requisition, Receipt, and Issue System, 15 November 1995.
Army Materiel Maintenance Policy, 20 September 2007.
Army Test, Measurement, and Diagnostic Equipment, 3 November
2006.
Department of the Army Forms
DA Forms are available on the Army Publishing Directorate web site (www.apd.army.mil)
DA FORM 1687
DA FORM 2028
DA FORM 2062
DA FORM 2063-R
DA FORM 2064
DA FORM 2404
DA FORM 2405
DA FORM 2408-12
DA FORM 2408-13
DA FORM 2408-13-1
DA FORM 2408-14
DA FORM 2410
9 September 2011
Notice of Delegation of Authority-Receipt for Supplies.
Recommended Changes to Publications and Blank Forms.
Hand Receipt/Annex Number.
Prescribed Load List.
Document Register for Supply Actions.
Equipment Inspection and Maintenance Worksheet.
Maintenance Request Register.
Army Aviator's Flight Record.
Aircraft Status Information Record.
Aircraft Inspection and Maintenance Record.
Uncorrected Fault Record.
Component Removal and Repair/Overhaul Record.
STP 9-94H13-SM-TG
References-1
References
DA FORM 2417
DA FORM 3318
DA FORM 3758-R
DA FORM 5164-R
DA FORM 5165-R
DA FORM 5988-E
DA FORM 5990-E
DA FORM 7372
DA LABEL 163
DA LABEL 80
U.S. Army Calibration System Rejected Instrument.
Records of Demands - Title Insert.
Calibration and Repair Requirements Worksheet.
Hands-On Evaluation.
Field Expedient Squad Book.
Equipment Inspection and Maintenance Worksheet.
Maintenance Request.
TMDE Calibration and Repair Data.
US Army Limited or Special Calibration.
US Army Calibrated Instrument.
Department of Defense
DD Forms are available on the OSD web site
(http://www.dtic.mil/whs/directives/infomgt/forms/formsprogram.htm).
DD FORM 314
DD FORM 1574
DD FORM 1574-1
DD FORM 1575
DD FORM 1575-1
DD FORM 1576
DD FORM 1576-1
DD FORM 1577
DD FORM 1577-1
DD FORM 1577-2
DD FORM 1577-3
DD FORM 2332
Preventive Maintenance Schedule and Record.
Serviceable Tag – Materiel.
Serviceable Label – Materiel.
Suspended Tag – Materiel.
Suspended Label – Materiel.
Test/Modification Tag – Materiel.
Test/Modification Label – Materiel.
Unserviceable (Condemned) Tag – Materiel.
Unserviceable (Condemned) Label – Materiel.
Unserviceable (Repairable) Tag – Materiel.
Unserviceable (Repairable) Label – Materiel.
Product Quality Deficiency Report Exhibit.
General Service Administration Forms
Standard Forms (SF) are available from the GSA web site (http://www.gsa.gov/portal/forms/type/SF).
SF 368
Product Quality Deficiency Report.
Department of the Army Pamphlets
DA PAM 40-501
Hearing Conservation Program, 10 December 1998.
DA PAM 190-51
Risk Analysis for Army Property, 30 September 1993.
DA PAM 385-1
Small Unit Safety Officer/NCO Guide, 10 November 2008.
DA PAM 600-8
Management and Administrative Procedures, 1 August 1986.
DA PAM 600-67
Effective Writing for Army Leaders, 2 June 1986.
DA PAM 611-21
Military Occupational Classification and Structure, 22 January 2007.
DA PAM 708-2
Cataloging and Supply Management Data Procedures for the Army
Central Logistics Data Bank, 23 May 2008.
DA PAM 710-2-1
Using Unit Supply System (Manual Procedures), 31 December 1997.
DA PAM 710-2-2
Supply Support Activity Supply System: Manual Procedures, 30
September 1998.
DA PAM 738-751
Functional Users Manual for the Army Maintenance Management
System-Aviation (TAMMS-A), 15 March 1999.
DA PAM 750-3
Soldiers' Guide for Field Maintenance Operations, 29 September 2006.
DA PAM 750-8
The Army Maintenance Management System (TAMMS) Users Manual,
22 August 2005.
References-2
STP 9-94H13-SM-TG
9 September 2011
References
Field Manuals
FM 1-02
FM 3-25.26
FM 3-34.170
FM 4-30.3
FM 4-30.31
FM 5-0
FM 5-19
FM 6-22.5
Other Product Types
10 CFR 19
10 CFR 20
10 CFR 21
683XXC
AEROFLEX J-1601A
AEROFLEX TS-4317 MM
AEROFLEX TS-4317 OM
AGILENT 33250A
AGILENT 3458A
AGILENT 54830
AISM 25-L21-AHO-ZZZ-EM
AISM 25-L26-AHO-ZZZ-EM
AISM-25-L26-AHO-ZZZ-EM
ANRITSU 682XXB/683XXB
BIRD MODEL 4421
CECOM TR 98-6
DHI RPM3
DRUCK DPI-145
DVC 08-15
9 September 2011
Operational Terms and Graphics (INCL C1), 21 September 2004.
Map Reading and Land Navigation, 18 January 2005.
Engineer Reconnaissance, 25 March 2008.
Maintenance Operations and Procedures, 28 July 2004.
Recovery and Battle Damage Assessment and Repair, 19 September
2006.
The Operations Process (INCL C1), 26 March 2010.
Composite Risk Management, 21 August 2006.
Combat and Operational Stress Control Manual for Leaders and
Soldiers, 18 March 2009.
US Code of Federal Regulation, Title 10 (Energy) and Part 19 (Notices,
Instructions and Reports to Workers: Inspection and Investigations), 1
January 2003.
US Code of Federal Regulation, Title 10 (Energy) and Part 20
(Standards for Protection Against Radiation), 1 January 2003.
US Code of Federal Regulation, Title 10 (Energy) and Part 21
(Reporting of Defects and Noncompliance), 1 January 2003.
Synthesized High Performance Signal Generator (Operation Manual), 2
April 2001.
Test Adapter J-1601A / RPM-001 Maintenance Manual, 1 January
2004.
Communications Service Monitor TS-4317 Maintenance Manual 10027850-4PO, 1 January 2004.
Communications Service Monitor TS-4317 Operation Manual 10027850-2PO, 1 January 2003.
Agilent 33250A, 80 MHz Function Arbitrary Waveform Generator User's Guide, 2 March 2003.
Agilent Technologies 3458A Multimeter - User Guide.
Agilent Model 54830 Series Oscilloscopes - Service Guide, 1 August
2004.
Standard Army Maintenance System - Enhanced (SAMS-1E) End User
Manual, 5 August 2010.
Standard Army Maintenance System - Enhanced (SAMS-2E) End User
Manual, 5 August 2010.
SAMS-2E End User Manual, 5 August 2010.
Anritsu - Series 682XXB/683XXB Synthesized Signal Generators
Operation Manual, 1 August 1999.
Instruction Book Thruline RF Power Meter Model 4421 and Thruline
Directional RF Power Sensors 4020 Series, 4027A Series, 4027F
Series, and 4028 Series, 1 January 2006.
Earth Grounding and Bonding Pamphlet, 1 October 1998.
RPM3(TM) Reference Pressure Monitor Operation and Maintenance
Manual, 1 January 2002.
Multifunction Pressure Calibrator DPI 145 User Manual, 17 February
1998.
Manikin, Resuscitation Training.
STP 9-94H13-SM-TG
References-3
References
EM 0007
(O) FEDLOG (S&I, COMMANDER, USAMC LOGISTICS SUPPORT
ACTIVITY, ATTN: AMXLS-MD, (A. LEWIS) BLDG 5307, REDSTONE
ARSENAL, AL 35898-7466), 1 May 2009.
ET6000-SERIES
Symmetricom User's Guide for ET6000, ET6010, ET6500 ExacTime
GPS Time Code and Frequency Generator.
FLUKE 5700A/5720A
Operators Manual for FLUKE 5700A/5720A Series II Multi-Function
Calibrator, 1 March 2005.
FLUKE 5725A
Instructional Manual for FLUKE 5725A Amplifier, 1 January 2009.
FLUKE 5820A
Operators Manual for FLUKE 5820A Oscilloscope Calibrator, 1 April
2003.
HEWLETT-PACKARD 5345A Hewlett Packard Operating and Service Manual for Electronic Counter
5345A.
HP 8153A
HP 8153A Lightwave Multimeter, Operating and Programming Manual,
1 September 1999.
HP 8902A
HP 8902A Measuring Receiver; Basic Operation and Application Guide.
HP437B
Power Meter, Service Manual, 1 June 1988.
MIL-STD-101B
Color Code for Pipelines and Compressed Gas Cylinders, 3 December
1970.
MODEL 9210
Programmable Pulse Generator, 1 March 1995.
MPC1-1000 AND MPC1-3000 MPC1-1000 AND MPC1-3000 User's Manual, 1 January 2001.
NRC FORM 3
U.S. Nuclear Regulatory Commission, Washington, DC 20555-0001,
Notice To Employees, Standards for Protection against Radiation (Part
20); Notices, Instructions and Reports to Workers: Inspections (Part 19):
Employees Protection, 1 May 2005.
NRC REGULATORY GUIDE 8.13
U.S. Nuclear Regulatory Commission, Regulatory Guide, Office
of Nuclear Regulatory Research, Regulatory Guide 8.13, Instruction
Concerning Prenatal Radiation Exposure, 1 June 1999.
NRC REGULATORY GUIDE 8.29
U.S. Nuclear Regulatory Commission Regulatory Guide Office
of Nuclear Regulatory Research, Regulatory Guide 8.29, Instruction
Concerning Risks from Occupational Exposure, 1 February 1996.
PPM INSTRUMENTS R1L-CR PPM Instruments Model R1L-CR Instruction Manual, 1 August 2004.
PPM INSTRUMENTS R1M-AR PPM Instruments Model R1M-AR Instruction Manual, 1 August 2004.
THERMACAL INC MODEL 28 Use and Maintenance Manual Model 28 Calibration Cool / Heat Source
(NSN 6695-01-359-4465), 1 May 1994.
TIMMS USERS GUIDE
Unit Standing Operating Procedure (SOP), 1 December 1999.
USATA MASTER LIST
United States Army TMDE Activity (USATA) Calibration Procedures
Master List, Updated quarterly, 1 April 2009.
USATA SOP 702-1
Quality Assurance Program for Metrology and Calibration Operations, 9
January 2006.
WAYNE KERR ELECTRONICS Precision Component Analyzer 6425B Operating Instructions Manual, 1
January 1990.
Soldier Training Publications
STP 21-1-SMCT
Soldier's Manual of Common Tasks Skill Level 1, 2 May 2011.
STP 21-24-SMCT
Soldier's Manual of Common Tasks (SMCT) Skill Levels 2-4, 9
September 2008.
Technical Bulletins
TB 11-6625-3263-25
TB 11-6665-227-12
References-4
Test Equipment Modernization (TEMOD) Program Guide and
Replacement Lists, 12 September 2000.
Safe Handling, Storage, and Transportation of Calibrator Set, RADIAC,
AN/UDM-2 (NSN 6625-00-179-9037), 1 June 1986.
STP 9-94H13-SM-TG
9 September 2011
References
TB 385-4
TB 43-0001-62-08-3
TB 43-0002-SERIES
TB 43-180
TB 750-25
TB 9-4920-454-24
TB 9-4920-459-24
TB 9-4931-523-24
TB 9-4931-537-24
TB 9-5120-202-24
TB 9-5210-204-24
TB 9-5210-207-24
TB 9-5210-208-24
TB 9-5210-209-24
TB 9-6625-1932-24
TB 9-6625-2182-24
TB 9-6625-2190-24
TB 9-6625-2285-24
TB 9-6625-2296-24
TB 9-6625-2297-24
TB 9-6625-2309-24
TB 9-6625-2322-24
TB 9-6625-2323-24
TB 9-6625-2331-24
TB 9-6625-2337-24
9 September 2011
Safety Requirements for Maintenance of Electrical and Electronic
Equipment, 1 July 2008.
Equipment Improvement Report and Maintenance Digest for TACOM
Life Cycle Management Command (July through September 2008 -3rd
QTR CY08), 30 November 2008.
Maintenance Expenditure Limits for various FSC Groups.
Calibration and Repair Requirements for the Maintenance of Army
Materiel, 1 July 2011.
Maintenance of Supplies and Equipment: Army Test, Measurement and
Diagnostic Equipment (TMDE) Calibration and Repair Support (C&RS)
Program, 7 October 2008.
Calibration Procedure for Tester, Exhaust Gas Temperature, Howell
Instruments, Inc., Model BH112JB-(), 26 June 2008.
Calibration Procedure for Pitot and Static Systems Tester DRUCK,
Model TS-4463()/P, 2 September 2010.
Calibration Procedure for Attenuators, Fixed and Variable (10 MHz to
40 GHz) (General), 30 March 2010.
Calibration Procedure for Cross-Checks, Intercomparisons, and Visual
Inspections, 20 January 2009.
Calibration Procedure for Torque Wrenches and Torque Screwdrivers
(General), 25 February 2011.
Calibration Procedure for Micrometer Caliper, Type I, Class 1, Style A,
B, C and D and Type 1 Class 2, Style A, B, and C (GGG-C-105) and
(GGG-C-105B), 23 August 2010.
Calibration Procedure for Micrometers, Inside (General), 20 February
2009.
Calibration Procedure for Vernier Calipers, Types 1, Classes 1, 2, and 3
Digital and Dial Calipers, 1 April 2011.
Calibration Procedure for Depth Gages (General), 18 June 2008.
Calibration Procedure for Power Sensors and Thermistor Mounts 10
MHZ to 40 GHZ (General), 30 July 2008.
Calibration Procedure for Signal Generator, SG-1207/U (HewlettPackard, Model 8642M), 2 July 2008.
Calibration Procedure for Digital Multimeters AN/PSM-45A (Fluke
27/FM) and Fluke, Models 27 and 27/AN and High Voltage Probe,
Fluke, Type 80K-6, 17 December 2009.
Calibration Procedure for Fuel Quantity System Test Set SIMMONDS
Precision/JC Air, Model PSD 60-1AF, 11 August 2009.
Calibration Procedure for Radio Test Set AN/GRM-114B, AN/GRM-122
and TS-4317/GRM, 17 June 2010.
Calibration Procedure for Power Meter Hewlett-Packard AGILENT,
Model 437B, 8 November 2007.
Calibration Procedure Manual for Optical Fiber Test Set, TS-4320(P)/G,
12 December 2007.
Calibration Procedure for Signal Generator Wiltron, Model 68347M, 1
July 2008.
Calibration Procedure for Signal Generator ANRITSU, Model 68369NV,
31 March 2011.
Calibration Procedure for Electronic Counter Fluke, Model PM6681/656,
18 December 2008.
Calibration Procedure for Transponder Test Set Model AN/UPM-155, 23
December 2008.
STP 9-94H13-SM-TG
References-5
References
TB 9-6625-2339-24
TB 9-6625-2344-24
TB 9-6625-2355-24
TB 9-6635-203-24
TB 9-6670-251-24
TB 9-6685-314-24
TB 9-6685-319-24
TB 9-6685-327-35
TB MED 523
TB MED 524
Technical Manuals
TM 11-5820-1118-12&P
TM 11-6625-3135-40
TM 11-6625-3165-14
TM 11-6625-3244-12
TM 11-6625-3244-40
TM 11-6625-3245-40
TM 11-6625-3250-12
TM 11-6625-3271-12
TM 11-6625-3271-40
TM 3-6665-312-30&P
References-6
Calibration Procedure for Spectrum, Analyzer AN/USM-677 (Agilent,
Model E4407B-H76) and Agilent Models E4407B, E4407B-E57,
E4407B-H57, and E4407B-1D51DR, 16 July 2010.
Calibration Procedure for Oscilloscope OS-303/G, 10 October 2007.
Calibration Procedure for Radar Test Set, TS-4530()/UPM (JCAIR Part
Number: 50-1045-70), 7 August 2009.
Calibration Procedure for Dial Indicating Tensiometers MIL-T-38760, 8
July 2008.
Calibration Procedure for Resiliency Testers (General), 29 August 2008.
Calibration Procedure for Self-Indicating Thermometers (Celsius and
Fahrenheit), 26 August 2008.
Calibration Procedure for Dial Indicating Pressure Gages Hydraulic 0100, 7 April 2011.
Calibration Procedure for Vacuum and Pressure Gages (0 to 120
Inches of Water), 3 April 1989.
Control of Hazards to Health from Microwave and Radio Frequency
Radiation and Ultrasound, 15 July 1980.
Occupational and Environmental Health: Control of Hazards to Health
from Laser Radiation, 31 January 2006.
Operator's and Unit Maintenance Manual Including Repair Parts and
Special Tools List for Grounding Kit, MK-2551A/U (NSN 5820-01-2631760) (EIC: N/A), 1 May 1994.
General Support Maintenance Manual for Oscilloscope AN/USM-488
(NSN 6625-01-187-7847) (EIC: KNQ), 15 October 1986.
Operator's, Organizational, Direct Support, and General Support
Maintenance Manual for Signal Generator SG-1207/U (Hewlett-Packard
Model 8642M) (NSN 6625-01-233-8615), 1 March 1987.
Operator's and Unit Maintenance Manual for Radio Test Set TS4317/GRM (NSN 6625-01-309-2825) (EIC: N/A) (TM 09311A-12/1), 15
May 2001.
General Support Maintenance Manual for Radio Test Set TS4317/GRM (NSN 6625-01-309-2825) (EIC: N/A) (TM 09311A-40/2), 6
November 2006.
General Support Maintenance Manual for Radio Test Set AN/GRM114B (NSN 6625-01-309-2824) (EIC: N/A) TM 09419A-40/2, 5 April
1994.
Operator's and Unit Maintenance Manual for Spectrum Analyzer
AN/USM-489A (NSN 6625-01-259-1060) EE393-BZ-OMI-010/ANUSM489A, 1 January 1991.
Operator's and Unit Maintenance Manual for Optical Fiber Test Set TS4320(P)/G (NSN 6625-01-355-4087) (EIC: N/A), 15 September 1993.
Operator's and Organizational Maintenance Manual for Calibrator Set,
RADIAC, AN/UDM-2 (NSN 6665-00-179-9037) (Reprinted w/Basic Incl
C1-4), 1 May 1995.
Intermediate Direct Support Maintenance Manual (Including Repair
Parts and Special Tools List) for M8A1 Automatic Chemical Agent
Alarm Consisting of M43A1 Chemical Agent Automatic Alarm Detector
Unit, M42 Chemical Alarm Unit, and Auxiliary, 17 March 1985.
STP 9-94H13-SM-TG
9 September 2011
References
TM 3-6665-331-23&P
TM 3-6665-343-23&P
TM 43-4920-910-12
TM 43-4920-910-24P
TM 43-4920-910-40
TM 43-6625-912-12
TM 43-6625-914-12
TM 43-6625-915-12
TM 55-4920-401-13&P
TM 9-2320-260-10
TM 9-2320-280-10
TM 9-2320-303-10
TM 9-2320-364-10
TM 9-2320-365-10
TM 9-2320-366-10-1
TM 9-2320-366-10-2
TM 9-4910-571-12&P
9 September 2011
Unit and Direct Support Maintenance Manual (Including Repair Parts
and Special Tools List) for Chemical Agent Monitor System (CAM), 12
June 1992.
Unit and Direct Support Maintenance Manual (Including Repair Parts
and Special Tools List) for Improved Chemical Agent Monitor (ICAM)
(EIC: 5AB) (NSN 6665-01-357-8502), 9 June 1998.
Operator's and Unit Maintenance Manual for Tester, PITOT and Static
Systems TS-4463/P (NSN 4920-01-388-6790) (EIC: N/A) (Reprinted w/
Basic Incl C1), 5 March 1997.
Unit, Intermediate, Direct Support and General Support Maintenance
Repair Parts and Special Tools List for Tester, PITOT and Static
Systems TS-4463/P (NSN 4920-01-388-6790) (EIC: N/A), 30 January
1998.
General Support Maintenance Manual for Tester, PITOT and Static
Systems TS-4463/P (NSN 4920-01-388-6790) (EIC: N/A), 10 December
1997.
Operator's and Unit Maintenance Manual for Test Set, Radar AN/UPM155 (NSN 6625-01-307-0512) (EIC: N/A), 23 August 2000.
Operator's and Unit Maintenance Manual for Spectrum Analyzer,
AN/USM-677() NSN 6625-01-470-7545 (EIC N/A), 10 December 2002.
Operator's and Unit Maintenance Manual for Oscilloscope, OS-303/G
(NSN 6625-01-470-7541) (EIC: N/A), 12 March 2003.
Operator's, Aviation Unit and Aviation Intermediate Maintenance
Manual (Including Repair Parts and Special Tool Lists) for Tester,
Exhaust Gas Temperature, Model BH112JB-53, (NSN 4920-00-3724593) (BH112JB-53) (NSN 4920-01-209-0664), 15 November 1979.
Operator's Manual for Truck, 5-Ton, 6X6, M809 Series (Diesel): Truck,
Cargo: M813, M813A1 and M814; Truck, Bolster, Logging; M815;
Truck, Wrecker, Medium: M816; Truck, Dump: M817; Truck, Tractor:
M818; Truck, Tractor, Wrecker: M819; Truck, 14 June 1985.
Operator's Manual for Truck, Utility: Cargo/Troop Carrier, 1-1/4 Ton,
4X4, M998; M998A1; Truck, Utility: Cargo/Troop Carrier, 1-1/4 Ton,
4X4, w/Winch, M1038; M1038A1; Truck, Utility: Heavy Variant, 4X4,
M1097; M1097A1; M1097A2; Truck, Utility, 31 January 1996.
Operator's Manual For Truck Tractor, Line Haul; 52,000 GVWR, 6,
M915A4, 28 February 2007.
Operator's Manual for Truck, Tractor, M1074 and M1075 Palletized
Load System (PLS), 30 April 2009.
Operator's Instructions Manual for M1078 Series, 2-1/2 Ton, 4X4 Light
Medium Tactical Vehicles (LMTV) Truck, Car., LMTV, M1078 W/WN,
W/O WN; Truck, Van, LMTV, M1078 W/WN, W/O WN; Truck, Chas,
LMTV, M1080; Truck, Car., LMTV, LVAD, M1081 W/WN, 17 June 1998.
Operator's Instructions Manual For M1083 Series, 5-Ton, 6X6, Medium
Tactical Vehicles (MTV) Volume No. 1 OF 2 Truck, Car., MTV, M1083
W/WN, W/O WN; Truck, Car., MTV, W/Material Handling Equipment
(MHE) M1084; Truck, Car., MTV, LWB, M1085 W/, 15 September 1998.
Operator's Instructions Manual for M1083 Series, 5-Ton, 6X6, Medium
Tactical Vehicles (MTV) Volume No. 2 of 2 Truck, Car., MTV, M1083
W/WN, W/O WN; Truck, Car., MTV, W/Material Handling Equipment
(MHE) M1084; Truck, Car., MTV, LWB, M1085 W/, 15 September 1998.
Operator's and Organizational Maintenance Manual Including Repair
Parts and Special Tools List for Simplified Test Equipment for Internal
Combustion Engines (NSN 4910-01-124-2554), 25 March 1988.
STP 9-94H13-SM-TG
References-7
References
TM 9-4910-571-34&P
TM 9-4910-751-14&P
TM 9-4931-509-34P
TM 9-6625-2469-15
TM 9-6695-239-14
Training Circulars
TC 21-305-20
TC 43-4
Direct Support and General Support Maintenance Manual Including
Repair Parts and Special Tools List Simplified Test Equipment for
Internal Combustion Engines Reprogrammable (STE/ICE-R) (NSN
4910-01-222-6589), 17 February 1989.
Operator, Unit, Direct Support Maintenance Manual for Test Set, STEM1/FVS (NSN 6625-01-135-4389) (4910-01-135-4379) (4910-01-1422640), 28 May 1991.
Direct Support and General Support Maintenance Repair Parts and
Special Tools List for (Including DEPOT Maintenance Repair Parts and
Special Tools) for Mainframe Counter, Hewlett-Packard Model 5345A
(NSN 4931-01-039-4040); Frequency Plug-In, 30 May 1983.
Operator's Organizational, Direct Support, General Support and Depot
Maintenance Manual (Including Repair Parts List) for Power Meter
(Hewlett-Packard Model 432A (FSN 4931-436-4883) and Thermistor
Mount (Hewlett-Packard Model 478A), 22 December 1969.
Calibration Set, Secondary Transfer Standards, Model No. AN/GSM421() and AN/GSM-705() (NSN 6695-01-473-1469 and 6695-01-4731473), 1 April 2003.
Manual for the Wheeled Vehicle Driver, 1 July 2009.
Maintenance Management, 8 May 1996.
Related Publications
Related publications are sources of additional information. They are not required in order to understand
this publication.
Army Regulations
AR 5-12
AR 200-1
AR 702-7
AR 702-7-1
AR 710-3
Army Management of the Electromagnetic Spectrum, 1 October 1997.
Environmental Protection and Enhancement, 13 December 2007.
Product Quality Deficiency Report Program, 20 July 1993.
Reporting of Product Quality Deficiencies Within the US Army, 15 July
2009.
Inventory Management Asset and Transaction Reporting System, 28
March 2008.
Department of the Army Pamphlets
DA PAM 25-380-2
Security Procedures for Controlled Cryptographic Items, 10 January
1991.
DA PAM 750-1
Commanders' Maintenance Handbook, 2 February 2007.
Field Manuals
FM 4-25.11
Other Product Types
437B
EM 0103
References-8
First Aid, 23 December 2002.
Power Meter, Operating Manual, 6 January 1997.
TM 9-6625-2300-13&P Interactive Electronic Technical Manuals
(IETMs) for Test Set, Electronic Systems, AN/PSM-80 (This Product
Includes the Following Items), 31 January 2006.
STP 9-94H13-SM-TG
9 September 2011
References
HP 8902A CAL MANUAL
HP 8902A Measuring Receiver, Operation and Calibration Manual, 1
August 1987.
MANUFACTURER'S MANUAL MANUFACTURER'S MANUAL
Technical Bulletins
TB 43-0129
TB 9-6625-2321-24
Technical Manuals
TM 11-6665-227-12
TM 750-245-4
Training Circulars
TC 3-34.489
9 September 2011
Safety Requirements for Use of Antenna and Mast Equipment, 15 June
1986
Calibration Procedure for Digital Multimeter National Instruments, Model
DAQCARD-4050, 26 October 2007
Calibrator Set, Radiac, AN/UDM-2 (NSN 6665-00-179-9037), 13 June
1975.
Direct Support and General Support for Quality Control Inspector's
Inspection Criteria, 25 January 1971.
The Soldier and the Environment, 8 May 2001.
STP 9-94H13-SM-TG
References-9
This page intentionally left blank.
STP 9-94H14-SM-TG
9 September 2011
By Order of the Secretary of the Army:
RAYMOND T. ODIERNO
General, United States Army
Chief of Staff
Official:
JOYCE E. MORROW
Administrative Assistant to the
Secretary of the Army
1106204
DISTRIBUTION:
Active Army, Army National Guard, and U.S. Army Reserve: Not to be distributed;
electronic media only.
PIN: 100899-000