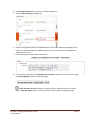
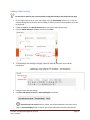
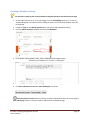
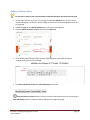
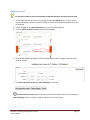
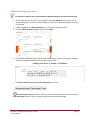
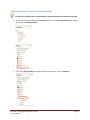
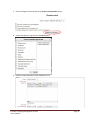
1
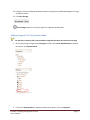
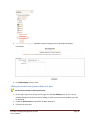
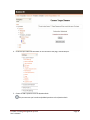
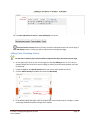
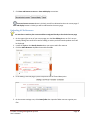
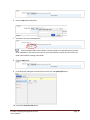
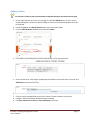
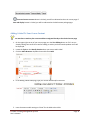
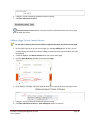
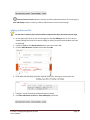
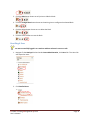
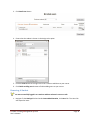
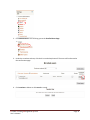
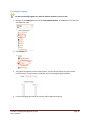
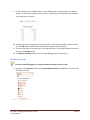
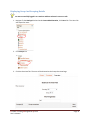
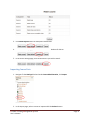
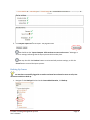
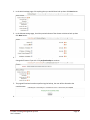
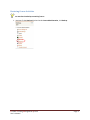
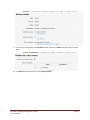
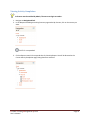
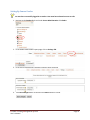
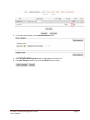
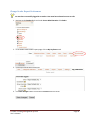
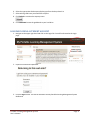
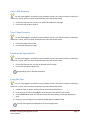
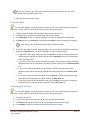
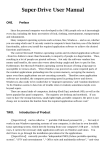
PORTABLE LEARNING MANAGEMENT SYSTEM USER’S MANUAL Contents PREFACE .................................................................................................................................................. 5 CONFIGURATION AND INSTALLATION...................................................................................................... 6 Four Steps to Producing a Moodle course with PLMS:.......................................................................... 6 Instructor Responsibilities ................................................................................................................... 6 Downloading PLMS .......................................................................................................................... 6 Extracting PLMS ............................................................................................................................... 7 Setting Up PLMS .............................................................................................................................. 8 Launching PLMS ............................................................................................................................... 9 Distribution Considerations ............................................................................................................. 9 Student's Guide Starting Moodle ....................................................................................................... 10 Stopping Moodle ........................................................................................................................... 10 LOGGING IN USING A TEACHER ACCOUNT ............................................................................................. 11 Adding A Course ................................................................................................................................ 11 Managing Assignments ...................................................................................................................... 13 Adding A Chat Activity ....................................................................................................................... 15 Presenting A Choice ........................................................................................................................... 16 Creating A Database Activity .............................................................................................................. 18 Allowing A Forum Activity .................................................................................................................. 19 Adding A Glossary Entry..................................................................................................................... 20 Adding A Lesson ................................................................................................................................ 21 Adding And Setting Up Quizzes .......................................................................................................... 22 Adding Questions To A Quiz............................................................................................................... 23 Adding Questions For Quiz Use (Question Bank) ................................................................................ 25 Adding Categories To The Question Bank........................................................................................... 27 Adding Questions From Question Bank In A Quiz ............................................................................... 28 Adding A Survey ................................................................................................................................ 30 Adding A SCROM Package Activity ..................................................................................................... 31 Adding A New Wiki Activity................................................................................................................ 32 Adding A New Workshop Activity ...................................................................................................... 33 Portable Learning Management System User’s Manual Page 2 Uploading A File Resource ................................................................................................................. 34 Adding A Folder ................................................................................................................................. 37 Adding An Ims Content Package To Your Course ................................................................................ 38 Adding A Label To Your Course Content ............................................................................................. 39 Adding A Page To Your Course Content.............................................................................................. 40 Adding An External URL ..................................................................................................................... 41 Adding A Block................................................................................................................................... 42 Managing Blocks................................................................................................................................ 42 Enrolling A User ................................................................................................................................. 43 Removing A Student .......................................................................................................................... 44 Creating Groupings ............................................................................................................................ 46 Modifying Groups .............................................................................................................................. 48 Displaying Group And Grouping Details ............................................................................................. 50 Removing Groups .............................................................................................................................. 51 Resetting Course ............................................................................................................................... 52 Importing Course Data....................................................................................................................... 53 Backing Up Course ............................................................................................................................. 55 Restoring Course Activities ................................................................................................................ 57 Enabling Course Completion .............................................................................................................. 60 Viewing Course Completion ............................................................................................................... 61 Viewing Activity Completion .............................................................................................................. 62 Setting Up Course Grades .................................................................................................................. 63 Creating Categories In Grades............................................................................................................ 64 Assigning Weights To Grade Items ..................................................................................................... 65 Changing An Aggregation Method ..................................................................................................... 66 Change Grader Report Preferences.................................................................................................... 68 View Grade Reports ........................................................................................................................... 69 Importing A Gradebook ..................................................................................................................... 70 Exporting A Gradebook ...................................................................................................................... 72 LOGGING IN USING A STUDENT ACCOUNT............................................................................................. 73 Viewing Grades.................................................................................................................................. 74 View A URL Resource ......................................................................................................................... 75 Portable Learning Management System User’s Manual Page 3 View A Page Resource ....................................................................................................................... 75 Download An Uploaded File............................................................................................................... 75 Using The Chat .................................................................................................................................. 75 Using The Wiki ................................................................................................................................... 76 Responding To A Survey .................................................................................................................... 76 Adding An Entry In The Glossary ........................................................................................................ 77 Using The Forum ............................................................................................................................... 77 ERROR MESSAGES ................................................................................................................................. 78 FAQs...................................................................................................................................................... 79 What is PLMS? ................................................................................................................................... 79 How can PLMS help you? ................................................................................................................... 79 What is Poodle?................................................................................................................................. 79 What applications are included in Poodle? ........................................................................................ 79 Portable Apps ................................................................................................................................ 79 Mozilla Firefox®, ............................................................................................................................ 79 Sumatra PDF Portable .................................................................................................................... 79 Moodle Start ................................................................................................................................. 79 How is PLMS distributed? .................................................................................................................. 79 How can I test PLMS? ........................................................................................................................ 79 Portable Learning Management System User’s Manual Page 4 PREFACE PLMS stands for Portable Learning Management System. It is a Moodle-based portable learning management system that organizes classroom information and learning activities even without Internet connectivity. It is a kind of information system that is transferable to multiple environments and manageable to a variety of infrastructure specifications using any USB flash drive. It is designed using pedagogical principles and aimed to help teachers develop innovative teaching and learning communities. PLMS is one of the deliverables of the research titled “ICT in Teacher Education in Region 7”. The research is authored by Dr. Dave E. Marcial and it was funded by the Commission on Higher Education through the Philippine Higher Education Research Network (PHERNet), facilitated by the Research and Development Center, Silliman University, Dumaguete City, Philippines. This manual is designed to help make PLMS easy to use. It is intended for new users with little or no experience using a Moodle-based learning management system. The goal of this document is to give a complete and comprehensive step-by-step instruction of the functions of PLMS. A PDF version of this manual is available at http://www.davemarcial.net/download.html. Every effort has been made to ensure that this document is an accurate representation of the functionality of PLMS. As with every software application, development continues after the documentation has gone to press so small inconsistencies may occur. We would appreciate any feedback on this manual. Send comments via email to [email protected]. Portable Learning Management System User’s Manual Page 5 CONFIGURATION AND INSTALLATION (adapted from Maflt.org) Four Steps to Producing a Moodle course with PLMS: 1. 2. 3. 4. Download the PLMS zip file from the website (this step requires an Internet connection). Download and/or create the desired course material. Configure the course on a local computer. Transfer the course to portable drives for distribution to the students. At this point, use of PLMS no longer requires an Internet Connection. Instructor Responsibilities 1. 2. 3. 4. 5. Download PLMS. Extract PLMS and set it up. Install the Moodle course material. Write student instructions that include specific course instructions. Copy the configured course to the remote drive for distribution to the students. Downloading PLMS 1. Go to the website http://www.davemarcial.net/download.html. Click the button Download PLMS. 2. Click Download to download PLMS-v1.rar. Don't worry about the warning message “Whoops! There was a problem with the preview”. This message is a notification from Google that the file cannot be viewed online. Portable Learning Management System User’s Manual Page 6 3. Click the button Download Anyway to finally download PLMS-v1.rar. Don't worry about the warning message “Google Drive can’t scan this file for viruses”. This message is a notification from Google that the file cannot be scanned online because PLMS exceeds the maximum size. You may scan the file once downloaded using your local virus scanner. Extracting PLMS 1. Go to the download location. 2. Double click PLMS-v1.rar. Portable Learning Management System User’s Manual Page 7 Note: Your computer must have installed WinRar. WinRar is a Windows data compression tool that focuses on the RAR and ZIP data compression formats for all Windows users. To download WinRar, go to www.win-rar.com/download.html. 3. Click Extract To button. 4. Specify a destination of your choice (Ex. C:\PLMS) 5. Wait until PLMS is fully extracted. Setting Up PLMS It is recommended that for best results, Moodle course must be installed and setup before transferring PLMS to the portable drive for distribution. This will require significantly less time than doing otherwise. However, the course material may also be edited on the portable drive without a major time penalty. Portable Learning Management System User’s Manual Page 8 Launching PLMS 1. Go to the folder that contains PLMS. 2. Double-click StartPortableApps.exe. 3. After the PortableApps menu opens, click Moodle Start. This starts Moodle inside of Firefox, Portable Edition. 4. During the Moodle startup procedure, two Windows Security Alert dialog boxes might appear. They ask if you want to allow other computers on your network to access this application. You may safely ignore them by choosing any of these options. ◦ Keep Blocking – Blocks access to the app from other network users ◦ Unblock – Allows access to the app from other network users ◦ Ask Me Later – Blocks access to the app, prompt appears every start 5. Login to PLMS using the login instructions given to you during your PLMS Training. Distribution Considerations Moodle, in its original form, is designed to work online. PLMS allows you use many of Moodle’s best features offline. However, doing so requires the instructor to make a distribution choice during configuration prior to transferring the course to portable drives. The PLMS is customized with two login accounts: 1. Teacher Account The Teacher account will allow users to create a new course, add and modify student account, and manage a course. 2. Student Account The Student account will allow users to update profile, and perform course activities. Portable Learning Management System User’s Manual Page 9 Student's Guide Starting Moodle 1. Connect the portable drive containing the course to your computer (e.g. Insert the USB Flash drive into your computer’s USB port) 2. Wait for the AutoPlay dialog to appear on the screen 3. Once it appears, either: o Double-click Start PortableApps, OR… o Select Start PortableApps Click OK 4. In the PortableApps menu, click Moodle Start 5. Once the processes start, Firefox-Portable Edition will launch and Moodle will display 6. Follow your instructor’s login directions 7. Follow your instructor’s course conduct directions Stopping Moodle 1. Close Firefox, Portable Edition 2. Wait for Moodle Start to exit 3. Exit PortableApps by clicking the X button in the lower right corner of the PortableApps menu 4. Remove the USB or other portable drive Portable Learning Management System User’s Manual Page 10 LOGGING IN USING A TEACHER ACCOUNT 1. Navigate to the upper right hand and click on the Login link. You will be directed to the Login page. 2. Input the username and password. 3. Click the Login button. You will be directed to the My Portable Learning Management System dashboard. Adding A Course 1. Navigate in Site Administration menu in the navigation block Portable Learning Management System User’s Manual Page 11 2. Under Courses select Add/edit courses. 3. Click on Add a new course button. 4. In the Edit Course settings page, Type in the Course full name, Course short name, Course ID number, and other pertinent information. Portable Learning Management System User’s Manual Page 12 5. Select the Save Changes button at the bottom of this page to save your course information. 6. You should already find your course under My courses in the navigation block. Managing Assignments User must have a teacher plus account and had created a course 1. Navigate in My Courses menu in the navigation block 2. Click on Course to add an assignment. 3. In the main course page and on the upper right corner of your course page, turn the Turn Editing button on if it’s not yet already. Editing icons and links as well as adding an activity and resources dropdown menu will be displayed. Portable Learning Management System User’s Manual Page 13 4. Locate Weekly Section where you want to add the assignment 5. Click the Add an Activity dropdown box 6. Under the Assignment option on the dropdown box, select either Advanced uploading of files, Online Text, Upload a Single File or Offline Activity. You will be directed to the Adding a new Assignment form page. 7. Fill in the Assignment Name and the description 8. In the bottom of the page, click Save and return to course to go back to your main course page, or Save and display to view the assignment page. If Save and return to course button is clicked, you will be redirected to the main course page. If Save and display button is clicked, you will be redirected to the assignment page. Portable Learning Management System User’s Manual Page 14 Adding A Chat Activity User must have a teacher plus account and have navigated already to the desired course page 1. On the upper right corner of your course page, turn the Turn Editing button on if it’s not yet already. Editing icons and links as well as adding an activity and resources dropdown menu will be displayed. 2. Locate the Topic or the Weekly Section where you want to add a Chat Activity 3. Click the Add an Activity dropdown box and choose Chat 4. In the Adding a Chat Settings form page, input the required chat room name and the introduction 5. Configure other optional settings. 6. Click Save and Return to course or Save and display to continue. If Save and return to course button is clicked, you will be redirected to the main course page. If Save and display button is clicked, you will be redirected to the chat room directly. Portable Learning Management System User’s Manual Page 15 Presenting A Choice User must have a teacher plus account and have navigated already to the desired course page 7. On the upper right corner of your course page, turn the Turn Editing button on if it’s not yet already. Editing icons and links as well as adding an activity and resources dropdown menu will be displayed. 8. Locate the Topic or the Weekly Section where you want to add a Choice Activity 9. Click the Add an Activity dropdown box and choose Choice 10. In the Adding a New Choice page, input the required choice name and the introduction 11. Add the options (required) Portable Learning Management System User’s Manual Page 16 12. Configure other optional settings. 13. Click Save and Return to course or Save and display to continue. If Save and return to course button is clicked, you will be redirected to the main course page. If Save and display button is clicked, you will be redirected to the choice page. Portable Learning Management System User’s Manual Page 17 Creating A Database Activity User must have a teacher plus account and have navigated already to the desired course page 1. On the upper right corner of your course page, turn the Turn Editing button on if it’s not yet already. Editing icons and links as well as adding an activity and resources dropdown menu will be displayed. 2. Locate the Topic or the Weekly Section where you want to add a Database Activity 3. Click the Add an Activity dropdown box and choose Database 4. In the Adding a New Database page, input a database name and description. 5. Define the fields and the templates. Configure other optional settings. 6. Click Save and Return to course or Save and display to continue. If Save and return to course button is clicked, you will be redirected to the main course page. If Save and display button is clicked, you will be redirected to the database page. Portable Learning Management System User’s Manual Page 18 Allowing A Forum Activity User must have a teacher plus account and have navigated already to the desired course page 1. On the upper right corner of your course page, turn the Turn Editing button on if it’s not yet already. Editing icons and links as well as adding an activity and resources dropdown menu will be displayed. 2. Locate the Topic or the Weekly Section where you want to add an External tool 3. Click the Add an Activity dropdown box and choose Forum 4. In the Adding a forum page, input a forum name, introduction and other optional settings. 5. Click Save and Return to course or Save and display to continue. If Save and return to course button is clicked, you will be redirected to the main course page. If Save and display button is clicked, you will be redirected to the forum page. Portable Learning Management System User’s Manual Page 19 Adding A Glossary Entry User must have a teacher plus account and have navigated already to the desired course page 1. On the upper right corner of your course page, turn the Turn Editing button on if it’s not yet already. Editing icons and links as well as adding an activity and resources dropdown menu will be displayed. 2. Locate the Topic or the Weekly Section where you want to add a glossary 3. Click the Add an Activity dropdown box and choose Glossary 4. In the Adding a New Glossary page, input the required glossary name and description. Configure other glossary entry settings. 5. Click Save and Return to course or Save and display to continue. If Save and return to course button is clicked, you will be redirected to the main course page. If Save and display button is clicked, you will be redirected to the glossary page. Portable Learning Management System User’s Manual Page 20 Adding A Lesson User must have a teacher plus account and have navigated already to the desired course page 1. On the upper right corner of your course page, turn the Turn Editing button on if it’s not yet already. Editing icons and links as well as adding an activity and resources dropdown menu will be displayed. 2. Locate the Topic or the Weekly Section where you want to add a glossary 3. Click the Add an Activity dropdown box and choose Lesson 4. In the Adding a New Lesson page, input the required lesson name. Configure and select other optional settings. 5. Click Save and Return to course or Save and display to continue. If Save and return to course button is clicked, you will be redirected to the main course page. If Save and display button is clicked, you will be redirected to the lesson page. Portable Learning Management System User’s Manual Page 21 Adding And Setting Up Quizzes User must have a teacher plus account and have navigated already to the desired course page 1. On the upper right corner of your course page, turn the Turn Editing button on if it’s not yet already. Editing icons and links as well as adding an activity and resources dropdown menu will be displayed. 2. Locate the Topic or the Weekly Section where you want to add a quiz activity 3. Click the Add an Activity dropdown box and choose Quiz 4. In the Adding a New Quiz page, input the required quiz name. Input an introduction. Configure, review and change the default optional settings when needed. 5. Click Save and Return to course or Save and display to continue. If Save and return to course button is clicked, you will be redirected to the main course page. If Save and display button is clicked, you will be redirected to the assignment page. Portable Learning Management System User’s Manual Page 22 Adding Questions To A Quiz User must have already created a quiz activity 1. On the upper right corner of your course page, turn the Turn Editing button on if it’s not yet already. Editing icons and links as well as adding an activity and resources dropdown menu will be displayed. 2. Locate the Quiz Activity you would like to add a question to 3. Click the link to the quiz. 4. On the Quiz description page, choose Edit quiz Portable Learning Management System User’s Manual Page 23 5. Click the Add a Question button 6. Choose the question type and click the Next button. 7. Configure the question and click Save changes. If Save changes button is clicked, the question is added to the quiz Portable Learning Management System User’s Manual Page 24 Adding Questions For Quiz Use (Question Bank) User must have a teacher plus account and have navigated already to the desired course page 1. On the course page, navigate to the Settings block then click Course Administration to expand the options. Find Question Bank. 2. Click on the Question bank to expand and show more options. Click on Questions. Portable Learning Management System User’s Manual Page 25 3. Select a category name and click on the Create a new question button. 8. Choose the question type and click the Next button. 9. Input the required question name and default mark. Portable Learning Management System User’s Manual Page 26 10. Configure, review and change the default optional settings when needed depending on the type of question chosen. 11. Click Save changes. If Save changes button is clicked, the question is added to the Data bank. Adding Categories To The Question Bank User must have a teacher plus account and have navigated already to the desired course page 1. On the course page, navigate to the Settings block then click Course Administration to expand the options. Find Question Bank. 2. Click on the Question bank to expand and show more options. Click on Categories. Portable Learning Management System User’s Manual Page 27 3. Select a parent category if applicable. Input the category name (required) and category information. 4. Click Add category button to save. Adding Questions From Question Bank In A Quiz User must have already created a quiz activity 1. On the upper right corner of your course page, turn the Turn Editing button on if it’s not yet already. Editing icons and links as well as adding an activity and resources dropdown menu will be displayed. 2. Locate the Quiz Activity you would like to add a question to 3. Click the link to the quiz. Portable Learning Management System User’s Manual Page 28 4. Under the Quiz administration block on the left side of the page, choose Edit quiz 5. Choose to add a question from the Question Bank This part assumes you have already added questions to the Question bank Portable Learning Management System User’s Manual Page 29 6. Choose the category with the question(s) from the Select a Category Menu. Mark the checkbox for the question(s) 7. Click add to quiz button. Repeat the same procedure to add more questions to the quiz. 8. Once done, click Save near the top of the Editing Quiz page. Adding A Survey User must have a teacher plus account and have navigated already to the desired course page 1. On the upper right corner of your course page, turn the Turn Editing button on if it’s not yet already. Editing icons and links as well as adding an activity and resources dropdown menu will be displayed. 2. Locate the Topic or the Weekly Section where you want to add a survey activity 3. Click the Add an Activity dropdown box and choose Survey Portable Learning Management System User’s Manual Page 30 4. In the Adding a New Survey page, input the required survey name and type. Configure, review and change the default optional settings when needed. 5. Click Save and Return to course or Save and display to continue. If Save and return to course button is clicked, you will be redirected to the main course page. If Save and display button is clicked, you will be redirected to the assignment page. Adding A SCROM Package Activity User must have a teacher plus account and have navigated already to the desired course page 1. On the upper right corner of your course page, turn the Turn Editing button on if it’s not yet already. Editing icons and links as well as adding an activity and resources dropdown menu will be displayed. 2. Locate the Topic or the Weekly Section where you want to add a wiki activity 3. Click the Add an Activity dropdown box and choose Scrom Activity 4. In the Adding a New Scrom activity page, input the required name , description and attachment. Configure, review and change the default optional settings when needed. Portable Learning Management System User’s Manual Page 31 5. Click Save and Return to course or Save and display to continue. If Save and return to course button is clicked, you will be redirected to the main course page. If Save and display button is clicked, you will be redirected to the SCROM package activity page. Adding A New Wiki Activity User must have a teacher plus account and have navigated already to the desired course page 6. On the upper right corner of your course page, turn the Turn Editing button on if it’s not yet already. Editing icons and links as well as adding an activity and resources dropdown menu will be displayed. 7. Locate the Topic or the Weekly Section where you want to add a wiki activity 8. Click the Add an Activity dropdown box and choose Wiki 9. In the Adding a New Wiki page, input the required wiki name and description. Configure, review and change the default optional settings when needed. Portable Learning Management System User’s Manual Page 32 10. Click Save and Return to course or Save and display to continue. If Save and return to course button is clicked, you will be redirected to the main course page. If Save and display button is clicked, you will be redirected to the assignment page. Adding A New Workshop Activity User must have a teacher plus account and have navigated already to the desired course page 1. On the upper right corner of your course page, turn the Turn Editing button on if it’s not yet already. Editing icons and links as well as adding an activity and resources dropdown menu will be displayed. 2. Locate the Topic or the Weekly Section where you want to add a workshop activity 3. Click the Add an Activity dropdown box and choose Workshop 4. In the Adding a New Wiki page, input the required wiki name and description. Configure, review and change the default optional settings when needed. Portable Learning Management System User’s Manual Page 33 5. Click Save and Return to course or Save and display to continue. If Save and return to course button is clicked, you will be redirected to the main course page. If Save and display button is clicked, you will be redirected to the survey page. Uploading A File Resource User must have a teacher plus account and have navigated already to the desired course page 1. On the upper right corner of your course page, turn the Turn Editing button on if it’s not yet already. Editing icons and links as well as adding an activity and resources dropdown menu will be displayed. 2. Locate the Topic or the Weekly Section where you want to add a file resource 3. Click the Add a Resource dropdown box and choose File 4. In the adding a new file page, input the required name of file and description. 5. On the content settings area, click Create folder then input the folder name to organize your files. Portable Learning Management System User’s Manual Page 34 6. Press the OK button when done. 7. The folder name you created appears Here the sample folder name is Notes. Creating a folder is not something that you have to do repeatedly. If you want to save your file in the same folder in the future, just click on the folder name without creating a new folder. 8. Click the Add button. 9. In the file picker dialog box, locate the file from the click the Upload file button. 10. Click on the Select this file button Portable Learning Management System User’s Manual Page 35 11. You should be able to find it under Content at this point 12. Click Save and Return to course or Save and display to continue. If Save and return to course button is clicked, you will be redirected to the main course page. If Save and display button is clicked, you will be redirected to the file resource page. Portable Learning Management System User’s Manual Page 36 Adding A Folder User must have a teacher plus account and have navigated already to the desired course page 1. On the upper right corner of your course page, turn the Turn Editing button on if it’s not yet already. Editing icons and links as well as adding an activity and resources dropdown menu will be displayed. 2. Locate the Topic or the Weekly Section where you want to add a folder 3. Click the Add a Resource dropdown box and choose Folder 4. In the adding a new folder page, input the required name of file and description. 5. On the content area, either drag a zipped/compressed folder into the box with an arrow or click Add button to open the File Picker. 6. 7. 8. 9. When the folder thumbnail appears, click on it and select “Unzip”. Click the original (zipped) folder and click the “Delete” button to delete it if necessary. Configure, review and change the default optional settings. Click Save and Return to course or Save and display to continue. Portable Learning Management System User’s Manual Page 37 If Save and return to course button is clicked, you will be redirected to the main course page. If Save and display button is clicked, you will be redirected to the folder page. Adding An Ims Content Package To Your Course User must have a teacher plus account and have navigated already to the desired course page 1. On the upper right corner of your course page, turn the Turn Editing button on if it’s not yet already. Editing icons and links as well as adding an activity and resources dropdown menu will be displayed. 2. Locate the Topic or the Weekly Section where you want to add an IMC content package 3. Click the Add a Resource dropdown box and choose IMS Content Package 4. In the Adding a new IMS content package page, input the required name of file and description. 5. In the content section, drag and drop IMC Content Package into the box or Click Choose a file to locate and add to your package. 6. Click Save and Return to course or Save and display to continue. Portable Learning Management System User’s Manual Page 38 If Save and return to course button is clicked, you will be redirected to the main course page. If Save and display button is clicked, you will be redirected to the IMS content package page. Adding A Label To Your Course Content User must have a teacher plus account and have navigated already to the desired course page 1. On the upper right corner of your course page, turn the Turn Editing button on if it’s not yet already. Editing icons and links as well as adding an activity and resources dropdown menu will be displayed. 2. Locate the Topic or the Weekly Section where you want to add a Label 3. Click the Add a Resource dropdown box and choose Label 4. In the Adding a New Label page, type your chosen words and/or resources. 5. Leave Common module settings as “show” for the label to be visible. Portable Learning Management System User’s Manual Page 39 6. Configure, review and change the default optional settings. 7. Click Save and Return to course. If Save and return to course button is clicked, you will be redirected to the main course page with the label now visible. Adding A Page To Your Course Content User must have a teacher plus account and have navigated already to the desired course page 1. On the upper right corner of your course page, turn the Turn Editing button on if it’s not yet already. Editing icons and links as well as adding an activity and resources dropdown menu will be displayed. 2. Locate the Topic or the Weekly Section where you want to add a page 3. Click the Add a Resource dropdown box and choose Page 4. In the adding a new page, input the required name of the page, description and page content. 5. Configure, review and change the default optional settings. 6. Click Save and Return to course or Save and display button to continue. Portable Learning Management System User’s Manual Page 40 If Save and return to course button is clicked, you will be redirected to the main course page. If Save and display button is clicked, you will be redirected to the course content page. Adding An External URL User must have a teacher plus account and have navigated already to the desired course page 1. On the upper right corner of your course page, turn the Turn Editing button on if it’s not yet already. Editing icons and links as well as adding an activity and resources dropdown menu will be displayed. 2. Locate the Topic or the Weekly Section where you want to add a URL 3. Click the Add a Resource dropdown box and choose URL 4. In the add a new URL page, input the required name of file, description and external URL. 5. Configure, review and change the default optional settings. 6. Click Save and Return to course or Save and display to continue. Portable Learning Management System User’s Manual Page 41 If Save and return to course button is clicked, you will be redirected to the main course page with the URL now visible. Adding A Block User must successfully logged in as a teacher and have selected a course to edit. Editing mode must be turned on. 1. Scroll the page down and on the right side locate the Add a Block block. 2. Select the block you would like to add from the Add a Block drop-down list which displays all available blocks not already added to your course page. 3. The new block will appear on the course homepage as the bottom block on either the left or ride side. Managing Blocks User must successfully logged in as a teacher and have selected a course to edit. Editing mode must be turned on. 1. Click the assign roles button to assign a role. Portable Learning Management System User’s Manual Page 42 2. Click the Hide button shown as an Eye icon to hide the block. 3. Click the Configuration button shown as the writing icon to configure the selected block 4. Click the delete button shown as x to delete the block 5. Click the move button to move the block Enrolling A User User must successfully logged in as a teacher and have selected a course to edit. 1. Navigate To the Settings block and under Course Administration, click Users link. The Users link will expand its items. 2. Click Enrolled Users. Portable Learning Management System User’s Manual Page 43 3. Click Enroll User Button 4. Ensure that the student is chosen in the Assign roles option 5. Click the Enroll button to the right of the user’s name to add them to your course. 6. Click Finish enrolling users button to finalize adding users to your course. Removing A Student User must successfully logged in as a teacher and have selected a course to edit. 1. Navigate To the Settings block and under Course Administration, click Users link. The Users link will expand its items. Portable Learning Management System User’s Manual Page 44 2. Click Enrolled Users. This will bring you to the Enrolled Users Page. 3. Under the enrolment column, click the X icon to delete/unenroll. The users will be directed to the confirmation page. 4. Click continue to delete or click cancel to cancel. Portable Learning Management System User’s Manual Page 45 Creating Groupings User must successfully logged in as a teacher and have selected a course to edit. 1. Navigate To the Settings block and under Course Administration, click Users link. The Users link will expand its items. 2. Click Groups link. 3. The groups tab appears to contain two columns. The left column displays the group names (initially empty). The right column will display a list of the assigned group members. 4. Click the Groupings tab to view any existing and/or add new Grouping. Portable Learning Management System User’s Manual Page 46 5. Click the Create grouping button to start creating the Grouping 6. Enter a name in the Grouping name field. An optional description may also be included. 7. Click Save Changes. 8. The next screen provides three icons on the same row as the Grouping: Edit (cog) to modify the Grouping name and the description. Delete (red x) to delete the Grouping. Groups (double head) to manage Groups in the Grouping. Portable Learning Management System User’s Manual Page 47 9. Click the Groups icon in the Edit column to start adding groups to the Grouping. Two columsn appear. The left column displays current groups in the grouping. The right side column displays current groups in the course. 10. To add groups to the grouping, click the group name in the potential members column list then click the Add button. Repeat these steps to add more groups to the grouping. 11. To remove a group from the grouping, click the group name in the existing members column list then click the Remove button. 12. Click Back to groupings when you have finished adding groups to the grouping. Modifying Groups User must successfully logged in as a teacher and have selected a course to edit. 1. Navigate To the Settings block and under Course Administration, click Users link. The Users link will expand its items. 2. Click Groups link. Portable Learning Management System User’s Manual Page 48 3. The groups tab appears to contain two columns. The left column displays the group names (initially empty). The right column will display a list of the assigned group members. 4. 5. 6. 7. Highlight the name of the group to modify from the groups list. Click the Edit group settings to make changes to an existing group. Edit fields where necessary. Click the Save Changes button to update the settings. Portable Learning Management System User’s Manual Page 49 Displaying Group And Grouping Details User must successfully logged in as a teacher and have selected a course to edit. 1. Navigate To the Settings block and under Course Administration, click Users link. The Users link will expand its items. 2. Click Groups link. 3. Click the Overview Tab. The user will be directed to the Group Overview Page. Portable Learning Management System User’s Manual Page 50 Removing Groups User must successfully logged in as a teacher and have selected a course to edit. 1. Navigate To the Settings block and under Course Administration, click Users link. The Users link will expand its items. 2. Click Groups link. 3. Click the name of the group to delete from the Groups list. 4. Click the Delete selected group button to remove the group. 5. Click the Yes button for the confirmation of the message that appears. Portable Learning Management System User’s Manual Page 51 Resetting Course User must have a course to reset. 1. Navigate To the Settings block and under Course Administration, click Users link. The Users link will expand its items. 2. In the Reset page, make and check selections on what to delete and reset. Click reset course button to perform activity. Portable Learning Management System User’s Manual Page 52 3. Click Select Default button to check/mark default data. 4. In the confirmation page, click Deselect all button to deselect all choices. 5. In the course settings page, click cancel button if you wish to cancel. Importing Course Data 1. Navigate To the Settings block and under Course Administration, click Import. 2. In the import page, select a course to import and click Continue button. Portable Learning Management System User’s Manual Page 53 3. Click applicable settings and then click Next. 4. In the Schema settings page, click the particular dates of the chosen activities to back up then click the Next button. 5. In the confirmation and review page, review the details provided for import. The confirmation page will place green check marks and red marks next to the backup settings and include item list for you to review. Portable Learning Management System User’s Manual Page 54 6. Click Perform Import button to import. The page will load. You should see the “Import Compete. Click continue to return to the course.” Message, or an error message indicating that the import process did not take place. You may also click the Previous button to review and edit previous settings, or click the Cancel button to cancel the import process. Backing Up Course User must have successfully logged in as teacher and must have selected a course to edit; User must have activities to back up. 1. Navigate To the Settings block and under Course Administration, click Backup. Portable Learning Management System User’s Manual Page 55 2. In the Initial settings page, click anything that you would like to back up then click Next button. 3. In the Schema settings page, check the particular dates of the chosen activities to back up then click Next button. 4. In the Confirmation and Review page, review the details provided for the backup. You can change the filename if you wish. Click perform backup to continue. 5. The page will load and once done performing the backup, the user will be directed to the complete page. 6. Click Continue button to proceed. You will be directed to the Restore page. Portable Learning Management System User’s Manual Page 56 Restoring Course Activities User must have backed up an activity/course 1. Navigate To the Settings block and under Course Administration, click Backup. Portable Learning Management System User’s Manual Page 57 2. In the restore page on the import a backup file setting, click the Choose a file button to open the File Picker. 3. A file picker will popup. Locate your backup file. 4. Upon clicking on the backup file and selecting the file, the file picker will close and the selected backup will be displayed on the provided files attached area. 5. Click on the Restore button. 6. In the confirmation page, click Continue and then select the course into which you wish to restore. Portable Learning Management System User’s Manual Page 58 7. In the course settings page, click Continue button and then click Next. You will see your chosen data. 8. Click Next ad on the next screen, click Perform restore. Portable Learning Management System User’s Manual Page 59 Enabling Course Completion This feature must be enabled by Admin; The user must login as teacher and a course must be chosen. 1. Navigate To the Settings block and under Course Administration, click Edit Settings Menu link. 2. In the Edit course settings page, scroll down to Student Progress Area. 3. On completion tracking, select enabled. 4. Check “completion tracking begins on enrolment” when you want to. 5. Click save changes button to save. Portable Learning Management System User’s Manual Page 60 Viewing Course Completion This feature must be enabled by Admin; The user must login as teacher and a course must be chosen. 1. Navigate to Navigation Block. 2. In the Respective adding an activity/resource page under My Courses ,click on the course you want. Click if it’s not expanded. 3. Click on Reports menu link to expand then click Course Completion. You will be directed to the Course Completion page listing data from activities. Portable Learning Management System User’s Manual Page 61 Viewing Activity Completion This feature must be enabled by Admin; The user must login as teacher. 1. Navigate to Navigation Block. 2. In the Respective adding an activity/resource page under My Courses, click on the course you want. Click if it’s not expanded. 3. Click on Reports menu link to expand then click Activity Report. You will be directed to the Course Activity Completion page listing data from activities. Portable Learning Management System User’s Manual Page 62 Setting Up Course Grades User must have successfully logged in as teacher. User must have selected a course to edit. 1. Navigate to the Settings block and under Course Administration click Grades. 2. In the Grades View Graders report page, click on Settings Tab. 3. In the Course settings page, change the settings when preferred. 4. Click Save Changes button to continue and Cancel button to cancel. Portable Learning Management System User’s Manual Page 63 Creating Categories In Grades User must have successfully logged in as teacher. User must have selected a course to edit. 1. Navigate to the Settings block and under Course Administration click Grades. 2. In the Grades View Graders report page, click on Categories and items link. 3. In the My Preferences page, click on Add Category Button Portable Learning Management System User’s Manual Page 64 4. In the Edit category page, input the required category name. 5. Choose an aggregation method for the category from the Aggregation drop-down. 6. Uncheck Exclude empty grades checkbox if you would like to aggregate all grades towards course total. 7. Enable include outcomes in aggregation if you want to include the results of designated outcomes in the calculation of the grades. 8. Input Category Total Name and enter any relevant information. 9. Click Save Changes button to view category. Assigning Weights To Grade Items User must have successfully logged in as teacher. User must have selected a course to edit. 1. Navigate to the Settings block and under Course Administration click Grades. 2. In the Grades View Graders report page, click on Categories and items link. Portable Learning Management System User’s Manual Page 65 3. In the My Preferences page, be sure that weighted mean of grades is selected at the course level under aggregation column. 4. In the Edit Category page, enter the corresponding weight values for each. 5. Click Save changes. Changing An Aggregation Method User must have successfully logged in as teacher. User must have selected a course to edit. 1. Navigate to the Settings block and under Course Administration click Grades. 2. In the Grades View Graders report page, click on Categories and items link. 3. In the My Preferences page, click Edit icon Portable Learning Management System User’s Manual on the action column. Page 66 4. In the Edit category page, click on Show Advanced button. 5. Select Weighted Mean of grades from the Aggregation drop down list. 6. Click Save Changes button to continue and cancel button to cancel. Portable Learning Management System User’s Manual Page 67 Change Grader Report Preferences User must have successfully logged in as teacher. User must have selected a course to edit. 1. Navigate to the Settings block and under Course Administration click Grades. 2. In the Grades View Graders report page, click on My Preferences tab. 3. Change the settings when preferred. 4. Click Save changes button to continue and cancel button to cancel. Portable Learning Management System User’s Manual Page 68 View Grade Reports User must have successfully logged in as teacher. User must have selected a course to edit. 1. Navigate to the Settings block and under Course Administration click Grades. 2. In the Grades View Graders report page, click Outcome, overview or users report link. 3. Click Outcomes Report link if you want to view the outcome summary. User will be directed to the Outcomes report page. 4. Click Overview Report link if you want to view the course overview grades. User will be directed to the course overview page. Portable Learning Management System User’s Manual Page 69 5. Click User Report link if you want to view the grades of a specific student. User will be directed to the user report page. Importing A Gradebook User must have successfully logged in as teacher. User must have selected a course to edit. 1. Navigate to the Settings block and under Course Administration click Grades. Portable Learning Management System User’s Manual Page 70 2. In the Grades View Graders report page, click Import tab. 3. Upload either an XML or a CSV file (Click CSV in this case) 4. Confirm that the following options are set to the default. Encoding: UTF-8 Separator: Comma Verbouse Scales: Yes 5. Select the number of rows to preview from Preview Rows prior to importing the file. 6. Click Upload grades. Portable Learning Management System User’s Manual Page 71 Exporting A Gradebook User must have successfully logged in as teacher. User must have selected a course to edit. 1. Navigate to the Settings block and under Course Administration click Grades. 2. In the Grades View Graders report page, click Export tab. 3. In the My Preference page, click Excel spreadsheet located below the tabs to export gradebook in Excel format. You can choose an appropriate alternative format to export gradebook if relevant. 4. Enable Include feedback in export by clicking in the checkbox if you would like to export the feedback column for each item in addition to the grades columns. 5. Select the number of rows to preview from Preview Rows prior to export. Portable Learning Management System User’s Manual Page 72 6. Select the appropriate Grade export display type from the drop-down list. 7. Select which grade items you would like to export. 8. Click Submit to continue the export process. 9. Click Download to save the gradebook to your hard drive. LOGGING IN USING A STUDENT ACCOUNT 1. Navigate to the upper right hand and click on the Login link. You will be directed to the Login page. 2. Input the username and password. 3. Click the Login button. You will be directed to the My Portable Learning Management System dashboard. Portable Learning Management System User’s Manual Page 73 Viewing Grades User must have logged in successfully using a student account; User must have been enrolled by a teacher to a course 1. Navigate to Settings block and click Course Administration to expand 2. Click on grades menu link 3. In the grades user view page, click on the respective activity to go to that activity 4. Click the Overview link to view your overall course grade You will be directed to the Overview report Portable Learning Management System User’s Manual Page 74 View A URL Resource User must have logged in successfully using a student account; User must have been enrolled by a teacher to a course; User must have located the course and the weekly section. 1. Click on the URL name to view link. You will be directed to the URL page. 2. Click on the URL to open resource. View A Page Resource User must have logged in successfully using a student account; User must have been enrolled by a teacher to a course; User must have located the course and the weekly section. 1. Click on the page name to view. 2. You will be directed to the page. Download An Uploaded File User must have logged in successfully using a student account; User must have been enrolled by a teacher to a course; User must have located the course and the weekly section. 1. Click on the filename link. You will be directed to the file page. 2. Click on the file name to download. Downloading of file is browser-dependent. Using The Chat User must have logged in successfully using a student account; User must have been enrolled by a teacher to a course; User must have located the course and the weekly section. 1. Locate the Topic or Weekly Section with the chat activity and click on it. 2. In the chat room, click on the reply link at the bottom of the question box to reply 3. Click on Click here to enter the chat now button and start chatting. A new chat window will open. 4. Input your chat message on the textbox provided and press enter to send. Set chat message will be displayed on the chat messages area. Portable Learning Management System User’s Manual Page 75 If you want to alert a user, click on the beep link found at the bottom of the user name located at the right side of the screen. 5. Close the window to close the chat Using The Wiki User must have logged in successfully using a student account; User must have been enrolled by a teacher to a course; User must have located the course and the weekly section. 1. 2. 3. 4. Locate the Topic or Weekly Section with the Wiki activity and click on it. In the Wiki page, change the first page name and choose a format. Click create page to save. You will be directed to the page you created on the edit mode. Click Save to save, click Preview to preview and click Cancel to undo everything you changed. Upon saving, the user will be directed to the View tab of the Wiki. 5. To create a new page, locate the navigation block and click the name of the Wiki to expand and then click on New menu link. You will be directed to creating a new wiki page. If you want to edit a page of your wiki, click the Edit tab or locate the navigation block and click the name of the Wiki to expand and then click on Edit menu link. You will be directed to the edit a wiki page. If you want to view the comments from that wiki page, click the comments tab or locate the navigation block and click the name of the Wiki to expand. Finally, click on Comments menu link. If you want to view the change history of the Wiki, click the history tab or locate the navigation block and click the name of the Wiki to expand and then click on History menu link. If you want to view the index of the Wiki, click the map tab or locate the navigation block and click the name of the Wiki to expand. Click on the map menu link. If you want to view the files attached to a wiki, click the Files tab or locate the navigation block and click the name of the Wiki to expand. Click on Files menu link. Responding To A Survey User must have logged in successfully using a student account; User must have been enrolled by a teacher to a course; User must have located the course and the weekly section. 1. 2. 3. 4. Click on the survey link. In the survey page, answer the survey by filling up the textboxes provided. Click Click here button to continue. You will be directed to the confirmation page. Click continue to proceed. You will be directed back to the course page. Portable Learning Management System User’s Manual Page 76 Adding An Entry In The Glossary User must have logged in successfully using a student account; User must have been enrolled by a teacher to a course; User must have located the course and the weekly section. 1. 2. 3. 4. 5. Click on the glossary link. In the glossary page, click on the add new entry button. Input the required concept and description. Configure other optional settings. Click Save changes button to continue. You will be directed back to the glossary page. Using The Forum User must have logged in successfully using a student account; User must have been enrolled by a teacher to a course; User must have located the course. 1. Locate the Topic or Weekly Section with forum you wish to join in and click on it. 2. In the forum page, reply by clicking on the Reply link at the bottom of the question box. A ‘Your Reply’ box will be appended on the page next to the question box. 3. 4. 5. 6. 7. Change the subject when needed (required) Input your message. This will bring you to the user public profile page. Change other settings when necessary. Add an attachment when needed. Click Post to Forum button to save. You will be directed to a confirmation page and will then be redirected to the forum page. If you want to edit a reply you posted, click on the edit link below your reply. Click on the delete link to erase your reply. 8. If you would like to reply to a reply, click on the reply link. Portable Learning Management System User’s Manual Page 77 ERROR MESSAGES The portability of PLMS comes with some unavoidable errors. Portable Learning Management System User’s Manual Page 78 FAQs (Adapted from Maflt.org) What is PLMS? PLMS is a Poodle-customized learning management system. How can PLMS help you? PLMS enables you to run and distribute Moodle content offline. Additionally, it leaves no electronic fingerprints on the machine where the content was viewed. What is Poodle? Poodle is a collection of portable applications that are used to execute Moodle from a USB flash drive or other removable drive. What applications are included in Poodle? Portable Apps An open source software package that allows portable applications to be executed directly from a flash drive. Mozilla Firefox®, Portable Edition The popular Mozilla Firefox web browser bundled with a PortableApps.com launcher. Sumatra PDF Portable The lightweight Sumatra PDF, packaged as a portable app, allows you to view PDF files on the go. Moodle Start An application created by MAF-LT that initiates all of the applications necessary to launch Moodle from the flash drive with a single click. How is PLMS distributed? PLMS is distributed in a zip file. PLMS-v1.rar contains all of the folders and files necessary to configure and deploy your offline Moodle courses. PLMS is customized with two generic login accounts, the teacher and student account. How can I test PLMS? 1. Remove and then reinsert the flash drive 2. Verify the AutoPlay dialog is displayed 3. Select Start PortableApps 4. Launch MoodleStart 5. Verify Moodle is running in Firefox Portable Learning Management System User’s Manual Page 79 Portable Learning Management System User’s Manual Page 80