1
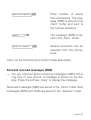
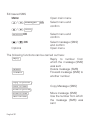
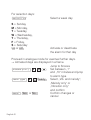
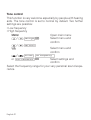
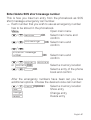
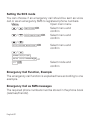
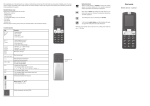
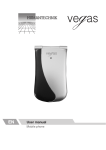
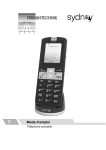
GB
Operating manual
Mobile telephone
Compatible with hearing aids
(HAC Hearing Aid Compatible to M3 / T3 Rating)
The »sydney« mobile phone has an integrated induction coil
and is compatible with hearing aids.
You will have to configure the settings of your hearing aid accordingly for an ideal operation with your mobile phone. Kindly
read the user manual of your hearing aid.
Prolonged listening at full volume may cause hearing da mage.
We congratulate you on the purchase of your »sydney« mobile
phone and we hope that it will render you many years of reliable
service. You have chosen a modern and reliable system. Kindly
read the user manual carefully in order to start using the device
properly and to familiarise yourself with all the possibilities of
the system.
Standard delivery scope
Kindly check if all following parts are included:
- Mobile phone »sydney« - Charging cable
- Desktop charger
- 1x rechargeable battery Li-lon
3.7V/ 750 mAh
- Short guide
- User manual
- Warranty card
Should any parts be missing, kindly contact your specialist
dealer or the manufacturer directly.
English 2
Table of contents
1 At a glance 2 Functionality 3 Start 4 Set up phonebook
5 Accept and make calls
6 Call list
7 Messages (SMS)
8 Voicemail
9 Further useful functions
10 Bluetooth
11 Emergency call function
12 Services
13 Menu structure
14 Troubleshooting
15 Technical data
16 Safety instructions
17 Technical Data
18 Index
Page
4
8
12
18
22
26
27
33
35
57
59
65
66
76
78
79
82
84
English 3
1
At a glance
Controls
1 Earpiece
2 Display
3a Soft keys
3bDirect dial keys
4 On /Off key / End call
5 Key Up / Down
6 Hash key
7 Microphone
8 Star key
9 Keypad
10 Dialling key
11 Mini USB charging jack
12 LED
13 Attachment for strap (not included)
14 Charging contacts
15 Headset jack (headset not included)
16 Volume control
17 Loudspeaker
18 Emergency call switch
19 Battery compartment cover
The keys of your telephone are represented in this user manual
using the following simplified symbols. Slight variations of your
phone‘s key symbols and the ones used here are possible.
English 4
Controls
17
18
15
16
19
13
12
11
10
9
8
7
14
11
10
9
8
1
2
3a
4
3b
5
6
English 5
Symbols and texts in the display of the handset
Symbols
Description
Display of battery capacity.
Running segments, the battery is being
charged.
Signal strength of the radio contact
Alarm activated
The keypad lock is activated
→ Page 24
A Roaming1 call is being effected
A headset is connected
There are new calls in the call list
→ Page 22
The microphone is in mute mode
→ Page 24
Call forwarding activated
The charges for roaming calls and messages (SMS) vary a lot
from country to country. Kindly contact your network provider.
1
English 6
You have a new message (SMS1)
→Page 31
Message memory full
Only call tone is activated
Only vibration alarm is activated /
silent mode is activated
Vibration alert and ringing tone are
activated or first the vibration alert
then ringing tone is activated
Bluetooth® 2 activate
The volume is set too high.
Attention when using the phone
SMS: Short Message Service = Service for sending short text
messages.
1
Bluetooth®: Standard for the short-distance radio networking
of devices.
2
English 7
2
Function
1 Earpiece Here you hear your conversation
partner, if you have no headset or
hands-free device installed and
activated and if the device is not
in hands-free mode.
2 Display
The messages on the display
lead you through the menu structure and help you with the operation of the device.
3a Soft keys
Different functions are assigned
to the soft keys in different menus.
The current functions are always
shown in the display.
3b Direct dial keys
With the direct dial keys you can
directly dial numbers stored on
them by pressing and keeping
pressed of the key.
= Keypad lock
English 8
Switch telephone on or off
Cancel current operation
End or reject
call
Browse to the right
4 On/Off key,
End call key
5 Key upward
downward
6 Hash key
/
# aA
7 Microphone
8 9 *
1
0
Call setting Activate/deactivate,
Upper and lower case,
Keypad lock
Keep „1“ key pressed to connect
to voicemail and to listen to the
messages -> Page 33.
Active when phoning
Insert special character
key
-
Navigate in the menus
Keypad
Enter numbers and names or create message (SMS).
English 9
10 Dialling key
Accept call or dial number
Show call list
Browse to the left
11 Mini USB charging Connect USB charger
jack
12 LED Strap eyelet
Shows the operating state of the telephone. The LED is on permanently
during the charging process and
flashes to warn if there is no signal or
no network is found.
13 Strap eyelet
Eyelet for strap
(not included)
14 Charging contacts
The telephone is charged in the
desktop charger via these contacts.
15 Headset jack
(headset not
included)
English 10
Connect headset. The earpiece, the
loudspeaker and the microphone are
deactivated.
You listen and talk only via the headset.
16 Volume control
Control playback volume
17 Loudspeaker
Here you hear your conversation
partner if the device is in handsfree mode.
18 Emergency call
switch
Activate emergency call (SOS)
19 Battery compartment
cover
Cover of the battery compartment.
Special Functions Keys
Standby
Hold #
Switched ringer Off / On −
Silent Mode
Hold
A connection is established to
your mailbox and you can play
messages recorded; -> Page 34.
1
aA
English 11
3
Start
This chapter will provide you with basic information about handling the user manual and the telephone.
Way of displaying in the user manual
Display 6
MNO
Description
2 Sek.
7
PQ
RS
Press shown key briefly
Press shown key for 2 seconds
Keep pressed
Keep shown key pressed
Input digits or characters Options e.g.
OK English 12
Presentation of text on display
Presentation of display symbols
Press soft key → Page 13
Stand-by mode
All descriptions in this user manual are based on the assumption that the telephone is in stand-by mode. The stand-by mode
can be reached by pressing the
key several times. Maybe
you might have to deactivate the keypad lock.
Energiesparmodus
After some time in stand-by mode, the phone changes to energy-saving mode. The display is now no longer illuminated.
Press any key to activate the stand-by mode.
Softkeys
and
have different functions asThe soft keys
signed to in the different menus. In this user manual they are
always named corresponding to the texts in the display.
Key In stand-by mode In the menu
- Open main menu - diverse
functions
- Open phonebook
- diverse
- Trigger keypad lock functions
English 13
Navigation within the menu
All functions can be reached via different menus. Kindly refer to
the menu structure to get to the desired function → Page 66
Menu (key)
/
Open main menu
Select desired
sub menu
OK (key)
Open sub menu
/
Select desired
function
OK
Open function
/
OK
Select desired
setting
Input digits or characters
via the keypad.
Key (soft key)
Confirm input
Key (soft key)
One level back
Cancel programming and
saving processes
and return to stand-by
mode
English 14
Create phonebook entries − Example
The way to navigate within the menus and effect settings is explained here using the Phonebook as example. Proceed for all
settings as shown in this example.
Menu
/
Open main menu
Phonebook list Select phonebook and
OK
confirm
/
Add new
contact
OK
Select sub menu and
confirm
/
to phone
To SIM or Select storage location and
confirm
OK
Name OK OK
/
Number Open input mode,
input number and
confirm
Yes or
Save entry or
cancel
OK
Save?
No
Open input mode, input
names and confirm
English 15
Input text and digits
The numerical keys also have characters printed on them for
entering text.
Your telephone offers different methods for the input of text.
These are used for creating or editing of contacts in the Phonebook menu, when searching for names in the Phonebook and
when writing messages (SMS).
Note:
Not every method is always available in every application.
Input text
Multitap
In order to input text in multitap mode, the key with the respec tive character/symbol group has to be pressed. If the first
symbol of the group is needed, the key is pressed once. If the
second symbol is needed, the key is pressed twice etc.
→ To insert a further character that is on the same key, input
first the first character as usual. Wait for about 2 sec. and
input then the next character
English 16
ABC Upper case Multitap
abc Lower case Multitap
123 Digits
→ To switch between text and digit input,
press the # key.
aA
Punctuation and special characters
Press the * key while inputting text.
Punctuation and special characters are displayed.
Use keys
/
to select the desired character and accept it
with the soft key OK. To insert a space press the key
.
0
English 17
4
Set up phonebook
In the phonebook of the telephone you can save up to 500 entries.
•Input all numbers with the area code always.
•If the memory capacity is used up, the display shows a corre sponding message when the next entry is being saved. If
you want to add new entries you have to delete old ones first.
•The phonebook entries are sorted alphabetically. To go direct ly to the desired contact entry, press the corresponding first
letter. If you want to search manually in the entries, use keys
/
→ You can get to know the number of entries that can be
stored on your SIM card from your provider.
Input names
The digit keys have numbers printed on them for the input
of names. To input characters, the respective key has to be
pressed correspondingly often. Information about input methods
→Page 16.
Input space
0
Delete
/
English 18
Delete
Move cursor left or right
Create phonebook entries
See page 15.
Save in stand-by mode
Input telephone number
Save
Open menu
/
To SIM or
To phone OK
Name OK
/
OK
Choose storage location and
confirm
Open input mode, input name and
confirm
Number OK Open input mode, edit number
and confirm
Save? Yes or No
Save entry or cancel
English 19
Modify, edit or delete phonebook entries
Namen
Open phonebook
Search for the desired entry as
described in the beginning of this
chapter.
OK
Open menu
The following functions can be carried out here:
Call entry
Show entry
Edit entry
Delete entry
Copy entry
(SIM ↔ telephone)
Move entry
Move
(SIM ↔ telephone)
Carry out the functions and confirm them.
Call
Show
Edit
Delete
Copy
Copy or delete all entries
Menu
/
OK
English 20
Open main menu
Phonebook list
Select phonebook and
confirm
Here you can carry out further functions:
Copy all entries
(SIM or telephone)
Delete all entries
(SIM or telephone)
Copy all
Delete all
Carry out the functions and confirm them.
Settings
Menu
/
Open main menu
Phonebook list
OK
/
Phonebooksettings
Select phonebook and
confirm
Select menu and
confirm
OK
The following functions can be carried out here:
Additional numbers
Memory status
Preferred storage
medium
View additional numbers
(e.g. own number)
The status of the SIM and telephone
memory is displayed
Select the desired storage medium
(SIM or telephone)
English 21
5
Accept and make calls
Answering call
Answer call
Reject call
Reject call
End call
End call
Make a call
Input number
Delete Delete last digit if input
wrongly
Dial number
Call list
Your phone stores the last dialled numbers (redial), the received
calls and the missed numbers in a call list.
/
Open call list
Select entry and
connect
Dial numbers from phonebook
You have to have numbers stored in the phonebook → Page
15.
English 22
Names Open phonebook
/
Select entry and
connect
Direct-access keys
You have to have numbers saves as direct dial numbers →
Page 35.
3 sec. M 1 , M 2 or M 3 Press respective key
Setting the headset volume
You can adjust the volume while phoning.
or
Select desired
volume
Prolonged listening at full volume may cause hearing
damage.
Display call time
During a call the call time is displayed in hours, minutes and
seconds.
Hands-free
Use this function to hear your conversation partner via the loudspeaker.
Handsfr. Activate hands-free
NoHandsfr Deactivate hands-free
English 23
Put microphone in handset in mute mode
During a call you can switch on and off the microphone of the
handset.
Options
Mute
/
Open menu
On
Switch off microphone
(mute)
Off Switch on microphone
Keypad lock
The keypad lock should prevent that functions are activated by
mistake.
3 sec. * key Activate keypad lock
→ When the keypad lock is activated incoming calls can be
answers as usual.
3 sec. *
key Deactivate keypad lock
Switch on/off ring tone
You can switch off the ring tone − there will be only the vibration
alarm.
3 sec.
# aA
Switch off ring tone
3 sec. # Switch on ring tone
If the ring tone is switched off the symbol
appears on the
display.
aA
English 24
During a call
Options Open menu „Options“
At this level you reach the functions that you can carry out
during a call:
Hold
/
Hold individual call
Hold current call
OK → If a call is held, this menu item changes to Continue call.
To continue the call on hold::
/
Continue call OK
Continue call
New call
New call OK
/
Select function
Enter telephone number
and call
→ The first call is being held.
Phonebook
/
Phonebook OK
Open phonebook
Mute microphone
/
Mute
On
English 25
6
Call list
A call list is available. Your telephone stores the last dialled, accepted and missed calls.
→ If a number coincides with an entry in your Contacts the
corresponding name is displayed
Displayed symbols for:
dialled calls
answered calls
missed calls
Call from the call list
Open call list
Select entry and call
/
Show details
/
OK
Open call list
Select entry and request
details
Optionen Open menu
The following functions can be carried out here:
Delete Delete entry
Menu phonebook save
English 26
Save entry
(SIM or phone)
Call
Send text message Call entry
Entry send a text message
Carry out the functions and confirm these afterwards.
7
Messages (SMS)
→ It might be that not all offered functions are supported by
every network. For more details contact your mobile service
provider
Message settings
→ The sending of text messages is effected via a service cen tre. If you want to send and receive text messages (SMS)
you have to store a service centre number on your phone.
As a rule your service provider has already effected this
setting
Navigate to the menu „Message settings.
Menu /
Messages OK
Open main menu
Select menu and
confirm
English 27
/
Message settings
OK
Select menu and
confirm
Profile settings
Navigate to menu „Message settings“.
/
Profile settings
OK
Profile 1 , Profile 2
/
Select menu and
confirm
or Profile 3 Edit
Select profile and
confirm
The following functions can be carried out here:
Profile name Edit profile name
SMSC address Edit SMS service centre
number
Validity
Set validity
Here you can specify for how long it should be tried
to deliver a sent message.
Message type Set message type
Carry out the functions and confirm them.
English 28
General settings
Delivery report
Select „Delivery report - On“ to receive a corresponding message when the message (SMS) has been received at destination.
Reply path
Select „Reply path - On“ to include the reply path of your provider when sending a message (SMS).
For further details kindly contact your provider.
Navigate to menu „Message settings“.
/
General settings
OK
Delivery report Reply path Select menu and
confirm
Activate or deactivate
Activate or deactivate
Memory status
Navigate to menu „Message settings“.
Memory status OK Select menu and
/
confirm
→ The used and available memory locations for the phone
and the SIM card are displayed.
English 29
Create SMS
→ A message can contain up to 457 characters, including
spaces. A standard message contains 160 characters.
When using more than 160 characters additional cost might
occur.
Menu Open main menu
/
Messages OK
Select menu and
confirm
/
Write message
OK
Select menu and
confirm
Compose your text.
→ Information about input methods → Page 16.
Options Insert templates
Open menu
OK
Ready OK
Here you can carry out different functions
Send only OK
or Search English 30
Enter number or
select from
phonebook.
Save and send OK
Enter number of select
from phonebook. The message (SMS) is stored in the
„Sent“ folder and sent to
the number selected.
Save
OK The message (SMS) is saved in the „Sent“ folder.
Send to many OK
Several recipients can be
selected from the phonebook.
Carry out the functions and confirm these afterwards.
Sent and received messages (SMS)
→ You are informed about incoming messages (SMS) with a
ring tone of your choice. A message is shown on the dis play. Press the soft key „View“ to display the message.
Received messages (SMS) are saved in the „Inbox“ folder. Sent
messages (SMS) and drafts are saved in the „Sentbox“ folder.
English 31
Edit saved SMS
Menu Open main menu
/
Messages OK
/
Inbox /
Select menu and
confirm
Sentbox OK
Select menu and
confirm
/
OK Options Select message (SMS)
and confirm
Open menu
The following functions can be carried out here:
Reply Reply to number from
which the message (SMS)
was sent .
Delete Delete message (SMS)
Forward Forward message (SMS) to
another number
Copy to phone /
Copy to SIM Move to phone /
Move to SIM Use number English 32
Copy Message (SMS)
Move message (SMS)
Use the number from which
the message (SMS) was
sent
8
Voice messages (Voicemail)
→ Maybe not all offered functions are supported by every pro vider. For detailed information kindly contact your mobile
service provider.
These might be services at a charge. In order to use voice mail messages „voicemail“1, you have to save a correspon ding number in your phone. As a rule your service provi der has already effected this setting.
Voicemail, also called Mailbox (answering machine in mobile
network).
1
Configure voicemail messages (Voicemail)
Menu Open main menu
Select menu and
/
Messages OK
confirm
Voicemail messages server
/
OK
<Space> Options /
Select menu and
confirm
Select voicemail server and
open the menu Options
/
Edit OK
Name Edit /
Ready Select menu and
start editing
Open input mode,
input name and confirm
English 33
Number OK
/
Open input mode,
edit number and
confirm
Save? , Yes or No Confirm changes
or cancel
In the menu „Voicemail server“ you can also carry out this
function:
Call Voicemail OK
The voicemail number
is dialled.
Listening to voicemail message
Navigate as previously described to the menu item
„ Call Voicemail“ and press the soft key OK or hold 1 The connection to „Voicemail messages“ is established
and you can listen to messages.
English 34
9
Further useful functions
Direct-access keys
On the direct dial key M 1 , M 2 or M 3 numbers can be
stored that can be directly dialled by keeping the corresponding
key pressed → Page 36.
→ Each number that you want to use as direct dial number
has to be stored in the phonebook.
This is how you save numbers to a direct dial key:
Menu Open main menu
Phonebook list OK Select menu and
/
confirm
/
configure
/
/
OK
Select menu and
confirm
/
Edit Select direct dial key
and confirm
Select:
View to display the
number
Modify to dial an entry
from the phonebook
Delete to delete a
stored number
Carry out the functions and confirm these afterwards.
M1
M2
M3
English 35
Speed dial
You can assign numbers to keys 2
to 9
. Keep the
respective key pressed for more than 3 seconds and the assigned number is dialled.
→ Each number you wish to use as speed dial number has to
be stored in the phonebook.
Menu Open main menu
Phonebook list OK Select menu and
/
confirm
Speed dial OK
/
Select menu and
confirm
Status On
/
Activate speed dial
Configure number
/
OK
Select menu and confirm
/
Add Select desired key and confirm
/
OK
Select entry and
confirm
ABC
WX
YZ
Date and time
In this menu you can set and adjust Date and Time.
This is how you get to the menu:
Menu Open main menu
Settings
/
OK Select menu and
confirm
English 36
Phone settings
/
OK
Select menu and
confirm
Time and Date
/
OK
Select menu and
confirm
Set Time/Date
/
OK
Select menu and
confirm
HH:MM Input time in format hours:minutes
and jump to
repeat
input day:month:year
DD/MM/YYYY OK
and confirm
configure format OK Select menu and
/
confirm
Time / , ,
Select format 12“ or 24“
and jump to repeat
Date / ,
Select format „MM DD YYYY“,
„YYYY MM DD“ or „DD MM
YYYY“ and jump to date
separator symbol
Date separator symbol / ,
OK
Select separator symbol
„.“, „:“, „/“ or „-“ and con
firm
English 37
Language
In this menu you can set and adjust the display language.
This is how you get to the menu:
Menu Settings OK
/
Phone settings
/
OK
Language OK
/
/
OK Open main menu
Select menu and
confirm
Select menu and
confirm
Select menu and
confirm
Select desired language
and confirm
Calendar
Via this menu you can open the calendar. You can change the
day displayed. You navigate using the keys /
and /
.
This is how you open the calendar:
Menu Open main menu
Extras OK
/
Select menu and
confirm
Calendar OK
/
Select menu and
confirm
English 38
Alarm
Via this menu you can programme 5 different alarms.
This is how you open the alarm:
Menu Extras OK
/
Open main menu
Select menu and confirm
Alarm OK
Select menu and confirm
/
00:00 Edit /
Aus / ,
00:00 Repeat /
,
Select an alarm
and activate edit
mode (Edit)
Select „On“ or „Off“ and
then navigate downward
Input time in format
hours:minutes:
and jump to repeat
Select „Once“, „Daily“ or
„Days“ (custom) and jump
to Snooze
English 39
For selection days:
SMTWTFS/ Select a week day
S = Sunday,
M = Monday,
T = Tuesday,
W = Wednesday,
T = Thursday,
F = Friday,
S = Saturday
On or Off Activate or deactivate
the alarm for that day
Proceed in analogue mode for eventual further days.
→ Activated days are displayed in a frame.
Jump to Snooze
Snooze (min.) / ,
Set between „1“
and „10“ minutes and jump
to alarm type
Alarm type / , Ready Select „Vib. and melody“,
„Melody only“ or
„Vibration only“
and confirm
Save? , Yes or No Confirm changes or
cancel
English 40
Calculator
A simple calculator for basic arithmetic operations.
Choose the required arithmetic operation with keys
(+, −, x, ÷).
With key # you can insert a decimal point.
With key * you change the algebraic sign (±).
and
aA
Menu Open main menu
Extras OK
/
Select menu and
confirm
Calculator OK
/
Select menu and
confirm
Example
To calculate „-5 x 2.5“ you need the following
keys:
5 * = -5
=x
2 # 5 = 2.5
OK = −12.5
Delete = Delete
JKL
ABC
aA
JKL
English 41
Tone control
This function is very welcome especially by people with hearing
aids. The tone control is set to normal by default. Two further
settings are possible:
• Low frequency
•High frequency
Menu
Open main menu
Settings OK
/
Select menu and
confirm
Set pitch
/
Select menu and
OK
confirm
/
normal , low frequency
or high frequency OK
Select settings and confirm
Select the frequency range for your very personal sound experience.
English 42
Network settings
Network selection: In this menu you can select other mobile
networks than the ones of your network provider. However such
agreements have to exist in order to do that.
Preferred networks: You can select and edit mobile networks
predefined by the SIM card. In order to change the priority use
keys
/
.
→ Maybe not all offered functions are supported by every pro vider. For detailed information kindly contact your mobile
service provider.
Open main menu
Menu Settings OK
/
Select menu and
confirm
Network settings
/
OK
Select menu and
confirm
Network selection or
Preferred networks
Follow the menu structure → Page 66.
English 43
Security settings
In this menu you specify which functions of the telephone or
the SIM card are to be protected by a password/PIN. PIN and
password can be changed.
→ You receive PIN and PIN2 with the SIM card. Further infor mation can be obtained from your SIM card service provi der.
Menu Open main menu
Settings OK
/
Select menu and
confirm
/
Select menu and
Safety settings OK
confirm
SIM lock
→ You receive the PIN with your SIM card. If you deactivate
the SIM lock you do not need to enter the PIN on switching
on the phone.
It is recommended to leave the SIM lock activated in order
to make it more difficult or unauthorised persons to use your
phone
Telephone lock
→ From the factory the password is 1234. If this lock is activa ted, you have first have to enter the password for the tele phone lock and afterwards the PIN on switching on the pho ne
English 44
Change password Change passwords/
PIN
Follow the menu structure → Page 66.
Tips
Lock the phone with your personal PIN. You can protect the
phone against unauthorised access with a PIN specified by
you.
Menu Open main menu
Settings OK
/
Select menu and
confirm
/
Safety settings OK
Select menu and
confirm
Change password
/
OK
Select menu and
confirm
PIN OK /
Select menu and
confirm
Enter old PIN OK
New PIN OK
Input again OK
PIN- & PIN2 code
PIN- (Personal Identity Number) and PIN2 code are 4 to 8-digit
numbers. You receive the PIN and PIN2 code together with the
SIM card of your internet provider.
English 45
PUK- & PUK2 code
PUK- (Personal Unblocking Key) and PUK2-Code are 4- to 8
digit numbers. These are only needed if you have entered the
PIN code of your SIM card wrongly three times in a row and
the SIM card is locked. You receive the PUK and PUK 2 code
together with the SIM card from your network provider.
Telephone settings
This is how you navigate to the menu „telephone settings“.
Menu Open main menu
Settings OK
/
Select menu and
confirm
Telephone settings
/
OK
Select menu and
confirm
Display settings
In this menu to adjust the display of your phone to your personal
profile.
Navigate to the menu „Telephone settings“.
Display characteristics
/
OK
Select menu and
confirm
Select:
to choose a
Background image background image
Show date and time to show date
and time
English 46
LCD-illumination to set the brightness and
the illumination duration of
the backlight
Colour scheme to select a colour
scheme
Follow the menu structure → Page 66.
Sound profile
In this menu you adjust the sound of the telephone to your personal profile.
Open main menu
Menu User profile OK
/
Select menu and
confirm
/
/
Options Define OK
Select profile and
view options
Select
Tone settings to select specific ring tones
for different tone alarms Volume to select the volume of the
ring tones for the different
signalling
English 47
Alert type Ring tone type Extra Tone Answer mode to select if you want to be
informed with a melody or
vibration about a call
to select the type of ringtone for the signalling.
to set extra tones for specific situations
to select which keys are
used to accept incoming
calls
Follow the menu structure → Page 66.
Example - Set loudest ring tone
DThe loudest ring tone is MIDI 1 + volume 7 = 100dB.
Open main menu
Menu User profile OK
/
Select menu and
confirm
/
Options
/
Define OK
Select own profile and
view options
Tone settings
/
OK
Select menu and
confirm
Incoming call
/
OK
Select menu and
confirm
English 48
MIDI 1 OK
/
Back
Volume OK
/
Ring tone OK
/
7 OK Select ring tone
and confirm
Select menu and
confirm
Select menu and
confirm
Select volume
and confirm
Automatic keypad lock
You can configure the telephone in such a way that the keypad
lock is automatically activated after a certain time in stand-by
mode.
Menu Settings OK
/
Safety settings
/
OK
Auto. keypad lock
/
OK
Open main menu
Select menu and
confirm
Select menu and
confirm
Select menu and
confirm
English 49
Function keys
You can configure which menu or which function will be opened
when pressing the keys
/
in stand-by mode.
Menu Open main menu
Settings OK
/
Select menu and
confirm
Phone settings
/
OK
Select menu and
confirm
Function keys OK Select menu and
/
confirm
Top or bottom
/
Select key
Edit Select menu or function
/
OK
and confirm
Call settings
→ Maybe not all offered functions are supported by ever pro vider. Kindly contact your mobile service provider for de tailed information. These might be services at a charge.
English 50
Caller ID
With this function the transmission of your own number to the
person being called is activated/deactivated.
Menu Open main menu
Call centre OK
/
Select menu and
confirm
Call settings
/
OK
Select menu and
confirm
Caller ID OK
Select menu and
confirm
controlled by network ,
/
Hide own number
or Send own number
OK
Select settings and confirm
Call waiting
This function informs you during a call that another caller is trying to reach you.
Menu Open main menu
Call centre OK
/
Select menu and
confirm
Call settings
/
OK
Select menu and
confirm
Call waiting OK
/
Select menu and
confirm
English 51
Then select:
Activate OK Deactivate OK
Query status OK
to activate the
call waiting function
to deactivate the
call waiting function
to show the current setting
Call diverting
With the following functions you can forward incoming calls to
assigned numbers.
Menu Open main menu
Select menu and
/
Call centre OK
confirm
Call settings
/
Select menu and
OK
confirm
/
Call forwarding OK Select menu and
confirm
/
Cancel all call
OK
forwarding actions Deactivates the call diver
ting for all calls
Select the desired settings for Deactivate call diverting
Divert all voice calls
Divert, unreachable
Divert, no reply
English 52
Divert, if busy
Divert all data calls
OK
Then select:
Activate OK
To new number OK
Search OK
Or:
To voice message OK
Deactivate OK Call status OK
Input number or
select from
phonebook.
Call diverting
is active.
Corresponding call diversion is deactivated
Show current setting
English 53
Call barring
With the following functions you can effect limitations on incoming and outgoing calls.
Menu Open main menu
Call centre OK
/
Select menu and
confirm
Call settings
/
OK
Select menu and
confirm
Call barring OK
/
Select menu and
confirm
Select the calls to be barred:
Outgoing calls
All calls
International calls
International calls, except for private PLMN1
Incoming calls
All calls
During roaming
Activate all
Password for call barring
Abort all
Change password for call barring
→ 1 Privat-PLMN (Public Land Mobil Network) describes the
network where your SIM card is registered (home network).
English 54
or
password for lock
Old password
New password
Confirm new password
OK
→ By default the password is 1234.
Automatic redial
If this function is activated, an automatic redial is activated
when the number dialled is „busy“.
Menu Call centre OK
/
Call settings
/
OK
Advanced settings
/
OK
Auto. redial
/
On
Open main menu
Select menu and
confirm
Select menu and
confirm
Select menu and
confirm
Activate function
English 55
Broadcast messages
Your mobile phone support the reception of Broadcast1 messages
→ Information about broadcast messages, tariffs, data and of fers can be obtained from your SIM cardservice provider.
Menu Open main menu
Messages OK
/
Select menu and
confirm
Broadcast message
/
OK
Select menu and
confirm
Broadcast is also called CB = Cell Broadcast (information ser vices of your network provider)
1
Factory settings
The telephone can be reset to the factory settings.
Menu Open main menu
Settings OK
/
Select menu and
confirm
/
Safety settings OK
Select menu and
confirm
/
Reset factory settings
OK Select menu and
confirm
→ By default the password is 1234.
English 56
10
Bluetooth®
Activate / deactivate bluetooth
Menu Open main menu
Extras OK
/
Select menu and
confirm
Bluetooth OK
/
Select menu and
confirm
Activated On
/
Activate Bluetooth®
or
Activate Off /
Deactivate Bluetooth®
If Bluetooth® is activated, the battery drains very quickly.
Deactivate the function when you do not need it!
You have the possibility to connect your »sydney« mobile phone
via the Bluetooth® connection with a Bluetooth® headset.
Menu Open main menu
Extras OK
/
Select menu and
confirm
Bluetooth OK
/
Select menu and
confirm
Search audio device
/
OK
Select menu and
confirm
→ Information on pairing your Bluetooth® headset can be
found in the user manual of your Bluetooth® headset.
English 57
Pair /
Select device and
establish connection
0000 OK Input PIN and
confirm
→ The required PIN can be found in the user manual of your
Bluetooth® headset.
After having successfully coupling the devices you can choose
from further functions.
→ Information how to use the headset while phoning can be
found in the respective user manual of the Bluetooth® head set.
English 58
11
Emergency call function
This telephone is equipped with a comfortable emergency call
function. 1 number and up to 3 message (SMS) numbers can
be entered for an emergency call. In order for this function to
work as planned you have to record a message first. See following chapter „Record SOS voice message“.
Record SOS voice message
If you trigger an emergency call, a SOS short message (SMS)
can be sent to up to three numbers.
A typical short message should contain the following information: This is an emergency call from ... Your name ... . I need
help.
Open main menu
Menu Settings OK
/
Select menu and
confirm
Help settings OK Select menu and
/
confirm
Record SOS message
/
OK
Select menu and
confirm
Compose your text.
→ Information about input methods → Page 16.
Saving process
Save
Save? save SOS message
or discard.
English 59
Enter/delete SOS voice call number
This is how you insert a number from the phonebook as emergency call number.
→ Each number that you would like to use as emergency call
number has to be stored in the phonebook.
Menu Settings
/
OK
SOS settings
/
OK
/
SOS voice call number OK
SOS Nr.1, SOS Nr.2
/
or SOS Nr.3 Edit /
OK Open main menu
Select main menu and
confirm
Select menu and
confirm
Select menu and
confirm
Select a memory location
Select a entry of the phone
book and confirm
After the emergency numbers have been set you have
additional options. Choose the desired voice call number:
Friend Options /
Select a memory location
View Show entry
Change Change entry
Delete Delete entry
English 60
Enter/delete SOS short message number
This is how you insert an entry from the phonebook as SOS
short message emergency call number.
→ Each number that you wish to use as emergency number
has to be stored in the phonebook.
Menu Open main menu
Settings
/
OK Select main menu and
confirm
SOS settings
/
OK Select menu and
confirm
/
SOS short message
number
OK Select menu and
confirm
SOS Nr.1, SOS Nr.2
/
or SOS Nr.3 Edit Select a memory location
Select a entry of the phone
/
OK book and confirm
After the emergency numbers have been set you have
additional options. Choose the desired voice call number:
Friend Options /
Select a memory location
View Show entry
Change Change entry
Delete Delete entry
English 61
Setting the SOS mode
You can choose if an emergency call should be sent as voice
call or as an emergency SMS to registered phone numbers.
Menu Open main menu
Settings OK
/
Select menu and
confirm
SOS settings OK Select menu and
/
confirm
/
SOS mode settings OK
Select menu and
confirm
/
Make SOS call ,
Send SOS Message or
Off OK
Select mode and
confirm
Emergency Call Function, Example
The emergency call function is explained here according to one
example.
Emergency Call as SMS messages
The required phone numbers must be stored in the phone book
(relatives/friends).
English 62
Do the following settings:
Menu Open main menu
Settings OK
/
Select menu and
confirm
SOS settings OK Select menu and
/
confirm
/
SOS numbers OK
Select menu and
confirm
SMS SOS Nr.1 to /
Select a memory location
SMS SOS Nr.5 Edit Select a entry of the phone
/
OK book and confirm
After setting the five SOS SMS numbers please make the
following settings:
Back
/
SOS mode settings OK
Select menu and
confirm
/
Send SOS Message OK
Select menu and
confirm
English 63
In the case of an emergency call:
The phone sends up to 5 emergency messages (SMS). The
recipient receives the message and can help you.
Starting the emergency call
Slide the emergency call switch upwards. A siren is sounded.
The phone dials the set number. Depending on the settings selected, the number is redialled or the next number is dialled.
Ending the emergency call
After making the call or to cancel the emergency call,
slide the Emergency call switch back down.
English 64
12
Services
This menu contains the SIM Application Toolkit (commonly referred to as STK) of your mobile phone provider. The content
and functions available vary from provider to provider and are
dependent on the SIM card used.
SIM Application Toolkit (STK) is a GSM system standard which
enables the SIM to initiate actions which can be used for various value-added services.
→ Please contact your local mobile phone provider for details.
They may concern services which are subject to charges.
English 65
14
Menu Structure
Main menu
Pressing the
= Menu key to open the main menu.
Then use the
/
keys to select a menu option and
confirm the selection. For further information on the menu
and operation, → Chapter 3, Page 12.
Messages
Write message
Options
Done
Send only
Save and send
Save
Send to many
Insert templates
Inbox
Options
Reply
Delete
Forward
Copy to phone/ Copy to SIM
Move to phone/ Move to SIM
Use number
↓
English 66
Outbox
Options
Send
Edit
Delete
Copy to phone/ Copy to SIM
Move to phone/ Move to SIM
Use number
Templates
SMS settings
Profile settings
Common settings
Delivery report
Reply path
Memory status
Preferred storage
SIM
Phone
Voicemail server
Broadcast message
Receive mode
Read message
Languages
Channel settings
English 67
Call centre
Call lists
Missed calls
Options
Delete
Save to Phonebook
Call
Send text message
Dialled calls
see Missed calls
Received calls
see Missed calls
Delete call lists
Missed calls
Dialled calls
Received calls
Delete all
Call timers
Last call
Dialled calls
Received calls
Reset all
Call cost
Last call cost
Total cost
Reset cost
Max cost
Price per unit
English 68
↓
Call settings
Caller ID
Set by network
Hide ID
Send ID
Call waiting
Activate
Deactivate
Query status
Call divert
Divert all voice calls
Divert if unreachable
Divert if no answer
Divert if busy
Divert all data calls
Cancel all diverts
Call barring
Outgoing calls
All calls
International calls
International calls except to home PLMN
Incoming calls
All calls
When roaming
Activate all
Cancel all
Change barring password
↓
English 69
Closed user group
Advance settings
Auto redial
Call time display
Phonebook
Add new contact
To SIM
To phone
Set M1/M2/M3
M1 call number
M2 call number
M3 call number
Copy
To phone
To SIM
Copy all
From SIM
From phone
Delete
Delete all
From SIM
From phone
Speed dial
Status
Set number
↓
English 70
Phonebook settings
Extra numbers
Owner number
Service dialing number
SOS number
Memory status
Preferred storage
SIM
Phone
Settings
Phone settings
Time and date
Set time/date
Set format
Schedule power on/off
Language
Display characteristics
Wallpaper
Show date and time
LCD backlight
Brightness
Time
Themes
Dedicated key
Up
Down
↓
English 71
Tone control
Normal
Low frequency
High frequency
Help Setting
Mode setting
Make SOS call
Send SOS Message
Off
SOS numbers
Set SOS SMS numbers
Edit SOS SMS
Network settings
Network selection
New search
Select network
Selection mode
Preferences
Security settings
SIM lock
Phone lock
Auto keypad lock
Fixed dial
Mode
Fixed dial list
Barred dial
Mode
Barred dial list
English 72
↓
Change password
PIN
PIN2
Phone password
Restore factory settings
User profiles
General
Activate
Customize
Tone settings
Incoming call
Alarm
Power on
Power off
Message
Keypad
Volume
Ringtone
Key tone
Alert type
Ring only
Vib. only
Vib. and ring
Vib. then ring
↓
English 73
Ring type
Single
Repeat
Ascending
Extra tone
Warning
Error
Camp on
Connect
Answer mode
Any key
Meeting
Outdoor
Indoor
see General
Headset
Bluetooth
English 74
Extra
Calendar
Alarm
Calculator
Bluetooth
Power
Inquiry audio device
My device
Active devices
About
Services →Page 65
(provider−dependent menu)
English 75
14
Trouble Shooting
Problems and solutions
Problems
Solutions
The mobile phone
cannot be switched on.
− No battery inserted.
− Battery is not charged.
The display is locked“
when the mobile is
switched on.
− Enter the PUK to
unlock“ the SIM card.
Contact your service
provider.
No signal quality is
displayed.
−No network connection.
The mobile
phone is in a location
where there is no
network service. Move
to a different location or
contact your service
provider.
Keypad does not
function or only
functions very slowly.
- The operating speed of
the display is reduced
in the case of low
temperatures. This is
normal. Use the phone
in a warmer location.
English 76
A message appears in
the display for some
functions, indicating
execution/use is not
possible.
- Many functions can
only be used after the
respective service has
been applied for.
Contact your service
provider for more
details.
Screen frozen or no
response when
pressing keys.
- Remove the battery for
3 minutes and try
again.
No connection to the
mobile telecommunication
network.
- Contact your service
provider.
The Insert SIM“
message appears in the
display.
- Ensure that the SIM
card has been installed
correctly. Contact your
service provider, if
necessary.
The battery cannot be
charged or is empty
within a short time.
- Battery is defect.
- Place the phone correctly
in the charging unit or connect the charging unit properly. Clean the contact surfaces on the mobile phone
and charging unit with a
soft, dry cloth.
- Charge the mobile for 4
hours.
English 77
15
Safety Information
Intended use
This mobile phone is designed for use when connected to a
mobile phone network. Any other use is considered unintended
use. Unauthorised modification or reconstruction is not permitted. Under no circumstances open the device or complete any
repair work yourself.
Areas of use
- Do not use the phone in prohibited areas.
- Switch the phone off in the vicinity of medical equipment (e.g.
in hospitals).
- Do not use the phone in petrol stations or near fuels and che
micals.
- Check with the airline whether mobile phones may be used
on board.
English 78
16
Appendix
Maintenance and care
The telephone is maintenance-free. If it becomes dirty, give it
an occasional wipe with a soft, damp cloth. Never use alcohol,
thinner or any other organic solvents.
The telephone should not be exposed to direct sunlight for a
long period of time. Furthermore, it should be protected from
high levels of heat, moisture or strong mechanical vibrations.
Warranty
The telephone is very reliable to operate. However, should malfunctions occur despite it being installed and used correctly,
please contact your local dealer or contact the manufacturer
directly. The warranty includes free repair and return. The requirement for this is that it must be sent in its original packaging. Therefore, do not throw this away. The warranty will become
void in the event of damage resulting from incorrect handling
or repair attempts by unauthorized people (breaking the seal
on the device). Repairs will only be carried out under warranty
if the completed warranty card is returned accompanied by a
copy of the dealer‘s invoice/till receipt. Quote the number of
the device in all correspondence.
English 79
Disposal of used electric and electronic units (applicab le in the countries of the European Union and other Euro pean countries with a separate collection system).
The symbol on the product or the packaging indicates that
this product is not to be handled as ordinary household waste
but has to be returned to a collecting point for the recycling of
electric and electronic units.
You protect the environment and health of your fellow men by
the correct disposal of this products. Environment and health
are endangered by a faulty disposal. Material recycling helps to
reduce the consumption of raw material. You will receive further
information on the recycling of this product from your local community, your communal disposal company or your local dealer.
Rechargeable batteries
The rechargeable batteries that come with the device can be
recycled. Please dispose of these rechargeable batteries
in receptacles designed for that purpose or return them to
a retail outlet. Dispo-se only of those batteries that have
been completely discharged to ensure environmental pro tection.
English 80
SAR Information
Information on radio frequency emissions and specific absorption rates (SAR = Specific Absorption Rate). All the applicable safety standards related to radio frequency emissions were
implemented during the development of this mobile phone.
The limit values are based on scientific directives and contain
a safety margin in order to guarantee the safety of all persons
regardless of age and state of health. The values specified in
the directive concerning radio frequency emissions are based
on a unit called SAR. SAR values are established using standard methods in which the phone is operated in all possible frequency bands with the highest power output. Although the SAR
values of various phone models can differ, all the models were
developed to maintain the relevant directives on radio frequency emissions. The following information applies to residents of
countries which, as with the European Union, have adopted
the SAR limit value recommended by the ICNIRP (International
Commission on Non−Ionizing Radiation Protection) which lies
at 2W/Kg (averaged from 10 gram tissue):
The highest SAR value measured, averaged over 10 g tissue,
was < 1.05 W/kg for this mobile phone measured at the ear.
English 81
17
Technical Data
Standard: GSM 900, 1800, 1900 MHz Triband
Dimensions:
Weight: 50,5 x 134 x 17 mm (B x H xD)
101 g incl. battery
Power supply: Input: 100−240 V,
50−60 Hz, 0.2 A
Output: Mini−USB 5 V,500 mA
Battery: Model: SKL BL-5C 3.7V, 750 mAh
Stand-by time: Max. call time: Up to 170h
Up to 120 min
Display:
SMS:
5.08 cm (2‘‘) colour,
resolution 176 x 220
Standard SMS
Permissible ambient
temperature: Permissible relative
humidity:
English 82
-10°C to 40°C
30% to 75%
This telephone satisfies the following EU directives:
- 1999/5/EG R&TTE directive
- 2002/95/EG RoHS directive
- 2002/96/EG WEEE directive
- 2004/108/EG EMC directive
- 2006/95/EG Low voltage directive
Compliance with the directives listed above is confirmed by
the CE seal on the telephone. CE compliance declarations are
available on the Internet at www.humantechnik.com.
Technical specifications subject to change without notice.
English 83
18
Index
A
Alarm, 39
Answer call, 22
At a glance, 4
Automatic keypad lock, 49
Automatic redial, 56
Activate/
deactivate ring tone, 24
B
Battery charge state, 6
Bluetooth, 57
Broadcast messages, 56
C
Call waiting, 51
Call settings, 50
Call, 22
Caller ID, 51
Call list, 22, 26
Call list details, 52
Control elements, 4
Call back , 22
Call duration, 23
English 84
Calendar, 38
Create message (SMS), 30
Call barring, 54
Calculator, 41
Create
phonebook entries, 19
D
Date, 36
Direct dial, 23
Direct dial keys, 46
Display symbols, 12
Disposal, 80
Declaration of conformity, 83
Delete phonebook entries, 20
Dial, 22
During a call, 25
E
Effect and
accept calls, 22
Energy saving mode, 13
End call, 9, 22
Earpiece volume, 23
End emergency call, 64
Emergency call function, 59
Emergency call examples, 62
Edit phonebook entries, 20
F
Function keys, 50
Functionality, 8
Factory settings, 56
H
Hands-free, 23
Hold, 25
High frequency, 42
I
Intended use, 78
Instructions for care, 79
Input text, 16
Input text and digits, 16
K
Keypad lock, 24
L
Low frequency, 42
Language, 38
M
Main menu, 66
Menu structure, 64
Mute microphone, 25
Messages (SMS), 27
Message settings, 27
Multitap, 16
N
Network, 43
Network settings, 43
O
Other useful functions, 35
P
Punctuation and
special characters, 17
Personal PIN, 45
PIN−/PIN2 code, 45
PUK-/PUK2-Code, 46
Phonebook, 15,18, 25
Q
Questions and answers, 76
English 85
R
Reject call, 22
Ring tone profile settings, 47
Ring tone, 47
Record SOS message, 60
Redial, 22
S
Speed dial, 50
Stand-by mode, 13
Services, 65
Switching on, 12
Set loudest ring tone, 48
Send emergency call, 64
SAR information, 81
Safety settings, 44
Safety instructions, 78
SIM Application Toolkit, 65
SIM-card, 6
Softkeys, 8
SOS, 59
Symbols, 6
English 86
T
Troubleshooting, 76
Tone control, 42
Technical data, 82
Telephone settings, 46
Tone settings, 47
Time, 36, 46
V
Voicemail, 47
Volume, 47
Voice message, 33
W
Warranty, 79
English 87
Humantechnik Service-Partner
D
Germany
CH
Switzerland
A
Austria
Eastern Europe
F/B
France
Belgium
NL
Netherlands
Humantechnik GmbH
Im Wörth 25
D-79576 Weil am Rhein
Tel.: ++49 76 21/ 9 56 89-0
Fax.:++49 76 21/ 9 56 89-70
Humantechnik GHL AG
Rastatterstrasse 9
CH-4057 Basel
Tel.: ++41 61/ 6 93 22 60
Fax.:++41 61/ 6 93 22 61
Humantechnik Austria KG
Wagnitzer Strasse 29
A-8401 Kalsdorf b. Graz
Tel.: ++43 31 35/ 5 62 87
Fax.:++43 31 35/ 5 62 87
SMS
Audio Electronique Sàrl
173 rue du Général de Gaulle Tel.: ++33 3 89/ 44 14 00
F-68440 Habsheim
Fax.:++33 3 89/ 44 62 13
Hoorexpert BV
Gildenstraat 30
NL-4143 HS Leerdam
Tel.: ++31 345/ 63 23 93
Fax.:++31 345/ 63 29 19
For other service-partners
in Europe please contact:
Humantechnik Germany
Tel.: ++49 76 21- 9 56 89-0
Fax.: ++49 76 21- 9 56 89-70
Internet: www.humantechnik.com
e-mail: [email protected]
RM465000/GB · 1010