1
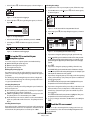
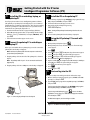
Getting Started with the V Series
Intelligent Programmer Software (IPS)
1
3
Install the IPS on a desktop, laptop, or
palmtop PC
Even if you plan to run the V Series Intelligent Programmer Software
(IPS) primarily on a palmtop PC, for backup purposes, we recommend
installing the IPS on a desktop or laptop PC also. Then, if you’re installing
the IPS on a palmtop PC as well, follow tasks 2–4. If you don’t need to
install the IPS on a palmtop PC, skip tasks 2–4.
a Insert the IPS diskette in the PC’s appropriate floppy disk drive.
b At the DOS prompt, type the letter corresponding to the PC’s floppy
disk drive, a colon (:), and INSTALL (for example, A:INSTALL). Then,
press E.
c Follow the instructions that appear on the screen.
2
Connect the palmtop PC to a desktop or
laptop PC
Before you can install the IPS on a palmtop PC, you need to connect the
palmtop PC to the desktop or laptop PC.
Note: Purchase the palmtop cable from the computer vendor where
you purchased your palmtop PC.
a Plug the palmtop cable into the side of the palmtop PC as shown in
Figure 1.
Note: The palmtop cable is keyed—be sure to mate the cable to the
plug properly.
b Plug the palmtop cable into a COM port on the desktop or laptop PC.
Install the IPS on the palmtop PC
a On the desktop or laptop PC, type INSTALL at the program directory
DOS prompt (C:\INTPROG>) and press E.
b Follow the instructions that appear on the screen.
c Restart (reboot) the palmtop PC by pressing
C+A+M (Delete).
Note: Turning off the palmtop PC and turning it back on does not
restart it.
d Disconnect the palmtop PC from the desktop or laptop PC.
4
Set up the HP palmtop PC to work with
the IPS
a On the palmtop PC keyboard, press
.
b On the palmtop PC screen, select the Setup icon. The main Setup
screen appears.
c
d
e
f
g
h
i
j
k
l
Press
.
Select Options (press E). The Options drop-down menu appears.
Select System (press E). The System dialog box appears.
Select Advanced (press a). The Advanced dialog box appears.
Press T until the DOS field is highlighted.
Replace 96 with 340. This setting increases DOS memory to 340K bytes.
Select OK (press E). The System dialog box reappears.
Press E. The main Setup screen appears.
Press
.
Select Quit (press q).
5
Start and log into the IPS
Now you’re ready to start and log into the IPS. Follow these steps.
a One the desktop or laptop PC, type CD, space, INTPROG at the DOS
prompt (C:\>) and press E.
b Type INTPROG at the program directory DOC prompt (C:\INTPROG>)
and press E.
If you’re using a desktop or laptop PC, type INTPROG at the program
directory DOS prompt (C:\INTPROG>) and press E.
Figure 1—Connecting the palmtop PC to a desktop PC
If you’re using an HP Palmtop PC, press
to access the More
Applications screen. Then, press T until a box appears around the
IPS icon and press E.
The Main menu appears, as shown in Figure 2 below.
Figure 2—The Main menu before logging in
T61929/Rev A 1779190 ER-7991-1
BEST ACCESS SYSTEMS
Indianapolis, Indiana
c Select File (Press f). The File menu appears, as shown in Figure 3.
Selecting the settings
To set up the IPS to work on your computer system, follow these steps.
a From the Main menu, select File (press f). The File menu appears,
as shown in Figure 6.
Figure 3—The File menu before logging in
d Select Login (Press l). The Login dialog box appears, as shown in
Figure 4.
Figure 6—The File menu with the Setup command selected
b Select Setup (press s). The Setup dialog box appears, as shown in
Figure 7.
Figure 4—The Login dialog box
e In the Password field, type the default IPS password—123456.
f Select OK (press E). The Main menu appears, as shown in
Figure 5.
Figure 5—The Main menu after logging in
6
Figure 7—The Setup dialog box with default settings
c If you want to change the printer page length, perform this step.
Set up the IPS to work with your
computer system
In the Length field, type the maximum number of lines that you want
the IPS to print on a page when printing reports. For example, if your
printer has legal-size paper and you want to print 72 lines on a page,
type 72.
You need to set up your computer system to work with the IPS by:
■ Optional: Defining the printer page size.
■ Optional: Selecting the printer port.
■ Selecting the transfer port.
d Press T.
e If you want to change the printer page width, perform this step.
Defining the printer page size
The printer page size is the size of the printable area on paper in your
printer. You can set the page length and the page width for the paper in
your printer.
The default page size for printing IPS reports is 55 lines in length and
80 characters in width. This page size is the size generally used for 8.5″ ×
11″ paper (standard letter size).
Selecting the printer port
The printer port is the PC port used for printing IPS reports from the PC.
Printer port options are:
■ LPT1 and LPT2, possible parallel ports on a desktop PC or laptop PC.
The palmtop PC does not have a parallel port.
■ COM1 through COM4, possible communication (serial) ports on a PC.
The palmtop PC has one communication port—COM1.
■ IR, the infrared port on some PCs, which is used to transmit infrared
signals to a printer with an infrared receiver. The palmtop PC has an
IR port.
Selecting the transfer port
The transfer port is the communication (serial) port used for transferring
data between the PC and a V Series Security Device, and between the PC
and another PC. The palmtop PC has one transfer port—COM 1.
In the Width field, type the maximum number of characters that you
want the IPS to print on a line when printing reports. For example, if you
want to print 65 characters on a line, type 65.
f If you want to change the printer port used by your PC when printing
reports, perform this step. (The printer port options not available for
your PC appear grayed.)
Press T until the printer port you want is highlighted. Then, press
the spacebar so the circle next to the port is filled in.
g If you want to change the transfer port used by your PC when it communicates with a V Series Security Device or with another PC, perform this step. (The transfer port options not available for your PC
appear grayed.)
Press T until the transfer port you want is highlighted. Then, press
the spacebar so the circle next to the port is filled in.
h To save your changes and return to the Main menu, select OK (press
E).
7
Read the IPS user manual
Now you are ready to start using the IPS to manage your V Series system. For instructions, refer to the V Series Intelligent Programmer Software User Manual.
BEST ACCESS SYSTEMS
Indianapolis, Indiana